
Leaderboard


Popular Content
Showing content with the highest reputation on 21/03/18 in all areas
-
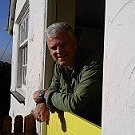
Hi all, Here's my just finished 1/48 Special Hobby Fairey Firefly Mk.IV, done as a Dutch Naval Air Service one, based at Biak in New Guinea in around 1960. Not my best ever build, but at least I managed to finish a Special Hobby kit this time. Previous ones always ended up on the shelf of doom for some reason. It was painted with Humbrol and ModelMaster, decals from the kit and a gun sight from Quickboost. Thanks for looking, I hope you like it. Pete23 points
-
This is my interpretation of the venerable Matchbox Hawker Fury Mk.1 courtesy of the Revell reboxing in the wonderfully bright, eye-catching livery of No.43 Squadron based at RAF Tangmere 1932. I originally intended this to be a gentle excursion and break from my Dambuster build as a contribution to the Made in Great Britain GB. Sadly, and shamefully, I ran out of time and failed to make the finish, but reincarnated it in the WIP section. Build thread is here: http://www.britmodeller.com/forums/index.php?/topic/235027219-revell-matchbox-hawker-fury-mki-172/& I believe it is Matchbox’s first kit way way back circa 1972: https://www.scalemates.com/kits/147812-matchbox-pk-1-hawker-fury The kit itself is a lovely little kit which goes together very well. Even after all these years, apart from some flash here and there, the tooling holds up quite well. It is also quite accurate with the exception of the tailfin which is a little undersize, and the undercarriage which is a tad high because it is moulded in the inflight position. That said these really are subtle nuances which are barely noticeable. Of course it has raised panel lines, the rivets are a bit OTT, as is the wing ribbing. The undercarriage is a little clumsy and toy-townish looking, but after all it is a kit from 1972. There aint much else on offer in 1/72, save the old Airfix kit and the Amodel Mk.1/2. I understand there is an MPM Production future kit in the pipeline. You’re not exactly spoilt for choice in respect of aftermarket – you can get an IP panel and some undercarriage conversions for the Spanish version, although there are plenty of decals for those tasty schemes to choose from. As for my build, well as I said above it started as a gentle OOB build, but I started adding details and ended up getting carried away, with the result that it was a proper kit bash in the end with quite a bit of scratch added and parts replaced. I sanded back the raised panel lines and re-scribed new ones. I pretty much rebuilt the entire cockpit interior, scratch building a new seat, cockpit frame, IP, gun mount, joystick, harness from take-away container foil, and other bits and bobs. The pit is pretty much Spartan as you can imagine with an early 70’s kit. You can’t see an awful lot of it, but as is the usual parlance “I know it’s there”. I trod on the windscreen and bust it so had no choice to make a new one from acetate with frames made from take-away foil. The guns were moulded on, so I cut and sanded them away and scratch built replacements from Albion Alloys tubing. Ditto the gunsight which was a bit oversize and clunky. I scratch built cross hairs and the pilot bead – quite fiddly but nice little touches I feel. I sanded back and cut out the exhausts which were moulded on. I replaced these with small sections of brass tubing, slightly squashed to replicate the oval shape. These were finished off in Humbrol Metalcote gunmetal. I left the rivets on the engine housing as I liked the effect, albeit they are a tad over scale. This was then covered in Bare Metal Foil to replicate the polished aluminium effect. The rest was finished off in Humbrol polished aluminium metalcote and HU 24 trainer yellow. The prop and wheels were finished in Tamiya NATO Black to give an off black effect. The wing ribbing was sanded back to give a more subtle effect, and I added the little actuators and counter weights. I used a little of the undercarriage but largely replaced it from flattened tube. Ditto the tail struts. I modified the wheels, spinner, tail, scratched a new tailskid and modified the radiator with little bits of mesh and a scratch built an oil cooler. The latter can barely be seen but “I know it’s there”. Made a pitot and venturi. The rigging is invisible thread. Phew! Anyroad it’s a great kit and an enjoyable build. You can build it straight OOB on a rainy Saturday afternoon like we did as kids, or go nuts like I did. Either road you’ll have fun. Thanks for looking.20 points
-
Hi Guys, My recent built, Tamiya rebox of Italeri's kit. It is a bit dated by today standard and were basic in detail. Also, constructions required a lot of sanding and filling up. The kit comes with basic decals which I omitted and used a one that I got from a friend, but the decal was giving problems as well, it was crumbling into pieces. For paint, I used mixed of Tamiya light grey and white. Hope it has turned out okay, a bit of frustration building this kit.16 points
-
This is the elderly ESCI 1/72 C-47 / DC-3 kit that I picked up for a tenner at last year's Driffield show as described in the Work In Progress section here: It's far from perfect, especially in the quality of its soft-edge camouflage, but it was primarily a first attempt to get a passable finish with my airbrush after it had laid unused for several years. As a kid in the early '80s in South Africa I used regularly to see and hear these Dakotas trundling through the sky. The brown was officially Dark Earth but the actual colour in service was much lighter. I think I might have gone too far and made it too light, but it's close enough. Decals come from a variety of sources: the national 'castle' insignia come from the old Superscale sheet, the code numbers (which are a bit too small) are from a 1/48 Airfix Spitfire kit and the yellow escape hatch lines are tiny sections cut from a decal stripe. More airbrushing practice is planned soon! Jon14 points
-
Needing very little introduction the iconic Laker Skytrain, one of the pioneers of low cost operations, operated the DC10 during the 70's and early 80's. They were familiar to anyone who frequented Gatwick, Manchester or Prestwick airports in the UK. I bought an MD11 from 26 last year as Ray was selling them at a good price and had originally intended to build it as an MD11 but, as I already had an Authentic Airliners MD11, decided that I would try to convert it into a late model DC10. The conversion wasn't too difficult, the main differences are a shorter fuselage, larger tailplanes, different tailcone, no winglets and different engines. The latter also required some work on the number 2 intake as the DC10 I wanted to model had the straight intake not the larger more rounded one of the MD11. Some later DC10s did have the same intake as the MD11. I took the GE CF6 engines from an Airfix A300 which were going spare as I intend to finish my A300 as an Iberia aircraft which used P&W engines, these were attached to the kit pylons with no problems. The hot section of the number 2 engine was cast from one of the Airfix ones. Despite some modellers experience with this MD11 kit I found assembly straight forward, fit was good and, with only a little adjustment, the wings attached nicely with the wingspar providing a good strong joint. The front fuselage was shortened simply by removing a plug from the constant diameter section, however this was not possible for the rear fuselage so I had to make some longitudinal cuts in the forward part of the rear fuselage to reduce it to the diameter of the rear part. This worked quite well and only needed a little Milliput to fair it in nicely. The tailcone was removed and the new one sculpted with Milliput. I used some acrylic tubing for the forward part of the centre intake and there was a little filling further along the intake where the engine sits just to reshape it a little. The tailplanes were perhaps the hardest part as I had to increase the length and the chord this was achieved with a couple of styrene inserts some Milliput and sanding to shape. Decals are from Flightpath and went on beautifully, windows and windshield are Authentic Airliners. I had to do a little adjusting of the centre windscreen sections as the EE kit part is wider in this respect. Paint is Halfords Appliance White with the grey belly Mr Color 315. The engines and wing leading edges are Mr Metal Color Aluminium 218 and the Coroguard my own mix of any old dark grey with a drop of silver. Of course half way through this project EE/MikroMir announced they were releasing a DC10! Regardless of that I enjoyed the conversion and at the time of completion this is the only way to build an injection moulded late model DC10. Having said that if you are after an earlier DC10 without the large forward wing fairing I recommend the AA kit. First a few WIP pics. Sorry about the messy workbench! Now the finished model. Hope you like it and thanks for looking. Cheers, Ian13 points
-
So boys, Mr. Reinis just finished his work on boxart for Comet. Grosvenor House like real thing. And you are the first who can see it.13 points
-
Much happier with my seam filling which I felt was a weak area on my previous builds. The next area which requires attention is canopy work, having said that these weren't the easiest of canopies to work with but something I'll be making more effort to get right in future.12 points
-
Hello Mates! This is the Italeri Tiger boxed by Revell with True Details resine seat, Microscale Decals (Changed), Hasegawa Data Recorder, sidewinder Dummy Rocket and a lot of detailing. I built this in 1999/2000. RAF Alconbury was chosen for Europe's aggressor unit. This was formed as the 527th Tactical Fighter Training and Aggressor Squadron in April of 1976 with the F-5E. It was renamed as the 527th Aggressor Squadron I hope you like the Snake 3-tone camouflage scheme Cheers, Thomas11 points
-
Hi, This is my recent model - Fokker D XXI (IV Serje) No 5 (142) in Finish colours of 2/LeLv 30, pilot Sgt. A.Trikkonen, earaly 1942. This is biuld from Special Hobby 1/72 kit but not the scheme from box. Here is she: This is my second Fokker D XXI in my life. First I did (of course Frog) in 1973 so in age of 14 and I still have it. I only removed some dust and here are family photos: The Frog Fokker was not painted with varnish, so I am surprised that decals are still on not broken! After 45 years of standing on shelf. This was quality... Comments welcome Regards Jerzy-Wojtek11 points
-
Im a bit annoyed with certain people on this thread....lets call them lower deck lawyers or armchair admirals who i strongly suspect (and apologises if im wrong) have never been in the armed force and feel that suddenly they are experts on the legalities of non aircrew flying.Pretty sure the regulations have got that covered...and we dont know if it was a jolly or actual work ....check test flights etc etc if it was work then people in flight test are well trained. Id be interested to know where all the knowledge came from ....the DASOR isnt even released yet11 points
-
Ced, The Lego bridge isn't that bad a price and while not 72nd, adds greatly to the display which can then go on a shelf and leave more room on the ceiling for other builds. Besides, that 3D printer you returned should cover the cost, right? The fish and chips talk is killing me. I am half British (me Mum) but was diagnosed with diabetes 3 weeks ago so no chips, bread, breading, stuffing, pasta, rice, oh the humanity. I am adapting but looking forward to when my numbers are down enough for a cheat day. Hunter is one of my favorite British jets. Got to see several of them on the tour I took along with Teleford back in 2013. Best though was when I found out my Uncle Pat was one of the chaps that installed the Dogtooth wing extensions in the field on older marks. Unfortunately he passed a couple years ago but I won't forget him. Looking forward to the build. They just did a Hunter GB over at UAMF and while the Revell kit is the favorite, there were some interesting builds going on with the Airfix kit.10 points
-
Good afternoon everyone. Some of you may have seen my updates of my build of the Italeri Su-34 in 1/72. Pleased to say that the kit is now finished. The kit went together rather well and is all oob. The main downfall for the kit is the fact the kit was produced before we had better access to Russian aircraft and as a result there are a few glaring errors, this reissue of the kit just really provides an up to date decal sheet, when compared to previous issues. The parts also require some clean up due to the injection pins in some rather odd locations. All painted using the hakata red line su-34 paint set. For those that haven't use Hataka before. This build was a test build for me to see how these paints settled as my plan is to tackle the hobby boss 1/48 Su-34. So I needed to find out the psi required on the airbrush and what ratio paint to thinner was required, as this was my first time with them. I recommend using their own thinners and thin 75% paint to 25% thinners, spray at low pressure and use a primer. Great results and i will definitely use them again. Give me your opinions please.8 points
-
The nom de guerre for this Phantom lies in its configuration. As it began life on the production line as an F-4D but was finished as the prototype F-4E. From the rear cockpit bulkhead aft it was essentially an F-4D, from that bulkhead forward it was an F-4E. In the 6512th Test Squadron, we maintained a unique flight manual denoting the differences and peculiarities of this airframe. Of course, the maintainers had unique manuals to keep this bird in shape. November 1981, shortly after returning to Edwards from Programmed Depot Maintenance at Ogden Air Logistics Center. She always went to the depot with a shark mouth on her, but always returned without one. Here she is in December 1983. Also has the short gun muzzle fairing replaced with a later long/vented fairing. On the way to the Utah Test and Training Range in April 1984 carrying an instrumented BDU-33 shape. A lucky shot as we barrel-rolled over her to check left side. On the Edwards ramp, May 1985. January 1989, returned from Ogden again and back to a short muzzle fairing. On her way for another test support mission January 1990. The pattern to the range skirts the Edwards housing area, seen beneath her. The didn't get her shark mouth again this time before being retired in 1992. The name in block letters on the gun fairing. October 1991, her last open day display. Thanks for looking, Sven8 points
-
Built for a RAF 100th anniversary group build. revel kit, from box, Xtradecal markings. Handpainted using Humbrol. Kit is fantastic, no filler, fell together in no time.8 points
-
Hi all. This is my first model in this year. Best regards. Michael.8 points
-
Let's not get carried away with our own surmises. We just don't know, unless some of you were there? Keep it to the facts, condolences and let's leave all the speculation to others.8 points
-
Well look at us, no frost nor do icy winds blow, well not very icy Howsomever icy winds DO blow over the Frog Buccaneer programme I had holes to fill in the front of the fuselage, and Milliput to use so I whacked up a dollop last night and did the trick with it but I also had to cut back the fore edge of the engine's nacelles to suit the length of the Maintrack intakes Brian sent me in my hour of need This gave me some very worrisome results, bear in mind this fuselage side now needs sihrscing back to the slim profile so the intake unit is not yet flush but I get this The leading edge fillet isn't lined up yet but the top and bottom edges are where they ARE going to be There's nearly an eighth of an inch to lose someplace Here's a bare-bones picture of the filled but unfinished fuselage which I suppose I might try to carry on with but I am pretty well displeased I cant even get my dander up by taking a run round the recent Hendie shots because his ip was blocked in the latest attack by the hacking scum Grrr Anyway in slightly nicer news There was enough Milliput for this another view almost hard enough for sihrsc I found out when scratchbuilding the Sherpa that if I drop a rule down into the Milliput it will find the level I need to file down to by stopping where the file did I expect to be Palouste casting soon ciao8 points
-
Hi Folks Another warts and all Sea Hornet from CA.this time from 728 NAS based at Hal Far. Painted with the usual Xtracolor HSS and using the kit decals. Cheers Ian7 points
-
I've been working on a small diorama showing a Manitoba Dragoons Staghound in the Netherlands. I had a couple figures finished but figured I needed one more. So I put together this 1/35 figure from a set of Bronco's Armoured Car Crew. I think Bronco is my favourite plastic figure company and I hope they produce more sets. The jerkin was moulded as separate pieces to be glued to the figure and make it look more like a resin casting than an injection moulded item. A new company Gecko has announced a couple sets of British Infantry that look similar and I am hopeful that the same sculptor and mouldmakers are involved.7 points
-
The vacformer turned up today and i eagerly rushed into using it. Set the top oven to 170 , gorilla taped the hoover nozzle to it and away i went. One thing i have noticed so far is that the PETg clear stuff hold the temperature longer that the plasticard that came with it , which is good. I also did not realise that vacforming would pick up the tiny little imperfections in the milliput master. It doesnt look bad for a first attempt , and im happy with it as a test. I wouldnt really use it on a model but it looks OK. Theres plenty of time later on for playing around with it. Back to the model for now. Heres a couple of pics of my first efforts7 points
-
Hello! Let's to start my another MiG! This is very quality ProfiPack edition set (PE, masks included). First time, I'm start to learn paint nozzle: Cockpit:6 points
-
Hi, friends. After introducing myself in "new members" thread I'd like to show you my latest work. This Buffalo was flown by Noel Sharp, a New Zealand pilot of No. 488 Sqn RNZAF. His personal aircraft, with a striking chinese dragon, made this model irresistible to me. Noel Sharp was credited with 3 kills during the Malayan campaign, including a Ki-43 and a Zero. He was shot down on 17 January 1942, but survived. Engineers were able to repair his aircraft, replacing the front section of the engine cowling with that of another plane (for this reason the ring colors don't match with the rest of cowling). Sharp was evacuated from Singapore before its capitulation, along with his Buffalo. The aircraft was destroyed at Palembang, South Sumatra, during a Japanese bombing raid on 7 February 1942. Sharp was KIA over Java on 20 February 1942, while flying a Hurricane with No. 605 Sqn RAF. He was 20 years old. Buried in the Kanji War Cemetery in Singapore, Sharp was posthumously awarded the DFC on 20 December 1946. Following two pics posted only for discussion purposes: The old Tamiya kit was improved with a PE set from Eduard, masks from Montex, vacform canopy (central section) and some add on (pitot tube made of metal tubes, Unithread for the wires) . I riveted the whole kit (I'm not a river counter but sometimes I do that). Everything is painted, roundels, letters, codes... using masks , with the exception of the dragon wich is a decal (btw too thick, I had to go over the rivets again). Undersurfaces painted with Tamiya Sky and Black. Upper surfaces (Dark Earth & Dark Green) with MRP (Mr Paint), I do like this new brand of lacquer paints. The pics: I love this barrel. Hope you like it. Regards JC6 points
-
Hi again all you Phantom lovers! I've found some sunshine in the form of images of F-4Ds taken during a visit to the 170th Tactical Fighter Squadron, Illinois Air National Guard at Capital Airport, Springfield, Illinois in May 1982. Note the fresh-painted machine with wrap-around camouflage in the final image. They need little introduction so here goes: As always, I hope you like them Martin6 points
-
more proggress6 points
-
Here is one with a mix of AIM-9 and Zuni on the Y rack: Jari6 points
-
You're the one doing the cool stuff, I just paid for a joyride! ZK-ADI was New Zealand's first airliner so I was over the moon to be able to go for a flight at an airshow in 2009. Plus I knew a pilot of one of ADI's stablemates, so an impromptu photo session was organised... DSC_0573 by Zac Yates, on Flickr DSC_0566-1 by Zac Yates, on Flickr DSC_0547 by Zac Yates, on Flickr Pilot's porthole. DSC_0619 by Zac Yates, on Flickr And his office. DSC_0546 by Zac Yates, on Flickr DSC_0548-1 by Zac Yates, on Flickr DSC_0539 by Zac Yates, on Flickr I tried making a Fox out of the old tool Airfix kit but it all ended up in the spares!6 points
-
Box art + 3D renders Release expected in late April 2018. Sources: http://www.icm.com.ua/news/530-mig-25-pd-soviet-interceptor-fighter.html https://www.facebook.com/ICM.Models/posts/769856953207245 Original box art Corrected box art - Spot the differences! V.P.6 points
-
My model, WIP: http://lapatrouillesimple.forumgratuit.org/t101p75-p36-le-curtiss-model-755 points
-
Blimey, it's more than 2 months since my last update . Apologies, but I have been getting on with it, just haven't got round to posting the photos. So, first up, as I mentioned in my previous post, I'd been hunting round for some alternatives for R.A.F. ground crew figures. Here is a set of railway figures from Bachmann: They're not 100% perfect, and are painted oddly in glossy enamel which I couldn't remove, but after a repaint and a replacement head from Dan Taylor Models: This chap is from the CMK Czech Air Force set, again with a new head from Dan Taylor Models: I've also done a few odds and ends for the diorama: And finally for today, the turrets were all completed and installed, so the Lancaster is all done. Gun barrels are from Quickboost: The next update will be about the various bits and bobs for the base and diorama, so more soon... Cheers Simon5 points
-
So, wings are attached to the main body. It was a little fiddly getting the joysick threaded into the pit as the wings come together with the fuselage, but the fit is near on perfect. I have rescribed where required, but not much was needed in truth due to the lack of panels on a hurricane. With that done, the pump thing was installed into the where well. I was not sure why this was not installed earlier in the build, but I thought 'follow the instructions, must be a reason'. I can confirm there was no reason and it would have been a heck of a lot easier to have installed it earlier! I have also applied Mr Surfacer 500 to the areas where I thought seams might have been an issue. Waiting for that to dry now before sanding back. Also masked the light on the underside off with some Vallejo masking fluid. And for those wondering, yes I have left a nice finger print where I held the radiator together whilst gluing! The rear control surfaces have been installed, with a great, positive fit. The rudder has no locating points, just a flush surface to glue on to. I have given the rudder a slight angle to give it a bit of life, and I thought a slight error in fitting will be less obvious than if it was straight. I have also masked the canopy. That was a predictable pain! Basically ready for primer now, and I continue to be very impressed with this little kit. Cheers, Val5 points
-
Good morning, small update. Last night I went on with my sanding and decided to glue the air intakes. I add CA glue as filler, as there was qquite a remarkable step, and once dry, i sanded it off. Here the lower Fuselage half's got the intake glued and with CA glue while the top one's already been sanded down. Top and side view: it starts looking smooth all the way.and it's taking shape too!!! I decided not to use the resin intakes as this kit will have the covers on. Flaps down!!! Timeto go tobed! Good night! Massimo5 points
-
Senior Service. Yes. Tax-avoiding companies are like that... Personally I was quite disappointed with Page 3. Not a single picture of a buxom lass to be seen...5 points
-
Cue Blackadder quote of the century; Aunt: [slaps him twice] Wicked child!!! Chairs are an invention of Satan! In our house, Nathaniel sits on a spike! Edmund: ...and yourself...? Aunt: I sit on Nathaniel -- two spikes would be an extravagance.5 points
-
Weathering the cockpit After the aqua gloss had had a couple of hours to dry I used a Tamiya panel line accent color (dark brown) to define various detail within the cockpit. Once the panel line accent color had dried I gave everything a coat of vallejo matt acrylic varnish to protect everything and to give a base for some UMP pigment(s) I had planned on using the kit supplied decal for the IP however I think it was meant to be used on a flat surface so I dug out some generic WWII RAF airscale instrument dial decals (AS48 RAF) a drop of aqua gloss to simulate glass I also added some aqua gloss to the leather(?) on the seat back Whilst searching for the airscale decals I discovered that I had some generic Eduard RAF seatbelts so I thought I could use them rather than the kit supplied decals Assembling the cockpit [ Next I’ll be closing up the fuselage until next time as always, any suggestions or comments will be gratefully received. rgds John(shortCummins)5 points
-
Thanks for the comments and likes chaps. I have a question for anyone who can advise; I'd like to add some flags for colour but I don't want it to be unrealistic, I know the union jack would be flown from the bow in harbour and the white ensign from the stern, but would they be flown in drydock if the ship had only just been docked? Any thoughts? More details on the drydock, railings, bollards railway carriages and bits and bobs of stuff for what's hopefully going to be a 'busy' looking drydock; And a test fit to see how it's coming together; Cheers Nick5 points
-
After not finishing a flippin' thing last year, I finished my semi-stalled Swedish J-22A in January, and now as part of a dual build of Eduard's new Royal Class boxing of the early Fw.190As, I've finished the European one (option D on the sheet). I added a resin cockpit (A3), bronze gear legs and resin wheelie-pops, and painted her with Gunze paints for the most part, covered with a few coats of the AKAN Flat Varnish, which I'm quite fond of these days Bada-bing! Now I've just got to polish off the Trop (option N on the decal sheet), and you can see both being built up here if you're interested. I could use the encouragement for the Trop, as it's going to be getting a little dio base of a bit of desert hard-standing, while the mechanics jack up the tail to pop off the prop. I've got issues with the base warping, and I've got some of the equipment inbound still, so delays might be the order of the day and I'll need some encouragement! Thanks for watching, and do try the veal4 points
-
Hi folk's,got this for under a tenner at my LMS really as a practice piece for some idea's which I used on the Churchill,it's a real oldie but as with most if not all Tamiya releases doesn't show in the molding.Finished in the scheme of the JGSDF as I liked the idea of the flag on the turret,after paint and glossing a wash was added in black then after matt coating dry brushed the highlight's in aluminium and a watered down wash of Mr.Colour earth ran into the area's where dust would settle,many thank's for looking in.4 points
-
Put the tracks on tonight. The front hull is only placed into position, as need to insert figures not started them yet. The colour of the seats in pic is showing up not quite as is. The colours for the radio found a picture of the actual radio. Colour of hull 155 Humbrol used. Progress above ... Pain fitting driver and gunner, the driver would be better if he could see over front plate better.4 points
-
The fix is holding on for the moment: Checking fit, all seems acceptable -the floor of the aft fuselage was glued in place before: I added a small spar and notched the fuselage side wall to accept it, to add an itsy-bitsy more of strength:4 points
-
The last of my refugees from the shelf of doom have heaved themselves over the side of the rubber raft and are wrapping themselves in foil blankets and gratefully accepting hot coffee. And in this case it is a duo of Airfix's rather wonderful Jet Provosts, built as a pair. JP T.4 3 by Martin Schofield, on Flickr Both aircraft had the addition of a number of small details, including aerials and fairings, but were otherwise built from the box. The model goes together like a dream, with the only points of caution being the angle of the tailplanes and the inevitable gap from the air intakes. As a kit it is perfect as a starter and well done to Airfix for releasing it as such. A couple more have found their way into my stash and I am eyeing up the other options on the Xtradecal sheet I purchased -particularly that attractive Venezuelan aircraft. JP T.3 1 by Martin Schofield, on Flickr The first aircraft was completed as one of the kit options, a T.3 of No.2 Flying Training School. I particularly like the light aircraft grey with dayglo stripes, and was delighted that this option was included. Now, as anybody who has chosen this option will probably guess, my delight was severely dented when it came to the decals -those big, bright, dayglo decals. After copious amounts of Microsol and a lot of swearing (and much entertainment for the rest of the model building group) those on the wingtip tanks and the rear fuselage finally settled. Oddly, the big stripes that wrapped around the leading edges went down with no issues, but my sanity took a lot of beating that evening. JP T.3 2 by Martin Schofield, on Flickr The other kit was finished as a T.4 of No.1 Tactical Weapons Unit. I first saw camouflaged JPs on ATC camp at Brawdy back in 1985, which was the first time that I'd ever come across them in anything other than red and white. After the T.4s were retired, by which time they were painted in air defence grey, one of them, XR679, was bought by a gent called Eddie Todd, who covered the grey in self adhesive multi-coloured circles and flew aerobatic displays at shows. He helped to offset the cost by raffling a flight in the aircraft, and at St. Mawgan airshow in 1996 I spent £1 on a winning ticket. A most enjoyable 20-minute flight after the show was the result, with a number of aerobatics and a short visit to Perranporth airfield (at the time beset by anti-noise NIMBYs). JP T.4 1 by Martin Schofield, on Flickr When Xtradecal issued their JP sheet for the new kit I was therefore very pleased to see XR679 included. Not wanting to get spots in my eyes I was never going to complete it in its demobbed form (see https://abpic.co.uk/pictures/registration/G-BWGT for the reason why) but the JP looks particularly neat in dark sea grey/dark green camouflage. JP T.4 2 by Martin Schofield, on Flickr So, to anybody thinking about building the Airfix Jet Provost, go and do it. It's a terrific build and a great mojo restorative. JP T.3 3 by Martin Schofield, on Flickr4 points
-
The mech in the back knows full well how a bang seat works, how to use it, he has to, he works near it ,sits in it while working in the cockpit, checks the pins every time he gets in, safe for servicing etc. and even removes it if he's Weapons trade. We knew about these things in training and pretty sure he will have had proper briefing before the flight from the Pilot. There isn't anytime to explain when somethings gone wrong.4 points
-
This has been happening, over on the Buccaneer thread, I think it has more relevance in here You can probably see that it hasnt been too happy to be sihrsced but of course nothing tells sihrsc to b. off She do what she want to like any lady do And stuff happens This shows the lighter areas from the rule depth gauging which helps guide the file Looking at the unfilled bits you would think there was more filling needed than actually was But blimey, it's proper hard for the file card Oops I thought I took a better one than that but I didnt, the file needs unclogging every couple of minutes because the Milliput has not entirely set off This is ready for a polish, then into the latex vat for buck moulding Expecting a couple of workable bucks to reshape with open hatches of choice by the weekend4 points
-
Red, at least for 1953 period. My Dad did his national service as an engine fitter on 617 Canberras at Binbrook and used to get very upset when he saw profiles with blue lightning streaks. Blue was used by another squadron at Binbrook, 9 off the top of my head, and he described how on night operations when the Canberras were taxying in, the ground crew would shine a torch on the lightning flash to see which squadron the plane belonged to Paul4 points
-
Welcome back, Rested from holidays, it was time to get back to the bench. I masked the flying surfaces and a couple of upper fuselage panels and sprayed them with AKI Extreme Metal Polished Aluminium. I then masked the anti glare panel with MM Olive Drab enamel: Next up is the masking for the US insignia and tail serials. Regards,4 points
-
Wow, Zac, what a privilege! A real adventure! Thanks for sharing the story, your views, and the photos. Since I am working on two other models (also posted as WiPs in BM), progress was paced after the initial push (have to give priority to finish the other two), but managed to cut apart the lower wing panels, give them the needed dihedral and angle, and glue them to a connecting piece that will be a floor section too. The gluing area is really small, so this may not work, and in any case will have to be handled very carefully once set:4 points
-
Modeling is usually not a straight and upwards stairway to heaven. More putty and sanding was required, and touch ups are needed:4 points
-
Thanks Steve. Not decided which scheme yet - if you've got a preference, go with it and I'll do the other one. I've made some fairly swift progress - fuselage and wings are now together - but as the cockpit will be closed I didn't spend a lot of time painting the interior. Everything has gone together fairly well - no trouble at all getting the cockpit framework into the fuselage - and the wing has gone on ok but left a blooming great step where the front of the lower wing meets the fuselage. The sanding stick has dealt with the step, I've accepted a loss of surface detail in a place where it isn't going to be all that noticeable so I can live with that. I like the cockpit framework - here's how it looked before the fuselage went on. The seatbelts are Eduard steel ones - first time I've used these, much better than the standard PE. The detail is nice, but it would be nice if the detail on the sidewalls was a little better. And here's how it's looking tonight:4 points
-
Not much on this front happening, engine test Oops, a bit overpowered I think! That's better. I had painted the wings but used Boeing grey instead of Gull grey which these are painted in. Fuselage masking removed and time to remask for the lower fuselage and wing repaint.4 points
-
Here it is this morning, pretty much done. Except I still forgot the flipping headlight lenses, duh!!!4 points
-
Thanks Richard Here it is as of tonight. Starting to get that faded, dusty, dirty look but needs more and maybe some rust in spots, Got to clean some of the mud off the road wheels too as it doesn't look right where they would contact the tracks. I don't have any clutter, chucked that all out when I thinned out my collection, never thought to save anything, so maybe a bedroll or tarp will have to do. And some headlight lenses would look ok too, oops.4 points


This leaderboard is set to London/GMT+01:00