
Leaderboard


Popular Content
Showing content with the highest reputation on 18/03/18 in all areas
-
Hi All Recently joined the forum to participate in the fun. Here's my first model completed since joining; a Revell 1/72 Hurricane IIc representing a 1 Squadron machine using Xtradecals. One of the reasons for building it is a pre-cursor to an R/C model of the same prototype. But there's a twist. It won't be a powered R/C model, but a glider! Seems odd, but there is a genre of R/C glider called a Power Scale Slope soarer that is a scale model of a full size a/c (either piston or jet or rocket powered) that is then launched from a hill and soars on the wave lift. I think it originated in the early 1980's when both electric power and miniature turbojets were not as developed as they are today, so the PSS genre made scale models of jets in particular viable. The UK based PSS Association has a bi-annual event where a model is designed and members are then free to select their own prototype, do a build thread on an R/C modelling forum and then there is a mass get-together at a soaring event where all the completed models are flown. See here for a little more info if you like: http://www.modelflying.co.uk/forums/postings.asp?th=134035&p=1 Anyway, back to the matter in hand. I enjoyed slapping the kit together. I had bought the Eduard etch but only ended up using the mesh screen for the carb intake (the kit part pinged off somewhere) as I thought most of the kit was reasonably detailed. I did use AML vinyl masks to help speed up painting and it's the first time I'd used those instead of copious amounts of Tamiya tape and tin foil. They made it easy for sure, but are they cheating....25 points
-
JRS-1 Bu No 1063, VJ-1 Pearl Harbor, Feb 42. DSC_0238 by stuart wellard, on Flickr DSC_0239 by stuart wellard, on Flickr DSC_0233 by stuart wellard, on Flickr DSC_0234 by stuart wellard, on Flickr DSC_0235 by stuart wellard, on Flickr DSC_0236 by stuart wellard, on Flickr DSC_0237 by stuart wellard, on Flickr DSC_0240 by stuart wellard, on Flickr DSC_0241 by stuart wellard, on Flickr24 points
-
The last of my refugees from the shelf of doom have heaved themselves over the side of the rubber raft and are wrapping themselves in foil blankets and gratefully accepting hot coffee. And in this case it is a duo of Airfix's rather wonderful Jet Provosts, built as a pair. JP T.4 3 by Martin Schofield, on Flickr Both aircraft had the addition of a number of small details, including aerials and fairings, but were otherwise built from the box. The model goes together like a dream, with the only points of caution being the angle of the tailplanes and the inevitable gap from the air intakes. As a kit it is perfect as a starter and well done to Airfix for releasing it as such. A couple more have found their way into my stash and I am eyeing up the other options on the Xtradecal sheet I purchased -particularly that attractive Venezuelan aircraft. JP T.3 1 by Martin Schofield, on Flickr The first aircraft was completed as one of the kit options, a T.3 of No.2 Flying Training School. I particularly like the light aircraft grey with dayglo stripes, and was delighted that this option was included. Now, as anybody who has chosen this option will probably guess, my delight was severely dented when it came to the decals -those big, bright, dayglo decals. After copious amounts of Microsol and a lot of swearing (and much entertainment for the rest of the model building group) those on the wingtip tanks and the rear fuselage finally settled. Oddly, the big stripes that wrapped around the leading edges went down with no issues, but my sanity took a lot of beating that evening. JP T.3 2 by Martin Schofield, on Flickr The other kit was finished as a T.4 of No.1 Tactical Weapons Unit. I first saw camouflaged JPs on ATC camp at Brawdy back in 1985, which was the first time that I'd ever come across them in anything other than red and white. After the T.4s were retired, by which time they were painted in air defence grey, one of them, XR679, was bought by a gent called Eddie Todd, who covered the grey in self adhesive multi-coloured circles and flew aerobatic displays at shows. He helped to offset the cost by raffling a flight in the aircraft, and at St. Mawgan airshow in 1996 I spent £1 on a winning ticket. A most enjoyable 20-minute flight after the show was the result, with a number of aerobatics and a short visit to Perranporth airfield (at the time beset by anti-noise NIMBYs). JP T.4 1 by Martin Schofield, on Flickr When Xtradecal issued their JP sheet for the new kit I was therefore very pleased to see XR679 included. Not wanting to get spots in my eyes I was never going to complete it in its demobbed form (see https://abpic.co.uk/pictures/registration/G-BWGT for the reason why) but the JP looks particularly neat in dark sea grey/dark green camouflage. JP T.4 2 by Martin Schofield, on Flickr So, to anybody thinking about building the Airfix Jet Provost, go and do it. It's a terrific build and a great mojo restorative. JP T.3 3 by Martin Schofield, on Flickr21 points
-
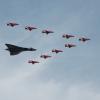
Looking for an easy build I deviated from my usual theme for a couple of 'specials', the Airfix Red Arrows Gnat (starter set) and Hawk 50th Display Season. Built mostly OOB they're a nice couple of kits and go together nicely. A mostly easy build as shown in the WiP here, just the paint (Xtradecal 'Red Arrows' Red acrylic) and the pitots. Oh, and the Hawk transfers - repaired where the side stripes broke and most of the bottom 'triangle' brush painted with H22, a great match IMHO for the transfer white. DSCN0339 by Ced Bufton, on Flickr A nice shot during the build: The Gnat The OOB build quickly deviated as BMers pointed out that the internal colours were wrong. The crew also needed their inner thighs trimmed to fit them in. Other than that and the pitot (slide fit tube) OOB (honest, ish) Molotow Liquid Chrome pen used on that, a great tool. The Hawk OOB except paint and pitot. Some fit issues on the rear coping (behind the canopy) fixed by bodging. The transfers went on OK except the starboard side stripe that split. Luckily H22 was a great match for the transfers so it was pushed together as well as I could and H22 used to touch up the crack. It was so good I decided to mask and paint most of the triangle on the bottom (details in the WiP). Much easier than trying to fit together lots and LOTS of individual transfers. (Excuse the Lego propping up the nose) The very tips of the triangle and the stripes down the back are transfers, the rest painted. Edit: must sort out the exposure / white balance on my photos!20 points
-
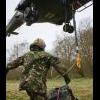
The Airfix 1/48th Lynx AH.7 converted to AH.1 standard using Rotorcrafts resin conversion set, blades converted to early straight type , replacement engine housing, replacement tail plane and gearbox housing. Painted with CJ Aerosols BS olive drab, then masked with Panzer Putty and camo applied with Tamiya NATO black rattlecan. IMG_4929 by Tony Osborne, on Flickr IMG_4928 by Tony Osborne, on Flickr IMG_4928 by Tony Osborne, on Flickr IMG_4925 by Tony Osborne, on Flickr IMG_4924 by Tony Osborne, on Flickr14 points
-
Canadair F4 Sabre 71 Squadron Royal Air Force Germany Wildenrath 1955 Trying to get back into the modelling groove after a very quiet couple of years. So here is my quick build of Academy's F-86 sabre, representing a Canadair F4. Built OOB with the exception of Eduard Brassin wheels and painted with Mr Paint and Gunze Aqueous Colour. Decals are from an Eagle Strike set. Regards Howard14 points
-
This is the Matchbox Hunter with the Aeroclub vacform nose conversion and homemade decals depicting Hawker Hunter FGA9 RRAF116 (ex XE559) 1 Squadron Royal Rhodesian Air Force c.1968 . The Aeroclub nose is a pretty good fit but still does not make a truly accurate Hunter nose given the faults of the fuselage that it has to attach to (too wide, etc, etc, etc). Still, it's a huge improvement over what Mbox did!! Comments and critiquing welcome. David14 points
-
Back from my wandering travels, this time the Shangri La that is otherwise known as Detroit, where we did manage to find a fantastic middle eastern restaurant. So good in fact that we rated it in our top 5 restaurants. A complete surprise, but welcomed nonetheless. It looks like while I was away, you lot got some modeling in so I had better try to catch up. Sheep seems to be the order of the day so we started off with cutting some windows in some masking tape. Which was then smeared with plastic putty and embossed, debossed and generally just messed up by dabbing some wire wool over the putty as it started to cure. Can you tell what it is yet? can ya can ya? After the putty had cured, I threw some paint on. First was a coat of aged concrete which was more of a buff color. When I realized that shade was too far off, I added some aged white, more washing it on than painting it. It's really difficult to photograph such a light color so I have adjusted the contrast in this shot to hopefully show the texture to more effect. Even at 1:32 scale you would be hard pushed to see the strands of wool on the sheepskin. The 1:1 tended to get a bit flattened and matted after them aircrew bums sweated on them for many hours. 'Scuse the horrible paint job on the seat - there's a lot more work to go into that seat before it's ready for general consumption, but you get the idea. The sheepskin also need trimming to shape. This is just the rough cut. Directors cut later. I think I'm happy with the level of texture on the sheepskin. A Flory wash should help bring out the texture a bit more. I'll apologize now - the next photo's are very repetitive but I took 'em so you're going to see 'em. I had my cloak and pointy hat on this afternoon. That hat must have been a bit cockled over 'cos things didn't turn out as good as I had hoped. But on the bright side - we have some cockpit parts to be getting on with. But do they fit? Well, they fit at least as good as the kit parts do! (Yes, I know the IP is back to front in this shot!). It's close enough and I'll be able to get it fitted without too much drama. One of the things that I wanted to capture were the small notches above the smaller gauges. In CAD it looked easy - it always does on the big screen. It wasn't until I printed it out that I realized just how small everything really was. The notches are there, but they are tiny. In fact there's just a hint of notch so whether they are still there after painting remains to be seen. IP with center overlaid panel (this time facing the right way!) Then with another smaller panel overlaid in the center panel and a comparison against the kit part. If I'm being fair, the kit part isn't bad, and is pretty accurate - I just didn't like all the bezels around the gauges which don't exist on the 1:1 this shot just because I took it.... Followed by a rather poor shot of the dry fit. It was difficult to get anything to focus on with the brass being so shiny and now I really must tidy my desk up - as Perdu pointed out, things are being assimilated into the desk and it's getting harder and harder to find anything toodle pip and all that.12 points
-
Afternoon folk's,finished Tamiya's Churchill as Ben Nevis 3rd Tank battalion Scots Guards,they landed in Normandy July 44 and ended up on the Baltic coast at the war's end after many month's of hard fighting.I figured being a Guards unit they would have kept their tank's in good order till the conditions took over so I kept the weathering to a minimum to show the tank not long off the beach,sprayed with Mr Colour paints which have a satin sheen which I only dulled with one light coat of matt,many thank's for looking in.11 points
-
Good day, ladies and gentlemen. I present you my next model.11 points
-
Ta Bill. I wouldn't mind so much if I could soak it up as well as I used to; I look at my lads seeming to soar and dive like terns for fish it comes to knowledge, whereas I increasingly feel like one of those dowdy herring-gulls you see on the beach, laboriously examining each bag for an unattended sandwich. Noticed yesterday that West Dorset is bringing in byelaws to make it a public offence to feed the gulls. Given that the gull population at Lyme Regis operate as a bunch of 'help-yourself' privateers it would make more sense were the charge to read 'Failure to repel boarders' when your fish supper receives a sudden gulling.... Crabbing on the Cobb there with the lads when they were young a wing-ed blighter nicked the plastic bag beside us (that had within it a kitchen knife for slicing bait), banked-away and promptly dropped it in disgust onto the seats of an unoccupied cruiser in the middle of the harbour. I would love to have known the owner's reaction later upon entering their vessel to find a strange 6" long blade sitting on their upholstery, possibly suspecting some kind of Mafia warning from the harbour-master.... If I can get it to work Massimo, you can be damned sure someone of your dexterity can work wonders with it! Delightful. I did a bit of 'research' (as you do) Ced and a bit vexed to find that the deep-cut blade isn't recommended for use with the Portrait 2. Rather vexing. I guess it takes a machine with a bit more oomph to drive a blade through thicker/denser materials. My thanks Martian. I wanted to get all of the angles and sizes finalized on those parts today; with three singularly-shaped parts on each side (each attached and working in different ways on the actual aircraft) it has been taxing my abilities to get everything correctly aligned, in scale, and strong enough to support the BT in the final analysis. There are so many ways it could go wrong juggling the variables each time you alter one part, not to mention keeping the BT at the correct angle (I noticed in some of my earlier shots that I'd positioned it upward at to extreme and angle, which is a perfect way of messing up the alignment of the various hinges and actuators), that it seemed time for an all-out obsessive assault on the problem once and for all. Firstly then, the top angled brackets needed their attachement points to the BT finalized. The bracket itself doesn't appear to move but is a fixed entity, the rearmost end of it apparently sliding on some kind of runner above the side doors on each side. There's no close-up photographs of sufficient clarity and taken at the necessary angle, so I've built a 'best-guess' for this region based upon diagrams in the parts manual, starting by soldering some 1mm brass tube slightly offset at the end of each bracket in order to form a 'sticky-out bit' to look a sif it is fitted in the runner above the door: I switched out the old solder tip for a much finer one - should have done this some time ago as better control of heat on small parts such as this: The tubing was then snipped and filed-down to length. The actual part on the aircraft appears much thinner in cross-section but at this scale, strength must take precedence: Dry-fitted they look like they'll do: Let's put the 'shelf' in above the side doors for those to rest on: Hopefully you get the 'runner' idea from this angle with the BT on: And t'other side as well: Feeling happy enough about the upper parts, time to similarly deal with the radii at the bottom: These are fixed to the BT, travelling back and forth through slots in the rear stations on either side in order to guide the upward rotation of the BT. The curve on them is fine but my lengths were out by 2mm so snipped them off to fit (the ends are mounted flush against the door frame). For now I'm not going to stick any of those parts on until the interior is fully installed and the fuselage closed-up - there's no easy way of dealing with all the multiple attachment points involved but of all the options this should result in most control and less risk for snapping bits off. What next? I want to lay out all the parts that are going to be shoved inside this aircraft - some of which I haven't looked at since last July - lay them out and do an inventory, then start to arrange them according to the colours. I expect I'll discover some bits needing repairs along the way too. I'm lucky to have tomorrow to play as well, it being a bank holiday here on Monday. Although we won't be heading off on the summer hols until the beginning of July, myself and Mrs. B agreed to last night to splurge some of the spending money on buying both of our lads their first flying lesson each whilst we're over in Dorset. It's something I'd always wanted to do if we had sons and damn the expense. Tony11 points
-
Added extra wiring to the engine to beef it up a bit. All the national markings (bar the swastikas on the tail) and number 1 on the fuselage sides were created with homemade masks. The nose markings was fun to do!! P3180089 by Richard Page, on Flickr _20180318_155912 by Richard Page, on Flickr P3180088 by Richard Page, on Flickr P3180087 by Richard Page, on Flickr DSC_0361 by Richard Page, on Flickr DSC_0359 by Richard Page, on Flickr DSC_0358 by Richard Page, on Flickr DSC_0354 by Richard Page, on Flickr DSC_0352 by Richard Page, on Flickr DSC_0346 by Richard Page, on Flickr _20180318_160104 by Richard Page, on Flickr _201803 _20180318_155912 by Richard Page, on Flickr18_155947 by Richard Page, on Flickr10 points
-
This has taken me at least four tries to get right as I started it before I got my airbrush. And this particular machine met it's demise in 2007 when it lost power in one of the engines the floats were deployed but one on the port side burst and it capsized.10 points
-
Me me me, in in in, now now now. I'll be up the bar with Bill, within clear sight of the telly and close to the toilets10 points
-
Here is my 1/48 Monogram classic Hawker Typhoon Mk.1B built for the Hawker (Siddeley) Group Build. Its OOB with a few extra details, plus the addition of a spare Tamiya pilot figure. The kit decals were in a poor state so I replicated the markings in CorelDRAW and home printed, except for the small white markings and the Tiger image all of which caused me a few problems and occasion to issue forth the odd expletive I also had to hand paint the large yellow 'Fs' because I couldn't get anywhere near a dense enough print. The weathering and staining is done with oils over the decal sealing gloss coat. The general idea was a trip down memory lane and an 'Old Skool' build, so apart from the primer and the final matt coat its all hand painted, I also tried out some paint effects to try and suggest structure and break up the flat areas of colour a bit. This is a truly fun kit to build and goes together very accurately despite it's age. I would highly recommend this kit as a mojo restorer or as just some light modelling relief. The build link is here:9 points
-
Good afternoon gents. Sitting in the kitchen, chores done, dinner cooking, snow dashed around the place with gay abandon I figured now was a time for an update. As mentioned earlier I took son of Dexter out and clipped the wings getting ready for the flappage. I’ve found that taking everything in this hobby slowly yields the best results. slowly passing the very tip of the saw up and down the line supplied, eventually you get through. please let me know if I’m going Photo crazy but I really want to try and do this step by step as I find other WIP projects really helpful. The first bit was relatively straight forward but the section nearest the fuselage was a little more tricky. Take it really slowly here or you may end up with more bits than you want. Spot quiz. What’s wrong with this picture? well I have to bend all those little spike bits over 180 degrees so it ends up on the other side. Simply slide the PE part between the two screw parts........ oh..... looks like I should have bought the bigger one. never mind, onward and upward. the only thing for it is to snip them off, I’ll keep the order by using Tamiya tape. Bend complete! Just need to add the triangular sections. badabing! heres the other one with some plastruct added. yay! Looking good. I woke to this. this morning, so a bench day was had. I’ll update tonight as I have to make the fire up, the fam want to watch the Bake off and I can’t not be there. Hope y’all like the echo goodness so far. More n an hour or two. Johnny. Oh ok cool. Thanks.9 points
-
Good evening, ...what a booooooooring night!!! Last night I had finished by filling most panel canals with CAglue. Tonight I filed and sanded and filed and sanded and filed and sanded and filed and sanded and filed and sanded and filed and sanded and filed and sanded and filed and sanded and filed and sanded and filed and sanded and all this filing ans sanding can be resumed in two pictures; It had to be done sooner or later!!! I went on trying to shape the dolphin belly (I'm nearly there!) Then I started working to match the flaps to their housing on the inner wings' sections.I had to file down with an angle the inner corners until I got an angle approximateli like that in the picture on my laptop. Then I glued two strips of plastic card immediately after the wing trailing edge.to fill the gap opened when I cut the ailrons off. I poured some CA glue on the inside , to give them rigidity. Once dried, I filed them down until I could fit the bottom wings'halves. Of course this is another job I'l have to stop here, as the final sanding will have to be done after these parts are glued. That's it for now. Let's hope tomorrow night won't be so boring!!! Ciao Massimo9 points
-
Thanks Johnny, and yes I will be picking up the Lanc again. Must say your thread has got me motivated. Save a zombie apocalypse, giant asteroid strike, or Mr Putin gets an itchy finger then yes it will be at Telford. Interesting gents, and to be fair I believe you are correct. It would explain a lot of things. Still too late to change now Roight up then. I had a slight imperfection just above one of the plates on the upper wing. Conveniently it is located where there is a breather pipe thing on the real aircraft. Not all Furys appear to have it, and I wasn’t going to fit it, but I decided why not and a small section of bent tube sufficed. Then I got the locaters for the aerial cables in place. Then I added the little braces on the rigging… very fiddly. These are held in place by Klear. Next I assembled the aerial cables which are somewhat of a tangled affair and to be honest I was not looking forward to. The quandary I faced was getting three cables fed into a small collar, which is then fixed to the tail by a single cable. Then getting everything taut and not making it look an unholy mess. The two outer cables were attached to the wing first. Then the wire to the fuselage. I used a small Albion Alloys piece of tube which I thread all three cable through – the fit was quite tight, so I could pull them taut. The single cable to the tail was glued first, leaving the fuselage wire slack. Once the cyano had set I pulled the other cable tight. Then it was oh so very carefully cut the two redundant wires with a razor, avoiding cutting the cable attached to the tail. If this would have happened all would have been undone, you wouldn’t be reading this, and I would still be frothing at the mouth and cussing blind! Once all the cables were cut I let out a loud sigh of relief, it was almost cutting through the umbilical cord, and the little Fury was born into the world at long last. Well not quite. The coup de grace was finally putting the propeller in place, the metaphorical cherry on top of the cake, which really sets it off. The blades were painted Tamiya NATO black. Revell’s call out is a dark leather brown, but from what references I’ve seen they were either black or a very dark grey. This was borne out by a debate on the inter-war aircraft thread a while back. Please permit me a few shots. Roight up then. It’s not quite finished as there are a few touch-ups to do (not telling where). Then I pay one more visit before I prepare a RFI. However, in the meantime the pub up the road has a beer (well loads in fact) with my name on them, so I’m off for a well earned roister.9 points
-
The 5th April this year is the 50th anniversary of Alan Pollock's flight through the span of London's Tower Bridge in protest against the government's lack of celebration for the RAF's 50th anniversary. Alan wrote up the episode in 'FlyPast' magazine, article here. I decided I'd like to mark this by bashing together a kit of his Hunter FGA.9 XF442 of No. 1 Squadron. Then 'the fun' started... 1/72 kits of the FGA.9 are out of production and old copies are hard to find. I found this one at a show: A few people have built this subject before; our own Devilfish built a beautiful 1/48 here and there's a thread of a 1/32 build on 'The Aviation Forum' here. Not many reference photos exist of the actual aircraft at that time (that I could find) but there's a few paintings. Hmmm. Let's have a look at what's in the box: ... with some bits and pieces, hopefully none missing: The canopy's not too bad: ... but the transfers are dead to me: Luckily I wouldn't be using them anyway. It looks as though I'll be printing custom decals and / or painting the roundels. Should be fun? Any help on colours, markings and anything else I don't know about gratefully received!8 points
-
Another spitfire variant to knock of the list. Eduards little beauty, nothing I can add about this kit that has not already been said. This was the weekend version, so no extra frills to be added. Stuck with the kit decals even though I seem to remember there being some discussion about the colour of the codes being wrong. Tim8 points
-
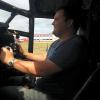
Thanks, I'll have a look. Thanks, Steve. I have a question on the bottom window. Does it slide back on tracks to open it? On the Special Hobby kit, the nose is moulded in clear, and it joins with the fuselage right behind the side windows. This means that a portion of the bottom window (aft of the fuselage-nose join) is grey plastic, whilst the portion forward is clear. Should I be cutting out the section that's grey plastic? You know, my mother never said that to me after I finished cleaning my room when I was a lad. I think that is what's ruined me. I should go see that Fred Freud guy. ***** OK, so I went and added some very important mission documents. In case you can't read them, the radio operator is perusing the instructions on transferring music to a FiiO X5 Third Generation high-res media player (I figured he would want to keep the Winston Churchill podcasts with him at all times), and the navigator has two maps - one shows the locations of all pubs within walking distance of the barracks that serve single malt whiskeys, and the other shows the shortest and fastest route to the relief tube in the rear of the aircraft. It also has a chart that correlates the total time spent in "relief" to an increase in range (assuming you can delay setting her down in an emergency). Cheers, Bill8 points
-
Hello all, here is a Revell 1/32 Spitfire I have been building to break the slow going Ju-87 build I am on. It is painted with Humbrol colours and with only seat belts added to the standard kit. It builds ok with a few fit and mould issues, but nothing to serious to worry about. Hope you all like it, all comments are welcome :-)7 points
-
HI all, A quick out of the box build for me, apart from the aftermarket decals from Bingo Decals. The Kinetic kit is a average kit, I did look online for a few builds and sought solace in others experiences. The kit is well detailed with great panel lines etc, the choice of the older four bladed props or the new swept eight blades adds a different slant. The whole kit demands presence in either the folded or spread wings layout, I chose folded if only for the storage, the reality is being an ex-navy engineer, I have a calling to naval, carrier based aviation, UK and US. One thing to note though, and I took advice from one build online, I added a large amount of weight to the nose area, it wasn't enough though so I displayed the model with tail supports. The kit decals didn't do the subject justice so to Bingo decals I went, the Screwtops CAG aircraft looked cool so that was the one for me. With the aircraft built and finished in Mr Color, US Navy grey, it was on with the decals, the large/ extra large screw on the radome was a real worry, but it went on with no problems, settling down with Micro Sol. The rest of the decals posed no problems apart from the nose where the contour of the nose in front of the cockpit did seem to stop the decals following the contours, however after a good bit of soaking and gentle brushing, the decals conformed and in the morning looked just fine. A quick panel wash and on with the wings, props and radome then she was ready to sit with my other US Navy aircraft. FLY NAVY, eat crab. The Woo.7 points
-
#6/2018 The first pair with a matching fuselage band is finshed. After the Bf109G-14 with a KG(J)54 band, now my dad built this attractive 262. A similar KG(J)6 pair will follow. Tamiya kit with EagleCals, the fuselage band is painted because the decal didn´t look right. EZ Line used for antenna wires and front brake line. Kagero and JaPo books for reference Build thread here DSC_0001 by Reinhard Spreitzhofer, auf Flickr DSC_0004 by Reinhard Spreitzhofer, auf Flickr DSC_0003 by Reinhard Spreitzhofer, auf Flickr DSC_0004 by Reinhard Spreitzhofer, auf Flickr DSC_0005 by Reinhard Spreitzhofer, auf Flickr DSC_0006 by Reinhard Spreitzhofer, auf Flickr DSC_0007 by Reinhard Spreitzhofer, auf Flickr DSC_0008 by Reinhard Spreitzhofer, auf Flickr DSC_0009 by Reinhard Spreitzhofer, auf Flickr DSC_0010 by Reinhard Spreitzhofer, auf Flickr DSC_0011 by Reinhard Spreitzhofer, auf Flickr DSC_0001 by Reinhard Spreitzhofer, auf Flickr DSC_0013 by Reinhard Spreitzhofer, auf Flickr DSC_0014 by Reinhard Spreitzhofer, auf Flickr DSC_0015 by Reinhard Spreitzhofer, auf Flickr DSC_0016 by Reinhard Spreitzhofer, auf Flickr DSC_0017 by Reinhard Spreitzhofer, auf Flickr DSC_0022 by Reinhard Spreitzhofer, auf Flickr DSC_0002 by Reinhard Spreitzhofer, auf Flickr DSC_0003 by Reinhard Spreitzhofer, auf Flickr DSC_0001 by Reinhard Spreitzhofer, auf Flickr DSC_0002 by Reinhard Spreitzhofer, auf Flickr DSC_0003 by Reinhard Spreitzhofer, auf Flickr7 points
-
my latest project it the Hasegawa LTD finnish airforce P40m...the model is out of the box except for a resin seat with belts,i have 4 more hasegawa P40's in the stash,glad it's a nice kit. the real plane was captured from the Russians after running out of fuel...it makes for an interesting contrast from my RAAF P40's and the desert airforce one i have done.29313578_731461260382582_8866192295437579413_n by paul sabin, on Flickr29342927_731461340382574_4932394801905775104_n by paul sabin, on Flickr29340099_731461313715910_7167449620062605179_n by paul sabin, on Flickr29260916_731461280382580_5004255009157665370_n by paul sabin, on Flickr29249904_731461367049238_6655517589231611422_n by paul sabin, on Flickr and with two of my older biulds29250251_731461387049236_7205961727963707897_n by paul sabin, on Flickr29261602_731461403715901_8823084096340989349_n by paul sabin, on Flickr the three kits are..the finnish hasegawa P40 M......RAAF 450 sqn AMT/Italeri P40K1 and RAAF 75 sqn P40n. i may have to move my JNAF P40 e up the line oz rb fan Posts: 861 Joined: Mon Apr 14, 2014 7:28 pm Top7 points
-
I've lost my modelling mojo, yet the stash is still growing! I came to the conclusion that I had better start building, so needed a quick and dirty build to get me going again. The solution? One of the £5 gift sets I got from Aldi at Christmas. I decided to go entirely old school, and opted to use only the paint (*1), brush and glue that came with the set. I also decided to use minimal tools, i.e. a sharp knife and sanding sticks. Started the build at 14:00 Saturday. The kit is really nice, adequately fine panel lines and good plastic. ...although the pilot moulding is below par. By 15:30 I had a painted cockpit and 2 fuselage halves ready for buttoning up! And by 17:30, I had an airframe ready to fly around the house! Let the painting begin! The first coat of red is very poor, leaving brush marks and an uneven finish. Another cost was added, then I stopped for the evening at 19:00. It took 5 coats of poorly applied paint to get OK coverage. The provided paint is shockingly bad. It seems to harden to a rubbery finish which obliterates detail and leaves nasty brush marks. The supplied brush is also a little to hard and tends to scratch the paint around... Eventually by Sunday 12:30, I was ready to apply decals! They seemed to unaturally stick to the paint, and refused to move around without some brute force. This made getting them in the right place was hard work. Thankfully this is the starter set, so devoid of all the stencils! Finally completed by Sunday 14:00, including a sleep and yesterday evening off! Not a great finished model, the painting really let this one down. Fortunately I have another 2 in the stash The good : Its a £5 kit! The plastic is good, and could be made into a fine model The bad : The supplied paint and brush are rubbish. (*1) and a little bit of flesh acrylic paint for their faces, I couldnt leave them grey! Edited to add build description and thoughts...7 points
-
Err...you're going to need some kind of fancy cutter if you're going to build the bridge too... Or is this in scale?7 points
-
Periscopes, difficult people and Lego bricks. A few days ago I walked into the local crochet supplies store and purchased two 1:100 scale E-class submarine periscopes... When I got them home I was initially quite encouraged - the length was about right and the tapering shape was pretty good - they even had a little assembly on the tip of the periscope that was clearly supposed to represent the lens. I chiselled away the large block of plastic at the base expecting to find a good long length of steel that I could use to really anchor this periscope into the conning tower. So how disappointing was this? There's not enough length in the base for me to properly key this into the conning tower and what's more - the bottom half of the periscope's mast is far too thick. This is not at all a fair representation of the original. I took it back to the shop and complained to the manager. She just kept going on and on about how they were supposed to be a 'crochet hook store' and how they supposedly 'knew nothing about submarine periscopes'... Ridiculous! Anyone who has a shop full of submarine periscopes should really know something about them I think! Anyhow - she wouldn't give me my money back either - said I'd damaged the item by removing the 'handle'. I just laughed at her and told her that periscope handles are inside the submarine so whatever I'd removed couldn't possibly have been the handle. Phew...some people can be so difficult eh! Anyhow - I've now decided I'm going to build the periscopes out of brass tubes that slip together like this. Simple huh! I still have to do something about the horizontal lens because everyone want's a periscope to have a little right-angley bit at the end... And now they look like this... I must be getting the hang of this drill-press business because these are fairly upright... Speaking of uprights - now the stanchions have to go onto the conning tower deck. I have used some thick Tamiya cement to attach some evergreen rods into the holes I had drilled earlier. As I have written before I always have issues with getting things truly upright and perpendicular. Here's my latest attempt to keep things straight. Lego blocks... I am experimenting with making construction jigs using Lego blocks (or in this case cheap Chinese rip-offs of Lego blocks). The idea is that Lego is very good at making items with true 90 degree angles so that whether-or-not something is truly upright should be able to be checked against the edges of the blocks - especially since they are always in such high-contrast colours. Here the stanchions look OK from the front... and here they look OK from the side...(maybe just a tiny touch crooked)... Being made of Lego, the jigs are endlessly reconfigurable - here's the finished jig for this job. I left the work sitting like this for 24 hours to let the cement get completely hard. And here is the result to date - with a small rough cut-out for the - whatchamacallit - stand thing immediately behind the front periscope... That's it for this time around except now I'll tell you a little secret... This submarine is supposed to be finished by Saturday 28th of April - the last weekend of April - that way it can be on the competition table for the West Australian Scale Model Exposition here in Perth. But I still have a long way to go. More importantly I feel like I'm running a bit low on battery power for this project. This has been a fairly long campaign and now I'm just down to annoying fiddly little details - no bandsaw work here, so I'm running a bit low on enthusiasm (note - running low not running out!). So any encouragement now would be much appreciated! Any mojo you can send through the interweb would be greatly appreciated! Best Regards, Bandsaw Steve7 points
-
Emoji? That would be the techy term for a smiley perhaps? I do agree with you that there is a certain difficulty to emote with a confused chap, a geezer looking very down at the mouth, laughing boy and the first prize trophy mingling with the simple likey device I expect there would be reluctance to add more code to the site though Now then Brian How much Bucc for our bang? Good question well phrased huh, this is the answer sir Quite a basically simple response Then this gets in the mix Oh look There in the box A Buccaneer of the Royal AIr Force, possibly joining the team next year if I find time I should point out to the team, the nose profile on the Frog model lacks something Mainly by virtue of not being slim enough to my eye I will be unlikely to change it now however7 points
-
This one was started about 3 years ago, then until early this year had been left in the cupboard. I decided to push towards completion so that my Special Hobby 1/72 F-86H was no longer lonely ...... The model is a very old Hasegawa F-86F (I think) mated to the Tasman Avon Sabre fuselage. It was a major surgery job getting fuselage and wings joined up. A lot of detail was lost especially under the fuselage/wing join. I took the opportunity to include some aftermarket resin details in the form of CMK wheel wells, and Pavla cockpit details. As I have a number of Sabre's in the stash (7 more after this one) I did some re-casting of these parts to help make ends meet! I'm afraid the only picture I can find pre paint shop is this one: You can just make out the Aden gun ports which are appropriately placed alum tube, sanded to profile. Also, keen eyed amongst you might notice the wing tip surgery which happened after I realised the wing span needed shortening! That episode caused me to venture into wing span/chord variations of sabres ........ a whole new world out there. The casting programme also, well some of them! A few of these are rejects. Much fast forward now to the task of painting. This machine will be finished as an aircraft which served with the R&D unit at RAAF Laverton in 1960. Model Allience decals will be used .......... The dayglo areas were airbrushed over white undercoat, then masked out ready for some Alclad silver. This shot shows the resin re-cast wheel interiors quite well: Then onto the airframe silver Then its time to start the decal process This is where she is at today Still quite a bit to do on both deals and finishing touches. The undercarriage is all being scratch built given the poor quality of the original doner kit, but an Airfix Sabre is providing a good subject to model from Airfix on left, scratch on right. This needs more tidying up at the moment. Stay tuned and I'll post more as decals and final touches take place. Cheers Terry6 points
-
Hi All, @Chris Calland and I are pleased to present to you, our OOB build of the Revell 1/400 Queen Mary 2. She has been a kit which has been neglected atop kitchen cupboards and under sofas until it got passed to me to build along with my friend, Chris. Link to our WIP page is here: I know that my model photography skills leave a lot to be desired Thanks for looking, and thanks to those who have helped and offered advice to me along the way. Mark & Chris6 points
-
6 points
-
This one is Revell's 1/25 2006 Hertz Shelby Mustang, just built out of the box so nothing too out of the ordinary. I completed it last April, and it was my first car build in quarter of a century, so please don't judge too harshly It's also the first spray painted model I've done, as well as being the first one I've used a wash on so it has been a bit of a learning process. As for the kit, it's probably gone together better than any of the other (three!) that I've worked on since getting back into the hobby with nothing that really stands out as requiring particular work other than having to glue in the wheel pins as they were a bit loose as floppy. The issues I had with the kit were very much down to operator error rather than issues with the kit itself. So, time for a few pics. I do appear to have had a bit of an attack of the dust monster when I took these, even to the extent of the blob of dust right in the middle of the lens First up, a standard front quarter view. And it also shows far too well how I managed to sand through the clear coat and skin the side-stripe decal while I was polishing. Definitely one of the lessons learned on this model. Shelby Mustang on Flickr Moving backwards, that decal issue is even more obvious. I also made a bit of a mess of the decal around the number plate, and the colour match between the gold touch up and the gold decal is pretty awful. I'm pleased to say that it seems that I have improved with my decalling since this car. This was also the first time it became obvious that windows are going to be my bette noir, and there are far too many times where it feels as though the windows hate me. On the Mustang, the rear window popped out while I was cleaning it before fixing the body on the chassis and took out a chip of paint and decal. I've done the best I could to stick it back, but you can see the damage in this pic. Shelby Mustang on Flickr It's a similar story viewed from the other side, and it anything the issues with the poor colour match on the rear decal repair are more obvious than the previous photo. Shelby Mustang on Flickr And onto the last quarter view, which shows that I also managed to skin this side decal as well. Despite that, I still feel this is the angle which shows off the car to its best Hertz Mustang on Flickr I thought I'd show one from the front too since this the grille was my first attempt at adding a wash. Tried to clean it up and stripped the chrome in one part by mistake, but I went over that area with the Molotow pen, rewashed it and can't tell where I messed up. I have to say that the Molotow pen is superb, provided the surface below is suitably prepped. Shelby Mustang on Flickr A couple of interior shots, just because I'm quite pleased with how it turned out in here (badly lined up masking tape aside!). My only gripe with the kit in here is that the join between the seats goes right through the seat handle in the headrest making filling the gap in this area to a decent standard a bit beyond my talents. The photos also show another thing I learned from this build - Revell clear spray has a really nice shine, but seems to react to the oil in my skin. I had to polish finger marks off the door panels out and was quite successful there, but unfortunately the damage to the finish above the doors was too great. Cotton gloves for me from now on when handling finished paint jobs... Shelby Mustang on Flickr Shelby Mustang on Flickr And finally, the engine bay. I was pleased with the way this turned out - why to the best bits have to be where nobody sees them? Engine Bay on Flickr Looking back at this, it sounds as though I'm not happy with the build, but in truth I was pleased with the outcome. So long as you don't look too closely, it looks pretty presentable and I'm happy to have it in the cabinet. It's also nice to be able to say that I have been able to put lessone learned into progress on later builds which is another good thing for me. Just hope I haven't gone too overboard with the photos.6 points
-
After I've had my Haddock, chips and mushy peas I'll dig out my pitchfork and torches and rustle up a mob!6 points
-
Good evening Yesterday I placed the undercarriage ,the drop tanks ,the canopy and the pitot tube and I think that this is the end of this build Patrice6 points
-
A story I’d actually never heard but this will be a fitting tribute. Can’t wait to see Tower Bridge in 1/72...6 points
-
Hi all, Completed 1/48 Monogram classic Hawker Typhoon, OOB with some added detailing to the rockets, plus the addition of a spare Tamiya Pilot figure. Brush painted old school except the primer (rattle can) and the matt coat (airbrush). Cheers, M.6 points
-
I've had this in the stash for a while, and felt it was time to get it built. Not that hard to do really, despite the number of small pieces that are included. Painted in one of Mike Starmer's mixes for SCC15. The dirt on the tyres has come out much brighter in the photos than in reality. Must get round to doing a base for it. Tim6 points
-
Sage advice from a man who left his wife for his nurse. You know, I've never read a lick of Game of Thrones* or seen any of the show. I'm not good with fiction where everyone's gross and corrupt -- I appreciate it's more like real life, but I already have to do that. My tastes pretty much take an abrupt nosedive after the Iliad and the Eumenides. Anyhoo, tonight was a double victory: not only did I, after nearly ten years of dating and marriage convince Mrs P to watch an episode of Chuck with me, but I also remembered I left my glasses in the grotto and got some decalling done when I went to retrieve them. 20180317_224214 by Edward IX, on Flickr Bisley is all decalled up. Next...dullcoat! The Blenheim I is pulling a reverse King Arthur in that it will lie uncompleted until what is most needed (the resin nacelles) arrive, but that still leaves me able to complete about 99% of the kit until then. 20180317_230658 by Edward IX, on Flickr The Owl Decals I'm using are kinda classic Czech decals in that they're tricky. The N in the portside NG-R is provided as a two-part N and a one-part N, and since the bottom half of the N went tits up on me, I had to press the full N into service after doing a little sawing-the-lady-in-half type magic trick. It'll likely need some support from cut-up bits of other decals on the sheet later. Anyway, that's all I accomplished today, aside from sawing the resin hedgehog flame dampeners off their blocks for the Bisley. I'll figure out how they fit on later. And since I'm on a Chuck kick and you're a captive audience (I'm trusting you'll avoid the postmodern horror of what Julia Kristeva called "abjection", the sanity-sandblasting realization that any injunction can be disobeyed and all human rules are merely artificial constructs enforced by consent that could be withdrawn at any time, leading to anarchy, and will therefore actually watch the thing), here's one of my favourite clips from the pilot, which we saw tonight. It's not really a spoiler (although I'm not a big believer in spoiler warnings; time is an ever-flowing river, and one can never step into the same river twice; both you and the river are different the second go-round), even though it's the stinger; the CIA's Sarah Walker (Yvonne Strahovski), who throughout the pilot has seemed to be more empathetic and kindly than the NSA's Major Casey (Adam Baldwin), is revealed to be equally as cold-blooded and as capable of violence through a snippet of video from the National Intelligence Database. Strahovski is obviously very pretty, but the show, which sometimes had indifferent writing, many, many continuity failures of the sort you'd more expect to see in a pre-internet-age show of the eighties, and the whole panoply of problems you'd expect from being a network TV show in the late 2000s lived and died on the chemistry between her and the lead actor, Zachary Levi. Levi's not too bad himself, but Strahovski's ability to merely hint at the emotions playing out behind her sphinxlike expression sustained much of the show's dramatic tension and emotional energy through the first two seasons and midway into the third. Anyway, Mrs P didn't hate it. * Not technically true. My baby sister KR (essentially my slightly improved but much meaner -- and this is not just my opinion -- clone) and I once read a sample chapter from one of the books by GRRM where baby wolves suckled at their dead mother, and as Wilde remarked of the death of Little Nell, one would have had to have a heart of stone to partake of it without laughing.6 points
-
Here's the Minicraft 1/144 Bf-110 I finished last weekend. It was an enjoyable build, but the model's fit wasn't very good. I chose the kit after I'd read an IPMS member review that said the fit was very good. I don't know what I did wrong, but the seam on the bottom where the wings met the fuselage was pretty bad and I had to fill with super glue and sand smooth. The bottom and top halves of the engine nacelles were mis-aligned so that there was over lap. I sanded these flush. The bright side of this kit was there was no raised detail and very little engraved detail, so I could sand the seams without any fear of removing detail! In retrospect I should've done this in 1/72, but I got the minicraft kit in a fit of nostalgia: when I was 13 I wanted the Revell "Squadron 144" Bf-110 in the worst way and never got it. Not much else to say. This is Rudolf Hess' Bf-110. I primered with Mr. Surfacer 1500 black and used Mr. Color paints. Minicraft got the paint colors wrong for this scheme. They showed two different schemes, but listed the same colors for both. I did some research and determined the scheme was RLM 74/75/76 with RLM 70/74/02 mottling. The out-of-scale over spray in the mottling is more evident in the pictures than to the naked eye. I'm still figuring out the wash: it's still a tad darker than I would've liked, but now I know it darkens when dull cote is sprayed on it, so I'll do it lighter next time! I should note that the gun in the back of the canopy didn't come with the kit. I had to make it myself. The other gripe I have about the kit is the gear bay doors. They are molded shut and you have to cut them apart if you are going to do a "gears-down" model. The plastic is very thick and results in gear doors that would probably be a foot thick in real life. I suppose you could sand them thinner, but holding on to them is a challenge because of their small size!5 points
-
One of the advantages of being an elderly gentleman is that I had the pleasure of seeing Roxy open for Mott the Hoople back in 1973. To be honest, I had never heard of Roxy before that show, but I sure knew who they were after! What a show. As my memory slowly escapes, I hope that one sticks around. Is this a different Detroit than the one I know? Mine's in Michigan - where's this one? Back to the Wessex, this is shaping up to be another epic Hendie masterpiece. Great work on the sheepskin cushions. (Thank goodness the conversation didn't devolve into the uses that the Romans had for sheepskin.) I really need to build another helicopter. It's been a while, and you're inspiring me. Cheers, Bill5 points
-
Good evening My second build for this Gb is another Academy Tempest flown by Flight Lieutenant Regis DELEUZE of Squadron 501 in Novembre 1944 Humbrol Paint Eduard PE detalling Set for the cockpit Decals from various decals sheets Build thread here http://www.britmodeller.com/forums/index.php?/topic/235033473-hawker-tempest-fl-regis-deleuze-sqn-501-1944/ Patrice5 points
-
I didn't realize they made 1:1 resin nose cones5 points
-
Another recently finished model. This was a joy to build and the level of detail is very impressive, especially in the cockpit and wheel wells. The latter require a wee bit of trickery to final assemble though! I was pleased with the underside black/white but it did take some careful masking, patching up/re-masking etc etc! I have a second Airfix Mk1 which I plan to do as an early metal wing, using the Alley Cat wing conversion. And here are some of the WIP taken during the build:5 points
-
Side on Frog Sorry blurry, early morning shakes Frog overhead Camera preferred the view outside, I dont blame it but the shape is there Matchbox reshaped That is a lot better Matchbox overhead I've not been well, OK!5 points
-
Good morning to all! A bit more progress to share with you: I flipped the car over in its jig and begun work on the under-engine cross bracing. To make these, I used: , 1,2mm brass tube 0,5mm brass that was used for leaf-springs M0,6 and M1 nuts/bolts/threaded bar 1,3mm washers Using the leaf-spring brass for the clevises (or whatever they're called), I marked out and drilled 3 holes for each clevis: 1mm in centre and 0,7mm for outers. Then, after bending to shape, I inserted a short length of M1 threaded bar and soldered in place. I could then use that to mount in a pin-vice and file/sand to final shape. After some fiddling about cutting the tubes to length I did a dry-fit. I didn't like the way the tubes bowed, 1 up 1down, where they crossed each other. So I decided to flatten the tubes at that point and bolt them together. A much more realistic look imho...and a fair bit sturdier, too! After a short dip in burnishing fluid it was time for final assembly!!! A very fiddly and frustrating task, I may add! Well, that's all for now folks!! Enjoy the rest of your weekend and thanks again for watching! Cheers, H sorry about poor light btw5 points
-
I thought you had been in my stash for a moment but then realised that the pictures were way too tidy and that it had to be a model shop! Martian5 points
-
Thanks Stuart and Kev Small progress for a week ... And construction commences on the forward cabin which has some awkward angles. It was important to get the angle of the roof correct which is a cardinal feature of this boat There's been work going on building the deck hatchways, so once the superstructure is complete, deck fitting can begin Thanks for looking Rob5 points
-
1/144 minicraft 737-400 malaysian airlines I’ll take better pics n swap them when i can rgds brian5 points
-
Things are starting to come together. I did a light wash around the framework on the side walls, added the floor and buttoned up the fuselage. In the process, you can see that I broke off a section of the rear roof on the port side. If you look back at the sprue pictures, you'll see that there was not much plastic at this spot to begin with. It's a wonder I didn't break it off sooner! But, when you get lemons, put the lemonade away and get out the Scotch. It turns out that this made it much easier for me to get a nice fit and alignment of the roof section, the rear port window, and the canopy. Here is the starboard side of the interior: And the port side. I believe the cylinder up front is a fire extinguisher. You can't see it in these pictures, but the "have a lay down" cushion for the bomb aimer is up front. Probably won't be able to see it when the model is finished either! Now for the fun part - we start building the rest of the framework, what I call the roll cage (I've been to too many sprint car races over here in the States). I added the framework on the port side first since you have to build the desks and their associated tubes and supports on that side. Once I'm finished with that, then the framework on the starboard side, and finally add the cross members on top. All the while, remember to check the fit of the canopy to make sure that the roll cage is not interfering. Looks like there won't be any problems. You'll also notice that I added a thin slice of styrene in-between the sides of the rear roof. When I re-attached the piece I broke off, I carefully aligned it with both the rear window and the canopy. As it turned out, that left a tiny gap on top that I filled with styrene rather than putty. The rear desk will go in next. I think this was the radio operator, and as it turns out a small piece of the radio gear is broken off. I was thinking of hiding that behind some paperwork on the desk. What would the radio operator be looking at? (No more Zoo covers, please.) A map? Mission papers? The quick-start guide for the radio? I'd also like to spruce up the middle workstation. Is this the navigator's position? Some photos from the war show a lamp here, and I can probably do something similar to what I did with my Beaufort: Somewhere among the resin pieces is a additional jump seat, and I'm guessing this is for the bomb aimer when he's not laying down on the job. If anyone can point me to some wartime photos of the cockpit and crew, I'd be much obliged. Most of what I've been able to find are modern photos of restored aircraft. I think it was the iPad on the instrument panel that gave it away. Cheers, Bill5 points


.thumb.jpg.b4a5069fd2c2dd5708ce1694345c5b11.jpg)

This leaderboard is set to London/GMT+01:00