
Leaderboard


Popular Content
Showing content with the highest reputation on 21/02/18 in all areas
-
Handley Page HP 67 Hastings C.1 of 99 Squadron RAF Transport Command 1956 S&M Models resin hollow cast kit. 1/72 scale. Notes on the build appear in the Cold War section.28 points
-
Airfix 1/48 Walrus 715 flight, HMS Birmingham, china station, 1938. Airfix's lovely walrus kit, abit disappointed in the moulding seams and some warping. went together well. painted with tamiya flat aluminium, kept the weathering to a minimum as they where kept very clean in service. decals by model alliance, used eduard steel seat belts, which are very nice and easier to use than brass, the guns are brengun resin ( just noticed the front one has disappeared in the photos, need to rescue it from the carpet monster.) just after i started this airfix announced they where releasing a 'silver wings' boxing!!! sods law!! thanks for looking.26 points
-
Loved building this, no fit problems at all, can't wait to stat the next one ,Black Mike IMG_4665 (2) by Tony Osborne, on Flickr IMG_4661 (2) by Tony Osborne, on Flickr IMG_4672 by Tony Osborne, on Flickr IMG_4671 by Tony Osborne, on Flickr IMG_4670 by Tony Osborne, on Flickr25 points
-
Hi All, this is my latest effort. Tamiya quality kit as ever just my modelling skills don't match unfortunately. As a teenager it was so easy but getting back into the hobby in your sixty's bloody hard, but I'm loving it. I'm satisfied with a decent tidy finish, tried weathering on cheap 1/72 kits and made a mess of it so I think I will keep to the Museum look. Please feel free to comment. Jim23 points
-
Resin kit ArmaHobby + Master Pitot tubes and ModelMaker decals. Some scratch added...16 points
-
Ah, what the heck let's throw some stickers at it. I had a lot of fun with the wing walkway stripes, as the longer pieces broke into 3-4 sections each for some reason. I got them back together okay, but it was tedious. It's really hard to see, but the light blue stripes have the pink hashed line alongside: Hmm...I guess a need a macro lens to get close enough. Regardless, based on photos these walkway stripes are not wide enough. But it's all I had, so on they went. Another fascinating aspect of the sticker session was that the decal paper, when wet, turned the exact shade of light blue as the markings. This meant that the stencils "disappeared" when I put them in water. I had to poke around with my decal brush hoping something would slide off and onto the model. I finished painting the gear wells, and also the exhaust area. Several panels have been painted with a different white, but again these are not easy to see. Take a look on top of the spine behind the cockpit and see if you notice anything. It seems my five different brands of white are all very much alike! The panel lines were toned down some more by sprayed highly thinned white over them. The camera makes the lines stand out more than they actually do for some reason. Probably some automatic contrast/tone curve/unsharp masking algorithms that are lurking in the confines of the camera's mother board. Onward... Cheers, Bill (who's already itching to move on to something else, maybe with a prop)16 points
-
Hi everyone, old build, used aires cockpit and awesome figure sculpted by Mike Good cheers15 points
-
Thanks Keith and Tony - it's good to laugh Yellow: Lovely coverage. Thanks @Jamie @ Sovereign Hobbies, I'm an even bigger fan now... yellow that covers properly? Rare as hens' teeth. What's that readers? You want to see the masks off? Oh, OK, here you go: What's that? You want to see the model? Here's where we are: Touch ups required in some places but... pardon? You want to see how the masks performed? Hmmm. Well, as it's you... No need to go closer to those - really nice. They look painted on. Oh no, wait a minute... Note that there seems to be some residue where the masks were burnished down, although not around the edges so I suspect, although I don't know, that it might be because I didn't let the blue dry for long enough before I replaced the mask. I didn't (bother) burnishing the outside when it was replaced. Lesson 1 for me then. If it shows after the matt coat I shall call it 'weathering'. The others require close up photos as, per usual, I'm prepared to expose myself for the benefit of others. (Yes, I told him. No, the judge didn't agree) Now don't forget these underwing roundels are tiny. That's my excuse. Oh, OK, very small. Especially the centre dot which I think got a bit stretched out of shape. If you click on the image you can go to the original on Flickr and zoom in. If you do that you can see that: there's a bit of Sky between the white and blue over the panel line there's a white crescent top left of the roundel Thinks. I sprayed the blue first. What must have happened is that I replaced the 'blue mask' out of line so that it covered the Sky and left a gap on the outside. The white then masked on the inside and oversprayed on the ouside. Lesson #2. As Cookie says, positioning the masks needs care. Lots of it. Lovely yellow coverage - that's over BLACK for goodness sake. Issues? Yellow ring, wobbly. I've thrown the mask away now but the paint is about 1mm at the widest and 0.5mm at the narrowest. Distorted red dot with a blue edge bottom right - blue first so a gap in the mask Yellow overspray on the white - gaps in the mask Yellow creep onto the blue All in all a bit of a mess but I refer you, m'lud, to this shot: With a bit of touch up, good enough for the ceiling. Lesson #3; carefully burnish ALL parts when replacing, even the tiny ones you're afraid will move. Next (still with me?) Quite happy with that. Need to take more care lifting the mask with a #10a - scratch on the Sky band and on the white of the roundel. Zoom in and you'll see there's some touch up required on the white and some yellow overspray on the camo top right - how did THAT happen? Finally, port side: Bit of creep of yellow onto the white and blue requiring touch up. Not enough paint on the top of the white fin flash, but I quite like that look. I need to let that dry really well before I mask up again for the idents. Tomorrow I guess. Feelings right now? Problems all my fault. Masks worked well but operator error on re-positioning caused problems. Colourcoats behave beautifully, including easy cleaning of the AB. Would I do it again? Yes, but it takes a LONG time so I'll probably use transfers on all but special models.15 points
-
Finally finished my new Airfix 1/72 McDonnell Douglas Phantom FG.1 this evening.14 points
-
Thanks Stuart - I'm with you I think, too much hassle, except for those 'special' models Thanks John - it is my first attempt... with everything and Colourcoats. I've done roundel masking a couple of times before and idents on the Boultbee. Practice makes, er, slightly better Thanks Roger, very kind Thanks Simon - I do like to share my pain experiences around Thanks Benedikt Your second comment looks perfect, especially after a hangover! Thanks Celt - Hurricanes are in my near future Thanks Keith - life is short?! Heck, better get on with it then... Thanks Tony - nice Spanish Lick o' paint? I have to lick it??!! Thanks Giorgio - they do look better. Just not that much better on the ceiling No silvering though. Thanks Bill - Experiments on a model... I was prepared to sacrifice this as it's not a very expensive kit and, if it worked out, I'd have another Spitfire! Guessed wrong. Couldn't wait: Giorgio's tape and flag poles: Bill's overspray protection: Jamie's paint and Cookie's ident masks: Happy with that after some small touch ups. Are the roundels a bit too high? Lined up using the kit scheme. Oh well, doesn't look too bad. Touching up next14 points
-
Hi All, Some pics of my Sea Harrier. Really pleased with this one, despite a couple of inaccuracies I couldn't correct as it was too late. I also dropped the model, breaking the windshield off. I managed to get it back on without it being too obvious. Despite my best intentions the wheels don't quite touch correctly (turns out my cutting mat is not perfectly flat!) which I will correct in due course. I need to reinstate the paint on the bottom of these where I've sanded the 'flats' to neaten the 'sit' up. I've at least two more to build, plus the GR.3s when they are (hopefully) released. This shows the aircraft 'Sharkey' Ward was flying when he downed Carlos Tomba's Pucara. (I built Aconcagua's resin kit of this aircraft a while ago, and soon I will build the Dagger this SHAR also destroyed. Can you spot a theme?!) Finished overall in Xtracolour EDSG with black / white / grey pre-shade, and a 'homebrew' of Flory Models washes for the panel lines. To the Kinetic plastic I added Eduard photo etch, a master pitot and AOA sensor, Eduard AIM-9Ls, and Armory's wheels (necessitating making 'forks' for the outriggers. (I learnt a couple of new swear words that afternoon, which became useful when I realised I'd put one in the very large bin under my bench.) Thanks for looking in, Gareth12 points
-
My finished Sea Vixen.A very enjoyable build, the kit went together really well, with virtually no filler used.Painted with Hataka Red Line Extra Dark Sea Grey, and Orange Line Traffic White.Weathered with UMP wash, and AK Interactive pigments.Motion blur carrier deck (HMS Eagle) courtesy of Coastal Kits Display Bases.Ian G-1 by ian gaskell, on FlickrIan G-1 by ian gaskell, on FlickrIan G-1 by ian gaskell, on FlickrIan G-1 by ian gaskell, on FlickrIan G-1 by ian gaskell, on FlickrIan G-1 by ian gaskell, on FlickrIan G-1 by ian gaskell, on FlickrIan G-1 by ian gaskell, on FlickrIan G-1 by ian gaskell, on FlickrIan G-1 by ian gaskell, on FlickrIan G-1 by ian gaskell, on FlickrIan G-1 by ian gaskell, on FlickrIan G-1 by ian gaskell, on FlickrIan G-1 by ian gaskell, on FlickrIan G-1 by ian gaskell, on Flickr11 points
-
Hi All, Been a long time since I posted an RFI! Here's the last completed kit that I took down to IPMS Farnborough where it took the coveted Second Place award! It was a commission build using the Academy 1/32 ROKAF F-16D kit, Eduard BigEd, Aires wheelwells and nozzle plus many scratchbuilt adaptations. The only downside was I didn't have the correct decals for the Turkish Block 50+ but with the customer's agreement, we finished it in the old F-16D standard colours and I reckon it works! All pictures courtesy and (c) IPMS Farnborough taken by BM's very own Kallisti Thanks for looking, Alan11 points
-
One of Mrs P's birds died today*, and so all life in our home came to a halt; coupled with the fact that her idiot mother spent all day yammering about the "special bond mothers have with their daughters**", Mrs P is now sad we don't have any girls and obsessing over our paltry two children with their totally wrong genitals. Today hasn't been great. * Five to go. ** Mrs P once threw an iPhone at her mother's head while her mother was driving because her mother decided the GPS was lying and they weren't really going to Ohio.*** I was there, trapped in a tiny glass and steel prison with these other two demented inmates. *** Mrs P's mother frequently argues with GPS systems. She is always wrong. She also insists on driving if she's in the car, presumably because she has latent homicidal tendencies. She is the second worst driver I know, after my sister who is legally blind in one eye and extremely frightened by parallel parking. While I'm on a roll, she's terrible at washing dishes, as bad as Winston, who's two, and I have to go back and rewash everything she's washed when she "helps".11 points
-
Wow! The postman delivered my new-tool 1/72 SH P-40E/Kittyhawk 1a and P-40N just now! I am very impressed with both of them, and I have listed some quick observations below. I don't think you can go wrong with either one, and they are better than the Hasegawa and Academy kits. I am looking forward to the K and the M, and holding out a faint hope that they will also do the P-40Q with the bubble canopy and cutdown rear fuselage! Not going to get anal about what needs to be removed/altered from one version to the next, as this is just meant to give you a quick look and not a detailed evaluation. Kittyhawk Mk 1a (72377) P-40N (72374) Many parts are common to both types as well as future releases; from what I see on the sprues, a P-40E, Kittyhawk IV, P-40F-1, P-40F-5, and P-40M, as well as Kittyhawk II's and III's can be done. Comments apply to both boxings, except as noted. Fuselage, wings, stabilizers, and fin/rudder fit almost perfectly on the 1/72 drawings I used- Osprey P-40 Aces of the CBI- which has P-40C ,P-40E, P-40K early and late, P-40M, and P-40N scale drawings, which are pretty accurate, at least in my opinion. Panel lines are very nicely done- sharp and very Fujimi/Hasewaga/Tamiya-like! Upper wings are one piece, with the central section that joins them providing the correct curved floor- yes! Adj. trim tab on LH aileron and fixed tab on RH aileron. Trailing edges very sharp, ailerons molded top and bottom on upper wing, but not the flaps, so it will be pretty easy to cut and position them on the lower wing halves, if desired. Exhaust recess has the bars separating each pair of stacks; fishtail and tubular exhaust stacks are provided, but the fishtail exhausts could be better. Wide chord and narrow chord props are provided; spinner looks very good- very sharp point and good taper. Two sets of wheels provided- both are 30" in diameter, so for a P-40N with 27" wheels, you will have to look at an aftermarket source. One set with smooth wheel covers and one with spoked hubs are provided- both have smooth tread. Three different injected instrument panels; each having the same rudder pedal assembly and main panel, but three different armament/switch panels between the pedal assemblies. Round and square-backed seats provided, but lack the reinforcement dimples and lower lumbar ledge- easy enough to add; radiator/oil cooler matrices done as front and back assemblies- nice touch. Cockpit sidewalls, armored back plate, and seat mounting frame as separate assemblies; control column and hydraulic lever supplied as separate parts Coolant radiator flaps supplied as open or closed. Landing gear struts and doors nicely done, with separate arm used to rotate struts included. Wheel bays are boxed in by a one-piece casting- very nice touch. Ribbing on roof of wheel bay but no canvas covers are included. On the N fuselage, the aux air inlets are done as recessed circles- will have to be drilled out and backed with plasticard for no see trough. There are two different styles of belly tank and one bomb which can be mounted on the centerline; stores/tank rack is provided, but mounting holes will need to be filled if the racks are not fitted. Wing guns and fairings are molded in total on the upper wing assembly- not bad-looking, but an insert with proper fairings and open muzzles would have been better. N's could carry a bomb under each wing, but there is no provision for this- no flashed over holes present. Gunsight is included on the clear sprue, but it is the same type for both kits- I think an N-3; for the large reflector sight used on the late E's, F's, K's, and maybe others, a different sight will have to be provided.) IIRC some versions had the gun camera built into the back of the sight assembly- see BS-w's post for details.) No ring and bead auxiliary sight is included. No gun camera port in the RH wing knuckle or supplied in a housing to go under the wing. Landing light opening in lower wing with lens on the clear sprue. The canopy is done as a separate windscreen, separate quarter windows/rear transparency, and two sliding hoods appropriate for each type; one hood on each type has an angled base at the front edge as well as one with a straight edge, so both open and closed choices can be made- nice touch!. Framing is appropriate for each type. I'm guessing that an additional windscreen with angled side panels will need to be provided for the late E/F/K variants that had them fitted. All in all, two very nice kits that will build into very accurate models of the versions named. Special Hobby is getting closer and closer to the mainstream kit makers in finesse, detailing, and accuracy with this series- I hope this quick look will be helpful and that I made accurate comments. I can't wait to get my hands on the rest! Mike10 points
-
Hello, I don't remember if i posted this one here. Tamiya model and presumed mix betwen French and german colors. Made when i did not weather a lot kits.10 points
-
Hello All, After a short intro in the new members area I thought I would start putting up a couple of the builds I have completed over the last couple of years as a make my return to the addiction/hobby. By quick introduction I built models very badly as a kid then went dormant for 15 or so years until the affliction returned. Picking up some of my childhood builds from my parents place lead me to understand just how rose coloured my glasses were in regards to how good I thought I was. Been lurking here picking up some pointers and techniques and the below represents an attempt to recreate some of them. The X-47b was among the first builds I completed. I say completed, because I think there came a point were I figured I couldn’t fix the errors any more without pulling it apart. But I learnt a little about washes, adding some detail and just how much easier it is to build a plane that doesn’t have a cockpit. Please enjoy, and any criticism is probably warranted and welcomed if it will make me better!10 points
-
Progress first: Oooh look, even the camera's focussing on the paint! Tricky getting the burnished masks up and the other bits down again. Tip - be careful when you remove a bit that you don't stretch it. Especially the tiny round dot in the middle of the underwing roundel. No, the PMask bit isn't any good, it's too small (eh, what?) Now back to the waiting room... Benedikt I agree with Jon, your English is fine and there are so many different dialects who's to say what's 'correct'? I remember meeting a local when I was in Abu Dhabi who spoke with a Geordie accent and dialect - "way eh man!". He'd done his degree in Newcastle. And there's another problem... Geordie's don't think Newcastle is proper Geordie! What I'll do, if you like, is tell you if I don't understand what you're trying to say. Always compromise, that's the English way Jon you're too kind, thanks very much I have no idea why I'm putting myself through all this pain - I WILL do an OOB build next. Probably. Thanks Simon I know what you mean! Some friends are 'studying' for their Citizenship and their knowledge is impressive. I'm just hoping they don't make us take the test! And 'zwei Bier bitte', surely? Hi Tony It's true that, as a Nation, we're not good at other languages. But, as one of my school chums said, "Which one do you choose? They only ever work in one country, whereas English works in all of them". Fighting talk, I know. He's the one who got into a fight in Spain. He blames the 'audio visual' teaching methods' we had where everyone sat in a dark room watching slides (often cartoons) of people and listening to the foreign phrase appropriate to that situation. The specific problem was where two farmers noticed that their Bull had escaped from a field and he 'learned' the phrase as "Oh well, never mind" when in fact it was "Stupid animal". When the barman accidentally knocked his drink over, my friend used the phrase... then the fight started. Thanks Giorgio Thinking in the language certainly helps, a lot. If you try to 'translate' everything word by word, you'll get into trouble... Me: 'Pas encore' = 'Not again'. Wrong. When asked if I'd like some more food after a filling meal, answering 'Not yet' is considered rude. Mrs B: 'Platre' = sticking plaster. Wrong. When a small boy falls over by the pool, suggesting he needs to have a plaster cast applied is too much. (It's 'sparadrap' I think.) Me: 'Briquette' = cigarette lighter. Should be 'briquet'. You feel really silly when you ask for a lump of charcoal to light your fags (there's another - our US friends are now imagining setting fire to gay blokes!) Oooh, rude words John, when could you possibly need them? Me again: After being asked if I'd like more food (there's a trend here, isn't there) replying 'Non merci, je suis plein' stops the conversation. Dead. Apparently 'j'ai bien mange' is correct. 'Plein' is only ever used, apparently, by 'course' people when referring to pregnant livestock. Who knew? Bet you can't wait for the yellow and masks off. Me neither. Soon, soon...10 points
-
Huge sigh of relief time for me, because after 2 more unsuccessful attempts tonight, and lots of swear words, I finally managed to fit the fuselage of the Horsa together with floor and seats in tact (mostly thanks to my other half suggesting I wait a minute and try again.) Pretty she may not be, but it is together, as is the tail. I have also been working on the interior of the Stirling, securing the floor in the rear of the aircraft, attaching the fire extinguisher, pouches and building the pe table. Tomorrow I can attempt to join the fuselage halves, as she will be in flight with wheels up I won't be building the rear wheel section.10 points
-
Here she is: Williams Brothers classic 1/72 Boeing 247D airliner, modified to the original 247 (no 'D') configuration. That conversion included modifying the kit's 'straight-line' fin/rudder to the earlier 'notched' style, and detailing the hinges; cutting off the kit engine nacelles and scratchbuilding new smaller-diameter ones (from Monogram 1/48 F4U-4 drop tanks); and using the engines and speed-ring cowlings from an Airfix 1/72 Ford Trimotor to replace the kit's late-style NACA-design fully-enclosed engine cowlings. (Both real aircraft utilized the same Pratt & Whitney R-1340 Wasp engines, so it was an easy swap...just requiring new scratchbuilt exhaust collectors.) The kit includes the early-style 'forward slant' canopy as an option; though I had to cut out the centerline pilot's hatch and replace it with an acetate piece, since the kit canopy is a two-piece affair with the seam running right down the center. I added the early-style tall aerial mast forward of the canopy from a shaped section of bamboo barbecue skewer, to give it enough strength and rigidity to stand up to the tightly-stretched EZ-Line aerial. Details on the finish can be found in the WIP here. Decals were all made up on my PC and printed on my faithful HP inkjet, using Testors decal paper and their Decal-Bonder spray to seal. The decals included something I tried for the first time: 'printed' panel lines. Uncertain of how visible my usual 'pencil' technique would be against assorted shades of silver, I made up a bunch of straight and curved lines in various thicknesses and colors, to apply as decals. I used the charcoal-grey versions exclusively---the black were much too high-contrast---and it worked fairly well, particularly on the 247's complex curved nose panels. There were two main drawbacks: homemade decals tend to want to curl, and with tiny strips of panel lines this became an exercise in patience in some areas. The other drawback comes from putting mainly clear-film decals over a silver finish: even with a Future undercoat and liberal use of Solvaset, there were some 'silvering' areas that remained invisible until the final finish-coat was applied. Most could be dealt with, but a few rough areas frustratingly remained. The aircraft I chose to depict---NC13304---was the fourth production machine of the total 75 built, and went into service in April 1933; it is the same one shown in a well-known overhead photo taken over the Chicago World's Fair in the summer of that same year. Here's the same aircraft as it might have looked on the evening 0f 10 October, 1933: United Airlines' regularly-scheduled 'Trip 23'---they didn't yet refer to them as 'Flights'---preparing to depart following a twenty-minute refueling stop at Ohio's Cleveland Hopkins Airport, on the next leg of her trans-continental route from Newark, New Jersey to Oakland, California. Now headed for Chicago, the ill-fated airliner was about to enter the annals of aviation history...but for all the wrong reasons. At approximately 8:49 PM, the pilot radioed his regular position report, with all normal and the aircraft on-course for the Windy City. When the next scheduled communication---twenty minutes later---wasn't made, it raised no particular alarm, since radio communication was still highly subject to weather and/or occasional technical difficulties. Alarms were raised a short time later, as confused reports started to come in from ground witnesses: an explosion had been heard in the night skies over the rural farm area near Chesterton, Indiana. A short time later, wreckage was found: the aircraft had been torn apart in mid-air---by what authorities later determined was most likely a nitroglycerin bomb planted in a lavatory storage cabinet---with the loss of all aboard: four passengers (the aircraft could have carried as many as ten) and three crew, including pilot, co-pilot and stewardess. This first-ever bombing of a commercial passenger aircraft---an act of what we would now call 'terrorism,' though then it was merely referred to as 'sabotage'---was extensively investigated by the FBI and civil aviation authorities. Despite pursuing numerous seemingly-promising leads and an ever-widening list of possible suspects who had any potential connection with the airline, the flight, or its passengers or crew, no credible motive for the act was ever determined...no probable suspect(s) firmly identified...and no credit claimed by any individual or organization, for having brought the airliner down. The puzzle of the ill-fated United Air Lines 'Trip 23' remains the oldest 'cold case' in commercial aviation---and one of the most frustrating and elusive 'unsolved' cases in the entire history of aviation.9 points
-
First of all the main topic: Hello Ced, The Spitfire looks very sharp apart of the little accident on one of the underside roundels. I think this can be fixed with a careful touch up. I wouldn't worry too much Second: Thank you all very much for your fine companionship. Too kind, but much appreciated. I do bother about these kind of things especially, if it's less I than I expected. I thought it would have been somewhere in the middle. But it tells me, that this course will make sense for me in the summer. Before I'll do that, I will make some other test to check up my pesonal status quo. And yes "being forced" to speak a language is (probably) the best way to learn or improve it as you have to use all your other senses. Nothing will teach you more than coming home from a bakery with empty hands after a disastrous conversation with the shopmen. I will qoute you all a bit later as I've sort of lost track at the moment and a slight hangover. Cheers to you all Benedikt9 points
-
First decals going down, Starting to look the part now.9 points
-
Hi All, Here are some pics of my 1/48 Comando de Aviacion Naval Argentina Lynx Mk.23 completed a couple of months ago. This is Airfix's HMA.8 with RotorCraft's HAS.2/3 conversion applied. The conversion includes a new nose, rotor tips, decking over the rear of the engines and tailplane / gear box housing and tail rotor. With a few minor changes to the antennae this is about as close as I can get to one of the two Lynxes Argentina operated over the Falkland Islands during the 1982 conflict. References and information are few and far between, so there are a few assumptions in the cabin, which is fitted with the Eduard interior set. I had to make some, admittedly quite poor, intake covers as the Airifix representation of the mesh covers is very poor. (To be fair, it's hard to see how else they could have designed them.) Thanks for looking in, Gareth8 points
-
A bit'o'primer on her wings Humbrol grey primer, I will be testing the wings I think the plating has survived the primercoat we will see when there is some paint on it8 points
-
I do not have an Airfix one to compare with Frog with Falcon here The Falcon one was cut to suit my Matchbox one Matchbox one with Falcon CMR with Falcon It seems to me that the Lesney one was moulded a tad slimmer This interested me a bit Obviously not a direct fit but confirms for that Frog and CMR have a similar song sheet Measured the spines on each of them 0.459 0.401 0.403 Frog is wider and the Falcon fits it like a glove Seen here on the Frog one A very snug fit8 points
-
Hi chaps Here is a quick up date on the problem that shall be named......."The bl#@$y Sperry Ball Turret" I wasn't going to start this part yet because I knew that I would have problems with it!....just kept putting it on the back burner!....I thought that if I cant manage to scratch build the ball turret then the whole B17G project would come to a grinding halt!...so I started trying to think of ways how I can replicate it with the least amount of fuss and specialized tools...that I don't own!! That little yellow kids ball kept staring at me!...taunting me!...because it knew that it would be useless if I tried to use it for a mold for vac forming....not solid you see....rubbery little thing....but I just had to give it a go! I made a do it your self vac forming kit a few years back and I dusted it down ready for a trial run on the yellow ball. The Henry hoover was got out of storage....(I hate hoovering!!)...and was put to good use for once!!....all connected up and ready for the off.... I started on the first attempt to use some plastic food packaging......it was pinned to the frame and popped into the oven for a few seconds....hoover on for suction and.....................failure!...the little ball stood up to having very hot plastic wrapped around it but I reckon the plastic was too thick. So next attempt I used a sheet of plastic card.......no.....too thin!.....so in the end I tried a sheet of 0.5mm and hey presto a result!.......... Then I thought that the plastic would get stuck to the soft ball ,but I didn't have any problems extracting the ball!....so I re loaded another 0.5 mm sheet of plastic on the frame and popped it in the oven (making me feel hungry all this talk of ovens!)... So now I had the two halves ready for a trim up......but I decided that I needed to cut the ball horizontally as it would be easier for me to do all the detail inside the ball..... The next 2 photos show the two halves together......roughly!! So....so far I think so good.....the test will be later when I try to marry up the two halves......but first its down to a load of detailing...starting with the lower half of the ball....blue ink marks the spot! I am going to start trying to cut out all the glazing first....then on with all the detail....so I will be back when I have managed to do that! Cheers for looking in Fozzy8 points
-
Hi all, I just realised that I never posted any image of my Ouragan build from a couple of years ago. So, to put things right .... I am not proud of this one. Maybe that is why I didn't post it at the time ;). Martin7 points
-
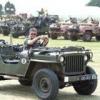
The kit from the Academy, on the semi-trailer is the Churchil tank, as part of the US-GB support. It's an older kit and it was a lot of work.7 points
-
Hello folks, This is the famous dz367, unfortunatly shot down over Berlin in January 1943. As at the time it had logged only 80 hours the weathering is rather light. Some Eduard photoetched parts are used for the cockpit and bomb bay. Cheers7 points
-
Hello dears, I will say that the famillies, and officials, the provost and so came up for a ceremony on the crash site. In 1992 ED800 has been located exactly but she lay 17 meters deep at the time and still sunking. Because the ridge on wich she crashed was holed in around 900 to 1200 as an iron mine, galleries plus lot of water made the ridge a kind of a sponge. In 1943 the german party that came up to recover did'nt found Nothing, they have collected some metal parts and a tiny human remnant. The Lanc was already engulfed in the Hill. So it is now a sanctuary and the path to get up there has been named "Chemin des 7 Sergents" More touching, one of the guy came in full tartan (They were both scots except one from the Midlands) He asked me if Mons was far away from the crash site, I reply almost 50 Kms west side Then he asked for playing Bag pipe on the spot, Of course it has been fixed quickly. That same bag pipe has been picked up aside their great father who was bagpiper of his regiment. And has been killed in 1916 at the Battle of Mons. Father and son have been killed 50Kms apart in 2 different wars. Sorry for my imperfect English but as I remember that days, I'm still engulfed by emotion ! Liberty have a price, that family has paid it for a lot of generation ! Respect ! An old lady came up with the telegram received in April 1943, his brother was considered missing in action over northern France... And no more news since we called up ! I can share ot of stories like that one, everytime I have that same respect and feeling of a duty ! Hope that I did'nt disturb too much dear Spad, sorry beforehand ! Sincerely. CC7 points
-
This is my rendition of the Welsh Models' Boeing P-8A Poseidon. I always thought of the 737, which the Poseidon is based on, as a small airliner, but this thing is huge. Because it is so large they made the fuselage vacu-form while the rest of is is resin. Even so it is still pretty heavy. With the exception of the landing gear all the resin was excellent with nice detail. It was a lot of work with a lot of sanding, but I think it came out pretty well. A few notes. They give you 3 options for the cockpit. There is a vacu-formed transparency that contains all the window and the fuselage has indentation for where the can go that you can open up. They also give you a decal for the windows. You can either cut out the individual windows and place them in the openings, You can cut the large transparency in half and glue each half to each fuselage half. Or you can fill in the openings and use the decal. They actually include a decent interior, so I chose the second of these and glued the transparency halves into the fuselage halves and detailed the interior. Unfortunately even though I carefully glued the halves in, after closing up the fuselage one side of windows popped out, or I should say in and disappeared somewhere in the interior. After I did a lot of soul searching and looking at what you could actually see of the interior I decided to close up the opening and use the decal. The only other issue was the main gear. I seem to recall reading a review that said the gear was white medal, but in my kit they were resin and crudely cast at that. And they are just not up the the task of supporting the weight. I should have replaced the main strut with brass rod, but instead I spent a lot of time repairing them. At some point they will probably collapse and then I will replace them. The decals are printed in Australia and they are excellent. Very thin but strong enough not to tear easily. They did have a tendency to wrinkle and fold, but were easily straightened and snuggled down and the film disappeared with only minimal solvent. But enough of me and on to the pictures. Next up is a Skunkmodels' RQ-9 Reaper. Enjoy6 points
-
Once again greetings from a very balmy Brisbane, Australia (believe me, Winter can't come soon enough!). This was my second entry into what has been a very successful Matchbox II Group Build. Final entries closed at midnight yesterday and although there were over 130 promised kit starts, 96 completed Matchbox models made it into the final Gallery - very impressive. This Tempest kit was rescued from the ever present 'Spares box' and was missing a number of parts which were either obtained on here via the BM 'Wants' section or donated from other Tempest scrap kits. I've done enough waffling over the course of this build, so here is the dedicated WIP thread link and a few photos of the completed model. Cheers and thanks... Dave (oh - apologies for the amount of photos - I got carried away with my first ever WIP!). And a few WIP photographs6 points
-
Here's the last of my trio of GSB aircraft: Hasegawa's 1/48 Vought F4U-5 Corsair. The decals are from the kit. The paint is Mr Color 71. Some small modifications have been made: scratchbuilt exhausts, resin wheels by CMK, resin aerials, lights have been replaced with clear plastic and the pitot is from Albion Alloys tubing. More details at https://jonbryon.com/hasegawa-1-48-vought-f4u-5-corsair/. Cheers Jon6 points
-
Hi Guys, Well this was a bit of a build especially messing up putting in the correct gun mantlet.....and trying a number of gun mantlet cover options which all failed. Why it didn't come as an option is beyond me as finding an image with it not attached is almost impossible! Anyway that is the negative out of the way. The positives was the excellent fit, excellent detail and tooling. I added a resin crew commander and centurion gear which were both excellent quality and add to the authenticity. Weathering was applied with some brown wash and "lots" of pigment to simulate the extreme effect of the Vietnam dust which permeated everything. Once my scratch building skills improve I will add the turret bin straps and the gun mantlet cover, certainly happy to hear advice and suggestions you guys might have . Anyway will be adding an M113 with T50 turret and then look a diorama options.6 points
-
Its the 1970,s and Gatwick has its regular fog in, where to go? No prizes just hope the pictures are useful. Hope you like something. PS, do not try posting whilst talking to the wife! Some repetition, sorry.6 points
-
I'd never even heard of this aircraft until I saw the Stoppel kit advertised, then I desperately needed one of course. It's a lovely little kit (the mouldings reminded me of recent Special Hobby kits), all I added were seat harnesses and a few tiny details like aerials and foot steps.6 points
-
Hi, everyone! It's my next model. 1. Cleared the fuselage surface from the plastic surplace; 2. Deepened the panel lines; 3. Make more deep the Dzus fasteners and a littlebit of riveting; 4. Added a dashboard from Yahu; 5. Drilled holes on the hood; 6. I replaced the obviously short wing spacers with homemade toothpicks, painted them with a "wooden" varnish); 7. I sewed the entire model with a bead thread 0.12 mm; 8. Antenna cable - synthetic thread; 9. Strips and circles are inflated by stencils (the Printscale and ICM decals hopelessly deteriorated, barely able to translate lateral decals). 10. I added a brace to the crutch, replaced the steps on the landing gear rails, etc., on the metal. rods. 11. Engine pipes from ReXX. 12. Belts in the cockpit from the stocks of colored etch.6 points
-
Finished this resin kit last summer. Quite an obscure aircraft, looks like the French lovechild of a MiG-15 and a F86 Sabre DSC_1558 by Dave Oliver, on Flickr DSC_1563 by Dave Oliver, on Flickr DSC_1590 by Dave Oliver, on Flickr Build article is in this months Airfix magazine6 points
-
Thanks Ian, Giorgio, Bill, Benedikt, Keith and Stew, kind of you Thanks Cookie - so, mask and spray the idents first and then roundels? Makes sense as then you can, as you say, mask over the idents and save time. Great tip Mrs B is out to book club tonight so a bit more done. I masked the prop tips ready for the black and then remembered Cookie's method of spraying the walkway lines. Why not, I've tried lots of other things on this one: Mask for black by Ced Bufton, on Flickr Sprayed that and then attached the stick out bits ready for touch ups in the morning: Untitled by Ced Bufton, on Flickr The exhausts need attaching too - they're in the pile.6 points
-
I'll miss this Group Build. So many childhood memories stirred by seeing Matchbox kits again. I'd forgotten how simple some of the kits were and what unusual subjects. The diorama base included with the armoured kits added so much and the moveable stand with the aircraft kits. Happy days revisited. Thank you Matchbox and Thank you all the Contributors.6 points
-
Good morning, after having spent some time considering different aspects of buccaneer canopy on Bill's topic (Perdu), it's time for a small update. to commemorate the Buccaneers deployment in Canada for what was a Canadian version of the Red Flag called Maple Flag (if I remember correctly!) I brought my Bucc with me to Montreal, where I appear to be at the moment.So , even if it looks ugly once finished, I'll be at least in a position to say it flew to Canada as the real things did some years ago!!! Anyway, I was here. After cutting the airbrake shells I had glued them to a piece of plastic card . Before going to the airport , I decided to add some material at the end as they looked too short.I used CA superglue and some flour, as I normally do. Yesterday, due to the jet leg, I got up at 2,30 AM and decided it was a good occasion for some modelling!!! So I cut along the shapes I had drawn and , immediately after doing so, I realized... ...they were both right handers!!!Could have stayed in bed!!! Never mind, I'll add a new finlet. After some filing and sanding I got here! I cut two more shapes off thinner plastic card, to create my version of the Airwave PE sides. From these new shapes, I drew the outlines of the parts to be cut and glued to the interior sides. Last night, after work, I went on with the airbrakes ' detailling. After some cutting drilling and sanding, this is what I got. Now I'll have to wait until i go back home to add some rivets, as my Rosie The riveter wasn't of the party! On the airbrakes' outside, there seems to be a thicker area, which I decided to recreate by adding a plastic card shaped plate...itisn't much of an idea, and it won't be easy to let it bend to match the airbrake round shape. I started by glueing the plates to one side. During the night I happened to go to the toilet , so I poured ed some Tamiya green cap glue into the joint to try to soften the sard and perform the miracle... but the miracle didn't perform and the card bent on a straight line... This morning I cut the plates to their final shape and started filing. I added some CA superglue in some points, where I saw some recesses. It'll work as filler. That's it for now. Hope tonight I'm not too tired and can go on with the filing. Ciao Massimo6 points
-
Also, not taking into account slang expressions or even welsh ... (sorry K ) Benedikt, as a non native English speaker, what helped me most was to try and think in English (if that makes sense to you). I often have to speak the Albion's language for my job, which is obviously the best thing to keep it fresh. Furthermore, whenever I can I watch TV series and movies in their original language with subtitles (that introduces the issue of American vs British English, but we don't want to get into that, do we? ) Sorry for adding to the drift, Ced, but you keep us waiting on that masking reveal so .... Ciao6 points
-
Fear not Benedikt - the British have always reserved for themselves the right to commit the greatest crimes against their own language! (It's to distract us from acknowledging that we're such comparatively poor speakers of our European neighbours' tongues...) That's before you even take in to account the damned autocarrot on my smartbone.... A Spitfire condom Ced! Who knew? (Can't wait for the Big Roundel Reveal, like everyone else.)6 points
-
A small update Original box for the Chestburster,This is the "Aliens" chestburster with small arms rather than the "flippers" of the original I've attempted to curve the tail by making small incisions in the tail and packing the gap with scrap vinyl. Look who's turned up,Why its "old faithful" the Dog burster from Alien 3 And the Facehugger makes an appearance I see a lot of flesh tones and gore in my future!6 points
-
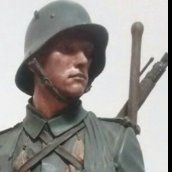
My attempt in bringing the old Verlinden Desert Rat into life. Still not happy with the eyes, but I'm learning... Anyway I like the over all look of the figure and the SMLE ist really gorgeous casted... Cheers Tobby5 points
-
The canopy mod James? Well it is something I usually do anyway so the work inside is visible otherwise there's no point to doing the work inside Vis: my Catalina, lots of stuff inside ALL OF IT invisible, I need to rationalise this henceforth I have bulked out the forward spine on the Matchbox one to allow for an opened canopy, Massimo is doing the same moulding, you can tell the kit canopy is supposed to locate down inside a step on the front spine end I filled the step on mine for appearances sake Plan A is to go ahead with the canopy changes I have already put in motion We discussed an exposé of plunge moulding for Ceb and yourself I recall I start with the raw materials, here we have 0.06mm actetate sheet from the local Artists supply shop cut down from A4 into handleable sizes Posing with the moulding buck (here made from a VERY ancient Matchbox canopy) that has been filled with green stuff malleable putty and before it set I inserted a stem with which to grip it in the vice I has had its frame lines removed with a selection of files and then polished to a shine with Nail Bar type buffer blocks Like these, four different surfaces starting with a hard grit filing surface then graduating through to Shine The file surface has Smooth on its opposite face and I usually use them in the order FILE, SMOOTH, BUFF and POLISH Makes a lovely shiny surface in no time The plunge/pull moulding technique needs heat to transform the acetate, I use one of these But frankly they aren't much cop as a heat source, I prefer a proper candle for decent warming ups Still we have what we have, tomorrow I intend having proper jobs I place the upright stem in my bench vice and set up the candle (usually atop the end of one of the buffing polishing blocks for a bit of height) Here I am checking the amount of acetate I have to handle, I do not want burnt hands do I? This should do I take a grip on the ends of the sheet and after holding it over the heat source I pull it firmly down over the moulding buck Thus The left side didn't take deeply enough due to the poor heat source but as I have a need for a separate front and back 'cos the Bucc is going to be displayed with its canopy slid back therefore I moulded a different front piece to the back piece, this will all depend on getting the straight cuts lined up proper, see? This one had distortion caused by letting the acetate burn in the flame but its front, screen area pulled in nicely so that is part one I was able to pull a nice rear end just ripe for trimming back This is the screen moulding for trimming|? \/ \/ \/ Back end Well as usual my pictures didn't help much, tomorrow I intend using a decent candle, I can show you better things... I hopes5 points
-
Finished this little resin kit last year, went together really easily for a limited run kit. Scratch built the test bed. The build article and history feature is in this months Airfix magazine. 19-DSC_0932 by Dave Oliver, on Flickr 12-DSC_0924 by Dave Oliver, on Flickr 15-DSC_0927 by Dave Oliver, on Flickr5 points
-
Got the confirmation by Special Hobby on facebook: "Completely new mould! "5 points
-
Benedikt, Us Brits are far too reserved and polite to correct anyones' English, the worst you'll get is a semi-audible 'tut'. Just to to create further thread-drift. My local newsagent recently became a British citizen after passing the exam. What he doesn't know about British history probably isn't worth knowing and would ask in depth questions about the British political system or the order of succession when I popped in to buy my morning paper.5 points
-
Getting quite close to finishing this port side view now. I thought it might be useful to show her... 1. Waterline view in normal steaming configuration: 2. Waterline view in docked down configuration, dock gate open: There was a third configuration called "Pre-Action", where the ballast tanks aft were partially filled (to save time later), but she could still sail around without a free surface of water sloshing about inside the dock (which anyone who has ever studied ship stability will tell you is about the most dangerous set-up imaginable if the ship is rolling very much). I cannot find any details of it, and anyway I can't see the advantage in wanting to model in that state. It's somewhere between the two! [Incidentally, below is a quite well-known photo of FS in action in 1982, which is often erroneously captioned; this is NOT (as is often written) a shot of her LCUs setting off for the beach on 21 May. It was actually taken 2 days earlier than that; fairly late in the piece it was decided that having all the troops in FS & ID was a recipe for trouble, so we took a calculated risk and docked down in open ocean (which had never been done before) to cross-deck the Paras to Norland. Using the LCUs it didn't take long; doing it by jackstay (which was a serious suggestion if it had been out of limits for LCUs and/or flying) would have taken many hours. The giveaway that it is definitely not on D Day is the fact that the LCVPs are still firmly on their davits. The weather, as you can see, was very much on our side that day - as it was the following day when we transited in through the TEZ to San Carlos; fog & low cloud - perfect! Great photo, though - and it shows Fearless in her natural element, docked down, using her main armament; the landing craft]5 points


This leaderboard is set to London/GMT+01:00