
Leaderboard


.thumb.JPG.3498f40362ff13ebfc4b2e45abbd545e.JPG)

Popular Content
Showing content with the highest reputation on 28/01/18 in all areas
-
Here’s my interpretation of the old Airfix Vulcan. A bit of a dog of a kit but with a bit of effort I think it builds quite well. I rescribed it as best I could and did a bit of creative licence to fill the empty wheel wells; I got the kit cheap because it didn’t have decals so I replaced them with the Xtradecal camouflaged Vulcan sheet. I like this particular scheme and the sheet has enough stencils for another full build plus lots of squadron markings allowing you to get up to half a dozen aircraft out of one sheet - that’s value. There’s still a bit of snagging to take care of - I want to redo the nav windows as they look a bit naff at the moment and there’s a couple of aerials I’ve snapped off already, but apart from that it’s pretty much done. The main problem is finding somewhere to display it. I’ve photographed it on QRA on top of my coal bunker - it nearly ended up in pieces thanks to a rogue gust of wind and the massive wing area. The panel lines are a bit on the deep side but I’ve tried to minimalise that with light touch weathering, on top at least.41 points
-
This was actually finished at the end of 2017, but PostImage was having some weird security certificate issues. This is part of a long ongoing complete Century Series project ("complete" because it includes the X-103, X-107, X-108 and X-109). I'll be replacing the current Hasegawa F-102 and F-106 with Meng examples. This is the Revell kit. I would have preferred a single seater, but the Valom kit was not available when I started building this, and this one was in the stash. The decals came from a Caracal sheet. I probably should have been a homer and done the WA ANG, but I thought the Maine ANG markings were more interesting. The kit went together well enough, though since I had to "un-lower" the wing flaps that was a struggle. But by and large it turned out all right. It does exhibit some of the problems I've been having with Kabuki masking tape lately. It has suddenly developed a tendency to pull up slightly at the edges, allowing paint to seep in. I don't think I've changed by technique, but it has shown up on a couple of recent completions. I used a Master pitot tube; I'm really coming to like those bits. A quick and easy replacement that makes a strong visual difference. This is completed aircraft #483 (17 aircraft, 3 ordnance, 14 vehicles for the year 2017), finished in December of 2017.29 points
-
Greetings from Hot and Humid Australia. Back in October 2017, the 2nd edition of Britmodellers Matchbox Group Builds got underway. It is still currently open, however has now only two more weeks for final entries to be submitted. In the day, Matchbox kits were probably my equivalent of what some folk here talk about Airfix & Frog models of the sixties. Each box had a beautiful Roy Huxley painting on top and came in 2 to 3 different shades of coloured plastic. Overall they were always quite basic, however were the perfect start for beginners, whilst also providing the experienced modeller with a platform to turn these models into absolute masterpieces. Amongst their new line-up of kits for 1976 was a Hawker Hunter. Now Matchbox had a knack of producing some quirky versions and off-beat subjects and true to form graced the modelling community with the first injection moulded parts to build a twin seat Hunter. I'm sure even back then, those modellers with an eye for detail soon realised that what was offered was quite simplistic and a little off in shape, however we could now build a T.7 of sorts so credit goes where credit is due. As a 15 year old (1985) I recall seeing this kit re-released in the lovely RAF Blue Diamonds Aerobatic team scheme. I'd heard of the Black Arrows c/o the Airfix F.6 kit, however the Blue Diamonds were new to me. For some reason I never ended up buying this kit back then, however have always wanted to have a go at one in this scheme. This latest Matchbox GB once again peaked my interest in this kit and I managed to hunt one down without dipping to deep into the kids inheritance! So here is my version of this classic kit in all it's shiny glory (or is that gory?). The obligatory GB WIP is also attached which shows a few modifications I made to 'hopefully' enhance the basic plastic. Now I'll admit that it'll never be branded as my best piece of work, however I figure that if I somehow went back in time as a 15 year old and produced this result, I would have been quite chuffed. Either way it does add a splash of colour to the cabinet and ticks off a 30+ year old modelling "Bucket List" item. Cheers... Dave (By the way - please take time to look through the Matchbox II GB gallery. There are some wonderful entries already presented and hopefully a few more to follow in the weeks to come). And some WIP shots.. And the Matchbox "Orange Range" inspired base!22 points
-
Hi all. I just finished Tamiya's wonderful 1/48 P-47D. It took me less than a week to build from start to finish. Such an easy kit to build with fantastic fit and engineering. I wanted this plane to look very well used with chipped invasion stripes on wings and fuselage. I painted first it in Alclad polished aluminium and several other metal colors over black primer, masked the parts for painting, put a bit of water with a brush on the places the paint needed to be chipped and sprinkled salt on those spots. After painting the salt was wiped off and presto, chipped paint effect. The decals on the cowling went on very well with a bit of decal setting. Very fun kit to build. Thanks for watching. René.22 points
-
Pics below of my Avon powered Sabre. I corrected the damage 'A' on the starboard side serial by 'robbing another 'A94' from one of the alternatives on the MA sheet. Didn't have anyother choice. The HP ones were OK but are a little tad denser and bolder. Any how, here are the pics: Markings depict a one of tried on A94-954 of 2(F)OTU, Williamstown, 1965. Below last but not least.... .... the model and the box it came from. Enjoy!18 points
-
Hi, here are pictures of Horten 229 in 1/48 scale. Well, it is not in fact finished, I still need to do some cleaning and add bits and fix some parts. I didn't still add hatches and brakes, since I had an accident with one brake and one hatch leg, so need to fix it. Upper part is glued but only on some points and very lightly, so it can be removed. Inner areas are completely engraved since it came with no details. those wooden planks at the back are scrathcbuilt. Hope you like it, cheers, Marko17 points
-
Hi, Finally found time to take some photos of my models today. This one is the earliest of them. It's an Airfix Mk 22 modified to a Mk 24. Help form a number of guys here especially Cookie regarding using parts from the Special Hobby kits for the props and rocket stubs. The plane is from 80 Squadron based at Kai Tak, Hong Kong in 1950. As well as the Special Hobby parts, I replaced the short cannon barrels with Master brass barrels. I also replaced the windscreen and canopy with ones from an Eduard Mk XVI as the Airfix ones were a bit soft in plastic and didn't polish well at all after removing from the sprue stub. The markings are from Xtradecal. Regards Michael17 points
-
Ever had one of those days when you think that seems like a good idea..... Well that was the case when I first saw this kit advertised... Although I have a dozen or so much easier Wingnuts to build I was somehow attracted to this one. In fact I even bought a Fokker D.VII a while ago just so I could build it without too much rigging.... Anyway this is the result of my attempt at one of their wonderful models. The build itself was fairly straight forward and everything is from the kit except for some HGW seatbelts. The major headache was obviously going to be the rigging and for this I decided to use the Wingnuts stretched elastic throughout. The other thing was how to achieve the planishing effect on the cowling. After several attempts I just couldn't master the technique that Wingnuts suggest with a very fine paintbrush. In the end I decided to go for a very fine (0.5mm) silver pen. It seemed to work and to me was an easier alternative. Anyway while I go and lie down in a dark room for a while, thanks for looking. IMG_2952 by Keith Sherwood, on Flickr IMG_2946 by Keith Sherwood, on Flickr IMG_2942 by Keith Sherwood, on Flickr IMG_2941 by Keith Sherwood, on Flickr IMG_2950 by Keith Sherwood, on Flickr IMG_2955 by Keith Sherwood, on Flickr IMG_2958 by Keith Sherwood, on Flickr IMG_2957 by Keith Sherwood, on Flickr16 points
-
Hi all, Here are some (quite a few actually!) pictures of my latest build, it's Hasegawa's well know 1/48 F-104 Starfighter finished in the markings of 202 Hikotai when playing the role of an aggressor for one of their annual Air Combat Meets. These ACM's have produced some very nice and unusual colour schemes and it was difficult to decide which one to build, suffice to say that there will be a few more in the future. Anyway here are the pictures. Here is a link to the WIP and whilst you are there have a look at the other great builds going on in the GB. Thanks for looking in and all comments and criticisms are gratefully received. Craig.16 points
-
For those that spotted the Vampire peaking in to shots of my Aussie Sabre build, here are pics of it. I had started this sometime at end of last November. Went on hold while I tried various silvers to get the doped on look without it being to glaring. Finally settled on Humbrol No.11 which looks fine, but probably better on between wars bipes! Also, the Canuck Decals I used I had some problems with Unusual as I have used a couple other sheets on a CF-100 and they were great. But the Vampire set I have( hopefully only this one) the problem was they were/ are very, very thin!! The blue nose decal cracked and was far too big, nearer to 48th I think, so was used as best I could and then repaired the blue by mixing up the colour and overpainting what was there and carefully replicated the shgape , with the aid of a couple black and white pics as best I could that matched. There are very VERY thin red trim lines to the nose and boom markings. The nose ones also broke up. I used what I could a d rendered the rest with some from my stock of stripe decals. Then I found the fin flashes were also much too big when applied. So, in order to keep the colours of the natioanl markings matching, I painted out with the silver the outsized portions thus reducing them to a more acceptable size. Thye are still not quite right but will have to do. Construction wise, basically the Heller kit with wing tips pinched from an A Models kit(which I found to be a bit dubious), and fitted the to this kit. I made up wing tip lights from scratch 'cos I lost the A Model bits when I moved the kit on. Any how here it is. Vampire F.3, 17063 of 410 Squadron early 1950s. Not my best but there you go. Thanks for popping by!14 points
-
Hi, This model was built (some years ago now) out of the box with no attempt to change the engines and knowingly aware of the kit's issues. Possibly if I were making the kit now I would address the issues but that being said I am quite happy with the result...anyway, here it is. The Halifax has been painted as DG221 'EY-A' of 78 Squadron flown by W/C Tait on operations against Genoa, 23rd October 1942 I hope you like it, Russ13 points
-
This is the pretty horrible Merlin Swift FR5 built as the recently restored WK275 Swift F4. You may well ask why when the Airfix kit is so much superior. Well, there was a Krap Kits group build over at UAMF and this was the crappiest kit in my stash. I actually enjoyed seeing what I could do with it (which was a lot given horrible mouldings, shrinkage, inaccurate fin, short shot and warped wings, etc, etc, etc, etc.) Thanks for looking and comments welcome (other than on my sanity for building it). David12 points
-
What is it, masochism, stupidity, senility?? After all of the complaining I did about the AMG Bf 109 A build of a few months ago one might think I would never touch another AMG 109 again. Well, the farther that model progressed the more I grew to like the kit. Sure, it had its fair share of fit problems and really, really stupid engineering, but the final product looked the part and it is by far the best Jumo powered 109 available. This time, I decided to go beyond "out of the box", but there actually isn't very much needed. The kit includes a Nice photo-etch fret with seat belts, landing gear covers and cockpit details; but more of that later. Initially I wanted to add the very nice Aires cockpit as seen in this photo, but the more I looked at it the less I decided it was needed. The molded-on map case must be removed from the left side of the cockpit and reconstructed on the right. This was done by folding some .005" plastic card using a photo-etch bending tool. This is much easier than making it from sheet brass; it can be cut with a razor blade and obviously glued with regular glue. The main addition to the cockpit is a Yahu instrument panel. These things are little works of art and really can't be appreciated without magnification. This one was intended for a 109 E, but given the fact that the cockpit is pretty much invisible in this scale, I'll try to get away with it. [/url] The rest of the cockpit need only some scrap plastic and detail painting. Instead of using the kit's photo-etched seat belts, I opted for the new steel pre-painted belts from Eduard. These things are magnificent. I can remember threading painted paper through individual etched buckles. In 1/72nd this was a challenge. These new belts are very thin, incorporate buckles, and can bet realistically draped.I added some burnt umber oil wash and was done. Here is the cockpit just before closing up the fuselage. Curiously, this time I had no trouble with the cockpit being too wide. The fuselage halves mated up perfectly. There is one trick to attaching the wings. As you can see in the photo, there is a "tab and slot" affair at the trailing edge. This is intended purely to frustrate the dickens out of the builder. There is absolutely no reason to complicate the assembly intros manner. I cut off the tab and a section of the wing root as seen here. This piece contains both the lower and upper wing root areas. The wing now fits (kind of) and after cleaning up, the small piece fits nicely once the wing has been attached to the fuselage. Attaching the cowling panels hasn't gotten any easier, but at least I now know what to expect. First, position the lower wing on the fuselage. This contains the lower cowl and forms a base for the next step, attaching the exhaust panels. Once these have set up, the cowl panels directly above them are taped in place and progressively glued. As you can see in these photos, most of the airframe has been riveted using various Rosie the Riveters. Another change this time was the the process of glueing the photo-etch radiator grill to its plastic base. To make life (much) easier, I sanded the base totally flat, positioned the grill, then flooded it with Tamiya Extra Thin Cement. I wondered whether it would still separate during sanding and shaping, but the Tamiya glue effectively welded it in place. There was still plenty of definition for dry-brushing to highlight the grill. There was a bit of sanding required, but by thinking the plastic part, this was easier than the last time. Further progressing along, here the nose has been filled and primed: ...then rescribed and riveted: Another change from the last model was the use of a vac canopy. After quite a bit of trial and error, the Squadron (Falcon) canopy proved to be the best fit. I returned to a familiar method of making brake lines, True Details .007" coated wire. In the past I have used sections of stretched plastic Q-tip tubes for guides, but .3mm Albion Alloys brass tubing works much better, and when glued in place, stays in place. Another piece requiring a minor adjustment is the spinner. The prop cutouts are just a bit too large, leaving a gap when the base plate is attached. A strip of .005" card was glued in place, then the joint was filled in with very thin superglue. Once sanded things fit very well. At this point everything is buttoned up and ready for paint. The white rudder and wingtips have been done...now the fun begins. This aircraft, 6 O 51, is one of about three very oddly painted early 109s used in the Spanish Civil War. Instead of the common RLM 65/63 or even 65/70/7, it had three upper surface colors. Initially I thought it was just a partial overpaint of RLM 63 over the delivery scheme of 70/71. But after the urging of a knowledgable friend, I studied the photos for some time. The contrast was just too great for the greens, so the natural conclusion was 61/62/63 on top and 65 underneath. There was something curious about the starboard stab though. The lighter color looked lighter than RLM 63 and the darker one was darker than RLM 61. So I lighted up the 63 with white and used RLM 70 for the other. So far so good. I went to my Gunge Sangyo (say it with me...God's Paint) stash and realized that I didn't have what I needed. A quick email to Libor Jekl, a reading of the Special Hobby SCW JU 87 A, and a review of a 109 F that I posted on Hyperscale years ago, gave me a close enough set of mixes. Also my non-red/green color blind wife confirmed the matches. Then came the issue of hard vs. soft edges. The photos three available photos of this plane are inconclusive. The best of them seems to show a fuzzy demarcation but then you realize that the whole photo is fuzzy. There is an excellent shot of a sister 109, 6 O 55, that clearly shows a hard edge camo. And since virtually every other plane with these colors has a hard demarcation, I went with that. Color RLM 63 applied and masked: Then 61/62 and the other two colors on the stab. Over the past few days I applied the decals, gloss coat, oil washes, another gloss coat and Gunze 182 flat. Whew; that was a mouthful. More soon.10 points
-
Just finished this one fra AZ, build out of box, ok kit had some resin parts that did not fit well, brush painted witm Modelmaster paint, clear/mat lacquer with airbrush, decals from kit. Photo dok. from internet. Cheers Jes10 points
-
Hi, I want to share withe a couple of rather rare models: Curtiss-Wright CW 21 Demon, by Rareplanes, (vacu, 1/72) and Martin 139 or B-10, Williams Bross, 1/72. Both are in markings of Netherland East India (today - Indonesia), 1941. CW-21 was my first ever vacu. I made them in years 1978-82. Comments welcome Regards Jerzy-Wojtek Martin: CW 21 and Martin:9 points
-
hi all, Here are some photos of military aircraft from my recent week in Thailand with 4Aviation. The main point of the trip was the open days held in celebration of Children's Day, so we had to manage three air-shows in a day! Apologies for the big post but they do have quite a variety of types. Enjoy, but if you have any requests for specific aircraft, let me know and i will see what i have. Airliners (yes, i know!) are in a separate post. Andy9 points
-
Welcome John Well, I have done a bit this evening. I glued the seat in and got the other bits that need Interior Green: Ready for IG by Ced Bufton, on Flickr Ah, look, open front wheel doors: Rats. But wait... see those lines at the bottom of the doors? I could cut them off using those lines. Stew taught me that the best way to do this is with patience, so out with my bottle of Mr Giemme PatienceTM, saw the rear with a nano-saw and then stroke a #6 down the line: Saw saw stroke stroke by Ced Bufton, on Flickr That works, good. Front door and the other side and I now have a smooth(ish) fuselage and three not so smooth doors: I'll clean those up but there's not much chance they'll fit is there. Is there? Next time on 'Quick and Easy Aircobra'...9 points
-
Fresh back from a week’s holiday, feeling nice a refreshed, but blinkin’ cold! A little update and a milestone reached – I got the primer on. Yep I dusted down the airbrush, relearned how to use it in what feels like an eternity since its last squirt, and got some Alclad primer on: All in grey, and it looks rather nice. The exception being the forward undercarriage struts which got blasted in Alclad black. From the best of the references the forward struts were polished aluminium, with the rest of the undercarriage being painted silver. Well it appears as such. Anyroad the will receive a coat of Alclad polished aluminium, while the rest of the undercarriage will be painted Humbrol silver. It should provide a nice contrast. As ever in this game there is always a sting in the tail, and one of the wheels somehow got contaminated, be it from dust, bits in the paint, or micro alien invaders which inadvertently got sucked into my airbrush. It is flatting back quite easily, so no need for a strip and repaint. Anyroad a final shot of the Fury in primer. It was a little fiddly aligning the struts. Some folk paint them separately and fix them at the end, but most builds I’ve seen have them have them fitted first as it should (I say should with my fingers crossed) be less messy and fiddly to glue the upper wing on later (providing I can avoid busting the struts of course). I’ve also left the tail off as I reckon it will be easier to mask the yellow fin flash. Well I’m pleased with the outcome and at long last I have something that resembles a Hawker Fury on the bench. Next up proper painting.9 points
-
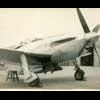
PK-13 : N.A. P-51K Mustang IV 19 sqd, RAF, August 1945 QV-V 'Dooleybird' flown by Flt.Lt A. S. Doley9 points
-
A little hung over as I was out with our kid last night. (Always messy) so here is what happened over the past day or two. I need to power through now and get this show on the road. Masking mojo ahoy and POP! Weathering time! note the anaemic wheel wells. These got a metallic blast then it was time to test the cheap AB and metal varnish thinner. everything seemed to work well. No clogging as yet. I cleaned everything out, fingers crossed for next time. the gloss dried over night and I started the oil wash. here’s the start on the front. WIP on the rear. and the wing. The wheels got done, tyres to do. Legs with an oil wash. And the covers. (I forgot the decals) I’ll try and squeeze em on after the fact. Wish me luck. all done, I’ll leave it and check on Sunday. (I haven’t been to have a look yet) remember the Wells? I’m falling in love with oil washes. The cans look the part too. Looking at it this morning I’m happy with that. I’ll pop up to the grotto later and see what the damage REALLY is. More soon. hope you all have s lovely weekend. Johnny boy.9 points
-
Hi Folks, It is a kit I feared a lot due to the number of parts, however, I gave it go and here it is. Hope it has turned out okay. Cheers.8 points
-
My latest modelling masterpiece, a 1/35 scale Flakpanzer E-100 model kit by Amusing Hobby. I made several changes to the base kit including; replacing the inaccurate plastic gun barrels with metal ones. Also replacing the rather weak plastic suspension springs with custom made metal ones too. The side skirt armour was modified so they can be displayed either on or off the vehicle, I also added a small crane to the side of the turret that would be used by the crew to aid with lifting the side armour on or off. Lastly the most important addition to this model is the obligatory bucket hanging off the rear, which every good tank model should have Took me about four months to complete in all & was a lot of fun, I think I'll make something smaller next tho...8 points
-
Welcome all! Not much done yet as we had Mother-in-Law for lunch (no, not with some Fava Beans and Chianti, just Turkey!). I hope to start in earnest tomorrow. Jon as Giorgio says the cockpit goes in from the bottom (see, no comment, I am reformed!) Keith - yes, a bit of a variation from the theme but hey, it's easy (it says on the box). I have a Thunderbolt and Lightning too - very very frightening! More tomorrow, I hope8 points
-
https://sites.google.com/site/rjcaviationart/decalarchive See also: https://sites.google.com/site/rjcaviationart/dec7 points
-
I've always had a love for the Meteor. It goes back to 1972 when I bought my first modelling magazine: something I still have as you can see below. It was a fascinating and intimidating article in equal measure. I knew there was a Meteor III and Meteor IV, the marks I and II were a mystery and to discover that there were marks 7, 8, 11, 12, 14, even 20! Meanwhile, the article gave me a glimpse into past treasure with the original 1956 Frog Mk.8 model (regarded as unobtainable - see later) and then described how to build a vacform machine out of wood, aluminium and asbestos (yes, really) that you placed under the domestic grill. At age eleven, you might have well given me the plans to build a moon rocket... Nonetheless, I was hooked on Meteors! Roll forward to 1988 and I was well into modelling and absolutely delighted when Matchbox brought-out this beauty: Now, a little context is required here: in the 1980s, there were no Meteors in catalogues: Airfix's Mk.III was discontinued and Frog's Mk.IV was, well, Novo so in that pre-internet age you found them where you found them. So to get a model with THREE, say it again, THREE variants was a Meteor fan's dream. It was an excellent choice because it was a kit-basher's dream too: combine it with the spares box or accessories and you could pretty-well model any post WW-II version. - PAUSE - 1988 to 2017: house move, climb the career ladder, raise two children (not on my own, naturally) and spend all your spare time involved with this: https://www.e-v-r.com/ - still my obsession - and so scale modelling disappeared from view. I still had all the kits tucked away but I'd lost my mojo. 2017 and the mojo came back. Slowly at first with lots of gentle dipping of toes into the water and a great deal of uncertainty as to what to begin-with. To cut a long story short, I decided to more-or-less pick-up where I left-off with the Matchbox Meteor. I decided to add a couple of extras to jazz-up the model and decided on a standard Mk.11. I had made a start on the model, having painted the rather bare interior black (which had dried glossy - no wonder I'd given-up) I chose to add the Airwaves etched cockpit walls and hack-around the Czech Master nosewheel bay to replace the flat plate moulded by Matchbox. This proved to be a challenge as the resin insert really didn't fit the different profile of a two-seater: So, off I went with superglue, Milliput a razor saw and a lot of nerves and - to all intents and purposes - bodged it together: Meanwhile, I attached the quite beautiful etched instrument panels: I then came to glue it all together. It was a struggle: the etched sidewalls and the resin u/c bay required a great deal of hacking and gluing the whole assembly together took a lot of patience and tape: I then came to add the 'lid' for the Mk.11 and Mk.12 versions. As you can see, the application of filler was a given: the mouldings had slightly rounded edges and leaving them unfilled would have looked terrible: Similarly, the tailplane was provided in two versions and the fit was similarly 'challenging': Meanwhile, I assembled the wings, using the narrow (early) intakes (thank you Matchbox) and filled the HUGE gap in the rear wing fillet. Once the fuselage was glued (it stuck together nicely), it was greenstuff time: As an aside, the orange fillings above are ear defenders! Those small foam thingies that you roll-up and place in your ear does an excellent job of sealing orifices while filling, sanding and painting. So, with the wings on the model starts to look like a meteor: TO BE CONTINUED...7 points
-
Here's my take on a widely-used German truck. I chose to model one from the Polish campaign.7 points
-
Finished this a year ago, super detailed the aircraft and engine, scratch built the crew ladder and engine trolley and heavily modified the figure. This was great fun to build as well as being very interesting aircraft to research...they are a tough bunch the Russians. A few things aren't quite right, but I'm pretty happy how it turned out. The build was in issue 87 of the Airfix magazine DSC_3486 by Dave Oliver, on Flickr mig by Dave Oliver, on Flickr DSC_3489 by Dave Oliver, on Flickr DSC_3497 by Dave Oliver, on Flickr7 points
-
Hello, Here is my version of the StuG.III. I was very inspired by the german armor without any camo painting. I'm not sure if any StuG were in the field with this red primer but I love its unusual look. Since it is a Dragon kit and its color is red, I called it "Red Dragon"7 points
-
OOB, built on my hotel workbench. Since I’ve been traveling for work, I made up a small workbench in my hotel room! I’ve built several cars, but this is my first aircraft.7 points
-
This thread will tell you all you need to know about the potential pitfalls in making a Sword low-back XIV: The XVIII will be pretty much the same, apart from some filling and re-scribing of the wings and, cutting the tail off. Thank you but I'm no master. This is a master at work: Thanks Steve. Ventura (aka Jay's?) Spitfires... I keep looking at their Seafire 47 and thinking "it has to be better than the Special Hobby one" but then I remember the MkVII in the stash that I haven't plucked the courage up to do. I tend to have 30 minute modelling sessions and working on several models at the same time means I can always be doing something whilst waiting for paint to dry or glue to set. Roll on retirement... only 18 years to go! Thanks Ced. I've found a really good diagram of the Sutton harness so the next ones I do will be better, just need to find some fine fuse wire for the buckles. A bit more work on the Vbs last night and this morning. I painted the Sky bands: and the spinners: (using Colourcoats, which goes on really well) then masked the Sky bands: I've since run some TET along the fuselage/ wing joint and taped the wings up. While the glue sets, I'll do some work on the XVIII. Thanks for looking.7 points
-
Hull details - including some more of the dreaded ovals! One of the things that I've noticed recently is that whoever draws submarine plans often show heaps of interior detail while almost completely ignoring the exterior. The photograph below shows a good example. The plans from the RAN historical website show a full cut-away of AE2 but almost nothing of the surface detail. I guess that the assumption is that there will be very little detail on the surface of a submarine and that to make the drawings 'worthwhile' they need to be cut-away. From my selfish point of view, as one building an exterior-only model this is a pain in the arthritis... in a way these drawings are 'too good' for my purposes - they contain too much information! So instead I have to view and interpret the photographs. Oh well - no real harm done... Worse things happen at sea! At least there are some quite good photographs on the public record. In this case to 'interpret' the surface detail all I've done is use a fine permanent marker to draft on anything that I want to reproduce on the hull. By the way, the little white strips on the 'step down' on the forward casement are just more PLA plastic, I stuck them on straight after the last post. There is clearly some linear texture in this area in period photos but I could not work out exactly what this feature is - my guess is that these are just wooden rungs placed there to stop people slipping. That's how I've represented them anyway. The hulls of these vessels were riveted - to my knowledge there was no welding in WW1 submarines. As I understand it structural hull welding was cutting-edge technology in World War 2, and was treated with great suspicion in submariner circles. Anyway some of these 'rivets' appear to be just great big structural bolts with heads sticking out onto the visible surface. Such things are easy to make a basic representation of, just stretch some sprue... Cut off a few mm, and stick it on with some superglue. Once the glue is firm, sand or snip away any excess. There were several more rivets on the casemate. Here are some more that I've stuck on - this time using fine evergreen plastic rods rather than stretched sprue. I then used some of these very high-quality shears to snip off the excess plastic. These snippers are specifically made for cutting parts from plastic kitset sprues. They cut plastic like a hot knife through butter. Leaving this. Dotted along the casemate at various intervals are these little oval-shaped openings. I'm not sure exactly what they are but they need to go on as they are quite visible. As Hendie says above, ovals can be a bit tricky - but these ones are pretty simple to get right. Just find a piece of evergreen tube that's the right size... boil some water... dunk the plastic tube into it while the water is still as hot as possible... and after about a minute, pull the tube out and stick it in a vice as shown. You can either leave it to cool gradually while in the vice or cool the plastic by plunging it into a cup of cold water. I chose the latter because it reminded me of how the Vikings used to quench newly cast swords by plunging the red hot blade into the body of a slave! I have not posted the photos as it might be too upsetting. Either way, you end up with an oval section tube as shown. This tube can then be cut into little slices - like cutting slices of bread off a loaf. After a bit of sanding to get them down to an appropriate thickness they can then be stuck onto the submarine in all of the right spots, or at least as close I can eyeball off the photos. And here's where we are up to now. Soon it will be time for a bit more paint on the hull but I think we still have one or two more posts to go first. Best Regards, Bandsaw Steve7 points
-
Thanks Leon, glad you like it I'm also pleased (and a little proud) to report that I've been asked if Andy Goodall can post the build on the Wacky Website! Crikey... More on the FaceBook group here.7 points
-
Sanger had been promising to release a 1/48th B-52 for a number of years, and kept teasing me whenever I visited the website with a message that stated the model was under construction but nothing more - I must confess I began to question whether it would ever actually be released. However, last year it was finally ready to purchase so I took the plunge and ordered one. Any version of the venerable B-52 can be modelled, ranging from the early tall-tailed versions typified by the D-model, right through to the current-day H version. Sanger also offer a wide array of decals to accompany the kit, with many different schemes that the B-52 has worn over the years being on offer to purchase with your chosen variant. I decided to go for a current B-52H - with 'Memphis Belle IV' nose art - as I vividly remember it displaying at one of the RAF Mildenhall airshows and taking lots of pictures of it under some very stormy skies. I also had a very good wander around one at last year's airshow at RAF Fairford too, so plenty of resource material is at hand. A few weeks after I placed the order, a rather large box arrived at my work (always the best option with an eagle-eyed wife scrutinising any parcels that arrive at my house!) and inside plenty of protective bubble wrap was one of the biggest kits I've laid eyes on. Only the 1/32nd B-29 I did a few years ago exceeds it in span: The wings are massive - the 30cm/12" ruler gives a sense of scale here. Each wing is approximately 2ft so the eventual span of the finished model will be around the 4ft mark. Sparring the wings so they remain rigid is going to be quite a challenge I feel, and the thought of rubbing down all those wheel-halves doesn't fill me with joy... I imagine, due to the difficulty in obtaining a vacuumform machine large enough, the fuselage is moulded in four sections, with a lengthwise break just aft of the rear undercarriage bays. This also allows a separate mould of the differently shaped forward fuselage for the D, E, and F versions. Again, the 30cm/12" ruler shows the size of this brute: Here are the stabilisers and engine pylons: This sheet contains the vertical fin, tip-tanks, various sensors as well as the different tail turrets for the G/H versions: These are the pods for the eight Pratt and Whitney JT3D engines - unique to the H variant: A close-up of the parts reveals some lovely fine surface and panel details: Sanger provide a wealth of detailed drawings and plans in order to help with construction, as well as some nice looking decals: And finally, a comprehensive set of white metal parts for the engines, landing gear, interior as well as some further detailing parts. There's a crystal clear canopy too - but only one which means very careful cutting and no room for error! I had promised myself that I wouldn't start this until I'd finished my Shackleton project, but to be honest it's an itch I've got to scratch and I really fancy having a go at it. It'll certainly be a longer-term project as I have other builds (Shackleton included) still going on in the background, so don't hold your breath for regular updates but I'll post my progress as and when there is some. In the meantime, I've got to decide where to start: wings and engines or fuselage... Tom6 points
-
While it can be cathartic to get things off your chest, how about a thread about those things that bring a little joy into our lives to redress the balance? I don't mind getting the ball rolling. The backstory: I have a brain that doesn't know when to stop. As a kid, I'd occasionally have fits. This ended up with me in hospital, hooked up to an EEG machine. The doctor told my parents that my brain was hyperactive and would overload when things got too much, resulting in the fits. These fits subsided as I grew older, but the over active brain is something I still have to live with. It makes it hard to concentrate on anything, almost impossible to relax and getting to sleep can be tortuous at times. As you might imagine, I'm an insomniac. Over the past decade or so the Mrs and I have been spending more and more time out in the countryside or at nature reserves. I've always loved nature ever since I was a kid, thanks to a junior school which encouraged us to take the time to look at the wildlife. When we are out in the wild, with little in the way of man-made sound and only the local critters to keep us company, I find that the "white noise" that is usually blaring away inside my head fades away and suddenly, I can truly relax. It's an incredibly profound experience and I always come away feeling as if my batteries have been recharged, so to speak. Although the long walks can wear me out for a couple of days (I also have ME), I always feel so much better in myself afterwards. It's no wonder that we are planning to move somewhere much more rural than we currently live. I have found that my favourite places are looking out over reed beds. I doubt that I've ever been happier that watching the sunlight dance across the top of the reeds on a balmy summer evening, watching marsh harriers, barn owls, kingfishers and, if you're really lucky, a short eared owl or some bearded tits (no sniggering at the back!). If we are at Lakenheath Fen, the occasional F-15 or V-22 will also bring a smile to my face. Noisy, yes, but they're aeroplanes, so are exempt! How about you? Cheers, Mark, hoping someone else gets the Ren and Stimpy reference.6 points
-
Hello All, I havent posted for a while, but thought my current build may be of interest. I usually model in 1/32 scale and usually Wingnut Wings, but having just read a great book on the Battle of Britain (The Last of the Few by Max Arthur) I’m hooked - I had a sudden urge to start a collection of BoB aircraft. My models usually go in a box in the garage never to be seen again, but if I stuck to the smaller 1/72 scale.. who knows, they may even see the light of day at home... To get me started I went for the Airfix new tool Stuka - and what a gem it is! Nothing like the Airfix kits I made back in the day. The detail in 1/72 is nothing less than incredible; worthy of a 1/32 scale kit. I still couldn’t resist getting the Eduard PE set though as this is the icing on the cake. I’ve made a start and have just about finished the interior. The gunner’s seat was drilled out to represent the ‘cage’ like construction (moulded as a solid piece in the kit). Painting was a light mist of black primer followed by Vallejo German Grey, then highlighted and a fine pin wash to accentuate depth, ending up with a flat varnish to tone down the Steel PE parts which are a tad too bright otherwise. Just one note using the Eduard PE - take care over fitting of the instrument panel - if it overlaps anywhere by the smallest margin it will affect the fuselage fit... I cant wait to get started on Airfix’s other BoB offerings already.... Thanks for looking in Guy6 points
-
Finished this little side project last week. Great fun6 points
-
Don't start me talking - I could talk all night My mind goes sleepwalking - While I'm putting the world to right Called careers information - Have you got yourself an occupation? Oliver's army is here to stay Oliver's army are on their way And I would rather be anywhere else But here today There was a checkpoint Charlie - He didn't crack a smile But it's no laughing party - When you've been on the murder mile Only takes one itchy trigger… Go on – admit it – your singing along already… So where do we start and who do we blame for this latest escapade into the world of tiny tanks? Was it @badger for getting me interested in AFV’s in the first place? Was it ALDI for putting an offer on these bad boys for £4.99 each? Was it @Lawzer for building one and then teasing me with the pictures of his triumph? Was it the PLASTIC SOLDIER COMPANY for luring me into the belief that these things are ‘easy and fast’ to put together? Anyway – let’s not apportion blame - until things start to go wrong of course… So let’s get going shall we and what better way to start than with the ‘box’ shot… ...well 3 boxes to be accurate... ...as usual I'm sure to have lots of questions along the way and as this is my first 'real AFV' kit(s) I'm sure to need some expert help - so I hope a few folk will tag along and keep my spirits up when it all goes pear shaped. More updates after tea - Steve6 points
-
T-72M with Masterclub tracks My son at work6 points
-
Dave is in the right ballpark, if you will excuse an "Americanism". It is not a letter 'F'. The area shown in the photograph of R-001 on board the Ark is an area that has been cleaned of paint so that an NDI (Non-Destructive Inspection) be carried out and indicate the beginnings of the problems that the Phantoms had with the outer mainplanes. On the Royal Navy aircraft, this was as far as it got. The initial inspection was what was called a "Dye Penetrant" inspection where by the area to be inspected would have the paint removed, the area thoroughly cleaned with MEK or Trichlorethylene, dried and over sprayed with a red dye from an aerosol can. The dye was allowed to do its work and after 10 or 15 minutes was cleaned of using a propriety and non-invasive cleaner. A white "Developer" was then sprayed, aerosol can again, and allowed some fifteen minutes to act. The developer's action draws any remaining dye entrant out of any cracks an indicates their existence as fine red lines. If no cracks were present, then no lines appear and the component being test is cleared for further use.. The second and later method was "Eddy Current" where an electrical signal was generated by a probe which was passed over the area being tested. A gel was used to enhance the signal. Any defect within the component showed up as a spike on an oscilloscope. The Dye Penetrant system is shown in use in the attached photograph :- The aircraft on the left has had the dye applied. On the right, the Technician is removing the dye preparatory to applying the Developer. All the Royal Navy aircraft had these areas to be examined covered between inspections with a layer of lanolin. A few had primer applied, some had both. RAF aircraft were similar. The shapes of the area to be examined varied dependent on the individual who removed the paint in the first place - varieties below :- The above is XT864 - the Airfix kit As part of the RN/RAF transfer programme, strengthened outer mainplanes were fitted. The photo below shows the initial stage of plating which, due to the fact that problems still arose, resulted in the degree of repair indicated on the kit outer mainplanes. After that, I believe that BAe manufactured new, internally re-designed mainplanes, but by that time I was long gone. :- Which is a long way of saying, "The serials under the wings of XV590 were not painted out". I think that it is about time that Xtradecal and Hannants got their act together. If you don't like being criticised, 'Suck it up Buttercup !' Dennis6 points
-
As Mike says, many things make me happy, but if I'm feeling down, there is one thing that always cheers me up. I know your not a fan @lasermonkey, but dogs press my 'happy' button. Very often those 'Human Being' things confuse the hell out of me, but I seem to have a special bond with dogs. A happy dog radiates joy and I always get pleasure from their company.6 points
-
All done As this is the Matchbox Dooleybird I used the Matchbox Dooleybird decal and the numbers. National markings. the blue checks on the nose and QV-V came from the Model Alliance sheet6 points
-
Thanks chaps for the positive comments. But lets move on - made good progress today! STEP 5 - completed STEP 6 - parts STEP 6 - completed STEP 7 - parts STEP 7 - completed STEP 8 - parts STEP 8 - completed And then straight to STEP 10 - parts STEP 10 - completed STEP 11 - parts I certainly have my "brm brm" moments - after all, the props do turn and the wheels do spin! More to come tomorrow. Cheers, Peter6 points
-
Some more normal speed progress this weekend. Fitted the new Mk9 type tail pipe with parachute housing. The new nose almost fits as well as the standard part! I lined up the lower profile so I can bog up the holes without loosing the lovely canon detail. Nose and tail on, intakes fitted and the wings to go on next which is the trickiest part of this kit. Looking like a Hunter, shame I have to fit the airbrake and Sabrina's onto this as they break the otherwise clean lines. Colin6 points
-
My first proper, fresh 2018 build. (the Aussie one a close second!) Basically Hobbycraft kit and leading Edge Decals. Corrected airbrakes by reshaping the lower edges to brake and opening. Everything else as per kit but LEM Decals. GOLD paint was AK Extreme Metallics airbrushed... nice to use but not sure if its the right shade of Gold for the GH aircraft. But It looks fine enough for me. what do you think? Golden Hawk Sabre 23465. And, to close tonights multi posting.... All three of my most recent completions for 2018.... so far. PS Big thanks to Julien for helping out with spare RCAF decals from the kit... much appreciated Whats next, not sure. I am having a bit of a Sabre fest( there are a fair few appearing here lately..) and have come across one of my Monochrome boxings with two kits inside to 1/144th. Hard wing Sabres with fences. and I have a couple sets of CanMilair decals to use so maybe those ... or I will get on with one of my Phantoms... See ya for now.6 points
-
It seems like I have hardly been anywhere near here this year... life is proving rather difficult but I did finally manage to sneak an hour or so in the basement today though with results that were slightly less than earth shattering. First up is a question... On the console mounted on the cockpit rear bulkhead - does anyone know if there should be a cut out similar to the one shown here midway up the left side? I've been scouring photo's and t'interwebby but all the evidence I have found has so far proved to be inconclusive. There does appear to be one on the right (port) side as far as I can tell, but I don't thinkit's as deep as the one on the starboard side. I had to do a bit of remedial work on this resin part as a few bits had broken in transit - such as all the switches at the top. I also removed what I assume to be Fly's interpretation of the map light - which was larger than the fire extinguisher for the cabin! I then spent a ridiculous amount of time scratching a replacement which is more in keeping with the scale. The replacement lamp was made from two lengths of brass tube sleeved together, a piece of wire inserted into the inner tube, then finally, a mounting hole drilled though the casing. Now, jumping back to the tail again I spotted another oopsy from Fly - the lower hand holds are not at the same height. Sloppy! Again some remedial work on the tail - this time blocking off the hand holds so you can't see into the tail. Thankfully, my inserts for the mesh area seem to have worked though I still have some more work to do there. When I started working on this tail I thought it would be done in a few hours... it's turning into a real tale of woe (sorry!) In other news.... more resin.... more broken parts. This time the cockpit center console. Fly really ought to do a better job of packaging these things. Missing parts this time included a bunch of switches, and the middle two throttle levers. The bag was emptied out and examined and while there are the remnants of a bunch of brokenparts in there, there was no throttle levers, which leads me to conclude that they were broken off before anyone even attempted to bag the console. After working on that lot for a while, I decided it was time to go wild in the country with some primer and try and get an idea of how things were coming along. Consoles don't look too bad after the repair work.... and that map lamp is a thousand times little bit better! And a quick spray over the tail area and this is also looking much better. Way superior to the kit parts I think. Actually, the real reason for firing up the primer to day was to have a good look at these bad boys.... Yup, the SACRU's from Shapeways. On the left we have the 1:48 version and the two on the right are 1:32, all printed in Frosted Extreme Detail. Pleased? Oh yes I am... well, sort of. The 1:32 scale parts printed perfectly and are in the shop. However, Shapeways software picked up a 'flaw' in the 1:48 version - I put 'flaw' in quotes as the are in question was part of a round surface and it picked up one small fragment of the surface. Had there truly been a flaw, it should have selected the entire surface as it had uniform wall thickness. I opted to use their a "print it anyway" option, and of course, it printed perfectly. However, because their software has determined there is a 'flaw' (there go those quotes again), I had to change the design very slightly in the 1:48 version before they would let me sell it. You would not be able to tell any differences between the items other than a scale factor but it was slightly annoying to have to deal with that issue. So what do they really look like ?.... cue the infernal and completely unforgiving macro shot. (Them big poles is cocktail sticks by the way!). I've merely sprayed primer on them - no clean up of the parts whatsoever. I think they'll pass muster. Close enough for government work at least. But what do they really really look like? Well, at a normal viewing distance, this is more like what you would see. Standard scale comparisons of pencil and knife blade included. I'll try and get those painted up over the next few days before I have to head off on my travels again. I'm also going to try and get some more photo etch done this weekend if at all possible.6 points
-
There's been some progress on the MkVbs. Cockpit bits ready to be installed: Wings attached: Oil cooler fitted and the radiator in progress (beware, the front radiator bit needs a little shaved off its sides to fit in the recess and some shaved off the top so that it doesn't interfere with the fit of the fairing): Meanwhile, I've started to assemble a Spitfire XVIII using a Sword low-back XIV and a Freightdog conversion. Here's the extra sprue Sword include in the box to allow you to do a low-back e-wing: and this is the Freightdog tail: Cut the low-back tail off at the transport joint: Like so: There will be sanding: and filler: The Sword XIV comes with separate rocker covers and past experiences with them has lead me to glue them prior to joining the fuselage halves together because I believe that the centre seam will be easier to deal with. (We'll see.) Thanks for looking.6 points
-
hi all, For those of you who like airliners, here's a bit of Thai colour......... Andy5 points
-
I am genuinely gratified by each and every one of the replies I have received - thank you all. When I was last making models, the hobby was to all intents and purposes a solitary one: I was never a member of any modelling clubs, so other than visits to the local model shop (remember them?) I was on my Jack Jones, being intimidated by photos of the championship-level models in the magazines. Therefore, it is a delight just to get feedback - any feedback will do but this has been really encouraging. So, this week I have been applying paint, courtesy of the Humbrol Acrylic range of spray paints. In my return to modelling, I'm trying to stick to acrylics: it's so much nicer to wash your brushes under a tap, while if you put the paint where it shouldn't, you can wipe it off - bliss. The big problem I had was the wing roots: there was a God-awful seam between the top and bottom of the wing by the rear fillets but there was the inevitable gap between wing and fuselage. I had squared it up as best as I could with a file (plus the same for the tailplanes which I attached using superglue gel so as to prevent drooping) but there was a <1mm gap that was awkward to get-to and not really suited to Greestuff or Milliput. Having done some research, I found that the cyanoacrylate gel I had was a good candidate but, of course, any excess immediately set on the fuselage. This was the result: Now, you can see that by this point I had put the structure together, sanded-down the lashings of filler and attached the canopy using PVA adhesive for later removal before covering it in masking fluid (another old friend that hasn't changed in 40+ years). Once together, rubbed-down and dried I used Humbrol grey primer to see how she looked: Don't worry about the canopy: that will be removed, the cockpit interior completed and then the frames hand-painted. That'll be a test for my eyesight! I went back to the joint line and cleaned-up the cyanoacrylate although I've not fixed it 100%: enough is enough, I'm not submitting the model to the IPMS finals and I hope that the application of camouflage, decals and varnish will reduce the effect which is stark when matt primer is used: I also acquired a tube of Vallejo plastic putty that comes with a really fine applicator. Where have you been all my life? Therefore, after another application of primer to keep things consistent, I went for it and sprayed two coats of Humbrol Acrylic Sea Grey Medium: It's not perfect but I'm reasonably satisfied for my first return to modelling. Note the nosewheel bay, while I was half-tempted to add low-vis two colour pink/pale blue roundels and call it finished! Next episode: Applying the green upper-surface camouflage - do I mask it with paper, masking tape or blu-tack and masking fluid? Or do I bottle it and just add the upper surface camouflage by brush? Stay tuned!5 points
-
The Blue Diamonds Hunter finally joins the gallery! So here's my take on this Matchbox classic. Overall parts fit is great, however needs quite a bit of tidy up to blend it all together. Improvements were made to the engine exhaust, wheel wells, upper fuselage deck spine and some (basic) cockpit detail. The full sorry story can be viewed in this abbreviated WIP - Overall a fun, cheap model and one of my many 'planned' projects that I can strike off my 'GOT TO DO' list. Cheers and thanks.. looking forward to the Matchbox III GB in a few years time!5 points


.thumb.JPG.2ce06c4ff2300a5faba93aaeacbdab25.JPG)


This leaderboard is set to London/GMT+01:00