
Leaderboard


Popular Content
Showing content with the highest reputation on 22/01/18 in all areas
-
Here she is! And what an impressive beast, such a big kit and a beautiful aeroplane and an important part of the RAF's maritime patrol history. A capability the service still misses today in my opinion. This aircraft is depicted as detached from Kinloss to RAF Luqa, Malta in 1977 just before 203 sqn disbanded and its Nimrods passed to the remaining units of the Kinloss and St Mawgan wings. It was converted to an MR2 at Woodford six years later and eventually became an R.1, surviving to this day. It was a straightforward kit to make despite its size, and the demarcation line worked superbly with spray cans and masking tape. The only slight issue I found was the fuselage roundel showed the white/grey paint line through it so I used two layers of decals on this one to mask it a bit. In my opinion, the traditional grey/white was the best Nimrod colour scheme. Colours used were satin white and RAL7035 light grey. Kit completely OOB as XV249 and no aftermarket parts.33 points
-
RAF Britannia C1 XM496 'Regulus' 26 Models kit, 1/144. The bus is an Oxford diecasts 'N' gauge model. Since seeing Ian Turbofan's and Dave Skoadriver's lovely Roden Britannias, I thought I must get one. Well here we are! This is from Ray at 26 decals, who sells several versions of the Roden kit with various option of his own decal sheets, all a bargain price. Rather than a civvy scheme I opted for this RAF version as I have happy memories of seeing them at Brize Norton in the 70's on several trips with the Air Cadets. As Ian and Dave pointed out, the kit is a real beauty, one of the best airliner kits available. I chose XM496 simply because it is the only genuine RAF Britannia still in existence. the only mods I made were to add a small teardrop blister on the underside between the wings. I struggled to find references, and just 'eyeballed' it from photos cutting up a 1/72 bomb to make the shape.. It meant that the underside 'towel rail' aerials were relocated to the top, again located according to photos. The underside 'teardrop'; I also opened up the cockpit area and scratched up some basic detail, as I was masking the cockpit glazing to leave it clear. The windows are so tiny, that I might not bother to do it again. So what next? I've got this lined up. Airfix VC10 with Braz Super VC10 conversion. Some guidance would be appreciated here, I think all I need is the leading edge extensions and engines/pylons, & some wing fences. The RAF VC10's were standard fuselages with these other 'Super' fittings right? Cheers John22 points
-
Hi all, Just got this one finished for the Matchbox GB here on the forum - those with an eye for general accuracy or rivets, please look away now! Talk about a trip down memory lane. While I never built this one as a kid, I remember their kits and great boxart and how they seemed to be in every newsagent and corner shop. Happy days. The full build thread is here but to recap: Kit: Matchbox PK-128 Build: OOB except for tarting up the pilots' seats: Paints: White from a rattle can, all others Revell Acrylic with a brush. Klear. Decals: From the kit! This aircraft XX915 was written off in a non-fatal crash in 1984. Taking off from Boscombe Down on a routine flight, No 1 engine failed and the pilot Sqn. Ldr. Tim Allen began to prepare for an emergency landing. During approach, No 2 engine ignited fuel leaking from the failed No 1 engine and the pilot ejected and landed nearby at Porton Down. The aircraft crashed onto open farm land 0.75 miles from there. You can read the full accident report here. Matchbox T2 Jaguar EPTS PK-128 (1) by Dermot Moriarty, on Flickr Matchbox T2 Jaguar EPTS PK-128 (7) by Dermot Moriarty, on Flickr Matchbox T2 Jaguar EPTS PK-128 (9) by Dermot Moriarty, on Flickr Matchbox T2 Jaguar EPTS PK-128 (10) by Dermot Moriarty, on Flickr And along with my Revell Jag.. Matchbox T2 Jaguar EPTS PK-128 (13) by Dermot Moriarty, on Flickr Matchbox T2 Jaguar EPTS PK-128 (14) by Dermot Moriarty, on Flickr Thanks for looking and enjoy your modelling. Cheers, Dermot22 points
-
Here's the latest from the bench...Yes...it's like a little factory here on Paros! I present one of the Hasagawa Double Kit Brewster Buffalos B-239 flown by Sgt. Nils Katajainen, LeLv 24, March 1942, aka, 'Orange 1'. This was nice kit and all the parts fit together very well, including the cockpit floor! I had fun with this one (as usual) and it served as a good learning platform for not only my airbrushing but also chipping fluid. A quick rundown on that--after priming and building of the fuselage/wings, I masked off the sides with sticky tac and gave it a spray of Vallejo USAAF Grey for the undersides. Then the top was then spread with Vallejo White. I let that dry and then applied the chipping media to the port side of the aircraft for the distinctive 'mottled' look using a toothpick. After that was dried, I masked more and prayed some black spots. Dry, then masked again and sprayed the green. I used Vallejo Olive Green. These are all 'Vallejo Air', btw. When everything had dried, I gently, gently used a stiff hairy brush to remove the chipping media. I was very happy with the results! I masked the 3 canopy pieces, sprayed with grey primer and then dry-brushed a bit of aluminum to give it some sheen. Then I masked off the whole the craft except what would be yellow and sprayed another light white layer...dried, then sprayed the Vallejo Air Yellow. Ok...what I have learned -- it is best to get the yellow bits sprayed first before anything else. Just less problematic and less masking in the end. Airbrushing can be a steep learning curve and I found I had to do fair amount of touching up when I was finished. The decals went on well, but they took a long time to disengage from the paper. I mean, enough time to go make a cup of coffee and feed the cats. I found the Finnish roundels a bit translucent but after weathering, it isn't noticeable. The decals dried and after a quick spray with Humbrol Clear Matte I weathered with some Flory mixed with white and grime for a light dust tone. I didn't like that so much so I washed as much off as I could and then applied some oil pin-wash which I liked much better. I think thats it. I will see you all in the Britmodeller 10th GB! --John19 points
-
Hi, Here is the Airfix Vampire T11 trainer, built straight out of the box but using the extradecal X72172 to build the 43 Squadron version. This was a really nice build with no issues and hugely enjoyable. I hope you like it, Russ18 points
-
Hello, My last model, the P-47D flown by Lt James R.Hopkins of the 9 th, Belgium, March 1945. Chosen for its superb decoration ! Best Regards, Michel15 points
-
On the 18th May 1988 Rich Lepman, a US exchange pilot assigned to the Tigers, was lined up on the runway at the annual APC at RAF Akrotiri with his back seater Steve Smyth. They were part of a pairs take off for the sortie flying F-4J(uk) ZE362/V with a standard gun pod fitted. The start of the take off sequence went smoothly and as normal, but just as the Phantom went into V1, the front canopy detached much to the surprise of the crew. They then had to flying around for 20 minutes Phantom Cabriolet style until the runway was cleared of debris and a normal landing was made. Thanks for looking.12 points
-
Dear Colleagues After 3 years work off and on I finally finished the beast. You are looking at the 1/700 Fujimi kit of Kaga from late 1941 with Fujimi’s own PE and wood planking extra. Then it is dressed with Veteran models 12.7 cm AA guns, Lion Roar 25 mm AA guns, davits, Nanodread life boats and searchlights, Rainbow launches (I could go on). The sponson supports are largely scratch built. I am particularly proud of the Zeros waiting to take off. Rather than use decals these were spray painted using my own home-made masks. She was originally designed to be a battleship but following the limits of the Washington Treaty was converted to an aircraft carrier in 1933 initially with 2 flying off decks but this was then changed to having two enclosed hanger decks in 1935. In line with the doctrine of the time she retained a battery of 8" guns for self defence. With Akagi she formed the 1st Carrier Division which struck at Pearl Harbour. She was sunk at Midway in 1942. Hope you like it? Andrew11 points
-
Hello Chaps, as part of my current Albatros project i would like to show my recently finished Mercedes D.III, these little WNW engines are great right out of the box yet open the possibilities to any degree of further detailing.... which in my case gave me the opportunity to add some bits & pieces....well pretty fiddly sometimes but IMHO worth the effort. Not sure if it's legit to start a New Topic in this section when only the engine is done so far but than i thought a little ''Engine Teaser'' in these grey Winterdays is always welcome... To be continued...... Cheers Hans11 points
-
Hi all, here's my latest, the Airfix 1/48 Seafire MK XVII. good kit, just replaced the exhausts with resin once from Quickboost. I held back on the weathering as it is a trainer, and I assumed that they would be kept clean. (And my salt weathering didn't quite work out lol)10 points
-
Hello folks, Again an Airfix Skyhawk! There is no after-market items used but a little of scratch for the cockpit, flaps and few details. The bombs are Hasegawa mk-83. Hope you like it, cheers9 points
-
For part of our display at Telford 2018, my IPMS Branch went mad and bought a bunch of the new Airfix Mustangs. I said I'd build one or two and this is the result. Like all of the new Airfix kits I've built the fit is tight but by making sure the mating surfaces are clean and a bit of dry fitting it went together really well and needed hardly any filler. I used the Kits World decals for a 334th Fighter Squadron machine and they and the Airfix decals performed faultlessly. I thoroughly enjoyed the build and am already planning my next one.9 points
-
This is an A-model 1/72 scale KA-26 Hungarian crop duster. Lots of scratch building. Fuel control levers were added, rotor control locks were added in the cockpit as were tape for the seat belts. The rotor assembly was practically rebuilt, control tubes and pitch change links were all replaced by styrene rod. The lifting ring on top of the rotor head was made be a curved piece of wire. The spray bars were built and added, using sprue rod and tiny cut pieces of plastic rod for the spray nozzles. Scale rope was used as the pressure lines to the spray bars while thread was used to simulate the high pressure line to the rear spray bar. The pesticide bin was made from a Testor's Clear Glue cap and reinforced with styrene rod to look like weld. A drive shaft was added to power the pump at the bottom of the bin as were some odds and ends for the loading port. I also opened one of the pods and used a 1/144th radial engine to recreate the 325 hp (239 kW) Vedeneyev M-14V-26 radial engine. I also added copper wire strands to replicate the fire detection system on the inner engine panel. It was then heavily weathered to replicate oil stains. See the link below to see why! Whew! (Side note: My kit caused a squabble among the contest judges, as they never saw a helicopter like this before, so I was awarded silver. However, the gentleman who built the V-22 Osprey seen in the back ground was president of an IPMS chapter and a master modeler himself, told the judges they got it wrong. He then forfeited his first place gold to me! That, in itself, was the greatest compliment I ever received in modelling!) This is one small model helicopter!9 points
-
I believe I heard something about that, so I'll go with that scenario! Many thanks Tony! A decent iron certainly helps with the soldering.... Thanks John, I hope lunch was edible after spending your time here! OK, so after having fixed something that apparently didn't need fixing anyway, just a little patience, I moved on with the canopy parts. First, I tried to figure out how to attach the wiring on the engine gauges. The answer was, don't! They are simply bent to look right and left at that. No point in making additional work when it's not needed! Then the lower canopy parts were attached. The secret is SLOW! Get it lined up, tack it with Plastic Weld, then gentle pressure to keep it where it needs to be. Finally, Plastic Weld carefully let into the seems, to secure it all where it needs to be. It WILL line up nicely, just don't try to do it all at once, and be patient! Next up, the ventral gondola. Again, patience, line it up carefully, then zap it! The forward fairing part was attached first, and needed a little careful sanding around the edges to get it to fit without spreading the sides of the main clear part and making that too wide to fit properly. Once again, patience and constant trial fitting is required. The rear part, with the MG attachment, seems to fit pretty much perfectly, so it will be tacked on for painting, then removed to add the gun and reattached and touched up afterwards. That's the plan anyway. Then I had to think about the gunner's seat, something I'd been putting off. I used Jammy Dog micro masking tape for the sling and then added a piece of Tamiya tape cut to shape for the seat part. It was all given a coat of RLM02 and a grey wash. I'm happy with that, so it was glued in place That, folks, is where she sits tonight. Progress may be slow from now on as I have an interview next weekend in Dubai. Flying out on Friday night and returning Monday morning. A long weekend beckons, and if I get the job, an even longer hiatus with training and relocation......I'll keep you all posted! Ian9 points
-
Thanks Simon One cream cake and on goes half a stone??!! Where do you get your cakes? Thanks Benedikt - glad to hear there were no broken windows, always scary during a storm. I had a (long) search for needle files and, apart from one diamond thingy at over £30 (no, not even me) I searched BM again and ordered some from Paul that Nigel recommended. Thanks Simon and apologies for telling the workers what a grand life us retired lot have... you'll be there before you know it! Thanks Johnny Yep, sanding after painting was a bit of a big step for me but I've seen others doing this - you know the ones who apply paint to find imperfections - and thought 'Hey, if you're not happy, go for it'. We'll see tomorrow if I made the right decision but I think the 'secret' is feathering the paint so as to not get (hopefully) lumps and bumps. Thanks John, very kind Brian! Welcome! I'm really pleased you're following and that you like the progress so far. I hope I'm picking up the bits and pieces you showed me during the walk around, although I did resist 'doing a Nigel' and modelling the fire extinguisher! Thanks again for the flight - the memory will be with me for a long while and I'm very grateful Not much progress this weekend. Yesterday we went up to London for the eldest's birthday. Decided to get the train and was initially excited that, when it arrived, it was one of the new 'should have been electric' Hitachi trains. Sadly the back set was broken and locked so the train was as crowded as the old ones they're supposed to replace. Already. And the reservation system wasn't working. What's wrong with these people? I remember when they proudly launched the 'Adalante' replacements for the HST and they left service after a few months with, apparently, no cost to the tax payer as they hadn't met their quality of service parameters. The HSTs got upgraded and they're still trundling. Ho hum. Went to the Sir John Soane Museum - a great place and I was really impressed by the guided tour Mrs B had booked. Well worth a visit. Nice lunch and then back on the train - same set - this time with paper reservation cards. Sometimes the old ways are best? Out to my sister's today so very little done, but I have masked the wheel wells (a la Stew) and the rest of the model with the masking sheet Hendie reminded me I had: What overspray? by Ced Bufton, on Flickr I'll hopefully get that sprayed tomorrow and have a play with the new MAC valve.9 points
-
Thanks Keith and Benedikt - great links! I didn't think about searching for 'Broaches', silly me I wanted these for the pitot and could still do with something small if I'm going to carry on doing silly tiny scratch bits. The KS Tools ones look good - they're available here and you can see from the second image how small the files are; 1mm thick x 5mm flat, 3 and 5mm round, etc. They're in London but charging £10 delivery so the total cost of £36+ is still 'an investment'. The broach set looks good though so I've saved the links in case I can't resist need them in the future. I'll see what the sets I've ordered from Paul look like, hopefully arriving soon. I'm getting close to the end I think (dangerously). The next major bodging modelling task was to get the wheels up: Ah, not designed the kit for wheels up then, what a surprise. The first job was to burr some slots in the locating holes: Burr by Ced Bufton, on Flickr ... but they still didn't sit flat. A silver mark on the wheel bay showed me the u/c leg was fowling: Silver hint by Ced Bufton, on Flickr ... so I filed that. Still not flat. Burr out the wheel bay at the front, sand the wheel, cut off the u/c leg from behind the wheel: and finally the wheel sits where I'm happy: One down by Ced Bufton, on Flickr You can see the mess I've made of my lovely wheels The other one's in now too and I'll touch them up later - when the glue and the Humbrol filler that the wheels are resting on has had a chance to dry.8 points
-
Bit of a late update. I was hoping to do some photo updates over the weekend but I didn't get chance. I have done a fair bit and made some progress. First off I decided I wanted to get all the suspension/wheel units assembled. The first photo is included to show how the three small rubber pads fit into the void at the top of the inside: - this provides some spring-back to make the suspension workable. I'm not too certain how long these will remain workable but we'll see. These are all the units glued together - it wasn't a quick job: Then, of course, I had to try a quick test fit on the lower hull: Next up I continued the base weathering on the upper hull (previously it had been given an overall thinned wash of Revell's Gunship grey) - this consisted of a very thinned Revell Anthracite wash around all the detail before an overall dry-brushing with a lightened version of the base coat which also includes some yellow and army green: That was most of Saturday's work. Next up on the hull I'm going to weather the sides of the lower hull before I attach the suspension units. Yesterday I decided I wanted to get some of the PE out of the way on the pioneer tools: It was a bit fiddly at times but most of it is now done. There was also PE to be fitted on the hatches: Also yesterday I started work on the .50 Cal and PE ammo box: So it was a fairly productive weekend. Comments and suggestions welcome. Kind regards, Stix8 points
-
Hi, my first time posting here though I've been lurking around the forums for a while. I usually just post on modelwarships.com forums but here's some ship love! So here's my latest model of the Uss James E Williams made out of the Trumpeter Uss Momsen kit and with new Pontos detail set. Also thousands of scratch build details and modifications! You can find the build log here for those that are intrested: http://www.shipmodels.info/mws_forum/viewtopic.php?f=59&t=166129 Reference used: https://www.navysite.de/dd/ddg95gallery.htm and https://www.navysite.de/dd/ddg95phototour.htm So without further ado here she is! And more full resolution pictures here! https://imgur.com/a/iLEh5 Cheers!7 points
-
After more than a year of my work on and off (more off than on) I'm calling this one finished. I bought the kit as a part built at the end of 2016 for 30 quid. The work done by the previous owner was excellent so I decided to keep as much as possible. There was some conversion work done to change it to a road car which I removed as I wanted a racing version. The decals were shot so a quick visit to BBK's website resulted in some excellent decals for the Wrangler Jeans car that ran in the Silverstone 6 hours in 1978. Work in progress link to build process. I can't quite get the doors to fit properly and the bonnet sits slightly proud, the rest of the fit has been flawless though. Overall one of Tamiya's finest car kits. Cheers, Stuart7 points
-
I've had this kit in the stash for some time, but also now have the much more up to date Kinetic kit. I therefore decided to take a flight of fancy and do it as a What If USAF ANG aircraft re-engined with a P&W F-100 taken from a kaput F-15E kit (together with the ACES II seat). Painted with Hataka Orange Line paints, weathering being a Flory Models dark dirt wash, and Tamiya Smoke. Decals came from an Eagle strike set. TBH this build has helped keep my head straight as my brother was diagnosed with terminal cancer just before Christmas, and passed away last Tuesday at the age of 56, can't tell you how torn up i am about this, but messing with bits of plastic and visiting forums such as this does help. Anyway enough waffle, here's a few pics (one day I will sort a proper set up for taking pics!): Mirage 2000C ‘what if’ by bryn robinson, on Flickr Mirage 2000C ‘what if’ by bryn robinson, on Flickr Mirage 2000C ‘what if’ by bryn robinson, on Flickr Mirage 2000C ‘what if’ by bryn robinson, on Flickr Mirage 2000C ‘what if’ by bryn robinson, on Flickr7 points
-
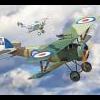
#1/2017 So, finally also my dad has finished his first model in the new year, continuing the Near/Middle East theme with an IAF Meteor that fought during the Suez Crisis in 1956. The Meteors were Israel´s first jet aircraft, therefore they served in the No.117 Squadron, also called the "First Jet Squadron". Airfix kit, Isradecals, Vallejo Metal Color Aluminium, antennas on spine are scratch. DSC_0001 by Reinhard Spreitzhofer, auf Flickr DSC_0003 by Reinhard Spreitzhofer, auf Flickr DSC_0004 by Reinhard Spreitzhofer, auf Flickr DSC_0005 by Reinhard Spreitzhofer, auf Flickr DSC_0006 by Reinhard Spreitzhofer, auf Flickr DSC_0007 by Reinhard Spreitzhofer, auf Flickr DSC_0008 by Reinhard Spreitzhofer, auf Flickr DSC_0009 by Reinhard Spreitzhofer, auf Flickr DSC_0010 by Reinhard Spreitzhofer, auf Flickr DSC_0011 by Reinhard Spreitzhofer, auf Flickr DSC_0012 by Reinhard Spreitzhofer, auf Flickr DSC_0013 by Reinhard Spreitzhofer, auf Flickr DSC_0014 by Reinhard Spreitzhofer, auf Flickr DSC_0015 by Reinhard Spreitzhofer, auf Flickr DSC_0016 by Reinhard Spreitzhofer, auf Flickr DSC_0017 by Reinhard Spreitzhofer, auf Flickr DSC_0018 by Reinhard Spreitzhofer, auf Flickr DSC_0019 by Reinhard Spreitzhofer, auf Flickr DSC_0020 by Reinhard Spreitzhofer, auf Flickr7 points
-
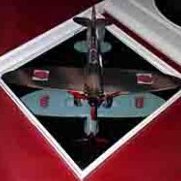
My Orange Spitfire finished and ready. It belong to the Schreiner Airways Texel and used as a target tug. LF IXc. PT986. 16-09-1948. 01-10-1948. H-27 & 3W-16. PH-NFP. 13-07-1954 from KLu to Schreiner. 08-08-1957 officially written off and scrapped. I think my next Spitfire has got to be LF IXc PT986 before it became a target tug.Now to find out more about her.7 points
-
Rescued this one from the bottom of the stash as I felt sorry for it. Decals were useless but luckily I had a spare set from a later 'Nose Art' boxing. Actually not a bad kit for its age, its wheels look a bit crude by modern standards and cockpit was a bit bare but otherwise it looks like a P-47 to me. Pilot is was a spare from a 'crashed' aircraft. I had to spend a lot of time polishing out the scratched canopy but I think it was worth the effort. As per norm, Vallejo model air paints.7 points
-
The wing is on! The joint at the front near the intakes is not as bad as I feared, and looks like it will be a relatively easy blend. It's kind of a weird design there, but what do I know? Never engineered an injection moulding tool in my life. A little filler and some paint and you'll never know. It seems that the main gear legs have to be installed in the bay prior to the bottom fuselage section going on. This means I've got a bit of a delay as I wait for the white metal gear - which I'm not sure if I'll use anyway. There are some other tasks I can do, such as cleaning up the rest of the resin parts, painting the exhausts, etc. That big Spitfire keeps looking at me too... Cheers, Bill7 points
-
Thanks Johnny - the masking stuff is handy for this sort of job but hard(ish) to search for! 'Masking Tape with Cover Film' works and also points you at 'drop cloth' which if, like me, you only use to protect from overspray is a lot cheaper (wish I'd known) Thanks Bill Of course I searched for the needle files (missed a set on eBay) but no joy. They do sell the expensive Swiss sets but I think I'll manage - £40-100 is too steep for me! Finally got the touch up done this morning: Touched up by Ced Bufton, on Flickr I initially confused myself with the MAC valve, trying to work out a number for the pressure I wanted. Then I remember Cookie's advice to adjust it to the paint flow that you wanted and with the compressor at 30psi I dialled it down until it sprayed exactly the flow / pattern I wanted on a paper towel. I think I've finally got it. Old dog and all that...7 points
-
Don't look very good do they? The paint build up stiffener plates I mean They can be felt by fingertips but they will be needing some extra enhancement which means I will probably outline them with a number 10 or 11 scalpel blade That might give some more substance to them with any luck I made castings of the auxiliary finlets from my Eastern Express (Frog moulds) Gannet because I mislaid the ones off this version many moons ago, I think that worked OK Here's the overall view this morning Don't underestimate the power of resin, says me This saves one of these kits from the spares box and I have Airwaves to fit It was 'club' this afternoon so I didn't get much spare time today but one little embellishment task I undertook, using my 4+ book plans was adding the thin fairings over the flap actuator mechanism Well six of the eight anyway, the ones at the wing roots will be done tomorrow She is coming along I feel, these will need additional chamfering to the pre-fitting chamfering I gave it, ready to test the 'fit' Yes the fairing over the starboard outer position shifted under the action of the clamp, since put right but I didn't have time before club to take any more photos7 points
-
I know I said that was me for this week but the tail flash was bugging me so I whipped it off, did a bit of careful masking and sprayed the tri band on the tail. The masking and painting gods have been on my side as it turned out ok. That is definatley me for the time being. Cheers and have a good week. Iain7 points
-
Finished this over on the KUTA X GB, was started over 25 years ago, a little bit of the story can be read in the GB. Only addition to kit parts were Eduard fabric belts. Finished in Vallejo ModelAir colours, Alclad II gloss varnish with Vallejo Matt top varnish. Techmod decals were not the best I've used, very thin but brittle.6 points
-
Tokin Gulf Fleet grows!6 points
-
Another one that I have cleared off the shelf and finally finished. The lovely Airfix Supermarine Swift FR.5. Built as WK281 and flown by Flight Lieutenant Nigel Walpole, No. 79 Sqn, RAF Germany, Gutersloh, April 1956. I am almost reaching the stage where I can start building for myself and actually keep the model....!!! Cheers all, Phil6 points
-
Spitfire MkI finished mostly OOB from the simple but excellent Tamiya kit in 1/48 scale. Tamiya acrylics as called for in the box instructions, with a little bit of hairspray technique on the wing & tailplane leading edges, and wing root where the pilot walks - XF16 Flat Aluminium undercoat. Little bit of brown & black mix for the exhaust & machine gun stains, hope I didn’t overdo it on the latter! EZ-line for the aerial wires6 points
-
The next item I wanted to sort out was the canopy. The kit part is poor. Thick, not very clear, a poor fit with ill defined frames. Flightpath to the rescue! The provide a beautifully detailed etched frame. I added the refuelling probe to it, after shaping the frame to match the fuselage's contours. I also replaced the actual refuelling probe with a turned aluminium one. For the transparency, I used a piece of clear acetate that came with a set of Airways cockpit decals. As masking the individual clear panels would be a night mare, I painted the frame first. Once super glued into place, the acetate was trimmed back, and the frame was glued in place. As the acetate is very thin & clear, you can get a good view of the interior. Next stage is finishing off the details on the fuselage, and then it will be time for paint! All the best, Angelo6 points
-
Thanks. I don't use acrylics or Humbrol where I can avoid it but hopefully that information will be useful to anyone who does and is looking for guidance. I used a 1:1 mix of Colourcoats ACF03 Terre D'Ombre Naturel and AFC06 Ombre Calcinée: As usual my camera hasn't done a terrific job in discerning the difference between the two colours. Once I had mixed it to my satisfaction I sprayed the main parts and once that was dry I painted the propellers in a darker brown mix and picked out the engine cylinders and exhausts in Vallejo Metal Colour Exhaust Manifold: Next I'll paint the tyres, reassemble the engine, attach the tail struts and start applying the transfers... Cheers, Stew6 points
-
I'm calling this finished now. I just got to make it an appropriate base but the main construction and painting's done. Put quite a lot of work into making this look not so much of a toy. Had to drill three holes and two slots in each side of the container pod because surprise surprise Revell didn't include them.6 points
-
About 10 years ago my father started the RoG Do217 but I don´t know why anymore, it didn´t make it to finish. Some years ago I managed to get him the ProModeler version of that kit second hand. In 2013 he then thought it´s time to build that German Medium. The kit was built oob, only seatbelts and antenna wire added. For the RLM 72 and 73 he used models and paint mixing suggestions on the web as reference and mixed it out of several Gunze and Tamiya acrylics. Not 100% satisfied with the colors, but I think they look ok. Quality and fit of the kit were very good, only had troubles with the decals, maybe due to bad storage, they were very brittle and had to be mostly puzzled together.5 points
-
Hey. This is my last model stuck in 2017. The model is a Tamiya product. I made a few changes, how I moved the steering wheel to the left, I made some more elenents and changed a few things in the silik chamber. Model painted with Mr.Color GX inks. Nice watch.5 points
-
Hasegawa 1/48 plus Eduard, Master and CMK resin. Camo - Major Edward Rector - Flying Tigers - 76 F.S. 23 F.G. China july 1942.5 points
-
Hello, The one on the bench. If any question about the captions in french, let me know ! Have a good day !5 points
-
Don’t dismiss all old transfers (I’m old fashioned and hate saying decal!). If yellowed, Tape then to a window and they will bleach back. Never tried it myself but others say it works. I have a transfers box with with stuff getting on for 40 odd years old in some cases. The ‘seed’ was a bag of surplus FROG sheets I bought in the early 80’s for about £1.00. Best bargain ever and still work perfectly! Here’s a set from a P-47 that I put on the new Airfix Typhoon for a laugh. Trevor5 points
-
Splayed legs and bottles of Malt? Cause and effect methinks...5 points
-
Anonymous Nimrod MR.1! All the tiny decals finally done, some are just a millimetre, but it is strangely rewarding to get them all on correctly. Ready for the fun bit tomorrow - roundels and serials!5 points
-
Don't worry, nobody's going to notice that little black mark in amongst all the bloodstains!5 points
-
I've been watching this GB, getting more and more twitchy, 'cause I wasn't 'in'. I did have a Takom Grant lined up, but, with the vagaries of evil-b and the RM, it never arrived. I'm not out of funds on that one so, only time lost ... Another go at evil-b, and this morning the postman DID deliver - this ... Dragon do two versions of the Sexton, this with CDP tracks and a single piece transmission housing, and another with the older three piece housing and conventional tracks - see @beefy66's build: Opening the - heavy - box, we see That's pretty much ramed full of plastic. I won't do individual sprue shots, Amorama has a review with better images than I would arrange. So far as I can tell, most of the plastic in the earlier version is here, together with some additions. Amoung the additional sprues is a new set of bogies - both of these are in the box: Note that the Ram bogies are heavier and more robust than the Sherman versions. The return roller brackets are a different design too, being angled rather than flat. (As far as I know, there were at least three different styles of return roller used on Sextons)4 points
-
SAM-2 kit from Trumpeter, scale 1/35, anti-aircraft missile on semi-trailer mounted behind the ZIL vehicle. Used patina - oil paints, Tamiya pigments.4 points
-
Time for a bit of filling. I was advised to keep the Milliput wet and warm whilst applying! That looks a bit better, although I can see it dip along the spine. A coat of magic primer shows up the uneven surfaces! A little more Milliput and some sanding with wet and dry and it looks much better. That's the fuselage extension completed, the next thing to do is plan where to add the side sponsons; tail fin and wings. I have done some more work on the drawing and the fin and wings should now be ready for cutting plastic I will probably start on the tail fin tonight and try some dry fitting. cheers Mike4 points
-
Now that becomes interesting - the 'official' last flight was at the 1990 Airshow (I have a print flown in the aircraft at that occasion) yet there are online sources saying her last flight was 16/2/92. I'm sure she was on static at the 91 show. I've asked in the British Phanton FB group, I'll see what come sup I photographed both sides at the airshow, and the red 'M' was on both sides of the fin (along with 43 Sqn zaps on the middle of the 111 fin badge!) Taken immdiately after 'last' flight 26731283_10157045947329922_7689695911122780297_n by David Fleming, on Flickr Just before 26734233_10157045956454922_2600087457476114181_n by David Fleming, on Flickr4 points
-
early morning daylight pics, tanks added just noted that I still have to do the C2 seat... and landing gear!!!4 points
-
I brush-paint Colourcoats. Like any enamel, once dry, they are very robust and can be handled without a care.4 points
-
So here's mine, the Jaguar T2 in Empire Test Pilot School scheme. The full build thread is here but to recap: Kit: Matchbox PK-128 Build: OOB except for tarting up the pilots' seats: Paints: White from a rattle can, all others Revell Acrylic with a brush. Klear. Decals: From the kit! This aircraft XX915 was written off in a non-fatal crash in 1984. Taking off from Boscombe Down on a routine flight, No 1 engine failed and the pilot Sqn. Ldr. Tim Allen began to prepare for an emergency landing. During approach, No 2 engine ignited fuel leaking from the failed No 1 engine and the pilot ejected and landed nearby at Porton Down. The aircraft crashed onto open farm land 0.75 miles from there. You can read the full accident report here. Anyway, on to the pictures! Matchbox T2 Jaguar EPTS PK-128 (11) by Dermot Moriarty, on Flickr Matchbox T2 Jaguar EPTS PK-128 (10) by Dermot Moriarty, on Flickr Matchbox T2 Jaguar EPTS PK-128 (9) by Dermot Moriarty, on Flickr Matchbox T2 Jaguar EPTS PK-128 (7) by Dermot Moriarty, on Flickr Matchbox T2 Jaguar EPTS PK-128 (14) by Dermot Moriarty, on Flickr Really enjoyed what was a great nostalgia GB and thanks for looking. Cheers, Dermot4 points
-
Thank you Bill, Keith, Chris, Simon, Jon, Tony, Johnny and Cookie - you're all very kind Benedikt that tree fall looks nasty! I hope none of the branches went through the windows? In to town this morning for a haircut, purchase of a Senior Person's Railcard (groan) and renewal of the 'Discovery Card' that gives us residents free access to some of the museums. Nice to have a wander around. Popped into Maplins and just resisted buying one of these. It won't last. Mrs B was out too so I took advantage of her absence for some 'real food'. There are lots of food places in Bath but I wanted food so I headed for the bottom of town and selected 'somewhere with chips'. Naughty of me. In my defence, I was left unsupervised (I must get one of those T-shirts). I dithered over Pieminister but they don't do chips so I plumped (apt) for a pulled Pork bun and fries in the Grillstock Smokehouse. Yum. It has to be said that, sometimes, junk food hits the spot. You know, the big one just below my chest. To be fair to them they did have a sign by the till that said 'Go Large' and offering to SupersizeTM me. As I said to the young lady behind the counter, too late for me, not required thank you. Nor did I accept the 'lunch deal' that added a sugary drink. Oh, the strength I exhibited sticking to my principles (and saving the need for another, larger wardrobe of clothes). I also visited an old 'Engineering' shop in Bath to get a quote for a threshold plate so that Mrs B can continue to pull off her Wellies on the doorstep without rotting the wood. Great place Bowlers, now part of Avery Knight (sadly). Old Mr Bowlers workshop has been preserved at the Museum of Bath at Work. Odd name that... sort of implies that work in Bath is a past activity... oh no, wait I remember the old shop, now a car park. You could go in there with a lump of metal and Mr Bowler would say "Looks like the lower bearing from a Hotpoint 1234 washing machine. I'll have a look" and he'd vanish into the bowels of the shop and there would be much clattering of drawers and boxes. If he didn't have the part he could make one for you. No, really. Great discussion with the lads in the shop about how I missed this but how could they survive when I can get a pair of (dangerous) clippers shipped from China for £2.30? Strange world, but some nice people. I also asked Maplin and Avery Knight about needle files, small ones. No joy. I already have these: File collection by Ced Bufton, on Flickr ... but I'd really like some tiny ones for jobs like the pitot. Any ideas chaps? Back to the bench. You know that feeling that us lesser modellers get when we ignore stuff? Sort of a niggling guilt. There are some seams I missed that I was going to put down to panel lines but then saw these: Had to be sorted, especially the locating marks for the gun pods. With a mix of chiselling and Micro-mesh I got rid of the plastic and 'feathered' the paint then applied the first thin coat of Azure: Lovely coverage this Colourcoats stuff. I've also masked and painted the walkways and blobbed the black in some other places. Progressing.4 points


.thumb.jpg.eca0c14e328767d0864cd6db01ca9ccf.jpg)


This leaderboard is set to London/GMT+01:00