
Leaderboard


Popular Content
Showing content with the highest reputation on 08/01/18 in all areas
-
Have a look. Mark30 points
-
de Havilland DH 60G Gypsy Moth Coupe The British Arctic Air Route Expedition 1/72 Avis (AModel) This is my latest completion for the Flying Boats and Float Planes Group Build, in the main it was built OOB with a few detail refinements and rigged with Uschi's rigging thread. A late decision to add the flying control cables meant that I had to leave off the rudder cables, I found it difficult juggling the model, tweezers and rigging thread with my arthritic fingers. In hindsight I should have added these cables when carrying out the main rigging work. I hope that you enjoy looking at my efforts by John L, on Flickr by John L, on Flickr by John L, on Flickr by John L, on Flickr by John L, on Flickr by John L, on Flickr by John L, on Flickr by John L, on Flickr22 points
-
Stick a fork in it! 8) It's done and I had a lot of fun doing it. I really recommend this kit. It goes together well and doesn't seem to have any negative aspects. 190 gear is difficult, but this kit makes it a lot less scary to get the angles right. I know a lot of you are building it now... or have recently finished the kit. I've been enjoying the 190 builds! Jason Brewer took some good shots for me! Aaron 190 3 by Aaron Long, on Flickr Aaron 190 4 by Aaron Long, on Flickr Aaron 190 5 by Aaron Long, on Flickr Aaron 190 6 by Aaron Long, on Flickr Aaron 190 7 by Aaron Long, on Flickr Aaron 190 9 by Aaron Long, on Flickr Aaron 190 12 by Aaron Long, on Flickr Aaron 190 13 by Aaron Long, on Flickr Aaron 190 14 by Aaron Long, on Flickr Aaron 190 17 by Aaron Long, on Flickr Thanks for looking!21 points
-
Hello, Here is my IAI Nesher “61” 5 in IAF No. 113 “Hornet” Squadron during late ‘70s. The Nesher was the Israeli version of the French Dassault Mirage 5 multirole fighter. The “61” was the personal Nesher of IAF’s ace Giora Epstein. KIT The model is based on Italeri Mirage IIIE/R in 1/32nd scale. This kit is good in size and shapes. Details are generally good but sometimes are a bit poor especially panel lines due the shared molding with the IIIC kit. CONSTRUCTION To convert the IIIE kit into a IAI Nesher the main change I had to change the following airframe parts: · Replaced the IIIE radome with a longer and pointed resin one from Isracast conversion set for Nesher; · Length vertical fin base. Other than the modification listed above I had to add more details using aftermarket as a resin ejection seats, wheels, undercarriage bays and ATAR 9 exhaust. I made from scratch the instrument panel and the FOD for air intakes. I added some details such as hydraulic pipes and electric lines into the undercarriage bays, undercarriage legs and cockpit tube. The pitot tube is turned metal set from Master. I tried to add some missing details around the fuselage: · Panel lines under and above the fuselage; · Fuel drain points and intakes; · All the aerial antennas; · Cannon’s barrels. COLORS & MARKINGS Paints were from the acrylics lines of Gunze and Tamiya. Squadron markings, serial numbers and stencils are from Isracast conversion set for IAF Neshers. Some IAF RBF tags were added to finish the model. And now go with the pictures! CIAO! Piero19 points
-
Hi Fellow modellers! This is my last of 2017. It´s the old Airfix Duck, It was a fun kit to build, and despite it´s age it´s very good. I added some details to the cockpit, vacuformed a new canopy using a mould made modifying the original, and replaced the engine with the Starfighter Decals Wright R1820. The engine was allso modified to later version and the cowling was thinned and the exhaust made from scratch. Decals are from Starfighter too and are of great quality. I hope you like it and every critics and comments are welcomed! Best regards from Uruguay Ignacio18 points
-
Here is the model completed in its National Parks Airways livery, not at all a casual choice. National Parks are not real estate for sale. The model was modified as you can see in the building post here: http://www.britmodeller.com/forums/index.php?/topic/235026972-modified-boeing-247-williams-bros-172nd/& by the addition of a restroom, cargo area and door, more bulkheads, nose cargo area and hatch, pilots hatch, some cabin detail, and other details, plus of course commissioning a special set of marks from Arctic Decals. I am really fond of the 30´s appearance that the forward-raked windshield provides, so I went for that variant. Many hours were spent searching the Net, reading references, sorting out details and looking at photographs. Modelers should be a bit more skeptic and proactive if they want a more accurate model. The venerable Williams Bros issue is still a workable platform -if of course showing its age-, and again I thank good friend, fellow modeler and ebil genius Sönke Schulz from Volkania* for gifting the kit. *His address: Ze Lair Volcanic Region German Transsylvania Since Sönke gifted the kit, he insisted in having an official "model completed" ceremony with the attendance of the Volkania Sturm und Drang band:16 points
-
Let's start this new year with a 109! Italy was the first foreigner user of the famous Willy Messerschmitt design. When in 1943 the Armistice was signed, a part of the Italian forces went along to fight with the Allies while the other, mostly composed of people from Northern Italy where the main industry factories were still active, which in turn meant a lot of bombing, joined the Fascist Republic, named Republicana Sociale Italiana. Organized with a German flavor, the RSI air force was articulated as an interceptor weapon, using top of the line fighters like the Macchi 205, the Fiat G55, and, when the Italian production of aircrafts came to a standstill after heavy bombing, the Bf 109. So here we have the aircraft of Maresciallo Attilo Sanson, credited with 12 individual victories. No picture of his aircraft are known to exist, nevertheless he is believed to have use the yellow 8 as when he flew with the 362a Sq on Macchis 200. The Italian had good stocks of RLM paints which means that the touch up are not very discernible. Those Eduard kits are gorgeous, and with the G14 on the line, I will surely be busy! Cheers and Ciao! DSC_0002 by jean Barby, sur Flickr DSC_0003 by jean Barby, sur Flickr DSC_0004 by jean Barby, sur Flickr DSC_0005 by jean Barby, sur Flickr DSC_0006 by jean Barby, sur Flickr DSC_0007 by jean Barby, sur Flickr15 points
-
THE SSV NORMANDY REMEMBRANCE FLIGHT (link here for what this is.) Urdnot Wrex: Bristol Beaufighter ARMAX ARSENAL AFTER SERVICE REPORT Substantial repairs needed after the SSV Normandy Remembrance flight did its scheduled show on Tuchanka. As de facto leader of the Krogan people, Urdnot Wrex was invited to take a flight in the aircraft he chose and designed. Eyewitness reports state that the aircraft returned a short time later filthy, dust-scarred and full of bullet holes. When asked for a comment on how the aircraft could end up with damage from weapons unseen in combat for over two hundred years, Wrex just grinned and sniggered. So, this was... let's say it was a troubled build. This is one of the first models I made when I was getting back into the hobby, using rock bottom cheap materials and gear. I made a start on it over two years ago, getting as far as painting. It's a really nice kit, Tamiya's Beaufighter from 1998, great fit if a little skimpy on internal detail. That time round, the paints were all dark and muddy, the surface finish was all sandpapery - and to make matters worse, after completing the quite complex camouflage pattern I had spilled a load of paint on one wing and wiped off the existing paint when I tried to clean it up. So, I stuck it on a shelf, telling myself I'd do it when I had the energy. Two years later, I thought "sod it, I'll give it a go". I think it's come out alright. The finish was a bit of a headache, I was trying out Tamiya polishing compound for the first time and it got all over the place. I experimented with various varnishes, and in the end a few coats of Future worked nicely. The heavy weathering and battle damage didn't come in until right at the end, when I decided it was missing something. The paint chipping is done with aluminium paint on a washing up sponge. The dirt and all over dark was done with artist's oil paint straight out of the tube. The good side of that is that if it's going onto a gloss surface you can blend it really well and choose how much or how little you want to stay on the surface when you wipe it off again. The downside is that it takes days to dry. Looking at the photos shows me just how many bits have obvious wipe marks, but *shrug* I know for next time. But yeah, if you read this far, I'm happy with how it came out given how much punishment this poor model has taken.14 points
-
Done with craft paints. Mark Thanks for looking.13 points
-
My guess is a re-release of the OO/HO Trackside Series brought up to date. Booking Hall - including no staff and locked toilets Fence and Gates - with trespassing youths Signal Gantry - complete with cable thieves and van Etc.12 points
-
Hi, Norwegian recce and light bomber hydroplane, Høver MF 11. After German attack on 9th April 1940 Norwegian airplanes, which survived, were all camouflaged. There are some photos showing those schemes like here: On left there is also He-115. The machine which stands behind it, with partially overpainted number (only "8" left) was subject of my model. I know two kits of MF 11, I did it from vacu kit by Broplan (second is resin one by Choroszy Modelbau) Here she is: This was my third build within float planes and flying boats GB. Remaining two were Blackburn Riopon in Finish colours (Broplan vacu) and Douglas DT 2 C in Norwegian livery (both were on RFI some weeks ago). Here are all three: Comments welcome Regards Jerzy-Wojtek11 points
-
Another one from the Matchbox group build. A few years back there was a thread with a pretty convincing argument that several Heyfords were used for trainers in WW2 and at least one was painted in trainer colours, with yellow undersides. Well, here it is, best as I can make it. Matchbox PK-605 1/72nd Handley-Page Heyford, acrylics by Tamiya, rigging by ez-line, plenty of putty by Tamiya and Perfect Plastic Putty.10 points
-
Hello everyone. Here's my entry from the recent Flying Boat GB. This is the old and wonderful Matchbox kit, modified here in order to represent M7+YK - a D3 variant of the Dornier 18 from 2/Kü.Fl.Gr 506 and one of the first Luftwaffe casualties of WWII shot down by the FAA on 26th September, 1939. My interest in the subject was piqued back in the summer by coming across a valedictory HMSO book published in 1942 on the Ark Royal (after she was sunk) that had a page of incredibly evocative contemporary photographs taken from HMS Somali of the downed seaplane. There's further details and reproductions in a rather lengthy WIP here. Those of you familiar with the aircraft will no doubt wonder about the inclusion of the large antennae on the gondola! It is the night/blind flying apparatus that is detailed extensively in two of the handbucher for the D variant. It appears to have been a collapsible item and stored in the cargo space when not in use, (in which a series of batteries were also positioned to provide power for it via an electrical circuit leading up to the top of the gondola). I have not discovered a single photograph demonstrating this gear in operational use but as the aircraft here is seen in a maintenance pose, I thought it might be fun to include it as part of a systems-test being run by the ground crew. Notes on process The kit itself has been made many times and was a pleasure to work with. In terms of broad dimension and shape it yields an accurate rendition of the aircraft, but did need significant remedial work on the bow, propellors and sponsons. Aside from fuselage, wings and struts, the rest of the kit (including flaps and ailerons) was discarded at the start as too crude for a decent representation. Having bought the original Lufwaffe handbucher (in digital form) I had the necessary parts and maintenance volumes to enable me to construct an accurate interior and add whatever detailing was necessary to the airframe out of brass and plastic. I won't bore you here by repeating a full list of those things (which are fully covered in the WIP) but the main elements I wanted to achieve as much accuracy for were: Drehkranz gun mountings -3D printed, with the mounting rings themselves built out of brass watch parts. Propellor assemblies were hand built from scratch (the blades themselves being canninbalized from a Lancaster and reshaped) I vacformed a new canopy and scratched all other from glazing transparent packaging. Flaps, ailerons and all hinges/acutators scratch-built from brass and plastic. The RLM paint-scheme was homebrewed from Tamiya acrylics and mixed directly on the aircraft itself using a technique I've been developing. All aircraft markings (aside from unit badge and hakenkreuz which were custom printed), were masked and airbrushed on. Working up the overall visual 'finish' involved experiments in salt-fading and the production of a variable lustre using polishing tools. On with the pictures then! Interior Sunshadows10 points
-
Dear Folks, Found this camo by chance and fell in love with it, the best of the two world, F-4 and Mig-21, Japan Air Self-Defense Force 07-8428. I built this aircraft from an old Hasegawa kit, the kit was basic but it was a smooth built. Few parts and straight not so fussy kit I say but it aged by today standard. I used Tamiya Khaki green and bright green for the Mig overlay and white mixed with black for the grey paint. I thought I had few weapon but the missiles were so basic that I skipped it, I will try to add when I get a better kit in future. I had a problem with tail, it is my fault tho, when I applied the decal the decal slide away and I was out for a walk thought the decals will be in place but when I come back, it was too late it was already confirmed with the kit. Hope it has turned out okay, thank you all for yr times and views. Cheers9 points
-
Would that include... Village Church - Converted into luxury flats Signal box - Demolised and replaced with a Tesco Express Service station - Closed but now operating as a 5 min car wash Detached house - converted into more flats Country Inn - Extensively re-built into a "Hungry Horse" full of screaming kids9 points
-
Hello. My newest project that just got finished.8 points
-
VEB PLASTICART - DDR , Ilyushin IL-18 1:100 , restoring project. First one in 2018. WIP here :8 points
-
Time to post up some photos of my effort, good old PK.23 hawker Tempest but done with a twist, as the Mk II prototype with Typhoon tail. I've long liked the look of it & was pleased at the way it came out. build thread here. Made pretty much OOB with additions of scratch built cockpit, converted tail fin, some filling of panel lines with twink which took more rubbing back than I wanted but worked OK I thought. painting was Aeromaster Russian light & dark grey which worked pretty well for the RAF shades of MSG & Ocean grey, with Hu 116 for the Dark green. decals a mix of Almark, Modeldecal & Xtradecal. Aerial courtesy of the hearth brush. I reckon its got a few more in it yet. Steve.8 points
-
My second kit 2018, manufacturer is unknown. It's Czech short run from the 90-s.8 points
-
Morning Chaps I had an urge to kick off some of the inhabitants of the shelf of doom over the Christmas break, and actually managed to make some progress... AIRFIX MINI COUNTRYMAN 32nd Scale. I love these Airfix 32nd scale kits. This one is quite a challenge with all the masking and that's where it stalled on the shelf. Really the only thing wrong with the kit is the horrible tyres, but at least with this one you are able to drill out the suspension to make the front wheels positionable. Add a good dollop of mud and weh hey Was very peeved to notice that the decal around the front headlight had moved... Ill sort it out at some point... AIRFIX JAGUAR XKR GT3 - 32nd Scale Another in this lovely series. This builds up really nicely, until you get to the decals. To say they put up a fight is an understatement and the ones on the rear panels being the toughest to get to behave. One tip I picked up, cut the roof decals into three (windscreen, roof, rear window) so that you can get all the decalling done on the body and sealed before you put the windows in. I added a little bit of CF decals here and there on this one. AIRFIX MASERATI MERAK 24th Scale The Zimmer frame really came out for this one as it has been lounging around on the shelf forever. This was originally a Gunze Sangyo kit and it still says so on the sprues and decals. It doesn't go together too badly, certainly shows its age in the interior (still tooled for motorised) but its just about the only Merak there is. The one big thing with this kit is that the wheels are just too small and make it look a bit silly and the decals exploded when they hit the water. Still, I'm happy with it. ITALERI VOLVO FH16XL & 20foot CONTAINER TRAILER I'm getting back into building trucks (woohoo) and decided it has been faaaar too long since I built a Trailer. Truck is painted in Tamiya Coral Blue with half of the kit suppled decals added. some small additions added to the cab,couple of newspapers and a coffee cup. Trailer is built OOB, with the frame being painted Semi Gloss Black and the container Flat red with some weathering in strategic places. Ok well thanks for looking... This clears most of the shelf of doom for now... There's still one or two lurkers, but they are getting sorted out tout suite Mad Steve.7 points
-
Not surprising John, but (wait for it) I think we're there! Good idea Keith. I have a big Brother All-in-One with a Fax (remember those?) I have three sets of ink for that as a hang over from the company but it won't last long once that ink has gone. Although it does print on A3. Thanks Bill - it really was kind of you to help and I owe you at least one pint Thanks Dave - outrageous! The sneaky wotsits! All the pain I've had with this... makes me want to track them down Talking of 2400dpi printers: 4800x1200dpi for £30 by Ced Bufton, on Flickr You know I would, didn't you. I must admit it was helped by Mrs B coming back from a shopping trip this morning and me telling her about my woes and that I was considering another printer. "Another one? Gosh, it's an expensive hobby you have isn't it?" I replied "Is it? How much do you think a printer is then?" She replied "I don't know" and was humbled when I told her £30. Ha ha! She then showed me the 'bargain' she'd picked up - another cashmere pullover. Mars and Venus, that's for sure. So, setup. I almost opened the upstarts guide until I read it properly. One of twelve (yes twelve) copies of the guide: only one of which was in English, so I used that. What's this for? Stickers to, er, show what... no, sorry, no idea. You know you're a modeller when you get excited by the boxes the ink cartridges come in: They might come in by Ced Bufton, on Flickr Wireless setup eh? Interesting. From this screen: Clever - GROPE? by Ced Bufton, on Flickr I thought the setup was having a GROPE (General Reconnaissance Of Peripheral Equipment, what ICL mainframes did in the 70s) as it found the printer type and the WiFi. Sadly it failed to use the password in my 'keychain' so I had to plug it in. Best laid plans. So there we are then. New printer. Was it worth £30? (New ones on plain paper at the top, 'best' old ones at the bottom) Oh yes. I shall print those on decal paper tomorrow. Hooray! Huzzah! Now, hopefully, I can get on with it...7 points
-
Thanks Bill. These arrived in the post this morning: Bill’s transfers by Ced Bufton, on Flickr Thanks Bill, I really appreciate it. I'll definitely be using these: Serials by Ced Bufton, on Flickr and the quality of the squadron codes is good: Sqdn codes by Ced Bufton, on Flickr Although if you look too closely in a close up photo you can still see the dots. Of course you can. There's a limit to the technology that I'm now realising... Thanks again mate! Thanks also for the comments on the masks - the cut of the 'J' is straight so it must have been me when I stuck the mule. I'll have to be much more careful on 'the real thing'. Thanks Benedikt. Those images are 'from scratch' vector graphics in Inkscape and they look great on the screen, as they would at 72dpi (or 90 odd, whatever it is). I'm now resigned to the fact that printing anything this size isn't going to work on my 600dpi printers - as I said above, a 6mm transfer is 0.2362 inches wide so, at 600dpi that's about 140 dots and you're almost bound to see them in a close up shot. Lesson learned! Thanks Cookie - I don't think you'll regret it (hopefully!). I'm still thinking about your feature for cutting decal sheets and I wonder if the PixScan™ feature might work? I probably need this for my Wacky Wabbit Harvard build and the mats are only about £12 so I'll investigate more... The people in the video in that link certainly look happy, although I'm not sure their tagline of 'Dream it up. Cut it out' gives exactly the impression they wanted? Thanks Johnny - printing at work is very kind of you - PM me if you want me to email the Inkscape file but if you're able to print just the logo (from the Bremont website) in Sky I shall be eternally grateful! Oh, and some 4pt Helvetical Neue BOULTBEE s would be magic. Cheeky I know Thanks Hendie. Worth a check but I've confirmed that draft is 'Off'. They're just too small I think to be printed at 600dpi. I've thought about popping out for a 4800x1400 printer but I'm not sure I have the bench space, or enough brownie points with Mrs B! That said, PC World have a CANON PIXMA MG3650 All-in-One Wireless on sale for £29.99. Of course a set of 'XL' cartridges is £40 - give then the guns and sell 'em the bullets eh? And don't get me started on HPs 'we'll send you the ink when you need it' idea. Or is it just me being suspicious? But then, I could just buy another printer when the ink runs out. Madness.7 points
-
Hello everybody, and one more update. Most of the parts on the super structure are installed now. The radar antenna on the driver side / front is made new with brass tubes from Albion Alloys as the kit offers no extracted version. The engine hood is made of etched parts from Voyager and is fully foldable. The tracks are Friul Metal tracks, also ready for painting. The huge antenna and the jib are both made of many, many small, smallest and huge etched parts which were all soldered. A brass tube is installed in the base to keep the radar turnable. Some cables, wiring etc. will follow at the antenna, as well as some further small stuff at the car itself ... Cheers Micha7 points
-
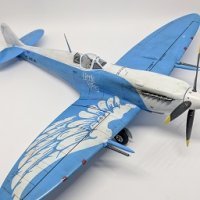
Hello everyone I would like to show you my last completed model, a Eduard's 1/72 Spitfire LF Mk.IX in IDF markings. The build is complete OOB, except for the engine cover, replaced with resin part It was a very enjoyable work, i'm thinking about realize another one in USAAF markings6 points
-
Woohoo!I finished one! THE SSV NORMANDY REMEMBRANCE FLIGHT (link here for what this is.) Jacob Taylor: Hawker Hurricane Mk.I The Hurricane was chosen when research into the family tree of Jacob's wife, Brynn Cole, showed that it was the type that an ancestor of of Brynn's flew during the war. The paint scheme is chosen for Jacob and Brynn's son, Luka Shepard Cole. Overall it didn't come out too badly given the massive amount of trouble I had in the finish stages - it's not exactly my finest hour but it's acceptable. If I feel so inclined I might come back and redo it at a later stage in the project. Stuff I like: - The quality of the paint pattern. - The seams have come together really well, with no loss of detail. - The filler on the (few) fit issues has come together really well. - The decals look good. Stuff I don't like: - The cockpit. - That awful, awful gloss job. - The weathering washes. - The many issues caused by the aforementioned awful, awful gloss job. Well, I finally got one of my Mass Effect planes done, and it was a surprise outsider which got there first! I'd screwed up my main airbrush by accidentally letting a bunch of paint dry inside it, so I decided to buy a cheapo model to test out my alternate airbrush, which I hadn't used before. When I got to the shop they had one of Airfix's newest releases, the 1/48 Hurricane, so I decided to spend a little extra and buy that - it's still pretty cheap if I ruined it and I'd heard really good things about it. At that point I thought, "You know what? Sod it. I keep starting so many models and taking months to finish them. I'm gonna do this one in a weekend." At this stage I'm still experimenting with different paints, finishes, weathering processes and so on so I kind of messed up the cockpit - there's nothing wrong with it per se, but I just kind of feel like it came out a bit grey and boring. Everything went together fine, it's a nice kit with pretty good fit between parts. There were only a couple of bits that gave me issues in the actual build - there was a fairly big (about 2mm) step where the underside of the wing section met the underside of the nose. A bit of Squadron putty and a lot of sanding got that really nice and contoured, and you can't even see the join there now. You can see this area on the photo of the underside, forward of the engine air intake and the landing gear bay. Unusually for a kit of this scale, Airfix give you the option to open up the wing to show the gun bay, so I decided to do this on one of the wings. It's pretty tough to cut out the access panels without ruining them, so Airfix thought to include separate panels if you want to do this. The guns were painted dark iron and then drybrushed with silver, which worked quite well, but I'm staying away from Tamiya metallic paints from now on. The metallic particles seem really big, and the few issues Tamiya paints have seem to be magnified in their metallics. Still, with ammo boxes painted the body colour and copper ammo in the feeds, they went together alright although the fit between the guns and the ammo boxes wasn't great. On to painting the exterior. Everything got a coat of Tamiya fine surface primer, then flat green - I'm not keen on my other airbrush, as it turns out, and I'm very glad my main one is fixed. I went with the green as it's a colour that's not used as much on the other planes I have planned, and the black just because I really like that colour combination. The starburst design came from mucking about testing my new knife on some masking tape - the design isn't perfect and it leaves the tail a bit bare, but the execution is spot on, I'm really pleased with it. Once the tape was on for that, a quick coat of Tamiya flat black completed the main painting. Decals went on next with no real trouble. Couple of coats of Future went on first. I wasn't using all the RAF roundels or anything, but I did apply all the little functional "No Step" and "Fuel goes here" labels. By coincidence the pattern worked out so there wasn't any issue with a black decal on a black background or anything. I got the decals flat to the surface with Revell Decal Soft - it actually frosts up Future and makes it go all milky, but another coat of Future over the top completely eliminates that. It was at this point I got a big blob of Future under the cockpit canopy by mistake, which I was really annoyed about. Then it all went t**s up. First of all I decided to do a subtle weathering wash. Tried it with oil paint, but it was too subtle - it pretty much just wiped straight off leaving the model completely clean. Then I tried a premade Humbrol enamel wash, which made the surface hugely tacky and when I was wiping it off the flat surfaces it tended to leave more of the cotton bud on the plane than wash on the cotton bud. I eventually got most of it off. Then I put the plane down and saw it - Some chemical had reacted badly with some other chemical and eaten away the paint. There were huge patches of bare plastic where my finger and thumb had been holding either side of the tail. Thankfully there weren't any decals or pattern in the affected area, so I was able to touch it up with green seamlessly. With my main airbrush fixed, I decided to gloss coat with actual Tamiya clear gloss rather than multiple layers of Future. Christ, I hate that stuff. It's goopy and sticky and will NOT do what you want it to. So, with my airbrush covered in sticky goop I had to immediately and completely strip down and clean that while my plane collected dust and bits of crap. The gloss got everywhere, including where I didn't want it, which is why the wheel bays and gun bay look so weird in the pictures. The surface is uneven and pitted, and is generally not very good. The real life Hurricane was made of fabric stretched over wood for a large part of the fuselage and tail, so I was going to do a further matt clear coat over those parts, but at this point I decided I didn't want to mess with it any more. The last thing to do was make the aerial, which I did by taking a piece of spare sprue and melting it with a lighter until it dripped to the floor in a super-fine (and very straight) filament. I superglued this to the tail and the radio aerial, cut off the ends and gave it a coat of Vallejo black paint. It actually came off the mast just as I was preparing to take the photo, which is why it goes downward in the photos. Oh well. That's Jacob's plane, then! I'm fond of it despite the havoc wreaked by that last clear coat.6 points
-
Hi James, I've got that book and it's very good!!! Now a small update Tonight I started detailling the port (port- starboard...nobody can stop me now!!!) wheel bay, which has got a different layout. Then I fitted two pieces of steel wire in the dedicated housingd on the fuselage, to start checking the wings positioning.These are just temporary ones to see if they could be strong enough to hold the wings' weight. I think this system will ensure a strong holding system for the folded wings. That's it for noow. Good night! Massimo6 points
-
Hello Guys! This is to make Mike a Tiger II That is is the second one from 2004. I changed the odd 20 "5", the mouth and did some detailing. Code was changed from AM to AD hastily. Longnose was a shorter fun to build, because easier OOB (Sorry, i couldn't resist.) Tarmac is the same joke too.... Cheers, Thomas6 points
-
Well, here's the final model I completed last year: Airfix's 1/72 Vampire T.11 in post-UDI Rhodesian Air Force markings. Humbrol enamels were used throughout and the markings are Xtradecal for the main insignia and kit for the rest. The former behaved in their normal impeccable fashion but the kit decals silvered quite badly here and there. I finished this on New Years Eve but I was laid out by the flu before I could take any pictures. All in all, it's a nice little kit. I have to aplogise for the picture quality as the light conditions here in the North East of Scotland have been terrible for indoor photography - today has been the best since New Year! Comments welcome! Mike.6 points
-
It's a pity the headaches afterwards from squinting aren't at 1/72 scale too Gorbs! Thanks for that. No you're not Giorgio - you're Italian and have one of the most beautiful languages. Hiya Bill! Praise indeed from one such as yourself. I'll let you into a little secret if you promise not to tell the others - I have something of a fetish for water dioramas such as this fine example: Although I won't be doing anything like that this time around, a future build will indeed include immersion! Wow - thanks Bill! I forgot the rope though! Can you ever forgive me? Many thanks Mike. My thanks to you also Jaime for being such an immaculate host in shepherding us through the whole fraught process of the GB and being such a constant support. Even last weekend I wasn't sure we'd get there Simon! Thanks for that. Cheers Meatbox! She certainly is from that golden age of 'flying things that floated' in terms of shape and style.... Vinnie - cheers for that mate. Thank you for those kind words Jason. Nigel - most kind of you sir. Hope things are settling down ok for you at the new premises? 'Classic' is right minion! Nothing like handling something from your childhood and feeling the passage of time is there? I suspect that I would have made it back then in a weekend and weathered it with glue.... Much appreciated Mike - thank you sir! From one of your craftsmanship Tomo those words make me glow with pleasure - thank you! I harbour fiendish plans for something sacrilegious involving a Roc at a future date.... You are too kind as always Johnny. Thanks as ever for the companionship! Ta Russ - just as well work involved a busy start to the week this morning or I suspect there would have been withdrawl pangs! One last big overdue here is to Mr. @TonyTiger66 who so generously donated the Kora beaching trolley on which the aircraft now sits in the cabinet - a gentleman if ever there was one. (I just hope you like the result TT!)6 points
-
All done now, the eviction from my modelling roost wasn't as sudden or total as I'd been lead to believe. Just to remind all what I was striving for. & what I've ended up with, I'm gently pleased with it, it looks a lot like the vision I had. I'll put some more photos in the gallery . Thanks to all for the support & for making this Matchbox GB happen. It has been an enjoyable nostalgia trip. Steve.6 points
-
Here is my build of the old Italeri kit - pretty accurate overall, with just some of the flying surface furniture, the internal primary structure, and some other details needing to be added. The Starthilfe packs were robbed from the Frog/Revell Ar234.6 points
-
Hi all, I thought you might like to see my latest 1:32 scale model (my 12th), which is the Fokker E.V flown by Hans Goerth whilst serving with MJF III in 1918. The model is the fairly recent release from MicroMir and although updated by them, still leaves a lot of corrections and modifications by the modeller to bring the end result up to standard. During this build I replaced the kit supplied cockpit side frames, pilot seat support frame, pilot step, ground crew grab handles, undercarriage struts and wing support struts with scratch built versions, made from Brass micro-tube and solid rod. The wing support struts and the undercarriage struts were made with an aerofoil section and reinforced internally with solid brass rod. They were fitted to the model without using the ‘Pheon’ supplied jig that came as part of their decal set. The engine was replaced by the ‘Roden’ version and the two machine guns by ‘Gaspatch’ equivalents, whose turnbuckles were also used. The lozenge 'fabric' decals were from 'Aviattic. The display base includes a figure from ‘Copper State Models'. The access panel wingnuts and Fokker style fasteners were from 'Taurus Models'. As usual I have compiled a comprehensive build log in Adobe PDF format. It includes step by step build details, supported by colour photographs and also covers the kit corrections and modifications as well some information on the pilot and aircraft. It can be viewed and/or downloaded from the linked Fokker E.V images here: http://igavh2.xara.hosting/index.htm My next model will be the Wingnut Wings Sopwith Pup (RFC version).6 points
-
Late I know but a very tiny catch up as I feel like I’m neglecting the lightning. Work has kicked in, kids are back at school and evening clubs and weekends are taken as the new year begins. I had a request to build a Lanc earlier this earlier this week and since this is my only one and I’ve wanted to build one forever, I can’t take my mind off it. she’s Huuuuuge! I’ll need some extra bits and bobs but I’ll try and push it to the back of my mind for now. (Very difficult) I got a few moments at the bench today doing thought I’d share what little got done as a token. “See I did glue something” post. Thanks to @propforward I glued the tail fins in place. you can just see them drying at the back. The front canopy got masked. and the rear one got done outside and a rim on the inside. I also glued on those pesky ducting strips. Im nearly ready for a silver under side. I’m away with the boy all next weekend so I shall endeavour to get some done during the week. hope you all had a lovely weekend. Take care. Thanks for dropping by for the shortest update evah. Happy modelling kids. Johnny.6 points
-
They will make HMS Belfast in 1:48 as an accessory set for the Supermarine Walrus...6 points
-
Good evening everyone ... Got my painting done this afternoon. I laid down a coat of US Olive Drab. Followed by a coat of the closest color i have to SCC.15. That was followed by wavy stripes of Black/Brown. I chose the stripes because i found a single photo taken in Northern France. The caption was in german. The photo is from wikipedia. If you look at the photo closely. All along the lower hull just above the tracks and the rear turret you can see a two tone color change. I believe the lighter tone to be green. The darker either black, brown, or an even darker green. 🔺↕️ The caption after translation. Ok so here lies my Achilles with paint. I did the white under the forward portion of the barrel and will touch it up before im all done. The last shot shows the belly of the beast. I left it mostly US Olive Drab. Though if you look you can see the color changes on the Transmission. Well its going to cure until tomorrow. I will clear coat it tomorrow and then more work. Good night, enjoy. Dennis 🔺* not sure if these are public record so i will state the ownership rights belong to others. I only use them for informational purposes. If i have to i will remove them.6 points
-
Here's what I consider my latest completion for 2017, even if we are already into 2018: KIT: Hasegawa 1:48 Macchi C205 VELTRO AIRFRAME: AerMacchi built Macchi C205 VELTRO Serie I, 360sima squadriglia, 150° gruppo, 51° stormo MARKINGS: the wing insignia ("fasci alari"), tail crosses and code numbers were airbrushed using self produced masks; the Savoia emblems inside the tail crosses and the red alignment arrows for the variable incidence tail planes were custom printed on transparent decal film and kindly donated by Eugenio @72linerlover , the rest of decals are from the kit PAINTS: mainly Lifecolor acrylics (including the dedicated set for Italian WWII fighters), airbrushed, with the addition of Model Master Metallizer Titanium for the exhausts and Tamiya acrylics for the white bands and crosses, the codes and a few other details. The smoke ring camo is airbrushed as well, thinning the relevant paint with Vallejo Glaze Medium and spraying at a very low pressure, removing the airbrush protective cap. Many thanks to @Giorgio N for the advice on Vallejo Glazing Medium WEATHERING: mostly with tempera washes, various hues Aftermarkets: - SBS Models resin/PE cockpit set - Quickboost exhaust stacks Scratchbuilding: - Resin ailerons; my first attempt at resin casting, pretty happy with that - Supercharger intake butterfly valve, using plastic card - Oil radiators grid covers, from PE leftovers - Main U/C bay sand covers, plounge molded over gum masters (actually nade cutting them out from a Staedler pencil eraser) - Main U/C bay inner doors, from some beer can cutouts and 0.5mm styrene sheet - Undercarriage actuator arms, from steel pipe and rod - Pitot tube, using a prescription needle and steel rod - Fuel tank vent, from brass pipe - The tail plane fairings were removed from the fuselage and I molded a milliput copy to be applied directly onto the kit tail planes, because on the real aircraft they had variable incidence, so there's a gap between the fairings and the fuselage - Main wheels brake lines, using various tin and copper wires - Wing navigation lights, again plounge modling clear plastic, using the model wing as master - and stretched clear sprue to reproduce the lamps and a few other minor things. This model is the second of a double build, which involved a C202 Folgore (completed in August 2017), again from Hasegawa; here's the WIP thread, in case you're interested A huge thank you to everybody participated in the WIP thread with suggestions, encouragement, advice and even supplying stuff . Enough blah-blah, on with the pics: All comments welcome Ciao Edit: here are some family pics with the other subject of the double build5 points
-
Hi folks, Well, my first yearbook (and, TBH, the 2017 was the first year in some I was able (as in "yes, you're able to pull your fingers out and finish something) to complete something. Here are the somethings of the year, all 1/48 scale: Academy F-4J, ZM decals for a F-4J(UK): Airfix Spitfire Mk XII, SOOB: Hasegawa F-104S + CED kit: Kinetic F/A-18C SOOB: Tornado IDS Revell + HaHen decals (lovely stuff, BTW): Hope you like them, Cheers, S.5 points
-
to my modeling circuit there are, in addition to ships and technology, I send some models from my modeling workshop.5 points
-
i have had a liking for the Bell X-1 since watching The Right Stuff many years ago. It ss the early part of the film with Sam Shepard's extraordinary performance as Chuck Yeager that I most enjoy. A colleague, who knows of my model making habits, was kind enough to send me a portion of the "stash" of a a friend of his who passed away a year of so ago. Within that batch he sent me was Tamiya's 1:72 scale kit of the X-1 and I thought that it would make a good kit to start 2018 with. It was a very quick simple build (i decided against using the transparent fuselage halves). I used Italeri Acryl Acrylic Flat Orange as the main colour, applied by brush. A couple of firsts for me - I used an artists oil wash to highlight the moving surfaces and finished with Tamiya Semi Gloss Clear from a rattle can. Maybe a little grubbier than I intended, but the semi gloss finish is exactly what I wanted. I will be trying the Flat Clear on my next build. Build thread here. Thanks for looking. And some photos taken in the late afternoon sun.5 points
-
From the Matchbox Group Build A straightforward kit made needlessly complicated by me overthinking it - aftermarket decals, marines and a plywood/sandpaper base5 points
-
I found this video just now of Hornets being armed and flown out during the Malaysian Campaign from RAF Butterworth. I hope it hasn't already been posted before. One beautiful airplane, but did DH ever make an ugly aircraft? Enjoy this You Tube video. Mike5 points
-
I didn't forget! IP by jongwinnett, on Flickr Probly upside down or summat but at least it's there... I then mopped up the bottle of clear I spilt over the bench while applying said IP, and got down to the nerve-wracking task of applying the glazing. Unfortunately it was, like the Mk I fuselage, banana shaped and I had to resort to superglue to get it to match up to the sidewalls. Superglue and clear plastic do not make good partners but I think I have got away with it (just!) I am now cooking 06/24 minor's tea (spaghetti and meatballs) and having a break before I try masking and then filling. Glass by jongwinnett, on Flickr5 points
-
Excellent. The model shall have it then, as it is rather conspicuous. Thanks for checking. Ugh - the dreaded lurgy! The bane of all modellers - when there's an empty workbench, spare time, and one can't take advantage due to being in a nautical way (as in heave-ho). The quarantine section is available and there's plenty of seats. I might need one myself. I'm taking a guess here - does the feel system make the powered controls "feel" as if one is instead pulling on some mechanical cables etc.? So that the pilot needs to apply increasing force as the control surfaces are actuated through their range? As far as the cocktail bar, some single malt Scotch is of course required along with a nice British IPA. I'm feeling hoppy today. And tell them to put a flag on that antenna - warplanes are supposed to harm the enemy not the taxpayer. I know all about being old and getting infections. I now have yet another sinus infection that won't go away in spite of the tons of antibiotics we're throwing at it. Last year, this resulted in sinus surgery after a stay in the krankenhaus with pleural effusions. The chemo regimen (that I've completed!) has basically nuked my immune system and my body no longer makes the IGG antibody, so I'm prone to upper respiratory infections. I just had another transfusion of synthetic IGG last week and it looks like this will be an ongoing therapy. Not unheard of in cancer patients like myself. I look at it this way - there are good days and bad days. But at least there are days! Cheers, Bill5 points
-
Great description! I have never had the pleasure of twin engine fixed-wing flight, but the speed of things going wrong is very reminiscent of learning about tail rotor malfunctions in the Sea King. I came to the Beast straight from the Gazelle, which is a delightful Gentleman's Conveyance of an aircraft; easy to fly, but hard to fly well, and thus a perfect trainer. [The IP on a Gaz is about the same size as on that beautiful Blenheim; lots of things might confuse you, but the complexity of the panel is not one of them. Then you climb into a Sea King. Oh. Em Gee. Dials, switches, instruments & levers everywhere, all surrounded by a veritable ocean of circuit breakers, which I am convinced were placed where they are just so that the Beefer (FAA-speak for instructor) has a Smörgåsbord of hellish failures to unleash on his poor stude, all within easy reach of a casual arm.] I digress. The Sea King has a device called the Negative Force Gradient Spring (NFGS); it sits in the tail pylon, and is designed to give the pilot some degree of control in the event of a tail rotor control failure - i.e. the TR is still turning, but the pilot has lost the ability to alter its pitch (for which there could be several causes, all unlikely but not impossible). Tail rotor failure itself is very scary indeed, but surviving it comes down to quick reactions; the faster you can dump the lever and shut the engines down to remove the torque, the more chance you have of getting into a survivable engine off landing. If your TR fails in the hover and/or at high power, you generally arrive on the ground in a horrible spinning mess (check YouTube for the odd video); if it occurs at height and lower power, then it's frightening but manageable. Tail rotor control failure is different, and much more subtle - and is therefore a favourite Beefer malfunction if he thinks you're doing too well in your annual QHI check. It is challenging however experienced you are, but the first time you do it is horrendous. The sweetheart nice instructor fellow will wait until you are nicely trimmed out at 90 kts, straight and level, and then jam his feet hard on the pedals so you cannot move them (simulating the failure by removing your control) and taking out the yaw axis of the stab. The next time you alter power (in either direction) the nose yaws - but slowly and un-scarily at this stage, because the NFGS is doing its job and keeping some pitch on the TR, and anyway you are 1000s of feet up so have no close visual references. Gradually the befuddled student works out what is going on, and then flies some dummy approaches at height, working out what combo of speed, attitude and power will provide a steady rate of descent that will give safe a running landing. It usually works out at about 40% power (its dependent on aircraft weight) and approx 40-50 knots airspeed. So far, so good; you have flown a dummy approach and it all seems easy enough. Then you try lower down. Set the aircraft up on long finals, in the speed / attitude / power combo that you've worked out, and descend slowly towards the runway. You are invariably flying in an awkward-feeling aircraft attitude with one wing low, but it's OK... right to the final 20 feet. By then the ground is getting a tad close, and it looks to be rushing by rather quickly (you don't do running landings in Gazelles cos they don't have wheels, so all this is a bit new). You also feel (especially the first time you do it) that your rate of descent is WAY too high, so you instinctively pull a little power to slow the descent... and the nose GOES BONKERS, SWINGING MADLY OFF COURSE at a rate you can barely credit. You stagger away from that missed approach at about 45 degrees to the runway, dodging control towers, hangars and local trees and flying at preposterous and uncomfortable attitudes, sweating and with heart rate rather raised. Oops, forgot; don't change the power! Try again. Set the cab up speed / attitude / power and re-run the approach. You are inexperienced, and you have just frightened yourself silly, so you focus obsessively on the power and rate of descent, reminding yourself that the u/c is stressed to withstand deck landings (though those are still way in the future), so you'll be fine provided you run it on straight. Down you go, and this time as you pass through about 10 feet your bottom starts saying that you're WAY TOO FAST ... so you keep the power static but instinctively twitch the nose up a little to slow yourself down... and OFF YOU GO AGAIN in the opposite direction as the speed bleeds off. Even when you get it right it is scary; you accept the rate of descent, run the aircraft on much faster than you think is sensible... and as soon as the main wheels touch the ground you chop both engines. Both the Sea King and the student subside in a dishevelled heap. The Beefer smiles sadistically under his dark visor. A friend of mine had one of these for real when embarked on a tanker. He got it back on deck, calm as you like; 20 kt wind and the ship wound up to max speed, giving him about 5 kts groundspeed over the deck edge. He was shaking like a leaf (and got a much deserved Green Endorsement). [Sorry, Blenheim-builders. Major thread drift about the speed with which things happen. Now back to our normal programming.]5 points
-
Thanks for all the birthday greetings everyone. So, a little bit of work has begun over the weekend. Just starting to get the basics of the lower hull together. It's interesting that Takom has slightly retooled the kit from the initial Lee/Grant releases. Obviously, they've added the extra bits for the ARV version, but some of the common parts have been modified too. One of the first jobs is to add the transmission cover and final drive housings to the lower hull, and Takom has made changes here. The final drive covers fit into recessed sections at either end of the transmission cover On the previous Lee release, those recesses were open instead of being filled in, which you can just about see in the photo below from my Lee build The revised transmission cover included with the M31 does give a bit more glueing area but otherwise doesn't make much difference. There's also a number of strengthening ribs that have been added to the lower hull, and these do improve things, as the Lee hull was a little warped You also get the opening in the base of the hull for the cable rollers, should you want to rig it up that way. I won't bother fitting the rollers, as I'll have the cable rigged on the main crane jib I've added some cast texture to the front faces of the final drive covers with Mr Surfacer since Takom only mould texture on the side faces. When the front end is finished, I'll add some more light texture to the rest of the transmission cover I've also started to build up the suspension bogies and track runs. The upper track section is mainly a single length, but a few separate links are added on the end to get the slight upsweep to the sprocket. There's a jig included for doing that Beyond that, I've been doing a bit of research on the 5 marking options included in the kit, for which this site has been very useful. Going by the production charts at the top of the page, the hull numbers for four of the 5 options seem to correspond to the second production run that were modified from previously used M3s. That matches the parts you get in the kit, such as the welded side doors. The one that doesn't match is the fourth option, which is an overall OD tank with the hull number 40103211. That doesn't seem to match up with any on those charts. The other options are... 40104020 'Georgia on my mind', OD with a sand camo 40103727, OD with chalked markings (there's a photo of this one on the above site, although the kit doesn't include the sand guards shown in the image) 40103935 'Invader', OD with black camo The fifth option doesn't include a serial number, and is OD with an improvised sand camo, and matches the one in this photo Not sure which one I'll be doing yet, but it'll probably be one of the two named options. A long way to go before we get to that stage though. Andy5 points
-
2018-01-07_10-12-40 by Edward IX, on Flickr Christ, I hope not.5 points
-
it certainly does Richard. I have a copy of that one in my archive somewhere. I find it a very nostalgic photo as to me, it captures the hangar lighting effect very well. Every time I look at it I get an almost 'homesick' kind of feeling. Ah... to be that young again.... The thing that struck me about that photo is that there's no Nitesun's to be seen anywhere. I have so imprinted in my mind that I can't picture a Wessex without one fitted. Maybe it's because it was such a traumatizing event to do an engine running fuel up and having to wiggle in past all that scaffolding with a honking great, very inflexible fuel hose, trying to not get a full blast of exhaust in your face and trying not to go up in flames in the process. I think that photo is after my time though as it looks like they all have the flotation device fitted to the u/c. - that was not common practice during my time. So back to plastic. Things have been slow (in modeling terms) since the new year and life always seems to make an appearance at the most inopportune times. Lets start with a teaser... can anyone spot the glaring error in tail in this photo (ignore the aerial, it's just dry fitted - but it's wring too!) It's kind of hard to see in this photo so I'll forgive you if you miss it How about if I overlay a nice straight line along the length of the tail ? See it now ? Maybe it's not too obvious in the photo, but... in the 1:1 all rivet lines are perpendicular to that red line. Not so on the kit. The rivet lines are all at some weird angle. Definitely NOT perpendicular. Soddit. It would be almost passable but as soon as you fit that aerial it becomes immediately noticeable. On the 1:1 the top edge of that aerial is aligned/parallel with a line of rivets but on the kit, the rivets veer off a couple of degrees. I've been mulling that over for a few days and I'm not sure what to do about it. What they (Fly) have done means that pretty much every rivet and panel line on the tail is wrong. In order to keep moving and to cheer myself up a bit, I carried on with other aspects of the tail, namely the hinges. If you take a quick peek back up at photo #1 of this post, you will see the brass hinge arrangement I first tried but didn't like. Thankfully, I did not throw it away as it came in handy after all. I snipped the center out if the 'hinge' leaving me with a small piece of tube soldered to a small piece of rod. I then carved a small 'v' shaped notch in the kit plastic where Fly forgot to add hinges, and that allowed me to slot in the leftover hinge. Repeat for t'other side and CA in place. After that all I had to do was add the center part of the hinge casting. This time made from styrene. I'm going to have a go at the styrene part again as I'm not entirely happy with the current part though it does prove concept for me. That's the easy part done - the rest of the tail hinge gets progressively more difficult from here on in5 points
-
Hy all, here i present my Saab Draken on 1/72. Its the first time i did camouflage, first time i did weathering, first time i made a underground and first time i made seat belts, didnt found a picture from that sorry. I used paint from mr hobby and did the wheatering with normal oil paints. The metal i painted with AK. I know theres fault in but im happy with the results. i still have much to learn but this is my 3th post so far, wel airplane that is. Hope you all like it and i will read with happy the good and bad reviews. Greetings from Belgium John th5 points
-
Thanks mates - great info on the anime and the lorry. I wonder how the lorry driver felt after the incident - nowadays, the press would be all over him I suspect. Oh well, stuff happens as they say. So how about I actually do some work on this bad boy? The first order of business is to see how the aftermarket will attach and what, if any, modifications need to be made to the kit parts or the resin. In my experience, you usually have to do both and I'm expecting that here. Since I want to display the starboard avionics bay open, I have to cut out the panel from the fuselage. I use a couple of different techniques to do this - sometimes I use a scribing tool (specifically the one from Tamiya which can remove a lot of plastic quickly) and continually re-scribe the panel lines until I've broken through. The plastic is quite thick on this model, though, so I decided to use the old drill and hack technique. It's important to not get your drill holes too close to the actual panel lines, as you need some plastic left to do the final shaping. First, use a marker to show where you want to drill: Then I used a small woodworking drill of 0.050" diameter to make some pilot holes. All drilling was done by hand, no electrons were consumed. These don't have to be precise, because next it's time for larger drill sizes that eventually overlap each other so that the inner portion of the panel is free. And it ain't pretty! This looks like a meteor strike, perhaps betraying the kit's Stratos 4 origin. Now, with some sanding sticks and scalpel blades, this was cleaned up in a satisfactory manner. I took my time to make sure that I didn't go beyond the kit's panel lines, but I failed to remember to do one specific thing (as we'll learn later). Some wise person once said "measure twice, and cut once." As someone who spent most of his life in the metrology industry (metrology, not meteorology, geez) you would think I would know this. But alas, I did not measure the actual resin avionics bay which, of course, is slightly smaller than this opening. All is not lost, as the vertical edges of the opening can be built up with strip styrene and we'll all be happy. Except the clod who made this extra work for himself. Dolt. Now, the avionics bay itself has to have its pour block removed completely so that it won't interfere with other components. I think this is one of the most common issues I see with resin parts - folks not removing all of the pour block and then complaining that it doesn't fit. Well, we take injection moulded parts off of the sprue before assembly, right? It's the same with the pour block. Let's have a look: See that extra layer of resin on top of the avionics bay? That's the pour block and it's gotta go. The temptation is always to start going at it with sanding sticks but this might take you a while. Never being one to shy away from potentially debilitating tendon severing, I prefer a razor saw. The key to getting a clean cut is to saw a little bit on each of the four sides, and work your way around the block several times. The cuts you make will serve to guide the blade of the saw and you cut deeper and deeper, so you don't get off track and cut through the inertial guidance and terrain following radar boxes. Soon, the pour block will pop off, and life will be swell (unless you slipped and actually severed a tendon - for this I advise rapid application of superglue and a trip to the National Health). We'll find out later how well this fits, especially with the cockpit, nose gear, and bomb bay resin. I then had a look at the cockpit (and beautiful it is!) but in order for it to be in its proper cockpit-esque position, in-between tightly closed fuselage halves, the locating tabs for the kit cockpit have to be removed. Not unexpected, but Ugh! just the same. The only tabs that don't have to be removed are the ones at the bottom, and this includes the various bumps underneath the section of fuselage between the two cockpits. This is because the rear instrument panel in the CMK set fits in this area. I removed all this stuff with a Dremel tool and a round bit, some very coarse sandpaper, and an occasional expletive. I think I also accidentally removed an alignment peg or two, but who needs those? I build Special Hobby kits! All of that was followed by some fine sanding and Bob's yer uncle. The resin pit needed to have just a slight sanding on the sides in order to have the fuselage halves close as they should around it. Luckily, the avionics bay does not interfere with the cockpit in any way. You'll notice that the cockpit tub has received a coat of Dark Admiralty Grey - I can't tell you how many times I've sanded things to fit only to find they don't fit once they're painted. Tolerances are such a pain. Today, I'll see about the nose gear bay, and if I'm lucky will also have a go at the bomb bay. After I shovel the driveway, of course. Memsahib beckons. Cheers, Bill5 points
-
PK-605, the 1/72 Handley-Page Heyford, in trainer colours. Build thread:5 points


This leaderboard is set to London/GMT+01:00