
Leaderboard


Popular Content
Showing content with the highest reputation on 18/12/17 in all areas
-
When I started building this model some six years ago, the delivery of the real airframes were already then several years delayed, and just a handful had been delivered - for aircrew training. Now that I have finished the model, the NH90 is still not operational, and possibly apart from one or two, no more aircraft have been delivered. It appears that the naval version of the NH90 cannot operate in from ships.... Revell originally issued the NH90 in army configuration, and the kit was actually quite good. They have since added a couple of sprues for the naval version, of a quite different standard. The new sprues lack the crispness of the original kit, with almost Matchbox old style trenches. There are also lots of details missing, which thus have to be scratch built. I also had to do a few local modifications for the Norwegian version, that Revell is not to be accused for, including the fuselage blisters and the double rescue hoists. As the real aircraft spend most of their time in the hangar, there was no reason for any weathering, other than dust on the rotor blades. Decals are from the Vingtor range, which I design myself... The reason why it took me so long to finish the model is partly because I was waiting for the type to be operational with the RNoAF, and partly because I started other models in the meantime. However, I have finally completed it. Nils20 points
-
This one was tough to photograph due to the combination of dark finish and winter sun. Please forgive the stark shadows, the indirect lighting was too weak to shoot, so had to place the subject in direct sunlight. All comments welcomed... WiP can be found here: regards, Jack18 points
-
This kit took way to long to complete, and for me that is a real mojo killer and causes a bad case of get-it-done-itis which in this case caused the decals to suffer, more on that later. The problem was not that it was a Mach 2 kit, again more on that later, but its large size, a natural metal finish and a relatively large number of paint colors. A weeks vacation in the middle didn't help either. Since I retired I have averaged 2-3 weeks per project and this one took a little over 4 weeks. This is my 7th Mach 2 and as far as the plastic is concerned I would rank it as one of their better ones, far superior to my last build, their E-1B. The main issues were the soft plastic is not conducive to building a large heavy plane and lead to a couple split joints, but the main issue is that no feature on the right side lined up with the corresponding feature on the left side. This was especially bad and annoying when it came to the wing roots. I pretty much fixed that, but I will not show you a picture from directly above over graph paper. I used the Pavla interior, but knowing that the "transparency" would be only translucent at best I didn't spend a lot of time on it. I had a hard time getting enough weight in the nose and it just sits on the node wheel. The decals where a major issue. My previous experience with Mach 2 decals was that they were far better then the plastic and in some cases really excellent. Not this time. while thin they were very stiff, or rigid. They refused to snuggle down and were impervious to all decal solvents know to man. I mostly go them to look OK, but I had to give them a top coat which I don't usually like to do with a NMF. But enough whining and on to the pictures. Before you ask, the wings should drop enough the the wing tips are even with the bottom of the fuselage. Next up is the Testors/Italeari F-21A Lion, aka ISI Kfir.16 points
-
Hello, This is the Academy F/A-18A+ converted into a spanish EF-18A (Modernized). The only after-market part is the decals. The kit is really very good, better than the old Hasegawa. The camouflage is a bit odd, definitely not the regular Spanish Air force one, probably applied during a maintenance work. Cheers15 points
-
I finished modelling for the year about 3 weeks ago as I have left my bench for the UK (Jeez it's cold) First Nitto 1/100 Tristar with home made decals (on a borrowed stand) 1/72 Vacuform Bison WIF Air Forski One, had the kit for years..had to do something with it! 1/72 CMR/AIrfix Combo York My favourite, 1/72 Vacuform Britannia again with home made decalage 1/72 vacuform (AIM) Stinson rescued after years languishing on the shelf of doom , 1/72 Mach 2 Viscount, yeah yeah home made decals 1/48 Roden T-28, who doesnt like a round engine? 1/72 Modified Airfix Jetstream, home made decals 1/72 Roden Cub, I have since fixed a few decal issues with this but havent taken a decent pic yet, home designed decals printed for me by Dekls (for the white elements) 1/72 Matchbox Stranraer Another WIF Hasegawa Shin Meiwa, just cos I like Flying boats Glue Bomb resurrection, a rare Aurora Super Beech 18S modified to represent a Super H18 home made decals, a nostalgia project for me also rescued from shelf of doom. Still something to fix with this but ran out of time, Airfix Canberra nose modified with a 1/32 Mustang drop tank shape14 points
-
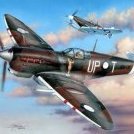
Hi everyone May I present my 1/48 Tamiya De havilland Mosquito FB Mk. VI finished as NT198 305 Sqn RAF. It was built mainly out of the box with the only additions being new barrels from Air Master, instruments from Airscale, code letters from Montex and I made the Sutton harnesses from masking tape. All pictures were taken on my IPhone 6 in our kitchen.14 points
-
Latest and probably last completed build for this year is Airfix's Bf110c. Quite a nice little kit that when together easily and only needed a small amount of filler overall, cockpit detail is sparse and I was going to get the Eduard PE set but I managed to pick up one of the Eduard weekend edition Bf110's so that one will get all the extras. This on is OOB, painted with Tamiya acrylics, and dark brown oil paint for the panel lines. The kit decals and stencils are excellent and went on with no issue. As usual any comment are welcome. IMGA0128 by neil Connor, on Flickr IMGA0129 by neil Connor, on Flickr IMGA0130 by neil Connor, on Flickr IMGA0131 by neil Connor, on Flickr IMGA0132 by neil Connor, on Flickr IMGA0133 by neil Connor, on Flickr IMGA0134 by neil Connor, on Flickr IMGA0135 by neil Connor, on Flickr IMGA0136 by neil Connor, on Flickr IMGA0137 by neil Connor, on Flickr14 points
-
Hello Everybody... It's Christmas this week, the weather over here in the Fatherland is cold and icy, so I guess we need a winter setup: This is my Sturmgeschütz III Ausf. B from Dragon in 1/35. It is pimped with some etch and some homebuild extras, Magictracks and a Tamiya commander with a NWM resin head. The two guys in the trench are from CMK. And I'm pretty sure the lads in the StuG. would prefer to be "Driving home for Christmas..." instead of freezing in Russia... All the best to all of you.. Cheers Tobby13 points
-
After two years I finished building the IL-28 Beagle. The base was the Trumpeter model, to which I made more than 1000 parts. I bought resin wheels from Armory and the OFAB-100 bomb from Eduard for the model. Several photos of the interior and other parts. Cockpit of the shooter. Sights. Bomp chamber. Pilot and navigator cockpit.12 points
-
Hi everybody, Here you are my latest build... a frenchy Turbofirecat made with Hasegawa/Revell Grumann S2A Tracker kit and Wolf Model conversion kit.Decals Sheet from Syhartdecal.You can see more on my FB https://www.facebook.com/AviapassionMaquette-1507844922841510/ Or on Master194 frenchForum http://master194.com/forum/viewtopic.php?f=4&t=99446 I hope you will like it Cheers Thierry12 points
-
Just finished my Airfix 1/72 Jet Provost T.4 this morning. Out of box and Hataka and Tamiya acrylic paint job.12 points
-
Unlikely to get any of the F-4J builds completed before the year is out so it seems like a good time to give the annual run down now. In no particular order; 1. South Atlantic Shoot Down 2. Testing Times for the TSR2 3. A-6 SEA Experimental Scheme Bomb Drop (Try saying that quickly after a few beers.....) 4. 15th September 1940 5. Taking the Barrier 6. High Speed, Low Level TSR2 7. Head On Attack 8. Anti Shipping Strike 9. Tiger Hurricane ........ and my modelling claim to fame for this year ended with my 74(F) Tiger Squadron collection going on display at the Norwich Aviation Academy last Friday. Thanks for looking.11 points
-
Hi, Here is my completed V-1.. I ended up with the Meteor / V-1 combo kit and built the V-1 first. A simple build but needs a bit of care with the seams.. Hope you like it..11 points
-
Here is my version of the 50 year old kit from Revell. It is built as the instructions indicated. For it's age it's a fine kit to build.10 points
-
Hello This kit is not easy, but the look of this machine encourages its finish ! https://i62.servimg.com/u/f62/16/96/57/77/iarfor11.jpg[/img] Best Regards10 points
-
A return back to the forum after a few months achieving nothing. I started this model just to get it out of the stash. A few years ago I bought an F/A-18E model from our favourite auction site and the seller very kindly sent me this kit as part of the deal. It seemed like a good simple way to get back building after a mini lull in production. the trouble is it really isn't the best of kits and desperately needs some extras to spice it up. As I hadn't paid anything for the kit I figured a few extras wouldn't hurt, so added: Aires Wheel bays Aires Cockpit SAC - Undercarriage Master - Static Dischargers Royale Resin - F-16 Wheels The cockpit and wheels bays really are a drop fit, even though they are designed for the Hasegawa F-16. Not really a coincidence since both kits really do bear an amazing similarity to each other. Construction isn't too bad apart the usual intake troubles with most F-16 kits and a really awful fitting wing to fuselage joint. Lots of filler and sanding sorts that one out though. Painted with Hataka paints and matt coat provided by Xtracrylix. The decals were Afterburners 'Bentwater Aggressors' sheet and a Two Bobs inert weapons sheet, both performed flawlessly. All in all another build finished from the stash and another one added to the planes I've seen theme, that I often like to do. Onto the pictures:9 points
-
Hi folks While it's a pretty accurate shape with good surface texture the kit is very much 'short run' quality in terms of parts fit. It's ok, but surely a subject deserving of a first line manufacturer in 1/32. Merry Christmas to all Britmodellers! Regards J A.9 points
-
Hello all im going to display my total output for 2017. Ive only been a Forum member since June of this year. I'm not sure if it should be models completed after joining. If im in the wrong please except it as ignorance. Starting early this year I finished the Revell super bug F-18E in a US Navy Centennial paint scheme. I chose to do VFA-192 Golden Dragons and went for a Dark sea blue scheme. This probably counts more as a whif as im not sure if they actually wore the scheme in 2011. An A-10 USMC whif. In the markings of VMFA-451. I actually did scratchbuild the arresting gear, a retractable refuelling Probe, and scored the wings to represent a wing fold. I just dont have a photo of all of it. I have a double nose wheel for it that will get grafted on soon. When your a general you get to pick your own plane. I did my P-61 in General Earl Barnes of 13th AF the plane was pulled from and crewed by the 550thNF Sq. The only bare metal P-61 in the war. The next up was an old Monogram F-20 Tigershark. I opted to do a Whif Air Nat’l. Guard plane using F-16 Decals From the Indiana ANG. I started this A-20 in 2004 but due to my leaving the hobby i finished it this year. Revell’s F-84G in kit Decals. The yellow bomb hashmarks are from the spares My attempt at an Israeli F-16D using the Hasegawa “B” and a conversion set. Then on to a Hasegawa -5 Corsair one of two that I've done this year. The first from VMA-212 in Korea. The second -5 was an 5NL all weather model based at Glenview N.A.S. Circa 1956. I was tired of all blue so I went for a different scheme. After the two corsairs I went with Tamiyas F4f wildcat. I opted to build a Martlet V in 1944. I forget the name of the carrier but it was used in one of the April raids on Tirpitz in Norway. Next up was the first of Fifteen models for a project I am doing about the 8th air force. The 4th FG eagle squadron P-51D from Academy in 1/72. Another Hasegawa this time an Luftwaffe F-104G in USAF markings from the late 1970’s. I used Foil for the Finish. Hasegawa’s F-8E Crusader in markings from VMF(aw)-232 in Vietnam. Still needs weathering. Thinking about this it does seem I build a lot of Hasegawa kits. I did this year as i was given a large number of kits from my Friends stash i did build several other kits mostly old Monogram. They will be added later as i dont have photos of those or my KUTA Build. Next up is this FG1. There is an RFI for this. Next up is Airfix’s great Lightning. I built mine as an F.3 from 111 Squadron. There is an RFI of this. Next up is Eduards BF.110D in 1/72nd. RFI as well My last two are the BlackSheep Scooter from VMA-214, and my VA-55 Fury. Heres the Hasegawa A-4E scooter in VMA-214 markings from Chu-Lai in 1966. WIP and an RFI. Last up for now is the Hobbyboss FJ-4b Fury. I did this in markings for VA-55 Warhorses. I hand painted the wing Checkerboards & made a mask for the Trident. RFI for this in aircraft. Thanks for the patience i know its a long post. Dennis8 points
-
My recently finished project.- Type 94 Fine Molds 1/35 I hope you like it If you have any comments or suggestions feel free to post them below. A few shots without the truck.8 points
-
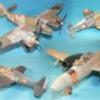
In 1947, civil war looked imminent in Paraguay. President Higinio Morinigo sensed rebellion in the air and thus decided to bolster his air arm, as this consisted mostly of WW2 unarmed training aircraft. Open Civil War broke out on March 7th 1947, by this time a dozen surplus P-38J's with mercenary pilots and ground crew recruited in the US were on their way. Most of the former Paraguayan air force sided with the Communist rebels, but the hastily repainted P-38's served pro government forces well, shooting down most of the rebellions aircraft, while carrying out bombing and strafing runs on insurgent positions. By August 20th the rebellion had been violently put down. This kit is the old 1970's Revell mold. It's not a great model, I started it as just something to tinker on between projects and it had been sitting 95% complete for the last month. I did plan on doing a Cuban machine, but I decided against using a nice decal sheet on what is a pretty poor model. Thus, I made up this little story. The P-38 did not see action in the Paraguayan Civil War.8 points
-
Im heading back to work this Wednesday so the chance of me finishing the 109 that is currently taking up real estate on my bench are slim, so, in order of build, here are my completions for the 2017 Done for The Modelling News ( I only mention them as these are review subjects, therefore not kits I would necessarily build otherwise) Kittyhawk 1/48 Super Etendard OOB. Like all kittyhawk kits they are not nearly as bad as people make out, well aside from the F-35 and Jaguar! https://www.flickr.com/photos/131700029@N03/38891004121/in/album-72157680003258224/ Again, for TMN, a Bronco 72 scale DS230 German Assault Glider. This confirmed for me I will never build 72 scale, although it is a nice kit Next up, a kit out of MY stash!! The kittyhawk 1/32 P-39N/Q Airacobra converted to represent a Mk 1 Next I completed a couple of the kinetic 1/48 Mirage IIIOs. A little disappointing for a 2015 kit Then, again for TMN, the new Kittyhawk 1/48 Su-35 Flanker E Thats it! Thanks for looking, and a Merry and safe Christmas to all BMers Bruce8 points
-
Thanks Gents Especially for the 'what do you call your daughter's in-laws?' I like outlaws (thanks Tony) but co-in-laws sounds more p.c. - thanks Giorgio! Stew you're right it is a Bonne Maman jam-jar, one of a few 'recycled' after our last French holiday. Handy size. After another thin coat and a micro-mesh polishing I'm happyish with this: Untitled by Ced Bufton, on Flickr Note the attempt at replicating the top of the u/c. I should really have stuck the cut-off gear legs on the back but hey ho. Masking for the camo next.8 points
-
Hi Everyone A group of us formed a model club here in the goldfields area of Central Victoria Australia a few years ago, we are a close nit mob of passionate modellers, 12 months ago we decided to have a group build as one member had managed to obtain some 'Toy' TB 2's at a local toy store, our ''simple'' task was to refinish or repose the model in whatever took our fancy, now we all model most things so thought this should be a walk in the park, well..........of the 15 modelllers that turned up at our end of year meeting 13 brought finished models, not a bad finish rate eh ! Anyhow here are some pics we hope you enjoy NWL_2608 by Norman Long, on Flickr NWL_2616 by Norman Long, on Flickr NWL_2601 by Norman Long, on Flickr NWL_2596 by Norman Long, on Flickr NWL_2588 by Norman Long, on Flickr NWL_2591 by Norman Long, on Flickr NWL_2574 by Norman Long, on Flickr NWL_2583 by Norman Long, on Flickr NWL_2577 by Norman Long, on Flickr NWL_2567 by Norman Long, on Flickr NWL_2573 by Norman Long, on Flickr NWL_2606 by Norman Long, on Flickr NWL_2651 by Norman Long, on Flickr Hope you find this interesting Cheers7 points
-
Hi. Its getting a trifle too cold to be modelling in my shed. Even with heating full on!! So to save a little energy I have confined my self to indoors and dug out my slide scanner and turned to my negative print films. Lats year i ran off all my slides and sevearl are here in this thread But for this term Something else from my archives. So, to kick off my pics from August 1970 at the Upper Heyford Open House. Not colour as you will see. Camera was a Kodak Instamatic 126. Cartridge tpe of film the wider one and not the narrow cartridge camera film sized at 110. One issue I recall with that camera was suffering parallax error. The view finder was off to one side so it was not easy to get your subject centred when taking the picture!! F-100. At the time of the show, all the tail codes were removed and soon after the F-111 arrived. A memorable moment of the show was when one Super sled did a very low pass down the runway at a break neck speed .... djort of the sound barrier I reckon.. Mighty fast!!! I recall logging around 70 F-100 that day. HH-3E Jolly Green Giant. 64-14716 HH-43 Huskie(?I do believe thats how they spelt it ??) There was another there serial 62-4533 which gave a fire fighting demo. ( Note the sexy white boots below the right hand fin... Those were the days>>>) C-130E 63-7799. Another on site was 63-7808. CF-104G. One of a pair 104776 and 104813. Nice bare metla and very pale grey/ white wings. Nice!!!!! Belgian TF-104G FC-06. Thats yours truly on the left( age 17) No idea who was "photo bombing"?? Anothe Belgian F-104 on display was FX-29 Taxiing out to display Rothmans Team Stampe G-AWIW Spitfire P7350. Jet Provost T.5 XW295. There were for T.4 there as well. I think the team was the Macaws Maybe wrong on that but the serials were XP679, XR651, '667 and 676. Finallly Hunter F.6. The two present were XF387 and XG161. Thats all I have photographically of that warm August day. Other types there were Chipmunk team with 6 of them but not all in the air, 4 x RF-4C, 2 x C-47 USAF, pair of Lightning F.6, Vulcan XM609. Thats all I have recorded and those numerous Super Sabres. Couldm't take very many pics because the film only had either 12 or 24 exposures. And I couldn't really afford that much on my pocket money back then. Oh, one other thing, the images were always squre so some of the above I have had to crop a bit as there is a lot of nothing in the lower half of the photo... as in the Hunter pic for example. Enjoy. And from time to time I#ll bung up some more black and white pics and some colour ones too all taken with the above mentioned camera and whe I progressed to the SLR world with my Zenit E. See ya for now.7 points
-
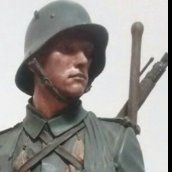
Hello Everybody, I thought it is about time to introduce my Avatar (Buddy Icon) to the world. It is my first attemt to build and paint(!!!) a 1/9 resin bust and painting a face is really hard. So don´t be too harsh, I´m still learning. The Kit is from Young Miniatures, a georgous cast in crispy resin (in fact so crispy that mine came with a broken collar an helmet in the box, but I fixed it with miliput) and it is inspired by a famous photo of a Young German stormtrooper at the Somme 1916. The base was homemade with same selffiddled barbwire am some blood am mud. The idea was to give him a tired and dirty but still confident expression. It is not perfect but I like it... All the best Tobby https://picload.org/image/drwdopri/20171212_103142.jpg7 points
-
Hi everybody, After the C2 and waiting to finish my Ki-100 of Aoshima I started on the C7. Not too many squadron choices because only one had it in the IAF, but my Wife choose the name, so it's the 514 nickname "titan" With it's little brother the C2 Will finish my Ki-100 now By Joel6 points
-
Scratch-built, with decals from Arctic Decals of Finland. There were several models and modifications. I scratched this model a few months ago, posting some images of it still without decals here in Britmodeller in the "British Heinkel" post: http://www.britmodeller.com/forums/index.php?/topic/235025835-the-british-heinkel/6 points
-
A bit more progress. Wing assembly attached to fuselage, pilot figures and rear MG fitted. Canopy as well with frame painted, would have been difficult to do if not done before it was installed. Have to say the pilot figures do make a difference to the model. Next step is to fit the rest of the parts and then onto filling and painting.6 points
-
Hi G and thank you very much. I have to say I am really enjoying this build - I'm still a bit nervous about the whitewash but it's been a fun kit to build so far. Thank you very much Sairou, that's very kind of you. I'm doing these slightly heavier than I normally would do as I've still got to add whitewash, mud and snow effects to many areas. You are way too kind Julian, but thank you. Thank you very much Glynn. Right this past weekend I've been putting off starting the whitewash stages by working on other elements of the build. One of the things I've been doing is painting and basically weathering the tools and other smaller parts that still need to be added. Part of the reason for doing this is avoiding risking the whitewash stages but also because I have found that painting and weathering these smaller bits can become a bit of a chore after getting all the major work done. Anyway this is what all the parts look like that still need to go together from the kit: - this is everything bar one fender light which I managed to break off the sprue early on and it's currently safe in a ziplock bag. Closer view of the smaller parts: Some views including some of the base weathering I have applied to the turret this weekend: I also added some wires to the back of the smoke launchers before fitting them. I used lead wire to represent the cables: More next weekend. Comments and suggestions welcome. I'm hoping the above photos work - EDIT: seems they do - Flickr has been having some issues lately - I used the BBCode for these which isn't as quick as the usual method but at least I can see the photos and hopefully you can? Kind regards, Stix6 points
-
Sorry to hear you've been floored old sausage and had to sit it out on the touchline with the halftime oranges and fat wheezy boys with a letter for matron... regards to Martian Senior and the long-suffering Martianess too. Indeed...it would take ten thousand Whatutsi warriors armed to the teeth with Kiwi fruit and dried guava halves to keep me stuck in me' pit... It's heartening to see that being merely bedbound doesn't halt progress on the double Helix, I somehow knew the Blitz spirit, not to mention 'British Phlegm' would see us through...it's what built the Empire and made Britain the complete mess it is today...6 points
-
Knowing that I was going to have to be in Oxford for some time, I decided to take the build with me and get at least one of the bits that I was not looking forward to out of the way. Accordingly, I laminated a load of plastic card into a couple of blocks and began carving out the extra fuel tanks that appear on the fuselage sides of the Ka28 variant of the helicopter. Shaping the tanks themselves was no big deal but carving them to fit the curvature of the fuselage sides was a right pain, due in no small way to the fact that a certain Muppet of this parish forgot to take his Dremmel with him and ended up having to do it the hard way! The foregoing took up most of my time away but I did manage to get some more detail added to the sonar winch and while I was absent some 0.5mm lead wire arrived for the cable. This is what I think I will be tackling next. I may even have a go today as I am totally fed up with being stuck in bed and the Martianess is at work so she can't complain. Thanks for looking Martian6 points
-
Not a bad year, I achieved what I wanted to and that was double figure personal builds, although it doesn't help that the stash increased by at least 1 per week. Anyways, onto the models. Trumpeter 1/35 SA-6 Gainful Airfix 1/72 Spitfire Mk 1 with Blackbird decals. Airfix 1/72 Hurricane Mk 1 Great Wall Hobbies 1/48 TBD-1 Devastator Revell 1/32 Beaufighter Mk 1F Hobbycraft 1/48 Avia S-199 with Aeromaster decals and spares box bits and pieces. Pacific Coast Hobbies Fiat G 55 Encore 1/24 12 pounder cannon Hasegawa 1/72 SBD-5 Dauntless Revell 1/72 P-38J Lightning (what if)5 points
-
Hi Guys, my nearly complete Sherman mk III, just waiting for some crewman at rest figures and weapon/equip set. Finish as a diaroma of brit tankies having a brew5 points
-
Hi all – here’s my second completion for the year, the Eduard 1/72 Hellcat. I painted this one in the markings of Hellcat Mk.1 JW-321 from 804SQN, HMS Archer, Op Meridian, January 1945. I used the H-Model decals, set HMD72013. I will confess upfront I know virtually nothing about these aircraft, so I built the kit out of the box, using what options I could see from the line drawing and photos of the aircraft in the decal instructions. If I had a tip for this build I would recommend the clear panels at the back of the cockpit be glued to the fuselage halves before they go together. I glued them in after the fuselage was closed and had all sorts of trouble getting them to fit properly due to interference from the head rest. This meant that the sliding section of the canopy didn’t fit properly, which I then made a mess of trying to attach…. Otherwise I can’t recommend this kit highly enough – fit and detail is excellent. I followed the Eduard instructions for the colours – Eduard calls out a number of gunze paints for the camouflage (the H-Models instructions don’t give paint numbers), which I used, but to my eye they seem quite a bit off based on photos of other models that I have seen. Oh well. I also realised after I took the photos that the gear doors are backwards – I have since fixed these….! Weathering was done with oil paints and pastels. With all of my mistakes on this one I am glad just to have something off the bench. Cheers, Brad C5 points
-
Hello Olivier, your work is simply fantastic. I read every page and I think that it's a great guide to this model. I have the Protar one in box, waiting for a detailed build up. I have realized some photoetched rims, I that you will like it! Luca5 points
-
In that case, the least you can do is make sure the oranges are cut evenly..if there's one thing I've had to thrash out with Darling in the boys changing room, it's his uneven orange halves... Matron's knocking on a bit now, I'm sure she'd like to hear from you...5 points
-
Well I'm calling this one finished. Its the Airfix 1/72 Whitly VII done in Coastal Command colours. Paints all Humbrol and sprayed on. Done out the box, kit decal etc. Only replaced the pitot tube on the wing with a piece of good old Albion Alloys finest. Apologies for the number of images. Could not decide which not to post :-) Comments welcome. Tim5 points
-
Apologies for the lack of updates, time is running out so thought I'd better get on with it! As you can see I have been busy rigging which I plan to tint black. There's a not brilliant fit between the wing and fuselage that needs filling. On to details now and a good chance it will be finished!5 points
-
This model languished on the "Shelf of Doom" for ten years! I have finally gotten around to finishing it. It is an OOB build, apart for the Swastika. Painted with Xtracolor enamels. A nice and easy uncomplicated build (so why it took me 10 years to finish I don't know!). The Condor has always been a favourite aircraft of mine with it's graceful and elegant lines, I just haven't had much luck when it comes to building them! Thanks for looking, and a Merry Christmas & a Happy New Year to you all! Angelo5 points
-
Further work..... All decals on and a flat coat applied... Canopy unmasked and prop finished and added....5 points
-
Thanks very much gents I (finally) got the last of the sub-assemblies assembled: It has been my habit for some time to prime my models with Alclad Black primer, but recently (due most likely to my cack-handedness and lackadaisical approach to spraying, but possibly also to the age of my stock of primer) I have been beset with a certain grittiness of finish, so I primed this one in ordinary Colourcoats Tyre Black - it's blacker than it looks in the pictures and gives a nice smooth matt finish that will function perfectly well as a primer: Over this I applied a coat of Alclad Semi-matt Aluminium, I will need to give it a second coat later on once I have sanded off all the random dog-hairs: I have at various times attached the wings and tailplanes for priming/spraying and I like the way it is coming along Cheers, Stew5 points
-
Moving on... The basic hull is now finished, I'll work on the details much later in the build, but for now I've added some plating effect with high build primer and built up the armour belt. The main section is fairly straight forward, constant thickness and size, but the shallower sections fore and aft get less thick as they get to the extremities. I built up the thickness of those sections with progressively smaller sections of 5 thou placard, then blended everything together. The main armour belt has angled sections around its perimeter, all added with some careful use of milliput. I've also drilled out the portholes, slightly differently laid out of each side, after matching them to various photographs, difficult to spot in the photos. The hull is resting on a 30cm ruler in this shot - it's big, heavy and difficult to photograph. The wooden decking for the main deck has been cut to size but not fitted yet - by masking the whole deck and trimming to size before transferring the masking tape to the sheets of decking - sounds simple - wasn't. The fore deck is etched non-slip plating prepared in the same way as the wood and equally tricky. I'll cut holes for the larger structures and surface mount the details (this plan may change) I've now started mapping out the main superstructure sections based on reference to 3 sets of plans, photos of the ship and photos of the builders model from the science museum. And referencing to the Samek kit, again easier said than done and both the forward and centre superstructures have changed since I took this shot. Finally I've also started on the main and secondary barbettes - both made up from wooden dowel wrapped with plasticard. Once they are all cleaned up I'll cut down the sections I need.5 points
-
2017 Saw me finish two models. WW1 German fuel cart: Second place in IPMS Vancouver Fall Show Vampira:4 points
-
Here's my version of the classic kit from Hasegawa. These 1/72 kits make wonderful models as they are. Kit decals and Model Master enamels.4 points
-
And so it begins... I thought I ought to put some stuff in the cockpit The jockey will be riding, so I've no idea how much will be seen4 points
-
Thanks General. Hang on a minute! I am one of the fat wheezy boys with a letter for matron at the moment! Thanks Dads. Martian4 points
-
Filling and sanding and fettling and drilling and cutting.... I added the grab handles on each side of the fuselage, I cut away part of the tops of the u/c legs for to make the landing lights there and cut away the wing tips for the navigation lights. I used plastic tubing for the exhaust A few more details in the cockpit, canopy on and masked then its ready for a spraying of white undercoat4 points
-
Nice bottom dear boy. Very smooth. Jont.4 points
-
Hi Stefan,you are quite correct I did not make the changes to the prop or add the grills to the cowling as I tend not to go for 100% accuracy, I did look into the argument's which still rage over the scheme on this aircraft and the concencus seemed to go with the blue as only one photograph exists and most agreed that from said photograph that the shade on the upper cowling matched the chequer board colour behind the prop,one thing that also struck me was (as the link explain's) Arthur Doley was aware of the kit strange he did'nt mention the wrong scheme to Matchbox,anyway your's certainly is a great build so we'll agree to diagree over the colour and enjoy Black knight's build. All the best Steve. https://www.rafmuseum.org.uk/blog/dooleybird-mustang-pilots-logbook-donation/4 points
-
Oh dear, it sounds like he has been cavorting with the local druids again! Thanks Dr Alain, I should have guessed that a remedy of yours would involve some form of Belgian rocket fuel. I am currently trying the French Navy/ Aeronavale cure, which for the curious involves the following procedure: 1. Take a hat and three bottles of whisky to bed. 2. Place said hat on the end of the bed. 3. Start drinking the whisky and at the end of the first bottle count the number of hats you can see. Should the number be one, keep drinking. 4. Towards the end of the second bottle, do a recount of the hat situation. By now two should be visible, if so, keep drinking. 5. Nearing the end of the third bottle, a count should reveal three hats on the end of the bed. This being so, your symptoms should have disappeared! Martian (Off to plug himself into the fourth bottle of whisky)4 points


.thumb.JPG.3498f40362ff13ebfc4b2e45abbd545e.JPG)


This leaderboard is set to London/GMT+01:00