
Leaderboard


Popular Content
Showing content with the highest reputation on 14/12/17 in all areas
-
A decent model from Hobby Boss with some issues. I used various shades of alclad, decals are home made. Yugoslav air force, early fifties.16 points
-
Latest F-20 in my stable is the Freedom Models F-20C. This excellent kit comes with an assortment of weapons, and a refueling probe. I've done it as a GR.3, during Operation Desert Storm. 112 Sqn, being one of the first squadrons deployed, quickly applied sharks mouths to their aircraft, as their predecessors had done to their P-40s in the desert. Armed with various munitions, in this case the American CBU-87 cluster bomb, they were assigned to destroy Iraqi vehicles and emplacements. For self defence, flare dispensers were fitted under the rear of the fuselage, and a flare pod and ECM pod fitted to the outer pylons. Tigershark GR.3 Gulf War. by Paul Carter, on Flickr Tigershark GR.3 Gulf War. by Paul Carter, on Flickr Tigershark GR.3 Gulf War. by Paul Carter, on Flickr Tigershark GR.3 Gulf War. by Paul Carter, on Flickr Tigershark GR.3 Gulf War. by Paul Carter, on Flickr Tigershark GR.3 Gulf War. by Paul Carter, on Flickr Tigershark GR.3 Gulf War. by Paul Carter, on Flickr Tigershark GR.3 Gulf War. by Paul Carter, on Flickr Tigershark GR.3 Gulf War. by Paul Carter, on Flickr15 points
-
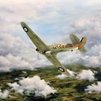
Hi all! Just completed this Aoshima Ta-152. A nice kit of a really elegant aircraft. I used a Quickboost cowl correction, Eduard belts, Kora wheels, and Eagle Cals decals. MRP paint was used with my Sotar airbrush...quite the combo! Made the mottling relatively easy and in scale. Love that paint! I tried doing some post shading with lighter mixes of the base colors. Hope I didn't go overboard! Thanks for looking!15 points
-
I built and painted this kit exactly as the instructions indicated. The only extras I did was do some minor scribing on the wings and fuselage. Fun build. Next time will vac-form the clear parts.13 points
-
Hello, I propose all my projects made of the brand Wingnut wings since the first, the SE-5, at the last Salmson. SE.5a "Hisso" Roland D.VIa Hannover CL.II Pfalz D.XII Pfalz D.IIIa Sopwith Snipe Late Sopwith Triplane Albatros B.II Early Fokker D.VII (ALB) Hansa-Bradenburg W.12 Early AMC DH.2 Bristol F.2b Fighter (post war) Bristol F.2b ....not finished Roland C.II Albatros D.Va (OAW) Roland D.VIb And the last Salmson 2-A2 Best Regards Michel12 points
-
Here is the original Ju88 built mostly out of the box with vac-form clear parts and replacement wheels. I used Model Master paints. Decals from the decal binder.10 points
-
Recently built to replace my first attempt of a 74 Sqn Hurricane when they were based in Iran circa 1942-3. This particular machine crashed on 30th January 1943 killing it`s pilot Bobby Waugh. Airfix 1/48 scale.9 points
-
DSC_0012-16 by jean Barby, sur Flickr DSC_0006-28 by jean Barby, sur Flickr DSC_0003-33 by jean Barby, sur Flickr DSC_0008-25 by jean Barby, sur Flickr DSC_0006-26 by jean Barby, sur Flickr DSC_0006_2-4 by jean Barby, sur Flickr DSC_0003_2-7 by jean Barby, sur Flickr DSC_0002_2-8 by jean Barby, sur Flickr DSC_0004-93 by jean Barby, sur Flickr DSC_0003-90 by jean Barby, sur Flickr DSC_0011-35 by jean Barby, sur Flickr DSC_0006-67 by jean Barby, sur Flickr DSC_0003-81 by jean Barby, sur Flickr DSC_0001-80 by jean Barby, sur Flickr DSC_0001_2-5 by jean Barby, sur Flickr DSC_0013-23 by jean Barby, sur Flickr DSC_0008-42 by jean Barby, sur Flickr DSC_0004-60 by jean Barby, sur Flickr DSC_0007-39 by jean Barby, sur Flickr DSC_0004-50 by jean Barby, sur Flickr DSC_0004-29 by jean Barby, sur Flickr DSC_0003-28 by jean Barby, sur Flickr DSC_0009-13 by jean Barby, sur Flickr DSC_0005-22 by jean Barby, sur Flickr DSC_0002-24 by jean Barby, sur Flickr DSC_0005-1 by jean Barby, sur Flickr9 points
-
Hello all! Here are some photos of one of the models that i finished this year. This model was subject to publication on the May 2017 issue of Airfix Model World. As referred on the title, this is the well known TanModel kit. The first issue. The fit required some tweaking and was problematic around the camera bay windows. The paints used were: - X-1 Black as a base for the metalwork; - Fuselage colours from the Mr.Hobby range; - Alclad2 lacquers; - VAllejo Model Color generic colours; - Satin varnish from the Vallejo Model Air range Hope you like it! José Pires8 points
-
At long last. After 30+ years of modeling, and about half a dozen failed attempts, I have finally successfully built a biplane model! This is Eduard's Nieuport 17 in 1/48 scale. It was built straight out of the box. Paints used were Tamiya flat aluminum, various Vallejo for the details, and some nameless artist oils on the wood bits. Markings are for the American Volunteer squadron (Escadrille Lafayette) in French service. This aircraft was flown by Edward Hinkle in the spring of 1917. Unbelievablethat it was 100 years ago! The Eduard decals performed flawlessly. I didn't use any softeners. The clear wing cellules were made using Micro Crystal Clear PVA. Rigging is Ezline. Blue! See below. There are plenty of rookie mistakes on here. I admit to having rushed to finish this. I just wanted to finally have a biplane in the collection, and having fun trumped getting things perfect. I didn't add any turnbuckles, which I guess is kind of a no-no now, but they looked oversized when I tried to do them. I thought .3 mm tube would work, but it looked like the plane was wearing cow bells. I'm also not sure about the blue rigging lines. I got that by reading something related to the WNW salmson, where they said the French lines were blue. That lot seem to know what they're doing, so why not? Here are some admittedly mediocre pictures.8 points
-
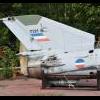
The 1:72 Zvezda kit of the MiG-21bis in Soviet markings. Built as an aircraft from the 797th Training Regiment around the early 1990s in an overall grey scheme. No issues with the build of the kit. This one thankfully didn't have any short shot parts like the last one did. Missiles are a mix of kit parts and from Dragon's Air to Air Missiles set. No issues with decals from Begemot. Option 7 on the sheet. Begemot Decals Overall Tamiya XF-19 grey. Build Progress Photos MiG-21bis-39 by Ryan Hothersall, on Flickr MiG-21bis-40 by Ryan Hothersall, on Flickr MiG-21bis-41 by Ryan Hothersall, on Flickr MiG-21bis-42 by Ryan Hothersall, on Flickr MiG-21bis-43 by Ryan Hothersall, on Flickr8 points
-
Good day, gentlemen. It's my next model.8 points
-
Built OOB, only added FODs on intakes. Used Agama alcohol based colors.7 points
-
I nicked your idea for brass strutwork earlier I'm afraid as well Tomo. Regular magpie at the moment... It's one of the oddities of age when you start to feel yourself within the flow of history. I've even secreted a few of my children's Captain Scarlet diecast verhicles so that one day in the future digging through my stuff they'll make a pleasant discovery... Oooh!! Somebody's keen! I had the airbrush out last evening Giorgio in order to give the undersides what I refer to as a 'unity' pass. I like to leave paintwork in a slightly unfinished fashion for a few days and come back to it later with a bit of perspective. What I've done here is to finish off with longer and more diffuse strokes in the direction of the airflow over the surface: Once treated with some (restrained) panel lining later that tonal variation should work. Interestingly, since shooting photos with a stronger LED lightsource I'm noticing a slightly stronger contrast in the photos than what the naked eye sees above - I wonder is the stronger light bouncing being reflected from some of the darker layers under those lighter topcoats, in the same manner light interacts with layers in human skin? I like that Johnny. I like that a lot. That's going into my modelling lexicon along with Ced's gunthingies! See that metal fitting that Richard Dreyfuss has the rope looped around in a bid to lose his fingers.... Can't wait for it to arrive Jaime! I'm just dying for a 'big book' to become submerged in over the Christmas break and this one would be perfect.... Ev-ery time. There's always one that has to go over the score. Err..just out of curiousity Ian - how do you make 1/72 rope look convincing? I'm just asking, as I have this friend who might need to know.... Mighty fine of you to say so Thom. Thank-you sir! Merci Bernard! I rmust slide over to your forum for a look at how yours bird is coming along as well! Hope it's going ok? That raises several questions about your involvement with cleats at the weekend of course... Quite possibly Benedikt - the only other reason I could come up with was to keep water from sloshing down the centreline where crew might walk and stop them slipping off, but that's pure guesswork. Just joining you in a moment's silent contemplation.... Spoken with the elegance and insight of a trained physicist Jerzy. That makes perfect sense! I hadn't seen your response when typing above Ian. That does sound like a runner as a potential safety feature, given the number of shots that show crew standing on various regions of the upperworks. I don't see any clear evidence of a different material surface in those areas but it might make sense that the raised linear features provided some kind of safety barrier to stop feet from slipping over the curve of the hull. Again, just guesswork on my part... The wing went on today! But first this: The bipod that supports the wing at the rear of the gondola. The kit part to my eye looks a little chunky in cross-section and as simply thinning it down would reduce the supporting strength of this feature, I elected to reproduce it more to scale out of brass using a technique 'liberated' from the compendium of lore on display in Tomoshenko's Fury mentioned previously. Taking that 1mm brass tube, I squashed it to the required (slightly oblate) form around some 0.4mm brass rod in a vice: These parts were then soldered at the correct angle with another piece of brass rod sandwiched between them to act as the locating pin for the wing: Test fitted: A lot better than the plastic and should give a good strong support for that horizontal acre of wing to go on. This fitting revealed the bipod to be a little tall, so I drilled out the mounting points in the fuselage a little more with a 6mm bit in order to sink them a little lower. Where that apex fits into the underside of the wing there's a hemispherical kind of fairing that I'll add later from Milliput. Say goodbye to that central interior because it's the last time you'll see it: Et voilà: As with joining the fuselage halves together, gluing the gondola to the fuselage and bipod I relided upon 24hr Araldite again, for three main reasons: 1. Lets you fettle respective parts into place without being panicked by rapidly-setting glue. 2. Simultaneously acts as an excellent filler along the seam lines. 3. Strength of bond between large awkward pieces. Just my preferences of course... Actually beginning to look like an aircraft after how long?: That new bipod should give a good bracing now against the weight of the wing: I hadn't forgotten to put the crew ladder that I'd built inside as originally intended, I'll leave it in the gondola doorway as if it's being used by the maintenance crew: She can sit there under the tape now for 24hrs before we have a look at the underwing struts... Tony7 points
-
Thanks Crisp - I agree and I'm in two minds about it; it's nice to see lots of dials and switches but, I guess, a green screen digital version would be 'cleaner' and more efficient to match the clean lines of the design. Do have a visit - it's nearly finished Thanks Bill I do use the approved method for the Vallejo, sucking a pointy Tamiya cotton bud (and remembering not to do it twice on the same end!) Of course I have a wide range of tools and I've plumped for the Micro-mesh belt sander and the Flory polisher. I'm still not using a rough enough grit for the first pass but I'm getting there! Thanks Cookie - the first coat will be on soon Thanks Simon, great tips. I did see somewhere that you should stir the tins for 3 minutes (!!!) so I'll probably use the Badger mixer and clean up the bench afterwards! Thin coats, got it Thanks Trevor - I agree that MM doesn't (quickly) remove excess material; it's designed to 'take off the bumps' rather than reduce the whole surface. Sanding first then After a few passes using the suggested methods I thinks she's had her last few spots of Mr Surfacer: Then I just need to clean out the panel lines and inspection plates. Off to see Star Wars later so I may not get much more done today. I'm pondering the LE stripes. I only have acrylic yellow so I guess I need to do that first (enamel over acrylic OK but not vice versa?) and mask them off?7 points
-
Thanks very much gents; I've been very impressed with the kit so far and I hope it will turn out okay, though I am conscious of the clock ticking now, as a fair amount of the time off I have for Christmas will be spent away... It is pretty big - the kit is engineered in such a way that the wings can be removed and re-fitted to the spars as required; I was initially sceptical but have now tried it and - in the absence of paint to spoil the fit at least - it works very well. Mine willl be stored wingless until such a time as I can dispose of it appropriately I sprayed the clear parts in the interior colour and began adding the remaining parts - in this case, what I imagine is the air scoop for the cockpit area: ... the various strakes and fins on the underside: ... and the little beaching trolley, I've left the wheels off as I think it willl simplify things to paint them separately and add them later: Hasegawa show where the rigging for the wing-mounted floats attach by means of some little dimples, I drilled these out as I think I can do the rigging more easily if I can attach it at the wing end and pull the thread through the holes in the upper float part, then fix it from the inside: Still quite a few bits to assemble and fix, but I hope to get more done at the weekend... Cheers, Stew7 points
-
2017 very well might go down in my personal history as the year I gave up modelling! Just the one two completions for the year and nothing new started, a rather worrying turn of events indeed. Not exactly a year to remember. (but what an ending!) I've just doubled my tally for the year! Completed this Eduard 1/72 Weekend Edition F6F-3 Hellcat this morning (28th Dec) after a mad 48 hour modelling frenzy. Used Mission Models Acrylic paints throughout (except for the silver on the Nav Lights). I'll post up better photos once I've taken some. Duncan B6 points
-
Hi all, here is another 1/48 scale kit I recently completed. It is a WWII GAZ AAAA truck from Unimodel that was released several years ago. I decided to modify a bit the kit by adding a gas generator. I found some pics and plans on the web of this kind of modification. The various parts of the gas generator assembly were scratchbuild with plastic cards. From left to right: the furnace where the gas (carbon monoxide) is produced, the box to store wood, the hand pump used to start the process, the filter assembly and a cooling system (I think). The kit was painted with Gunze acrylics. I displayed it on a small base. The birch tree is done with Magic Sculpt on a twisted wire frame, the leaves are from Mininatur. The two figures are from ICM. The small river was done with clear acrylic resin. I hope you will like it, Christian.6 points
-
This is an older build but I don't think I've posted these photos before. I did re-scribe the model and added a few bits from the Airfix B-26. MicroScale decals.6 points
-
OK, so things are getting even more bonkers. @Beard & @Corsairfoxfouruncle are not the only people with multiple Spitfire builds.... except mine aren't Spits, as you already know; they're post-war (Griffon) Seafires. To recap for any new readers... FR46 (the original subject of this thread) is done, and I am slowly building a detailed FR47, with engine exposed, Aires cockpit, added camera bays and a dinky wee flight deck tractor. For some reason I have decided to expand operations to a third simultaneous Supermarine aircraft (with the Walrus) [in truth I have been tinkering with it for a few days]. Enter THE FANG. I am using the only game in town for the Seafang in 1/48 (as far as I know), namely the Trumpeter kit. It's bit basic in places, and I'd lay you money that the cockpit is completely made-up - but the fit is actually excellent. First up some pics before the fuselage was glued, to show what I have done with the cockpit. No after market or the like for the cockpit (I don't there is anything anyway, even if I wanted it) - just some Airscale dials and some painting to liven things up. Since these photos I have added some generic seat belts made out of wine foil, but otherwise the cockpit is as you see it [note to self; still need to glue in the stick!]. Then this afternoon I got onto a bit of a roll, and ended up here: You will note that I am using resin tail & rudder; these are the Barracudacast ones designed for the Airfix 46/47. I used them on my Mk46 and thought the separate control surfaces added a lot of life, and since the 46/47 & Seafang tail was the same, I'll be using it again here. That meant I had to saw off the Trumpy rudder, and I am having to do a bit of modelling at the root of the tail, but nothing too silly. Other than that, we're pure Trumpeter. This aircraft will have its wings folded, like the 47 but (obviously) unlike the 46; I have therefore done the requisite surgery - slightly tricky because the wing fold join is not a straight line... but safely complete. I have put the FR46 away in a safe place to avoid damaging it, but at some stage I will get it out again and photograph it alongside this beast. You will not be surprised to learn that I have the Revell (nee Special Hobby?) Seafire XV and the Airfix XVII in the stash... and I have assembled parts of Airfix PR.XIX and unused FR46 wings to form the basis of a Seafire 45 in due course. That will complete the Griffon Seafire set. One day I might even extend it yet further - Attacker in one direction and Merlin Seafires in the other... but not yet! What started out as a Mojo-restoring build has morphed into a serial Seafire frenzy, and I am having so much fun! More soon Crisp [Wibble]6 points
-
OMG - epic fail - they missed an engine pod.6 points
-
I seem to have been a bit luckier than you, then, as the fit is jolly nice on mine. Yep, all glued in. IDGAF, as the kids say. Some work needs to be done to fix the seat of the port aileron. All in all, though, fit was excellent on mine; the wings clipped into place and one could almost have gotten away without glue...but almost is not the same as actually not needing glue, I hasten to add. I did a fair amount of sanding to soften the rib detail atop the wings, but even so, it's still very prominent: Anyway, more later, as I need to get to bed. Back in the office tomorrow and all.6 points
-
With the assistance of a wee can of fizz I got a bit more of Gannet2s innards glued together In the process of setting out the destructions for ready reference I took a closer look Some might notice the right hand panel on the centre section names the section being worked on I didn't notice but there (or LO!) is a reference to the driver's mate's postition Nuff said! You get stupid little levers for any odd shaped in-cabin protrusions to stick in Lookit this Would you believe throttle and some other (Prop pitch?) levers too? Barmy but... The radar op's position is now completed, there's even a small control box in there with a curved loop of cables leading to another panel and the main part of the i.p. is in place, there's a second panel to insert with the main blind flying type panel to add over the top, later night all6 points
-
Scratch-built, with decals from Arctic Decals of Finland. There were several models and modifications. I scratched this model a few months ago, posting some images of it still without decals here in Britmodeller in the "British Heinkel" post: http://www.britmodeller.com/forums/index.php?/topic/235025835-the-british-heinkel/5 points
-
ISAF - Task Group "Black Cats" - 51 Stormo Afganistan 2009 Kinetic model with a few resin and PE details. Invite5 points
-
Greetings Beautiful People. I have here another finished kit to show. This is the second T-62 kit from the fantastic line of T-62 offer by Trumpeter. This is actually a commission build for a dear little brother. Here in this link, you can see the first T-62 I did - http://modeller-innovation.blogspot.com/2014/01/trumpeter-135-t-62-era-mod-1972.html Some photos And my Gary Wintin Shot... LOL .. More informations and more photos and bigger ones can be found on my blog as usual - http://modeller-innovation.blogspot.com/2017/11/trumpeter-135-t-62-during-chechen.html Please do have a look and thank you so much in advance for any feedback you guys may have. C&C are welcomed. I may have lost some of my previous skills and I am slowing trying to get them back. Thank you for always supporting and for the kind words and various encouragements. Until the next launch5 points
-
I kind of have a little crush on my dentist; she's a cute Indian woman, very short, with the faintest of accents. (Which just goes to show how ungrateful I am that the universe presented me with a tall, beautiful wife.) She also makes a lot of jokes, (which I appreciate), many about how badly my gums were getting cut up during the surgery (which I didn't). Consequently, my mouth is in a bit of pain now. Women, they always find a way to get you. Yes, a slight but very welcome detour on our national journey to the bottom. Especially since my late grandmother, whose funeral was, as you know, yesterday as well, was impregnated and married at fifteen by a much older seminary student whose views inclined profoundly towards the regressive, and who beat their children and far, far worse before abandoning her with five of their children and taking the sixth (his favourite) off with him, not to be seen again by them for another forty years. I know it's irrational, but on some level it feels as if my grandfather, who I've never met, but whose malign specter haunted my own childhood, was beaten a little last night as well. And he deserves all the beatings he can get. In happier news, my Haynes Manual on the Wellington came, and it is GREAT. I had sort of adopted the snobbish position that the Haynes Manuals were rather lightweight texts on their subjects, but as a modelling reference, it's superb. I wish I'd had it when I started the kit.5 points
-
Not a recent build, but this Trumpeter kit was a good kit with no obvious hang ups. OOB build. Fits nicely and not long after it was finished, an ex RN serviceman who served on Carriers post WWII ended up purchasing it. Paints are from the Gunze range & weathered with artists pastels.5 points
-
Here is the second in my line of Latin T-birds. I still have two Platz T-33s in the pile! As you can see she is depicted as “3304” of the Fuerza Aerea Dominicana (Dominican Air Force), and was one of four machines acquired in 1956 and operated briefly (until 1958) by that force. The US Mission withdrew them in 1958 and they were supplied to Brasil. The Dominicans went through the same again in 1967 when they acquired two ex-USAF machines and those, too, were withdrawn by the US for similar reasons. With the FAD during the time of my model they were operated by the Escuadron Ramfis from Trujillo Air Base. At the time the force operated a wide variety of types, such as ex-Swedish Mustangs and Vampires, Thunderbolts, Mosquitoes, Invaders and many others. They were generally painted in bright colours but sadly this didn’t extend to the T-33 fleet. Like my earlier Uruguayan build, this is the excellent Platz kit. My model is based on the following image: What did I do/use? Platz T-33 1/72 Kit built out of the box Painted with Humbrol Enamels – 27001 Metalcote Aluminium overall, 33 Black wing tank halves, 153 Insignia red/189 Insignia blue/34 White for the tail flag, 60 Scarlet for the nose, 226 Interior green, 147 Grey and a few sundry others. Finished with Humbrol Glosscote and Mattcote. Nose guns from half-round Plastruct rod Wing pylons from plastic card Decals were a mix of: 1) wing and fuselage roundels from a Colorado P-47D sheet 2) Ramfis unit badge from a Hobbycraft P-51B kit 3) home printed serials 5) Spanish language stencils from a Microscale Latin T-33 sheet. 5) wing way decals and red lining from the kit. Panel lined and dirtied up a little with Flory dirt and then a few swipes of Tamiya Weathering sticks here and there. I hope you like her. Martin4 points
-
This is the Fine Molds 1/48 X-wing kit painted up as Blue Leader from Rogue One.4 points
-
Hi All, Finally, I managed to complete the first model for this whole year. Somehow finding time for hobby was especially complex. Hopefully I will now gain some speed and would be up to my building plans next year And it looks like there has been a lack of T-birds recently on this forum so here is another one! This time it’s Canadair CT-133 Silver Star in its earliest version of RCAF markings. Model is built from Sword kit combined with excellent Leading Edge decals. Sword kit requires some effort to allow for clean assembly. The worst thing in Sword’s kit is the canopy. Front screen does not match in shape and width to the main part. So you can either model canopy open or look for a replacement. In my case, my brother helped me with vacuum pressed canopies that he did earlier for his Sword’s F-94 (it has same issue). Some extensive sanding and dry-fitting was required to make sure canopy sits right on the fuselage. Other changes: lower parts of intakes were cut from large lower wings/fuselage part and attached to each of fuselage sides for easier clean up of seams inside of intakes exhaust tube was replaced with a circular one added pitot tube in front of nose gear and fuel discharge tube on the aft starboard beneath the stabilizer sanded fuel tank fillers from outer sides and cut them through in inner sides of fuel tanks Also some mods were required to convert later service period T-33 into an earlier CT-133: equipment cooling vents in front of the canopy were sanded off as these were added later in T-33 life removed 4 of 6 gun port covers (Canadair CT-133’s had actually only two guns!) and drilled out 2 remaining gun ports drilled starter exhaust on the aft port side, removed US-version exhausts repainted some cockpit PE in black Otherwise Sword’s kit is pretty decent for a short run kit. As a benefit, Sword supplies resin gear bays, ejection seats and painted PE fret for cockpit and for some external bits. Resin wheels were the only purchased aftermarket. On to more photoes: And some family shots. First, with its British cousin that was also a very successful conversion of an early jet fighter into a T-bird: and second is my full collection of jets with centrifugal compressor engines - could not stand making a collective shot of fatty (or not that fatty) buddies Thanks for looking! Merry Christmas and Happy New Year to everyone! Dennis4 points
-
Blimey, hadn't realised it was a month since I updated this thread! I have some progress since then, mostly masking and painting the overall fuselage white (Halfords FIAT 210, my usual pure white when I don't want something as starkly white as Appliance Gloss White, if that makes sense): and then masking the white bits and airbrushing the red/orange bits Model Master International Orange (12197) - not my usual brand, but I have US-specific colours in this range - and the black bits brush-painted in Humbrol Satin Black 85: Next steps: fitting and painting the ancillary parts, especially the undercarriage. And seriously thinking about the winch, which I have been putting off until now...4 points
-
RUSSIAN This was an Amodel Yak-18a based on the Real Aeroplane Company G-CEIB. It was built pretty much out of the box but with bought red star decals and fuselage numbers from the scrap box. Real Aeroplane Company Yak-18a G-CEIB The Airfix "Under the Red Star" Limited Edition Hurricane, P-40 and Spitfire were out of the box builds. CIVILIAN Piper Pawnee The Aeropoxy Piper Pawnee was copied from a real duster TC-ZRR. The fullsize aircraft had no markings except for the registration. These were printed on ink-jet decal paper. de Havilland dH-88 Comet Airfix de Havilland dH-88 Comet. Out of the box with lots of filler to make everthing fit! That's the lot! A busy year.4 points
-
Great - thanks Keith and Jamie, great tips and explanations I've 'done a Joe' ( @Fatboydim ) this morning and spent some time polishing, then cleaning out the panel lines etc with various tools. An unusually shiny finish for me but, if people are watching this as a Colourcoats 'demo', I suggest you look elsewhere! Stew et al do much better... LE stripes next then.4 points
-
The figure painted and mounted in the cockpit. I used Citadel paints to paint the figure. I added a decal from an old aircraft kit, I had lying in my 'box of tricks'. The kit's decal is a little tough to get it to sit. So if you are going to build this kit, make sure you lay a good coat of gloss on the surface of the area you are going to put decals on. I think I am satisfied with the look.Hope you guys are too. Now I can glue the two halves of the craft together and continue unto the exterior part.4 points
-
There's nothing inherently dangerous about acrylic resin binders which will hurt enamels. What's dangerous is that "acrylic" means pretty much nothing nowadays as far as model paint is concerned - it ranges from the rubbery water based acrylics (which are totally benign against enamel - that's why they rub off models when touched or peel off in sheets when masked) to the rather aggressive acrylic lacquers to the ferociously aggressive acrylic aerosols. The word acrylic no longer tells the modeller anything they need to know about the paint. The behaviour, required thinner, health precautiouns, smell, surface preparation needed and inter-brand compatibility are all aspects governed by what else is in the paint - not the acrylic resin binder liquid part. It's not the acrylic bit to watch for, but the thinner its designed to work with. If it smells hot (like MRP) then be careful with the coats as it has teeth. Simple alcohol based acrylics like Tamiya is fine.4 points
-
Just finished a refurbishment on one of my old comet daleks just took under a week to do. I had originally installed led dome lights but they didn't work so I raided my spares for more suitable ones and the look I have gone for is from the evil of the daleks from the trougton era. The first PIC is how it used to look and the rest is the completed rebuild4 points
-
Kit: Revell Scale: 1/48Type: F-15EExtras used: Wolfpack F-15I update set, Isradecals, weapons from Tamiya F-16 kitPaints: Tamiya (upper) and Mr. Hobby (lower)4 points
-
I built the RAF rescue kit a few years back and spent a few hours re-doing the turret rails and the toe rails - fiddly but I reckon it was worth it... I even tried making scale nets. Won't do that again any time soon! Please excuse the shoddy photo (0600 and I haven't had any coffee) and the model needs cleaning. I want to put it into a dio with my 70ft Vosper...eventually. I would point out the scratchbuilding an Mtb Hull isn't too horrific, whether you carve from solid, which I'v done for a couple of sailing vessels or, as I did on my Vosper, build up with plastic card, easier, I think. Careful though, as has been said already, Coastal Craft are addictive, I've done 5 and just wish Italeri would turn out their stunners in 1/72nd scale.... Welcome to the asylum!4 points
-
No i can't afford fancy riveting tools so i make do with my saw blades. If you pinch the blade between thumb and forefinger and place it on one side of a curve. Then start to move it slowly with even pressure. It will rotate following the curve and give you straight lines on round areas. Its hard to explain but if you practice it over time it gets easy to do. Dennis4 points
-
Spad & Company.... Inspired by the wheel well rivets, I just had a slow motion Eureka moment/ hour or so My little craft saw can give straight lines across the back of kitchen foil. AND because of the Set of the teeth, it gives me a perfectly modulated double row of rivets, So sorry to be all over your thread, Johnny', but I just had to TELL SOMEONE...! You guys 'll understand the importance of this. They may even name the technique after me..!😃4 points
-
Hi all, hope the night is going well. As I was house bound due to the ice and unable to get out. I managed to get something done in between chores etc. I managed to strip the old Tamiya Panzer grey off the chassis today. Picked up some really good stuff from B&Q. No fumes, water soluble and took it off in an hour. Started to finalise the fenders and ammo containers. But once I did a dry fit of the wheels, I really need to get on with the tracks. It'll be nigh on impossible to fit them once the fenders are on the chassis....so next step the tedious task of putting the tracks together. I can't remember now if this kit came with the separate links I have, as I also have the all in one's too in the box too. The separate link ones are OK, not brilliant. But they'll have to do. Night all.....hopefully I'll have the tracks on their way to completion. Simon.4 points
-
Until 2017, most of my building in recent years has been scratch building on model railways for customers. There have been a few plastic kits of buildings, but mostly scratch work in wood, styrene and acrylic; plus a bit of helping my daughter learn to build. This year, I've done some aircraft for myself, but quite a few models for friends, building aircraft they like, or aircraft that they fly or own. The idea to frame the models in a 3D picture frome came about from the "Snoopy verses the Red Baron" model my daughter and I built this year. It was a way to hang the model out of the way of damage, and to keep the dust off. It made a nice presentation and I thought it could work for other models. I've divided the builds up into themes to present them here. Most were built out of the box, with minimal changes, to keep the turnaround time reasonable, and because a lot of extra detailing wouldn't be seen once framed. The WW1 and WW2 modles are the first batch. WORLD WAR 1 I found some nice embroidered RFC wings on Ebay for £2.00 each which made a nice addition to the SE5a and Camel models. I drew the background map in the photo editing program GIMP and used some airshow and re-enacting photos to finish off the presentation. Because the Eindeckers rigging would be clearly on show, I added the rigging wires with some 0.1mm stainless steel wire. Revell Fokker E.III Revell SE5a ( 1964 manufactured kit ) Revell Fokker D.VII Revell Sopwith F-1 Camel WORLD WAR 2 Airfix Series 2 Mosquito This 1970's Airfix Series 2 Mosquito needed quite a bit of filling, but the low parts count helped to speed up the build. I scratch built some cockpit interior details to fill out the original empty space. Auster Mk.V TW439 AZ Models used to make a Mk.V Auster, but it appeared they were long out of production when I started looking. I ended up buying the Mk.III version, and using a silicone mould taken from a Piper Pawnee for the Mk.V's cowl. Other changes were home made decals, the addition of a wing mounted generator and belly tank, as per the full size example below. The Bf109, Spitfires, Hurricanes and P-51 were all built straight from the box, other than adding mounting hardware in the wings and fuselage. Airfix Messerschmitt Bf109E-4 2 off Airfix Spitfire Mk.II's 2 off Airfix Hurricane Mk.I's Revell P-51D Section 2 to follow shortly.....3 points
-
Working on the Matchbox 1/76 LRDG diorama set. the build nearly didn't happen, as the decals were missing. Thankfully, one of the Britmodeller members donated a set. Finished this Jeep last night, great fun, but going crosseyed working at such a small scale..3 points
-
The is the 1/76 Airfix "Assault Gun" from a very old bagged kit. For it's age it is nicely detailed. A few bits were added from the Fujimi kit like mg, v-scope and rear deck wheels.3 points
-
Managed to get some time on the Wespe. These Masterclub bolts are great. Drill a hole like the real thing. Wonderfull........although, I have realised you have to plan where you going to put them as it's easier to drill the holes when the AFV is in pieces....still nice stuff.3 points
-
Now it is unto the figure building and painting. The figure is not the best but since half of the body is going to be hidden within the cockpit, I am not so concern. I used putty to fill in the gaps and ONLY areas that were going to be seen. As I will not be painting the lower legs and the back of the figure,as these areas will not be seen. I also left the feet off the body, as they will definitely not be seen when the figure is in the cockpit.3 points
-
Great quote, thanks for sharing. No idea where the spitfire will live once built but I will cross that bridge when it comes to it..... heres a link to the spit im planning if it's of interest to you: https://goo.gl/images/x4kJAF3 points
-
Hi everyone I’ve started to weather my Mosquito and I’m happy with how phase 1 has gone. As most of you do nowadays I used a Flory models dark, dirt wash over a semi Matt finish, left it to dry for a day then using water moistened kitchen towels and cotton buds wiped it off. Because the finish on the model is semi Matt it stuck to certain places quite nicely, giving the impression of a well used machine. I still need to take a little more off especially around the nose and cockpit area but once I’m happy I’ll start with the oils. Well that’s that for now. Cheers all Iain in a very cold, wet Cornwall brrrrrrrrr3 points
-
Thanks Giorgio! A little more micro-welding to follow tonight....and then I want to stop doing that for a bit now....it's getting obsessive! Thanks Jaime. I just hope that Watson's book on Germany arrives before Christmas now. I don't suppose it mentions Herr Dornier by any chance? Painting them without snapping anything off will have to be done as delicate as handling a reactor fuel rod! I seem to keep discovering lots of little jobs along the way Phoenix that always makes the painting stage seem to be 'about a fortnight away'...which seeing as that nearly takes us to the end of the GB is not actually a movable feast any more! That seems about right to me Benedikt! Thanks Ced - 'gunthingies' they shall be from now on. I like the sound of that! Well. It started this evening with me deciding to press on and get the fuselage detailing finished. A quick job methought and to begin with it proceeded quite well, getting some parallel lines addedalong the top of the fuselage, all the way along from front gunthingy to the 'hump' that the aerial loop sits on: There's some kind of curved cover that crowns the fuselage between rear gunthingy and the hump, which I added from metal foil just to raise it slightly proud: Up for'ard, the paralell lines are crossed by another set just behind the cockpit: I know not the function of these, in terms of why they are raised so from the otherwise aerodynamically smooth skin of the aircraft. Due to their small size I made these out of the smallest hair-like Slater's microrod that I had, and once the glue had cured, sandned them down to a squarer profile: Prior to doing this, I'd also added some panel lines and rivetting. Not a whole shed load, only those elements that seemed to stand outr repeatedly in photos, namely a longitudinal panel line that runs down the side of the fuselage on each side from bow to tail: plus a few rivet lines where the viuewer's eye will be drawn to specific features on the fuselage like the cockpit: and portholes: That is as far as I want to go in terms of creating a semi-realistic representation, as opposed to turning the aircraft into a diagram... One set of features that has almost been fetishistically tormenting me (largely due to their visual prominence yet miniscule size) on this aircraft are the sets of cleats on both sponson and bow. There is not rational explanation behind this torment, save that they looked extremely hard to build and...well...you guessed it: I had to have a crack at scratchbuilding cleats in 1/72 didn't I? If anything you can blame @Tomoshenko for these urges - if you haven'tseen the jewellery that he's been adding to his droolsome Fury I urge you to do so with all haste: Right. I've no idea how to build cleats so let's start confidently by cutting up some 0.44 mm rod and tube: The closeups might look a bit bigger tonight as I've devised a poor man's macro by sticking one of the spare magnifiers in from the visor I got at Telford in front of the camera lens. Not optically 'pure' but it does give a handy blowup. The lower set of rod with the flattened ends are intended to form the base onto which the other rod parts are soldered at 90° in order to form a T-shape: the respective parts are each about 2mm long, taped down here in readiness for soldering: As always, not a pretty sight when fresh out from under the hot rod: But a process of gentle filing starts to bring out some essential cleatiness: Why am I reminded of the pickaxes of the seven dwarves from Snow White? 'Hi-Ho. Hi-ho, It's off to the Dornier Flugzeugwerk we go...' The bow set CA'd into place: Looking dapper enough: Same again on the stummel: All four in place: G'night all. Tony3 points


This leaderboard is set to London/GMT+01:00