
Leaderboard


Popular Content
Showing content with the highest reputation on 04/12/17 in all areas
-
1/48 Eduard Aussie 8s are all finished up! HUGE thanks to Brewer for the amazing pictures. First up, the NMF: Alclad and Tamiya chrome silver rattle can Brassin wheels Barracuda resin cowling topper. Silver Spit 14 by Aaron Long, on Flickr Silver Spit 15 by Aaron Long, on Flickr Silver Spit 1 by Aaron Long, on Flickr Silver Spit 4 by Aaron Long, on Flickr Silver Spit 7 by Aaron Long, on Flickr Silver Spit 8 by Aaron Long, on Flickr Silver Spit 17 by Aaron Long, on Flickr Teeth! Eduard 8 Tamiya RAF colors and Gunze for the RAAF gray and green. Brassin Wheels Ultracast cowling top. Ultracast cockpit door. Grey Nurse 1 by Aaron Long, on Flickr Grey Nurse 3 by Aaron Long, on Flickr Grey Nurse 5 by Aaron Long, on Flickr Grey Nurse 7 by Aaron Long, on Flickr Grey Nurse 10 by Aaron Long, on Flickr Grey Nurse 11 by Aaron Long, on Flickr Grey Nurse 17 by Aaron Long, on Flickr Grey Nurse 19 by Aaron Long, on Flickr Grey Nurse 4 by Aaron Long, on Flickr Thanks for looking! And BIG thanks to Jason Brewer (Brewer Models) for the pics.23 points
-
Hello Folks, Here is another model from the Matchbox GB,......this one represents Halifax Mk.I, L9613, NF-V from 138 (Special Duties) Sqn based at Stradishall and later Tempsford for agent and supply dropping in support of SOE. On the night of 28th November 1941 the real L9613 had dropped the brave Czech agents into Czechoslovakia responsible for killing Reich Commisar Reinhard Heydrich, and who were tragically betrayed by one of their own to the German`s, resulting in an infamous final shoot out in the Karel Boroejsky Church in Prague. The model has Aeroclub white metal propellers and has been heavily `modified' using spare parts from the Revell kit, such as the nose turret, undercarriage legs, exhausts, and the engine nacelles were also cut up and made more accurate using parts left over from the Revell kit too. It was brush painted using Polly Scale and Humbrol acrylics and the decals came from AML,..... although the codes had to be altered and the grey codes on the right side were modified Xtradecal ones. Here is the WIP; Here are the engine nacelles in the process of being `modified'; And here is the model,....with early markings on one side and later markings on the other; late 1942-43; 1941- early 1942; So that is it,.....hope you like it! Cheers Tony20 points
-
Dear fellow Britmodellers, here's my 1/72 Tamiya P-47D in markings of 509th Fighter Squadron, 405th Fighter Group, Belgium 1945, flown by Lt. James R. Hopkins. Built from the box with addition of Montex decals (K72008), painted with Tamiya & Gunze acrylics. Photographs by Wolfgang Rabel. Thanks for your interest! Best greetings from Vienna, Austria. Roman19 points
-
Evening all This is very likely to be my last completed model for 2017 - I've been working on it on and off since August and it crossed the finish line this week. I picked up this classic from Airfix at a model show for a mere £20, and set about building it for a bit of nostalgia and a love for one of WWII's unsung heroes (the Spitfire seems to get all the glory!) I built it more or less out of the box, but did use SAC metal undercarriage legs, an Eduard seatbelt set and aftermarket decals from Techmod. A bit of extra piping was added to the engine, but other than that it's as it comes. It fitted together pretty well - at least better than I was expecting for such an old kit. The wing roots were a little tricky and there was plenty of filler needed here - Archer rivets to the rescue to replace those lost in the filling and sanding process. The worst fitting parts were probably the landing light covers and these took a lot of careful trimming to get them flush with the leading edge. Some of the detail is a little clunky and not up to today's standards, but the surface detail is streets ahead of the Trumpeter offering, with beautiful raised rivets and lovely fabric effect on the rear of the fuselage. Paints were from the Xtracolour enamel range, with the flat cote from Humbrol. Hawker Hurricane MkIc, 306 (Polish) Squadron, RAF Ternhill, November 1940. For £20 it was certainly great value for money. Happy modelling! Tom19 points
-
This is my third build for the Heller 60th Anniversary Group Build on HyperScale's 1/72 GB Forum, and conveniently serves to mark the plane's 50th anniversary as well. I finished mine as Royal Thai Navy machine. The main modifications were to scratch-build closed cowling gills as the kit's were terrible, add push-rods to the engines, scratch-build the nose radome and wing fences, plus plunge-mold the bulged observation windows. The Siam Decals were a gift from good pommie-kiwi mate, Colin Milliput (AKA Whitehouse) who lives in Thailand. The hardest part of the build by far was assembling the undercarriage. Build Log: http://www.network54.com/Forum/644810/thread/1509340676/last-1509678989/(View+All+Messages+in+this+Thread) http://www.network54.com/Forum/644810/thread/1509243251/last-1509301138/(View+All+Messages+in+this+Thread) http://www.network54.com/Forum/644810/thread/1504349593/last-1504428684/(View+All+Messages+in+this+Thread) http://www.network54.com/Forum/644810/thread/1504433118/last-1504470561/(View+All+Messages+in+this+Thread)17 points
-
Hello and thanks for your interest, this is my attempt on RS Models 1/72 Airacobra I. The export version was called P-400 and is identical to the P-39D series. The kit was problematic, suffering from incomplete mouldings, damaged clear parts and generally poor fit. This is the best I could get out within the 4-weeks timeframe I had. The model was painted with Tamiya & Mr.Hobby acrylics. Decals from the box, representing a machine operating in the Murmanks area, winter 1942/1943. I'd like to thank fellow Britmodellers Troy Smith and Fernando as well as Mr. Gerhard Pomp from Vienna for their valuable help in research. A detailled build review will be featured in an upcoming edition of Scale Aviation Modeler International. Photographs by Wolfgang Rabel of IGM Cars & Bikes.17 points
-
Hello chums. Here at long last is the RFI of my Airfix Handley Page O/400 that I finished a few months back. I have been working in the Float plane GB since its finale and haven't had the chance to get the photo tent up until that one was finished. Here are some links to the Group build if you're interested. Catalina "BLACKCAT" WIP Catalina "BLACKCAT" RFI And the WIP for this build can be found here. WIP The build is based around the "Last Days" wording that I saw in a reference book during the build. This was in reference to the flight performed by Sir Keith Park. "Sir Keith was originally from New Zealand and became an air ace with the Army’s Royal Flying Corps. Initially in the First World War he served as a soldier at Gallipoli and the Somme, but became a pilot and ended the war having shot down 20 enemy aircraft. After the war, at a time when air flight was still in its infancy, he decided to demonstrate what could be accomplished with large aircraft. Sir Keith and his crew of eight flew their Handley Page 0/400 with two 350 h.p. Rolls-Royce engines at an average airspeed of 66mph. The 1,880 mile flight in 1919 took 30 hours in the then state-of-the-art bomber despite unpredictable weather, and returned four days later." A wonderful story I'm sure you'll agree. During the build a few sad occurrences, the death of two of our girls. Belina and Doctor who. ( hens ) below is Belina in her sick pen. And the death of one of my favourite Directors. George A Romero who watches me build all this plastic tom foolery. So as it happens this build and its FRI are dedicated to them all. Truly the "last Days" Without further ado I bring you many, many, probably too many but who cares its Christmas, pictures of the Handley Page O/400 in all its glory. Tamiya paints. (acrylic) Ezline (lots of it) Flory wash. RP toolz punch. and the usual blood, sweat, tears, wine, friends. you get the picture. Phew. Hope you enjoy the pics. I'm orf to post this now so I don't loose it all. Have you all a lovely Sunday and Merry Christmas and more than that. Happy modelling chums. Johnny15 points
-
Hi, Here’s my attempt at the Wellesley Mk I by Matchbox. The model represents an aircraft from 45 Squadron flown circa mid 1938 and was made pretty much out of the box. I thoroughly enjoyed building this old kit, which fitted surprisingly well and I even had a go at some internal detailing….which of course can’t be seen now but at least I know it there. I know I've posted this before but that was using photo bucket so since the photos have been deleted I have decided to repost it again as a practise! Thanks for looking....AGAIN Cheers, Russ R13 points
-
Here's my take on the Academy Helldiver, a VB-3 machine flying from USS Yorktown. Nice kit to put together, no problems apart from some trouble with gloss varnish, but that was probably me! Build thread over on the 'Radial Engines Rock' GB. Kit decals, Vallejo ModelAir paint. Didn't use all the stencils, got bored with that part of the build very quickly!13 points
-
This one fought me somewhat, but I got there in the end. It was missing an air intake and its canopy, so some old-school modelling was needed to finish. The underlying kit is a FROG issue of the Hasegawa mould - I am told that there are shape issues, particularly around the nose, and that the hump is too rounded, but it is a good kit to assemble and it looks OK to me! Replacement air intake from Milliput, moulded using another kit and some silicon mould material: Replacement canopy, crash moulded again using another kit, Milliput and silicon mould, then acetate, a hair dryer and some force! Looks OK, but a little Tippex filler needed: And Voila: .... As always, everything is hand brushed using Humbrol enamels. and finally, for comparison, I built the same kit a few years back as an A-4G, without a hump, but with decals courtesy of Modledecal: FredT13 points
-
Hi folks, this is yet another addition to my growing Romanian AF collection. The Hasegawa kit was built OOB and the markings are combination of fabulous Radu B. decals and my own masks. Hurricane No.7 of Escadrila 53 was flown by Andrei Radulescu who claimed 3 kills (I-153) on 30 June 1941. After the initial campaign on the eastern front the remaining Romanian Hurricanes were sent for overhaul and were no longer used in the first line due to lack od spares and to avoid mistakes for AA gunners with Soviet Hurricanes. Cheers Libor12 points
-
Hi Guys! This is my Matchbox (Revell) Blue Angels Panther F9F-5, the latest member of my aerobatic teams collection. Primed and painted with Vallejo acrylics. Best regards, Orlando12 points
-
Along time ago, in a galaxy not too far away, when I was 6 (over 45ish years ago!), I built my first ever model. It was the Airfix series 1 plastic bag issue of the Me262, which was purchased from good old Woolworths! I added so much tube cement to the canopy that it melted, and it was painted gloss green, which never dried properly and spread green finger prints everywhere! It was eventually shot down by Airfix's British Paratroopers as it was bombing them as they attacked the Costal Defence Fort! When Airfix released their new kit of the 262, I just had to build one for old times sake. So here is a slightly better finished model: I then realised, once I finished the Airfix kit, that it was in the same markings, though a slightly different scheme, as a 32nd scale Trumpeter 262: Thanks for looking Angelo12 points
-
Hello all Been a while since I completed something but I thought I would share my latest effort. Built to support the IPMS Car and Motorcycle SIG display at Telford this year, this is the Hasegawa 1/24 Ferrari 250TR finished in the less common white paint job with blue racing stripes as worn by chassis # 0732TR and uses the Renaissance decal sheet Tk24/267. The car was driven by Hugus and Eriksson at the 1958 LeMans and unfortunately retired at the 7th hour, so not an auspicious performance. The race was won by another 250 Testarossa (0728TR) driven by a duo including Phil Hill. That car is actually one of the subjects on the kit decal sheet, though the kit is inaccurate for that car. I had a load of fun with this build and in typical Hasegawa fashion it goes together with precision and displays a fair amount of forethought with most ejector pin marks and sprue gates being located so that they end up out of sight and covered over. Can't imagine how much, unnecessary as it turned out, cleaning up I did! I replaced the kit wheels with a set of metal rim/photo-etch spoke beauties from Hobby Design and wired both distributors, feeding the wires into the ends of a couple of copper tubes glued onto the rocker covers - a feature in photos of the real thing conspicuously absent from the kit's otherwise beautiful engine. I also added a fuel rail to the carn=bs and a couple of lengths of spring type tube which represented the corrugated fuel lines when painted yellow. I also replaced the solid intake grill with a piece of wire mesh though it can't be seen so I'll not bother so much next time! I also made good use of my Molotov Chrome Pens on rivets etc but most significantly, for the windscreen frame and rear view mirror glass. Well recommended! All in all a most enjoyable build and my thanks to those BM'ers that offered their insight into the likely colour of the tonneau cover! Anyway, enough of this rubbish, here are the pics - comments and criticism welcome in equal measure. Hope you like her. ATB Rick9 points
-
My go-to material for NMF airplanes has been Bare Metal Foil for the past two years. I was just never happy with a painted NMF. Some modelers could do a great job with Alclad, mine never looked right. My first BMF was a P-47. Next was a P-51, then a F-104 and finally a F-86. After I finished the F-86 I was ready for a real challenge, so on March 1st I purchased a Monogram 1/48 scale B-29. Sure this is a big model, but it has a simple cylindrical fuselage and big flat wings, how difficult can it be to foil that thing. WRONG, wrong and wrong. It has been 11 months and I am still not finished. I didn't work full time on it, but I should have been finished by now! This model has a number of problems that make it a slow go. This photo shows where things stand as of the past week. The fuselage is 95% finished (I ran out of foil), the wings, engines, cockpit, and landing gear are finished. I included my P-51 for scale. So far I have used 8 sheets of foil, and still not finished. I hope to finish it this week. This kit is from 2003 and it has it's share of pros and cons: Pros Only 1/48 scale B-29 available Minimal flash for an older kit Well-engineered connection between main wings and fuselage Well detailed interior (although most of the interior is not visible after the kit is finished) Nice clear parts, except the cockpit glazing does not fit correctly Numerous options for bombs Cons Tail heavy. Needs a lot of weight in nose of fuselage Warped main wings Raised panel lines and no rivets Really bad looking engine exhaust pipes Poorly engineered connection between engine cowl and nacelle Fuselage engineered for bomb bay doors to only be in open position. I would like to share with you the steps leading to the model's current status: MAIN WINGS Let's start with the most visible problem with this kit, the main wings are warped between the outside engines and the wing tips. The warp is very obvious, so it need to be corrected. My solution was to use something to flatten out the wings as the cement cured. Whatever it was, it had to be really rigid. I used my old architect' scale. Its triangular cross section prevents it from bending. Now that's a straight wing! Next came the engine nacelles. Just another problem. Typical of Monogram and Revell larger bomber kits, the horizontal joint in the nacelles is a big mess. I can't understand how Monogram could release a kit with this type of defect. After using my trusty sanding stick I was able to reduce the joint to an acceptable size. The joint was eliminated after some putty and sanding. The center portions of the 1:1 airplane's wings were painted. This was to prevent the special alloy that was used on the wings from corroding. Also, the ailerons were covered in a fabric and painted. I used Testors' Metallic Aluminum Plate on the painted surfaces of the wings. I wanted a matt finish so I did not buff the paint before a protected it with Testors' Metallic Sealer. This is how the wing looks after the Bare Metal foil is applied. I used two different colors of the foil, Matt Aluminum and Improved Chrome. I also used a rivet tool to emboss rivets on the plastic prior to applying the foil. I apply the foil to each panel individually. I cut the foil a little larger than the panel, apply the foil, burnish the foil with a paper stump, and then trim the foil. Using paper stumps as a burnishing tool is the real secrete for getting a really smooth foil finish. It is the only way to remove wrinkles and that that odd pebbly finish. Since the stumps are made of paper, you can press down as hard as you wish and the foil will not tear. After the foil is burnished I wipe it once, and only once, with 0000 steel wool. The steel wool adds a nice natural to the foil.8 points
-
Hi, Academy Sopwith Camel 1/32 OOB. The model is made for the customer. Cheers, Martin8 points
-
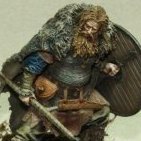
Hi guys first tank that I've managed to get finished started this last year final done (hopefully). It's a lovely kit to build really enjoyed it! I plan on making a base just got to get so materials but I've got an idea in my head! I'm looking for any advice on this for further improving, I've used 'skills' and techniques from doing aircraft so not sure what other tank stuff I could do so any comments will be greatly appreciated. Thanks for looking! Regards Joss8 points
-
So based on some CAD images, the CAD render and the pre-release test shot made in AMW, it appears that the Airfix kit does not to give us the intake boundary layer bleed vents or some vents that the Fujimi kit did. Based on the AMW article, we do know the Airfix kit gives us folded wings, posable slats and flaps, a removable radome with a radar antenna plus some other goodies which the Fujimi kit does not. I don't see anyone criticising the Fujimi kit for not having these options all of which were possible back when it was released. I think I'll wait and see what the production kit is like before I criticise the Airfix kit. Remember, it is only a hobby.8 points
-
I cant still remember that quite particular taste that the cheap Woolworths' brand had - somewhere between marzipan and imminent chemical poisoning.... Succinct is the order of the evening. Souvenir shots taken of this: Because it's now looking like this:8 points
-
Thanks Johnny, very kind of you Molly's tail is up this morning and she's wagging bravely so well on the road to recovery - thanks to everyone for their kind comments and good wishes. Molly says 'Woof' 🐾 A bit more done on the Spit this morning. A bit of sihrsc action on the tips of the wings to get them square and then on with the tips: I managed to achieve, for the first time, a feature that appears in the builds of modellers I admire - fingerprints in the TET: I had the same with the intake underneath. Focussing on positioning from the reference shots (the instructions specify 'somewhere underneath') I failed to spot the glue running onto my fingers: Another milestone achieved! I foresee some Micro-meshing in my future.8 points
-
Thanks Fella`s,..... I really appreciate your encouragement again with this model! Well,..with its time travelling dual identity......it is finished!!! To finish off I used left over undercarriage legs and exhausts from the Revell kit and a scratch built tail wheel guard to prevent the agents parachutes from becoming entangled on the tail wheel. The real aircraft appears to possibly have a tail wheel shroud too,.....but as I couldn`t make this out well enough to scratch build I left well alone!; late 1942-43; 1941- early 1942; So that is it,.....hope you like it! Cheers Tony8 points
-
Blimey is it Sunday already? Wow yes it is Anyway following revelations and close observation of the photography it was obvious that the intake area on the Frog moulds wasnt QUITE there The topmost pair of intake vents were too small in comparison with the plans from my new bible, the 4+ book The entire nose is too slim to allow for enough plastic that can be opened out at the top I managed a decent job on the lower intakes but am disappointed about the top bit, so out came the plans And the Milliput The very front needed a slim expansion piece to enable me to get the profile shown in the right of the shot and I did not think PPP was going to be good enough to take the knife work it is going to need Always a believer of the right stuff for the right job it is time for Dolgellau's finest to make an entry and Here is my starting place, I am not going to sihrsc this tonight of course, in such weather conditions as these prevailing I want it to get as firmly set as possible notwithstanding what Milliput claim on the instructions As I had some Milli left, (don't you always?) I took the PPP off the Bucc's fin top and replaced it with a properly fileable putty which will also get the treatment on the morrow Better base shape this time round too8 points
-
Actual actuators active tonight. It started off with these. 0.4mm tube soldered to some brass strip: Thence in the middle of excess solder being filed away: 0.6mm tubing then inserted into housing for a test fit to sort out length: Followed by testing the 0.4mm tubing doesn't encounter any obstructions sliding in: Having sorted out all six fitted (three per wing): First the housing, followed by the actuator were fixed into place with epoxy: The two outer ones on each wing control the aileron, the inner one (in focus below) operates the landing flap: None of the brass parts will be trimmed to length at this stage as first I want to mark and cut recesses into the respective flaps and ailerons to mount them into, and then to trim them back flush once I've established those points and fixed the parts together: The idea is that the three actuators we've just added per wing will take most of the weight, the six hinges per wing will act more as bracing: The third hinge outboard on each wing acts as a double hinge, marking where the aileron and flap are split into two sections: Enough actuating now. My eyes hurt after that. Night chums. Tony7 points
-
- Under an appropriate weather the first Russian jet fighter from CZECH MODEL - Junkers Jumo 004 grafted to a Yak 3 cell.....7 points
-
Hello all! Here are some photos of one of the models that i finished this year. This model was subject to publication on the May 2017 issue of Airfix Model World. As referred on the title, this is the well known TanModel kit. The first issue. The fit required some tweaking and was problematic around the camera bay windows. The paints used were: - X-1 Black as a base for the metalwork; - Fuselage colours from the Mr.Hobby range; - Alclad2 lacquers; - VAllejo Model Color generic colours; - Satin varnish from the Vallejo Model Air range Hope you like it! José Pires6 points
-
Hi everyone, There have been a few F-89 Scorpions in RFI recently and this is mine that I finished for Telford. The kit is the Revell kit and I used the design of the original decals to print my own for the checks as the white had turned yellow on the decal sheet. Masks were created for the star and bars as the ones on the decal sheet were not well produced. Vallejo and Revell acrylics were used. Robert6 points
-
"The Search For SPOCK The Gannet" There is a Gannet nose in here somewhere #1 They find some of it #2 To Quote a (?) Comedian- And There's More before your very eyes she appears #3 Ah isn't this bettererer? And still she arrives (thanks to Sihrsc the Barbarian) #4 Then the sculptor boo-boos If you looks kinda closely you can see where I have had to stuporgoo the Milli back onto the nose, as I was carving with my scalpel I accidentally lifted the curved bit off the edge The result of overenthusiastic hacking And a blunt Number 11 New blade time More later chaps6 points
-
Hi everybody, time for a WE progress report I've been a bit lazy as of late with this build, but now I think I quite caught up with it. First, though, I want to show the additional decals that Eugenio @72linerlover very kindly donated (he actually printed them out): these are the Savoia emblems, needed to complete the tail crosses, and the red alignment arrows used for the variable incidence tail planes. Thanks Euge! I did cut my own masks for said crosses, the wings "fasci" and the codes (two sets, just in case ... ), using ORAMASK 810 as a support and a Brother Scan'n'cut cutting machine; masks were designed using Inkscape Cross masks in place and Tamiya Tape for Curves to mask the white fuselage band We don't want no overspray, right? There she is: Mission accomplished, no overspray Either I'm beginning to learn, or the world is coming to an end ... Anyway, I used my standard sequence for white: a base coat of Tamiya Flat White with a few drops of Tamiya Sky Grey in it, followed by a pure Flat White coat. A protective Future coat was airbrushed on the white parts, then I put on the remaining masks (showing only one each, for brevity sake) And here's the result, after airbrushing a sort of off-black (Tamiya Flat Black mixed with Neutral Grey; the idea was to have a natural desaturation) For the red 3, I first airbrushed a Tamiya Flat White base coat, followed by Tamiya Red. Both the "6" needed some touch up, which I did by brush: They certainly look better from a distance I also worked on the propeller blades and spinner: blade tips painted yellow (first airbrushing some Tamiya Flat White as a base, then a final coat with Tamiya Flat Yellow and a drop of Red) then masked and sprayed the same off-black I used for the fasci and codes some light chipping on the front side and the back The spinner received a coat of Tamiya Flat White and some chipping In both cases (for the blades and the spinner, that is) I used a Dremel brass polishing tool for the chipping. Almost ready for decals ... Comments welcome, as ever Ciao6 points
-
Hello Folks, Here is another completed model,.....the Matchbox Halifax built as a Mk.I used by 138 (Special Duties) Sqn at Stradishall and later Tempsford for agent and supply dropping in support of SOE. This model represents L9613 which had dropped the brave Czech agents into Czechoslovakia on the night of 28th November 1941 who were responsible for killing Reich Commisar Reinhard Heydrich, and who were tragically betrayed by one of their own to the German`s, resulting in an infamous final shoot out in the Karel Boroejsky Church in Prague. The model has Aeroclub white metal propellers and has been heavily `modified' using spare parts from the Revell kit, such as the nose turret, undercarriage legs, exhausts, parachute exit and the engine nacelles were also cut up and made more accurate using parts left over from the Revell kit too. It was brush painted using Polly Scale and Humbrol acrylics and the decals came from AML,..... although the codes had to be altered and the grey codes on the right side were modified Xtradecal ones. Here is the WIP; And here is the model,....with early markings on one side and later markings on the other; late 1942-43; 1941- early 1942; So that is it,.....hope you like it! Cheers Tony6 points
-
OOB, Xtradecals.5 points
-
Sort of amazed myself on this one. Knocking it on the floor wasn't in the plan but putting it back together into something resembling the real deal was the amazing part. Here it is, finally got the tow cables in place and some dust to tone down the glossy areas and warts and all it's a dirty, dusty APC. Not sure I'd want a ride though, must be pretty cramped for 10 infantry in there. There's a pretty much complete interior, less engine and drive train but of course it's all hidden now.5 points
-
Next victim almost ready for the paint booth. Another Israeli AFV, they are sort of appealing. I think this was built on the old M60 and the Israelis sure believed in add-ons and modifications to get the most life out of this old stuff. The Academy kit doesn't measure up to the Meng, Takom or Rye Field stuff but what the heck, it's available and the price is great, half or less of the other kits. Here is as of this aft.5 points
-
Hello dear friends. I present you with my latest build that has been completed for the float plane group build that can be found here. (link to add) I ended up taking quit a lot more pics than needed hence this post but I though I'd share anyway. Hopefully you'll like them. We have for you today the.... Catalina PBY-5 "BLACK CAT" by Academy. She has been a venture into black paint schemes, salt weathering and many more new techniques that I'll strap in the old brain box for future builds. The WIP can be found here. WIP And the Gallery for the GB can be found here. Gallery I have also managed to squeeze in an RFI for my last build of the HPO400 "Last Days" that can be found here if you're interested. HP O/400 RFI Without further annoyance from my jabbering here she is. AAAAAnd there you go. Thank you fellow Britmodellers for letting me once again indulge my flights of fancy and post about a zillion pics of my latest endeavours into plastic and lead shot. Hope you have a great Sunday. I need to choose a new kit to build over Chrimbleton. Merry Christmas to you all. Johnny Cat.5 points
-
We've been warned about the way this thread is heading on at least one occasion already gang so perhaps we need to reserve our judgement and vitriol until such time as the kit is on general release and the reviews of the production kits are widespread. Then, based on that knowledge, vote with our wallets. If you like what you see and read then buy it. If, however, you do not then turn your attention to some of the other kits in your stash or the shelves of your LMS/favourite on-line retailer. In the meantime let's calm the rhetoric and stick to the facts please.5 points
-
My attempt at building a WR tail code A-10 in euro one camo. I don’t live to far from the twin bases of Woodbridge and Bentwaters and already had my HAS diorama, so an A-10 was always a logical choice. I remember going along to a Bentwaters airshow as a kid and frequently seeing the ‘hunting pairs’ of Warthogs flying over. Inspiration also from the new acquisition at the Bentwaters Cold War Museum. Lovely to see one back there. This is an old Revell kit from eBay with a nice resin seat thanks to @RMP2. Thanks for looking.5 points
-
Thank you very much Clive. I have been looking at lots of photos of these type of tracks with snow on but pretty much each one looks different! So I'm just trying to get a general appearance of not too heavy snow - I did quite a bit of work on the initial painting and weathering of the tracks so I don't want to loose all that effort completely! Thank you very Badder. Yeah - I'm finding it quite tricky to work out what looks correct. I don't want too little, but, as I mentioned to Clive, I don't want to lose all my original painting and weathering. Thank you Ozzy and yes a winter Panzer IV sounds like a great idea! Thank you very much Julian. These wider tracks do add an extra dimension to this Panzer III and I agree, working on these tanks in any way must have been awful in the conditions they faced. Hi John and thank you for your comments. There are some really talented brush painters out there who manage to make their painting look like it's been airbrushed. Amazing stuff. When I was trying to find some ideas for how to improve my painting I watched loads of videos on YouTube and was frequently amazed by their ability. Thank you Blaubar and you make a good point. So yesterday afternoon I did start work on your suggestion by adding slightly more snow on the back end of the tracks. No photos though as it was a bit too dark to get a decent photo. Not much in the way of photos of yesterday's session. I began by gluing on the fenders: After these were set I began work on the initial weathering on the rear and front of the lower hull which actually took me longer than I was expecting. There are quite a few areas that I wanted to get sorted and weathered before the next set of pieces are glued in place. By the time I stopped doing the weathering effects the light wasn't really that good to show up what I had done. Finally yesterday I decided to find all the other small kit parts (tools, lights, boxes, etc.) which I haven't even done anything with yet and cut them (still with some sprue in place) off the main runs so I can get some cleaning up done on them when I get the odd minute: Comments and suggestions welcome. Kind regards, Stix5 points
-
1000 likes Now I know that you guys would realise that I'm the sort of cool 'James Dean' 'Rebel Without a Cause' kind of guy that frankly just doesn't give a damn about how many likes he has on britmodeller - but I couldn't help but glance down and notice this earlier today... Any way - I don't care... Do you think George Clooney would care? Nope - neither would Bandsaw Steve - hardly noticed this at all in fact... I think it was this guy - 'Courageous' that cast the one thousandth 'like...' it's fitting really - a submarine icon and all... Not that I really care... Do you think Humphrey Bogart would care? It'd be pretty sad and uncool to go around just waiting to get 1000 likes on Britmodeller - pretty self absorbed and a bit nerdy really... It was just luck really that I noticed it... Anyway - in passing I mentioned it to the tools out in the shed. Now these guys don't get out much and they got pretty excited - so I let them throw a little party to celebrate. After all - they did a lot of work for this and they are square enough to care. Not like me - I couldn't give a damn! The party started as a little social get together - nice and orderly. Once the sound system cranked up and they played 'Blondie's 'Call Me' the party started to come alive... Soon after this point the chisels went home and got a good night sleep - hand tools are sensible like that. Always looking after their cutting edges. On the other hand, once you start the power tools they just don't know when to stop. Here that flirty little Dremmel has taken some dance floor 'selfies' of herself with the bench sander. Shameless little thing! More dance-floor selfies from the small hours of the morning - the party started getting out hand at this point. I went home expecting that there would be some noise complaints from the neighbours. By this stage they were cranking Meatloaf's 'Bat out of Hell' at well over 100 decibels. Power-tools eh... what can you do? The following morning things were very shabby indeed. I tried to have a talk with the bandsaw - told him he was supposed to be the leader of these tools and should have set an example. He just told me to 'shut up and close the curtains'. Wonder what will happen if we ever get to 2000 likes. Not that I really care... Steve...Bandsaw Steve5 points
-
Glad to hear that Molly is returning to normal. I think you should just paint over the fingerprints and then sign them. John5 points
-
Things not been going well .... I've got the plans why can't I follow them ? Nagging ache that things weren't looking right. Not suprising when I realised that I had the frame spacing wrong and had started from the wrong datum point You get the idea, so ripped it out and made a start on the correct framing Which of course means all this is wrong Which does prove a point, my teachers were right .... Don't you just love modelling? Kev5 points
-
Hello Neil, thank you very much for your interest. I created the "chipped effect" using Vaseline creme. Yes, Vaseline creme! But you can use any other similar medium, like Nivea Creme as well. First, aplly an all-over coat of Silver/Aluminium (I used Tamiya TS-17). Next, apply Vaseline (or similar) with a fine brush on those areas you'd like to keep Silver. This is usually the areas that receive the most wear & tear, like wing leading edges, panels etc. Work steady and careful, and use little amount of creme - when you add 'blobs' of creme, these will be moved around the surface by the airstream of your brush! I also work in segments in order not to touch the surfaces (you'll get nasty fingerprints then!). Here's the first step - basecoat with Tamiya TS-17 Aluminum. Applying the Vaseline creme with a fine brush: Add pre-shading: Now the top color (Olive Drab H52). Note, I started on the left wing. After this is finished, I will turn to the fuselage, then the other wing. Working in segments reduces the risk of acidentially touching the surfaces already covered with creme. After paint is dry, you can use Tamiya tape to create the final appearace - stick to the surface and rip off. You will be presented with paint chips like this : Model painted and chipped, next come the decals. Neil, I hope this little tutorial is useful. With best greetings from Vienna, Austria.5 points
-
Well, the weeks' leave came and went and I didn't make a start on the two MkVbs I promised. This is because both my time and inclination to do any modelling have dwindled to nothing. However, I have been doing a Bf-109 in the Matchbox Group Build and it's got the modelling block sorted so, although the MkVbs will be delayed, I'll be recommencing work on the MkVI and MkIX in the next week.5 points
-
The Bristol collector ring, both styles. Chris5 points
-
This year I decided to try and build more kits outside GBs - as it happens I've only managed one so far with another which may get completed before the year ends. First completion of the year was in the Mustang STGB: North American Mustang IV No.112 Squadron, Italy, 1945 Kit: 1/72 Airfix Starter Set Paints: Humbrol, Revell, Citadel and Railmatch all applied by brush Extras: Tamiya tape seatbelts, styrene for the control column and aerial WIP: Here RFI: Here Next completion was in the 70s NATO vs Warsaw Pact GB: T-64 Main Battle Tank Mod. 1972 Cold War Vignette: Waiting and Watching Kit: 1/72 Modelcollect - includes a metal barrel and L&L tracks Paints: Humbrol, Revell, Citadel and Railmatch - all applied by brush Vignette base: 4mm MDF, household filler, a variety of turfs, tufts and trees from Woodlands Scenics, Greenscene and Army Painter WIP: Here RFI: Here Vignette photos: Here First build of the year outside a GB: Tamiya's 1/35 Panther Ausf.D - Sd.Kfz.171 The version I have decided to finish mine as is No. 445 - Pz.Gr.Div. - Großdeutschland - Kursk in August 1943. Kit: Tamiya /135 Panther - Ausf.D - Sd.Kfz.171 AM: Tamiya individual track links, grill set and metal barrel Paints: Humbrol, Revell, Citadel and Railmatch all applied by paint brushes Mud: Mig - European dry mud WIP: Here RFI: Here Another STGB build next: Mosquito FB Mk.VI MM417 EG-T No. 487 Squadron RNZAF Based at Hunsdon, Hertfordshire in February/March 1944 MM417 EG-T served with 487 Squadron from 29 February 1944 to 26 March 1944. On the 26th March she was lost while leading the attack on coastal defense emplacements which were under construction at Les Hayes and was hit by flak during the mission. Wing Commander I S Smith was forced to crash land back at Hunsdon. The crew survived but the aircraft was wrecked. Kit: 1/72 Tamiya De Havilland Mosquito FB Mk.VI/NF Mk.II Extras: Eduard Zoom Set SS137 Paints: Humbrol, Revell, Citadel and Railmatch Acrylics - all applied by brush Base: Zvezda Snap-fit German Howitzer and a Wilko's picture frame WIP: Here Lots and lots of RFI photos: Here Vignette base photos: Here Shaky YouTube video: Here Photoshopped photos: Here I was actually quite pleased with the base for this and thought the little Zvezda snap kit and crew really looked the part: 1/72 Zvezda Snap-fit German Howitzer Vignette base photos: Here More tanks next - 3 this time in the From Russia With Love GB: Russian Tank T-34/76 Model 1941 (Cast turret) Kit: Tamiya 1/48 T-34/76 Model 1941 (Cast turret) Extras: Stretched sprue aerial (although I hadn't fitted it when I took the photos below) Paints: Humbrol, Revell, Citadel and Railmatch acrylics all applied by brush WIP for the whole project: Here Diorama photos: Here Yak-3 RFI: Here Russian Tank Destroyer SU-122 – No.5234 Kit: Tamiya 1/48 Russian Tank Destroyer SU-122 Extras: Tamiya Russian tank crew figure Paints: Humbrol, Revell, Citadel and Railmatch all applied by brush WIP: Here Diorama: Here Russian Heavy Tank KV-1 (w/Applique Armour) Kit: Tamiya 1/48 KV-1 with Applique Armour Extras: Tamiya Russian tank crew figure Paints: Humbrol, Revell, Citadel and Railmatch all applied by brush WIP: Here Diorama photos: Here In the from Russia With Love GB I also built an aircraft: Yak-3 White 6 Lieutenant Marcel Albert, 1st FAR “Normandie Niemen”, 303rd FAD, Autumn 1944/Spring 1945 Kit: 1/48 Zvezda Yak-3 Extras: Tamiya seat belts and EZline aerial wire Paints: Humbrol, Revell, Citadel and Railmatch Acrylics - all applied by brush WIP: Here Tank RFI: Here Diorama photos: Here I combined the above four builds in scene and added some figures: Road to Berlin 2 WIP for the whole project: Here Yak-3 RFI: Here 3 tanks RFI: Here Over the summer there was the Blitzbuild GB - my entry: Meng 'Toon' Sherman M4A1 This is was a great kit to build - loads of fun. Fit was mostly pretty good. Actual build time was probably about 18 or so hours. I was thinking of doing more weathering and adding some mud but time got away from me in the end. Thank you to Enzo for setting up the GB and to everyone who took the time to comment in my WIP thread. WIP: Here More photos: Here Final completed build at the moment - my entry in the Radial Engines Rock GB: Dragon M4A1(76)W VVSS - 1/72 2nd Armoured Regiment - Polish 1st Armoured Division - Holland 1944 The WIP can be found here. The RFI can be found here. As always I have to thank everyone who has contributed in anyway to my build threads - my builds wouldn't be what they are without all the encouragement, advice and support from the fine modellers here on Britmodeller. Thanks must also go to Enzo and all the hosts of the GBs - these GBs certainly help focus my modelling! EDIT: When I originally did this post I had not completed my Panzer III Ausf.L, Late Production, with Winterketten - from the Dragon 1/35 kit - but I have now! It is only my second non-GB build of the year and I thoroughly enjoyed it. This was my first Dragon 1/35 kit and it seemed to go together really well. This was also my first go at a whitewash finish which I have been nervous about doing for a while but I decided I needed to get one under my belt. I opted to a really worn version which, hopefully, looks okay. As my last completion of the year I was pleased with how it turned out. WIP: Here RFI: Here Comments and suggestions welcome as always. Happy New Year! Kind regards, Stix4 points
-
Nice to see your pet hedgehog getting involved in the build. Martian4 points
-
I think I may have over egged this a bit lot , I think we'll call it tissue snot resin from now on. TR for short. Now I'm going to apologise I felt the need to lay up the said TR to make the mould from the other room with my hands behind my back. You'll understand Materials used, standard resin as available from any Halfords Autofactors near you. For mat I used tissue, yes what you blow your nose with. Not toilet paper it's made to dissolve . This is still to stiff to get into tight corners. So I painted resin stiffened up with talc into the corners before laying tissue over. I'm sure in the real deal the glass fibre mat adds strength, I'm hoping I'm not got to regret it. This shows the two halves of the plug secured to plastic card. Wrong! I should have split the plug, blanked one half along the keel line with card. Laid up the TR to this card. Let it set, remove card . Re attach second half of plug re wax etc and lay up the second half of the plug to the TR lip. Hope this makes sense, if you need more info PM me. This shows the two halves of the new mould with the plug in the background You can get some idea how rough the outside TR work is. Learnt, split the two tissue plys. tear tissue into small pieces, size of your thumb. I used a stiff brush for stippling the resin and working the air out, on reflection slightly softer may work better. The mould needs at least the waxings with mould release (make sure you are sitting down when you find out what it costs. Contrary to popular opinion it does not include a blonde to do the rubbing). This wax should be allowed to dry, I used a fan heater and polished to a nice shine. Repeat. The final belt and braces is pva mould release. This has to be sprayed on, imagine try to brush water over a waxed surface !! Mould laid up with 4 layers TR Overlap cut off before splitting mould. On any real size mould leave a couple of days to set otherwise you'll have a banana. and the new baby released ..... These are straight out of the mould no touch up. A few air bubbles etc to touch in and the job is a good un . Thanks for reading all the above rubbish or maybe you didn't. I'm certainly no expert, I've four hulls between 18 & 30" for R/C work. Feel free to ask and don't be offended if I don't answer tis only cos I don't know the answer Kev4 points
-
Who, Molly? I think she looks fine in black.... Keith4 points
-
Blimey, looks like the modelling equivalent of DIY SOS just hit the Vosper !! Just make sure they don't repaint the inside purple and pink mate Or add a warp drive and photon torpedoes4 points
-
Well gentlemen, fascinating though this debate is, I have ordered 6 of the kits and I will give my comments once I have actually built one.4 points
-
another shot with my finished SBC-4 Helldiver from the KUTA GB4 points
-
managed to do a little bit I used the coloured transparent warning lights from the DACO set was not convinced before, but looks good installed!, also differences between orange, red, white and of course green/blue the C2 seat is not finished yet obviously, but the red is quite ok color wise, no? as Danny from DACO suggests, the main landing gear bay will not be glued, it centers itself and may allow slight adjustment sounds promising! took care of ejector pin marks on the inner tail surfaces, again, thanks DACO sounds logical, but I only did last minute before glueing them..... I addeds ome nose weight, just to be on the safe side.... I hate tailsitters.... as I could not find anything else I needed to to before closing the fuselage, I did so late last night!4 points


.thumb.jpg.76f12b87ce9ca9929c9aabdcf8f9d2dd.jpg)


This leaderboard is set to London/GMT+01:00