
Leaderboard


Popular Content
Showing content with the highest reputation on 12/11/17 in all areas
-
Hasegawa model with many extras. Camo - Pakistan/India war 1971. Oryginally "D" from Jordanian AF dispatched to help Pakistan and shot down 17 december 1971 by Indian Mig-21. I invite You to watch.23 points
-
Hello fellow Modellers! This "Red" 02 is a "Polish Flanker" stationed in Stargard, Poland and featured by photographer Robert Senkowski in Verlinden Lock On 17. 1992, when VVS left, there was a big fly out ceremony. I spent a lot of time to make a sleeker aft fuselage and other corrections and detailing. I made this model 2002/2003. The older pictures on tarmac were on film. I hope you like this grey stuff, Cheers!18 points
-
Scratch-built, with decals from Arctic Decals of Finland. There were several models and modifications. I scratched this model a few months ago, posting some images of it still without decals here in Britmodeller in the "British Heinkel" post: http://www.britmodeller.com/forums/index.php?/topic/235025835-the-british-heinkel/14 points
-
Hello all I made this many years ago but recently wheeled it out to practise some weathering techniques. So before I completely ruin it I thought I'd put some shots up. It's the old Italeri Mk Vb in the markings of 249 Sqn on Malta, October 1942. Not a bad kit, I seem to remember, but lacking detail compared to recent kits. I also seem to have avoided adding any stencils! Thanks for looking! Ian13 points
-
Latest completed this year, Eduards 1/72 Fw190 F8 Wurger. Built OOB for a change, no extras. Quite a nice little kit, a bit over engineered in places, presumably for the extras that Eduard also make, but still builds up well with no filler required. I used the rockets as I'd never seen a Wurger with that set up and regretted it as soon as it come to fitting the little blighter's, I also found the kit decals difficult to handle, a couple of small one just shrivelled up and even the larger one tried to wrinkle. All paints are Tamiya acrylics. Other wise an enjoyable build and looking forward to the P39 Airacobra I have in the stash next year. As usaul all comment are welcome. IMGA0081 by neil Connor, on Flickr IMGA0080 by neil Connor, on Flickr IMGA0082 by neil Connor, on Flickr IMGA0083 by neil Connor, on Flickr IMGA0086 by neil Connor, on Flickr IMGA0084 by neil Connor, on Flickr IMGA0085 by neil Connor, on Flickr13 points
-
Hello again! As promised here is my 1/48 Hobbyboss F4U-1 Corsair on its scratch built display plinth. I wanted to capture the look of a sun bleached, beaten up Corsair waiting for the next sortie.11 points
-
Chieftain Mk. V Tamiya Following my Mom’s rule „don’t open a new bag of crisps until the old one is empty” the new Takom Cieftains have to wait in the build-one-day-corner until all the old Tamiya Chieftains have been used up. So this one is my first attempt to create a rusty wreck. It was inspired by some cool pics in the web showing some old hulks on the shooting ranges of the AFV Gunnery school at Lulworth Camp. Main focus was on the painting, so I didn’t spent to much time with the build. The rubber tracks aren’t nice, but as this was a “build it or bin it project” I couldn’t be bothered to spend money in aftermarket parts or upgrades. The model is out of box, I just added some scratch parts for the inside of the turret. Painting was done with Revell Acryl, weathering with Lucas oil paint and pigments from MIG and CMK.11 points
-
Well deserved Peter - she's a beauty. For those who didn't get to Telford I hope you won't mind me posting some rubbish shots I grabbed with my 'phone through the admiring crowd: Pride of place, just where she (and your skills) belong11 points
-
Hello to all, after the vintage race car Fiat 806 Corsa 1/12, my last build, and the american classic car Chevrolet Bel Air Convertible 1957 1/25, I am happy to present here a very different model: the nice Yakovlev Yak 3 Eduard at 1/48. The decision to build this kit comes from my indescriblable enthusiasm for the great Juan Manuel Villalba's "Guide du maquettisme aéronautique" (Histoire et collections ed.), in which, through others, the famous modeler dedicated several pages to a wonderful Yak 3 (everything this man touches turns to gold, imho). My build began in april 2016 and finished in july of the same year. I decided to follow the steps of the master, and came in contact with him (he is not only a great artist, he is also a delicious man, of an extreme kindness). He replied patiently to all the questions I had (and I had many...), and with the book and his hints, I learnt a lot. I would like so much to meet him, we are regularly in contact by mail, but pity, we live so far apart... To be honest, I must say in this build, most of the ideas were not mine but his ones (he would say the contrary, and that definitely, it is my personal work, he is so kind...). I was most of the time just trying to reproduce what he had done before me. I am not ashamed to say that, Woody Allen was also influenced by other directors, before finding his own style (I am a fan). Well, let's leave Juan (he is so modest, he would be embarrassed if I go on...) to see the pics: I will begin with a few photos, screen captures from videos found on YouTube, of the real aircraft, on a restored version: ----------------------------------------------------------------------------------------------------------- and now the build. My pics will follow logically the steps of construction. Just a word about the kit: except the decal sheet, of quite poor quality, this Profipack Eduard kit is excellent. I have been so critical (rightly) about the Fiat and the Chevrolet, it is fair and important to say too when a kit is very good... Of course, if there are questions, I will reply with pleasure...10 points
-
HI Other one finish has little time there , P40c trumpeter ,A model which asks for a little of work and with a little of care arrives has to make a beautiful model..... white métal landing gear,model master gun's barrel, photo etched eduard cockpit ,painting mask AML for red star and code , resin soviet pilot QIN YI ,painting gunze ,tamiya and AK shipping fluid , divers wash oil and tamiya , watercolor pencils photos winter effect the soviet pilot painting acrylic and mixture citadelle for the face pascal9 points
-
Hello, After Ruslan http://www.britmodeller.com/forums/index.php?/topic/235026555-antonov-an-124-ruslan-aeroflot-revell-1144/# I have finished another Aeroflot "Heavy Lift" It is IL-76 from Trumper. Kit was much more difficult to build as Revell Ruslan and it has no interior. So If you think about IL-76 buy fantastic new Zvezda. Airbrushed wit Revell enamels and aqua.9 points
-
I'm sorry to say so but there is so much incorrect information in this thread. First of all, all RF-4B/C/E have the same length, and the general shape of the nose is the same, although there are two camera bay shapes (one angled and one rounded). The first 36 RF-4Bs had the thinner wings of the F-4B/N (i.e. no large bulges). The last ten RF-4Bs had the bulged wings just like all the RF-4Cs and RF-4Es (those RF-4Bs are all in the 1573xx BuNo range). Almost all RF-4Bs had the angled nose profile. Only exception were the last three RF-4Bs - they had the rounded nose profile. RF-4Bs started out with the shorter burner cans and unslotted tail planes. Later on, the remaining airframes were retrofitted with the longer burner cans and slotted tail planes. ECM updates were also carried out at some point. All RF-4Cs had the thicker/bulged wings. All RF-4Cs had the shorter burner cans. All RF-4Cs had the unslotted tail planes. Initial RF-4Cs had the angled nose profile, but around FY66 airframes the rounded profile started appearing. Some RF-4Cs were retrofitted with the rounded nose profile (I have never seen it the other way around). You really need a picture of the aircraft you want to build to be sure. All RF-4Es had/have the thicker/bulged wings. Original Greek and Turkish RF-4Es (all FY77) had/have the slatted wings of the F-4E/F/G. All RF-4Es had/have the longer burner cans. Most RF-4Es had/have the slotted tail planes. German RF-4Es had the unslotted tail planes. Most RF-4Es had/have the rounded nose profile. German RF-4Es had the angled nose profile, and so did the initial Israeli RF-4Es. Later Israeli RF-4Es had the rounded nose profile. Now, those are only the general differences. Added to that are all the details; cockpit, antenna suite etc. HTH, Jens9 points
-
I've been really slack and made almost no progress Nevertheless a few little tips The bottom wings don't seal up perfectly around the guns. I've ended up with two gaps on the right of the picture and one on the left. Also in the wings roots there are gaps but from a bit of research it appears these are correct. Also they were too well defined and proportioned on both ring roots to be just a "poor" fit The wing roots on the kit do need a bit of attention to tidy them up but not much...there's a bit of putty to be sanded on the left side in the picture above I filled the gun gaps with a bit of putty but it wasn't great. I found it easier to just drop in a bit of Mr Surfacer 500 and then smooth it with a bit of a wet finger Still needs a bit of smoothing/sanding/polishing but sort of looks like this now. The leading edge of the wings between the fuse and the guns looks like it needs a sand and polish too! I tidied up the interior green on the cockpit area and mounted the gun sight I've done most of the fiddly bits, wheels, tail wheel, prop etc. When the time comes I'll gloss them and weather them with the rest of the aircraft Right now it's really time for masking the canopy (which is probably why the project has ground to a halt) I'll push through that awful process and get it on and hopefully be in a position to do some pre-shading Cheers Bruce9 points
-
^^ As I put nothing on the forum for a long time I release this evening....lol another finish and Just my third tamiya corsair 1/32 scale .... yes I no ....There is anything more has to make for my case... Painting Gunze, textile harness HGW, wheels resin Brassin, wash AK, pigments tamiya and AK, watercolors pencils, decal barracuda "RAMBLIN WRECK" Espirito Santo MAY 1944 Well on him the D ....is in the stash ^^ pascal8 points
-
hello guy's !! For a long time I have nothing poster here.............sorry ......... thus here is my last one A1-J Tamiya , paint AK interactive set Vietnam and, gunze , tamiya , camouflage free hand , exhausts 50/50 nato black tamiya and matt brown diluted 90% with alcohol low pressure (1 bar ) and resumption with pencils watercolor for the effects , eduard zomm for cockpit , quick boost resin boot cockpit sliding enclosure I believe I have to forget nothing, an assembly which my pleased good I think of redoing him but in 1/32 scale ... cheers Pascal .8 points
-
Good afternoon world. Having only returned from Telford this morning with the dawn there'll be no modelling done today (merely some salivating over and poking at booty obtained during the show), but what a trip! Myself and my youngest left the West of Ireland at 4.30am on Friday, and were keenly poised at the doors of the International Centre by 10am Saturday, to be immediately greeted by the true magnificence our dear Martian overlord trundling along past the queue to get in, supreme and yet benevolently viridian amongst his subjects - a sight that takes a long time to vacate the retina I can assure you. As a first-time visitor to the IPMS, any pretence at maintaining a coolly-urbane demeanour evaporated within the first five minutes, beginning with Debs' fine Wellington on the BC table and not ending until 7 hours later with a final wistful parting bow of obeisance to Bill's Wasp and the Martian Sikorsky upstairs in the winner's enclosure. Worthy awards one and all and I count myself lucky to have seen such work in person. For the first couple of hours myself and Raph simply circulated the halls, thrusting money at various vendors between and betwixt standing in front of tables of fantastic modelling, communicating with each other largely through the medium of 'Cor!' Then, suddenly, it was 2pm and time for the Britmodeller meet over by the Birmingham table. I must confess to having felt incredibly nervous (as I always do) at such first-time social encounters but I needn't have worried as a charming @perdu promptly seized my paw and introduced me to the assembled BM posse. Apologies to anyone I gabbled at there but have missed mentioning here from tiredness but: Keith, Steve, Don, Tom, Ced, Crisp, Phil, Nigel, Debs: It was a pleasure to meet all of you, and not for the last time I hope. Meeting @CedB was the only instance on which I've had the opportunity to say to somebody in a Doctor-Livingstone-I-presume kind of voice: 'I recognize that face from seeing it in a Spitfire cockpit...' Bill even let me hold his Auster. What a day! The day was not without certain elements of comedy. After getting delayed by locating my son, we weren't immediately able join the posse decanting upstairs to celebrate the winning BM entries, and so by the time we arrived at the foot of stairs a security guard told us we'd have to leave our bags in the cloakroom. After viewing the winning entries and going back to the cloakroom it was to find a gentleman of advanced years in front of me remonstrating with the woman running the place and rather tersely haranguing her for not being able to locate his black bag in a room full of identical-looking blag bags. After a minute or so of this he rubbed his chin thoughtfully and said 'Well, I thought it was black, but I think it's actually that brown one there at the front.' I swear the woman made the gesture of cocking a pistol as she turned away. I should add also that when meeting Martian for the first time, the look of mild disdain on his face that I was not clad for the event in full Baronness' pantomime-dame rig has to be the only occasion in my life when another man has been genuinely disappointed that I was not dressed in women's clothing. The drive back westwards to Ireland was a happy one as a consequence of the day and new friendships, barrelling out of Dublin towards Orion's belt sinking on the horizon with the sun chasing and eventually overtaking us. I need to go sleep again now: I have to go in and give a three hour lecture first thing tomorrow morning and unfortunately it can't be on the topic of 'My Weekend'. More as it develops during the week, and for those of you not home yet - Slán abhaile Tony8 points
-
8 points
-
I think this is an extremely important point. If Airfix's latest CAD masterpiece is extremely fiddly to build, with crazy tight tolerances eroding the fun, a new modelor is going to be less likely to enjoy and fully get into the hobby. I also don't get why 1/72 is getting so complex from a profit point of view - why tie someone's limited modelling time up on one kit of complexity and tight tolerances, when a slightly simpler (I.e. quicker) build may retain more fun and have the customer dipping back into their pocket sooner?8 points
-
This is Airfix's very nice 1/48th scale Hurricane kit, I really enjoyed this build. I added a few details to the cockpit and gun bay, improved the landing lights by open the structure around them, removed the cowling Dzus fasteners and replaced them with a beading tool, added Brassin wheels, used the Aires exhausts which had to be cut apart and glue back together in the correct place as it has the exhausts are too far apart. Painted with Humbrol enamels and decals from Xtradecal.7 points
-
Here's my building of Airfix's 1/72 Spitfire. It's pretty much OOB, I added tape harnesses. The paint is Tamiya Medium Sea Grey with Xtracrylics PRU Blue. This photo Spit was built alongside the Dutch trainer version. This is the RFI thread for both. Cheers Will7 points
-
Fingers crossed Simon! I checked again today too, no luck. Engine attached. I dimpled the surface of the wings a little bit and this is the first pic where it has shown up - just above the gun on the right wing. I was worried that the overall Gloss Sea blue scheme would look too sedate and took a round file to a few panels - way too heavy handed in places (should have practiced first), but I sanded some of the worst offenders back, and they really only show up at just the right angle to the light. There was a lot less luck to be had with the canopy masking. Much of the paint came up with the mask. I foolishly painted the interior green Zinc Chromate with acrylics, and then the Gloss Sea blue with enamels. Um, don't do that. You can see the blue-tack through the windows (and most of the frames) that's holding them in place. I'm planning on posing the canopies open. After some work with a tiny brush and a toothpick. A bit more work to do, but I'm not going to re-mask them. Almost ready for decals. I have to say that the Academy kit is really an enjoyable build - I wish I was a bigger fan of the Helldiver.7 points
-
Eduard edition with QB scoops, resin weapons, wheels, cockpit. Pitot and barrels - Master Markings - Algeria - 1973 Ramadan War (YomKippur War) - Algerian contingent in Egipt/Syria Arab coalition during the attack on Israel I invite you to photos6 points
-
Ok, I have absolutely no willpower and have decided to start on this even though I have a ridiculous amount on the go already. The obligatory box shot is below, and I will be building it straight from the box. This is the later "black box" release (from Revell I believe), and it occurs to me that all of my GB builds this year have been reissues (China, Revell etc.); not one has been a classic release. The shame.....6 points
-
Let me add a few words of thanks to you all that were able to come along and puff me up with undeserved praise, but beggar it lads I enjoyed the whole thing I was heartened that got an unannounced Whofan joining the happy throng too, chaps ( including Tony's lad) This morning Martian had detransformed into human disguise Still real fun lads I'm looking forwards even more to next year as there's a chance we've more friends coming along Can't wait I've a little tale to close my piece here so Tony can get some kip and some modelling later I mentioned I won a trophy A lovely silver (sic) salver with a Czech roundel and a Winner 2017 plaque It came with a free pen too I love free pens, we play at lots of crossword puzzles here in our house, but it also had a copy of one of the 4+ publishing aircraft books I've been very dependent on their magnificent Wessex book so I know how brilliant they are When I opened the bag to see the rest of their magnificent bounty it was gob -smacking time They gave the the volume on..... The Fairey Gannet Wow How did they know? Any way again thank you all for making this an even more memorable 'Telford' than usual I'm orf, I've some great reading to do. 😃6 points
-
Right. Back from Telford (& mighty fine it was too - especially being able to put a face to so many BM friends now). This is where we are with the Walrus: I have re-sprayed the rearmost 4 bays of the fuselage Duraluminium (not sure why it was different back there, but it was). I have also used one of my favourite tools - Caran D'Ache colour pencils - to start the process of improving all that base colour Interior Green. Stage 1 is to highlight most of the edges (of which there are a lot!) with a paler green; same principle as dry brushing, basically. I have done all four sections seen here, but in this photo it is most obvious on the part furthest from the camera. And, just to prove that other people have the same mad ideas as me, here's a photo of a Walrus on the Airfix stand, where they have opted to build the same half-folded configuration as me. Mine will be the other way round (starboard spread, port folded), but you get the idea. Mine won't have guns, but will be rigged (fnaarrr). Pip pip Crisp6 points
-
Ahoy! My 11th completed model in 2017. This is Eduard's Weekend Edition, so it is a bit simplified. No PE I in the box, so I included some generic PE belts, and scrstchbuilt the metal suspension straps for the drop tank. I also added elastic fabric aerial wires. The rest of the kit is out of the box. All paint is Tamiya.6 points
-
Hi folks, I made it to Telford for the first time yesterday but only after work intervened which meant I only arrived at 5pm. So I missed quite a lot. Oh well, over the past week I've done the decals on the Seafire. Cutting and locating those individual 4 inch serial numbers/letters was a bit of a task, but they went on ok in the end. Overall I found the Sword decals quite challenging to work with - very thin and rather brittle which meant I turned to Xtradecal for most of the stencils. The tail codes are also Xtradecal. As I was applying them I noticed on photos that the S should be slightly bigger than the 121, but I don't think it shows up all that much. The underwing roundel broke into 3 pieces but I managed to save it and it'll probably look ok after a bit of weathering. And there's a bit of touching up to do on the fuselage roundels too. I'm using this profile as a reference for Victor Lowden's aircraft: But it's a bit inaccurate as the top camouflage colours are erroneously reversed. But it enables me to do an alternative to S-146 (Reynolds) and S-112 (Murphy) which are often modelled. Justin6 points
-
Thanks very much fellas, and thank you Bruce for the heads up, on the double post (fixed now) G'day people, Well, I started the day by painting up the kit seat and adding some PE loveliness Pavla offers a resin seat however unaltered, it is far too tall to sit in the cockpit. You would have to reduce the raised plinth that the kit seat rests on which could be tricky. In any case the kit supplied seat is very nice and really only lacks the seats straps to look convincing. The kit decal sheet even includes a pair of data plate decals for the seat headbox (not mentioned in the instructions) and the PE set also supplies pre-painted stencil placards but I think the kit decals look better so that is what I used. I also repainted the pre-painted seat PE belts because I did not like the colours. A quick test fit to make sure that there will not be any surprises come installation time Satisfied I moved on to the main wing assembly. As already mentioned, as supplied the APU exhaust is simplified and far too shallow to be realistic The APU recess was opened up by chain drilling and then cleaned up with files. Once satisfied, a representation of the exhaust duct was scratchbuilt using plastic sheet Once dry, this was trimmed back. The rectangular lip that surrounds the APU inlet is a little soft in definition and PE replacements is supplied for bothe the APU inlet and exhaust so the extant detail was sanded off in preparation of the PE application. Once I was happy that everything was neat, the PE parts were then added The final task was to sand off the molded wing vortex generators and clean up the wing seams as I will be replacing these with PE items later. I chickened out on doing this with my FRS.1 build but I want to have a crack with this one to see if it is worthwhile. I consider myself a reasonably good detail painter but I could not compete with the pre-painted instrument panel PE parts The PE instrument panel was installed into the tub. The main gear bay has also been painted and weathered. The two oval depressions in the main wheel bay roof represent recessed scoops that allow the main wheel unit tyres to nestle inside the wheel bay when retracted. They are a bit too flat/shallow to be accurate but there is no point getting too carried away here as the main gear doors are typically closed on the ground unless opened for maintenance. I was satisfied with the effect following the application of a simple wash to imply depth. Additionally, when hydraulic power is removed, the doors droop slightly leaving a noticeable gap, which is how my doors will be depicted when they are finally installed. The cockpit tub, nose gear bay, main wheel bay and airbrake assembly were now offered up to the fuselage and this was then glued together and is currently drying, cheers, Pappy6 points
-
I don't understand the uproar over Airfix not announcing next year's range at Telford, Airfix have used several marketing tactics over the last few years,Telford is just one of their marketing arenas. Just a few years ago they announced new kits using the Advent Calendar, there was also a release list one Christmas via a website newsletter, and then there was the yearbook just a couple of years ago. Variety is the spice of life, I'm sure we'll find out what's coming once the Sea Fury, Phantom, and Mitchell have hit the shelves. I'm not going to speculate on new releases, but hope for a few more FAA types in 1/48.6 points
-
Hello gents, in addition to the RTR Chally, here is my second Challenger 2 ... this one from the Scots Dragoon Guards deployed under KFOR mandate in Kosovo during year 2000. Cheers, E5 points
-
Hello! Here is one of my models. In building I used Eduard whells set, Q-M-T photo etched set, Master Pilot Tubes, Ejection seats Neomega, Reskit Matra -155, In painting I used MR Hobby paints. Weathering- oil dots and washes. Decal- Modeldecal.5 points
-
Thanks Will and John for the heads up. Luckily for me she'll be wheels up (as usual) so I can avoid that problem! Thanks Dean and I'm glad you enjoyed your flight too - who wouldn't??!! I think I'll try the 'print the photo' idea - I really need to just get on with it. Back from SMW and, perhaps not surprisingly, no one does 1/72 pilots of bearded fat blokes in flying suits. The man on the PJ Productions stand was Belgian unhelpful. Honestly, in this 'I want it now!' world don't they react to customer demands? I now have no excuse for delay so I'll get the crew box out and find some likely candidates for surgery. Oh, and thanks to @TheBaronI've downloaded and installed Inkscape. Another user interface to learn... More tomorrow, hopefully.5 points
-
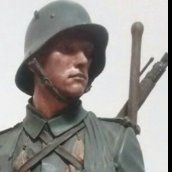
Cheers, guys. Well, she’s finished! I made a safety harness out of some ribbon, a couple of bits from a stug and a king tiger to make a buckle, and some unused PE parts for lengthening/shortening bits. It looked really good, but then I accidentally bashed it whilst drunkenly handling it, and thought I was sober enough to fix it properly. I ended up overdoing it on the superglue, so now it’s all a bit patchy and wonky. Oh well, still doesn’t look too bad. So here’s a few pics of the harness: And here’s a little walkaround of the finished loader. And here are a few close ups. One from up top And one with a dark background to make it stand out. I should really do these pics with a nice background, not just on my dirty old desk! So thanks for looking guys and following along. It’s taken me a while, and I’m really looking forward to working on something else! Cheers! Tom5 points
-
Source: http://imodeler.com/2017/11/telford-kit-news-airfix-172-vickers-wellington-preview/ Test build and sprues on display at SMW Telford 2017. Release expected in May 2018. V.P.5 points
-
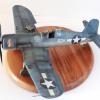
This is the Hasegawa kit, released in the early 90's and bought by me about 20 years ago. Despite it's age, it's still a great little kit and the French markings included make it a bit different. I think my intermediate blue came out a bit dark, perhaps a drop or two of white in that next time I build something with a USN type camouflage, but otherwise I'm pretty happy with this. The SBD makes build number 9 for 2017.5 points
-
Other brands? There are other brands?5 points
-
Inspired by the stunning Saladin vignette from master modeller Witold Socha that I found online in 2015 I wanted to build my own version of the scene. The Dragon Saladin is amazing and great fun to build. I just added the crew from Firing Line, thanks, Mr. David Parker. Great figures!!! The house and everything else was scratch build. Hope you like it…4 points
-
Hello fellow BM's. I thought I'd share another one of my recent builds with you if I may... here I present one IJN B5N2 'Kate' depicted ready for the attack on Pearl Harbour: This is Airfix's excellent and highly detailed kit which allows you to pose the aircraft in a variety of setups. I thought I'd show mine on the deck of Zuikaku loaded but wings folded and canopy closed ready for the second wave to take off and hit the US Pacific Fleet. I didn't have many problems building this one, the fit was good, the canopy nice and clear and paint scheme simple. I made some guesses on the colour of the aotake but decided to show it as a deep metallic blue as Tamiya suggest from their paint range. Weathering is minimal as I understand the airplanes were well maintained at this stage of the war, particularly before they saw much action. Decals were cut right to the detail to avoid silvering and I had to apply quite a bit of Microsol and set to get them to behave. Some minor riveting applied to the wings to make them a little more interesting. Hope you enjoy and feedback as ever welcomed. JB4 points
-
How do chaps, I really enjoy building these kits and use them as a mojo booster when my modelling interest drops of from time to time. Onager Dune Crawler. Lovely kit then went together really well. Tweaked the build a bit as I wasted the twin cannon without the missile launcher section. Nice and easy to do this. I decided to paint this up in dull desert colours as opposed to the bright colour scheme that the Skitaari use. I think it suits the muted 'Afrika Korps' type scheme quite well. Was painted with Tamiya, Vallejo and GW paints. The base was covered with sand and the rocks are stones from the garden. This is the 4th Sentinel kit that I've built in recent years. I really like these little kits. decided to do this one as some sort of 'urban demolition' type vehicle. Painted in GW paints and washes. The brick rubble is made up from some plaster brick rubble that I've had for years. Apologies for the wobbly photo's but these were just some quick shots whilst I had the camera out. Comments and suggestions welcome. Kind regards, Steve4 points
-
OOB...plus barrel/pitot - Mastera, exterior resin - Pavla (bay and wheels), cockpit - NeOmega, handmade vacu canopy. Camo - Syria 1967 - alliance with Egipt during 6-days War.4 points
-
I've now finished my AZ Spitfire trainer type. It's been built OOB and painted with Tamiya acrylics. I've really enjoyed building It though some of the short run nature of the kit was challenging. I bought it earlier this year from a model shop in the Czech Republic that had the last two for sale in the world or at least on the web. The only alternative would have been the CMR resin version, which is way more expensive and maybe even harder to build! My kit was the Dutch boxing which I chose as I loved the look of how SM250 was restored and converted to look like H99 until Boultbee took it down to Goodwood and put it in wartime markings. Needless to say AZ recently reissued the kit with the same Dutch markings as well as Irish Air Corps and a civilian target option. The kit could also be built as the Tr.8 as the parts are in the kit, though you would need to find the right decals (AZ did do a boxing with three of the Tr.8's civilian colour schemes if you can find it). Anyway here's some views of the completed aircraft. It was built alongside an Airfix PR19. Here's the RFI thread I have AZ's Russian 2-seater to build as well, and a plan to kitbash a Grace type too. For some reason l find the unusual Spitfires like clippies and bubbles more attractive. Cheers Will4 points
-
Finally ready for spraying the main colour. White interior bits first ... Windows masked with Blu-tack. Much cheaper than those Eduard masks! ... Starting to look more like it now! Dark sea grey satin spray applied ...4 points
-
Well, since I finished the Airfix kit, I wanted to do another Mustang from the same decal sheet. This cheeky named steed fit the bill! Tamiya kit OOB, except for the decals which are from the he same sheet as the D. and here ya have them! Meng, Tamiya, and Airfix.4 points
-
The underside has dried overnight so time for the final job of a matt coat on the top surfaces. I really like this Galeria Matt - I tried 3 or 4 different types before someone on here recommended it - WHOEVER YOU WERE - (so many people have helped me in the last year) - THANK YOU!!! All the others I have tried seemed to turn white and frosty - but this stays so 'clean' - whilst really completely matting things down and killing all the reflections from the gloss coat. Here is a before and after on the top coat - I think it shows it really well... BEFORE AND AFTER...4 points
-
To add to my verbal congratulations Bill here's some piccies (I hope you don't mind me posting them). Perdu’s Wasp by Ced Bufton, on Flickr Sorry I couldn't get more detail - no macro lens! She is a tiny little beauty. Well done Bill, well deserved4 points
-
It's been a while since my last update. The next step, which focused mainly on assembling and painting things for the wing took more time than expected. I realised that normally I tend to think of an aircraft's wings as a bit of an after thought. If an airplane is a human body, the wings are like the arms and all the "interesting stuff" is in the main body. With how Tamiya conceived of their kit the wings are an integral part of the fuselage (like the real thing) but that does mean that a bit more effort than usual is required. The only thing involved with the kit bash into a mk IV in this stage was adding the HK models fuel tanks to the Tamiya mid wing section. This was considerably easier than I thought. I also added some details from the Profimodeller set. To be honest, I'm not happy with that (it really makes me appreciate Eduard). As with the interior set, parts indicated in the instructions are simply not there. I only recommend it if you build a Mosquito with the enlarged bomb bay doors - not for the regular version since especially the bomb racks are a disappointment. I haven't added them yet but I'll be using the leftover parts of the Tamiya VI kit. Radios from Tamiya with kit decals. Some parts of this section needed modifications before they would fit the HK models fuselage since the plastic of that kit is much thicker. For example, the part with the control rods was trimmed on either side. I will be exposing the right engine, so I spent some time weathering the firewall. The inside of the HK Models canopy frame with Tamiya and Profimodeller details: I went ahead and started painting the interior of the nacelles with AK Interactive's White Aluminium. Propellers and spinners. Very satisfying to paint some Ocean Grey! Landing gear main components: Landing gear doors: And finally, the tail planes: Next step: attaching the wing to the hybrid fuselage. Will it fit? Thanks for looking!4 points
-
Hiya Folks, A swiftupdate prior to getting ready to go out to the War Memorial this morning, here is the first Wellesley in its faded Temperate Sea Scheme, brush painted and using my last supply of the old but good Aeromaster acrylics,...I also found another photo of the `Polish' Wellesley and have added it to the initial post on the subject for anybody who is interested; All ready for an emotional day now,...... Cheers, Tony4 points
-
Supermarine Spitfire MkV floatplane. Some background can be found here: http://www.tailsthroughtime.com/2011/01/spitfire-floatplane-that-reginald.html?m=1 The Brengun kit is the 'old' AZ MkV with added floats and appropriate transfers. The WiP can be found here: Anyway, here are some photographs: Thanks to jrlx, TonyTiger66, Rob G and Pin for hosting this Group Build and thanks for looking.4 points
-
In the back of the Jeep, sitting on the rear wheel arches are a dummy BC-348 radio receiver and a large wooden crate. At the time, the crate contained two speakers, while the dummy radio held a 12 volt car battery, amplifier and MP3 player. At the military events, I use to play aircraft sounds at random intervals, and with enough volume, you'd be surprised at the number of people who keep looking skyward; even those I've caught out before. The amp eventually blew after a couple of years and never got replaced. This is the fullsize dummy BC-348 radio I made in the Autumn of 2008. While the microstrip on the side panels were drying, I started on the radio and the crate. The body of the radio was made from 'Chemiwood', a high density modelling foam that can be cut, sanded, filed, drilled, tapped etc. I used to work somewhere that used large amounts of this stuff, and I collected up the offcuts that would normally be binned, but that were perfect for small modelling. Small styrene details were glued to the radio with cyano, and would be trimmed to the final shape later. It was easier to do it this way than trying to hold a 0.5mm diameter piece of styrene. The overall length was about 1/2 inch and about 1/4 inch high.3 points
-
As Steve put it so eloquently (as usual) it was great to meet you Tony but our parting was too soon... it did get quite crowded eh? Hopefully we can meet up again in a less frantic setting but please don't feel that you need the 'weekend attire'3 points


This leaderboard is set to London/GMT+01:00