
Leaderboard


Popular Content
Showing content with the highest reputation on 13/09/17 in all areas
-
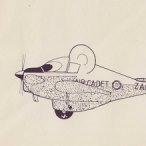
Airfix 1/72 Jet Provost T3A of No.1 Flying School RAF Linton-On-Ouse 1984 This is my recent entry in the Made in GB GB II. I fancied a quick and easy build after completing a few longer builds. The kit went together well and has enough detail OOB for 1/72. Thanks for looking and please leave any comments or questions you have!32 points
-
Hello, Here's my just finished 1/72 Revell Gannet AS.4 in Marineflieger markings. I decided to do it as UA+110, which is preserved these days as UA+106 at the Luftwaffe museum at Gatow near Berlin. Bit of a mixed kit, some nice details, and some crappy fit, especially around the cockpit and clear parts. The tail hook snapped into 3 pieces, and one of the canopies has broken in two on the sprue. Painted with Humbrol enamels. I hope you like it. Thanks for looking, Pete27 points
-
This is the 4th one I've built but the first in this scheme. One of my favorite kits to put together.26 points
-
.21 points
-
Completed the old 1/24 Airfix Little Nellie Wallis Autogyro. Blog review here: https://miksmodelkits.wordpress.com/2017/09/13/airfix-wallis-autogyro-james-bonds-little-nellie/ Youtube review and build here with more detail pics: https://www.youtube.com/watch?v=B-j3l8McmxM&list=PLoJWYG0njom-5OGxASTZqWLjQu3B_7D4g ln1web by mike michael michaels, on Flickr lnnp2web by mike michael michaels, on Flickr21 points
-
Hi, Here is my completed Hasegawa Bf109 G6. Its built from the excellent 1/48 kit. I started this for the 109 GB but finished it last week. The model depicts an Aircraft of I./JG 27. In the Squadron Signal In action BF109 part 2 there is a nice Don Greer illustration of this Aircraft which I based my build on. illustration is based on an Image of Hauptmann Diethelm V Eichel- Streiber's Aircraft who was Commander of I./JG 27 in September 1944. This image appears in Monograms painting guide to german aircraft (pg 27). Anyhow... The build was very nice and I used a set of eduard steel seatbelts in the cockpit and replaced the kit MG151 barrels with brass tube with some heat shrink for the barrel dust covers. I adeed a bit of wire in the cockpit for the fuel line.. The rest is OOB. The Hasegawa G6 is a nice kit with a good few options in the box but you have to sort the seam out on the cowling side. Often you see that left in on builds... I painted the model in Mr Colour lacquers free handing the mottle and I used some card masks to help with the main camo. Decals are a mixture of Hasegawa and Tamiya I used Mr Softer / Setter on them and they were fine.. I think the Hasegawa kit can still give the new Eduard offering a run for its money. Anyhow here are a few photos... Photos were taken with an old Canon 5D with a 25-105L series lens I use a shoot through umbrella with speed light and a fixed output Softbox with daylight corrected bulbs background is a piece of semi reflective white card. Hope you like em.. Cheers Plasto19 points
-
Hello guys; After my last model built (Bf109E7 1/32 Eduard), I spent a little time working in this beautiful kit. I used interior and surfaces sets by Aires, Barracuda mainwheels, flaps by quickboost and Mastel PL barrels. Xtradecal decals was used. Cheers!13 points
-
Hello,Friends - Here are my 'Voodoo' and 'Delta Dagger' builds of the Monogram kits.Although raised detail throughout,I find the quality quite exquisite and wished to retain as much of this as possible as a tribute to their manufacture.Finished in Enamel Paints and Varnish wih original kit Decals.I have found these to be the most enjoyable kits I've built so far and hope you may enjoy viewing them again.(Their photos disappeared some time ago as a result of the 'PB' issue). 😉👍 All the very best,Paul.13 points
-
I spent half my childhood in the shadow of arrivals and departures from Norton AFB. The sight and sounds of C-141s and the occasional C-5 was ever present. Up until 1994. So this is the Roden kit, built OOB, but in the Euro I scheme that I would see at airshows and around my house in Redlands. So I ponied up the $131 for this kit because of nostalgia. However, that's not a good value for this kit. It was plagued with flash on most parts. All the major parts, wings, fuselage, tail, engine nacelles all had flash on them. All 28, yea, 28 wheels were TWO PIECES! What deranged designer decided this? The decals were mediocre and only had one version. For a 21st century kit of this price point, I really expected more. Three star kit ⭐️⭐️⭐️ However, the old C-5s I knew as a kid live in this representation, and I'm happy.12 points
-
Well that's finished the Yak. A very enjoyable build, despite the engine casing's fit issue, but that was easily sorted out, so don't let that put you off.Aftermarket used was a pair of NeOmega resin seats. Painted with Vallejo Metal Colours, and Akan acrylics.Weathered with UMP wash, and Tamiya's Weathering Master System.Ian G-38 by ian gaskell, on FlickrIan G-39 by ian gaskell, on FlickrIan G-40 by ian gaskell, on FlickrIan G-41 by ian gaskell, on FlickrIan G-42 by ian gaskell, on FlickrIan G-43 by ian gaskell, on FlickrIan G-44 by ian gaskell, on FlickrIan G-45 by ian gaskell, on FlickrIan G-46 by ian gaskell, on FlickrIan G-47 by ian gaskell, on FlickrIan G-48 by ian gaskell, on FlickrIan G-49 by ian gaskell, on FlickrIan G-50 by ian gaskell, on FlickrIan G-51 by ian gaskell, on FlickrIan G-52 by ian gaskell, on FlickrIan G-53 by ian gaskell, on FlickrIan G-54 by ian gaskell, on FlickrIan G-55 by ian gaskell, on Flickr11 points
-
Actually got some time in before bed tonight. I thought I'd sand down the filler on the strut bottoms. Having done that I thought 'Why not rig those cross struts?'. 'Cos it's a pain, that's why. I have those PE CA applicators and some kicker so obviously the theory is apply a dot of CA to the location, insert the EZLine and then kick it. Tools at the ready: Untitled by Ced Bufton, on Flickr A drop or two of CA in the little black dish that came with the Mr Hobby applicator set. A bit of yellow PostIt over the drop that fell on the diagram. Tip: put this on the drop before you rest your hand in it to avoid cursing. Apply drop of CA to model where you want the line to go. Hold model in suitable position so you can see the location. Rest end of line in drop, holding with tweezers. With your third hand, apply kicker. Tug on line - fixed. Repeat with other end after cutting line a little too short so it stretches into place. At this point the line looks like it's fixed. Let go. Twang. Line fixes itself under wing. Curse. Prise off. You now have kicker and CA at the locating point. Apply another dot of CA. Attempt to remove instantly glued applicator from model. Curse. Apply dot of CA to end of line and position with tweezers. With your other, fourth hand, apply kicker. Pray. After lots of cursing it's done: Thanks goodness. ready for some paint in the morning. At least the 'accident' with the applicator and kicker gave me an excuse to try the new PE scissors. With PC's warning in my head I positioned the blades such that the top one was against the lug and the lower one was 'under' the part like this: Can you see that? No? Imagine how I felt trying to get a photo of it! Anyway, I hope you get the idea. The cut part looks like this: Just one nub (the first cut) which I was able to cut off with the scissors - they're really sharp. It is fiddly getting the blade close to the part but once there the scissors go through the PE like a knife through butter. Nice.11 points
-
Hi fellow modellers, this is one of my latest additions for the upcoming Valiant Wings title AIR WAR OVER ITALY, the Special Hobby kit built with some updates in the markings of the Aviazione Cobelligerante Italiana. Cheers Libor10 points
-
Hi All, I spent almost 2+ months putting a little 1/72 scale Tamiya Fw-190 kit together pretty much out of the box and this is all I have to show for it.... Airbrushed with Gunze RLM shades, weathered with oil paints, enamel panel line washes, dry pigments and oil from my sweaty fingers... Not much done outside the box, I added some Eduard generic Luftwaffe seatbelts, drilled out the gun barrels, added some brake lines and an antenna wire. Check out the WIP thread, which honestly isn't amazingly helpful or informative but has some pretty pictures of the beautifully detailed but hidden Tamiya cockpit at least. Enjoy!10 points
-
Thanks Alex I'm still not 100% this morning, what Mrs B calls 'clammy', so I hope we're both feeling better soon. Thanks Giorgio - nearly there, just the main struts to do. I had an idea that I could run a nano-brush along the edges of the nano-canopy and get a nice frame. Untitled by Ced Bufton, on Flickr Just like I thought I could do on the... whatever it was I was doing last time I tried this. Of course I slipped again, but it was soon scraped off, gently, with one of my treasured flat-tipped toothpicks: I also used the nano-brush to touch up the sanded struts and paint the EZLine: Yes, one did come loose but that's expected I guess. In more important news, David Slater has won his copyright case for the 'selfie' that Naruto the crested macaque took and that was widely publicised and used by people like me as their screen saver. I've now replaced it with a picture of Molly. So there.10 points
-
And almost done with the Smoke float rack Cheers Dan9 points
-
I already knew that the Mk46/47 had a larger tail, but I don't think I'd realised just how much larger it was until I compared the fin and elevators of my Mk.XVII kit with those of the Mk.46. No wonder the Mk.45 was a tad longitudinally unstable; the difference is huge! Besides, there was already a known problem with Seafire XVs & XVIIs (& the Merlin-engined ones, for that matter); torque reaction and the accompanying tendency to swing on take-off isn't great in any circumstances, but on a crowded flight deck it can be lethal - and of course the Griffon turned the opposite way, so the later aircraft swung towards the island, making it even less desirable. I have read an account recently (can't put my finger on it this morning to attribute it; sorry) of a Mk.XVII effectively side-slipping on deck - the pilot kept the yaw pretty much under control with rudder, but even so the aircraft crabbed bodily sideways during the take-off run. Bet that was fun... So the Mk.45 was never a realistic prospect as a Naval fighter - tail hook or no tail hook - and I think it never went to sea [Edit: it did, but only for a session of deck landing trials - which presumably resulted in a report that said: "On no account take this thing to sea!", since the Mk.45 was only issued to 2nd Line squadrons] even in the later version with contra-props (which were the answer to all this yaw & crabbing malarkey). Buckets of power is all very well, but controlling it is just as important - and that's before we even start talking about torque stall when over-shooting from a failed approach... [We have to wait a little longer to see sexy 5-blade airscrews on a flight deck, with the immortal Sea Fury - my "if I could fly only one aircraft" winner by a mile.] Anyway, enough of this idle chatter; there has been some modelling going on. My replacement upper cowling has arrived, so I've started cutting to accommodate it; port fuselage half almost done, starboard not started. I've also been doing some simple improvements to the cockpit internals - specifically, drilling the lightening holes in the frame behind the pilot's seat, which are pretty visible in a Spit. Airfix's more recent releases - e.g. the Mk. XVII - have these distinctive holes moulded as dents, but the Mk.46/7 moulds must be 20-odd years old now, and they have nothing. Simple change, but helps to pep it up. No photos, but modelling is happening - & I'm enjoying it, so the initial aim seems to be achieved!9 points
-
This is the Trumpeter 1/700 Vittorio Veneto. I used the Eduard etch set for the Roma but left off the things like radar, as this represents the ship in 1940. Vittorio Veneto was a Littorio class battleship, a fast powerful modern battleship, armed with 9 high velocity 15 inch guns.Vittorio Veneto was the prime target for the Royal Navy's Mediterranean fleet at the battle of Cape Matapan. She was torpedoed by an Albacore, flown from HMS Formidable but managed to effect enough repairs to escape. The Cruisers Pola, Zara and Fiume were not so lucky and were caught at night by HMS Warspite, HMS Valiant and HMS Barham and destroyed by 15 inch shells and destroyer torpedoes. Vittorio Veneto survived the war but was scrapped. thanks Mike8 points
-
Thanks Martian Cheers Tony Yes, feeling a tad better this evening and able to have some Heinz Cream of Tomato, my 'go to' food when I'm feeling under par. With a cheese sandwich. No, not Cheddar (unusually), it was the remains of the Pont-l'Évêque we brought back from Brittany. Wikipedia says "It is probably the oldest Norman cheese still in production" and it certainly smells like it! Although we love it it does... how can I put it... stink. Every time we opened the car door on the trip back we were hit by its pungency. If that doesn't kill off any remaining bugs in my insides, nothing will. After fitting the balances and touch ups she's ready for transfers: Untitled by Ced Bufton, on Flickr I used the nano-brush again for the touch up. I'm really liking them for small jobs; plenty of volume in the brush (for its size), doesn't seem to dry like my Tamiya small points and doesn't leave brush marks. Recommended! By the way, I remembered when the other accident with the brush was - back when I was painting the rib on the underside. Got there eventually. Sad old...8 points
-
Its called modelling. I've been doing it (badly) since 1965.8 points
-
Thanks pheonix - I really must grow some more arms (cue Martian!) Thanks Keith - glad to hear I'm using 'the approved method' Top struts are in: Untitled by Ced Bufton, on Flickr Not much drama there... or was there? One of Stewart Francis's one liners. Love that guy. More here. Just the wing to float struts left now and I think I have enough squashed tube but, just in case, I've ordered some more. Oh, and a new pointy brush (I didn't look after the current one) And a new set of applicators (I didn't look after the current one) And a sucky pick-up tool. I hope it doesn't suck... no, wait... oh, you know what I mean.8 points
-
DSC01047 by Steve Cook, on Flickr DSC01048 by Steve Cook, on Flickr DSC01049 by Steve Cook, on Flickr DSC01050 by Steve Cook, on Flickr DSC01051 by Steve Cook, on Flickr DSC01052 by Steve Cook, on Flickr DSC01054 by Steve Cook, on Flickr7 points
-
I just finished this, which was a delight to build. It practically built itself with a fair number of parts not even requiring glue. I just noticed a couple of strakes that I missed and will put on tonight but apart from that I'm calling it done. Exhaust stains are probably a bit overdone but on the whole I'm pleased with it. Model was entirely OOB except for a few stencils from the spares box as the kit sheet was suspiciously bare of these.7 points
-
Seriously, do we need to be SHOWN how to fix something as minor as this? I thought this was a forum for modellers. Jeez... Richard in NZ7 points
-
Hello Dears, Just a few photos from my Cell phone, it was 9 PM We had an hour to spend for the ferry and so, here's my only split from my promise to my kids ! Here's the gate signal, and the center of the black wall with all the names Kinda like the Viet Nam mémorial in DC, but very well done. This not finished yet of course Both 2 are replicas, and to me, it is not a problem, since in the salt air right over this ... Real a/c would have suffered a lot ! Here's the center of the monument, it represent a propeller, a 3 bladed one. There's a club house and info center that has the shape of an elliptic wing, very nice place, moving but relaxing ! There is also a bust of Keith Park, but the photo was bad so I show this one from Picaddilly Even the Aerodrome dogs are remembered, and this is justice ! So, not the best shot at all, but just to share with you. Sincerely. Corsaircorp6 points
-
A quick bit of work on the main rota. As the join between the blades and the hub are just simple butt joints, I have drilled the blades and inserted pins to fit into holes drilled in the hub: That's all for now6 points
-
A man went into an antiques shop to buy a table. Almost at once, he saw the table he wanted, and asked for the price. "£2,000, sir" "Never!" exclaimed the man, "that's unbelievably expensive." "That's true," replied the assistant, "but this is not just any table. This piece of furniture has special powers." "Go on, prove it," said the man. The assistant went up to the table and said, "How many floors are there in this building?" Immediately, the table jumped into the air four times, and indeed there were four floors in the building. The man wasn't completely convinced. "OK, ask it how much money I've got in my wallet." The question was asked and the table jumped up eleven times. "That's incredible," said the man, "It's true, I've got two £5 notes and a £1 coin. I must have that table." So the man paid the £2,000 and the antique table was delivered the next day. While it was being installed, his mate popped over and remarked on the new piece of furniture. "It's very special," said the man. "Here, I'll show you." He thought for a moment and then said, "How much money has my wife got in her bank account?" The table went completely berserk. It started jumping up and down and was still going 10 minutes later. Flabbergasted he said, "But how can that be? Where did she get all that money?" The table stopped moving, its legs slid apart and its drawers fell to the floor.6 points
-
.6 points
-
Ahem... Actually, that should be pedant, not pendant. A pendant is a bit of jewelry typically worn around one's neck. A pedant however, is "a person who is excessively concerned with minor details and rules or with displaying academic learning." That, I think is the correct usage you were attempting....6 points
-
I've just finished Bandai's little box scale A-Wings (when I should really have been finishing the Gigant), and I decided to finish them in the colours of Phoenix squadron from Rebels, which in turn are based on the original McQuarrie concept art. The markings aren't a perfect match, as the A-Wings in Rebels have a number of differences to the original ROTJ ones, as represented in the kit, but they're close enough for me. They're built OOB as there's not a lot you could do to improve them. Now we've got the A-Wing, along with the X and Y, lets just hope we can finally complete the set with the B-Wing before too long, preferably in 1/72 as well as the box scale line Thanks for looking Andy5 points
-
After nearly 2 years in build, I'm calling it done. Here's a couple of photos. Base kit was the Airfix Mk XIX but with grafted-on Seafire Mk46 wings. Build/conversion can be found here - Work In Progress. There's also a copy of the write-up published on my website - Vexillum Militaris It's not quite what I was hoping for. Lots of room to improve (there always is!). Paul. Supermarine Spitfire Type 356, Spitfire F Mk 21 of 600 Squadron (County of London) RAuxAF, Biggin Hill, 1947. Almost 100% Airfix. (If only they'd produce and decent Mk XIV/XVIII). [Ed: Ha! Which they now do! Released in 2019... https://www.scalemates.com/kits/airfix-a05135-supermarine-spitfire-fr-mkxiv--1168098]5 points
-
Hello All, This is the finished article that my son has been working on for the past week or so. It's his first ever model aircraft, having only painted a couple of wargaming archers before in 1/56. I tried to help him with bits he was too nervous to attempt, such as the canopy and the lines in between colours, but most of it is his own handiwork, following instructions and guidance from me on the sidelines. Thanks to everybody who has followed the progress and given him such a massive amount of support during the build! Here's the build thread:5 points
-
Kit manufacture: Hasegawa N° 00537 Scale: 1/72 Type: S-3B Viking Extras used: None OOB Paints and colours used: Gunze Aquous H308, H337 Other info: So I've been building this in the background and thought I'd share it for some feedback. The kit is pleasant but shows it's age with some flash and a few fit issues. I also managed to make myself some problems but in the end I think it look the part. I scratch build the refuelling pod from a fuel tank and a refuelling pod from a Revell Tornado, it isn't accurate but good enough for me. Also I have never tried to weather a raised panel line kit so thought I'd just go with some Flory Dark Dirt, it has done the trick. Anyway enough waffle so here is the finished kit: 1/72 Hasegawa S-3B Viking by Neal, on Flickr 1/72 Hasegawa S-3B Viking by Neal, on Flickr 1/72 Hasegawa S-3B Viking by Neal, on Flickr5 points
-
What would Theresa May do? Whatever, probably wisest to do the opposite. If it helps, my vote would go to the Tante Ju. Mmmm, corrugated surfaces, just right for sanding and filling.5 points
-
You under-estimate the importance of obtaining as low a ride height as possible. Harry Miller, having built one of the most successful single seaters went on to design a front wheel drive car which allowed him to do away with the drive shaft and seat the driver much lower in the chassis. He didn't do that for fun. Leon Duray won in such a car. A lower roll centre allows much higher cornering speeds. It's also one of the benefits of dry-sump lubrication. It allows the engine to be mounted lower and reduces the roll centre. Also, smaller diameter wheels help. Changing the yaw and pitch balance can be done in a number ways, the position of the fuel tank, wheelbase, suspension geometry etc. but lowering the roll centre is more difficult. Achieving a lower car and roll centre is the ideal of most designers. I love three wheeler Morgans and one of the most successful Morgan drivers was Clive Lones. He noticed that after the front suspension of his race car was bent while racing, making it lower, the car handled far better. He got Morgan to fabricate special cranked front suspension tubes, reducing the ride height several inches. This improved the handling so much and the factory was so impressed that production suspension was similarly modified although to a lesser degree. Have a look at modern Morgan racers - they literally hug the track. If it was good enough to convince Harry Miller, Clive Lones, H. F. S. Morgan and a host of others since, who am I to disagree? Dave5 points
-
making headway with the Botha, decided the internal nose framing had to be modelled to make it look right as it is quite prominent in photos. Tail plane also added and wings on. A lot of scribing has been done and more to do... getting close to u/coat and have to decide final scheme.5 points
-
Well, I had the same reaction when I saw Mock's post on 72nd Scale - just basic modelling skills - but since there seemed to be some consternation locally, I thought I'd post the link. Better to have too much information than not enough. Those of us who enjoy totally crazy kitbashes to try to get what we want that's not otherwise available will certainly not be put off by a bit of trimming to get that engine nacelle to fit. John5 points
-
Inner bays rigged! And the tail finished too: So just the outer bays, top & bottom wing control runs and a few minor pain touch-ups to do. The Bob's Buckles/Uschi vd Rosten rigging system takes time, and my method with the wings was to install all eyelets, glue the wings in place and then rig. I did find however that some of the fuselage-to-wing attachments were difficult to get at (a bit like painting your bathroom door with a long pole through your front letterbox while viewing proceedings from the kitchen window), and so if I did an F.2b again I'd attach those lines at the fuselage end before putting the top wing on. It takes time - maybe a couple of hour-long sessions per bay, but it's very satisfying. The Uschi rigging line takes superglue very easily and sticks pretty much on contact. That helps a great deal because for my first few attempts I was fully expecting the line to come unglued when I released the tweezers. So far no major mishaps and I should also say that it's pretty robust: I've stuck my fingers into various bits of rigging so far and none of it has broken. I think my only regret is that I maybe should have gone with RAFwires after all because even the 0.005 Uschi line is very fine. What do you think?5 points
-
Luckily I managed to keep the three component processes seperate and so have afternoon tea, dinner and firefly observers compartment all under control. The Special Hobby plastic is very soft and so it sanded down in no time at all using dymo tape as a backstop. Gluing, filling and sanding the join on top of the canopy should be a piece of cake! The wings and undercarriage bays now await lashings of the sanding stick.5 points
-
Doesn't sound like a showstopper to me - in fact, if you check out the 72nd Aircraft forum, Jonathan Mock shows you very simply how to fix it: http://z15.invisionfree.com/72nd_Aircraft/index.php?showtopic=9469&st=15&#last ...and scroll down a bit. John5 points
-
Thanks PC! Thanks Simon To be fair to me I do remember to wear a hat when in the sun, I just don't always remember to pack one! Page 6, oh dear... Thanks Giorgio I fear that the temperature of the beer and the presence of bubbles may be one of the reasons that international integration will always remain a 'hope for the future' Thanks Keith Oh no, have I bought another pup? I did search on BM for reviews but couldn't find many - I should have realised that this was a warning and not a sign of rarity! Thanks Rob No salmon mousse for me... not with all those Oysters and Breton 'how much butter can you get into pastry' delicacies around. Thanks Johnny I do have a LOT of catching up to do (see below) Thanks Alex What now? Finish this one and then choose from the stash (later) Still wobbly this morning. Weird. I usually have a pretty strong constitution so, like most men, when something gets me it 'gets me good'. I also have 360 notifications to catch up on - crikey chaps, you've been busy! I have started to attend to these strut ends. Untitled by Ced Bufton, on Flickr Probably. And I've got out the EZLine for the inter-strut struts. And ordered some drills (thanks Tony). More later, hopefully.5 points
-
And we're all done and dusted... I put the various bits together, and as predicted lining the flattened wheel bottoms was tricky, I used extra thin to stick them on which gave me some working time. I used a small ruler as a flat surface and jiggled it around until it was more or less pointing down. The second wheel was easier because I aligned with the one already fitted. The prop and canopy went on easily enough and I got on with fixing up an antenna wire. Using a tiny cut slice of brass tube and monofilament thread (I think it's 0.006 inch or something, super fine smoke coloured) I created a small turnbuckle which I stuck into a small hole in the tail fin I drilled during construction. This would serve as my tensioning anchor. Then I fixed a second length of thread into a small carefully drilled depression on top of the canopy (I used medium CA glue to fix it, I was careful not to actually get any on the glass). I then threaded this through another slice of brass tube, through my turnbuckle and back through the brass tube to form a loop. I then pulled the loop tight to tension the antenna, fixed it with some CA and carefully snipped off the excess. I added some blobs of PVA to round out the insulators / turn buckles as seen in photos, I'm still waiting on the PVA to cure before I slosh some white onto them. So here we are finally, after 2+ months of glacial building. I'll post up a proper RFI soon. Hope I did the subject justice!5 points
-
This is a project that lasted quite long, intermittently and was my first contact with the new molds of Airfix. The general impression is good, as the model is huge, considering the scale, with clean parts, in light gray plastic, without annoying signs, clear transparent parts and thin wellprinted decals. The whole construction was completely Out Of the Box with the only addition of the Fabric seat belts of Eduard on the seats, an unnecessary addition, hardly distinguished, just wanted to try it. It is almost as though decals, hard to fold, I don't think there is reason to use them at least in 1/72 and in close or greenhouse canopies bomber. And once that we talk about seat belts, last experimenting with the green stuff, which by adding photo etched buckles, gives amazing results. The fit in large pieces is too good and most buckle up seamlessly, except for the transparent "greenhouse" in the space of the cockpit that on the right side leaves a step, which needs persistent rubbing and attention to fix. The smaller pieces are somewhat abstract castings but at such a great model probably passed unnoticed. However, the barrels of rear machine guns were replaced by resin aftermarkets. One of the drawbacks is the bomb hatches which in order to glued open must cut the pieces respectively. They suffer from poor application and do even worse things, no soldering connectors. The painting was made with mixes of colors of Tamiyia, which unfortunately were lost as I kept them in another file which accidentally deleted. Fading was homogenized with filters giving an almost uniform wear. The fabric wing surfaces (which admittedly is a bit imprecise) were highlighted with light oils and the resulting image was supplemented with panel line wash of tamiya and mig. Smoke trails on the engines completed the whole picture.4 points
-
The wintercamoso far....4 points
-
It seems to me that in these days of tighter tolerances than we were used to, slight variations in plastic composition, mold temp & cooling time could all have an effect on the dimensional integrity of the finished product. For my money, I believe I'd test fit, adjust as necessary & glue without thinking twice about it. Steve.4 points
-
Airfix 1/72 Jet Provost T3A of No.1 Flying School RAF Linton-On-Ouse 19844 points
-
Gentlemen, let me explain, what aircraft is our MB-6... We were inspired on one what if forum, where it is described together with some "operational history" and profiles.... See the photos of prototype..... Gene K - do you think that change of the kit from some 60 parts to 120 parts and new fuselage mean minor tweaks? Talking about our MiG-21 line.....4 points
-
In preparation for closing the fuselage I've been looking at the fit of the canopies, in particular the width. Navy Bird inserted a thin shim of plastic card to widen the fuselage slightly between the front and rear canopies and I found this an excellent way to get the front canopy to fit flush with the fuselage sides. The special hobby kit provides two forward canopies and I've selected the one above with a slight "peak" towards the front which appears to match reference photos. The other is a bit more rounded and perhaps shallower. The main modelling issue is however what to do with the observer's canopy. This is a two-pice affair (both sides meet in the middle). Even with the shim, the canopy sits much too proud above the fuselage. I'd need to widen the fuselage by 1.5-2mm to get them to meet in the middle, something that would then throw out the front canopy and no doubt the shape of the fuselage itself. I can see three options and would like some opinions from those who've trod this path before me - 1. sand down the fuselage sill by about 1mm which may affect the alignment with the forward canopy in profile 2. sand 1mm off the bottom of each canopy side which takes out the entire sill and may then compromise fettling it neatly into the fuselage 3. sand a 1mm off each of the top edges which would make the top glass windows appear narrower What do you guys think? The first might be easiest and least obtrusive. The shot below, but this shows the overlap of nearly 1mm. Doesn't sound much but thats nearly 72mm (3 inches) in real money.4 points
-
You can always create your own Photoetch. http://www.britmodeller.com/forums/index.php?/topic/234944044-how-to-make-photo-etched-parts-at-home/ http://www.micromark.com/Micro-Mark-Pro-Etch-Photo-Etch-System_2 and a link to someone using this for the first time: https://modelshipworld.com/index.php?/topic/8385-first-attempts-at-photo-etch-with-micro-mark-pro-etch/ Or you can wait for Ced to buy it and then have him make them for you.4 points
-
Update time! While waiting for the CA to dry on a nagging seam on the Do335, I brought out my new drill bit set and drilled those holes where the 'knobby' things were. Rolling the metal rod under the sharp edge of a hobby knife got me eight of these. Which were then pushed into the holes and secured with a tiny bit of CA. Here's with the fore deck in place. And here is my snafu produced by the dremel. And my second, produced by my inattention while snipping the dorsal bow fin off the sprue... As you can see, out came the scrap styrene and CA. And finally, the new 'floor' for whatever detail I decide to place into the hole. I could have fixed it, but I've decided some detail would be nicer. Al for now, have a good night and model on!4 points
-
Welcome back my friends... Hey All, I have been working on the various fluid tanks for a few days now, and I'm getting backed up with the photos. Altho the install is not complete, I'll show and tell what's up. I first built card replicas to get the size and the geometry correct... The construction of the tanks was really simple, just small sheet styrene. Test fit into place. I was concerned about the angles of the tanks, and running into things next to the engine block. I managed to get the tanks to sit on the frame and fill the space nicely. Four new (old) fluid tanks... The install of the Power Steering fluid tank... The install of the, I have no clue, fluid tank...I know it's there. I cant find any info so far as to what's inside it. Oil? And here you can get an idea of how crowded things are getting... Now that I have all four tanks permanently installed, it's time to plumb all this stuff together. I'll be back with the plumbing soon. Thanks All...4 points


.thumb.jpg.cfc129272ffec824439b15e6013d5952.jpg)


This leaderboard is set to London/GMT+01:00