
Leaderboard


Popular Content
Showing content with the highest reputation on 19/07/17 in all areas
-
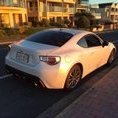
This a project that lasted quite more than i expected, because of many parallel builds. Finally it went through a few months ago and recently i managed to take some decent photos. I hope you like it!32 points
-
Hello As many of us I have built the 1/72 Airfix Hawker Typhoon Mk Ib in the markings of Squadron Leader Stapleton, No.247 Sqn, Eindhoven 1944. Patrick14 points
-
I believe it was Nelson who said that no man who put his ship alongside a French one could really do too much wrong, and in the same spirit, I opted to put on the RAF Dark Green tonight. 20170718_235104 by Edward IX, on Flickr Nelson's advice may work better in a nautical environment, for in the swamp-like hell that my grotto became in the last few hot, humid months, the blu-tac stuck fiercely and lifted paint. I blame the Alclad White primer that I (IIRC) used, their white and black primer have never held paint well for me. 20170718_235057 by Edward IX, on Flickr The camo pattern is spurious, based on one photo I've seen, and I took the opportunity to cover some of my more egregious blunders. I still need to do the top wing.13 points
-
I am really getting addicted to these 1:48 military vehicles. This was just a weekend build. Finished in brush painted Tamiya acrylics. I was going to wait to take some photos outside, but winter weather has really set in. Build thread here. Thanks for looking.10 points
-
And my last post for today is yet another delta. This time the Kinetic Mirage IIIO.10 points
-
Construction thread can be seen on this site. This was my first attempt at riveting. For those considering this, a warning. It will forever change your life. Thanks for looking.10 points
-
Heres another build from last year. Eduards 1/48 Mirage IIIC. This is my first serious attempt at a natural metal finish using AK Interactive Xtreme metal colours. Even though it wasn't perfect I can say I am still very happy with the results.9 points
-
Having been abroad for some time, without time, space, or the usual array of materials to make any models - I was raring to go when I got home. I had bought a few kits online while away, and they were all waiting for me. I wanted to get back on it with a few straightforward OOB builds, but was also hoping to avoid re-doing any schemes I had attempted before. The two kits I decided to crack on with were the new tool Airfix Hurricane (trop) and one of the two Hellcats in Eduard's combo boxing. Both in 1/48. First up the Hurricane. This is a lovely kit, a real joy to put together. There was nothing all to report as far as issues go, aside maybe from the main landing gear's attachment to the gear bays being surprisingly shallow... But that was nothing a night of drying didn't fix. I usually just like rock-solid, deep wheel attachments. I opted for the box's suggested 2nd scheme - the Rhodesian training markings. This would avoid repeating a BoB or similar scheme - which I am a little bored of. This was painted using rattle cans : Tamiya's TS-80 + AS-12, and a Humbrol rattle can of chrome like paint - used for the most shiny panels on the nose. Decals were from the Airfix kit and went down very nicely, and responded wonderfully to some Micro Sol. The only non-OOB part here is the red gun patching, which was excess from the extras box. Weathering was an oil pin-wash of black and brown, some Tamiya weathering pigment brushed for exhaust stains, and a little Humbrol dry pigment for dust on wheels, walk areas and so on... The second kit I decided to go for something altogether more exotic. I had seen a while ago a photo of some very lurid looking Hellcats, which appeared to be bright orange. I did a tiny bit of looking around and found that these were in fact drones used in post-war a-bomb testing... Some photos make them appear alternatively red, orange, or pink. Either due to different paint schemes, fading, or bad photos... I decided to go for a dark orange to hedge my bets. I am aware that this is an early mark Hellcat, and most likely those used post-war would be late, but as above - I just wanted a fun, quick build, using what was in the box... Further to that - the decals are not aftermarket made for the drones, though these do exist. They are extras from previous Corsair and Hellcat builds. But they seemed pretty close on to the photos I saw of drones. To paint the Hellcat I used MOLOTOW rattle cans. These are made for graffiti - and as a result come in myriad colours and shades. Helpful for someone like me without an airbrush or the ability to mix spray paints. The two tones of orange here are Vermillion (darker) and Lobster (lighter). With the tail painted using MOLOTOW Avocado. Weathering was an oil pin wash. The chipping was done by brush painting patches of Valejo paint onto the sprayed primer and dabbing masking fluid on that before the main colours went down. Annoyingly I just noticed that I took these photos before doing the wing-tip lights. They were done (I promise) using wood glue. Thanks for looking - and as ever - any tips, notes, or criticisms most welcome. Bruce9 points
-
Heres a few pics of a build I completed last year of the 1/48 Tarangus SAAB JA37 Viggen.9 points
-
Oh my. Where to begin to respond to Crisp's Pret musings (BTW good luck at the interviews) Oi, Wadge a mean ordinary? I made that table top out of oak left over when the oak floor was laid!!! Showing your age Crisp - weren't the Fylingdale 'golf balls' replaced by pyramids back in the late 80's/early 90's? (still got golf balls near us at Memwith hill tho'). Or - if you meant some sort of pyramid shaped comparison - I don't even want to think about it..... Hmm. I'm not holding my breath on that one either. As it happens I was relatively safe, cos the pouring took place in the room we use for hobbies/chilling and were I do all my modelling (save for airbrushing enamels/lacquers - which I do in the garage). I have my modelling stuff in a bureau and use the fold down desk as a work bench. Cosy winter evenings with Mrs F knitting and watching TV and Mr F modelling (+ a glass or two of vino). Cripes that sounds middle aged......... Reverse view: Oh - and I do have a mat cunningly made by binding the edges of offcuts of the room carpet underneath the bureau to catch spillages etc And the view out of the window of the Village church - well you can see the church in the winter when the leaves have fallen..........it's nice and quiet hereabouts. Thing is. We're now so used to chilling in this room that we hardly ever use the Sitting room to - well - sit in!9 points
-
Thanks Simon - sadly that's the 'Z nose' that is no longer on the FD site and Colin hasn't replied so your parts will be much appreciated (fnaar fnaar!) There's a picture of the nose parts here, the first photo in the 'Clear Parts' section looks very promising... Thanks Tony - yes, 'gurt large' as they say in these parts. I must admit the 'modelling' resolve was wearing me down a bit but I think we're on the last legs of getting everything together; fingers crossed. Thanks Steve - very kind of you. Enjoying it so far! OK, we have a plan (before something hits me in the mouth). Radiator, prop and exhausts on their way from Hannants... well, ordered anyway. I know they're to be supported and I will, but I do wish they'd move their warehouse closer to somewhere with a post office... I've asked for '24 hour' post but this doesn't seem to include the time it takes to get stuff to the nearest depot. Ho hum. That 'get it by 6pm' logistics lot have a lot to answer for in terms of raising our expectations. In the meantime I think I can carry on with the nacelles, closed wheel bays and the fuselage clean up. The nacelle fit is nice: Untitled by Ced Bufton, on Flickr except where I wasn't careful enough with the 'fat wing' leading edge: Just a tiny gap that'll fill easily. All glued now ready for the AM when it arrives:9 points
-
As intimated in my earlier post, some actual modelling got done yesterday. Not a lot as it was hardly modelling weather here in Poole, really hot and muggy. However, while still waiting on the CD-ROM, I decided to turn my attention to other jobs what need doing on the build. The pan of the pilot's seat is way too deep even allowing for the use of a parachute as a cushion. He would basically disappear into the seat and not be able to see out of the aircraft. As one who had occasion to wear these seat type parachutes in the ATC. it was a simple matter to cut away part of the pan and close the hole up with some plastic card. This will be cut and sanded to shape later today. Next up I fitted the underside panel containing the recesses for the arrestor hook to the port side of the fuselage. This was not the greatest fit I have come across and some CA was used to fill the gaps. Study of photos of Roc floatplanes seem to indicate that the recesses for the arrestor gear were plated over in some fashion and plastic rod was glued into the recesses on the kit part. This was roughly carved to shape and some Mr Dissolved Gloop plastered over the area. Once again this will all be tidied up later on today when the gloop is properly set. I also glued the two engine cowling halves together in preparation for making a start on the engine in the near future. Thanks for looking Martian8 points
-
Eduard's 1/48th Bf109F-4 with the Eduard resin engine and gun bay set. Flown by Lt. Hans-Joachim Marseille, North Africa 1942. gazza l8 points
-
My latest offering, built straight out of the box, this was a lovely little kit, not much filler needed at all. Well done Kovozavody Prostejov. I hope you all like it. Brush painted using Humbrol enamels, I am no good at doing camouflage with a brush sorry.7 points
-
I modded the CMR resin seats in the JP's Phil - I didn't cast any Mk4 seats (wish I had actually). It's easier than vac forming Tony. You've mastered that so no excuse not to start casting your own resin bits and bobs. Speaking of which.... I mounted the u/c lower arm on a bit of scrap sprue. I cut the notch around the end of sprue to give me something to give my finger nails purchase on to pull it out of the RTV mould later on.... Then embedded it in plasticine. I use the 'bombs away' method of pouring to try and minimise air bubbles in the RTV mix. I'm right handed - and trying to take a piccie with my iPad and pour left handed at the same time woz a bit of a joke....... This time I also tried using an old vibrating electric toothbrush to agitate the mould in an effort to better get the air bubbles to rise to the surface. Here's the base of the electric toothbrush and the bottom of the mould. I pushed the stub of the toothbrush into the plasticine on the bottom of the mould: Thus. I secured the bottom of the toothbrush to the mat with some more plasticine and kept the toothbrush running/vibrating as I poured the RTV and for a few minutes afterwards. Dunno yet whether it worked. I suspect that the quick curing green fast catalyst I'm using traps more air than the slower curing red catalyst and I think I'm gonna get some more of the slower red catalyst.... Anyroad up. This is the current state of play. The mould has cured. Lego and plasticine removed - and now you can see why I carved the notch in the sprue lug to give me something to grip to remove the master (it came out ok ) I'll try casting some resin copies later today after work. Then I'll see how the bubble avoidance efforts worked out.7 points
-
A little bit of morphing can only do a retired gentleman good Ced, you will find that you and morphment are well suited Nice work on the engine body bit/fit too Looking at those chaps holding down the Stirling gives me a little frisson, my dad could have been on the other side of that one And looking UP, look how high that wing is No wonder he broke his arm as he ice-nonskated off one one cold and frosty morn Ced's pic of the Hallybag shows nacelles that would swiftly respond to the attentions of a six inch half round second cut My traditional modelling tool of choice. 😀7 points
-
Good afternoon, morning, evening wherever you are in the world! Allow me to present my take on XS927 an English Electric Lightning F.6: This is the now discontinued 1/72 kit from Airfix, built out of the box with the only customisation being some improvements to the cockpit, ejection seat and a stretched sprue pitot. Painted using AK Interactive Xtreme Metal Enamels, primarily polished aluminium. I learnt quite a bit on this one regarding NMF's and using metal repair tape for some even more shiny bits Sealed using AK Interactive Intermediate Gauzy which is a satin/specular varnish designed to go over NMF and then treated to usual oil paint weathering. The kit was quite challenging in places, needed a bit more patience than I anticipated and I think Airfix could have made some better design decisions, particularly when it came to the undercarriage, nose joins and belly seams which took an age to get right and even then, mine are not perfect by any shot. A mostly up to date WIP can be found here: Hope you enjoy, as ever comments, questions always welcome JB6 points
-
I finally present SE-BDB “Agne Viking” my Roden DC-6 which began life as part of the Airliner III Group Build last year. Very near the end of the GB I messed up the finishing and had to strip the model back to the bare plastic and start again. As I admitted at the time I was fed up with it, other things got in the way and the DC-6 languished for about six months before I got round to re-finishing it. I used the “Independence” issue of the kit because it includes the round-tipped Curtiss Electric props fitted to early SAS DC-6s. The build is more or less out of the box apart from the radar fairing on the lower left front fuselage and the astrodome for the over-water version. The fairing was guesstimated from photos and sculpted from Milliput and the astrodome was based on a part salvaged from a deceased Minicraft DC-4. Both took a bit of fiddling to get right although we’re talking awkward rather than difficult. Generally the kit went together well although some bits - notably the engines and the undercarriage - are a trifle crude. Roden have been generous with scribed panel lines but the quality of the scribing on the fuselage leaves a bit to be desired, particularly for a natural metal finish. After several abortive attempts at improvement I ended up filling quite a lot of the scribing and leaving an effect similar to the Minicraft DC-4. I know that was a cop-out but if I’d done anything else I doubt if the model would ever have been completed. The finish is AK Interactive Xtreme Metal Aluminium with Rub n Buff to provide a little contrast. Rub n Buff is a medium which has rather gone out of fashion but I’m fond of it, not least because it is very easy to use. The only problem is that decals don’t stick to it very well unless it’s over-coated with Kleer or something similar. Exhaust and weathering was done with pastels and a Tamiya weathering set. The F-DCAL livery decals looked beautiful on the sheet but applying them was a bit of a nightmare. Luckily I started with the windscreen which disintegrated as soon as I tried to position it. That forewarned me and I coated the rest of the sheet with Microscale Liquid Decal film which helped but at the expense of the decal film becoming more prominent against the natural metal. I quickly came to hate the way F-DCAL had printed the windows, doors, stripes, titles and everything else as a single decal, one for each side. That approach might work for laser decals but with fragile silk-screened ones it just made everything twice as difficult as it needed to be. By cutting the main decals into more manageable sections I got there in the end but I still had several heart-in-mouth moments and at one point I thought I was going to have to buy a second sheet. Fortunately that turned out to be unnecessary but I won’t be posting any close-up photos! After I had committed myself to the SAS scheme I realised that all the registrations were missing from the decals. Unfortunately F-DCAL’s customer service had a major hiccup and failed to sort this despite repeated e-mails. Viking very kindly helped me out with some spare Lima November registrations. Many thanks John. My apologies for the lack of spinning props. The fit wasn’t great and they had to be fixed in position. I have been told that the Swedish-registered DC-6s had their blade tips painted blue-yellow-blue rather than the white-blue specified by F-DCAL. If anybody has photos to confirm this on the natural metal scheme I’d be interested to see them with a view to updating the model. Final thoughts? It’s nice to get to the end of what turned into a lengthy and occasionally fraught build. With its blunt nose, short fuselage and round-tipped props “Agne Viking” looks quite different from the ubiquitous DC-6B and from some angles can almost be mistaken for a DC-4. Overall I’m pretty pleased with the result and I hope you like it too. It would be nice if one of the decal makers gave us “photo-real” windows for some of the classic propliners. Thanks for looking and as always constructive criticism is welcome. Dave G6 points
-
Hello all This is an Airfix Bf109, and is my fourth ever model, so of course it won't be as good as the masterpieces you guys create, but I tried my hardest and it was a really nice kit, with everything just falling into place, and I highly recommend it. I hope you guys enjoy! Best Wishes BetaSingh Image Gallery6 points
-
It's not until you see personnel lined-up like that below these 'big beasts' for scale that you get a true sense of how big they were is it Ced? The Stirling similarly looks like a bunch of blokes standing under part of the Hammersmith flyover: Admiring your resolve in getting this build Halifactually corrected to your satisfaction. Tony6 points
-
Thanks Bill Thanks Simon - if it's the one shown as the 'Z type' and you don't need it you'll be my saviour; I can just get hold of the radiator/prop and exhaust sets and I'll be a happy bunny! Here's what I'm trying to replicate: for JB910: JB910 & Crew by Ced Bufton, on Flickr It does look like the right one so I'll get the other bits ordered - great! Excited now Thanks Keith, very kind and encouraging as always Thanks Michael - I love that analogy; I think I'm in the 'concerned but lazy' group and, to be honest, this isn't one of my favourites (any more!) Thanks Johnny - I think the kit is OK actually with decent fit so far - it's just maybe not that accurate! Thanks Chris - you've bought another kit? I take full responsibility... Thanks Ed and Bill - I still don't think I'm up to that level of scratch building so hopefully the AML bits will fit the bill.6 points
-
Afternoon all, Here's a selection of images from a superb four and a half days at the Yeoviton Air Day attending from the Thursday through to the Monday lunchtime to catch the vast majority of the aircraft arriving, rehearsing, displaying and departing. Lots of good stuff on show, but as ever it was the Rafales that stole the show, just an incredible display Aero L-159 ALCA 6053 Czech Air Force RNAS Yeovilton 06/07/17 by Shaun Schofield, on Flickr Saab JAS-39C Gripen 39244 Czech Air Force RNAS Yeovilton 06/07/17 by Shaun Schofield, on Flickr McDonnell Douglas F-4K Phantom FG1 XV586/010 Royal Navy RNAS Yeovilton 06/07/17 by Shaun Schofield, on Flickr Saab JAS-39C Gripen 39244 Czech Air Force RNAS Yeovilton 06/07/17 by Shaun Schofield, on Flickr Boeing C-17A Globemaster III 92-3292 US Air Force RNAS Yeovilton 06/07/17 by Shaun Schofield, on Flickr Northrop F-5E Tiger II J-3085 'La Patrouille Suisse' Swiss Air Force RNAS Yeovilton 06/07/17 by Shaun Schofield, on Flickr Extra EA 300L JY-RFE Royal Jordanian Falcons RNAS Yeovilton 06/07/17 by Shaun Schofield, on Flickr Dassault Rafale M 36 Aeronavale RNAS Yeovilton 07/07/17 by Shaun Schofield, on Flickr Dassault Rafale M 36 Aeronavale RNAS Yeovilton 07/07/17 by Shaun Schofield, on Flickr Dassault Rafale M 36 Aeronavale RNAS Yeovilton 07/07/17 by Shaun Schofield, on Flickr Dassault Rafale M 45 Aeronavale RNAS Yeovilton 07/07/17 by Shaun Schofield, on Flickr Aero L-159 ALCA 6060 Czech Air Force RNAS Yeovilton 07/07/17 by Shaun Schofield, on Flickr Dassault Rafale M 45 Aeronavale RNAS Yeovilton 08/07/17 by Shaun Schofield, on Flickr Dassault Rafale M 36 Aeronavale RNAS Yeovilton 08/07/17 by Shaun Schofield, on Flickr Dassault Rafale M 36 Aeronavale RNAS Yeovilton 08/07/17 by Shaun Schofield, on Flickr Dassault Rafale M 45 Aeronavale RNAS Yeovilton 08/07/17 by Shaun Schofield, on Flickr Dassault Rafale M 36 Aeronavale RNAS Yeovilton 08/07/17 by Shaun Schofield, on Flickr Dassault Rafale M 45 Aeronavale RNAS Yeovilton 08/07/17 by Shaun Schofield, on Flickr Dassault Rafale M 45 Aeronavale RNAS Yeovilton 09/07/17 by Shaun Schofield, on Flickr Dassault Rafale M 45 Aeronavale RNAS Yeovilton 09/07/17 by Shaun Schofield, on Flickr General Dynamics F-16AM Fighting Falcon E-600 Royal Danish Air Force RNAS Yeovilton 09/07/17 by Shaun Schofield, on Flickr Dassault Rafale M 36 Aeronavale RNAS Yeovilton 09/07/17 by Shaun Schofield, on Flickr Boeing C-17A Globemaster III 92-3292 US Air Force RNAS Yeovilton 09/07/17 by Shaun Schofield, on Flickr General Dynamics F-16AM Fighting Falcon E-600 Royal Danish Air Force RNAS Yeovilton 09/07/17 by Shaun Schofield, on Flickr Northrop F-5E Tiger II J-3085 'La Patrouille Suisse' Swiss Air Force RNAS Yeovilton 10/07/17 by Shaun Schofield, on Flickr General Dynamics F-16AM Fighting Falcon FA-132 Belgian Air Component RNAS Yeovilton 10/07/17 by Shaun Schofield, on Flickr Eurofighter Typhoon FGR4 ZK352/BV Royal Air Force RNAS Yeovilton 10/07/17 by Shaun Schofield, on Flickr Hope you enjoy, a bumper selection from RIAT will be forthcoming in the near future... Cheers, Shaun5 points
-
These were 2 of 3 aircraft from the Airfix Pearl Harbour Anniversary set. Unfortunately the "Zero" was piloted by a Kamikaze pilot and it flew straight into the bin of doom! In truth I could not get the canopy looking anything near decent, far too intricate and I over weathered it and could not get back to looking acceptable to my eye. I have come to the decision that weathering is a dark art and I am in awe of those people who do it well. That said all 3 models went together well with very little filler required. I hope you have enjoyed viewing them as much as I enjoyed building them, look forward to your comments please be kind. Off now to finish the 'Tirpitz' that I have had 75% finished for the past twelve months. Watch this space as they say.5 points
-
I'm not much for jets, but this caught my eye and I decided to try it. The kit is from 1975. The kit offers two decal options...Irish and Belgian. I hope you like model #22 for this year..5 points
-
Thanks John. I think I am favouring wire for the rigging, but I will be trying that later. Good question Kallisti, I was thinking of making a cabinet out of a spare matchbox! Thank goodness my wife loves candles - it means plenty of raw material for that! Very kind Glynn, thanks. Well, I have been able to get some more done to this ship. First up, I encountered a hitch: The etch for the prop surround/rudder seems to be slightly too large and protrudes under the keel line. It butted perfectly up under the transom and around the prop shaft, so I could not adjust it, and it is a too complex shape to try and scratch, so I am leaving it at the moment as fitted. Depending on the size of the prop, I may try and replace it with a wire and plastic one instead. Then it was time to try and solder the foremast up. I rigged up a jig: Then remembered to transfer it to a ceramic tile before soldering, which of course I should have done first. Anyway, I managed to solder it square and true(ish) and it needed minimal clean up to get rid of the excess solder. One thing I need to do is get used to filing in tapers to yardarms and masts, this is not quite right, but again it is not really noticeable on the display stand. I did toy with the idea of replacing the etched ratlines (is that the word?) but the wire I had (.3mm) looked to be about the same size as the etch, so I went with what was supplied in the kit. I have fitted most of the remaining resin parts, funnel, carley float and lifeboat and I found some spare oars for the lifeboat on another etch fret I had. I am getting close to the final run in now, so hopefully the next update should show her finished. Thanks for looking in and the kind comments, Ray5 points
-
Nice to see the inclusion of the tractor, we have three of those here where I work, splendid little beasts but hard to get much info on. The early versions didn't have the fire fighting and demineralised water tanks, and the back end panel work around the wheels was quite different. Vickers Royal Navy deck tractor by James Thomas, on Flickr Fairey Gannet AEW.3 XL500 G-KAEW 6 Jan 16 by James Thomas, on Flickr5 points
-
Excellent idea Sir Baron - the cracks in the glass inflicted after dropping it some time ago may not matter if I cover it with a piece of Contact (and contrive to artfully the inevitably resultant air bubbles, ha ha). Love the 'jab slab' term, very appropriate, will nick it :). That is indeed a Marshall Islands Arctic Possum! How did you guess? Bravo! He usually masquerades as a pomeranian/chihuahua cross, but you weren't fooled in the least! His possum-like nature comes to the fore when he is picked up and cuddled, although he also sometimes looks like a Patagonian Koala in that situation, too. Where you were fooled is the musical instrument: it's an oboe, not a bassoon (although our daughter occasionally plays one of the latter). Double reed instrument anyway, so close. And you didn't make the mistake that makes all oboists' teeth itch and crawl, which is to accuse it of being a clarinet >shudder<... Cheers, Alex. <-- not a possum, Arctic or otherwise; or a bassoon5 points
-
If you don't look at pictures of real ones it will look fine. Otherwise it looks odd from 6 feet away. All the bits fit together quite well because the distortion carries through to the undercarriage etc. You could probably make the whole kit in about two hours work plus painting if you don't correct anything. @perdu - you could scratchbuild an inner then an outer nacelle and cast two more. That's pretty much what Aeroclub have done.5 points
-
From the 26 Decals package, the RODEN 1/144th Bristol Britannia G_AOVJ of Caledonian Airways 196 60's. Decals by 26 Decals.5 points
-
Unfortunately I've been busy with work lately (it's that time of year!) and also had to go out to Wichita, Kansas, for a week for annual recurrent training. Between that, trying to keep the garden (yard for Americans!) tidy, and reposting all my old PB pics to Flickr and updating all my old threads, I haven't had any time for modelling for a while. However, I did decide to forgo the garden work today (my excuse was it has been too humid. That's my story and I'm sticking to it!) and finished the rigging on the Pup. I drilled through the lower wing at the inboard end to pass the flying wires through to the undercarriage mounts and then fitted all the flying wires. That's going to be left until tomorrow when I hope to get it all tidied up. Ian5 points
-
Hi Guys Whilst updating my website the other day I looked at my P51 which I built a few years ago and decided that I would put it on this site - because this was my inspiration that eventually led me to scratch build. It took me many months to build and I thoroughly enjoyed the experience of scratchbuilding the hangar and all the equipment. Sadly when I moved to live in Bulgaria I was forced to sell it to Westway Aviation in London who I believe, are currently using it to advertise their company. I have seen many fantastic builds on this site and I have had many of you say to me that they would love to scratch build something one day. I hope that this will prove that with a little bit of patience you can actually go from building a small clock for example - to a full scale scratch built aircraft - it just takes practice! This is the 1:24 scale Airfix kit of the P51 D Mustang 'Big Beautiful Doll'. Everything else is scratch built. Here are the pics:4 points
-
I fully expect to be saying things like "Alexa [or Siri], spare my family," in ten years.4 points
-
Tony, please, this is a family site.4 points
-
Yes, the weapons are placed for 360 degree coverage. Phalanx is intended to stop leakers that get past the Type 45 in the outer screen and the inner screen of Sea Ceptor armed frigates. The 30mm guns are for dealing with asymmetric threats like those faced by USS Cole. It is bad form to shoot small inflatable boats carrying bombs with depleted uranium when 30mm HE will do!4 points
-
Yeah, I was in my element! Thanks for looking.4 points
-
New pics Source: http://www.specialhobby.net/2017/07/modely-v-priprave-viii.html V.P.4 points
-
Going off topic briefly Ced, are you aware that Radio 4Extra are doing the original " Navy Lark" series at the moment, in fact it's on now.4 points
-
VB 194 Revell 1:72 The model straight from the box, building it made me a lot of fun.4 points
-
TWO re-activated fave builds in one morning - first Edward (@Procopius) and now Yer Man@Fritag; happy days indeed. As so often with Steve, little snippets added to the "ooh, that's a great idea" file (though at least I beat you to using Albion non-brass slide fit, which is wonderful stuff - see Vixen arrestor hook for details). Plus more airings for that most excellent aviation/engineering geek word, "fescalised". Bliss. Shame I'm stuck in a Pret in London, resting between job interviews, rather than at my desk. [Can I also say that I am in awe of anyone who pours sticky liquid resin-y stuff, with their wrong hand, over a teeny-tiny cutting mat perched near the edge of an ordinary non-expendable table, in a tidy room furnished in pale materials that would show up any spillages something rotten? Either you have cojones the size of Fylingdales, or Frau Fritag is a meek & mild Little Woman (breath not held on that one), or you can do stuff with your wrong hand that I wouldn't contemplate even with my right one. Respect!4 points
-
Nice work on the vac forming Tony Is the lower retractable door a single curvature or double curvature? If it's a single longitudinal curve then maybe you could make the door separately from plastic card just gently curved with a bit of rolling and/or heat treatment? Alternatively maybe you could glue the Master back together, fill the join and then do another pull over the bottom of the BT to get a door without a join? Apologies if I'm repeating summat already suggested - blame the popularity of the thread!! So much to read on return from hols..........4 points
-
I see you morphing into a master-modeller in retirement Ced. Retirement (sigh) now don't that sound good.......4 points
-
My it's good to see you back at work mate It was indeed Nelson who said that before Trafalgar; putting his ship alongside that of the enemy didn't work out all that well for him in the short term, but did mean that he is still remembered as a national hero over two hundred years later. Not sure what message you can take from that in modelling terms but it is an excellent sentiment. Nice job on the green too, shame about the paint lifting. Cheers, Stew4 points
-
Proving once again that I refuse to take anything, even a hobby, seriously, I present the latest what-if from the 72 Land production line. This is the Italeri Eurofighter 2-seater. Decals came from various Hawk sheets and the serial number was chosen pretty much at random. The biggest challenge was the white stripe swooping down the side; you can see where there has been some patching done. Unless the Royal Mail changes its policy about shipping enamel paints, this will likely be my last Red Arrows model, since I used up the last of my Xtracolour supply. This is completed aircraft #478 (11 aircraft, 2 ordnance, 11 vehicles for the year 2017), finished in July of 2017. As always, you can find further details and my ongoing paint and construction log in the 72 Land Blog as referenced in the sig line below.4 points
-
Thanks John, thanks Pete. Having played around with the doors for a couple of days I have come to the same conclusions and will be sticking with the original 'wicket' door. When swapped over, their styles make the swap very obvious. I now have to decide whether to fix the doors fully open, part open, half open, or closed. With the wicket door fully open I'd have to model some interior with contents. I do like the idea of having some coats hanging on the back of the door. Thanks again for your input. Rearguards, Badder4 points
-
Hi everyone. I haven't been able to keep up with this WIP thread of late, mainly because of the Photobucket fiasco and also because my PC packed up. So here it is completed, weathered with oil washes and pastel chalks and finished with Alclad semi matt varnish Thanks for looking, gazza l4 points
-
Dreams of showbusiness success now lie cruelly shattered upon the ground before me... Glad to hear it Tony - they seem to have lit that exhibit extremely well - some nice dramatic accents to the airframe. I've modded mine Alex: Take photo of favourite drinks coaster (or download an image of one you like from the internest). Open up said image in gallery app to full screen. Put iPad on table before you and place long cool drink upon image of coaster, ruminating upon how much cooler the drink is than an overpriced jab-slab. For longer drinking sessions, a slideshow of alternating coasters can add a touch of class to proceedings. Whilst other Sea Kings are available, they are all as nought to me now since seeing what the Crispinator has achieved there. The franchise started here. Are you listening Stan Lee? I dare say five different modellers would dice it five different ways James. I just didn't fancy having to cut portholes and doorframes into seams and am more content to simply rejoin the two halves of the upwards opening (did we ever work out what the correct name for that part was btw?) door as the lesser evil. It also means I can stick the port and starboard sides of the rear fuselage on to the respective sides of the kit prior to closing up in order to continue on the existing interior wall detailing. I'm conscious I may not be explaining it all that lucidly but you should see what I mean as the drama unfolds... ...and yes, it will most definitely be open! No sweat on the PM btw, just let me have the coordinates and I can programme them into the delivery drone.... Other amphibian sports are available. And I thought tractors with trailers slowed the traffic. Being stuck behind you on a hot afternoon must have been a nightmare Pete. Yeah. You've got me curious now as well Tony. We insist upon a full report.4 points
-
Eduard bf109e1 in 1:48. OOB painted with Vallejo and weathered with so washes. Thanks for a great GB everyone Joss4 points
-
Hi Folk's 109G10 from the 1/32 Revell kit,based near Prague in 19454 points
-
Thanks AgentG, here's something for ya.. Just a tease guys... ' could take another week to apply all the dirt... Later...........3 points
-
Evening guys, a little more done today. But before I carry on I'd like to dedicate this build to the Late George A Romero who sadly died yesterday. He will be remembered through his films, a true genius who watches over me while I've been building my kits. the "last days" emblazoned on this giant will now have double meaning. Night George. Onward and upward. We have the top part of the fuselage popped on. the fit is actually ok? Shhhh don't tell anyone. I glued the dials in the front position. and noticed on this pic that the fit really isn't that great of the top half of the fuselage. Oh well. Let's put some wings on, what's the worst that can happen right? Err nothing bad, they just went on. I forget where I saw this little trick but I'm masking the internal sections with cling film anticipating paint. Oooh another shot of that 'orrible edge. As you can see the milliput is out. The underside of the wings get some fix up action. as does the edge seam. much better. a little more clen up and I'm ready for a prime and pre shade. Game of thrones tonight so I left her there. fingers crossed for a little more tomorrow. Thanks for taking time out to cast your eyes over this old bird. Happy Modelling guys. Johnny Bub.3 points


.thumb.jpg.ba34a9f6ddce411193946dbdcc7b5fe8.jpg)


.thumb.JPG.3498f40362ff13ebfc4b2e45abbd545e.JPG)


This leaderboard is set to London/GMT+01:00