
Leaderboard


Popular Content
Showing content with the highest reputation on 18/07/17 in all areas
-
Heres a few pics of a build I completed last year of the 1/48 Tarangus SAAB JA37 Viggen.36 points
-
Hello As many of us I have built the 1/72 Airfix Hawker Typhoon Mk Ib in the markings of Squadron Leader Stapleton, No.247 Sqn, Eindhoven 1944. Patrick27 points
-
Heres another build from last year. Eduards 1/48 Mirage IIIC. This is my first serious attempt at a natural metal finish using AK Interactive Xtreme metal colours. Even though it wasn't perfect I can say I am still very happy with the results.23 points
-
Construction thread can be seen on this site. This was my first attempt at riveting. For those considering this, a warning. It will forever change your life. Thanks for looking.19 points
-
And my last post for today is yet another delta. This time the Kinetic Mirage IIIO.16 points
-
Good afternoon, morning, evening wherever you are in the world! Allow me to present my take on XS927 an English Electric Lightning F.6: This is the now discontinued 1/72 kit from Airfix, built out of the box with the only customisation being some improvements to the cockpit, ejection seat and a stretched sprue pitot. Painted using AK Interactive Xtreme Metal Enamels, primarily polished aluminium. I learnt quite a bit on this one regarding NMF's and using metal repair tape for some even more shiny bits Sealed using AK Interactive Intermediate Gauzy which is a satin/specular varnish designed to go over NMF and then treated to usual oil paint weathering. The kit was quite challenging in places, needed a bit more patience than I anticipated and I think Airfix could have made some better design decisions, particularly when it came to the undercarriage, nose joins and belly seams which took an age to get right and even then, mine are not perfect by any shot. A mostly up to date WIP can be found here: Hope you enjoy, as ever comments, questions always welcome JB13 points
-
Proving once again that I refuse to take anything, even a hobby, seriously, I present the latest what-if from the 72 Land production line. This is the Italeri Eurofighter 2-seater. Decals came from various Hawk sheets and the serial number was chosen pretty much at random. The biggest challenge was the white stripe swooping down the side; you can see where there has been some patching done. Unless the Royal Mail changes its policy about shipping enamel paints, this will likely be my last Red Arrows model, since I used up the last of my Xtracolour supply. This is completed aircraft #478 (11 aircraft, 2 ordnance, 11 vehicles for the year 2017), finished in July of 2017. As always, you can find further details and my ongoing paint and construction log in the 72 Land Blog as referenced in the sig line below.12 points
-
Am still here. Promise Month singular Bill. Months plural is a bit harsh surely? Aint it? As ever excuses first.......Work - fortnight's summer hols in Canada (Montreal/Quebec city) - Wimbledon and the Tour de France on the tv crying out to watched in the evenings - and out on the bikes in the nice summer evenings.... To be candid I should also add to those excuses a certain level of frustration deciding what to do with the main undercarriage legs x 4 - and a bit of consequential demotivation As an aside - All my modelling photo's are on photobucket but I haven't as yet been denied the direct linking facility. Having read Bill's (Navy Bird) contribution on the 'photobucket stopping direct linking' thread I guess this is because I've got a (cheap) grandfathered Plus account - so it looks like I've got until 31 December 2018 to find an alternative host......... I originally thought that the Airfix main undercarriage legs would do. But when I looked at them properly I changed my mind. The prominent 4 x circular brake piston/pad housings on each wheel hub are poorly represented (if at all), the hinge section where the leg and the lower arm articulate is just the wrong shape as is the lower arm axle end and the detail is generally soft. I was tempted to leave well alone; motivation was lacking and who was gonna look at the undercarriage anyway? But eventually I decided that seeing as I'd worked on the nose leg I really ought to work on the main legs; and the question of whether or not anyone else would look at it the detailing, or care, if they did, has never really been any relevance to my modelling decisions anyway - it's about the pleasure of the build (?). So with motivation thus slightly regained...... Seeing as I've got 4 x legs to do I decided to go down the resin casting route again. I separated the lower arm from the upper section and scribed and detailed the upper section ignoring any detail that was 'handed' between left and right legs so that I had a master I could cast 4 times. More RTV mixing. My set up was as follows: I tend to use small disposable shot glasses/mixing cups found on evil bay and measure the RTV and catalyst on micro scale to accurately get 10% by weight catalyst for small quantities. This is the 'quick set' (c. 2 hours) catalyst. Obligatory Lego piccie And some casts. They're satisfactory but not perfect as there are one or two resin bubbles to remove. I need 4 and I've poured 8 to have a few spares. I'm tending to the view that the quick set catalyst results in slightly less flexible moulds than the normal (8 hour) set stuff. I'm not sure that this is technically correct (I simply do not know) but I've nearly persuaded myself that this mould is slightly less flexible than I'm used to. I know that resin isn't as strong as injection plastic but these are pretty chunky mouldings and I think resin will be up to it........... I've also re-shaped one of the lower arms - paying particular attention to the hinge point with the leg and the axle end. And I've added better representations of the brake piston housings from some 1mm rod suitably sanded to fit. There are more details to add. But this is as far as I can go before adding detail that is 'handed' between left leg and right leg mouldings. (There - that's a few hours of carving, shaping and detailing disposed of in two sentences ) The question now is whether I make 4 of these in plastic () or cast 4 like this in resin and then add the 'handed' details. I think the latter. Again I think the mouldings is chunky enough to be strong enough in resin. And a quick check to see how the two elements fit together. I'm quite pleased tbh. Whether it's worth the effort is a question that I'm just not gonna ask myself....... And I'm sorry to say that that is the only progress in the last month or so folks Note to self - must try harder..... Right. I've got all my favourite builds on BM to catch up with. Now I've at least added something to my own thread I feel (somewhat) entitled to comment on other folks WIPs12 points
-
1/72 Spitfire Vb in the markings of a Danish pilot who escaped the German invasion and occupation, a salute to my Danish-American heritage. Build consists of: -AZ Models Spitfire kit -Squadron canopy -Quickboost exhausts -Master brass 20mm cannon -aftermarket resin seat, can't recall the maker, sorry -Variety of decals including AZ Models kit, Aeromaster, and Revell for the Danish bits (Thanks Bruce!) First photo includes a slight glimpse of my Mormor (grandmother) who struggled all through her school years to learn English as her family assimilated into their new life in America, while still treasuring their Danish heritage.11 points
-
Great story John, as usual Had a fiddle with the radiator flaps this morning. Nice fit without the flap but it pushes out the sides when fitted: Untitled by Ced Bufton, on Flickr so I drilled out the locating holes and cleaned off the flash from the flaps until there was a better fit. Fiddly. Just those seams are glued and clamped now; at least I had an excuse to use my new crocodile tweezers: I'm definitely behaving like the GoT characters at the moment... I know the Winter Walkers radiators and props are coming but I'm still fiddling...10 points
-
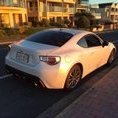
There's lots to do in Canberra. Admittedly it's not as lively as Edinburgh, Brighton, Bristol, Glasgow etc, but it beats quite a few places I've erm, been. Being able to visit the home of this thing on any day of the week for around 70p makes me very happy: T10 points
-
Here is my build of the Dapol OO/HO Stephenson's Rocket (C046) I built the Airfix version in the Seventies and rather than build the one I have in my stash, I bought a Dapol version for a "just for fun" build. As turned out, it was fun! Dave8 points
-
Thanks Simon - I'd found the FD sets and I think it's the first one I need, bookmarked in the hope I'll hear from Colin. If I don't get hold of a 'Z nose' then the planned scheme is going to be wrong anyway... Thanks Alex - crowbar after toe, thankfully. Once I'm back on my feet properly it'll be heaving rocks around the garden. Oh, OK, big stones then. Thanks Martian and Edge - I have the AML set bookmarked too and, if I'm going to do JB910 I'll also need the 'type C exhausts' - this is getting pricey! Thanks Ed for the detailed comparison. I'll have a think... Thanks Bill and PC - your confidence in my abilities is deluded very much appreciated. I'll have another think... scratch a cowling and mould copies. Gulp. Parts #140 have been fitted: Untitled by Ced Bufton, on Flickr Easy really - as Michael said they're more or less upright. On to the nacelles. The radiator flaps on the outer ones are fine and they went together well. Just dry fitted : They fit really well with a bit of wriggling. They look fine - is it just the fronts that are wrong? I'll do some research...8 points
-
On form to date, it'll go like this: Dassault will demand design leadership Germany will say that it requires 400 aircraft so as to get a significant amount of the workshare. Dassault will dig its heels in and say that this is quite unacceptable, since France has greater recent experience of designing fighters than Germany and to give in to the German demands will lead to job losses in France. The programme will come close to collapse. Someone will then realise that the German contribution will involve Airbus, which is, of course, not just a German concern, and whose involvement will benefit both partners, which will in turn lead to Dassault being told to crack on with it. About five years into the programme, rumours will circulate that Airbus doesn't know what it's doing, and that the cost has gone up. About ten years into the progrramme, rumours will circulate that Airbus builds really nice commercial jets, but that it really doesn't know what it's doing with military aircraft. About twelve years into the programme, a minister from one of the two partners will concede that Airbus had some problems with the A400M, but will point out that DASA (as was) was part of the Typhoon programme and is ideally suited to this project. Cynics will observe that the Typhoon took nearly 25 years to get from project MOU to front line service. About fifteen years into the programme, Carlo Kopp will write an article explaining that the new Franco-German fighter is rubbish and that Australia shouldn't even think about buying anything other than the F-22 to replace the Super Hornet. This will be accompanied by another article on Air Power Australia explaining that the cost of putting the F-22 back into production would be entirely worth it. The Germans will then confess that they actually require no more than 150 aircraft, and Dassault will demand a renegotiation of the workshare. Airbus will disagree. The programme will be delayed a little bit further. India signs up to the project. Dassault trumpets that this proves its fighters are the finest in the world, and that it looks forward to negotiating with the Indian MoD. And then gets Airbus to do this so as to avoid the inevitable blame. Reports of a disagreement over workshare for the avionics emerge. The Germans demand that a German company be involved in a critical part of the project, such as the FCS, something which German engineering delivered very quickly on the Typhoon. Press comments that it was delivered quickly simply because it was then handed over to Ferranti, who did know what they were doing, are dismissed as unhelpful Anglo-Saxon propaganda. The first prototype flies. All seems well. A reporter for Flight International claims that the new aeroplane is better than any fighter that has ever flown, and the internet goes into meltdown. The second prototype flies. India announces that HAL will be building all but three of the airframes for the IAF. The Franco-German partnership demurs. India cancels the aircraft on the grounds that the contract award was made as the result of corruption, only for the next government to reinstate it, buying 25% of the originally planned number and reopening the fighter contest. Airbus is blamed for the debacle. Lockheed Martin takes a brochure from the shelf and suggests that it will seek to sell the F-16 Block 250 to the IAF. The first aircraft finally reach the French air force and turn out to be pretty good. The Luftwaffe complains that a piece of masking tape found in the cockpit of one of its first deliveries could cause a fatal accident, and grounds the whole fleet for three months while technicians are given the task of seeing if any more masking tape can be found in places they shouldn't be. Cynics suggest that this may be an attempt by the German government to delay having to pay for the aeroplane. The Germans deny this. A small war breaks out, and the French send their aircraft to the warzone amid much trumpeting and triumph. The new aeroplane flies several well-publicised combat sorties. Only later does everyone realise that some rather ancient Rafales released the bombs because the new fighter isn't cleared for any air to ground weapons yet, and the new aircraft were responsible for taking photographs of each other over some dramatic landscape, while a Rafale can just be discerned somewhere in one of the photos. This is dismissed as unhelpful Anglo-Saxon propaganda. In due course, the German government confirms that the concern over the masking tape was misplaced, and the new jet's safety is not compromised by this. However, the investigation into the masking tape has revealed another serious fault which - oddly - doesn't appear to be found on any of the French aeroplanes, leading to another brief grounding (of the French aircraft) and suggestions that the German government is looking to delay paying for the aircraft. JG71 eventually reaches IOC some 26 years after the start of the programme and 10 years after IOC was envisaged. The first Indian squadron turns up at Ex Cope Thunder 2071, which marks the first occasion upon which the RAF and USAF have the opportunity to see how their new Incom Corporation F-65B Starfighters perform. The Indian media duly reports that their aircraft have a 120-0 kill ratio against the F-65B. The RAF diplomatically suggests that the score might be a teensy bit exaggerated, while the USAF has a serious sense of humour failure and says that the Indians will never be invited to another exercise if they don't stop doing this sort of thing. The Indian defence minister chides the press for misrepresenting the exercise (despite the fact it was his department which fee the press the detail). Commentators suggest that for security reasons, the F-65Bs hadn't been alllowed to switch their cloaking device on, or to use any directed energy weapons, noting that this means that the F-65s didn't, in fact, have any armament options available and were rendered about as threatening as a Goodyear blimp under the exercise ROE. This is dismissed as nothing but a set of excuses by an unlikely combination of a virulently nationalist Indian blogger and the comments page in The Guardian. Aviation and Space Technology Weekly runs an exclusive based upon a leaked email from one of the participants. The world is somewhat alarmed to discover that the email was in fact written by one of the F-65B Starfighters - which is found to have also just set up an Instagram account - rather than by one of the humans involved. Dassault issues a press release claiming that the Franco-German aircraft has been sentient since 2026, long before the Anglo-American aircraft, but is too shy to have a social media presence. Approximately 30 years into the type's service, a balanced analysis of the aircraft finally appears in Volume 28 of International Air Power Review (released with apologies from the publisher about the five decade delay between volumes 27 and 28) and it turns out that the aircraft wasn't as good as the brochure claimed, but not as bad as the internet suggested. A bear, seen exiting some woods with a copy of the Times and a roll of Andrex, is heard to observe that, yes, it is true... the Pope is Catholic.8 points
-
Here's my rendition of the Hobby Boss Flanker kit. Built generally OOB except for the seat which came from Wolfpack-Designs. Painted with Gunze lacquers and weathered with enamels and oils. Decals from Begemot. Hope you enjoy the photos! Mark7 points
-
Pretty much an oob build, zimmerit done with tamiya tool and humbrol filler, titanium wire used for antenna after many attemts to stretch sprue, bandage and pva used for the camo net. I used Micro sol and set for the first time, and i think the set has reacted with one of my tamiya clear coats (white stain around decals). All damage was done with a lighter and fear! I used tamiya weathering kit for rust and soot and pastels for dust, which doesnt show up too well in the photos. I thought the model looked good untill i saw the photos. I may revist this at a later date to improve the weathering, i think i got a bit burned out with the tracks and the zimmerit!7 points
-
VMA-311 "Tomcats" that is. Gotcha! This is the Hasegawa 1:48 A-4M Low Visibility built Out of Box using Testors Model Master and Mr. Color paints. Decals are TwoBobs 48-092, Low-Viz "Mikes", Part I.7 points
-
All change I came back to this today and decided to scrap the back box It just looked wrong in every way so I took the other moulded back piece, filed it shaped it and trimmed it to a better shape with my Swann-Morton scalpel This looks far better I think A smidgeon of PPP to infill the back section of the box and we're on our way at last Bits and bobs of additional detail make a difference You have to ensure that the additions are attached to the 'part' you are making before you try to cast from it Looking a bit more like than yesterdays efforts Casting day tomorrow I hope A bit different this time around, I ground the recesses in the head box away with my Expo minitool Some trimming to do when the first casting is done I reckon7 points
-
My (really not very good even by my standards) attempt at the new tool 1/48 airfix hurricane in finnish markings. I started this about a month ago and have been plodding on and off at it. The part that makes up well outer wing spar I suppose you'd call it was pretty warped and I had a bit of trouble getting it to stay true. In fact when I came to attach wings to fuselage it became apparent I hadn't done it right Anyway, painted with tamiya acrylics and aftermarket decals (which when I got them looked like they would dissolve but worked pretty well). and next to another hurricane (can you guess the kit maker??):6 points
-
Well this really is a rarity for me, my first ever Vacform build and finishing a Group Build, something I fail to do on too many occasions ! I have had this kit in the stash for many years and like many of us was completely terrified of building a Vacform kit, but thanks to the encouragement of everyone on here, WE have done it. Until I built this kit I didn't know much about Gordon Stevens, the man behind Rareplanes, but having read about him he was a remarkable man who by his undoubted skills and determination brought us the opportunity to build kits that none of the mainstream manufacturers would have looked at. I would therefore like to dedicate my rather modest build of this, one of his earliest kits to him. The poor old Supermarine 224, wasn't a success ending its life on a firing range as a target, but hopefully RJ Mitchell learnt something that he later used to make the more recognisable Spitfire the success it was. As for this kit I learnt a great deal, cutting out the parts from the sheet is nerve racking, the sanding seems to take forever as you are frightened of taking off too much and you constantly worry that the parts aren't going to fit. However the sense of achievement is amazing, so please dig out that Vacform kit you have had in the stash for years and give it a go, everyone on BM, especially me is right behind you. cheers Pat6 points
-
After some time I am happy to post here again, this time with Monogram's F-105D, rescribed and painted freehand, hope you like it!6 points
-
Thing is Ced, the nacelles obviously are wrong, but are they only that obvious when the model is sat on a table 6 inches from your nose where you can critically examine it having been briefed by t'internet on what to look for? When it's suspended from your ceiling and you're looking up at it from a few feet below will they be that obvious - especially to need hours of scratchbuilding and moulding to improve? Or will your normal excellent building and finishing give you yet another atmospheric model - a Halifax full of nervous young crew plodding along in a darkening turbulent sky under your study ceiling... Just saying.... Keith6 points
-
I am at a loss here Ced I know Ed is saying there is lot if effort to scratchbuild a fix for it but how hard can it be? Laminate plasticard using plans and pictures of the real thing Bit of Milliput to tidy up and violet! cast four from one We too often take a step back when there's a perceived problem, we all have the basic materials to tackle these things ourselves Ed, who knows a fair bit about these things has said the best was a shrink the kit bits and rejoice I haven't studied it but you know me, home brewed is ALWAYS best brewed 😇6 points
-
It's good to hear that the toe is getting better Ced, although slowly by the sound of it. I really like the Halifax; once the problems were ironed out it would appear to have been a very useful tool for the purpose. My paternal Grandfather was on Stirlings and extremely fond of them. He spoke a little about his experiences when he was very old. He said that on the bombing runs he went through cycles of feeling completely detached from what was going on below, to having to drink to quell the horror and guilt he sometimes felt in dropping bombs on civilians. He had a wife and two, then three very young children at the time. They were facing the same. It's clear he didn't like it (the concept of bombing civilians). He was relieved when put on Stirling transports. My impression is that crews did get attached to certain, individual, kites; he actually still had a little part of one of his . He didn't speak badly of Halibags, Lancs, anything. No 'competition over which is best', just a love of his kites. The overriding impression is that whatever they were in, if they got home in mostly one piece, they were very thankful. He had been in an emergency landing, quite badly injured. Many scars/burn evidence on torso, only one lung left. They weren't shot down, just something went wrong on a transport landing. Apologies for the digression.He was a smiley old chap. Just had a few memories flood back there. Also still on a digression; thanks for the advice on the bitter schnapps chaps (poet and I don't know it; again!). Is it to be consumed neat, if so, chilled? If it's mixed; soda? I like unusual drinks, especially herbal, alcoholic or not . Aquavit is a personal favourite. Used to have it with fish in Denmark. Some of the sailors would have a glass for breakfast ! I hope Freightdog can help with the cowls Ced. I'm sure your mojo will return soon, especially if they have the parts. It really is quite disappointing when a manufacturer makes a model of a major type for mass production, but fundamentally gets something very wrong about a 'scale model'. Best regards TonyT6 points
-
With the Beagle Basset having been set aside for the paint to harden off, I decided to jump back on this today. I primed, painted and assembled the wheels to the lower frame, then painted the footplate with some satin black masking the edges up first in preparation for the green. I was tinkering about with the handrail fit having used one of the longer parts for the for last attachment point on the smokebox. Because of the nature of the material the parts keep springing away from the boiler, so I will hold off on a final decision once I start to fix them permanently into position. My next job will be to paint and fix the connecting rods and running gear.6 points
-
Another recently finished model, a Hellenic Air Force Starfighter, using Hasegawa's kit with lots of resin parts from CMK, and a seat from Kasl, plus Eduard's FOD covers. The parachute housing is scratchbult.5 points
-
Spent the Sunday at RIAT and stayed Monday for the departures. The weather on Sunday wasn't great with a few rain showers late in the afternoon, although this apparently was an improvement on Saturdays weather... Monday, typically, perfect weather. Thanks for looking, gazza l5 points
-
Hi Simon, The kits won't come with a water base, you will have to make it or buy it separately. You can buy printed type water base I think they are available from Sovereign Hobbies. However making a sea scape does not have to be hard work and is a lot easier than you might think. Much depends on the scale you intend to model at, but judging that you wish to build a carrier the method I use will be appropriate. Fundamentally for waterline models I use textured paper: Which I glue to a board and paint with Humbrol 31 Slate grey, I give that a couple coats of gloss varnish. That is the quick and easy way to make the sea. Then I place the model onto the sea base and draw out the wake pattern, this one is for 1:600 scale For my larger scale models 1:350 and above I encase the hull in cling film to protect it and glue the model to the base. I then use acrylic texture paste to sculpt the wake for the larger models. Because the hull is encased in cling film you can be messy as you like. When the texture paste is dry you can cut away the cling film leaving your ship mounted on the sea. For my smaller scale models I use Acrylic Structure Gel which dries clear but can be mixed with acrylic white paint and this can be applied with a brush. If you have a full hulled model and you are worried about hacking it then instead of using a wood base mount the model in polystyrene. The technique is the same to make the sea scape. All the materials to do this are available in your local Hobbycraft or in any arts and crafts shop and are not particularly expensive. Much depends on you personal preference but you will be surprised how easy it is. I hope this helps. Paul5 points
-
A 48" crowbar! You could do yourself some real damage with that. Another little story for you. My first posting in ATC was at Liverpool ( Speke in those days ) airport where one of our runway controllers had been a flight engineer on Stirlings and had some wonderful and frightening stories to tell. On one occasion they went to northern Italy and one of their aircraft couldn't get enough power to climb over the Alps so flew between the peaks! He also told me they carried Sten guns and sometimes came home low and shot up anything with lights,He eventually went on to Lancasters which he preferred. I borrowed his flying helmet once and on the inside were marked the names of places he'd visited with ticks alongside, many of them had five or six. Another of the runway controllers was the WT operator on the aircraft which brought Chamberlin home from Germany with the infamous piece of paper. Cheers John5 points
-
Evening guys, a little more done today. But before I carry on I'd like to dedicate this build to the Late George A Romero who sadly died yesterday. He will be remembered through his films, a true genius who watches over me while I've been building my kits. the "last days" emblazoned on this giant will now have double meaning. Night George. Onward and upward. We have the top part of the fuselage popped on. the fit is actually ok? Shhhh don't tell anyone. I glued the dials in the front position. and noticed on this pic that the fit really isn't that great of the top half of the fuselage. Oh well. Let's put some wings on, what's the worst that can happen right? Err nothing bad, they just went on. I forget where I saw this little trick but I'm masking the internal sections with cling film anticipating paint. Oooh another shot of that 'orrible edge. As you can see the milliput is out. The underside of the wings get some fix up action. as does the edge seam. much better. a little more clen up and I'm ready for a prime and pre shade. Game of thrones tonight so I left her there. fingers crossed for a little more tomorrow. Thanks for taking time out to cast your eyes over this old bird. Happy Modelling guys. Johnny Bub.5 points
-
Last night I took some photos of my recently completed Bandai 1:144th scale U-Wing. Well, nearly completed - of course I realized I hadn't yet chipped the red markings on the wings yet, so I jumped the gun a tiny bit. Oh well . This was a fun build - the U-Wing kit is very nicely layered, goes together surprisingly easily, and has a lot of possibilities for painting in interesting ways. I'm seriously thinking of picking up another one. I decided to go with a hypothetical Red Squadron color scheme on this. I may yet add some squadron markings on the wings, but I haven't decided what I want there and I'm happy to let it sit for a while. One odd thing - the panel lines on the right wing are noticeably deeper than on the left wing. The fact that they look so much stronger on one in the photos isn't that I washed them unevenly; that seems to be a kit defect. I have no idea if it's on all U-wings, or a subset, or just mine. Anyway - a highly recommended kit, like every Bandai, really. Wings open: Rear engine detail: Top and bottom head-on: With Red Leader for size comparison: And in formation with a bunch of different Rebel fighters:4 points
-
Eduard Big Ed set used although a lot of the external replacement bits were unnecessary I thought, so I left them off. Before anyone has a go at me I think the following are wrong: -incorrect fuselage roundel type -live torpedo should have a yellow nose (according to an FAAM info board) -the kit's PE wing bracing wires are wrong - they had a circular cross-section rather than flat Eduard's pre-coloured wing folds are wrong - in real life they appear to be fabric covered and match the colours of the upper and lower camouflage. Only found all this out after I had finished. Must do better research! Hope you like the photos nevertheless. Regards J A4 points
-
Hi at all, I have noticed the start of some Dreadnought builds during the last days. Well, I don't want to stand back and get started with a report, too. This model is released by polish publisher "Maly Modelarz". It is rather detailed and - hopefully - will bring a lot of fun. First of all, the card frame of the hull had to be mounted and glued. I have added decks and parts of the superstructure. Did not glue them yet, since I will have some work on the deck's surfaces. The width of the planks and their colour isn't that satisfying. I am going to replace them with newly drawn "wood". Kind regards Tom4 points
-
Here is the second of my Ton Class models, this time HMS Upton a Minesweeper. I was not originally intending to build this model but as I had decided to develop Photo Etch for Brereton I thought I should go one step further and develop PE to enable me to build another model to show the extent of the difference between a Minehunter and a Minesweeper. So I designed the PE and bought another kit. I originally started out with the intention of building HMS Wotton which is why the build log refers to HMS Brereton and HMS Wotton. http://www.britmodeller.com/forums/index.php?/topic/235001978-ton-class-mine-hunter-hms-brereton-and-minesweeper-hms-wotton-1350-scale-atlantic-models-kit/#comment-2348495 However I changed my mind as I had no connection with Wotton whereas I grew up in a village called Upton. I am aware that in doing so I am causing confusion with the Atlantic Models kit that I converted. To be clear the Atlantic Models kit is a Minehunter and is actually HMS Nurton and not HMS Upton as stated on the box cover. Not that it matters too much as it is an excellent kit and a joy to build. So here are pictures of my HMS Upton, a conversion from the Atlantic Models kit to a Minesweeper: And finally here are some pictures with my models of HMS Brereton and HMS Upton together: I hope you enjoy the pictures Thank you Paul.4 points
-
This is the artwork for the forthcoming Special Hobby (SH72162) 1/72ND Sunderland GR.Mk.V kit, said to be a 2017 release,...... I deffo want one of these!;4 points
-
It's taken me a while to read back through this thread to realise that you're making a BII (Special). The Tollerton nose is included in the BIII boxing but isn't used and, I have a BIII in the stash... the unused bits are yours, if you want them.4 points
-
Not gone into rubber yet (Ced? Fnaarr a bit uncalledfor?) Spent a fine time in the sun fettling the buck, pipes and tapes added so I don't have to when they're resinous Can you tell which daft beggar started out thinking he was going to make two 'by hand' before he remembered?... Not as detailed as Steve (nor Pavla) but Im happy with these Lets find out how the cast copies tomorrow, mayhap Since I took this picture I have reset the seat cushion a bit more centrally This shows some of the 'busy' I have put on top of the head box quite well though Now for rubber... Need camera for Tony to see how ridiculously easy it is with the proper raw materials Get set up on the tripod again and ""FLASH!!"" Saviour of the universe Not4 points
-
Although I'm smiling, I can't like this post as it may be seen to be encouraging flipantry! 🐸🐸4 points
-
Eduard bf109e1 in 1:48. OOB painted with Vallejo and weathered with so washes. Thanks for a great GB everyone Joss4 points
-
Hi Jon, There were two versions of the CO vents. Most photos show the British-installed versions seen on the Mk.I through Mk.III. The Mk.IV had a Goodyear installed variation, seen on page 60 of Aircraft Pictorial #8 (Corsair Vol 2). The Mk.IVs were also delivered with the "short short" wing tips (page 59), rather than the short tips seen on earlier FAA Corsairs. Cheers, Dana4 points
-
Thanks for all the comments lads! So into the home stretch with this one, sorry for not posting in a while. Next up was masking for the deicer boots on the leading edge.. 1_144_C-2A Greyhound_WIP_19 by Dermot Moriarty, on Flickr Followed by the nose.. 1_144_C-2A Greyhound_WIP_20 by Dermot Moriarty, on Flickr 1_144_C-2A Greyhound_WIP_22 by Dermot Moriarty, on Flickr And tail.. 1_144_C-2A Greyhound_WIP_17 by Dermot Moriarty, on Flickr 1_144_C-2A Greyhound_WIP_18 by Dermot Moriarty, on Flickr The outboard vertical surfaces and their inner facing side also got a coat of Revell Night Blue 54 in preparation for the decals. 1_144_C-2A Greyhound_WIP_23 by Dermot Moriarty, on Flickr Speaking of decals, here we go! 1_144_C-2A Greyhound_WIP_24_decals by Dermot Moriarty, on Flickr After applying the tail decals, I found them to be very dark, almost black. So I went over them with some thinned Night Blue again and was much happier with the result. 1_144_C-2A Greyhound_WIP_26_decals by Dermot Moriarty, on Flickr Have to hand it to OzMods - the decals were great with sharp printing and colours and stuck down really well on the airframe (if a little too well sometimes which made moving tricky). The tiny blue cheat line was a bear to do - would probably try to paint and mask it if doing again. Also, the decal placement instructions were hit and miss but I guess that's what online image searches are for! Last few things to add like gear and props and then onto some weathering. As always, thanks for looking and enjoy your modelling. Dermot4 points
-
Thanks everyone for the best wishes - the toe is getting better, slowly, but is still a bit of a mojo killer If the Revell kit is anything to go by I can understand why the Halifax wasn't that popular - I picked up the nacelle bits today and tried fitting the cooling flap - it doesn't fit without some fettling. I may try again tomorrow but, having referred to the photo of JB910 I've realised the kit is, er, a bit inaccurate. As is we didn't know. I've contacted Colin at Freightdog models to see if he has any 'Z noses' left; if so I'll order the correction set too, otherwise it's going to be 'look how horrid it looks OOB'. John (nimrod) I've not tried that particular brew but I bet it originated from some Monks. They seem to be good at producing intoxicating drinks from herbs. I've had a few types of Schnapps but my main memories (vague) are of Ferna Branca which an Italian waiter suggested I try after a night on the Grappa - no, I didn't drink the water our host gave me to take to bed and yes, it was similar to John (Biggles) experience in Frankfurt! Other news: I've ordered a crowbar to assist in some planned stone wall work in the garden. I went for the 48" version for leverage, despite the reviews of the 36" version here. The review "One-man demolition machine" is a bit worrying...4 points
-
Thanks guys. Managed to move on to the decals. I wasn't 100% sure exactly what I was going to do and basically made it up as I went. I ended up using some Imperial logos from the kit, some decals from a couple of generic Gundam sets and the chevrons and triangles from two different Verlinden rub down Israeli vehicle sets. The rub down decals scratched up very well. Next is to seal the decals in with semi gloss varnish. Then an acrylic pin wash.4 points
-
Many years ago I went to Frankfurt as a ( drinking ) supporter of the London Airways football team for the annual European ATC football competition and became very unwell after drinking Schnapps with the Amsterdam supporters who were young ladies with EHAM printed on their tee shirts. I havn't touched it since, the Schnapps I mean. John4 points
-
Keep to your day job Tony.... Nice work on the Buck, yes you can say it, it is not a rude word . Simon.4 points
-
Sounds like the umpire in a really fast game of frog tennis. Possibly frog Wimbledon (Common) Presented by Sue Croaker. Commentary by John McEncroak4 points
-
Certainly not; I am always masked in public4 points
-
Surely that title now belongs to EX-FAAWAFU? Martian4 points
-
My path to adulthood captured exactly PC.4 points
-
The actual build notes are a bit lost in the s/n but I gather you are going to use the Freightdog set for the engines. It's an improvement on the kit (a reasonably decent improvement) but I saw two builds of the kit recently - one FD conversion alongside a scratch built "engine shrinking" conversion and I must say the latter was a LOT better. I'd find the pic but its in Botophucket somewhere. I have reviewed the kit and the Aeroclub conversion and I think that is the ONLY way to get a decent result without a monumental effort. good luck finding an Aeroclub one though. The AML ones look pretty similar to FD but perhaps a bit more detailed. i'd suggest you try them and see! Kit as is - pretty crappy FD - some improvement - not a lot of effort AML - perhaps a bit more improvement - perhaps a bit more effort Aeroclub - rather more improvement - a little bit more effort Scratchbuild - probably the only way to a really anally good result - a lot of effort3 points


.thumb.jpg.15e2795e57b2999f5f3d73779c25d24a.jpg)


.thumb.jpg.76f12b87ce9ca9929c9aabdcf8f9d2dd.jpg)


This leaderboard is set to London/GMT+01:00