
Leaderboard

.thumb.jpg.d17ff607fc7e89ed057e63fcb6f2a888.jpg)


Popular Content
Showing content with the highest reputation on 03/07/17 in all areas
-
Hi Everyone, Finally finished my latest addition to my Indochina collection, My attempt at Czech Models 1/48 Grumman Goose kit Finished to represent an aircraft of Esc. de Servitude 8S, Cat Lai, Indochina, 1952 Built mostly from the box contents, additions being: Pitot Tube, Antenna Mast and Aerial Wire, Anti Collision Light, Window Blinds and Ignition Harness. Replaced some of the fiddley and weak resin items such as seat legs with more robust materials, especially as you can`t see them anyway Decals from Berna Decals set BD 48-81 Hope you enjoy, Thanks for looking Cheers Russ33 points
-
I finally finished something, and it's not even vacation time yet! This model was started a long time ago, and back then it was the first short run kit that I've ever attempted. Due to reasons it stalled at 25% done, but after all work on a Beaufighter during the autumn I got the mojo back to do something about this one. I had a fun time with the gun throughs and the cooling fans, but in the end they do look quite nice! Not so much with the rocket rails though :-( Anyway, here are the pictures (yes I wil cut of the radiowires a little more. I just need to have a steady one first or time the cutting to my heartbeats) Onwards and upwards. One finished is worth two new on the bench and five in the stash right? Here is a link to the WIP: (pictures from photobucket are blocked, but I might put them over to flickr if need be)24 points
-
Dear fellow Britmodellers, following the Photobucket disaster that made all my images posted to Britmodeller disappear, I've changed to a new hosting site named "Village Photos". The model I'm showing you today is AZ Models' Bf-109 G14-AS in markings of Italian ANR, Milan/Malpensa airfield, 1945. Original photo here: It was built with the addition of Master metal gun barrels and Brengun photo etch, decals from the box. I was a bit unhappy with AZ Model's decal for the "Blue 1" - it does have an off-center white shadow (only visible when you've slid the decal off the backing paper....). The original photograph doesn't confirm this. Painted with Gunze/Sangyo acrylics. Photographs by Mr. Wolfgang Rabel of IGM Cars & Bikes, thank you very much. Thanks fpr your interest, with best wishes from Vienna. Roman Schilhart20 points
-
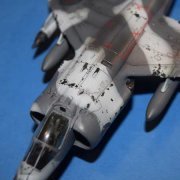
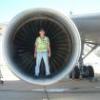
Hobby Boss 1/48th F-111C Paint: Mr Hobby and Tamiya acrylics, Model Master Metalizer Lacquers Extras; Eduard BigSin F-111C set Eduard – F-111A Interior set Novascale – F-111C RAAF 1 & 6 Squadron decals OzMods – F-111 Afterburner Cans Ozmods – F-111C Wheels & Tires Ozmods – F-111C Long Range Fuel tanks Custom made and cast Recon Pallet. build link This was built as part of the F-111 STGB. I had always wanted to build an F-111 having worked on them in them in the 80’s with the RAAF, so though this would be the perfect opportunity. For something a bit different I’d build one of the Recon versions which I worked on, sounded simple…… My first mistake was the model, the Hobby Boss model for those who don’t know is an absolute dog of a model! Everything fits really well and is a joy to build, but not if you want an F-111 that’s accurate. If you want a F-111C forget it, and if you want a Pre-Pave Tack or Recon bird good luck!! This was going to be an uphill build right from the start plus I ended up being away for over 8 weeks of the build. The real hard part of the build was the Recon door, nobody turns out a 1/48th conversion kit, and the only conversion kit available anywhere is an old rough one in 1/72nd. I ended up using this for some of the design work. Actual detailed draws are just about non-existent as well (though someone here is bound to have some). So I had to make the door from scratch then cast it, for something so small there’s around 40 hours work in it. That part was easy! The rest of the build was such a pain in the a#*e! Anyone following could attest to my constant ranting about the model. If Hobby Boos had just spent 30 minutes of research on the internet they could have fixed the majority of issues with the model! Unfortunately in the end I just fell out of love with this build and the model, a bit heartbreaking actually for something I had really wanted to do. I ended up just going through the motions to finish her and get her off the bench! It was a hard build and definitely not some of my best work…though the Recon door did turn out quite nicely. Please Tamiya release a good 1/48th scale one….I now have a door for it!!!!! Thanks for looking and please enjoy, comments welcome, you can be a savage as you wish!17 points
-
Hello Dears, This RFI is a little bit different, as this model has been the first finished in my third and present modeller's life. I finished her years ago, around 10 years if I remember... But I let her to my local club, so my little orange aeroplane as my daughter called her has toured lots of modeller conventions, aaaand suffer from it !! I get her back in such a poor state, Bent and battered Bell X-1 Broken UC, all the probes are broken or missing So she deserved a refurbishment I make yhis one because, I also like Charles E. Yeager and I have some of his aircrafts waiting on my Stash Here she is, standing proudly again !! The kit is the old Eduard profipack, with resin interior and photoetched parts, very complete kit and surely almost OOB, a rarity for me. Painting has been made with a blending of Mr color Orange and Yellow. To be continued11 points
-
Hello! Here are several photos of the construction and final result of the latest model to come out of my workbench. The airframe is painted in order to represent a C-47 in service with the Portuguese Air Force detachment on Lajes airfield, Terceira Island, Azores. The base was built by the RAF in 1943, as an effort to close the azorean gap which allowed german U-boats to run havoc amongst allied vessels. In 1945 it was passed on to the Portuguese forces, and since 1945/6 it has served as an American base. This scheme was not normalised and existed during 1952 only on this C-47 It`s the Airfix kit with the addition of Quickboost engines and wheels. Hope you like it! Cheers! José Pedro9 points
-
Hi, I've had this on the go for a while and finally got it finished today, it's the MPM kit of the PR10. Nothing wrong with the kit to cause a slow build just work getting in the way of good modelling time. The PR10 was a hybrid Meteor as it had an F8 fuselage but an F4 tail, with a long span wing and of course the camera nose. VS975 served only with 541 Squadron based in Germany from 1951 until it was scrapped in 1958. It was originally camouflaged and had the earlier part metal canopy. That makes 23 Meteors completed now. Thanks for looking. Steve9 points
-
Hello friends After some time away from the forums i would like to share this one with you. This is the 1/48 Hasegawa kit with the Aires cockpit and the Syh @rt decal set. I hope you like it Best Regards Vitor Costa9 points
-
Been a while since posting on here, finished a couple and started a few since. One that crossed the finish line was the L-39 from Eduard... From this kit (they reboxed the hell out of it) enough waffle, here's some beauty shots... In place of a series of photos of the build, I opted to just make a video of the full build process, owing to Pinterests horrific upload system. Hope you enjoy! (Also more stills at the end of the vid) Cheers!9 points
-
Only additions are Brassin' bang seat, wheels & Aires VT nozzles. Really good kit, no build issues, definitely will build another one, only dirtier with replaced RAM patches. John7 points
-
Hi, Just finished this F-4B in VF-51 Screaming Eagles CAG Colors. This jet Killed one MIG and displayed the 4 MIG kills the squadron scored on its last Vietnam cruise. The kit is the new Zoukei-Mura F-4J kit with the following additions: Accessories used: Eduard Brassin F-4B wheels Master Metal Pitot tubes and AOA Sensor Eduard Brassin Seats w/ PE Furball Decals - They Fit Perfect! Scratch Built items are: Chin Pod Fin Cap Thin wing including the wheel well and speed brakes Non-Slatted Plain Elevator F-4B WSO left side panel F-4B WSO Upper and Mid forward Instrument Panel Scratch built Canopy sills, Breaker bar Short Exhaust Nozzle, Trim, Exhaust tube, and burner assembly Intake fans. (The Kit supplied full engines were not used)7 points
-
Here I'm for some other photos I've repaired the UC with a new metal axle Probes has been remade with syringe needles and copper wire The transparencies were not very good, a bit thick and shady The adjustments were good, just a bit of putty here or there, considering that it was one of the first Eduard kits, it was pretty good !! Far less good is my way of painting, lookin' at this one, I see that my painting skill has improved a bit !7 points
-
Today I started by finishing off the decals which was basically a few tiny stencils plus the danger warning on the tail: By the way the kit decals release very quickly and lay down well but they are very thin, fragile and highly prone to wrapping themselves into an untanglable bundle. Unfortunately I lost the serial number on this side due this behaviour. Definitely not the easiest decals to work with. I then gave the main rotors some droopage: I then tried to assemble the main rotor only to discover to my horror that I had glued the hub on upside down!! - how very embarrassing. After a bit of a think I decided that the best solution was to cut off the arms and drill and pin them back the other way using some 0.5mm brass rod. Here I am part way through the task:: Note also that the red decal band has come adrift. I glued the lose band back in position with some thinned Gator Grip and then assembled the rotor using Humbrol Liquid Poly: I then set that aside to dry and gave the craft and doors a second coat of Aqua Gloss to seal in the decals followed by a panel line wash using thinned Payne's Grey oil paint: This is how that came out: Next I assembled the hoist (which turned out to be a right game) plus the tail skid: While the touch ups on those were drying I started to make the navigation lights using some clear sprue, my burner and a 0.6mm hole in one of my punch sets: I made plenty of spares as these things are all too easy to lose. Tamaiya red and green clear was applied, I think three of four coats will be required: The last thing to add before the final coat of varnish was the fin: For the finishing varnish I used Alclad Klear Kote Semi-Matte as the real machines are quite glossy: During rotor repair operations half of the red band had gone missing: That was repaired with more red strip form the spares box here mounted up ready for final varnishing: I used W&N Galeria matt varnish on both rotors: Next some final assembly starting with the main wheels, note the distinctive tow in: I then added the front wheel and strut, trimming it to length until the distinctive angled down tail sit was achieved: In the end I didn't glue it in as it is a good fit and the wheel can now be steered if liked. I think this is one of the last painting jobs, adding matt black anti-slip to the front steps: The last job of the day was to unmask all the glazing and door openings: Nearly finished but not quite. I still have the brake lines, wires to the navigation lights, the lights themselves and the pitot tube to add. All jobs for next Saturday. Bye for now, Nigel7 points
-
Hi Guys and Gals Here's something I picked up earlier today to do as a display unit for my LHS. The plan is to do it as a 'staged' diorama showing the various build processes I've gone through to reach the end result. The kit (and an essential add-on): What you get in the box: The baseboard on a surrounding display board: Baseboard with the layout map overlaid on it: The Instructions: And finally - the initial layout plan: The page on the left shows the various stages I am going to follow (roughly). I've already cut out the bottom right corner of the map to expose the underlying base board, I'll then leave an exposed portion of the layout map, then a section of the ceramic 'stones' without any dressing, then dressed stones on a grass covered base with ageing, texture and weathering increasing towards the top left corner. Just gonna be a quick build this, but I'm tempted to get another of these kits for myself to do a more accurate, up-to-date representation of the 'Henge The ceramics are easily workable with scalpel and scribes. The glue is a quick drying general purpose glue which seems to work well. More pics to come through the week. Comments, questions and suggestions are welcomed. Thanks for looking Kev6 points
-
Today I finished this 1/72nd Airfix TBD Devastator. I've built it box stock with two exceptions, the addition of masking tape seat belts and a set of Tech Mod aftermarket decals. It's finished as the Battle Of Midway aircraft of Lieutenant Commander John C. Waldron, Torpedo Squadron 8, from the USS Hornet. If you're not familiar with the story of the ill fated VT-8 you can read about it here. https://en.m.wikipedia.org/wiki/VT-8 With some care and careful fitting it went together quite well. I paid special attention to the folding wing joints, prepping them for a good fit that would not require filling or sanding when done. By removing the locating pins I was able to build them first in top and bottom halves, taping them to a mirror to maintain perfect flatness and focus solely on getting the wing fold joints as I wanted. I decided to leave the raised rivet detail on the fuselage because I thought it both homage and emphasis of the anachronism that was the Devastator at the beginning of the war. I used Vallejo acrylics for the overall camouflage and Tamiya acrylics for the rest.6 points
-
Hi, everyone! I present you my next model of Japan ASW Patrol Aircraft.6 points
-
Hi everybody; WE progress report, although I didn't have much time for modelling. Unmasking the bottom surfaces Some minor touch ups to do. Radiator, both sides Tailplanes - just a tad of overspray I did some of the touch ups (on the splotches too) - some other I will do later. I then airbrushed a protective Future coat on the model Then I started masking for the white surfaces; since I intend to use as less decals as possible, I photocopied the Savoia Crosses ant taped them to some Orimask masking tape, and carefully cut them out The idea is to use only the central portion of the cross decal. Here's a shot from the spraying booth I first airbrushed a mix of Tamiya Sky Grey and Flat white to get a good coverage, then I went over it with Tamiya Flat White. Here she is, after unmasking Again, a few touch ups to do I fixed them carefully scraping with a pointy toothpick, but I'm going to add some green drybrushing later, after another Future coat I also airbrushed Tamiya Flat White on the front part of the propeller blades and only on the tip for he back sides - this will be the undercoat for yellow Spinner plate and cone got painted too Any comments welcome Ciao6 points
-
SAAB B-17C, Danish Army Air Corps (Hærens Flyvertropper), Marivox 1/72 Made this one back in 20125 points
-
Ok guys. This thread is back up and running. I've re pathed the pics to Flickr. PB can kid my neathers. I'll re instate my year of threads over the next few weeks. and with any luck more HP 0/400 John5 points
-
A few words: I'm sorry that photobucket prevents you from posting for free, ok we see if you see it from galleries in another forum: Clearly I finished the kit! Hope you like it........ A question: do you know some other site like photobucket? Ettore5 points
-
Can you see this image? I resized this in the Britmodeller post by holding the 'Ctrl' key and right-clicking the image, then selecting 'Edit Image' from the menu that appears, then changing the size to 800 width keeping the aspect the same.5 points
-
Thank you very much Drift - next bit below! Hi Valkyrie and thank you. Figures aren't too bad to do. I have done some before. Tamiya figures are usually okay to paint mostly because they are nicely detailed. Some manufacturers make the detail too soft which makes them more difficult. Didn't get as much time on this project this past weekend so the figures are still in the same state. Hi Robert and thank you. Progress on the T-34 can be seen below but the figures didn't get any further. Hopefully next weekend. Hi Nigel and thank you very much. No Yak this weekend - just T-34 I'm afraid. A lot of this past weekend was spent decorating and fitting carpet - didn't get as much time on this as I'd hoped. By the time I had the T-34 to a similar state as the SU122 it was getting a bit dark so the photos are a bit grainy - I only did the three below: Comments and suggestions welcome. Kind regards, Stix5 points
-
got a little accomplish on the cockpit, still have not decided on what scheme but I'm leaning towards a German unification bird5 points
-
All fingers legs arms and toes crossed here that this coming week brings this particular model subject much closer to reality; subject to wind and tide, we should see a Royal Navy Aircraft Carrier back at sea for the first time in many years, ready for the first F-35B to land on later next year. These markings for 809 Sqn in HMS QUEEN ELIZABETH and HMS PRINCE OF WALES are largely from my own imagination and courtesy of my inkjet printer, but perhaps not that far from the truth. This is Fujimi's delightful 1/72 F-35B kit, with a little hacking about from me (e.g. the rather obvious auxiliary air inlet is missing on the kit) and my own decals. I haven't fitted any weapons in the open bays yet - but some scratch built Meteors and SPEAR 3s are on the workbench! For those who doubt that colour can ever be applied to these aircraft, check out the USN variants at sea now! And as a comparison, here she is alongside Italeri/Revell's old X-35B kit Edit - here is a link to my second build scheme and an update of this one post FoC Flying Trials: 2018 Updates FLY (ROYAL) NAVY ! FredT4 points
-
Hoped for some more modern 1/48 stuff and it seems to happen, yes! https://www.facebook.com/TamiyaUSA/4 points
-
G'day All, I'm calling this one as of now done. It's my take on the aircraft "flung" off HMAS Sydney between July - October 1918. Built OOB and rigged with Ez-Line. It's my third WNW kit. I experienced a bit of trouble with the decals cracking but other than that, any other dramas were of my own making. Apologies for the picture quality....one day I'll learn to take better ones....and today isn't it! Devo P.S. Rigging that little bullet fairing in the last pic was.......interesting4 points
-
Howdy Folks… After starting a thread a few months back entitled – ‘wheels up or down – what’s your opinion’? I decided it was time to have a go at a ‘wheels up’ aircraft – silly me… This was also a test for a lot of ‘newby’ questions I have been asking – so thanks to all the members that have chipped in along the way with useful suggestions about all the products and techniques used… Airfix – 1/48 Hurricane MKl Halfords Grey Undercoat Aerosol Fillers - Mr Dissolved Putty / Cyano and talc Vallejo Model Air Paints Humbrol Acrylic Gloss Varnish – hand brushed Decals from the Airfix ‘Ready for Battle’ kit Microsol / Microset Tamiya weathering powder set – snow white and soot Winsor and Newton Galleria Matt Varnish – airbrushed When it came to displaying the finished piece I really struggled for a solution – other than hanging it from the ceiling in the office. So I started another thread called – ‘wheels up aircraft - display inspiration PLEASE’ - thanks for all the ideas here too. The base is made from 18mm MDF for weight and the image on the top is a cloudscape that came from an internet wallpaper site. The ‘British Lion’ appeared almost by magic after a google search and seemed so appropriate. I wondered about adding some text and then it came to me - the Churchill quote – what could be better – I just wish I’d remembered to add 1940 to the dateline – DOH… I’m still very much a beginner – so any constructive comments would be appreciated. It has been fun and a brilliant learning experience – so here she is… Thanks for taking the time to have a look - Steve4 points
-
Another wonderful afternoon at Old Warden! Thanks for looking.4 points
-
Some time ago I've decided to make models of all helicopters from the "Crow" program. Here is AH-64 Apache. Set is Academy, scale 1/48. I'll never buy Academykit again. An extremely vague instruction, tragic decals, form marks everywhere. Fit is not better. I'd be better buying a Italeri set. Polish markings, of course. Painting is Mr. Hobby and Tamiya. Weathering was dome using AK and Tamiya fluids.4 points
-
I've had these on the back burner for a while - they're good tinkering projects while main pre-occupations like the Grumman OA-12A Duck I'm building on KG144 as part of a group build and other biggies are drying (or being otherwise uncooperative). The North American T-6G Texan is Valom's kit. Pretty nasty really, I'm afraid. Poor to non-existent fit, shape issues and thick, clunky detail. Compared to the Platz/F-Toys kit (of which I have quite a few) it pales very rapidly in fit, surface detail and everything except decals. BUT it remains cheap, readily available and actually very, very good fun. I also think you can get it to look ballpark like a Texan if you totally ignore the panel lines scribed onto the canopy (which would have you create square side windows that look very off). Pretty much out of the box except for a bit of cockpit detail and the undercarriage doors which are plasticard. Valom's decals are excellent, however. Good, interesting schemes, thin and well behaved - can't ask for more and really raise the kit up a notch. I did mine in markings for aircraft No.74 of the Ecole de Pilotage de l'Armee de l'Air, based at Cognac (Base aérienne 709 Cognac-Châteaubernard) in 1964. I'm happy with it and feel I gave it my best shot without getting out the scriber. I have another in the works, again on the back burner. The Miles M.14 Magister is a conversion from the Anigrand Trailing Wing bonus kit that comes with the Short Shetland (another Titan on my workbench at the moment - more of that soon, I hope). The basic resin kit is quite, er, basic. I filled in the slots in the wing which on the trailing wing aircraft take the booms. I decided quite early on that I wanted to do one of the yellow pre-war ones with an incredibly polished cowling and the glam spats. I thought that could look marvellous in this scale. I sprayed the aircraft with Halfords white primer and then airbrushed with vallejo yellow, then when I was happy with the tone I painted the cowling glossy black. Over this I brushed AK Interactive True Metal, which I know can give a superb natural metal finish. I polished this with a cotton bud. It took several applications but I'm happy with it. I added the IFR hood behind the rear cockpit using small gauge lead wire bent to shape, with the canvas being vallejo filler built up in layers backwards to give the wrinkled effect (not really visible in photos), then painted green, before washing in a darker green to bring out said wrinkles. I also added the curious two-pronged pitot and an exhaust pipe (using more lead wire). This was an absolute joy to build, I have to say. One of those kits where you really look forward to every little bit and every step, no matter how small is somehow hugely satisfying. If I win the lottery, I may buy more Shetlands simply to build more Magisters. I've done it in markings for L8338 of No.30 Elementary and Reserve Flying Training School based at RAF Burnaston in 1939. I think. I don't really know but that's my guess based on serial numbers. Doesn't matter hugely - they all got moved around a bit. Decals all spares and Mark1 for the pre-war serials. Thanks for looking!4 points
-
Back from holidays and it's finally starting to be less warm in The Netherlands which means I'm finally able to return to the model. The top of the fuselage can be masked as I'm now happy with the vertical stabilizer and top of the fuselage. The wings can now finally be attached. The gaps between the wings and fuselage are rather big, so they have to be taken care of with putty and sanding. Also, the wings have to be masked when airbrushing the underside of the fuselage. Adding the putty.... ...and the result after sanding. Once more the wings in the primer. For once, it was right the first time, so no second round of putty and sanding necessary. That means the wings can now be masked I use sandwich bags to cover the biggest parts of the wings. This saves on expensive masking tape. The fuselage has been airbrushed! I use ModelMasters Gloss white, with a smidgen of gun metal (I used the same combination on my MD-11). This gives the desired colour. I also airbrushed the engine cowlings. As the model is drying, I have the time to work on the landing gear. I like the landing gear dirty, so I use this stuff to weather it. It is water-based and works quite well IMHO. After the fuselage had dried, it's time to masked the fuselage to airbrush the wings. Not easy with all those curves, but luckily Tamiya curved tape works wonders. I use ModelMasters Canadiaan Vodoo Gray for the wings and stabilizers. And then the present may be unpacked! It's starting to look like something. As per usual, the engines are a project in themselves. I used the weathering set from Tamiya to rust-colour the exhausts. The metal colour on the pylon is a home-made decal. She stands on her feet! I added the decal before attaching the stabilizers. I've also given the tail a weathering. The engines are done and have been attached to the wings. Normal super glue works best for this. I've painted the leading edges and added a light weathering to the wings and stabilizers. They will be weathered a bit more later on. As stated, the corogard is a decal. It looks nice, but a bit too dark for an aircraft on the ground IMHO. Finally, decaling can commence! Draw's decals are excellent (those from Revell too by the way). The folks over at ModelBrouwers pointed out the KLM decal on the vertical stabilizer was to high. They were right (3mm too high) so I've corrected this. I also added the internet dome from Bra.Z. And this is where I'm at! Almost done, just a few more decals, weather and antenna's to attach before I can take the end result pictures. Hopefully this weekend. Regards, Martijn4 points
-
Thank you for replying, I thought it was probably too good to be true. I can see the image in the quoted reply. Ill try as Das Abteilung suggested. Can anybody see it now?4 points
-
The Boeing B-47 Stratojet was an American long range, six-engine, turbojet-powered strategic bomber designed to fly at high subsonic speed and at high altitude to avoid enemy interceptor aircraft. The B-47's primary mission was to drop nuclear bombs on the Soviet Union. With its engines carried in nacelles under the swept wing, the B-47 was a major innovation in post-World War II combat jet design, and contributed to the development of modern jet airliners. The B-47 entered service with the United States Air Force's Strategic Air Command (SAC) in 1951. It never saw combat as a bomber, but was a mainstay of SAC's bomber strength during the late 1950s and early 1960s, and remained in use as a bomber until 1965. It was also adapted to a number of other missions, including photographic reconnaissance, electronic intelligence and weather reconnaissance, remaining in service as a reconnaissance aircraft until 1969 and as a test bed until 1977. This is the Academy 1/144 B-47E, built out of the box and using the kit decals. Airbrushed using Vallejo paints and sealed with Alclad gloss. Finished in the markings of the 320BW, 441BS. A great model and still a good size at this scale. I decided from the start that I wanted this displayed in flight. This is it with the Corgi diecast 1/144 B-52: Thanks for looking, Phil4 points
-
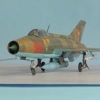
Ok Gents, I hope that you'll enjoy this one too Don't know who will be the next RFI since the MiG has done some problems yesterday, There still are 3 contenders. Thanks for watching and I'm open to comments. Have a very nice modelling week, will be back in a few days. No , no not holydays but evening work. Sincerely. Corsaircorp4 points
-
Both the Heller colours and the restored aircraft at the Bodø museum are completely wrong. There should be no yellow fuselage roundel ring, no fin marking, and no blue cowling nor fin. A rather good book on 263 Squadron's deployments to Norway was published by MMP Books a couple of years ago. This includes good and accurate profiles and plan views. Nils4 points
-
Thanks to Prof Matrix giving us an extension on this assignment, I will get over the line, just a small update to show that I very nearly made it by the original deadline, just need to remove the canopy masks, and a few small touch up here and there4 points
-
Thanks tony, I did say I had taste. Nobody is sure what "normal service" is round here anymore. Well, the normal bit anyway! I agree about the Stag, in fact one of my mechanics specialises in them. As for the TR7, wash thy mouth out with some particularly vile tasting soap and hye thee to a nunnery I mean monastery! Sort of, I think? Its a cool kit anyway! Thanks Bill, try not to dribble on the Roc though! I do guitar porn as well. For me it has to be the rare Fender Lead II. That's Crisp sorted then. With his Navy pension he can probably afford to buy one each. Thanks on behalf of all of us Crisp! Were the late lamented 'Liz Sladen still with us, I would happily move the car and she could stare at my bedroom ceiling until Mrs Martian booted her out. She can be a bit unreasonable like that sometimes! (If she reads this bit, I am a dead Martian!) I shall make a point of descending upon you. We are having to give Scotland a miss this year due to Gill's heart scare. She should be fine but we need to be sure before venturing too far from home. We will be back next year. Well, Crisp is getting spoilt today, what with flying cars in EDSG/Sky and Triumphs with folded wings! You are a lucky lad Crisp. What are you? This little short of blasphemy. I feel a spell of "cultural readjustment" in our corrective facility on Phobos may help you to see things a little more clearly. Nice Tartan, not so sure about the baby poo brown carpet though. Sarah-Jane has had nice new blue carpets fitted. The Plastic dash was forced on Triumph by US elf and safety regulations which worried about wood splinters in the event of an accident. Like if you hit something fast enough to cause splinters to be flying everywhere, you wouldn't more serious problems on your plate! Martian, Defending TR7s across the Galaxy Oh yes! we were building a model weren't we? I got plenty of Mr Dissolved Gloop on the wings last night but sadly it was not quite cured enough before I had to go and do a full day's MVS duty. With a particularly manic patrol behind me, it is unlikely I will get any done tonight. In fact, I am struggling to stay awake to reply to all your posts.4 points
-
I decided to do a spot of preshading on the panel lines using oil pastels. Once I'd drawn over most of the lines, I brushed off any access powder and gave the kit another coat of Humbrol flesh/Humbrol ochre. I'm quite pleased with the overall effect, one more coat should do the trick.4 points
-
Model made on the basis of authentic notes, the application should not be overdone with vodka. Eduard 1:72 With this La-7, a rather interesting history. In April 1945, as Alexei Vasilievich told us, One evening they sat and drank with his technician. Alelyukhin Talked about life after the war and about what would be good To put a monument to La-7: paint it in red and raise it On the pedestal ... The next morning, the regiment was raised in combat alert and Alelyukhin, dressing on the run ran to his plane. What kind of Was his amazement when he saw that his whole car - from Nose to tail - has become a dazzling red color! As Alexey Vasilievich later recalled, he "in gratitude" Already reached for his gun, but time to deal with Then the technician was not.4 points
-
Airfix Supermarine Spitfire Type 389 PRXIX RM643/Z of No. 541 SquadronBenson, Autumn 1944 WIP thread with a lack of pictures4 points
-
Hi, here's where I am now, I've even enlarged the tail feathers! Just guessed as I don't have any plans so they are probably wrong! Bad news though, I must've slightly misaligned the intake pods as trying to get the wheel well doors to fit is a nightmare of large proportions! Not sure how to fix at moment, to be continued, maybe....4 points
-
Right that’s it I can be finally done with this Pig….well actually it’s a dog!!! I made a real effort to finally finish her, I had to or else I would have abandoned her in an almost complete state. She fought right to the end and even after I took the final photos I found some mistakes…my doing this time, but HB didn’t help by getting it wrong in the first place!! Today was a case of rushing around finishing all those last little bits, I’ve missed a few but I really don’t mind. Unless you’re a “rivet counter” you won’t notice them. Looking at some of my personnel photos and some on line she’s almost there, she would have been better if I hadn’t had last minute issues with my airbrush (my 0.2mm nozzle has split, $100 Oz for new needle and nozzle!!! ) and the decals form both sets just didn’t work in a few places. All that aside, she’s done, from certain angles she looks really good, from others……..well those photos won’t be posted. Thanks for everyone who followed and commented, plus put up with my rants, without it I would have sent her to the shelf of doom long ago. As usual I’ll try and have some different photos in the gallery and RFI. Thanks and enjoy. she's a big sucker!!!4 points
-
Here's my latest build, and a thoroughly enjoyable one at that. The new Hobby Boss kit seems to tick all the boxes, and is pretty much good enough out of the box, although the Pavla cockpit does trump the kit parts in every way apart from the control column, which ended up as an amalgam of both kit and resin parts. I caved in and got the Quickboost FOD guards, but other than those two items I just added some wiring to the main gear legs, a few bits to the nose gear well, and a little bit of finessing of the intakes to add a strengthening plate on the side of each one, and to show the blow-in doors relaxed after the engine stopped. I also added some framework to the underside of the clamshell cover to the lift fans, as well as a bit of bent solder to represent the big cable runs on the real thing. The kit was painted using Alclad primers and clear coats, plus a number of their excellent metallic shades, and all non-metallic paintwork was done with Lifecolor acrylics, with the exception of the pull-handles on the seat, as I don't have red in my Lifecolor armoury. The decals are from the kit, and the Afghanistan disruptive camo is partly from the instructions and partly fiction, while the decals are from the kit, and performed admirably. Choosing which ones to use on the undocumented side and underside was a PITA, but I got there in the end. A quick close-up of the cockpit to expose my wobbly demarcations! Thanks to everyone for watching... I now need to paint the clear wingtip lights, tip of the "anchor" thing under the nose, and build up some rear FODs... other than that, it's finished! The build thread can be found here if you fancy a read. Yak-38M Kit Pavla Cockpit Review sample courtesy of3 points
-
Trying google too. https://goo.gl/photos/fTxzUxGSVHeVhoPj9 woot! Google no but Flickr yes! Thanks Tony. Now time to choose.3 points
-
Why use a picture of a blank piece of paper (which can be compressed to take next to no room at all) when you can max out your space with innovative Photobucket / turd memes ?3 points
-
I'm trying to think back to my specific battles with Milliput when I did my 'experiments' with an Oyumaru knockoff and Eduard Spit Mk IX bits - and boiling water. Registration dimples were essential (a piece of plastic runner or a cocktial stick - or any other stick-like object, really). These are made in the first mould half before it gels; I filled each mold half separately making sure that there were no voids - probably the trickiest part of the process; Squished the halves together so that the excess formed as thin a flash as possible, but in the process you have to watch out that the pressure doesn't end up enlarging the cast compared with the original. All of my knockoffs I mean copies were larger than the originals; My best results were with fluid epoxy glue used for sticking together full-sized sea-going boats, which is probably beyond the scope of this forum. It also was tricky to work. Second best was a similarly fluid porcelain repair epoxy, but was quite a bit more brittle than the boat-builiding glue, especially when being drilled; The results are still visible, thanks to not using BotoPhu**et... My tuppence-worth. Cheers, Alex. <-- not an Oyumaru copy...3 points
-
I have started my favourite activities. Light wash on bottom at first.3 points
-
I think I have found a solution - Tix solder which is designed for jewelery seems to be about the lowest melt I can get. I shall order some, give it a whirl, and report back. In the meantime... with t'interwebby all in a kerfuffle over PhotoRansomBucketThief, I laid back and silently doffed a cap to Perdu who had previously pointed me to Postimage for hosting of the images, though how long before theyall follow suit, who knows. Buffers! That's what's important! Buffers! Them things on the end of trains which stop them crashing into each other. One on each corner there is. So I needed 4 This is another one of those jobs that I had been putting off for some time, though I'm not really sure why. It was (so far!) a lot easier than I imagined it would be. My original plan was to make one good one and use that as a master to cast more in resin. However, after I made the first one and realized just how easy it was, I decided to continue and use brass for all 4 buffers. I printed out a buffer at the right scale, taped that to some styrene and filed that to shape. Then, digging through my scrap bin I found an earlier abortive attempt at a bogie side frame from way, way back in time. The brass was about the thickness I was looking for, so I chopped out a section, used the styrene template and scribed around the perimeter of the buffer. I used a sweetheart file to get the rough shape before switching to a finer tooth to get the final shape. ***edited*** "sweetheart" is NOT the correct term for an illegitimate file begads! The brass was a bit battered which didn't really concern me - have you ever looked at the condition of those buffers ? Rinse and repeat several times.... Once I had the shapes all looking similar (or as best I could manage) I had to add some curvature to the buffers. This was accomplished by first bending the buffer around the handle of my razor saw. That was then flattened slightly in the vice before adding a final curve to each end of the buffer. Next stage was to cut out some small lengths of brass tube to act as a mounting point. These were ca'd into place, as close to the center as I could guesstimate (I really should have marked them out better) - that was followed by a generous helping of Milliput to fill out the form. As the real buffers are big humongous castings, the brass by itself didn't look convincing - the milliput helped add some beef to the shape. It looks kind of nasty here, but should shape down nicely later. (My trial version is on the far right) After some gentle sanding and filing, and getting the first one looking really good, I found that all the handling made the milliput pop off the brass buffer at the slightest opportunity. Ouch ! So, superglue was called into action once again, this time to glue the milliput back into place on the buffer. Once glued in place, another sanding brought the buffer back to the land of bufferdom. Small slices of brass tube were called into play to look like collars and slid over some brass rod which was in turn, inserted into the buffer. Center shot - rear view of a buffer - dry fitted at the moment. I know these are not 100% accurate but it appears that there are more flavors of buffers out there than you can shake a stick at. The main profile is good though - the oval with a flat top - as long as that's good I am fine. Once the buffers are in place, it will be very hard to see behind them, but I think this is realistic enough. ... and more dry fitting - mainly to give myself a lift and some encouragement to keep going with this. Even though these would have been relatively easy to cast, I think brass is the way to go here as I am not sure that resin buffers would have held up over time. I doubt I'll get any more done before going on vacation, so... until next time....3 points
-
Thanks, it feels like it's getting closer to the end now. Primer rubbed down and a few blemishes sorted out, just given it a couple of coats of gloss black ready for the Alclad. I'm going to leave this for a few days to harden off first and then I need to tackle the intake vanes, which will be fun..... Steve3 points
-
RF-111C A8-134 - 6 Sqn. RAAF Base Amberley 1988 Hobby Boss 1/48th F-111C Paint: Mr Hobby and Tamiya acrylics, Model Master Metalizer Lacquers Extras; Eduard BigSin F-111C set Eduard – F-111A Interior set Novascale – F-111C RAAF 1 & 6 Squadron decals OzMods – F-111 Afterburner Cans Ozmods – F-111C Wheels & Tires Ozmods – F-111C Long Range Fuel tanks Plus custom made and cast Recon Pallet. Link to build3 points


This leaderboard is set to London/GMT+01:00