
Leaderboard


Popular Content
Showing content with the highest reputation on 28/06/17 in all areas
-
This is the Airfix Kit and it was fun. Two toned scheme ...light and dark greens and browns. Decals from Hannants and they worked great, Xtradecals... Battle of Britain. SBS Resin engine....Very nice and very hard to see. Steel Wire for Bracing, EZLine for antenna. Photo-etched seatbelts,drilled out gun barrels Loved the shiny spinner and don't care if its correct for BoB. Looks cool Last photo shows the cross arms I almost forgot. Thanks For Looking Cheers Bill40 points
-
Build #6 for the year, the Great Wall Hobbies TBD-1 Devastator in 1/48. This is Ensign George Gay's aircraft that he flew with Torpedo Squadron 8 at the Battle of Midway in 1942. Of the 15 Devastators of VT-8 that attacked the Japanese fleet at Midway, all were shot down with Gay being the only survivor. Torpedo Squadron 6 and 3 followed, losing 10 of 14 and 11 or 13 Devastators respectively. It would end the combat career of the Devastator, but Gay would go on to report the destruction of the 3 Japanese carriers to Admiral Nimitz, then fight at Guadalcanal with VT-11. After WW2, he flew for TWA for over 30 years, often signing his book 'Sole Survivor' with the words; "May you be as lucky as I was at Midway". The GWH's kit is nice in the box, it's not until you start to put it together that you find some problems. The interior, especially the instrument panels are tricky to fit, I didn't succeed with the lower half, but it cannot be seen anyway. The separate canopy sections are too thick to be positioned open, meaning you either have to buy the Squadron replacement, or use the full canopy supplied. The instructions depict two style of under carriage leg, loaded and unloaded, however only the unloaded leg is supplied in the kit. The decals are awful, with virtually no glue on them and they were almost impervious to decal softner. I had to soak the wing insignia in Mr Mark for AN HOUR!! before they would conform to the surface detail and even then, they started to crack. The paper masks supplied are also useless. That said, it's still the best TBD in 1/48 available. I've also decided to keep the aircraft cleanish. As far as I'm aware, VT-8 did not see much, if any action before their fateful mission at Midway. Thus their aircraft looked to be in rather good condition.21 points
-
This is a Hasegawa rebox, great fit except for the seperate cockpit walls. Also some excessive thickness around the air filter outlet, no big deal. Added the rocket fuses, and kept the weathering to a minimum. Regards.17 points
-
During my schooldays in the Seventies, I started building the Airfix Superkits and over the next ten years I think I built all of them (apart from the Mossie and Typhoon). Last year I decided to build them all again and started with my favourite - the Stuka (markings were painted): Now I have just completed the Airfix 1/24 Hawker Hurricane Mk1 (14002): A straightforward build. National markings were painted using Montex Super Mask - Hurricane Mk I Airfix (K24018). Aftermarket items used were Airscale Instrument Panel Decals (AS24 HUA), Eduard 1/24 RAF WWII Seatbelts (23005) and the Aviaeology Hawker Hurricane Stencil Decal Set (AOD24S04). Spinner was scratchbuilt. I am now working on the Airfix 1/24 Bf109E but I think I have already run out of room with a Mossie and Typhoon waiting to be built. I may have to move house before building them! Dave15 points
-
Hello, very cool model, Eduard 1:48 in unusual painting.12 points
-
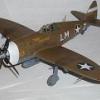
77th FS 20th FG 8AF Spring 1944 flown by Lt James Morris The canopy was ill fitting and my diabetties would not permit me to make the correct small framework on the side windows, please allow for that.11 points
-
Thanks Christer - I was obviously misled by the name of the colour - school boy error Resprayed this morning with the Hataka: Untitled by Ced Bufton, on Flickr Careful, that floor's wet. What I need is a 1/72 'Warning, wet floor' yellow sign. Oh, and another 'Warning, wet floor sign ahead' sign. You can never be too careful. Is this better? It does look more like H78.11 points
-
Then that Stuka, again, the new Airfix kit. Followed by my latest build which also happens to be another dive bomber. The Academy Curtis Helldiver. There, all caught up with wingy things.11 points
-
Usually these are three things I stay away from,but recently I have had problems with my hand and find gripping small parts almost impossible.So bye bye to the gentlemans scale.This model was given to me by a fellow club member so despite my usual rule it got built.I normally make one or two mistakes per model and if they are bad the model gets recycled via the wall and the bin.As this one was a gift it survived.As I did not have the right blue,I mixed some paint together to get a shade I liked,mistake 1, did not mix enough and for the life if me could not mix it a second timeThats why there are patches of a different blue on the model.Second mistake,when taking photos I managed to break off the undercarrige doorsif this was not a gift it would been thrown against the wall pretty sharpish.Anyway its finished,not my best work by a long way,but in my defense its only the second 1/48 aircraft I have built since my hand problem.As is my usual all paints were acrylic and slapped on by hairy stick.BTW, the aircraft is missing its pylons and weapons because they are being used for a what if project for a club comp.10 points
-
This is my second kit coming back from my 18 year long dark ages. Built OOB except for the 50mm cannon from Master, really makes the difference. A slight weathering has been applied, still learning. Regards.8 points
-
Hello all. I recently took a bit of time off a scratchbuild ship and dabbled in the dark art of kit-building again over in the 'Made in Great Britain II' Group Build section of this fine Forum. If anyone is interested it is here http://www.britmodeller.com/forums/index.php?/topic/235021509-tamiya-e-class-destroyer-finished/&page=1 I had great fun with it, and learnt a few things along the way, especially when I tried a slightly different technique for the water base. It was an absolute joy to put together, fit was excellent and that allowed me to complete various sections, get them photo-etched and painted before fitting to the ship. Here she is: And finally the obligatory 'pen inclusive' shot Just slightly off-topic, that pen has an interesting history. It was given to me back in 1980, and it had my name engraved on it. Foolishly I used it at work. One day, I noticed that I did not have it in my pocket and I was heart-broken. I looked high and low for it, but ne'er a trace could I find. Three months later, a customer walked into the shop I worked in and said 'Hello, I borrowed this some time ago and forgot to give it back!'. Well, I was gobsmacked, and so happy, and it put my faith back in human kindness. So, who ever you were, 'Thank you for that!'. Cheers, Ray7 points
-
On with camo painting: Lifecolor Giallo Mimetico (Camouflage Yellow) for the splotches I left port wing root relatively clear from splotches because this part shows repair jobs and an overpaint in gloss grey (some sources say that, a few others mention bare metal - couldn't find anything decisive, so I decided to go for gloss grey) Bottom side The splotches were airbrushed thinning Lifecolor paint with "Alcool Puro Bianco", a commercial product containing water and IPA at around 10-15% (and perfume ). I tried a range of pressures form 0.5 to 1 bar, the better control I got was at around 0.8. There is some touch up needed, but the yellow splotches are now going to be covered with Marrone Mimetico (camouflage brown), sprayed in a way to only leave the outer edges showing through - that is going to be tricky Wish me luck! Comments welcome, as ever Ciao7 points
-
It's not often nowadays that I get to make a vehicle model, having in the past built many, many kits by Tameo, Meri, BBR, Alezan, Marsh, Provence Moulage, Starter, Tenariv - in fact probably every major car manufacturer in 1/43 scale, plus a couple of 1/20 Studio 27s too. But this is just off the table, a kit dating back to (IIRC) 1992, and which I only 'discovered' during a garage tidy at Christmas. I did have trouble with cracking of the decals, but a coat of hairspray did the trick and they stayed together long enough to be applied. Mind you I notice a couple of cracks now I look at the photos: must touch those up. Model is Raul Boesel's Jaguar XJR-16 from the 1991 IMSA championship, from a 1/43 kit by Starter: The XJR-16 is the final iteration of the 1989 XJR-10/11 (IMSA/WEC, respectively), the latter of which I modelled all of 27 years ago, again 1/43 scale by Starter. I dragged it out of garage storage this morning and took some photos of that for comparison. It's stood up remarkably well considering it's been boxed and tussled around for at least two house moves!6 points
-
My kids showed an interest in making a plane after seeing my Heinkel 111... so this is their first attempt at one. There were a few problems with the kit... the fuselage didn't fit into the assembled wings so trying to trim fuselage to fit didn't go well and there are slight gaps And in building this it's also raised a few questions... which i will list at the end. First issue was the matt black paint wasn't drying matt. 2 1 Next problem was the canopy didn't fit 8 3 We used masking tape but some residue was left behind and trying to remove only messed up some of the paint work. 4 Also the decals on the side of fuselage seem to be a little too big and when placed as pictured in instructions... just didnt line up and are almost wrapping over the top of fuselage. 7 5 So as you can see it is a Spitfire and has all the right part it's just not the best job ever to be done, but with 4 kids all helping to build it... it wasn't likely to be perfect. The main thing is they enjoyed it and want to do more... who knows they could go on to be like the rest of us and enjoy models all through our adulthood. And now the problems... Masking... masking tape seem to be fine but after painting and leaving to dry left residue........ what would be a better product to use? Painting... Although we spray painted it there is a clear ridge between the two colours used....... what can be done to achieve a flat universal finish? Decals... they look like decals just placed on top and rubbish at that...... what's a good method of applying decals as to make them look more authentic?6 points
-
Hi all, continuing my interest in converting military vehicles into recovery trucks and wreckers, (Matador BRS recovery and Diamond T wrecker in 1/35th scale), I looked at the Airfix refueller and thought it would make a nice early post war recovery truck. The model is as per the kit for the cab and chassis, with a plastic card body. The Harvey Frost type crane was also scratch built using evergreen products, and was to date the most difficult I have made due to the scale. The decals are home made and white horse is hand painted with a fine brush and mapping pen, using white drawing ink. The white horse itself is the one on the Berkshire downs at Uffington, near Wantage. There was a white horse garage locally but they did not have a recovery truck. The floor of the base is cork, and the wall is a thin piece of plywood, sandwiched between sheets of brick pattern plastic card. The clutter by the wall is typical garage, somewhere to junk the exhaust pipes and other bits. I have also made a Bedford light recovery from the Airfix kit Thanks for looking.6 points
-
Hello folks , this is the excellent 72nd scale kit from tamiya that kind of falls together when you are taking the sprue out of the box ; the model is built completely out of box as "Little chief" , the airplane of Lieutenant Frank W. Klibbe who I believe was credited with 7 kills . About 80% of the total time taken was spent on painting and weathering and I am personally quite glad with how it came out . Regard , Basu Roy6 points
-
Port flot bag bungee cord finished. Eyes crossed - taking Zebedee for a walk! Bungee cord: Zebedee:6 points
-
Wow - has it really been this long since I have completed any modelling. Well a few days at home meant that I got these back out again. Down to detail painting the earlier FAA ejector seats and the cockpits.6 points
-
Thanks Bill Thanks John - the only solution, to save face, is to make 'brmmm brmmm' noises when you're using the spiker... or just go out in the rain. No, NOT naked, for goodness sake man, think of the neighbours. Look what a very kind @Michael Enright sent me: Untitled by Ced Bufton, on Flickr Nice eh? Michael says he's from a Merlin engined Halifax kit of old so just the job. I shall have to mould some spares. And build a couch for him to lie on. I think I need to declare this a mojo jolting build as it's taken me so long to re-start after the business sale shenanigans. I'll just get on with it and see how it goes. Starting with spraying the IG. I had a bottle of Hataka Interior Grey-green so started with that, but it's not right is it? Here compared to the Xtracrylic IG: I shall call that 'pre-shading' and spray the Xtracrylic over the top: and on other bits: Hopefully I'll feel like fiddling with the panels tomorrow.6 points
-
Following on from the fairly straightforward and "modern" injection moulded DC-4, I decided to have another stab at a vac form. My last attempt failed miserably but hopefully this one will get to the end. The kit in question is Welsh Models' Handley Page Herald. It is essentially all vac form with the exception of the engines which are cast in resin. Propellers, undercarriage etc are in white metal;. Aerials will need to be made from scrap plastic and stretched sprue. The kit comes with a nice decal sheet for Channel Express who were one of the last users of the Herald, operating them on freight and newspaper flights into the 1990s. However, I wanted to do mine in a more nostalgic (for me) scheme. The Heralds of BIA were a common sight at Dublin Airport all through the 1970s when I was a keen spotter. Indeed, the very same aircraft had been common for a large part of the 1960s as well when they operated in British United Island Airways colours. I'm going to complete it in BIA colours. The 2-6 Decal Sheet shown below contains registrations for all the Heralds BIA operated in the red scheme. The colour instructions are not quite accurate although from what I can see from looking through as many colour pictures I could find on the internet, no two BIA Heralds were painted identically. Some BIA Heralds also had the black and white striped propeller blades which were tried on a number of aircraft in the 1970s - so I'm tempted to do one of those. The smaller sheet shown underneath is the original Welsh Models decal sheet that they originally included with the Herald when it was first released well over 30 years ago. I'm tempted to keep this to one side for use on a BIA DC-3 project. I always had a soft spot for the Herald which I looked on as the plucky British underdog to the much more successful Fokker F-27 Friendship which outsold the Herald by a factor of about 20 to 1. I had cut out the main components ages ago but here's some pictures of the assembly work so far.5 points
-
More random details gradually being ticked off the list. Firstly one that is at least connected to recent activity - the non-slip coating on the stub-wing has now been painted (Tamiya XF-69 NATO Black, since you ask). Happy with that: The others you might have to think a little harder. Firstly the Da-Glo Red on the I-Band transponder can that sits underneath the tail (& has been knocked off about half a million times): Then the start of the ECU blanks, getting their first coat of yellow ready for having home made transfers and other general knocking about. as you can see, one is already made up and the other still on the Eduard brass runner: the final one is not painting, but gluing - don't be misled by the Mr Metal Primer (which is great stuff, incidentally); on this occasion it is there purely for its weight. This is my home-carved (styrene) blade V/UHF aerial which will eventually sit rather prominently on the nose, being glued to its (PE, FlightPath) base plate. More soon Crisp5 points
-
I am now reaching the point where I can no longer put off solving those little intractable problems that we all face in every build - the "Hmm, gonna need to sort that somehow.. but not now..." things. One of these is the flot bags in the sponsons. On the real aircraft, they are held in place by strong bungee cords; if the flot bottles are fired, the bags fill with air at a rapid rate, and burst out of the bungees. It is a simple solution - far better than the flot "cans" of the Wessex & Sea King 4 - and I never knew it to be a pain throughout my Sea King career. They were just there, and on the rare occasions when needed, they worked. Here is a real sponson: You can see that the bungee is pretty clear, and that the bag itself is a slightly darker colour than the restraining material. (Incidentally, it wasn't always white; sometimes the cord was dark). I have tried drawing the cord in place with the thinnest marker I could find, and that didn't look great (I did this weeks ago on the starboard sponson, so you might have noticed it in some pictures). I have also thought of gluing in place a thin cord - Uschi rigging cord, to be precise - and then using strips of transfer to denote the loops. But experiments with that looked much too crude. It is one of those details that needs to be there to capture the right look, but if it is too prominent it is a distraction. Newest effort is simpler; following on from the transfer idea, I have added a number of short sections of Xtradecal black stripe, the thinnest I could find. The Hasegawa moulding does have rather vague representations of the loops (which I think can be improved with painting), which helps to line things up. The front end and the lower section not yet done. Once toned down with further painting, I think this can work. Incidentally, I am pleased with the creep marks I painted on the wheels / tyres. These tiny things make a lot of difference, IMHO. More soon Crisp5 points
-
Okay then, if you insist. This is how she looks at the minute, and will probably stay like this until the weekend, with the glossy coat and national markings finished. A shot of the rear end (ooh errr!) which has most of the markings on it. The decals I have used for the national markings are from a Zotz "roundels of the world" set as the Egyptian ones in the kit are too big for the scheme I have chosen and these are thankfully the right size, they performed nicely and have settled down well. I have used the kits decals for the aircraft's serial number on the nose, after re-arranging them to more closely match the aircraft in the picture, and they also went on very well. I will keep searching to see if I can find any pics of re-painted Egyptian Mig-21's with any stencils on (thanks @Radleighfor your offer of help, greatly appreciated and needed) but if I can't find any by the weekend I will probably start more weathering and the matt coat. Thanks for looking. Craig.5 points
-
Hello folks I'm part way through three GB WIP (F-111, Yak-23, KASKR -1 Autogyro), all being currently done from my bed, on a tray. This is increasingly becoming my 'normal' modelling area . A flying boat is on the cards soon, but.... Wanting to try to be a man of my word: I said, way back, that I would build a Spanish Mirage. I have a Heller kit in the stash but; I saw a Special hobby kit at a very good price from an Evilbay person in Germany. The wallet fell open, money flew away, 10,000 miles, to beautiful Germany (very reasonable international postage rates), and this one is on its way to me: I don't know much about Mirages. Just that they are very attractive and space age looking aircraft. From France. I like France a lot and I like very attractive and space age looking aircraft 🇫🇷 🚀 . If anyone could give any hints regarding any after market bits I really should get to improve the kit, any pitfalls etc, I would really appreciate it. I can order them whilst waiting for it to arrive. It has a Spanish version right OOB. Yay ! It may be some time before I can start, so I'll turn it into good research and learning time. . Best regards TonyT5 points
-
Hi all, Just to pull the relevant bits from my post in buzz's link: If you are building the Flight Test Markings boxing of the Revell kit, the wings are BAC 707 grey overall with a grey elastomeric finish on the upper wing box (this is a similar shade to the outer grey) If you build the Carbon Fibre Livery aircraft F-WWYB. the upper wings are Matterhorn White with a white elastomeric finish on the upper wing box (this too is a similar shade to the Matterhorn White) and the lower surfaces are BAC 707 grey. All production A350 wings are Matterhorn White overall, also with the white elastomeric finish on the upper wing box. Following on from my original post I understand that the use of white is actually part of the certification of the wing structure due to thermal tolerance requirements; the carbon fibre wing has to remain within a stricter temperature range since it cannot expand and contract as much as a metallic wing is able to. Boeing 787 wings are also overall white for the same reason. I'm planning to build a Finnair A350 for which Halfords has the required RAL9003 white available for the fuselage. I haven't had a chance to properly investigate with a match for Matterhorn White yet, but maybe a white primer could provide a solution. Some time at the paint racks in Halfords awaits... The term 'Airbus Grey' is something of a myth. I think it comes from when Xtracolor obtained paint chips from contacts within the industry in the 1990s; I have heard that many of the colours such as the BA Landor and World Colours, the mid '90s US Airways, British Midland 1996 scheme and the final Northwest livery were actually provided by someone in Boeing at that time. I suspect Hannants may have received some samples from a similar source in Airbus and the light grey chip was simply marked as 'grey'. This may have been assumed as different to BAC 707 'Boeing Grey' and entered the range as such. Since then modellers have taken this to mean they are different shades. Being fortunate to have had access to documentation not readily accessible outside of the airline industry I have searched for evidence for use of a specific 'Airbus Grey' and each time it has led to BAC 707. There is even a document in the Airbus Process and Material Specification Manual titled "Characteristics of Grey Color BAC 707 Top Coat" which sets out the standards for supply of the paint. More recently the use of the code M9001 has appeared, especially on the A380 and A350, but following the paper trail I ended up back at good old BAC 707! I wish I could post the physical evidence of this but as it is all proprietary documentation I'm legally not permitted to. A warning for those using Xtracolor paints, be wary of using the latest batch of X301 - the paint in the tins I have has a distinct greenish 'concrete' tinge to the dried finish; it's very noticeable when placed next to a sample from an earlier tin which was a good match to the original. I've gone back to using the alternative X150 Voodoo Grey instead. I'll have to find a stockist of the Holts HL01, it looks very close on FortyEighter's lovely A380. For the record, the real A380 upper wingbox colour is RAL7004. This finish is called Aeroflex and has now replaced Corroguard on all Airbus metallic winged aircraft. This has ended up as a a longer post than intended, but I hope that it answers some questions on the A350 wing colours and the grey in particular. Jonathan5 points
-
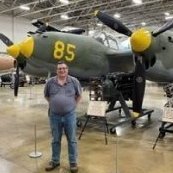
I promised Ced I would post up some pics of the Airfix Stuka when it was done and that has been awhile now so thought I ought to put a few pics up of my last several aircraft builds, all in 1/72nd. First off is the Hobby Boss P-38 done in Haitian markings. It saw combat in these markings.5 points
-
Next up is the new Airfix C-47. This one is done in Israeli markings from the 1956 Suez conflict.5 points
-
Morning all,not a great deal done on anything for a couple of day's but the exhaust's are now painted and fitted.5 points
-
Just finished this Revell DO-17Z-10. It's the ICM kit repacked and new decals. It will be reviewed in Scale Aircraft Modelling in the near future.4 points
-
Hi I am a model, I decided to build my own bending tool, I built the first one in 2016, now after 6 months of testing, building models, bending sheet PE, I built the next model. How do you like it ? https://www.youtube.com/watch?v=I5zNurbdNJw4 points
-
Hi everyone I've decided to restart my Hawker Typhoon. I started it a couple of years ago and I don't know why I put it to one side? It will be built with a few panels removed to get some natural light into that lovely cockpit so I'll have to add some extra detail in the shape of wire, plastic rod and plasticard.... Cheers everyone Iain4 points
-
Hi, This model has been built for the 70th anniversary of Warsaw uprising. Figures are German soldiers modified to being Polish resistance. Heads are from Hornet set. Tracks are the AFV individual links and wheels from Panzer Art. Thank you for looking.4 points
-
Hi Guys Here are some pics of my latest figure - the Mini Art Gladiator in 16th scale. Not too happy with this one as I mucked up the joints on the leading leg plate/padding. Still - we live and learn, don't we? Base is painted MDF with a bit of desert texture I did add a plume to his helmet, otherwise it's straight from the box. Thanks for looking Kev4 points
-
Good evening everyone please find below, after a 40 year build ! Berwick Winston Churchill's Boeing 314 Clipper. Here is a photo of the man himself at the controls, with the signature cigar: Below are the pictures of the completed build. The kit was lost in my parents loft until being recovered when we sold the house after I lost my father. I failed to finish in the KUTA IX Group Build so here it is. All comments greatly received and many thanks to all the BM members for the continuing encouragement, it would never have been finished without you Cheers Pat4 points
-
I've started this one over a year ago and finally have the time to finish but here it is. Somewhere in Russia, probably just before the Battle of Kursk. The models used: Heinkel He 111 H-6 - Revell 1/72 Ju 87G-2 Stuka 'Kanonen Vogel' - Academy 1:72 Kubelwagen and Kettenkrad from the Academy 1/72 WWII Ground Vehicle Set Figures from Preiser and Revell The 'making of' thread is available here. Hope you like it. Thanks for watching.4 points
-
First up, a few photos to show the standard of fit around the cockpit glazing, there are a some gaps but overall it's not too bad for a kit of this vintage. Today I managed to get the fin and rudder parts roughed out, I'll finalise the shape once I glue the fuselage halves together, so the next job will be to complete the interior fit.4 points
-
Hello Dears, I say, very shy, because I think that the dame was afraid to show herself on BM, She has been painted, de-painted and re-painted, The exhaust stacks will not go on their palce (my mistake) Broke an UC leg, and tailwheel (twice) Chemical reaction with the decalstransfer and so on, I was about to think that there was a curse on her since she was almost finished. So I took some photos before anything broke again It is the Eduard Mk VIII Spitfire with old Superscale decals The building has been straightforward, but I did have a bad idea.... Did'nt like the idea to paint the ac with the exhaust stacks on... So I did put a plasticard instead of the 5 parts Eduard's exhaust, thinking that I will glue the exhaust after the painting, seem promisig but ... NO When I did put the exhaust on, they standed proud of about 3mm from the engine cowling.... Next time, I'll put the plasticard more on the Inside of the cowling Well, I use some shhhhhht ICM exhaust on the Eduard Spitfire4 points
-
Targets are submarines. Tanks are part of one's flying machine. Oh, I see. A brown job. Probably best to re-set, in that case. I hope it has now worn off.4 points
-
Magnifying photographs sure does show all the little details and all the mistakes to go with it :-) One last shot.4 points
-
Hi all, In the last episode, Our Hero was ready to assemble the vectral pieces, complete the cockpit and nose section, and begin final finishing… Actually, by mid-May 2017 I was getting further and further behind schedule; I was planning on taking the finished model to WonderFest, one of the really neat modeling conventions anywhere. This year the ‘Fest was held on the first weekend of June. With two weeks left, it was still possible but I needed to get the front LED’s in place and add the fiber optics with the cockpit tub mounted. That was not without its own issues. With about four days left, I hit a snag in getting the upper nose into place; while I was thoroughly bummed I knew I just needed to leave her unfinished rather than completely screwing her up in a rush. I previously showed a picture of the crew while still in work. Here they are verifying the fit of them and the front seater's instrument panel. Once they were mostly complete I used some tan paint to prime them, then brush painted the base colors of orange (a bit faded in this case)and off-white for the back seater’s chest protector; the pilot has opted not to wear that bit of kit since it was not comfortable for her to wear. Medium Sea Grey was used for the harness and parachute straps, dark gray for the chest packs, and so on. I masked off the figures’ heads and spray painted the helmets a very pale gray. I painted the faces with a base coat of flesh and a darker shade around the eyes, lips, etc.; I chose not to try to paint the eyes based on a figure painting guide I found and I like how that turned out. If you look back at the figures in work, you will see a fine white line across their faces; my plan was to mix up some clear epoxy, add some clear yellow to it, and just drop it into the top half of the faces, relying on the .010” plastic rod I had glued on to “catch” the epoxy and make a semi-clear visor. It nearly worked pretty well. Meanwhile, the seats got a coat of Medium Sea Grey, olive green padding, a gloss clear coat, some darker washes, and a clear flat coat before going into the cockpit. As an aside, a couple of weeks after these pictures were made my buddy Wally informed me that Star Wars helmets cannot be a single color without some markings on them. So I dutifully dug around in my decal stash and came up with some tiny round decals. Here the crew is nearly done. Next up was to build the instrument panels. They were made with .015” clear for the main panels, with .020” solid rear pieces (actually the back side of the instrument panel) and .040” strip glued around the edges to make a shallow box. I glued an additional .010” sheet onto the clear sheet that had been pre-drilled to make holes to represent the gauges. The gauges were taped off and the whole box painted off black. I had a set of old instrument decals which are black faces with the instrument markings left clear. These I applied individually; this was a struggle with old decals that did not want to stay put. If you scroll back up to the previous picture, you will see the finished panels as well as the crew. I glued the cockpit tub into the nose, having added shims and made the cockpit floor as level and true as I could. Once the instrument panels were ready, they were glued into place and holes were drilled into the side edges, going through the original side pieces of the main fuselage. With that done I simply threaded one fiber optic strand into each end of the assemblies. The plan was for the light to splash around inside the boxes and gently illuminate the dials from behind. That almost worked but the light is very dim and will largely go un-noticed unless you look in from the rear angles. Ah well… two strands might have done much better! I then added two fiber optic strands on each side console of the pilot and the WSO, adding a heavy coat of clear red and clear yellow to the ends. These turned out as desired, visible from each side but not bright. In my experience cockpit lighting is mostly set to be dim to lessen the impact on the crew’s night vision. In any event, to be honest it was a struggle to get everything into place; if the fiber optics remain unbroken through this time next year I will be very thankful! The last cockpit items were the front coaming set over the pilot’s instrument panel, and the control sticks. The sticks were made similar to modern fighters, a central short stick above a fixed pedestal (and by far the easiest way to fit a control stick into a cramped cockpit). Being in a hurry at that point, I did not take a picture of the nose with the fiber optics in place before the top of the nose was glued on; still, you can see some of the strands in the picture below. Alternating between the front and the rear end, I figured out a way to build the rear maneuvering vectrals inside the rings. These are only a general match for the usual Y-wing units, but I did design them as if they will work as thrust diverters mimicking the use of rudders and elevators on a real vehicle. Remember too that these units should be a bit beefier to handle maneuvering with a higher bomb load. The vertical pieces make up the rudder and a fixed forward support unit while the horizontal pieces represent the elevators. Each vertical and horizontal piece has two thicknesses of .015” sheet making the skins, with .030” spacers in between; the horizontal pieces were assembled and then cut in half. Here are the pieces ready for assembly. The assembly on the right is just pieced together for a fit check; not bad! The vertical one piece assemblies were installed first with two pieces of .030” brass tube mounted from the outside in and pushed part of the way in. The horizontal pieces were held in place on one side, and a single piece of .030” brass was used to go fully across the span of the elevators (through the rudder assembly). This gives the two assemblies a bit more rigidity. The upper and lower vertical pieces were then pushed home, all glued in with epoxy. If you look at how thin the outer rings are (having been vacuformed, remember), I needed to build as much strength into these units as I could manage; even so they will always be somewhat fragile. On the other hand, they do look pretty much in scale which pleases me a great deal. Here are the finished assemblies, minus the inner rings which will be added soon. Upper left shows the rudder on the back side; middle right shows the "front face" with the elevator pieces facing forward and the front of the rudder assembly. See you all next time! Cheers, Jim4 points
-
Ah, but you can't see the stunning lady I'm chatting with at the bar! 😁 Ian4 points
-
They're off...!! Good to see you've made a start Ced. The old plastic fantastic will get the life mojo whirring again. I'm looking on a tiny screen, with all the possibilities of that and my eyes being out of kilter, but I think that Keith may be right. The first colour looks a little more 'British'. Oh dear. I couldn't really be less scientific about it could I ? I'll get back in my trunk. Someone put the lock on. I've got my Frosties, long life milk and a transistor radio. Best regards TonyT4 points
-
So I finisihed this one in december 2015, my first completed kit in over 18 years. This is an old Promodeler kit from the stash, had to get a set of decals, but the pinup and the other one are from the original set. The paints are Vallejo Model Air and Revell Aqua, some 20 year old Squadron Putty, and not as much sanding as would would expect. A fine kit indeed! No weathering or washes on this one, had to take it easy. Regards.4 points
-
Hi all ! I'm back ! Ok .... roughly 10 months ... it's not as soon as that ... Nevertheless , Here are some tiny updates : The seat : I wanted to add a safety pin and it's RBF stuff , it's done My model managed to try a barrel and crashed on my bench upside down ! And a kind of miracle occurred : no damages , except for the stick , which BTW was too long , and it's no more !!! Then , it was time to build the HUD : Basically , I wanted to build this : ... located there : As usual , PC " made in Picard " and Q-tips , and my trusty Chopper II . Then fitting tests and tests and tests : it's very tricky to find the right size for the HUD and it's glass ( and the appropriate angle ) because the space available is really tiny and the thickness of the windshield is impossible to measure . Then , it's painting time : 1 - black primer 2 - silver in the hole + dark grey ( too grey !!!! ) 3 - drak grey ( again ! ) but not as dark as the previous one + silver drybush ( very light ) + UV Solic resin for the lens And the final product : the glass is glued with contacta clear . Thanks for passing by and see you ...... soon4 points
-
At long last most of the main fuselage structure is in place and we can move on to getting some fine detailing done. I have begun adding the stringers to the fuselage interior. These have been made from .20 'thou x .10 'thou plastic strip. This might takes few days to complete as I have begun to tire quite quickly when I have been at the bench recently. It could be illness but the optician reckons that it is because my modelling glasses are over ten years old and my eyesight has changed. Hopefully the new glasses that are on order will go some way to rectifying the situation. Anyhow, here are some pictures of the work done thus far. Thanks for looking Martian4 points
-
A; If you're going to do a lot of this; invest in some Tamiya tape, just about the best tape for modelling. An alternative tape is Frog tape, for decorating use. Buy at Screwfix, its by far cheaper from them. I got a big roll of 1 inch wide and slice it down into thinner strips as and when needed. Bought the roll about 3 years ago and I've hardly used very much off the roll even though I use it a lot B; you'll always get that ridge; you can only limit it, by spraying only very thin coats along the tape edge, not allowing a build up of paint. If it gets too much you can reduce it by lightly sanding with 800 or 1000 grade wet & dry paper used wet. Do it carefully and you can reduce the size of the ridge; go too hard and you'll remove too much paint right back to the plastic C; decals set better on a glossy surface. Gloss up the paintwork, apply decals, then use a setting agent. By far the most popular and common setting agents are Micro-Sol and Micro-set. These draw the decals down really tight and even into the panel lines. After doing this apply a matt varnish to seal the decals on D; the markings on that Spitfire were really like that, very over sized E; your team enjoyed building it - thats the number 14 points
-
Much betterer :). approves, too. Of course, he has to, or else ...3 points
-
And here are the pictures ! Fuselage halves are now joined, fit is decent but there are some small problems here and there, some caused by the addition of the resin tub and by a small modification I did to the nose wheel well. With the fuselage halves closed it was clear that I should have done a better job when I chopped the cockpit area for the resin parts... sorting this will not be easy. While taking pictures I realised I had totally forgotten to mention one small job I had done: the FA.2 retains a camera in the front fuselage, the kit shows the camera clear panel as a recessed panel line only of course so I decided to drill the port and reproduce the clear panel. This was done using clear resin poured into the hole. The result is not spectacular but will do the job. Hopefully the resin will become a bit clearer after a good pass with very fine abrasive foil. Before sorting any gap in the fuselage assembly I decided to glue the wing in place, thinking that as I have to open the filler tube, better fill everything in one go. Well, there are quite a few gaps.... The gap on the lower front fuselage is the result of the replacement of part of the nose wheel well floor with plasticard. The original floor had a nasty ejector mark right in the middle, I chopped this and replaced with flat plasticard, onto which I'll add a couple of structural features. For some reason though the plasticard pushed the halves away. No problem, some filler will sort. The gaps where the wing meets the fuselage on the other hand are all of Airfix making !3 points
-
Thanks for the comment. I was surprised by the fin too, it is quite a bit off and I am keeping my fingers crossed that my current plan to correct it works OK. As for the glazing, I have added the cabin windows to the fuselage halves tonight, when I checked them out they looked a bit on the thick side and I had to trim the fuselage openings and windows to improve the fit. The rear ones snagged up on the little bulkhead, so they needed some careful trimming in this area. The fit isn't perfect and there are some small gaps around the frames that will have to be filled, they also protrude from the fuselage at the top edges, but with some sanding and polishing they will be fine. The canopy fit isn't bad at all and once the instrument panel is in position it could help things further again a small amount of filling will neaten things up. I'll take some photos of how everything looks before I continue any further and post them at the next update.3 points
-
Hello, here is my completed build: H17 HMS Escapade 1/700 Tamiya E-Class Destroyer with White Ensign Photo-etch, Colourcoats paint in the main, with a sprinkling of Humbrol and Revell too. Ray3 points


.thumb.jpg.ba34a9f6ddce411193946dbdcc7b5fe8.jpg)

.thumb.jpg.cfc129272ffec824439b15e6013d5952.jpg)


This leaderboard is set to London/GMT+01:00