
Leaderboard
.thumb.jpg.d17ff607fc7e89ed057e63fcb6f2a888.jpg)


Popular Content
Showing content with the highest reputation on 23/05/17 in all areas
-
Hi there! This is My interpretation of the Super Catalina 'Tanker 53' from the Movie 'Always' Build log can be found here:- Items used:- Revell 1/48 PBY-5A Catalina Kit No; 04507 Italeri 1/48 B25 Mitchell Kit no; 2650 (Donor for engine cowlings and intakes) Brassin 648 192 resin wheels Quickboost 48 554 Engines Scale Aircraft conversions replacement U/C 48068 Belcher Bits Corrected Catalina Tail Draw Decals Catalina Fire Bomber set Paint used:- Tamiya acrylics Alclad filler primer Windsor & Newton Oil Paints thinned with Zippo lighter fluid Mig Pigments (Soot) I found this a great kit to build with no major problems,fits are good,no flash to speak off and good surface detail. I've got a Invader in the stash & decals to build the companion for this! Thanks for looking in! Keep Sticking! Cheers, Pete40 points
-
Hi Everyone, Here`s some pic`s of my latest build that I finished last week. Revells boxing of the Monogram 1/48 Devastator Done in the markings of VT-5, aboard USS Yorktown , circa 1937-41 Added a few bits of extra detail, some from and Eduard etched set ( ignition harness, seat buckles and a few details on the cockpit walls ) Some from scraps of plastic card ( wing folds, wheel wells, cockpit floor and inside of the bottom of the fuselage ) and some bits of wire ( wing folds and torpedo slings ) Decals from `Yellow-Wings Decals` set 48-001 and the stash The carrier base is a Eduard accessory and I know it`s the wrong colour for the time frame, but it looks better than the garden table. Hope you enjoy, thanks for looking Cheers Russ32 points
-
Kit manufacture: Hasegawa Scale: 1/72 Type: A-10A Thunderbolt II Extras used: Verlinden Productions resin and photoetch update Paints and colours used: Vallejo Model Air Ghost Grey in the cockpit, various Vallajo and Tamiya paints inside, Gunze H57 Aircraft Grey, H301 Grey FS36081, H302 Green FS34092 and H303 Green FS34102 for the camo colours. Aqua Gloss, Tamiya Semi Gloss and Flat Coat were used for the clear coats. Weather was done with thinned down Tamiya Rubber black and Flory Dark Dirt weathering wash. The kit was ok... Raised panel lines are a pain as they are hard to reproduce when lost through sanding as well as cause issues with holding wash. The fit wasn't great; a lot of filler and sanded needed. To be fair it is an older kit and the amount of resin and lead I crammed in definitely didn't help. That said, it wasn't cheap for an older kit. I bought this before I really new about reboxing etc, and knowing what I know now I'd have probably invested the same money on a new kit. At the end of the day, I'm pleased with how she turned out and she undeniably looks like a hog. Here's the pics: So there we go! Thanks for looking! Comments and criticism welcome as always, Many thanks, Val22 points
-
Hi Folks, I was out of town and due to personal reason was not able to build any models for last two month. However last week as I was looking at my stash I stumbled upon this Eduard mig-15 nice little kits, I say can't get better than this. Honestly, it was my quickest none stop building. I so enjoyed so much that I completed the built in 36 hours. The fit was perfect, they were no gap and everything when smooth, for paint I used Tamiya grey for interior and mrcolor silver and alclad ii for different shades of natural metal finish of the aircraft, I thought I do Chinese marking then thought Korean's war mig so gotta to be Korean, maybe a Chinese's marking next time. here are some picture I shot in natural light with my cellphone, more picture later. Hope it has turned out ok... cheers22 points
-
My first build 2017 Focke-Wulf Fw 200c-4 Condor9./KG 40. Avard, France 1944 Revell 1/72 painted with a mix of Taimya paint19 points
-
Built this recently,thought I'd share a few pictures, just added a Eduard cockpit Zoom Set and some Nomega resin seats:- Thanks for looking in! Keep Sticking! Cheers, Pete16 points
-
Well I have now finished my first Wingnut Wings Sopwith Camel (bar a few teeny tiny touch-ups and so I have taken a few photos to show what even a cack-handed modeller like myself can make out of this superb kit. The kit went together faultlessly and any errors, or deficiencies are entirely my own But hey who cares, it is meant to be fun and I found this one a whole heap of fun and the finished model looks just grand to me. Wee tip for anyone building this kit, be careful once you have the ailerons and control horns in place. I put pressure on an aileron and managed to detach it and snap the accompanying control horn meaning fun and games with superglue and a file to try and get it looking anywhere near it's original self prior to the Beardie bear getting my grubby paws on it. Anyway I hope you all enjoy and it inspires you to get into the wonderful world of World War One aircraft and WIngnuts15 points
-
OOB except for the Sierra Hote seat and Eduard Mavericks.12 points
-
A brief history of the aircraft: On August 29, 1961, the DTIA ordered the design and development of two Mirage III V vertical take-off prototypes to be produced conjointly by Dassault Aviation and Sud-Aviation. The Mirage III V, a Mach 2 aircraft heavier than the Balzac, prefigured the operational version. It had eight Rolls-Royce RB 162-1 lift jets and a Snecma TF 106 with afterburner, the French version of the Pratt&Whitney JTF 10 turbofan. Mirage III V 01, equipped with a TF 104 b turbofan (63.7 kN of thrust with reheat) made its first stationary flight at Melun-Villaroche on February 12, 1965, piloted by René Bigand. A new version of the engine, the TF 106 A3, was mounted in December 19685, for the 15th sortie. The authorities realized that the chosen configuration was more complex and cumbersome than they had expected. At the end of 1965, the Air Force general staff drew up operational requirements for a Mirage III V called 1970 as they foresaw the need by 1970 for a nuclear vehicle to replace the tactical air units’ F 100s and Mirage III Es in cas of a hostile first strike. The aircraft’s first transition from stationary to horizontal flight was made by Jean-Marie Saget on March 24, 1966. Disappointingly, the lateral behavior of the aircraft during the transition phase proved more problematic than on the Balzac. On March 28, 1966, for technical and financial reasons, the Defense Ministry halted the production program, though allowing tests to continue. In June of 1966 NATO in turn abandoned its vertical take-off supersonic aircraft program. Mirage III V 02 fitted with a Snecma TF 306 turbofan made its first flight on June 22, 1966 piloted by Jean-Marie Saget. It was equipped with new air intakes over the lift jets. During its 11th sortie on September 12 it reached Mach 2.03 in level flight. It is the only VTOL aircraft in the world to have broken Mach 2. But on November 28, 1966, at Istres, it was accidentally destroyed during crabbing flight tests, and the program was definitely abandoned. WIP Link: This is the 1/72 Modelsvit Mirage IIIV-01. This is the first time that I have attempted a short run kit and experienced the challenges that this brings. It has been the hardest, most complex and difficult kit that I have ever done. The fact that it was a commission build is the only reason that it was even started let alone finished...!! Every part of the build was a challenge with barely any parts fitting properly - I sometime thought whether it would of been easier to whittle the aircraft out out of a solid block of plastic!! Anyway, it's all done and dusted now and will be heading off to its owner this week. The model has been airbrushed using Vallejo paints, aluminium for the fuselage, various shades of grey for the rest. The decals were superb and went down a treat. No weathering as such was applied as this is a test airframe. All sealed in with Alclad Gloss. I want to dedicate this to my best mate who passed away in March, he too was a keen model maker and aviation enthusiast. He was looking forward to seeing this build completed but I wasn't able to finish it in time. Cheers guys, Phil Thanks for looking, Phil11 points
-
My latest build, a 1/72 Heller T-28 converted to AT-28D of 15th Strike Wing of Philippine Airforce. Cockpit and canopy was from Pavla, cut and scratched build the airbrake; cut and reposition the flaps; added blade, whip antennae and red anti collision light on the rear fuselage; removed and filled the airscoop in the front fuselage; scratched build the gunpods and pylons. LAU-68 from Italeri's Huey kit and Mk-82 from Hasegawa's Aircraft Weapons 1. Decals are from Blue Diamond Decals. Thanks for looking.11 points
-
This is my recently completed Typhoon. Humbrol enamels and Revell acrylics were used throughout, all brush painted as usual. More details here: I really enjoyed this build and I'm extremely pleased with how it turned out. Comments and criticism welcome as always. Sean11 points
-
Hiya Folks, I`ve fancied doing a 22 Sqn RAAF A-20G Havoc for a while to go with my Boston Mk.III and a post by Syd here on BM a week or so ago prompted me to do something about it! By combining the Revell Boston Mk.V/ A-20J kit (Special Hobby parts) with the late gun nose left over from a Revell P-70 kit (again Special Hobby parts) I came up with an A-20G and with decals from the spares box (roundels/fin flashes), Xtradecal (white codes) and Ventura (Grey serials). Here is my WIP with photos of the real thing; And here is the model; Yes it did end up being a tailsitter,......I didn`t think that the undercarriage was strong enough to handle the weight required. As usual it was brush painted,....using a mixture of Humbrol enamel (155- Olive Drab) and Polly Scale acrylic (US Neutral Grey) (US Dark Green,...representing the Mid Green `blotches') and Humbrol enamel black, yellow, silver etc. Thanks again to Syd for his help with info for this model, Cheers Tony PS- I`ve only just managed to post this,.... here is the A-20G with an earlier aircraft from 22 Sqn, in this case replicated by the 1/72nd High Planes Boston III.11 points
-
With that big canopy there was plenty of room to turn your shoulders and twist around - or that's how I remember it John. Anyway - everything seemed blooming difficult as a student at TWU on the Hawk - so I don't suppose one more thing made would have made much difference Anyways - wot makes you think I needed to look behind? As the steely eyed wannabe Lightning Pilot that I was, all the targets (i.e. everyone else) was always framed in the gunsight out front...obviously.........Not. I'd always rather watch someone else work......... Well I've done all four of the wretched things now Giorgio mentioning combining PE buckles with lead foil got me thinking a bit. And in the end I took the shoulder straps off the front seat that I'd done and annealed them to make the PE softer and easier to pose - especially at the top where the strap has to twist through 90 degrees so the lug can go into the head box. It meant sacrificing the painted finish but I think it was a worth it as the annealed PE was soooo much easier to handle. I then did the same from the outset for the second front seat. Here they all are. The front and rear seat to the right have just had the straps done and they still need a quick oil wash on the straps and a squirt of clear matt to deaden the shine. Those two a bit shiny at the mo cos I used Johnson Klear to help stick down the lead foil/PE. Next job..... Steve10 points
-
USS Randolph Feb 1945 Okinawa campaign9 points
-
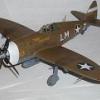
Dear fellow Britmodellers, here's my 1/72 Airfix Mustang P-51D (Kit #A01004A) built straight from the box. Decals represent the mount of Lt. Eugene W. James, 352nd FG, 328th FS, Bodney/Norfolk, England 1944. Painted with acrylics from Gunze/Mr.Hobby and Alclad II. This kit is cheap, easy to build and has very good surface detail. The plastic used by Airfix is quite soft, which resulted in some broken or bent parts. I broke the control column and the blade antenna when trying to remove it from the sprues. (I scratch-built a new control stick and replaced the kit's antenna with a photoetch item.) One of the undercarriage legs was badly bent. Due to the softness of the plastic, the model is in a "wobbly" state, when you touch it, it rocks from side to side! This is the only weak point of the whole model kit. If I build another one, I will invest in a metal undercarriage from Scale Aircraft Conversions. Ok, here's the pictures ... as usual, taken by Mr. Wolfgang Rabel of IGM Cars & Bikes. Best wishes from Vienna! Thanks for your interest! Roman8 points
-
1/72 scale diorama (made in 2008) with Roden armoured car, a Revell panzer IV turret and Preiser figures. Everything else is scratbuilt, including the ruined house (made with plaster and a home-made mold).8 points
-
Thought I'd better see if they fitted after all of that. The instrument panels I made earlier are stored in a safe place at the mo'; and the seats will join them for a bit now. Must remember the control columns....... And then there's the leg restraint chords; which I seem to remember wrapping around the control column after a flight (as modelled on my JP build) but which some photo's show clipped to the instrument panel. Think I'll wrap around the control column as it looks more casual and fighter pilot ish....... I've also already vac-formed the front and rear coamings - which need a few more refinements before fitting. Maybe that could be there next job. Or maybe I'll do an inventory of the surface detail that still needs doing. Or maybe I'll vac form the windscreen and canopy; or maybe I'll do the undercarriage. Oh heck - still lots to do.....8 points
-
USS Hornet Feb 1945 Okinawa campaign8 points
-
My first build after long hiatus (explained more in my Heller 109K thread) the Hawker Hunter MkI. Completed this a couple months ago, just getting around to posting it. Actually used the Eastern Star reissue, but it's the original 1959 Frog tool. Built box stock with the exception of blanking off the intakes and I decided to give scribing recessed panel lines a go. Painted with Tamiya acrylics. Oh...I also used a piece of the sprue to carve the little bullet fairing at the back of the horizontal stabs. Yes...that's a pilot's head molded into the solidly blanked off cockpit...and the wheel well outlines are simply scribed into the bottom...it was 1959, after all. Still, builds a nice looking model of a beautiful jet IMHO.7 points
-
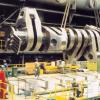
Mr. B shown video. Physically impossible to comply with her response. Loved that playlist it was part of btw Ced - much chuckling and lightened my afternoon no end. Thank-you! Who the hell did you see - Jesus? (That aside I'm glad to hear you're recovering Bill) I was chatting with a pal some time back and he mentioned how much more he tended to chat with his doctor now that he was a gentleman of advancing years, compared to his youth. I asked why he thought that might be and after moment of two replied: 'Dunno. Must be a shared interest in mortality...' Thanks for the good wishes Chris. Likewise I hope that your take on the Sistine Chapel doesn't take you too long. Large parts of our place haven't been repainted since we moved in: with two teenage boys and sundry animals in and out of the premises the whole time, any pretence at 'bohemianism / shabby chic' can't be maintained much longer I fear.... Dosed with Lemsip and spirits revived by Ced's chuckle list, I couldn't let another night pass without having something to show ye, so to the bench, the cadmium and the plastic, and a determined effort to finish-off the rear ladder and sheaves. The by-now-obligatory photo of heat-traumatized Blutak: From whence two triangles emerge: 0.4mm tubing and some scrap PE for the baseplates. The roller between them is just some sprue machined down, with some 3mm diameter plastic sheet punched-out for the ends. One fully assembled they pass a visual inspection when compared to the real thing: There's a couple of smaller tringular braces that go across the struts on the real thing, but I haven't decided yet whether it's worth adding them here. Finally, with the ladder trimmed-down and mounting holes drilled out, these were all mounted together onto the rear section of the ceiling: A swine to get both of those pieces looking acceptable, but they should make the view in through the rear look a lot more interesting at the end: This region will obviously be the other way up then of course: Apart from reinstating some quilting around that, that's the rear ceiling done to match the main run completed earlier. A small region that took an inordinate amount of time to get into a reasonable shape, but given the fact that it frames the main view in from the back, important to get right. Next task I think is to attend to the cargo bulkhead and then pause to do a snag list of anything I might have overlooked in there so far. Thanks for reading. Tony7 points
-
I need the last strap to be adjustable because of risk in knocking the wheels off their marks when getting the straps on in tension I wish I'd thought of this before full length strap and ratchet end Part retracted and tightly in on the ratchet when it is at the 'right tight' place I'll pull it out a bit and trim it off Then wrap 'the excess' strapping round the ends after7 points
-
Not just realise Jason, I'm counting on it ICM provide the internal framing for the cockpit amongst the kit parts but the Revell issue of the kit does not mention these in the instructions which is a shame as they are quite nicely done - thanks to Super-Hobby putting a scan of the instructions for their catalogue entry for the ICM kit you can fit those parts, as I did: The rudder bar has also been fitted. Later I will hopefully get some paint on the interior parts and then I can get on wth the assembly... Cheers, Stew7 points
-
What an excellent kit and photo set. Loved this build and I can see why Tamiya are still selling this kit. One of the best £10 I have spent. The full build is available at http://www.britmodeller.com/forums/index.php?/topic/235018264-135-tamiya-panzer-kampfwagen-ii-ausf-fg/&page=1 Anyway here are the finished photo's.6 points
-
I've been away from the forum for far too long so figured it was high time I posted a few recent builds. To start things off, here's my Wingnut W.12 built for Airfix Model World, the article for which appeared in this past April's issue. Cheers, Eric6 points
-
Thanks Giorgio - it's a bug I intend to squash as soon as possible! This will be the last one for a while (although I do have a Pup in the stash...) Bite the bullet, get on with it. Plan A was to fix the rigging to the top wing, fit the wing and then tie it down. I braced the wing so that things were straight(ish): and then got on with it. Some bits needed doing more than once and I must admit that, by the end, the precise spots of CA were getting more like blobs and I was getting shaky from the concentration but I got there: Sadly my patience was completely drained and I couldn't get the last bits done - just the undercart to do: A bit of patience and a few blobs of glue and I can still make my target of tomorrow - the anniversary of Amy's arrival in Australia.6 points
-
View on economics have nothing to do with being part of a parliamentary right or left, even less so with being extreme right or left. As the link posted by Jessica well explained, German National Socialism was a right wing movement, deeply rooted in the nationalistic environment in which many other right wing movements found their birth. That some in the NSDAP may have had relatively socialist views has little importance. These socialist views were in any case limited to certain aspects of the control of production assets and to putting production above finance. Even the most "leftists" of Hitler's friends like the Strasserists never had anything like Soviet Russia in mind and in any case any vestige of revolutionary ideas in the NSDAP was extirpated during the so called Night of the Long Knives through the murder of anyone in the party with such views (together with many others). The NSDAP was also heavily funded by the owners of some of the most important private enterprises in Germany, something that I'm pretty sure wouldn't have happened had the Party showed real communist views... That the far right and the far left sometime show more than one point of contact is another story, and actually a very interesting one, but I feel that I've already digressed too much.. So, speaking of the movie, I personally feel that we're making a big fuss out of very little here... fair enough, today in the US the name given in those days to the dog is a pejorative word that is better not used. I can understand the feelings of those who feel offended by the word, if sticking to the historical accuracy of a small detail is going to offend others let's change a name. If the name of the dog is changed, is this going to be a big deal ? Don't think so, in the end a movie on this raid has a lot more to show, the Dambusters epic is about the courage of the aviators, the ingenuity of the persons behind the idea, the perseverance of those who worked to make these missions possible. Accuracy is in correctly showing these aspects, a name of a dog, even if it was a code word for the mission, is just a detail. It's like trashing a model because there's a small difference in the font of a code. As for transmitting History to the new generations... well, we're talking about a movie here ! A movie, no matter how accurate it is, is meant to entertain first, any educational value is down in the list of important aspects. If we want education, that's what documentaries are for. Want the kids to learn History ? Take them to a museum, buy them books and show them documentaries. If this movie is finally produced and ends up having a different name for the dog, take the kid to the cinema first, then to the RAF museum and mention the dog name if you want. And if you want them to know more of History, talk to them about slavery too, they would understand why many find the N word offending. The past has witnessed much worse alterations of historical facts and the world has survived. A lot of what people think they know about Roman emperors is the result of negative propaganda from their successors and names of pharaos were deliberately cancelled from monuments they had built. We read works like the Iliad often forgetting that they are works of art and we celebrate even today achievements of people we call great men while in other parts of the world they are known as butchers.. yet historians manage to find the facts and make them available for everyone in books. Actually even amongst people like us, who consider ourselves enthusiasts, I'm pretty sure that most have plenty of inaccurate views about historical facts, even facts related to something like WW2 or even more recent events. Only a few months ago there was a thread on the Vietnam war where almost everybody mentioned Australia as the largest contributor to the war after the US... how many did know that South Korea contributed 5 times more men than Australia ? And there are many other examples... Does that make us lesser men or women ? No, just shows that nobody knows everything and that each of us considers the knowledge of some facts more important than the knowledge of other facts. Fortunately however all facts are constantly researched and made available for us to find, maybe by accident, even if the first time we heard of a certain battle was in a movie that geve the dog the wrong name... Ok, sorry for the long rant, I'm going back to modelling related stuff now !6 points
-
G'day Chums, After a bit of an hiatus may I present the first off the bench for a couple of years or so.This is my first proper dalliance with a Luftwaffe subject,it ain't perfect,to be honest it ain't good but here she is. This is not my finest hour but at last I've got something done. Thanks for looking in chums,all the best.6 points
-
so little lesson on the world we live in: This is called art. Worth millions of dollars. this: is called hobby. Worth almost nothing. than you wonder why so many people are mad at this world.6 points
-
Hello, on Friday I finished the latest project, which started beginning of this year. And after the great feedback for my D.H.2 Stripdown I like to show the latest here too. This Pup was created from a very old Eduard short run kit, a 80PS Le Rhone form Small Stuff replaced the kit engine, real wood was used again for struts, air screw, gear, top of fuselage. The seat belts are the new steel from Eduard too and the decals come from Pheon. Painting was done with colors from Alclad, Gunze and Oils. The etch parts of the kits were fantastic, but the Vickers was added from "Parts". A lof of brass was added for the terminals of the "RAF-Wires" and other details. Have fun - I hope you will like it too, Frank Looks really like a Pup. Please note the open coolings of the Vickers: Please note the open tail with a wooden skid with scratched metal parts: I like the engine: And finally the view from below: In the open cooling vent the cylinders are visible: The end.5 points
-
It's been a while since I last posted any work. This is Airfix's Harrier GR.1 I couldn't stop there so had a go at a little diorama. The Mini is Oxford miniatures re painted. The Landrover is another from the railway guys re painted, the figures from Matchbox and Italeri. I have made this diorama to represent the RAF in the late 1970's. Hope you all like it, comments always welcome Regards Glenn5 points
-
One of my firsts models. Added metal barrels and Bronco tracks.5 points
-
Hello all, Having completed the Air Baltic Avro, I have finally got round to finishing my Iberia One World A320. The kit is the Revell A320 (The Edelweiss boxing) which I recall picking up at the local toy shop, and managed to haggle a lower price for it too (Can't remember how much) but the kit itself was alright, the usual filler was required but that was only around the fuselage join, not much problems elsewhere it terms of fitting. Only problem was every part suffered flash, and there was a few pieces that suffered quite badly, not an issue obviously as it comes off easy, just delays the process a bit. Spraying was easy, white coat was all that was needed for the body, though I manage to accidentally get some green paint down the front side, so had to tidy and re-spray that bit, which set it back again. Lesson learnt, keep wet brushes and open paint pots well away from the model! The One World, windows, doors and Iberia related decals are from Classic-Airlines, and are lovely to work with. The rest are from the stock Edelweiss decal sheet. Thanks for looking! James.5 points
-
Hi, Back to my archive shelvs content - Vultee Vengeance II of 24 Sq RAAF, New Guinea 1944. It is reshaped a bit Frog/Novo kit. The main change was that the general shape of wing was modified. Second major change was completly new cowling mounted. Some minor changies done as well like a closing of canopy (perhaps I was not right, since they dismount it ,I am affraid...). I made her in Jan 1997, so more than 20 years ago. Comment welcome Regards Jerzy Wojtek5 points
-
May I present... Col. Robin Olds P-38J Lightning, SCATII On my Honeymoon last year I took with me 'Fighter Pilot', which was an incredible read, easily one of the best biographies I have read and decided that I would pay tribute to Col. Olds with either a P-51 or P-38, as I had already built an F-4 Phantom earlier that year. I decided it had to be the P-38 after a memorable passage in his book where he talks about downing an ME-109 in a glide, due to dropping the external tanks but forgetting to switch to the internals! With the aircraft chosen, that meant scouring for a decent kit and decals. After doing some research I settled on the Academy kit, but unfortunately in 1/72, was nowhere to be found and I thought that the project would probably not start. However at the tailend of last year I noticed a kit made by MPM on Hannants and took a gamble after the description said it was an Academy moulding. I found decals by Kits-World for SCAT II and when the postman delivered the goodies I nervously opened the MPM box... fortunately all was well and some crisp moulded plastic fell out with 'Academy' on the sprue! For those interested, the WIP thread is here: It's been a labour of love completing one of my favourite aircraft of WW2. My last attempt at a P-38 was well over 20 years ago, where I built an Airfix Lightning. Hope you enjoy!5 points
-
Hi folk's,another Hobbyboss easy kit this time the La-7,it's the mount of Ivan kozhedub triple hero of the Soviet Union.Built as part of a three easy kit build ongoing in the from Russia with love GB.5 points
-
Chords? You have time to play the guitar whilst flying those things? Blimey. "Break right and D minor 7. Roger" The cockpit is pretty special though Steve, so you are excused. (If anyone doubts this, grab a bog standard Airfix Hawk off the shelf and take a look at the parts. Zero resemblance to Wing Commander Friiag's masterpiece). Kirk5 points
-
Thanks Giorgio - it was a bit of a test! Thanks TT - brilliant videos, thanks for the links. I'm pleased that you reminded me it's tomorrow where you are - now I can post in the Gallery. Thanks Benedikt - out of patience now! Thanks Avereda - looking forward to seeing yours progressing She is done and in the gallery: Thanks also to Phil ( @HP42 ) for kindly donating the kit - I hope I've done her justice. Some shots not used in the gallery: Not sure what's next yet... several candidates in the stash - I'll see what grabs me in the morning (I should be so lucky, fnaar!)5 points
-
Hi Here is my last build with this Italeri 1/72 Short Stirling B. Mk I N6103 of No 149 Squadron in 1941. Nearly from the box : I've just added some curtains, modified the bottom of the engine nacelles and put the main under-carriage at the end. Soon to be published in Tamiya Model Magazine French Edition. Patrick5 points
-
Glad you like the progress sithman and thank you for the kind words, the 'soot' worked out ok though next time I think I'll get some weathering products to try. Thank you guys, much appreciated! The final assembly so far is going well, I will hopefully finish it tonight and get pictures these next few days. Cheers, David.5 points
-
Indeed they are. You should really go and see them. They put on a great show. Thank you. You're too kind. Thanks! Here's one for you. I did indeed. Ears are still ringing now. Ha! Great taste in music I see. X factor eh. There's a different opinion right there. I was never a fan of Blaze but the music was still solid. "Trooper" is a pretty sturdy pint, a session beer if you will. oh and thank you for your kind words. The early stuff if great, they have had a bit of a resurgence of late. Well the last 10 years. Oh and thank you also for the kind words. The guns are splendid aren't they. I got them in tonight. Look even better on the nose. "Does that count" well that's a hell of an anecdote, I think it counts a lot, lemmy and Motörhead are / were amazing. Alas I never got to see them live. You're a lucky man. Tar muchly. Thank you. I love Floyd too. Saw them ooh years ago. Now that was a gig. a little more done done tonight but I'll post about it tomorrow. thanks for all your lovely comments. Johnny.5 points
-
The background to this a/c is well known to all BoB nuts and anyone unfamiliar with the detail can view the actual a/c partially renovated at the IWM Duxford. My own fascination stems from seeing the Flying Review article from the 1960s when I was in my first unspectacular modelling phase, made more potent since I moved in 2000 into a house in East Dean that's arguably the closest to the actual site which Horst Perez chose to force-land his damaged a/c on the evening of 30/9/40. Some years back, I made what I thought was quite a representative 1:24 scale model of this a/c based on the camo scheme used on the Duxford a/c. I'll do a separate post on that one, but I've since found additional contemporary pics of the a/c and, rightly or wrongly, decided that I prefer to believe that the Duxford scheme may be mistaken, despite well respected opinion to the contrary. The evidence outside the contemporary b&w pics suggests I'm wrong, but I nevertheless present the following series of pics of W Nr 1190, White 4 from the 4th Staffel JG 26. I prefer most of m y BoB models that represent a/c that have been in the field for some time to look a bit used and abused, particularly the Jagdwaffe ones which were rarely housed under cover, mostly being located in the open or in rudimentary pens. Despite it being the subject of some paint adjustment in August 1940, "White 4" was doubtless heavily used as the BoB continued through Aug & Sept 1940. So, apologies to those that finish their models factory fresh. This model has been finished in Tamiya acrylics with uppersurfaces in what I concocted to show a faded variety of RLM 70/02 over Tamiya AS-5, which I feel is a credible faded RLM 65. The 4th Staffel tiger head emblem is my interpretation of the b&w contemporary pics, transferred to inkjet white transfer paper after reducing to what looks like the right size, with Abschuss and W Nr markings treated similarly. The yellow fuel triangle is also my interpretation. Evidence from the actual machine suggests the mark within the yellow triangle was "100" in line with the engine requirements, but on Luftwaffe a/c the marking would normally show "C3". B&w contemporary pics of the a/c on display in N America suggest that the triangle showed "C3" rather than "100" which may have been present due to earlier renovation attempts. I suspect my fascination with this particular casualty of the BoB will inevitably force me to re-think the whole thing and have another go at sometime agw, but the sun's shining and the green bits in the garden are getting restive!5 points
-
This is Bandai's latest addition to their ever growing Star Wars range, and probably their best one yet. They've done an incredible job both with the moulding, and with the engineering, meaning the kit has some stunning detail, and will slot together perfectly. The only thing they need to do is make it BIGGER. The original studio models famously featured a raft of parts from various classic Tamiya, Revell and Airfix kits, and Bandai have faithfully reproduced all of these, the most obvious one being the German Sd.Kfz 222 Armoured Car that sits on the back of the AT-AT's hull. For this build I've gone with a non-movie dark colour scheme, which was based on some profile artwork I produced for the project. You could see it as a special forces version, or anything at all really. I'm leaving it open to interpretation. The full build is here The original artwork that was used for inspiration And the build itself And some scale comparisons, first with the proverbial paint pot With Bandai's 1/144 Y-Wing... (at this point @Gekko_1 will be thinking up plans for a AT-TC (All Terrain - TIE Carrier)) And, obviously, with a Nigel top hat Thanks for looking Andy4 points
-
Good evening gents. I have mostly been getting ready for my holls but I did manage a little more tonight and some pics. The guns got added. And the props got assembled. Just needs decals. red nose day indeed. they fitted on ok too with the offset plastic washer. i also managed to fit one side of the UC doors. i had to cut the hinges to fit and I still need to attach the little PE actuators but they look great on. hopfully a little more tomorrow. some ref books turned up for my next build today. I think I made a decision. It's small but BIG! Thanks for dropping in its much appreciated. Happy modelling. Johnny string.4 points
-
When my wife and I were doing the same, we settled on my choice of Sally for our daughter. To this day my wife refuses to believe I chose that name from a song title in the Tommy album. (Sally Simpson). There are no points for guessing what I was going to suggest we name a boy .........4 points
-
On the basis that my name is already out, I submit Eric for consideration. I am proud and feel priviledged to have met Eric Brown, who was a clear, intelligent, very mortal, level headed and modest man who endeared me greatly. Some other famous war time sorts give the impression of having a huge deal of admiration for themselves. I found Chuck Yaeger's Facebook page to be unsufferable for example and unfollowed after a few weeks of self-lauditing. Eric Brown on the other hand was possibly the most personable and unassuming gentleman one could hope to meet.4 points
-
Thanks, chaps. I'm trying. I did just receive a lovely parcel from @GrzeM and the chaps at Arma-Hobby, however, so I really need to start on that.4 points
-
Well that's the camouflage finished, and I've had my first go at a bit of post-shading.The Hataka paints have come out well, and mixed well with a little bit of Akan's Faded White, when applying the post-shading.I've also done the exhaust cowling, the blast protector areas around the wing canons, the swing-wing roots, plus the 2 pitot antenna's. These were done with Vallejo Metal Colour Steel. The antenna covering on the tail is done with Akan's Russian Radome Green. I shall let this dry, and I can now think about some glossing. Untitled by ian gaskell, on Flickr Untitled by ian gaskell, on Flickr Untitled by ian gaskell, on Flickr4 points
-
First of all, I want to express here my solidarity again with the British people, struck again by an awful attempt at Manchester. Difficult to come-back to our subject in such circumstances, but life goes on, this life terrorists hate, this life we do love... Dear Nick, as an answer, these 2 photos showing how I get my cambered wheels: I made a cut at the red arrow level, and put a drop of cyano in the cut. Dry fit assembly: the camber may seem excessive, but take in consideration that the weight of my model, xeighted down by the presence of the driver in resin: P.S: Thanks Hannes for the hints about the Mef spark plugs.4 points
-
So I had one of those faaaarrrrrrrkkkkk moments that occasionally happen in this hobby when I went back through reference photos to nail down some of the final details. From the mid point of this project I had in mind that I wanted to depict the aircraft as it was immediately after it landed in Paris, and before the souvenier hunters took to the aircraft with a knife and cut out the Ryan logo on the right side of the rudder out (and various other damage done). From the kit decals, it was obvious that they had the period after the logo was cut out in mind as there was only one logo present, being for the left side. The kit decals also lacked the various flags of the nations visited which was present on the cowling of the aircraft. I had prepared an extremely small mask, at great difficulty, to spray the winged R logo that was missing in the kit decals. This alone didn't worry me. Upon further inspection of period photos that I had only just discovered (always the case) something was bothering me about the aircraft and that was that the slits cut in all of the cowling panels were not present! This of course would mean a complete strip and re-do of all of the panels that I had worked so hard on. I guess these cooling slits were a modification made to the aircraft before its publicity trip around the USA and Latin America. I had started the process of marking out all of the panels to re do them before I came to my senses and stopped, just before I took to the model and tore them all off. The added time and difficulty of the re-work would mean that I would miss the self imposed deadline of having this on the comp table at a show in a few weeks time, not to mention the risks of completely stuffing the model up. I think I had already pushed my luck in getting the original panels to work, so decided to stay with them. I went back through and searched for a moment in time that the model would represent, that is, after the completion of the record breaking trip across the Atlantic, sometime during the trip around the USA and before the trip around Latin America. On the museum example (which the model is based upon) there is two tubes poking through the bottom of the fuselage aft of the pilot seat which were fitted before or during the Latin America trip to enable the dropping of flares for night landings. I had already gone to the trouble of removing these as they were a little rough (and also not present on any of the photos of the period of time that I originally wanted to depict) so I was indeed disturbed that I had missed the cooling slot issue. I settled upon a point in time 3 months after the Atlantic trip that allowed me to reasonably accurately depict the aircraft as was the present state of the model. This date was notable for being a short joy flight where Lindberg carried Henry Ford as a passenger, being Ford's first flight in an aircraft. All of that aside, it was time to start sorting out a few final details. I started with the patch repair of the rudder where the logo was cut out in Paris. Once again, a small mask was made up to do this. I airbrushed decanted AS-12 to give it a slightly different hue and it will be blended in a bit with the final clear coat. There were many small slits made in the front of the cowl to allow air to enter. These were present as dimples in the kit but I decided to paint these on rather than cut them out as per the original process. Yet another mask was made. Next up were the small vents on the top of the wing. These were included in the kit as white metal but were a bit clunky and could do with an improvement. I selected some brass tube and inserted some copper wire into it. Pushed it in a little so that the copper wire would not be visible And then bent each part 90 degrees. The copper wire inserted previously stops the tube from crimping. The finished product. Looks way better. I wanted to add the many fasteners present on the cowling and propeller, so obtained an Archer decal sheet. Applied to the prop. Next up was the cowl. These raised detail decals really add an important element to the overall build. Pretty happy with how it is turning out.4 points
-
Finished. Sean4 points


This leaderboard is set to London/GMT+01:00