
Leaderboard


Popular Content
Showing content with the highest reputation on 25/03/17 in all areas
-
At last - two 20+ year builds completed! I started both of these in the mid-nineties. My employers decided to send me to Central Asia for three years in 1997 so I took both of them with me, plus a supply of modelling materials, thinking the long dark winter evenings would be great for modelling. Some hope! They came back with me in 2000 unchanged and sat until last year in the same state. The Phantom is from the Hasegawa Collector's series with a photo-etch fret, white metal parts and soft tyres. I got as far as assembling the airframe ( I wish I had taken a bit more trouble with the fit of the intakes) but it then sat in its box as an unloved lump of grey plastic until last year. It had decals for the 50th Anniversary Transatlantic Air Race, but I have used Xtradecal 74 Squadron markings. It was one of those models which I felt I ought to build but never had much passion for, but as it moved towards completion, it slowly transformed into something I now really like. The Airfix Buccaneer has got something of a reputation but it wasn't too bad. I had done very little to it - just assembled the upper and lower wing halves, the slipper tanks and the ejector seats. Some of the sink marks were enormous and needed a lot of filling, especially on some of the cockpit components. The fuselage mouldings are very floppy, but cementing the bomb door into the lower half stiffens it up a lot and lets you get a reasonable fit. Working round the joints a section at a time and leaving them to set really hard gives a good result. The worst parts are the lower part of the intakes, the top surface of the wings and the airbrakes. I think I could have saved a lot of filling by gently bending the tabs that form the lower part of the intakes (part of the lower fuselage moulding) downwards so they matched the intakes better; by assembling the top wing halves to the completed fuselage to get the best possible fit on the top and then adding the lower halves; but I don't think you can do much with the airbrakes unless you want to have them open! They hardly fit at all if closed. Using the kit decals was a mistake. They are fuzzy and some of them silvered badly even on a Kleer base. The roundels had a very slight out-register white margin which I carefully trimmed off. Model Alliance do a replacement set for a very similar scheme. Both are 'from the box' but I may replace the Bucc pitot with a Master one as I've it broken twice already and it's very fragile. They are brush painted with Humbrol and Xtracolor enamels.22 points
-
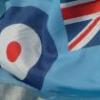
My first non-World War One aircraft in over 35 years is now complete! The kit is the new tool Airfix one in 1:72, with a resin wing conversion by Alley Cat to make it a metal winged version. I also added Eduard PE details, Rexx metal exhausts, and CMK resin 5 spoke wheels. The wing conversion is beautifully cast, with excellent detail, and fits the kit almost perfectly. I needed to sand under the nose to reduce a step there, but that was the only fit issue. My wing was also a little thick on the trailing edge so I had to sand that down, meaning I lost the detail of the ailerons and had to rescribe the rearmost panel lines, but others have stated that theirs were thin enough to not require sanding. Other issues I had were that the Rexx exhausts didn't fit so I had to open out the slots in the nose - unfortunately I hadn't checked the fit early on and didn't discover that until I was almost finished! I got them to fit, but it would have been much easier to do before anything had been assembled. The wheels also require reshaping of the mounting lug on the kit leg as the kit wheels have a slot, not a hole. Easily taken care of. The squadron codes and "N" in the serial are from the Microscale BoB sheet, while the serial number is from the Pegasus WWI RFC/RNAS serials sheet. All other markings are from the kit. The full build log is here. The aircraft modelled is VY-P, N2319, of 85 Squadron based at Lille-Seclin in early May 1940. Flown by Sgt G "Sammy" Allard who claimed 2 He111's destroyed on 10th May. Many thanks to @Troy Smith for all the help with the details of this aircraft and very useful info on Hurricanes in general! Anyway, enough of the chat, here are the pics! ] I hope you like her! Ian19 points
-
Well, it's finished! A most coulorful addition to my cabinet.. For the build look over here:18 points
-
Hello everyone , this is the 72nd scale profipack kit from eduard finished as a Cuban Air Force jet . Built entirely out of the box , the fit as well as the details are just excellent . The PE does a fantastic job with the cockpit though it is very difficult to photograph that once built up . The mig-15 is perhaps the most attractive jet in my opinion , I like to think of this jet as a cute tiger cub ( I suppose that makes the fulcrum the tiger ) The model was brush painted with gunze metal colour (aluminium/chrome ) and weathered using oil and airbrush post shading. Thanks for checking out the pics , Regards, Basu17 points
-
This is one of the most difficult to find Revell airliners and prices for this kit are usually astronomic. I had the luck to achieve this one on Ebay for a surprisingly cheap price. The box and all parts were in pristine condition,only the decals showed their age a bit. The kit itself is very nicely molded and has engraved panel lines. Fit is quite ok,the most difficult parts were the wing to fuselage fit which was very poor and required some serious correction work to get the wings in the right angle atached. I decided to build this one as a desktop model.The landing gear is very basic and I didn't like the look of it. As the kit included the classic Revell display stand which allows the model to be displayed in different "flight modes" I decided to omit the landing gear. The Convair 990 looks also very elegant in flight. I decided to paint the whole Swissair livery by airbrush and only use decals for the logos,and other details. Paints are Revell and Testors enamels. For the decals I used a mixture of kits decals (the "Coronado" in the tail,and the "A" from the wing-registration and the registration in the red cheatline) , Swissair titles,logos and the white cross as well as the registration on the wings come from the Glencoe/Frog Convair 880,cabin windows and doors are from a Vintage Flyers decals set. As I tried to build this kit mainly straight from the box I kept the "open cockpit windows" and just filled them with Krystal Klear" The engines show the Coronado before the enhancements she received on behalf of Swissair. Research showed although that the first examples Swissair received came in this configuration and were modified later on so I had not to make alterations on the kits engines. After years of searching for this kit,I can finally add this classic airliner to my collection and it will get a special spot in my vitrine. Cheers16 points
-
Hiya Folks, It is a bit late but here is the second Fortress that I started building before Christmas alongside the Airfix 100 Group one. This is the Revell B-17G built as a Coastal Command operated Fortress Mk.III of 220 Sqn at Lagens in the Azores, later transferring to Keflavik, Iceland which is where my Grandad was stationed, The worst part of this kit is the awful nose glazing which is ribbed along the inside with unduly thick plastic so I sanded mine smooth on the inside and polished it up as best I could,, here it is part way through; EDIT......UNFORTUNATELY I DO NOT HAVE THE BELOW PHOTO ANYMORE,..... SO COULD NOT RE LOAD IT AFTER PHOTOBUCKET DECIDED TO PLAY SILLY BUGGERS! I do wish that Revell had not gone this way with their nose glazing on this kit and the Halifax too. The model was finished using Tamiya rattle can bare metal silver and then matt varnished to represent a weathered appearance. Here is a view of a Fortress Mk.III wearing B Type roundels on the undersides, note how much smaller the ASV radar radome is compared to the model; Here is a post war Mk.III with underwing serials,from memory I think that it was at Farnborough and used for trials? Note the chin turret and ball turret have been deleted. And here is the excellent DK Decals sheet that I used,; ..... the excellent book `Boeing B-17 Fortress in Coastal Command Service' was an excellent reference and is highly recommended too; Also,.....this Key Publications special includes a photo of my subject, HB791,..... coded `T', but presumably prior to the ZZ codes being applied,with the single code `T' being behind the roundel and waist window on the right hand side of the aircraft. All the best Tony Edit,..... yes I know the elevators are not symmetrical,.... I knocked one while moving the model for the camera and only realised later! They are now level and dropped down. EDIT, EDIT,..... I HAVE REPLACED ALL BUT ONE OF THE DELETED PHOTOS FROM PHOTOBUCKET BY RE LOADING THEM VIA FLICKR.13 points
-
1/72 AZmodel Hawker Hurricane Mk.IID 6 Squadron Egypt 1942 This was built for the MTO GB and only just got round to taking and posting pics. Being typically an old East European kit it proved quite challenging. Quite a lot and a I mean a lot... of sanding and filing was required. Not entirely happy I got a good fit on the parts and rushed the paint job as well because the GB was nearing the deadline. I did manage to practice cutting out the landing lights as they are molded solid on the wings. Still, I did complete the model and probably go with a Revell or Hasegawa Hurri kit next time13 points
-
AEG G.IV Late 1:32 Wingnut Wings The AEG G.IV late first started to appear with front line units in early 1917 although it wasn’t until the summer that were available in useful numbers. Developed from an early concept of the heavily armed ‘battleplane’ which was designed to fight it’s way through enemy formations, it was the first of the line to be intended solely as a bomber. The battleplane concept was proven to be flawed after heavy losses were suffered, although it partly resurfaced in later years with the Me.110 ‘Zerstorer’. The G.IV is less well known than the Gotha series of bombers, but in fact was able to carry a heavier bomb load. It was also the most popular amongst aircrews as it was considered to be the easiest of the twin engine bombers to fly. At first it was used as day time bomber, but heavy losses soon saw it switched to night bombing raids. Another lesson that was re-learned in second world war. The kit was reviewed almost exactly 2 years ago, but deserved to be allocated sufficient time to tackle the build, which has taken until now. [Edit] Forgot to say there is a Work in Progress here.[/Edit] It is not one for begginers, but is not actually that difficult to build if you have a couple of Wingnut Wings kits under your belt. Of their bigger kits I would think it is one of the simplest to build. There are no wooden areas to depict, the rigging is actually pretty straighforward, being mostly 'X's of wires in the wings. And the fit is so spectacularly good it self aligns everything as you fit it together. The only thing to be wary of is whacking things on your workbench as it gets bigger. There are options to display the engines fully cowled or fully opened. I follwed the suggestion in the instructions to 'mix and match' to create a mostly open framework with the lower parts using elements of cowling. Almost any combination is legitimate, as period photographs will show. It is anothe winner from Wingnut Wings, as I thoroughly enkoyed the build from start to finish. It has proven to be more of a challenge to photograph, due to it's size. Hope you like it. To give an idea of its size, here it is with a WNW Albatros. Thanks for looking, John11 points
-
11 points
-
Hi everybody This is my last work. The Hawker Hunter 1/72 from Revell. It's a very pleasant kit that I recommend to the fans of this jet to do. I just change the cockpit with Eduard Photoetched, Quick Boost seat, Master pitot, and some improvements. I hope you like it and thank you for your remarks ! Hughes11 points
-
Hobbycraft 1/48 Hawk 75A11 points
-
Morning you lot. well now that was a new experience. I think it stems from many, many, many frosted canopies as a kid. I tend not to get stressed out but this is a real doosie. Cutting, sanding, fitting, sanding, fitting. Arrrgh. lets start at the start eh? cut out bits. Nice and shiny, dusty but shiny. but with all the good will and sanding and fitting in the world I couldn't get it to fit well enough. so I've made the executive decision to go canopy open. Which means this. so PING! "jees they come apart easy". And another first, stretched sprue. I built the little holding part but with only one dowel ( what can possibly go wrong? ) after some holding of breath and cold sweat we have it held in place with a cocktail stick bluetac and a peg. there's a bit of clean up on the rim I've just noticed in this pic but I'll let that dry before painting. Oh I masked too. here's the front. feels like I'm winning now. Just some paint and a bit of glue an we should be done. thanks for dropping by and for all your help and support. have a lovely weekend. Happy Modelling. Johnny open.11 points
-
Hi modelers, I think I've not written anything since 2016... not much time to spend on internet, I prefer to spend it on my models! Well, I've just realized that I am nearly on the way to finish a BF109G-6 in 1/32 from Revell, without having posted any thread about her! So let's go! The kit is the 2013 released BF109G-6 that has led to also a G-10, not sure about a K-4... anyway, the kit has a nice price and the surprise is good because it seems that Revell has made a step forward: the quality is much better than in the past.... except for two things : the boring box, and the primitive instruction sheet with numbering mistakes, omissions... to upgrade the kit I have the following goodies: - Eduard Brassin cockpit - Eduard Brassin exhausts - Quickboost compressor intake and gun bulges - Barracuda Spinner and prop - RB production coolers grills - Mastermodel MG131 tip and pitot tube So let's crack on this Gustav! The Eduard cockpit is a beauty! Crisp details, perfect fit and two options for the inboard canon (20mm MG151/ 30mm Mk108), the gun sight (early/late version)and the instrument panel, P-E or the resin one that requires additional decals. I have chosen to use the resin part; the P-E one look too flat for me. the colored P-E sheet. The two possible options for the canon: Revell swaped the references, Eduard is correct! I go for the MK108. Revell and Eduard side by side... Initially my intention was to use the kit cockpit, but I had a chance on the Eduard kit for few Euros on Ebay, so I decided to upgrade this area. But strangely I got an issue with the Brassin cockpit. The floor was 1mm shorter compared to the flanks resulting in a mismatch of all the side pipes with the floor. After Emailing the customer support, they send me a correct new floor. The contact with Eduard customer support has been excellent and smooth, thumbs up for them! It's the first time I was using Brassin components and I need to admit that the resin is pleasant to work with: it's easy to cut, the engineering is clever and it does not generate so much dust when cutting. I go quickly o the cockpit assembly, I use Lifecolor and Tamiya paint; my airbrushes are Iwata's, a 0.3mm High Performance and a 0.5mm Revolution : - P-E assembling - white primer and black preshading - RLM 66 overall. - starting picking-up the black components and dials - weathering on the instrument panel, plus gloss varnish inside the instruments. - Decaling, gloss coating. - overall weathering and smooth dry-brushing... and here's the result: I'm quite happy with the result; the belts are a mistic problem that I can't solve, but I'm happy the same. I've noticed some improvement in my technic compared to my BF109E-4 so that's the most important, I'm getting new skills. It was time to close the fuselage ! Before the closure it's necessary to fit the exhausts from inside, thing that will make the paintjob more delicate. So i decided to paint the exhasuts first and to mask them. Here again the Brassin parts are fantastic. The 4 scoops on the engine cowlings are molded closed so I opened them with the driller and sharp knife. Time to fit the wings! Starting from the top; the modular wings of this kit are clearly indicating that Revell has done more kit with the less engineering possible... in fact this wing section has the G-6 landing gear bulges giving the possibility to create a G-10 and a K-4 with the long bulges. It's this modularity that created me few issues. the first one is due to an incorrect position of the landing gear bay structure that create a slight gab between the wing parts. THe second is the inner plastic frame of the wing that just make the wing impossible to fit correctly. Not a big issue in the end, trim, cut, dry fit... In the end an overnight dry to ensure the glue has locked everything in place. there's also an issue with the top engine cowling part that has not a so flush fit with the side... so let's putty! the wings as well after sanding, filling again, riveting, the last components were installed : MG131, compressor intake, gun bulges, grilles, antenna, DF loop... the faps and cooler flaps were preshaded and painted inside with RLM02 and then masked and positioned provisory. added also the landing gears and the ATC rack.. time to prepare the Barracuda props and spinner! Ready for paintjob! Primer! Preshading and yellow stripe and wing tips. Since my skills in airbrushing are still weak, the preshading is a good moment to test the thinning and the pressure! first layer of RLM 76...the pictures are not that good... then going with the typical scheme RLM 74/RLM75. Attention! Revell references are swaped! I sprayed 50% thinned with low pressure( about 0.5bar). This time I did it freehand without masks for the scheme because I wanted to have smooth change between the two colors. Time also for the spinner : primer, preshading, matt white and mask. here's the result: Then I tried to create my own german cross masks with Frisket film... not too bad for a first shot... That's where I get for now. Unfortunately I broke my 0.3mm airbrush nozzle... and I need to wait for the spare part.... Still have the motling to do before final marks and decals and then weathering.... But in the meantime, I've started the FW190F-8, same brand and scale... Thanks for watching! Of course, any comments are welcome. Happy modeling ! Greif10 points
-
Well here it is, the RFI thread for my Morane Saulnier Type G as flown by Captain Pjotr Nesterov of the Imperial Russian Air Service, the WIP thread of which can be found here. Before I show some pics of the finished article, I thought it might be appropriate to give a bit of background info on the man: (Image in the public domain) Pjotr Nikolayevic Nesterov was born on 27th February 1887 in Nizhny Novgorod, Russia, the son of Nesterov Nikolai Fedeorovich and Margaret Fiodorovona. In 1897, Nesterov entered into Nizhny Novgorod cadet military school (where his father had previously worked) to train and work as a soldier. He completed his training in 1904. Initially specialising in artillery, his first exposure to aviation came in 1909 when he was posted to a balloon observation regiment as an observer. In 1911 he built and flew his own glider, before being accepted into the St Petersburg Aviation School at Gatchina. He graduated from there in October 1912, and very soon after he passed the examination to become a military pilot. In May 1913, Nesterov was appointed commander of the XI Corps Air Squadron based at Syretzk Aerodrome near Kiev. On the evening of September 9th 1913, he set off in his 70hp Gnome Rotary-engined Nieuport IV monoplane and climbed to 1,000 metres. Shutting off the engine, he put the aircraft into a near vertical dive. At about 600 metres he pulled back as hard as he could on the control yoke, and simultaneously restarted the engine, powering the aircraft through a loop. Eventually the aircraft returned to a normal horizontal path; Nesterov had performed the first complete aerial loop in aviation history. Upon landing, he was promptly arrested, charged with "useless audacity" and "taking undue risk with a machine, the property of his government". When 12 days later, French aviator Celestin Adolphe Pegoud emulated the feat to wild acclaim in Paris, the charges against Nesterov were dropped and he was promoted to Staff Captain. A short while after, he was awarded a medal by the Central Aero Club of Russia. With the outbreak of war less than a year later, the various armed forces lost no time in making use of aircraft, albeit solely for scouting initially. Nesterov, by now flying another French design (a Morane-Saulnier Type G), was himself actively engaged in monitoring and reporting on Austrian troop movements. On the 27th August 1914, returning from a scouting mission he happened to pass over some of his own soldiers at low level. These ground troops, very few of whom had ever seen a flying machine, were unable to tell whether the aircraft above them was friend or foe; some of them panicked and opened fire. Fortunately the resulting damage to the aircraft was slight - a hole in the fuel tank - and Nesterov himself was not harmed. He was, however, rather annoyed! He landed his aircraft adjacent to the regimental HQ, and having immediately sought out the embarrassed senior officers, proceded to lecture them, using some very choice language, regarding the differences between Russian and Austrian/German aircraft markings! Having already arranged to have a serrated steel stake fitted to the tail skid of his aircraft with which to rip open enemy observation balloons, Nesterov announced his intention to bring down an enemy aircraft. He had formulated a plan to bring down his adversary by ramming it, and fatally damaging it with his undercarriage. His chance came on the 8th September when an Albatros B.II of the Austrian 11th Flieger Kompanie (piloted by Feldwebel Franz Malina, and carrying Oberleutnant Friedrich Baron von Rosenthal as the observer) was seen over the Russian lines near Żółkiew (now Zholkva, Ukraine), at too great a height to be troubled by Russian artillery. Nesterov took off and quickly climbed to meet the intruder. His colleagues on the ground witnessed the slower Austrian aircraft weaving to avoid the attentions of Nesterov in his smaller but faster mount. After several failed attempts, Nesterov finally succeeded in damaging the Austrian's upper wing, whereupon it plummeted earthwards in flames. Nesterov's aircraft, initially entangled in the Albatros' wreckage as it fell, became free at some point during the descent. However, all 3 men perished; the first casualties arising from an aircraft-to-aircraft confrontation. There is some conjecture as to the exact circumstances of Nesterov's death - some claim to have witnessed his aircraft turning upside down about 25 feet off the ground, causing him to fall from the cockpit (as was common practice at the time, he was not wearing a seat belt). Others, perhaps more fancifully, claim he managed to survive just long enough to crash-land his aircraft - minus its undercarriage - at his airfield. In any event, he died from a broken spine the following day. His body was laid to rest in a tomb in the historic cemetery of Askold, in Kiev, on the banks of the River Dnieper. It became a place of pilgrimage for fellow Russian aviators on each anniversary of his fatal encounter, even beyond the chaos of the October Revolution. His method of ramming an enemy aircraft, known as 'Taran', was never recommended as a tactic by the military hierarchy. Nevertheless, several other Russian pilots (Kozakov among them) were known to have resorted to it and survived. It was even employed during the Second World War by a number of Soviet pilots, with a modicum of success and without loss of life. Nesterov's memory lives on to this day; his name has been given to many streets of major Russian cities, several monuments, and even an asteroid. In 1962, the Central Aero Club sponsored the Nesterov Cup, to be awarded to winners of the World Aerobatic Championships, a name that the cup still retains. Here then, are some (ok, a lot!) photos of my own humble tribute to the man, a 1:72 scale model of his Morane Saulnier 'G', s/n 281: Hope you enjoy them, I had a whole lot of fun making this little kit and learning more about the life - and death - of the man who flew the real thing.9 points
-
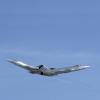
I know,some of you may think "how on earth can he churn out so many models in one week ?" As my stash has grown bigger and bigger,I decided to increase my production rate and work on several airliners at once. It's also more interesting to work on different projects on and off as only on one,at least for me...I have usually 3-4 kits on my bench on which I am working on and off so from time to time 2 airliners roll off production line almost simultaneously. So,here we are,the last of the bunch is also probably the most special one. The Air France Concorde in the striking Pepsi livery. Pepsi struck a deal with Air France in 1996 to brand one of their Concordes in this special livery. Altough the Jet could not fly more than Mach 1.7 due to the color,it flew 16 flights to 10 cities from Europe to the Middle East. After that,the Concorde was repainted back in the usual all white Air France livery and entered regular service again. The whole story can be found here... http://jalopnik.com/remember-when-a-concorde-wore-this-ridiculous-pepsi-liv-1709488664 I saw pic of this Concorde back then and always though it looked cool. So I was more than happy when I found the rather rare decal set for this particular aircraft.Having the decal set,I needed to get me another Revell Concorde as the other one in my stash will receive the Singapore / British Airways livery. I am not sure but I think the decal set was made by Gio Decals.The set was already a bit aged but it was still usable,although with much care. The tail logo was the most tricky part,esp. as they didn't really wanted to lay around the edges.I had to use a lot of decal softener and carefully repaint cracks that were unavoidable. Its not as perfect as I wanted it but I can live with it and from a normal distance its not really noticeable. All additional markings come from the original Revell decal set as it has lots of detail to enhance the overall look. The build was straight forward with only minor filling and sanding areas,esp. around the wing halves. I also shortened the front gear but it still sits a tad too low on the back. I airbrushed the whole kit by using Revell enamels. Revell Blue 54 with some drops white 04 to get as close to the Pepsi blue as possible.The instructions from the decal set are no help in that matter. Revell Gloss White 04 for all white parts and Aluminium for the landing gear. The engine hot sections were painted with a mixture of satin black and iron. The fuselage and wings were also clear coated after all decals had been aplied.The Pepsi decals didn't really wanted to stick,probably due to their age ?,so the clear coating did the trick. To tone down the too shiny surface a light mist of Testors Metallic Sealer was sprayed on the whole model. Enough writing on with the pics....after this one the next batch of airliners awaits its turn on my bench...9 points
-
He must be ill I wonder if he's a grapes and flowers invalid or 'boxachocklits please' ? if you are feeling low Ced there's a box of virtual Quality Street on its way While I have been waiting for H to post me a present I have been redoing the Clear on the empennage and giving an actual try out to my home brewed red/white tail danger marks Here are DAN and GER, quite obviously not talking to each other I must get them reunited soon.... ..... ..... Oh well they are not supposed to be together on this machine are they? So The old virtual jointing game This is the folded into itself side, I will wait til later and do the serials, ROYAL NAVY letters and DAN markings all at once later 'wiedersehn9 points
-
Hi folks, Finished off this quickie project this week - the elapsed time is quite long but the time I actually worked on it is pretty short as it was waiting for the Cosmo Zero. Another enjoyable little kit from Bandai with crisp details which belie the tiny size. (click for more/bigger) The base is another rubberwood coaster with a sheet of clear plastic on top. I painted the bottom with ocean colours in reverse, and then applied tinted gel on the top to get waves. The two layers give a nice impression of depth, albeit one that might be a bit unrealistic for the scale. The gel texture is a bit lumpy and messy in detail but if you look from normal viewing distance I think it does the job. The wave crests are just a bit of white paint, variously sponged, drybrushed and painted on and then wiped with a finger along the wave to break up the shape. I forgot to take a scale cue picture, but the model is just under 100mm long. No problems with cracking plastic on this one - I did give it a good coat of Klear before doing any weathering, maybe that did the trick? Thanks for looking! Will8 points
-
Here is the progress of my build of Ansaldo SVA 5 by Fly 1/728 points
-
Evening chaps. I've missed ye all over the last few days but much appreciated the banter. My thanks. Without further ado an update on the interior. Here'sthe kit floor and my new overlay tested for fit: That's ok so. Onto the next part then which is to mark out the general floor arrangement: I had Martian's wise words in my head about over-thinking things before getting down to this part, worrying somewhat that I'd burned-out a little on the planning. Tedious though it was I'm glad at this stage to have done that intensive research on structure and layout however, as it meant I could just build pleasurably now with a generally good idea of what needed to go where. You can see in the above sketched outlines that there is a central 'tray' feature recessed into the centre-line of the floor. On recovery operations this had the capture line coiled snake-like along the whole length of that tray. Along with a calibrated brake on the winch, this arrangement of the cable helped decelerate the snagged capsule in such a manner so as to avoid ripping the chute and lines, and so losing the payload. From reference photos I've also clarified the the forward fuel tank arrangement towards the cargo bulkhead didn't extend the entire width of the aircraft, but had a walkway space left on the port side to grant access to the flight deck. Again from photos I noticed that the stations don't go straight down onto the floor but instead meet a kind of box girder that runs the length of the aircraft, added here out of black plasticard: It's important to add that, otherwise the stations would go into the raised deck structure that you can see cut out now below: Those two outer sections then had part of the floor at the rear cut out in order to provide recesses into which the hydraulic arms for the capture poles are mounted, and then some platicard supportsto raise them from the kit floor: On the actual aircraft these raised walkways were made from a steel framework overlaid with plywood. Note also that the raised deck doens't do all the way back to the rear edge of the aircraft, as there are a set of rollers to be added. It was necessary to build that much of the floor first in order to establish a vertical dimension between floor and ceiling for the addition of the stations. I managed to get the starboard side done this evening; My initial plan for fabricating an elegant lattice for the stations that could just be slipped into place proved immediately utopian when I discovered that on the kit (I don't know about the actual aircraft), the vertical floor/ceiling measurement decreases slightly from front to rear of the aircraft. This, along with the irregular spacing of the stations meant measuring, cutting and gluing each one into place on an individual basis. As you can't get a ruler inside the fuselage, a pair of dividers was the best method of measuring the separation. I'll have a crack at the corresponding job on the port side tomorrow. Once it's clear the stations work fit-wise with the floor and ceiling on both sides we can start some of the horizontal detailing. The portholes also need masking on both sides so that will be a chance to try out my new punch set on some Tamiya tape. Glad to be back in the game; I hope you're having a good weekend so far? Tony7 points
-
1/700 USS Triton SSRN-586 the first submarine to circumnavigate the world submerged, also the only western submarine to date with twin nuclear reactors. This is the OKB resin model, hand painted in humbrol enamels, populated with Eduard 1/700 naval figures. Build thread here; http://www.britmodeller.com/forums/index.php?/topic/235018250-1700-uss-triton-ssrn-first-submerged-circumnavigation/ All the best Chris6 points
-
Hi folks. Seasoned campaigners will already have their preferences in this regard locked ‘n loaded, so this is for anyone new (or relatively so) to kit mutilation, as well as the incorrigibly curious (like me) who just like to see how others do things. My five friends, from the back and left to right. Sprue nippers. Capable of chopping through most sprue gates, their only real drawback is they may cause the plastic on the part to scar from time to time (ie – the act of closing the jaws tears a little plastic out of the part where it joins the gate), requiring a little filler to rectify. This is because they ‘cut and crush’ the gate (the part of the sprue frame that connects directly to the part itself), rather than ‘cut’ in the way a razor saw does for instance. No.10a scalpel blade in a retractable handle. There are innumerable ways parts can be ‘mapped’ on to a sprue frame. Sometimes access to a small part is so confined, the 10a is the preferred choice. You can either draw the blade over the gate repeatedly, until through or cut a ‘v’ in it that you deepen before repeating underneath on the side of the gate opposite. Never fit a blade to a round handle. One day it’ll assume a tiny life of it’s own, roll off the bench and with a high pitched ‘Wheeeee!’ dive bomb your foot, point first. It’ll hurt. The flat retractable holder stays put and the blade only needs to come out when it’s needed. Tweezer nippers. These are a step up in cutting power over the 10a and capable of accessing the same tight spaces. Again, they ‘cut and crush’ but to a significantly lower degree than full size sprue nippers. JLC razor saw. This gets the most use by far and has fine and ultra fine teeth. I use the latter on most applications, the principle being to cut only on the draw stroke to keep the cut accurate and controlled. Razor saw. A heavier version of the JLC, this is great for cutting gates ‘full width’, as you’ll see below in a subsequent image. Here’s a 1/72 engine for the Autocar in Airfix’s US Bomber Re-supply set. The part is small and the four gates are in locations where the moulded detail can be easily damaged if removal is attempted by cutting right next to the part. The crushing action of sprue nippers would be transferred to the part, pushing it away from them and distorting the other gates, likely causing tear damage. Best avoided. Access for removal is tight. Time to travel a more circuitous route to where we need to get to. To avoid such damage, take a step back and a different approach. The heavier razor saw was used to cut the gates away from the sprue frame itself. The result is to now have the part completely released from the sprue frame, with the gate stubs far more readily accessible. Once the part is thus safeguarded, the JLC saw can be used with the ultra fine teeth to cut the gate stub free. Once again, cut on the draw stroke (as you pull the blade towards you). Don’t attempt to saw back and forth but cut on the draw, re-position the blade, cut on the draw again and repeat until the gate drops away. This helps ensure a straight cut. If you’re less confident about this, simply ease the saw slightly away from the part and then cut on the draw. The surplus gate left on the part can then be trimmed off with the 10a and tidied with 1500 grit abrasive paper. Here are the tweezer nippers in action. cutting at their tips causes almost no part distortion and they can access all manner of awkward gate placements but are obviously limited to smaller gates, as they exert less pressure than full size sprue nippers. The sprue nippers have a flat side to the blades. Orientate the flat side to the part for the cleanest cut. You can opt to cut a little further away from the part if you think the plastic may scar, then trim with the scalpel afterwards and tidy with a little 1500 grit abrasive paper as necessary. So, that’s the end of this mini-tour of one of modelling’s basic tasks. Think twice, cut once. Plan parts removal and as you’ve seen, don’t rush it. Better by far to make multiple separation cuts to free up access to the gates ‘off sprue’. Obviously the number of gate combinations and parts access you will potentially encounter in your modelling life is huge but the principles here will go a long way to ensuring parts damage is either eliminated or kept to a minimum. That means ‘frustration avoided’ and helps ensure a happy plastic basher. Have fun with that plastic! Beer and cider has the same effect too…6 points
-
Good day, gentlemen. The painting was made “on motives”. It is difficult to see the scheme of the original drawing. Some kind of gibberish. The prototype belonged to Italy's long-range bomber squadron. This plane did not become successful. Many were non-combat casualties. And among the fighting was the death of son of Benito Mussolini - Bruno. As a result, this squadron began to bear his name. A set of typical shortrun. Many details were made by myself.5 points
-
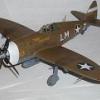
Hello all, This is my first RFI (although I did take part in a GB last year), and my first attempt at a base/vignette. It is modelled as the aircraft flown by Lt. Col. Benjamin Mayo, 84th FS, 78th Fighter Group, USAAF, based at Duxford, England, 1944. My wife picked the kit based on the cover art – something to put on her work desk (she’s American and instinctively drawn to the stars and bars). It probably wouldn’t have been a subject that high on my to-do list, but I really enjoyed getting into the project, as you always do once you start and do background research. I also thought a base and figure would be good to go with it, so the project grew… In addition to the many images that I used for reference, these are two which helped me compose the proxject. The first is of P-47s at Duxford, the second is of Capt. Dewey E. Newhart (who was killed in action on the 12th of June 1944 during a mission over Northern France. Incidentally, Benjamin Mayo survived the war): Tamiya 1/72 Republic P-47D Thunderbolt, kit decals (some electrical wiring and stretched sprue added for brake lines, wheel bay hydraulics and instrument panel wiring), Hasegawa figure, MDF/particle board base, 600 grit wet and dry sandpaper, Woodland Scenics grasses on top of sand/ground up cork/paint/PVA mix, and some DIY, including scratch-built wheel chocks. Acrylic paints (Model Masters silver, Tamiya olive drab), acrylic gloss “varnish”, with oil washes and some silver pencil “chipping”. The tarmac also got some pastel and oil treatment. The Tamiya kit is fantastic, but I wish I had done something other than use the kit decal for the seat harness. Many of the decals took some wrestling and involved quite a bit of MicroSol. Feedback welcome (and I appreciate that some of the oil washes are on the heavy side, now that I see the photos!). Thanks for looking, David5 points
-
Well taking a break from my Huron build to get work done on the house so had a little bit of time to get back with this one have now set it in some water and started to paint in the main color beefy5 points
-
Started putting the transfers on... And the Hellcat has had a couple of coats of Gloss Sea Blue...5 points
-
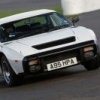
Evening all, I haven't posted anything in ages but have recently got in to building cars... I've been building the Belkits RS1600 since November. I was way too cowardly to post a wip, sorry but tempting fate if you ask me. I named my build Project Walker as homage to the actor Paul Walker who sadly passed away in a car crash, one of the leads in The Fast and the Furious film franchise. Naming seems to work for me, especially one with an identity like this. This is my version of the Mk1 Ford RS1600 Escort from F&F6. Finished with Zeropaints Fast and Furious Blue and Hobby Design decals. The wheels are aftermarket from MotoBitz, a real find and I'm very happy with the final colour. It would be great if more aftermarket comes out for this kit, different colour decals, RS alloys, bib spoiler... Bucket seats came from a Ford Focus and I added a cross member to the rear roll cage. Wing mirrors came from a friend spares box. In 1990ish I was driving around in a Mk1 Daytona Yellow Mexico, lowered, Janspeed exhaust and bored out to 1760cc. I might have been a boy racer; probably why when I saw the Belkits kit I thought YES! Thanks also to Pink Floyd, Ozric Tentacles and Public Service Broadcasting all of whom helped me out no end along the way. Anyway here's Walker I hope you like him. Thanks for looking.4 points
-
So so here she is, I've built using the separate track links and also the grill set. Everything else is OOB, the reason for the straw on the front is due to the tank being used in a Band of Brothers esk diorama. So here she is.4 points
-
Here's my 1/35 Trumpeter BTR 80A. It's a great kit but you must get the sit of the suspension right early doors - I didn't as you will see. I tried to sag the tyres with small screws but I was in great danger of wrecking the hubs and adjusting the screws when the wheels were on was tricky Painted with Vellejo acrylics which I still find tricky to get consistent results from but does give authentic looking colour I think. The KFOR script was done with some stencils I picked up which I was pleased with. Let me know what you think - plenty still to learn but getting there Cheers David4 points
-
Crikey Johnny I've only just spotted this on the previous page! Thanks old chap ! It looks like I did it more or less the right way, just taking it slowly. I didn't take out the main barrel and trigger. I forgot that I have some 'pipe cleaner/miniature chimney sweep' type cleaning brushes that I should probably have used on the barrel interior . At least now I have a resource I can return to to look at the strip down procedure . Advice taken on maintenance and cleaning. What on earth I was (or wasn't) thinking when I left that Gunze red in there I have no idea. Yes, for A and B it's wanting me to mix paints to make Medium Sea Grey, and for C and D I think it may be Azure Blue. I finally deduced the names by looking at colour names on the aftermarket transfer sheet: I don't have Humbrol 64. I have to say that so far, I think that the LifeColor may be a little dark for an underside colour. Perhaps it's correct. I also thought that Spitfire wheels and u/c legs had a metal finish, but maybe that's just because I've seen pictures of models and restored ones that are like that. In my next update I'll show how I've stripped the wheels back again. I may try Hataka MSG now the airbrush may be working again. I wonder if the new Hataka paint for brushes (blue range) colour matches their paint for airbrushes perfectly? Now there's a question worth ask I guess them, for builds where one wishes to use both techniques . Thanks again Johnny Best regards TonyT4 points
-
Next bit of progress, the Alclad on the vanes and paddles are done So now these are all done, time to start attaching them... Finally for now a better photo of the base which has had 2 days to dry out... I'll be adding more of the vanes today so more soon...4 points
-
25/3 update. More work on the main armament:4 points
-
Given the quality of the included brushes and paints on Airfix Gift Sets, let us be thankful for small mercies4 points
-
Thanks to Ced and Rob, slow and steady... More progress today and getting much closer to the RFI stage..... First up, for some reason I didn't check the fit of the exhausts......I should have, before painting! After realising how bad the fit was, I had to employ a scalpel to enlarge the cutouts on the nose. The first side went well, but the second left me with exactly what I didn't want...a large scrape across the paintwork! I think I managed to save it, although I'd rather not have had to! Then it was on to the final details: fit the prop, add the rear view mirror, canopy handles, and canopy...... There are still the pilot's step, radio aerial, and exhaust stains to add, and maybe a little weathering...but it's close to an RFI post! Ian4 points
-
Just to finish off,......the Revell Fortress is now finished too; Cheers Tony4 points
-
24/3 update. Main gun mount painted. Some touching up and repairing done to other paintwork. Heavy Duty Judy is teething Main gun assembled and ready for painting. Whoot, that is a big artillery piece. I hope to add more tomorrow4 points
-
Definitely a provocative title but hopefully just an informative post and a request for the people who understand colour theory to comment on and allow me to improve my methods. The following are photos of the colour chips in the RAF Museum book with various filters as used for black and white photography in order to show the possible problems in interpreting colours from photos. I haven't done a thorough evaluation yet of the differences. Photos were taken outside in direct sunlight in RAW and converted using Lightroom, all with Daylight (5500K) White Balance and all the conversion sliders set to zero, hopefully aproximating to standard black and white film. I'm tempted to try the 'No Filter' shot with the yellow slider set to -100 but I'm not sure if this would emulate orthochromatic film or not. One of my interests was Light Slate Grey versus Red for Coastal Command code letters and it's obvious that there can be effects from different filters. Titles seem to have come up as links, sorry. No Filter P001 Yellow 25 Red 21 Orange 11 Yellow/Green3 points
-
Edited using Postimage. Having just joined the group I would like to share with you some of my recent projects. I have just returned to modelling after a 20 year break. I know there are inaccuracies,but I build models as a pastime and for my own amusement. Airfix Focke-Wulfe 190. 1/72 Scale. Tamiya Sea Harrier 1/48 Scale. If this had been my first experience of Tamiya models I would never had bought another, I had to rescue it from the Bin of Doom on several occasions. Airfix Harrier GR3 1/72 Scale. A very early Airfix kit, another one that had to be retrieved from the Bin of Doom, finished the model and the outriggers didn't reach the floor. First aircraft model I have built wheels up, won't be the last. Thanks for looking.3 points
-
Although I love my classic racing cars, it's ages since I built a model of one. I started this one because my model club was holding a competition entitled "Civilian Vehicles". It's fairly basic - as you might expect from a set of moulds that date back to 1967. I presume it was also available in Airfix's Slot Car series - which was their rival format to Scalextric. Here's the finished model. The main area I'm disappointed with is that the roundels were on the thin side. I replaced the kit wheels with better items designed for slot cars.3 points
-
Not good PC . I hope it was a good course. It's important that the courses are actually delivered with some enthusiasm these days, that they're enjoyable (assessment aside). Mrs. T. has just borrowed AUD $13,000 to do a distance learning Masters, full time, whilst working, full time. Australia really is, more and more, copying the US in all aspects of policy, treatment of citizens and so on. I could digress.... Thanks John . Yes quite a busy year so far at Tiger Towers. I ran with the first of PC's suggestions, albeit with a different fluid. I couldn't find my laquer thinner, so experimented with turpentine and cotton buds, an old paintbrush. I decanted a small amount of turps into the bottle cap and applied it to the airbrush seams. It became clear that a very remiss cleaning, around five or more months ago, following use of Gunze red was the reason for the problems. In the end I gave up on the 'no soaking' rule and left the tip to soak for half an hour or so. I had to use fine long nose pliers with folded kitchen roll between the jaws (to prevent scratches), to persuade the airbrush to come apart. The needle was completely seized. I had to grasp it, being careful not to apply any bending force, and pull it out with a gentle swivelling motion. The lid required a little brute force. After a good and thorough cleaning with the turps, I reassembled. I gave it a couple of blasts through with turps at 40 psi. High pressure on purpose to hopefully blast any remaining paint gloop through. It appears to be atomising and spraying well, but I haven't tried it with paint yet. Fingers crossed . Thanks Ced ! What would one of my threads be without a spillage? Rescuing the Mac was fun and it really is quite usable. Today I watched no less than four John Mills War films on it courtesy of YouTube. The processor was able to deal this and the movies were very clear. By way of a fun thread tangent; henceforth commences a brief TonyTiger set of great British war film reviews: For those interested, and as it's the weekend, here are links to these rather wonderful movies; Old Bill And Son is mainly jocular, yet examines many 'types' that featured during the war; the spiv, the strong mother, the ageing WWI veteran, the lovely French lady and so on. It also becomes quite emotional, examining themes of family commitment, loyalty and loss. Wonderful jingoistic British cinema! We Dive at Dawn gets a big thumbs up from me. I'm going to have to ask @whitestar12chris if it's possible to get hold of a Turkish Class submarine kit, in case it's possible to make a model of 'U61'. Known as HMS Sea Tiger in this film, what better name could be given to a vessel ? The Way to the Stars. Blenheims, an Anson, Hurricanes, Bostons, B-17's and Lancasters. This history of a WWII airfield, interwoven with personal interest stories of those serving there is just wonderful. A slow start, but give it a chance; a wonderful cast and it touches the heart in many ways. Noel Coward's 'In Which We Serve" can be found in a few lists of 'best War movies ever made'. Rightly so. Chaps trying to survive after their ship has bought it following attacks by JU-88's off of Crete. Noel Coward's role as captain is superb, had me holding back the tears a few times. Stiff upper lip required, an excellent look at the role of the Navy in WWII, from the lives of lowest to highest rank. Got to make the thread interesting ! All best regards TonyT3 points
-
US Mk-82 Bombs 1:32 Brassin Whilst some of the big 1:32 scale kits provide a decent selection of weaponry in the box, they aren’t always up to the standard we seem to have come to expect when attaching them to our masterpieces. This is where Eduard and their Brassin range come in and the ever expanding catalogue of resin bombs come into play. Arriving in the pretty standard cardboard box, the set has parts for six complete bombs. The casting is up to the usual standard, with some very fine details, such as the bomb lugs moulded onto the bomb casing, although one had managed to be broken in the box. Assembly is nice and simple, as once the fins and bodies are removed from the casting blocks and cleaned up it’s just a matter of joining them together, then deciding what fuse type you’re going to fit. There are two types of nose fuse, one short and one on a fuse extender, there is also the option of just having a plain nose cap for an un-armed weapon. Then it’s just a matter of painting, (any colour as long as it’s olive drab it seems), adding the supplied decals, and weathering as required. Conclusion As is becoming the norm for Brassin these bombs are really well manufactured. Great moulding, good attention to detail and an excellent addition to any modellers armoury. Review samples courtesy of3 points
-
Some of you can probably tell with the amount of my older stalled builds today has been a very productive day, that has something to do with the lovely weather and also as I've been up since 4.30 this morning watching qualifying for f1 (which I am also very happy with as Ferrari looks to be very close to the front this year ) Today I have got some more clear onto the bottom half of the body so in a couple of days once I have polished it up slightly, no where near normal as it's a 70s lemans car so the paints weren't great, I can finally start pushing forward to getting this thing on its wheels. Speaking of wheels I have painted up the rims in a mix of tamiya x18, rubber black and a small amount of gun metal. After getting some semi gloss clear over the rims, mainly for protection not because I wanted more shine, I put the rims in the tyres and had a go with Fujimis normal crappy tyre decals. They look ok but it took a lot of patience to get them into place as like normal Fujimi tyre decals they didn't want to leave the backing paper And finally I have started to clear coat the upper part of the body, going very slowly as not to mess up the decals now. More soon Shaun3 points
-
Well finally I've managed to get a decent topcoat on the body shell. I'm giving Hycoat rattle cans a try and having been impressed with their primers decided to try the gloss coat which is 'Double Acrylic Concentrated' - wow so much lettering on such a small can. The first attempt wasn't too successful, the finish resembling shiny sandpaper? Yes, warm room, warmed paint etc., etc. I left it to harder off and flatted it down whilst doing other things like the RS2000 masks - which will be appearing at the usual place soon. I recoated the body shell yesterday and this time, using the same application process, success. I think it's good enough to avoid polishing as it will be decalled within an inch of it's life and no doubt weathered after a coat of Alclad Klear Kote. I've also been experimenting with the much discussed Molotow Liquid Chrome pens with impressive results, I think these may be ideal for retouching the sprue attachment points on chromed parts, rather than having to strip and rechrome the part, especially if it's the ballistically hard Belkits chrome! I'll post a photo if anyone's interested and has not seen the You Tube clips.3 points
-
Latest one off the production line and the first for this year this is my take on Tamiya's 1/48 F-16 Aggressor painted in the colours of the 18th Aggressor Squadron based at Eielson AFB in Alaska in the attractive Arctic scheme. Built pretty much OOTB with only a couple of added extras such as the static wicks. The kit builds quite nicely but is not the easy and perfect build that some claim, at least it wasn't for me. Don't get me wrong it is a nice kit and builds well but you need to take care on a couple of parts of the build, mostly the intake. Painted with Hataka paints which were like coloured grit and will not be used again. This kit was built as part of the ongoing F-16 STGB which is well worth a look as there are some cracking builds on there. Thanks for looking in guys, and if you are interested here is the WIP. Craig.3 points
-
Although wary of Luftwaffe colour debates, as it happens I have measured the chips in the various books, including the older Monogram. FWIW the closest FS value to the RLM 79 chip in Tafel 5 of 1941 is FS 10219 at 2.80 where < 2.0 = a close match. The RLM colour is a little more pinkish. FS 30227 is further away at 6.85, significantly lighter and more towards beige with less red, but both are Munsell Yellow-Red (YR) hues. For a model considerations of scale and weathering might be borne in mind. I was surprised to find no remotely close RAL hues, not one. The RLM 79 chip in the Monogram book is closer to FS 30215 at 1.95, again both YR. The difference between the two chips is 2.67. The Tafel 41 is a tad lighter and "pinker", the Monogram slightly more "brown saturated" and yellower. Nick3 points
-
Right so I think it's about time to drag this build back on to the table. After a couple of months sat in storage because the red plastic of this tamiya model is just insane and managed to get through around 4 coats of 2 different types of primer at the same time I had to get some zero paints sealer paint which I put on yesterday and because it's very quick drying I also got some tamiya white primer on again afterwards with thankfully no problems so far so the brawn is slowly coming back to life. More soon Shaun3 points
-
Friends, After hitting a rough patch with my 777 I wanted to hammer out a quick build to get some mojo back and try out a few new ideas related to paint and finishing. I have a dozen or so 1/200 Hasegawa kits ready for paint, so I grabbed this 737-800 and a set of appropriate decals. The paint job wasn't much of a challenge, I admit, but I've been wanting to practice polishing my clear coat to get a really deep, smooth gloss finish so it was preferable to keep it simple. Also, I had never used Rib Hobby decals before, but I was very impressed with how well they went on the model... Anyway, I just applied a coat of Future to seal the model, and I will attempt to polish the finish once the clear cures. So, for now, I'm not ready to call it finished... Thanks for taking a look!3 points
-
So, on to construction! I couldn't decide whether or not to include the pilot figures, so I started prepping them anyway. They looked a bit odd staring straight forwards, so I cut off the instructor's head and re-attached it so that he can keep a watchful eye on his student. Better not miss any items on that checklist! The cockpit seats and control columns were attached to the floor, and some sort of wheel (maybe trim?) attached to the port-side cockpit wall, and then all of the interior parts were ready for painting All of the parts were painted with a mixture of Tamiya flat black and ocean grey acrylics, for a very dark grey. I used the ocean grey simply because I had some lying around. Details were painted with a toothpick, and Tamiya metallic aluminium dry brushed over the walls and floor. Some grey weathering powder was used for further highlighting. Most photos seem to show everything in the cockpit as various shades of dark grey, so I took a bit of creative license and made some levers red and yellow. The decal for the instrument panel went on well after I trimmed away the carrier film around the top section of it. The ejector seat handles were made from the wire from an electric resistor. I find this is also useful stuff for clearing out blockages in my glue applicator (there's not a lot fits down that tiny tube!) I'm going to put the cockpit together, and make a decision on the pilots based partly on whether or not I can get them in post-assembly. It's going to take a while to paint them and I don't want them holding up the rest of the build. That's all for now!3 points
-
Hello Benedikt, I have been busy with other things (re-reading the entire main Dune sequence, and Jane Austen's completed works minus Susan, practising, firefighting courses and tests, etc.). The Seafire has languished after carelees assembly- and handling-damage to the head armour plate and F11 (PU resin is very fragile, particularly after having had holes drilled in it). Said damage is proving rather intractable to fix, and I've given up after each attempt to sit down and think it through. An extended break reading has been essential to keep me from going completely around the bend. A break from captioning and uploading snaps has and preparing posts been necessary as well. I've kept away from the rest of the forum so as not to get attacks of envy. I'll be back when I have something to show - but don't hold your breath! Cheers, Alex. <-- has been having a well-earned break.3 points
-
WOW thank you guys - such kind words and from so many of you - I am thrilled to bits please forgive me if I don't respond to each, I read every one and they all mean something to me I can assure you of that ..I have been a bit quieter lately as life and work have got in the way a bit, and in 2 weeks I am off to Miami for 3 weeks so trying to get as much done as I can.. The first major step was assembling the cockpit pod and breaking it out of it's supporting frame - I can tell you I hold my breath every time I touch it as if anything pops off inside I am doomed.. ..also the bit I was most worried about was fitting it into the airframe - if it didn't fit I either build a new cockpit or a new Spitfire.. ..thankfully with a bit of fettling it slots in neatly ..the bottom floor needs doing next so it really is complete and I can fit it, so I rolled a sheet of cheap litho (it's going to be painted so not the good stuff) into a shape and worked it until it loosely fitted.. ..then while it was taped in place I built a holding jig around it to keep everything from flexing - the trouble with using litho in this way is if you flex it, anything CA'd to it just pops off so this is essential... ..and you can just see the floor through the assembled 'pit - so now have to figure out how to detail it and still be able to slide this into place - even marking where the bulkheads are is impossible as I can't get inside with anything to do that.. ..still loving making this model - even if it is getting like a ship in a bottle working on the cockpit.. thats it for now, back soon TTFN3 points
-
Tamiya 1/48 F-16C Block 52 South Carolina ANG Tamiya 1/48 F-16C Block 32/52 "Thunderbirds" Aftermarket Master Model Pitot/Probe Shull24.com AAQ-33 Sniper XR pod and GBU-38 JDAM w/ BRU-57 smart rack GBU-12 Paveway II and TER donated from Block 25 kit. Left Side HTS Pod from Kinetic F/A-18C kit. Decals from Caracal Decals "Dark Vipers #1" sheet Have Glass V paint by Hataka, various other paints by Tamiya, Lifecolor ,Vallejo , Mr Hobby.3 points


This leaderboard is set to London/GMT+01:00