
Leaderboard


Popular Content
Showing content with the highest reputation on 10/02/17 in all areas
-
Hi, Some view of my second build of 2017. I choose the Airfix Shackleton for start the year. It's a great kit but i can resist adding some photetchef from Eduard and a pair of Brassin resin wheels. There are many pictures but it is a large plane35 points
-
Morning all. You know sometimes, you just run out of steam on a project - for various reasons. This is one I was really enjoying, and then for some reason - principally because the windscreen caused me grief and got a big glue mark in it, the spark sort of died a bit. I'm not unhappy with it, but Im not overjoyed. Anyhow - inspired and aided by Pappy's & Callum's models - here's my "lurker" - finished with Tamiya & Gunze acrylics, decals from the kit, and few improvements to the gun pods. I've forgotten to add the kill marks, and the camera fairing on the starboard nose should be in MSG. Oops! All comments welcome as ever. Jonners34 points
-
Hello fellow modellers, I would like to share my latest build with you. Since the Mosquito is a British plane, I think here is where 'she' belongs... Mosquito B Mk. IV Series II (Film Production Unit - FPU 1944) Serial No. DZ414, Callsign 'O' Orange with 'camera' mission markings... DZ414 was handpicked out at Hatfield Aerodrome (The De Havilland Factory) on 22. December 1942 by Flt Lt C.E.S. Patterson for service with the FPU ( RAF Film Production Unit). He subsequently flew DZ414 for 20.000 of its 24.000 miles, including its debut operation to L’Orient on 14. February 1943 in the wake of the 466-bomber raid staged the night before, the night bombing attack on Berlin on 20/21 April 1943 (performed to coincide with Hitler’s birthday), when DZ414 was badly damaged by flak, the raids on Turin and Nürnburg, and on the long-range operation to Jena on 27. May. The second ‘B’ on the nose is for the Berlin operation on 13/14 May 1943. Whilst part of the 2nd TAF, DZ414 took part in many notable operations, including 14 anti-Diver sorties (V-1 Flying Bombs) flown by Flt Lt Vic Hester of No 613 Sqn. along with cameraman, Flg Off Oakley, between 19-25. June 1944. The aircraft also participated in the Amiens prison raid on 18 February 1944, its pilot Flt Lt Tony Wickham, making three passes over the burning prison so as to allow Plt Off Leigh Howard to film the flight of 255 of the 700 prisoners released through the breached walls. On 31. of October DZ414 participated in the attack on the Gestapo headquarters in Aarhus, Denmark, filming the attack on the buildings of Aarhus University. Finally, on 21. March 1945 DZ414 was flown by Fit Lt K L Greenwood of No 487 Sqn. RNZAF, as part of the force sent on the Shellhouse raid, Flg Off E Moore of the FPU filming the first wave attack on the building. Despite its wartime contribution, this veteran machine was SoC in October 1946 and unceremoniously scrapped. The kit is HK Models 1/32 Mosquito B Mk. IV Series II. Aftermarket photoetch parts from Eduard & Profimodeller + a lot of scratchbuilding. HGW seatbelts. The RAF Accumulator Trolley is a resin kit from Iconicair with a scratch built JAP Engine Generator on top. None of the kit glass was used, instead the vac-formed canopy/nose glass from Tasman was used. And finally, some detail photos of the build... The cockpit, a mix of Eduard and Profimodeller photoetch together wit a lot of scratch built details... Rolls-Royce engine with cooper and lead wire/piping, scratchbuild exhaust shrouds, header tank, air compressor etc... Bomb bay interior with 'scratched' bomb attachment crates... Paintwork is done with AK Interactive RAF Daylight Fighters set, Ammo of MIG British Cockpit Colors, washes and oil weathering... Kit decals were used together with stencils from Profimodeller and some homemade markings printed on decal paper. Thanks for watching! Regards: Kent19 points
-
Hello, I`ve decided to show you some of my older models, so here`s the first one. The kit is well known oldie goldie. I mus admit I really enjoyed building it. There is a lot of things that have been replaced and altered... I thought this one would be a rather quick build but it turned out to be something longer for my standards... My model depicts or is rather inspired by the Deperdussin from Oslo Teknisk Museum. I`m aware that there are plenty of errors and flaws in my build, but I`m relatively happy with the result.17 points
-
Hi all! Just wanted to share these pics of a build that I have recently completed. This was a rather unusual build for myself as it wasn't for me; it was sort of a commission build for a friend of mine who was retiring. She was the Office Manager of the church that my wife and I attend, and where I volunteer in the office one day a week. Last year, during a conversation that we had about my RAF service, she happened to tell me about her uncle that had served in the RAF during the 2nd World War. Sadly she had never met him as he was lost on ops on 27/28 July 1943 during Operation Gomorrah, the bombing of Hamburg. With the information she was able to give me, and with a little more research, a plan started to form as to how I would be able to say thank you to this lady for the 12 years of service she had given the church. So fast forward to the beginning of January this year, I acquire all the bits and bobs I need - including the latest Airfix 1/72 BI(FE)/BIII Lancaster and make a start. My target date - 5th Feb which is her last official date as a member of staff of our church. I took my time (a little too much I think) and it was finished on the Thursday before hand! so here you go. I am aware there maybe a couple of flaws, but then again, who isn't critical of their own builds! So here you are: Well I hope you like the pictures - I dont have this in my possession any more but the lady who it was built for, and her husband adore it, and as a representation of the aircraft that her uncle was aboard when he was lost I think I works very well. In this case, it doesn't need heavy weathering, or for it to look like it has been on dozens of ops. It is a memorial and a thank you. Regards John B13 points
-
Well, believe it or not I'm going to post a progress report! I've been painting and detailing the resin cockpit from Pavla, and although it's not quite finished I think you can get a good idea of what it will look like. As I mentioned before, I painted the pit Gunze H339 Engine Grey FS16081 instead of black. I used a black wash to bring out much of the detail that Pavla cast into this part - and there's a lot of it. The instrument panel and side consoles are from the Eduard photoetch set. The PE was designed for the Airfix kit (which is for the B(I).8 or very early PR.9), not the Pavla resin, so of course none of it fits. So I cut the photoetch into pieces that would match the surfaces of the resin. It's not as difficult as it might sound, you just need some good photoetch shears. So here it is at the moment: The ejection seats will come later. They're always one of the last things I do for some reason. The cockpit fits quite well in the Airfix fuselage - there will be no "Aires Cockpit" sanding sessions that last into the middle of the night! I also purchased the wheel wells from Pavla. They're a direct drop in replacement for what comes with the kit. The Airfix parts are actually pretty good (although there are some ejector pin marks in a few nasty places) but I think what Pavla have produced are much nicer. When I was test fitting the cockpit, I realised that the "lip" at the very front of the fuselage (which the kit nose slides over) has to be removed if the model is displayed with the nose open. Accordingly, I hacked it off. I might have some more progress tomorrow, but we're also preparing for my grandson's first birthday. This of course means whatever skills I might have related to model building will most likely be called upon to make Mickey Mouse decorations. Ugh. Cheers, Bill12 points
-
Hello, Only OOB...oil paint for the weathering... next Typhoon... Regards!11 points
-
This is Italeri's Bell Sioux model (US Army release) modified to represent a Westland Sioux of the Dieppe Flight, Air Troop, 40 Cdo Royal Marines, operating out of Sembawang Air Base, Singapore, 1968. Italeri do issue a British Army variant of this kit, but this was a US one, so I had to do a few small mods. The landing skids aren't quite right, and the radios behind the fuel tanks are a little small, but otherwise I hope I've captured it. I added said radios, paper seatbelts, the small blade antenna and ground plane, plus the whip aerial on the tail. Decals come from my spares box. I've seen an etch replacement tail boom for this kit, but quite honestly the kit parts seem good enough for me. They are a little fiddly, but the only real issue I had was aligning the engine - although it doesn't really show, I think mine is at too much of a slant forward and I'm not sure where or if I went wrong. FLY NAVY FredT11 points
-
For the 50 year anniversary of the first flight of the Viggen I built two Lansen's used in the test program. First out is a A 32A Lansen "Gamma" used for tests of the Radar and some electronics. It is a Heller 1/72 kit with "Gamma" parts from Maestro Models and decals from Moose Republic (ex. RBD decals) Next is a J 32B used for ejection seat tests. Also a Heller kit that was converted to the Fighter variant J 32B using the conversion set from Maestro Models. I had to scratch build a new canopy and the fairing behind the cockpit and also the camera pods on the wing tips. The decals are the J 32 prototype decals from Moose Republic and some of my own,9 points
-
A couple of Tamiya classics, that is to say, old. The girls got them for me at Christmas, finding them on ebay, both for a tenner! They gave me them almost apologetically, afraid I wouldn't like them! Being Tamiya they pretty much fell together and only needed glue and paint, the only problem I found was the age of the decals, most of the Gepard ones were okay but the Sgt. York ones fell apart. They were both brush painted in Humbrol enamels and it was a first for me, painting a more complicated camouflage on a vehicle. The Sgt. York is in "European Winter" and the Gepard is the NATO tri colour scheme. Both are completely out of the box and I have to say were great fun to build. So my first two totally 2017 builds completed. Sgt York 1 by phil da greek, on Flickr Sgt York 2 by phil da greek, on Flickr Sgt York 3 by phil da greek, on Flickr Flakpanzer Gepard 1 by phil da greek, on Flickr Flakpanzer Gepard 2 by phil da greek, on Flickr Flakpanzer Gepard 3 by phil da greek, on Flickr Hope you like them & please share any comments but as always, the number of rivets may not be correct!9 points
-
I built three Eduard Spitfire IXs (two IXc late, and one IXc early) as my first builds of 2017. I weathered Henryk Dygala's "Pat", but things went south after that, so no more weathering for me for a spell.9 points
-
I hesitate to call this a build thread just yet. It's more of a holding area while I sort out what needs to be done. (and maybe keep Bill quiet for a little while). This is purely a diversional build from my current train build which has now lasted around two years. I'll use this to provide myslef with some light entertainment when things get heavy down in train land. So, what are we doing here ? The topic title says "Scout" - it also says "1/48" and no-one make a 1/48 Scout do they ? Well, of course not - why would I make it easy on myself ? I am attempting to make a Scout AH1 from the Fujimi Westland Wasp something or other. Should be nice and easy n'est pas ? Well let's take a look shall we... First the good news.... the fuselage isn't too bad. There are a few gaps and some misalignment which should be easily fixed with a little fettle here and there. The bubble top canopy looks to be a good fit here on the starboard side. Unfortunately, the same cannot be said of the fit on the port side. Nothing seems to match up at all, not to mention that there seems to be a divot missing from the top of the canopy. Well then folks, let's continue. Surely it can't be that bad now can it ? What about the interior ? Well, this isn't going to do.... looks like there will have to be some scratch building done in here. Oh my dear lord.... according to the instructions, this is the main rotor gearbox And it does NOT get any better from here on in.... this bit of Robert the Robot with Bell-bottoms purports to be the engine This is "other bits" of the engine ! Looks like we had a bit of hole slippage there - don't you just hate when that happens ? The "almost" complete engine..... sorry this just isn't going to do ! EHhrrrrrrrrrrrr..... No ! No freakin' way ! Sorry sir, it just ain't happenin' OK Bill... happy now are you ? look wot you went and done ! I foresee some scratching in my future - now I need to do lots of reseaaaaarch cos I'm pretty sure the engine, gearbox, interior and other bits do not look like the parts supplied with this kit. ... to be continued (but probably not anytime soon!)8 points
-
"And we go on fighting despite the assurance that we have lost the war. Why, then, do we go on dying? Out of despair? But there is no despair. You know nothing about defeat if you think there is room in it for despair." -- Antoine de Saint-Exupéry, Flight to Arras Hope is the only good god present among men The rest abandoned us and went to Olympus. -- Theognis, Fr. 1135-6 They came in the night. They killed everyone. I hid in the shadows. And then it came to me: The magic sword. -- "Kill Them All", The Magic Sword You're gonna have to do better than fear You're gonna have to step out of the shadows and fight. -- The Protomen, "Keep Quiet" "This then, my lords and gentlemen, is the message which we send forth today to all states and nations, bound or free, to all the men in all the lands who care for freedom's cause. To our Allies and well-wishers in Europe, to our American friends and helpers drawing ever closer in their might across the ocean, this is the message-lift up your hearts, all will come right. Out of depths of sorrow and sacrifice will be born again the glory of mankind." -- Winston Churchill, "Speech to the Allied Delegates", 12 June 1941 I've just finished up three Eduard Spitfire IXs, and I was wondering to myself what would make a good follow-up to building three of a pretty great (but not perfect) kit of my favourite airplane of all time. Easy. Build four more. Since I have four of the quad-kit Royal boxings of Eduard Spitfires, I have plenty to spare. Poland's been much on my mind recently, as I'm currently reading Richard Lukas's The forgotten Holocaust: the Poles under German occupation, 1939–1944, and recently finished his shorter work Did the Children Cry?, about the brutality inflicted upon Polish children by the Nazis, so one of the four Spitfires I'm building will be EN526/SZ-G, Polish ace Aleksander "Gabby" Gabszewicz's first Mark IX, with the wide cannon blisters and short carb intake. I can't seem to find a photo of this aircraft, so if anyone knows of one, I'd be most grateful. In the event EN526 can't be represented by the model, I have a backup plan in the form of another Polish Spitfire. I'll also be building WZ-GJ/"Eleanor", a reverse lend-lease Spitfire LF.IXc flown by Major Garth Jared (3 + 1 probable + 1 damaged) of the 309th FS, 32nd FG in 1943. Tony recently built this aircraft, and I agree with his conclusion that it was painted in the standard Day Fighter Scheme rather than desert colours. Major Jared was a graduate of the University of California, where he met his wife Eleanor; he would later name his Spitfire after her. He served as a test pilot in the P-47 program before heading out to the front, where he was killed in action on 18 April 1944, when his P-51 was hit by flak. In addition to his wife, he left behind a year-old son, Stephen. I was able to locate Stephen on LinkedIn, but figured he would be unlikely to respond well to some weirdo contacting him with questions about his late father and so have not bothered him. My third Spitfire will be LF.IXe NH432/OU-D/"Waipawa Special", flown by Flying Officer Max Collett of 485 Squadron RNZAF. In 1993, Max Collett took the time to write a letter to a small boy in America after seeing his letter to the editor in D.C.O., the official magazine of the Spitfire Society. I've kept it ever since. It would be impossible for me to not build this aircraft. Lastly, I'll be building TB752/KH-Z/"Val", flown by Squadron Leader Henry Zary, an American of Polish descent (his birth name was Zartykiewicz) from New York City, enlisted in the RCAF in February of 1941 and remained with it throughout the war, though as an American he could have joined the USAAF and received much higher pay after his own country entered the war in December of 1941. He scored five victories, three of them in a single sortie on 25 July 1944, when he shot down two Bf109s and then, having expended all of his ammunition, caused the third to crash by skillful flying. He contracted pleurisy after the war and died in Quebec on 11 February 1946, aged 27. 20170208_223137 by Edward IX, on Flickr 20170208_223141 by Edward IX, on Flickr So far I've begun the seats. I'm doing one with the styrene seat armour for scientific reasons. 20170208_223125 by Edward IX, on Flickr8 points
-
**Pictures are in the process of being added, I have 'IT' issues So after a year of really banging out group builds I have decided to kick off another WIP (note I said kick off and not complete!). I have numerous bits in the stash and so it was a case of what to choose. The group builds were mainly 1:72 and 1:144 so I really wanted to give my sausage fingers a break and go for something bigger so 1:48 it has to be. I didn't want to pick out one of my stalled builds so that cut out the Wasp, Aurora and finishing off my failed Wessex GB. I have also had a bit over overkill with the Wessex and Helo GB so Rotors were out! So i shelved my Navy Lynx and Seaking. I wanted something BIG and also clean so I wasn't continually knocking off small bits, and seeing a few Canberra builds over the last couple of weeks stirred my interest in this graceful beast. I used to watch these at Yeovilton in my early grubbering career, I would stare across the runway as these beautiful creatures lifted into the air with their Hunter brethren.........then I would get a crack across the back of the head because I should have been marshaling a Seaking 4 instead! But I did love these Navalised bombers. I had a 1:48 Airfix Canberra in the stash which I bought on a whim because it was cheap......and I mean really cheap, I think it was half the price of the Airfix 1:72 and even then I decided it had to be a Naval one so bought the AliCat resin set there and then which I think was 3 times more expensive than the kit! but worth it! It was then filed away. And now I think it is time, time to get this beast out. She will be a TT18 of Fradu, in a grey upper with black/yellow stripes under and a few dayglo stripes. So here we have the stuff... First up the obligatory kit boxes I wont go into the details of the Airfix kit, it has been reviewed planty of times and its flaws are many and well known, but here are the Ally Cat extras, the set mainly consists of the target tugs and a couple of extra Belcher Bits (made under license) drop tanks. The resin is, as expected, beautifully cast and there is an etch set for the fins. I am not sure of which ones to fit but there is a nice selection. It also comes with a nice decal sheet, I am thinking of going with 841 or 844 as I like the boxed in numbers for the nose, just think they look cool and kind of 70s like. Decals look nicely printed. There is also some nice clear resin and a couple of mods are required for the kit. A whole top deck and canopy replaces the kit area which is good as the kit has issues in this area, also included is a side vision window and a new bomb aimers glass. The resin will need a careful polish but should go nicely. I just have to be careful with the cutouts. So onto the kit and the first thing I noticed was the crew, I think airfix must have been modeling them on Hobbits or something, below is a comparison. On the left is my 1:48 scale dummy (no name yet but from Tamiya) and on the right 'Dave' my 1:72 scale buddy (from an Airfix islander). I tend not to measure details too much but go by the eye of something I can reference. If there is a lump the size of my hand on the real thing I can gauge the scale by relating it to one of my Scale mates. A very handy tool, but you can see the Airfix Canberra crew are around 1:58 scale, so we are definately not fitting the crew. As yet we have no other extras but I am seriously thinking about a pilots bang seat as a lot can be seen under that canopy, but that's for a bit late, I shall see how the kit seat looks. So first up is a start on the cockpit, I just assembled the plastic to see what we have and then throw in some extra detail. So the basic cockpit And because of the glass nose you can see the back end of the IP so I have added some backs for the instrumentation and will add in a load of wires to make it look busy One note is I cant find any front details for the Navy Canberras so in the absence of that I am going to model it on a B2 (from which they were converted), But a question for the well knowledged out there. In the reference I looked at just back from the bomb aimers window is a flat window on the under side. Would that also be the same for the TTs? Now would be a good time to find out before I go too deep! Finally the in progress front area. Not much will be seen as it has a small opening and will be black but I will know . So there we go, she is underway. The navies heaviest bomber I do believe? Enjoy! Bob8 points
-
The new museum at Filton, the home of the Bristol Aircraft Company are repatriating a Freighter from NZ shortly, which in my world is great news. To celebrate I have taken my Superfreighter from the stashlet and decided to make it as a Mark 31 using the Magna resin conversion kit. So without further ado.....the boxes. A little surgery... Now here's where I need some help, what goes on behind the pilots seat in that big hole? The answer is not freight.. there are I think some racks with equipment on and possibly another seat? I have looked at previous builds, searched the internet, bought the Freighter book etc. but cannot find a nice clear guide. Any one know?7 points
-
Hi everyone, Here is the third of ten models on the workbench waiting to be finished. A great kit from Eduard. I used Gunze paints, AK Interactive Paneliner and Tamiya Weathering set. I hope you like it. Bruno7 points
-
When I was browsing for references I came across a website with two videos of the aircraft and thought 'Oh good, I'll come back and watch those later'. Of course I didn't bookmark the page (big mistake) and now I can't find it... rats. I was hoping one of them showed the interior, specifically the rear cabin, as I'm having trouble deciding what to do with D5, D6 and D8: Hmmm. A seat of some sort. That's as far as I've got. I've sent an email to ICM in the Ukraine in the hope that they can send me a better, or at least clearer, set of instructions. I did assemble the front bulkhead last night in a brave spate of bravado: Weird eh? The instructions are still upside down and the pedals, carefully removed from the sprue, broke in half while I was positioning them. Anglo-Saxon was uttered. Other bits are ready for painting: I'm out for a neighbours get together tonight and off to the Tank Museum Model Show tomorrow so I may 'pause' the build for a while and see if ICM respond.7 points
-
][/URL] Thx, Gary7 points
-
Here's one i did earlier, its the venerable Heller Illustrious built as HMS Victorious in her early war years, actually not a lot of the original kit survived, there is probably more (St) Peter Hall (White Ensign phot etch set) than Heller in the result, as the kit only bears a passing resemblance to the actual class of ships, lets hope someone comes up with a decent 1/350 kit, as I do think they were very attractive carriers. Aircraft and crew were L'Arsenal, the crew were cut down a bit from thier 1/350 figures (there are about 160 of the little blighters), the rest is bits and bobs of plasticard and brass.6 points
-
Dear Fellow Modellers Thought I would try my hand at the Riich 6 pdr and crew The figures are servicable but not superb. I gave loader no 1 a Hornet head. I added some more camo tapes to their helmets The markings for the men are Durham Light Infantry in 49th Infantry Division. Perhaps you could imagine them defending the Rauray spur following Operation Martlet? Hope you like it? Andrew6 points
-
No going back now; the windscreen is glued in place!6 points
-
As so often with things you dread and put off for ages, that wasn't as bad as I'd feared; the secret was to anchor the part down as firmly as possible, because any movement at the wrong moment was fatal (ask me how I know). In due course, once the glue is fully dry and I have cleaned up a bit, I will probably add some Micromark or Archers rivets around the edge of the top piece to give a 'border' like the others - but I am calling this section done. ...and (dry fitted) in situ, thus completing the top section of the fuselage. Note also restored Coke Can and the PE surrounds to the ECU exhausts... and lack of SSLs / Manual Throttles, which are yet to be restored. More later Crisp6 points
-
Hi chaps. Sorry for the lack of updates, but I've been rather busy. Had to wait for my new toy to be delivered!  A guillotine! Not a bad bit of kit, for the £12.20 I paid for it, with spare blades. Needed a couple of modifications though to get it working right. Used my trusty tamiya scriber to cut a groove for the blade to go into, as before, the blade just came down flat onto the base and wouldn't cut through the material. Also the cutting guide, the red quadrant, had some lumps along the face you butt the material against. Looked like it might have been left from the removal if spare material, from the moulding process. Another little niggle is that there is no side to side movement in the guide. It's great if you only want to cut angles, or strips of one width, but not much else. I had to make a packing piece to get the strip width I wanted. Think I will make a new, adjustable guide in the future. It produced a nice clean cut with minimal clean up required. A bit of forces is needed to cut through, and the base tends to flex a bit. I think it needs screwing down to a solid surface, and handily,there are two screw holes provided at the front of the base, by the handle hinge. Overall a good piece of kit. Right, after all that I can now get on with the build. I'm using my new toy to cut 8mm wide strips. I want to use these to replace the twisted and distorted rail sections in the upper rear leg sections. Here's the setup for cutting the strips. I'm laminating 13 strips into a block, to get the required thickness. This is what I've ended up with, a block of 13 strips, equalling 6.5mm, as I used 20 thou card stock. here you can see what I'm hoping to achieve. I've got 2 done, only another 6 to do. Sorry for droning on, hopefully the next update will be shorter, and sooner. Ta ta for now. Matt6 points
-
AMG catalog 2017 Source: https://www.facebook.com/permalink.php?story_fbid=1717594275219693&id=1505395696439553 V.P.6 points
-
Do you ever try and do something just to see if you can even do it? 20170209_204242 by Edward IX, on Flickr Me too. 20170209_212255 by Edward IX, on Flickr Anyway, only a little work done so far: 20170209_212108 by Edward IX, on Flickr I'll still need to paint the seats that curious reddish-brown colour they were, as well as the black of the seat backrest -- that will come once the enamels dry. I may rethink which Spitfires exactly I'm building -- I had originally wanted to do more aircraft from the occupied countries, but last night I was kind of exhausted when it was time to pick out paint schemes. So that might be a little up in the air, we'll see. We'll see! It took almost a month exactly (granted, January is interminably long) to build the last three, so hopefully I can get these done within six weeks.6 points
-
Ok here is tonights work - completion of the camo. This an update of the past two and a half hours or so of work. Sat down at the bench @ 9pm. Started masking. Was a bit slow going as was concurrently watching brooklyn 9-9... By 2145hrs it looked like this: Longest part is working out where it all goes, using panel lines as references. Then filling in the areas is easy. So by 2221hrs it looked like this after almost an hour and a half. Good job the undersides were still masked from the 1st green... Next it was off into the garage at 2230hrs to this! 3 degrees C mind you acrylics spray great in the winter, nice and cold so hardly and tip dry or retarder needed. Anyways after 20 ish mins by 2250 it looked like this... Alright alright alright... It came out quite glossy, think thats because its so cold it went down very 'wet' so smoothed out alot. Anyways, back inside, 15-20 mins to let it dry and have a brew to warm myself up and did this! And this is the final result - ta da! Really pleased, came out better than I expected. Couple areas to rub back and touch up. Plus had a couple tiny spots of the first green lift off (not to the plastic) with the tape. Must have touched the primer with my paws... A note on the colours, the contrast is very strong, looks more like a 71/02 scheme, but I reckon it's because the 71 came out very matt which makes it lighter, and the 70 is glossy which darkens it to the eye. After all the varnishes and weathering it will even out. (I hope!) Thanks for looking and good night! Now 2350 and up at 0600...6 points
-
Gday All Latest project to hit the Cutting Mat is the Kittyhawk P-39 Airacobra. kittyhawk boxart , Ive always liked the look of the P-39 in RAF colours, so will be doing this kit as a Mk1. American aircraft - to me - always look better in pommy colours anyway! Something like this hopefully. P -39 Collection - A Cash Peter Arnold 050c_zpslqoqxkgy , The kit looks fantastic in the box, hopefully it builds up nicely too. Kittyhawk allow you to build a model with engine cowlings, gun access panels, cockpit doors, radio access panels, oil tank hatch and radiator flaps open. In addition, landing flaps can be displayed in the lowered position as well as separate elevators and rudder. I plan to take advantage of all of this! Despite this multitude of open panels, I decided I needed more. Quite a few photos I saw of Airacobras being serviced show not only the main rectangular cowling that Kittyhawk supply as a separate part off, but also the triangular panel behind it, so the first thing to do was separate this with the aid of a scalpel cowling removed , YIKES!!! Thats quite a large hole Of course this then meant I had to actually build the additional structures you might see. Why do I do this? Anyway, some interior structure was knocked up using plastic strip. , Im certainly not a super detailer or even decent scratchbuilder. It took me about six goes to get that bulkhead the right width! To me it looks a little over scale, but the strips were the only sizes I had, and , yes, I know I should have laid the stringers down first, then done the ribs but honestly, once its all said and done, I don't think you will notice. I just wanted some structural components visible rather than a blank opposite wall. I also purchased the Eduard sets for the kittyhawk kit. On the exterior set Eduard supply the fastening framework for the cowlings so I combined both to outline the open panels on the one side. The centre divider has a plastic strip behind it. The other fuselage half has the cowling and radio hatch glued in the closed position with no fit problems , To Be Continued Bruce5 points
-
This is my first RFI as a newbie member of the forum. When I decided to get back modelling I picked up a few cheap and basic kits to practice on with a view to trying out at least one new technique with each. In this instance the goal was rigging but I ended up trying out a whole lot more. Despite the age of this kit it was a real pleasure to work with and it's whetted my appetite for more! I've already started on the next two 'practice pieces' from the (rapidly expanding) stash. As I intend building another, more detailed, Swordfish in the future this one was was built in the radar equipped (pic 3), rocket toting, Mk III guise. WIP is >HERE< Swordfish RFI 1 by Martin Fay, on Flickr Swordfish RFI 2 by Martin Fay, on Flickr Swordfish RFI 3 by Martin Fay, on Flickr Any feedback, criticism and advice welcomed! While researching for the build I found myself intrigued by the aircraft, the missions it was involved in and the men that flew them. As a result I've ordered copies of "The last Torpedo Flyers" and "War in a Stringbag" to learn more on the subject. Cheers, Martin5 points
-
Hello all, This is a recent completion for the UK Gunpla Modellers FB group 'scratch/mod' build off which ran from November 2016 until this week. With the aim of the GB being that all entries had to modified in some way, be that a custom paint job, scratch building, new panel lines etc. As per, despite having all that time I did the majority of the work in the last week or so in sessions snatched between completing assignments for my degree course and job hunting. Hence why it's a bit on the sloppy side. Still, I finished something for a GB and that shouldn't be taken likely, considering my previous form. The base kit is Bandai's aging HGUC Zaku II from 2002 I believe, which is pretty low on detail but would make an ideal first kit for a younger or more inexperienced modeller. Those with more experience are probably likely to find it pretty lacking. Though if you're good at that sort of thing (which I'm not) I'm sure it would make a great blank canvas for detailing up. Due to my aforementioned time keeping issues I decided to go for the 'clean' look which I've not done before. I was wanting it to be more weathered (especially to hide where I'd failed at even the most elementary modelling techniques like removing seam lines....) but ran out of time. In Brief the mods I added to the kit were as follows: HGUC Zaku II (2002) RED 12 Mods: -new panel lines on the torso, front and back skirts and feet... -monoeye and bazooka range finder both replaced with polished perspex rod. -ribbing added to Zaku shield and right shoulder -builders parts hands added -backpack replaced with a modified version of the Gelgoog Jäger backpack -left shoulder modified to shorten spikes -stupid giraffe neck shortened -'Red 12' colour scheme. Paints used: -Stynylrez primer, Tamiya, AK Xtreme Metals, Vallejo Model Air, Microscale Industries gloss and matt varnishes and Ammo panel washes. Decals: -Revell, Academy, Bandai and some rather rubbish third party Chinese ones. I had a real struggle with the Bandai and knock off decals, the Bandai ones had yellowed pretty badly and were on pretty thick film and despite my best efforts silvered pretty badly in some places (though my being in a rush probably didn't help) the third party ones were on nice thin decal film but there was often too much of it meaning that there was a lot of careful trimming required, they also weren't that clearly printed and didn't respond at all to Microset/sol. Toodles, Paul5 points
-
Howdy folks, I've only been in the model making world for just under 2 months now, I've snap built a few Gundam kits however never completed one to where I'm happy. I think I've picked 2 kits to begin with that would be considered difficult, a Real Grade Gundam Red Frame Astray and a Master Grade Full Armor Unicorn... The wee Astray at about 5 inches tall is the first kit I've 100% completed, or there abouts anyway! I've applied stickers, removed some nubs (because I was pants at it at first, although still not brilliant) and added some panel lining. Here are a couple of pictures I've taken of my final offerings; And a couple of very quick edits that I did on my phone:5 points
-
This was probably my most favourite Bandai kit to date. No glue anywhere and all the seams are small or hidden. I lit this with a couple of Leds and button batteries so it's all contained. The switch is hidden behind the right gun and the batteries are accessible via the underside panel.5 points
-
All Hot of the bench is this lovely scheme IMO.Built out the box with model air and tamiya flat cote.Decalling was not as bad as i expected. _MG_5069 by Glyn Fuller, on Flickr _MG_5070 by Glyn Fuller, on Flickr _MG_5071 by Glyn Fuller, on Flickr _MG_5072 by Glyn Fuller, on Flickr An enjoyable build. Glyn5 points
-
Hello folks , this is the 72nd scale kit by modelsvit finished as an Indian Air Force machine from the eighties . For a short run kit , the fit and finesse of the plastic is very good ; however the decals proved to be a nightmare -The sharkmouth decals split into about 15-18 parts each and it was a painstaking exercise to re align them and then touch up with a fine brush . It kind of shows in the final result in the form of some crooked teeth . The kit rocket pods were very poor and were replaced by eduard resin UB-32 pods . I weathered the model though not much can be made out in the photographs - one of the shortcomings of mobile phone camera is their poor dynamic range and inability to reproduce desirable contrast between shades of blacks . Cheers and thanks for checking out5 points
-
Hey Everyone, Back working on the MAZ. The DIO project is a lot of fun and has eaten up a bit of time recently. I left off with needing to build the four differentials for the drive line. These little things have turned out to be a nightmare to figure out the geometry and how to go about rendering this thing. I have had a miserable time trying to find photos of anything down inside the frame of the beast. The best reference I have believe it or don't, is the plastic part that Trumpeter has produced for the MAZ kit. The card reference was somewhat simplified in its design. I ended up using the card pattern for the parts and just sort of made stuff up as I went as to the final shape. This is the card reference and the Trumpeter kit part... The parts for the eight U-joint end mounts... This is those part mounted together... I next had to come up with some sort of spacer... Looks like it might work... This is about half of what I need for one differential. I have to finish building this one unit, then one more with this pattern. I have to flip the patterns for two more the opposite direction. Be Back Later...5 points
-
Thanks for all your kind comments lads. I've had a really grotty day at work (so few photos) which has really only cemented my intention to get out of the institution where I'm currently employed at the earliest possible opportunity before I too become irreversibly idiotized... Enough personal woes: Your gracious comments were a real tonic to come home to and I thank you for them. I've done a little more on herself this evening. The tissue-paper CA seemed to work ok for the clothes and I've experimentally employed a little Mr.S 1000 to soften a few contours and plump up her cheekbones a little. I couldn't for the life of me get her right arm resting convincingly on her leg with Milliput so 'borrowed' the arm from a Buccaneer pilot, suitably thinned down and attached Frankenstein-style. It looks ok. I thinned down that nose too Martian - you were quite right, there was something of the Joe Bugner about it before! Dinnae fret over those apparently fat legs and clown shoes, they are the latest additions awaiting reducing in the next go. I've got to take my youngest into town on Saturday mornings at the moment for a tech. course he signed up for but hope to fiddle with Mo again tomorrow a little and get some EDSG onto the plane on Sunday. I intend doing nothing more this evening than pouring a big gin and taking a trawl round to look at how you've been getting on with your own stuff. Tony5 points
-
First up, a quick win (as we ex-management consultants no longer have to say, thank God!): some more nice Eduard PE-ery: Again I took the trouble to counter-sink this with my invaluable micro-chisel. Definitely worth the effort; it looks like part of the airframe, rather than something stuck on top of it. My thoughts are now turning to bits that I cannot put off any longer - notably this area (apologies for slight lack of focus; this was taken when the airframe was still in the main museum, where the lighting is not great for photography - most of my shots of this cab were taken in Cobham Hall (the reserve collection) where the light is much better): One thing that I see with pleasure (especially after what I just said about counter-sinking) is the fact that the oval shape with prominent rivets around the edge of the ECU exhaust is proud of the aircraft skin - trying to counter-sink that neatly would have been a challenge! So I can happily use this (part upside down 107): Note also parts 86, which are the exhaust blanks, as seen fitted to the real thing above. (I like the little detail of the THIS WAY UP PORT stencil, though whether I can produce anything that small must be in doubt). Eduard also produce two little handles for the blank, elsewhere on the PE fret. So far, so good. Now move your eye forward to the engine bay door. Appreciate the lovely raised rivets! Then look at those blooming' coolling grilles... I have already fitted the rear fire access one, which is well inset into the skin, so a doddle to fit inside the part. The forward ones, however, are a challenge - and is the thing I have been putting off. The problem is that - unusually for Eduard - the PE grille they provide for this aperture is rectangular, whereas the hole is very much tapered. Not easy to tell in that shot, so hang on a minute while I take another one. [A few minutes later]. Right. That gives a better idea of the fairly complex geometry of the aperture. The lower two are fine - the triangular one is mirrored on the starboard side, and that worked perfectly, and the small square-ish one to the rear is simple enough (and is also inside the skin). It's the top one, which is tapered and twists throughout its length, and I have been dreading trying to get a piece of brass to fit cleanly. Below you can see FlightPath's offering on the left - by no means awful, but actually (though interestingly it isn't very apparent in this photo) it is just surface etching, not a grille - and every other grille on the model has real holes in it. The other one is Eduard's piece, which just looks as though the designer put it into the Too Difficult tray. Anyway, addressing that is going to be today's game, because it is the last major part that remains to be fitted to the airframe - and therefore prevents priming. Back later, no doubt. Crisp5 points
-
Hi Guys at the last Scots Nats in Perth I got a book from John Adams with a picture of a B24 of the 36th Bomb Squadron named Beast of Bourbon. It had the best nose art I can remember seeing and so I decided to go for it and build it. I looked it up on the net and found several pictures of it plus a model of it on some tribute forum, not sure which. Anyhow, I purchased an Academy B24H from a friend and contacted another mate, who is big into 8th Air Force, for help with the noseart. He had some information for me and as he is a bit of an artist he said he'd do the decals for it. Some may know Rob Gray from several 48th scale assembly ships he built several years ago that appeared at the Donnington Nationals, In fact I think he won a catagory with his 'Pete the pom inspector'. He also supplied some colour information from the B/W photos as he's colour blind and sees in greyscale I presume. Not that I ended up painting the upper nose surface in Post Office red as he originally instructed me to. I changed the Academy front turret for one out of an Hasegawa kit and pinched the forked antenna on top of the fuselage from the same kit plus the two antenna on the nose. I was going to use the rear turret from the same kit but it was too large so went with the Academy offering. The wheels are resin from True Details and I also bought a set of Aviaeology stencil decals. The kit was sprayed with Humbrol Aluminium (56) from a can. I originally didn't like it as I thought it was too dark but it's grown on me. I sprayed the control surfaces with matt varnish, masked them off and sprayed the whole kit with clear Laquer from Halfords. I also bought a Squadron canopy set mainly for the bulged blisters as the Academy set doesn't have them, at this point I didn't know I had the Hasegawa kit in stock but in fact that had the blisters as part of a complete panel. The rest went in the spares. Having never used a set of Robs decals I was unaware how they'd behave but apart from one little annoying bit they were fine. The annoying bit was the hole for the little blister windows. Rob had sealed the decals with decal coat and I applied them as supplied. I then had to cut the window out and the coat acted a bit rubbery, in hindsight I should have cut them out before I applied them to the kit. The model was finished using pastel chalks for a light weathering, still might add to that at some point. I bought a copy of Squadron of Deception by Steven Hutton and it has all manner of information about the aircraft of the 36th including details of radio fits. It seems Beast of Bourbon had several types fitted but I couldn't figure out when so I went with 8 Mandrel antenna, 3 under each wing and 1 under each tailplane. B24H 42-50385 R4-H 'Beast of Bourbon' joined the 36th Bomb Squadron on 4th July 1944 at RAF Cheddington and served until crashing on take off on 19th February 1945 at Long Marston. Of the crew S/Sgt. Carl E Lindquist (21) Pvt. Fred K Becker (20) and Pvt. Howard F Haley (20) were killed. RIP [URL=http://s82.photobucket.com/user/Honeybee_02/media/20170123_164311_zpshtytyeaj.jpg.html][/URL] Hope it meets with approval. A very big thanks go to Rob Gray without whom I doubt my version would look so good. Now about that 48scale set........ Regards Paul5 points
-
Woo-hoo, Emily's on the way Cheers, Stew5 points
-
Cheers folks, again your comments are very much appreciated. I've not done much to it as I've been waiting on the clear coat curing. Anyway once it was dry I could have left it the way it was, but there was a couple of dust specks and also I feel that the straight from the AB the clear coat looks kinda toy like. So to dull it down slightly I purchased a new set of micro-mesh clothes and got to work. I worked my way through grades 3200, 4000, 6000, 8000, and 12000. I then compound polished it with Tamiya Polishing Compounds. I then finished it off with a coat of Zero Paints Pure Carnauba Wax. Here's the roof before I got to work. Shiney but as you can see some dust specks in it. And after I then did the rest of the car in the same way along with all the additional panels that make up the car. Here's the bonnet with the bonnet vent part attached to it. Then it was onto the tail section. I think the tail lights could have turned out better as I used solid red, instead of clear red by mistake. (I wasn't paying attention) I've only to fit the number plate holder then that's this part finished. Well that's it for the moment, hopefully it won't be too long now until I get the rest of it finished. Cheers5 points
-
Thanks John - I'm saving the hammer for later threats, but haven't needed it, yet. Thanks Leon - Google translate does it's best... it's just not that good (yet). Thanks Alexey - another great build from a master modeller - I aspire to those results! Hi Jont and welcome Nothing to see really today - I'm slowly gathering and cleaning up parts for painting. You can see how careful I'm having to be: C1 - pin by Ced Bufton, on Flickr Locating pins right next to the sprue gate and flash to remove. Careful now. The seat is nice and thin but side cutters starting stressing the part so it was carefully cut off with a scalpel: Hopefully paint on the internals tomorrow.5 points
-
I managed to find some reasonably suitable decals in my spares box which I had to touch up with Humbrol paints . Here it is , in flying mode mounted on an AIRFIX stand. Some additional portholes had to be added and these were glazed with Humbrol Clearfix. A cluster of four bombs were provided in the kit which fitted into the slot under each wing root.....I think I used mine on a 1/72 Lysander. Trying to evade a Ju88C over the Bay of Biscay. And finally, the Airfix and Kader Sunderlands in comparison. cheers, Adrian5 points
-
Hi everyone I'd like to throw my hat into the ring with another Starfighter. In the 80's GB I built a couple of Mig 21's (still to be finished) so thought I'd do something from our side of the iron curtain this time. I see the other two are West German and Belgian so thought I'd go with an NMF Norwegian example. This is an F104G. I'll be using Hasegawa's 1/48 scale F104J kit converted to a G which I'm assured by the good people here in BM land is a merely change of wheels and some bulged undercarriage doors. This also works for me quite nicely as I voted for the NMF GB in Novembers poll which didn't get through so two birds killed with one stone. Or something like that? Plus I've always liked the look of the Starfighter and haven't ever modelled one. Decals and other goodies are in the post so hopefully some updates soon. Thanks for looking James4 points
-
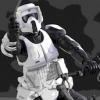
Hi everyone I will try to share with you, the assembly of the speeder bike with scout trooper. I'm sorry, but my English is poor ... so I'll try to explain clearly I had already made the kit from AMT a few years ago, but the bandaï seems to me better proportioned, on the right scale. I pass quickly on the contents of the kit with a picture that summarizes all the parts of the box: The molding is very nice and the assembly could be done without glue, like the gundams It is on the scout trooper that there will be the hardest work. The only advantage (for me) of this mounting option is that you can mount and disassemble the miniature as you want ... easy for testing and mounting. The head will be disassembled to hide the mask before painting: Then I assembled the bust. The joints will make it possible to give a dynamic position to the figurine and which will be specific to each assembly The legs are then assembled on the bust, The knee protectors allow to hide the joints of the knees, but the ankles look like "toy". The arms are assembled, one hand on the handlebars and the other is in blaster shot position On the side of the speeder, I assembled the stabilizers, very well detailed, with a small line of joint that must disappear The speeder is fully assembled to give a definitive look to the figurine I will replace the plastic cover with a more realistic cover. For this I remove the fixing studs On the figurine side, the articulations are blocked with glue, then filled with milliput. They will be smoothed later with "Mister surfacer" The thrust flaps are modified to be in a semi-open position, and different from each side. See you soon, guys4 points
-
No, not an inept attempt at the first coat of RAF BG - I just had a little paint left over after spraying the two sponsons, so decided to check some seams before I move onto the underside. Initial impression not too bad, though the TR drive shaft might need some work. It does, however, give a nice glimpse of that rich dark colour that all proper Sea Kings should wear. I flew them in two different shades of grey and the red & grey SAR livery, but this was always the One True Sea King Colour in my eyes - probably because it was the colour they were when I first flew them. Unlikely to be much tomorrow, because I am going to Bovvy for the new show - I don't know why Yeovilton stopped doing model shows, but I am glad someone down here has stepped into the breach, even if the place is full of tanks rather than aircraft! Hope to see some of you there. Crisp4 points
-
It`s a wee bit fresh outside! But that didnt stop me running to the shed for five minutes! Here is a previous shot of the turret, My plan was to have all the lids open, I like open lids, Tanks, Aeroplanes, Helicopters, open everything up, show us yer guts! Well this morning in sub zero temperatures I did some very technical groundwork! I should have done some very technical groundwork at the start but that's a horse of a different colour, Anyhow, the vast holes are self evident FCT goes in the big one at the back, not a problem, Gunner lives in the lower one, Operator in the upper one as you look at it in the image. The lower half of the FCT is visible through both hatch openings as in the real vehicle, the "Scaley kit" or radios to the lay person, lives under the top left corner of the Operators hole, kind of in the wedge between the FCT hole and the operators hatch pivot and is as the youth of today might say "Totes visible"! In the opposing wedge, behind the gunner goes the mollins gear, intended to "Hoof" spent cases out through this opening................ Again "like, totes visible", These truths are self evident! And as such have been vaguely considered in previous pondering sessions whilst taking the odd strictly medicinal alcoholic aperitif! What was not necessarily so evident to me at the time was the view forward............................Bugger! The turret ring is too small, but I was hoping to loose that with some creative paint work, what I cant hide is the ballroom sized void in the middle of the turret! Having now had a good gander at the drawings I have come to the conclusion I`m going to have to scratch the breech of the main armament! My initial measurements indicate that it will intrude 60mm into the turret! The rear face of the breech ring will be under the edge of the roof plate here! So this morning I cemented the two halves of the kit gun barrel together to provide a suitable donor "tube" and tomorrow I`ll laminate up some thick blocks to make the breech! With this kind of forethought and planning I`d be a "shoe in" for a top job at the MOD! Ta for lookin` no "G" Granto4 points
-
Give a man a chance. I am experimenting with a new technique in scale modelling, namely carving up old rubbers (erasers to those with American and/or dirty minds). You just follow the old sculptors' advice, and move the bits that don't look like sponson. Painting and rivets might be an issue, but pioneers always face ill informed criticism.4 points
-
Hendie it's reputed that the Fujimi Wasp kit is 1/50th, certainly some of their "1/48th" plane kits (Mirage, Skyhawk) are. I don't know either way, and I don't have the kit. Airwar.ru has some plans http://www.airwar.ru/other/draw2/wasp.html credited to Bob Hunt, which maybe of use if someone here knows if they are cobblers or not. Primeportal has a 3 page walkround of a Scout http://www.primeportal.net/hangar/jon_davies/westland_scout_ah1_xt626/index.php?Page=1 lots of engine shots, which enlarge when clicked Others will know more, but these may help? cheers T4 points
-
Creeping forward... Withe the dynamo fixed in place, it was the turn of the support brace. I made one up in styrene but wasn't happy with it, then found a piece of brass angle which worked quite well. A small hole was drilled to accept some brass rod for the brace to the dynamo. The "clamp" was made from a scrap of styrene drilled through then cut in half. Now all fixed. T'was surprisingly difficult to get it all to go together. More scraps were called into action to make an electrical box, and the first decal of the build was added. The electrical box was then wired to the dynamo using lead wire. - decals also added to the dynamo. I think there's supposed to be three wires, but two will do for now. If I get really bored, I'll add a third! And the electrical box was fixed in place with E6000 Now that has just got to get painted another shade of black and I *think* I can call the underside finished, at least for the moment. Of course, usually when I come out with that comment I then find something else that needs done - but let's roll with that for now. And I just found the "not finished" part ! The chain for the dynamo and the belt to the bogie still need added ! Oh well.4 points
-
Release in 2017. Will be based on the Pavla kit as the masters are own by AZ model.. It will be upgraded and changed where Az model knows about issues. Plastic quality will be different. Schemes: US float, US wheels and RAF/RAAF. Three boxings Source: http://z15.invisionfree.com/72nd_Aircraft/index.php?s=f9a6f02f7315e97029cf486d9a2276e2&showtopic=7748&st=225 V.P.4 points
-
Thanks Ian - it would be easier if they weren't so faint... I think I have a copy of a copy... Thanks Giorgio - I think fairly painless is as good as I can say... tight fits, especially with the slightly worn moulds, just requires careful dry-fit and scraping. So far. The final bits for step 1 are C15 and C20, the back of the bomb bay. C20 has offset 'pins' that go into holes in the fuselage part so it's not possible to get it in back to front, but the pins are a bit blobby. There are two pins on the 'roof' at the front and one at the back, also needing some trimming. This makes the whole thing a bit springy; pushing C20 into place and holding it there while positioning the roof in between was, er, testing, but eventually I got it together and gently held it 'manually' while the TET had chance to set and then gently held it to cure with a Berna: Untitled by Ced Bufton, on Flickr Removed the clamp this morning: Looks OK. Just noticed the other pin on the top of the bulkhead which will, I hope, locate properly in the top half, no bottom half, oh heck, the other half then. The two main parts do still go together and, with a bit of wiggly, 'click' like a new Airfix and settle nicely together (or not, if you don't get all the pins located). Part D9 then goes on the back, somewhere like this? Just the seat to fit to complete step 1 and that's, obviously, not interior colour so will be added later. Step 1 ready for paint. Phew.4 points


.thumb.jpg.0bac681e0da8e4ed7557610e98fda908.jpg)


This leaderboard is set to London/GMT+01:00