
Leaderboard


Popular Content
Showing content with the highest reputation on 21/01/17 in all areas
-
Good morning. I would like to show you some models made before signing up on Britmodeller (yes , i love the Navy!) F6F-3 Hellcat Eduard 1/48 FM-1 Wildcat Hobbyboss 1/48 F6F-3 Hellcat Eduard 1/72 F6F-3 Hellcat Academy 1/72 F4U-1 Corsair Tamiya 1/72 P-51C Mustang Mk.III ICM 1/48 P-47D Thunderbolt Tamiya 1/72 Norseman Revell 1/72 Bf-109 K4 Hasegawa 1/48 Bf-109 E4 Academy 1/7229 points
-
I love flying boats and I have had one of these big boats in my unbuilt stash for a number of years. It was an original release boxing from the early 1970s. A member of our model club called Tony had started building a recent Hasegawa reissue of the Marlin when, about three quarters of the way through, he decided to jump ship from aircraft modelling and join the salty beard and barnacled bottom brigade and he now builds superb waterline warships on sea dioramas. He offered his unfinished Marlin to me and because of the quality of his build so far I accepted. I carefully removed the canopy and improved the cockpit using photos I could find on the web. I then added pilots as I like to have crew in all my models. Engines, props and beaching gear came next. I then decided to make my Marlin different from the kit offering and the ones you always see displayed. I converted mine from a SP-5B with tail radar to the earlier 1950s P5M-2 with a manned tail turret. So it was out with the hacksaw and off came the radar. I also opened out the blanked off tail cockpit and added a floor, gunners seat, ammunition boxes and a gun sight. I also opened up the beaching hatch . I found a tail barbette from the old Revell Skywarrior in my spares box which was ideal for the Marlin and added a couple of 20mm cannon from brass rod. The big radar housing above the cockpit was also removed. And then on a nice warm and dry morning before the wind got up I went out into our back yard and sprayed the whole aircraft with a can of Tamiya AS-8 Navy Blue applied straight onto the plastic without any primer. Any touching up and all other colour details were done with brush painted Humbrol enamels. And finally I managed to find some appropriate decals in my spares box for a United States Navy big boat in the 1950s. And there she is. Thanks Tony...................... My original boxing from the early 1970s. Is that a hairy brush I see.................... It took me a few attempts to get this shot without my fingers in view..................29 points
-
I picked this up as an impulse buy a few years ago as I really fancied the silver SEAC aircraft. Several times during the build I wished I hadn't. Horrible fit, trenchlike engraving on the newer parts. I actually set it aside for over 2 years before doing a "quick finish over the last couple of week so by no means my best work at all, very much a view from a distance model. Build thread can be found here. For all that though, it still looks pretty attractive. The markings are for an aircraft of 648 Squadron in India, 1945. Thanks for looking.27 points
-
27 points
-
Hello! This is one of my model. I did it at 2015. It is difficult kit. I used a lot of putty. Canopy was made of transparent packaging. Native canopy did not fit the model. I used MR color paints. Weathering- oil dots, salt dots, pigments and washes.24 points
-
Hello my friend, I would like to share my F-105G Hobbyboss 1/48. Built for an Article on The Weathering Magazine... Hope you enjoy, Cheers19 points
-
Hello,Friends - This subject is my first completed build of the year.The only non-standard kit part is the pitot probe which I like to replace with nickel silver wire.The paint used was Humbrol 'Super Enamel'No.69,airbrushed over a base of Halfords White Primer.The decals are sealed between two brush-applied coats of 'Klear' Floor Polish.I wanted to pose her with deflected control surfaces and an open hood and canopy.The mountings for the hood and canopy were very fragile so I've discreetly strengthened them with the wire. Thank you for viewing.😉👍 All the very best,Paul.18 points
-
I started this for the Helicopter II GB 3 ½ years ago, and ran out of time because an elderly relative died near the end. It sat gathering dust almost complete for a while, and then I dropped it when my dog was around; he ate the starboard skid and starboard horizontal stabiliser end plate before I could get it from him. Anyway, as people who have been kind enough to read my Sea King WIP thread know, a few days ago I decided it was about time I resurrected my lovely Gazelle. A couple of hours of scratch building later, to replace the terrier-ingested parts, and here she is. I will take some better pics over the weekend. Original build thread here: Finished helicopter here: the airframe in which I flew my first rotary-wing solo, on Trafalgar Day 1985. Hope you like it! Crisp18 points
-
Hello all I'm slowly working my way through Airfix's new tool kits. Here's the latest - the Bf 110C finished as a night fighter with NJG 1 in 1941. The kit goes together really well, but being one of their early kits it's rather crude in places and lacks detail. The panel lines are far too prominent, of course, but look a bit better under a few coats of primer and paint. I added some masking tape belts but apart from that it's out of the box. I used Tamiya paints with some brown and grey washes and pastels to try and break up the black finish. Decals are by Print Scale. Thanks for looking!18 points
-
These are the completed builds from the recently finished P-51 STGB III which I did not complete on time. The original thread is here which has the work in progress. http://www.britmodeller.com/forums/index.php?/topic/235015012-phantomes-triple-172-build-2x-tamiya-p-51d-1x-academy-p-51b/ Quick summary of the three aircraft: 1) P-51D "Jumpin' Jacques" (Tamiya). Built OOB except for Eduard superfabric seatbelts (amazing stuff!). Decals were some spares from a Hasegawa kit. Paints were Mr Metal Color for the NMF and Gunze/Tamiya for everything else. Weathering was done with Flory washes, with Tamiya Smoke for the exhaust stains. 2) P-51D "Detroit Miss" (Tamiya). Same as above except decals from an old Microscale set. 3) P-51B "Bonnie B" (Academy). Same as above except decals from Xtradecals. Color was Gunze H73 as Olive Drab. I was extremely pleased. Gunze totally botched RAF Dark Green (which is what it was supposed to be) and unwittingly created a very nice faded olive drab with just the right amount of green and brown. H73 was also used for the olive drab anti-glare in the other two aircraft. Weathering was done with Humbrol enamel wash. There are a few inaccuracies in the markings, some my fault some from the decals.In particular I was not pleased with Detroit Miss as the markings seem somewhat oversized. Also I think the Bonnie B markings on this set are incorrect (no locomotive kill mark and Bonnie B should be white). I used TallyHo decals for the insignia of the first two planes which ended up being noticeably translucent (and did not conform to panel lines). Terrible stuff. Anyway, were fun builds and reminded me why the Tamiya 1/72 Mustang is my favorite kit in the universe (and the Academy P-51B is nearly as good)18 points
-
And all three together18 points
-
Another one of my impulse buys, I bought the CMR York conversion (fuselage tail all sort of bits and pieces) at Melbourne Model Expo in 2015. Just after I handed over the cash the guy selling the kits said all I need now was an Airfix or Hasegawa Lancaster..Doh! I thought the York was a complete kit..see that is what happens with impuse buys.. you do no research! I had visions of doing the very bright and shiny all - silver RAAF / Governor Generals aircraft.. but after looking at the resin I knew it was going to take too much work to get the item to a pristine base line to apply the all flaw revealing silver paint. So I built Danair, for the interesting colour scheme and because I have seen this aircraft at Duxford. I need to do a few more touch ups an antenna mast and a final top coat but I'd just finished decallingand putting the props on..had to take a picture16 points
-
This is my last finished model... Hobbyboss A-29B Super Tucano from Brazilian Air Force.... A full article showing the corrections of the mistakes and some details will be featured in a forthcoming issue of the Model Aircraft Magazine... hope you enjoy, Cheers...15 points
-
Hi all, here some pics of my new build Italeri Mirage IIIE. Apart from the pitot (by Master) I build it OOB. Hope you like it!14 points
-
This is the only thing I finished in 2016. I had a very slow year. I’ve always wanted to build a CP Air 747, I just think the colours look cool. It just catches the eye. And that is why I like building airliners. I have to say I think the Hasegawa kit is a nice kit. It does not need too much work done to it. I rescribed the panel lines and replaced to apu exhaust with some metal tubing. I planned to have a chrome finish. That plan changed. I had applied gloss black and chrome alclad but I could not find any way to seal the chrome Alclad with out dulling it down. I wanted to seal it so I could mask off for the orange. I decided chrome was going to look too much and was not going to work. So I went back to my way of doing things. I sprayed the orange and grey, then masked off for the alclad silver using the orange & grey as a base coat. (Rules are made to be broken). After the decals were applied I hand painted Winsor & Newton Gloss Varnish to seal everything. I prefer to hand paint gloss varnish. I get a better finish. I know some people think everything has to sprayed, but I can get a really good finish hand painting. I have been building airliners for years and before the airbrush I had to hand paint, so you learned how to paint without leaving brush marks. The decals are from TwoSix Decals. As always they are good. Work first time. Thank you for any comments. Regards Ken13 points
-
Hi, In 1942 Haiti started organizing their airforces from Garde d'Haiti. The first equipment was a group of biplane Douglas O-38E received from US, which immediately started antisubmarine sorties over Caribbean Sea and this region of Atlantic Ocean. I've learnt about it some years ago reading something about Battle for Atlantic in Net. There was a page about Latin American share in battle for Atlantic - now I cannot find it again. Nevertheless - I have found another page with photo and colour profile and even with scratchbuild model. More can be read here, especially in post by Juchan which I appreciate very much. He clarified my doubts: When I realised that Ardpol is producing Douglas O-38E - the late variant of O-38 with completly re-worked aerodynamics (completly new fuselage for instance) I desperatly needed it. The Ardpol is a small family business located in my home city Krakow (like also Choroszy Modelbud) - so I bought the kit about year ago and soon start work on it. But then I have some months break... This is resin kit, very delicate and detailed. In box you will find only pre war US decals. In presented here model there are home made early-style Haitian national insignia (Czech markings were the base for them). Depth charges Mk XVII by Attack Squadron. I added aerials, Pitot tube and landing lamps. The photo exists for no 4001, but the 3012 was one of existing Haitanian O-38 E and such number I was able to find in my drawer (decal set - Techmod "US Numbers yellow")... Here is the result: As always - I made propeller rotable : And family photo - two Ardpol Douglases O 38 (B and E): Coments welcome Regards Jerzy Wojtek12 points
-
Hi All First one completed for 2017. Started over the Christmas holidays, finished earlier this week. Mainly out of the box, but I added some of the missing scoops and inlets on the spine and beside the cockpit, also the small intake on the nose, also added a few bits of plastic card on instrument coaming to make it look a little busier. Tried to improve the front lights but did not work as well as I hoped, also removed wing tip lights and made new ones using clear sprue. The decals are a NIGHTMARE, I found them really tricky to work with, especially the Dayglo, (I made a few small errors myself with the decals), thankfully I have two kits so as I destroyed various decals I could get a replacement......... Last but not least made the school boy error of not adding nose weight, so I had to insert a metal pin and make a small base to get it to stand correctly. I persevered as I really like the box art and as soon as I saw that I knew that it was one of the schemes that I had to build. Now comes the problem I still want to build about another 6 with different schemes, I have one more kit so that is a help, but not sure what scheme will be done next. cheers Ali12 points
-
Here's my recently completed Special Hobby Sopwith Tabloid; I started this kit probably 15 years ago but didn't like how the rib tapes were molded so I sanded them thinner and the model sat while I tackled other projects. Photos in the Mini-Datafile show these a/c having lightly colored rib taped so I went over them with a white pencil. The deck and sides were highlighted with a brown pencil to pick out some details as well. Rigging done with .005mm fishing line, ceramic wire and EZ Line. Decals were minimal as a/c this early in the Great War weren't using the Union Jack so I just redid the kits decals to make up RNAS 168. This is a model of the a/c that was used to bomb the Zeppelin sheds.12 points
-
Here's my Roden Junkers (1/48) that sat unfinished for 10-12 years. Basically OOB build but the kit's decals were terrible at laying down in the corrigations. I used Microset, Walther Solvaset and finally a Mr. Set to get them to soften.11 points
-
Last finished model.11 points
-
Kuat Systems Engineering Firespray-31-class patrol and attack craft Slave I Bandai Slave I (1/144 scale); completed in Tamiya and Vallejo acrylics, MIG enamels, and Secret Weapon Miniatures pigments. The stand and the Star Wars decal are from the Fine Molds version of this model and the mythosaur skull was made with my Cameo cutting machine. All and all, I think this kit turned out great. I was pretty nervous about starting it because the paint job is pretty complex, but once I got in the thick of it I was okay. It could probably stand to use some more weathering and I'll probably do some before I take it to the model club meeting next month, but for now I'm calling it done. The work in progress log can be found here. Comments and criticism is welcomed as always!9 points
-
Hi everyone, Here's my last build : REVELL's (ex-MPM) Douglas P 70 "Nighthawk". Not an easy kit, believe me ! But it's finaly dne and I'm happy with it . Here is the completed model : 1) the interiors are very well detailed, I added a photoetched harness from EDUARD (US seat belts WW2), but a lot of adjustments will be necessary to get a proper fit in the fuselage halves. 2) Follow exactly the instruction sheet during the main landing gear assembly ! Then the engine nacelles and their front parts will be glued and sanded before gluing them to the wings (if not, you will have some bad surprises ! 3) The engine cowlings do not fit correctly to the wings leading edges. 4) The rear canopy doesn't fit very well to the fuselage. I found a picture of the real plane on internet and shows different shades of grey, dark grey, gloss and matt black, so I tried to have the best rendition as possible. Apparently, this plane belonged to a conversion (or test ?) unit based in Orlando, Florida and then later, this unit moved to California... I airbrushed my model with REVELL paints. I replaced the stars (the white was offset) by MICROSCALE stars of the same dimensions. Some weathering was added and voilà ! A P 70 on the shelves ! Hope you like it ! Critics and comments welcome, Pierre.9 points
-
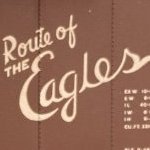
Hello All, After several years on the shelf of shame, my Matchbox/Revell Privateer is done. It has been converted to the Coastguard version and the next time I see him it is going to a pal of mine. His Dad flew in these back in the day. The conversion involved replacing the side gun turrets and with big picture windows and replacing front and rear turrets with observation canopies. I also added interior framing (mostly now invisible) wheel well detail, exhausts and some other minor engine detail. I could have done more accurisation and improvement, most notably the air intakes around the cowling and the propellers, but it isn't appropriate for a desktop model (and would have taken another two years at my rate). This is my first 4 engine "heavy" and my biggest model ever. My wife's only comment on it has been "It's very big isn't it" so I think she's quite happy it's going to my pal's house! The insignia are from an aftermarket sheet but all the lettering, coastguard emblems and engine grilles are all laser-printed onto clear decal paper. The "DANGER" lettering was applied on top of scrap white decal squares and the coastguard logo was applied over a spot of white paint to deal with the transparency issues. Pics: Thanks for looking, Adrian8 points
-
Hi all, Here is, finally, the Nippon Maru from Imai at 1/150. She has been a training ship for many years and is now a museum. It was a long but fun built, very nice kit, too bad Imai is no longer around. This is the first with four mats and I figured then that one extra mast should not be that much more work, yeah, right... Anyway, hope you like her. T/care Jesse8 points
-
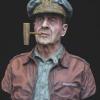
Well Guys, a year later & after my figures & busts, the back burner project gets done & finished... Many thanks to Macgregor of this forum, a fellow club member of mine & all round top bloke for the excellent photography...cheers Mate... A great project build that challenged me to push a bit harder on my modelling but has now opened the floodgates for another Norton, a Protar Norton Commando 750...see you in another year... Mark D7 points
-
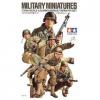
Hope all you BMers are having a good winter. My modelling room is just making 5 degrees C, so it's a little tough on the old fingers. Building up energy to start a new build thread. For now here are some classic Matchbox / Revell 1/76. There are 3 kinds of kits I really appreciate - with figures, with dioramas, with interiors. A lot of fun with these kits!7 points
-
Probably time I get these photos up. Here is my recently completed build of the Eduard 1/72 scale La-7 Profipack kit. The kit was built mostly out of the box but I indulged in a few additional bits 'n' bobs in the cockpit (not that they're in any way visible). The kit went together reasonably well though I encountered a difficult wing to fuselage fit, and had a bit of trouble with it's DIY undercarriage alignment. The comically thick clear parts were also a bit disappointing. The plane is finished as Sergei Dolgushin's aircraft using the provided decals. Out of all the grey on grey schemes it jumped out at me with it's striking red nose and striped tail. Plus it didn't involve any camo masking . Due to some odd printing glitch my decal sheet had large amounts of excess carrier film Luckily the markings themselves were printed properly and went on well enough once cut out carefully. Feel free to take a look at my WIP thread for all my trials and tribulations. http://www.britmodeller.com/forums/index.php?/topic/235012308-172-eduard-la-7-profipack-oob-but-not-really-build/& Can't say it's been the best build I've done but it is my first Soviet warbird and I'm quite pleased with it. Excuse the number of photos, I think I went a bit overboard7 points
-
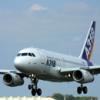
Hi guys, First post on here so here goes: It started about 18 months ago when I was asked by my boss to commemorate the boardroom, named Concorde, at our new factory, Factory 2050 in Sheffield. I hope you guys like it, first time custom decalling and paint scheme with gloss coats so a model of firsts. Ta, Ben7 points
-
Right, as promised here are some pictures of the completed wings. I used the Daco parts for the wings and on the whole found that they worked fine. The only down side is that they are not quite a good enough fit to allow me to paint the wings separately and fit them at the end of the build. I have done the wings with the control surfaces deflected to ad a little more interest to them. The two white dots you can see on the top of the port wing are the result of a certain Muppet of this parish drilling the wrong parts for the under wing pylons! Next up I think I need to think about fitting out the RAT bay and this leads me to my plea for help. I have good references for the turbine itself but nothing on the mechanism that extends it into the airflow. I can probably knock up something convincing but obviously would prefer to get this part of the build right. Thanks for looking Martian7 points
-
I've been working my way through some long term residents of my stash and this little gem of a kit has been with me since late 1999. Bought at the long closed model shop in Bath one evening on a work trip, I was worried the decals would be unusable and I could find no alternative. Luckily they were brilliant, thin and pliable, a joy to work with. The kit itself is a modification of the original Monogram Panther -5 and fits together beautifully. It is almost out of the box, just some aftermarket belts and an Eduard masking set, A total joy from beginning to end. Even Photobucket worked perfectly. Thanks for looking7 points
-
A short time later, they're painted and fitted, should have it finished tomorrow7 points
-
As I mentioned a couple of posts up, I've started work on the legs, or one leg to be precise. One of the things I needed to check was whether I could make the knee joints without using the clear inserts, which are there to add some friction resistance to the joints. On the real droid the joints are completely open, which is how I want to make them. The clear plug sits inside the centre section of the knee joint Then the two outer halves of the joint clip over the plug from each side If you leave the plug out, it looks like this, which is how the real thing looks With the plug out, the joint is just about tight enough to support the upper leg, but there's no way it would support the whole body with gluing the joint in a fixed position. You can also see that the upper leg has quite a prominent seam line where the two halves join. This sanded out okay, but you have to be quite careful with this kit because Bandai have used a really soft plastic across all the parts, soft enough that you can leave a mark in it with your finger nail. You have to be really gentle with any sanding to avoid leaving deep marks in the surface. The lower leg is also a two-part assembly, but the join is on a panel line, so it doesn't need any filling/sanding. There's surprisingly little articulation on the legs, at least compared to the earlier figures, but that's probably down to them being so spindly As you can see, as soon as the hips and torso is added, the whole thing collapses from the weight of the upper body, so the joints will definitely need gluing I've also been painting the shoulder rings. These had a metallic base coat like the body and head, then a coat of pale grey with more hairspray chipping The yellow band and the panels were then masked off and sprayed. There's actually two different greys on the panels, a mid shade on the lower panels and a darker grey on the upper ones They had a black pin wash on the panel lines and were clipped into place on the shoulders. The torso has been detail painted too. I didn't bother with any of the supplied decals, as they aren't that good. The white outline that goes on the front of the chest was particularly bad. Instead of a solid white line, the decal was made up of diagonal checks. It was easier to run some white paint into the panel line, then wipe off the excess Andy7 points
-
Hello everyone, I'm new to here and I'd like to start off by showing my Amodel 1/72 Il-38 May. A challenging kit but not without reward, I am a huge fan of this company as they make subjects not found anywhere else.6 points
-
The photos on this slightly dull January day are a little disappointing and have shown up a few minor issues that need to be resolved (winter modelling in artificial light never quite works for me), but my first full build of 2017 is effectively finished! This is the Italeri 1/72 AW-101 (the James Bond Issue), updated to become one of the Royal Navy's ex-Danish Junglie Merlins. The additional bits and bobs, including the spectacularly ugly nose, are all home made from sprue and Milliput, and some of the decals are inkjet printed; I'll do a full write-up of the build on my website once I sort out the piccies and get some better daylight, but I'm very pleased with the way this has turned out so couldn't resist posting some early pictures now. There is a seagoing (blades folded) HC.3i on the stocks as my next build, plus another HM.1 (I built one a few years ago) to follow, plus goodness knows how many others in the stash just singing out - looks like it might be a Merlin year in prospect. FLY NAVY!!! FredT6 points
-
Thank you Julian - most kind! You are way too kind Badder. Thank you. I'm in no rush to get an airbrush. I thoroughly enjoy painting with brushes and I haven't got anywhere to use an airbrush anyway. I have spent a fair bit of time on this today but only remembered to take photos this morning The photos - first one showing the tracks after having been painted with Revell's Anthracite and then dry-brushed with Humbrol's Gunmetal: Also this morning I got the first bit of work done to get the inner road-wheel rims looking like they are shiny and worn from the guide teeth as Sarge reminded me above - thank you Sarge - good job you are on Britmodeller!: Today I also manage to start adding some dirt washes to the tracks as well as doing some work on the exhausts and other bit and pieces. I will take and post some photos tomorrow morning if I get chance. Comments and suggestions welcome. Kind regards, Stix6 points
-
After a long break I have at last got some more done on this today. First I finished off both engines: With the engines done, construction now moves onto the "Fuselage": This quite large piece of PE will form the spine of the fuselage: Those are the main tools I am using to cut out and clean the pips off the parts. The flat jaw pliers are an essential aid to holding the parts during sanding. The PE is actually very soft (too soft really) and is easily bent and distorted. The pliers held close to the pips provide the needed local support. The two tiny plastic hinge points snapped when I tried to bend it up so I had to glue and align carefully by hand. I haven't got any clamps so it had to be done with finger pressure. Anyway, finished it looks like the part in the instructions: Next another big piece for the fuselage, here before I have cleaned off the fret pips: By the way, no blades snapped so far but I did collect extra spare blades after Christmas as a precaution. Again the two tiny plastic hinge points snapped so I aligned by eye. Here's how looks glued and folded up: Those upward pointing legs are super delicate, I hope they survive the construction process. The next job is to unite these two pieces of fuselage but that's a job for tomorrow. Bye for now, Nigel6 points
-
Day 8th Riveting (fuselage panels liners) and masks installation.6 points
-
Thanks Benedikt - done! I've fiddled with the tailwheel doors - Giorgio's idea of the BluTak helped a lot with the dry-fitting but, frankly, the doors don't fit closed: so I've given up and started filling the bay. I also have the same problem as Cookie with the i/p not fitting (of course). What a pain...6 points
-
Thanks guys - Guinness is good for you! I think the 'surfer' ad was one of the first ads, but sadly not the last, that had me thinking "WTF is all that about??!!" I used to like the ads with the talking Toucan, my favourite being the one where the man is pouring a Guinness in front of the Toucan saying "Guinness" repeatedly, presumably to teach him to speak the word. The Toucan cocks his head as if listening. In the background a door is heard to open and a voice says "I'm home love", at which point the Toucan says "Bad news Mrs Jones, your husband's turning into a parrot". Classic. Guinness in Dublin is like nectar. Elsewhere, especially the UK, not so much IMHO. Thanks Simon - Dave Allen, sadly missed. Thanks Benedikt - I didn't think of that and I'll be careful with it in the future. Sadly the mats can only be delivered by courier so I'll need to save up. Thanks Jont. it is one of the attractions but feel free to have a pint whether you're moulding or not! I'm going to wait the full 24 hours for the rubber to go off so I did some work on the Spit. Seams sanded: What a big nose you have, Grandma. And then the tailwheel bay and doors: cleaned up: Too fiddly after two evenings over the pub but I'll see what the doors are like before deciding to use them or Milliput.6 points
-
right then, here is where we are at Airfix first: CP was painted and glued with the fire wall dry fitted, i didn't use the transfers provided in the kit as i always find them too stark and unrealistic so just stick with painting the detail provided. Untitled by robert mulvey, on Flickr Untitled by robert mulvey, on Flickr and here it all is dry fitted in place Untitled by robert mulvey, on Flickr word of warning... do not paint the landing gear on the spruce, it makes it an absolute pain to make, I can safely say its the most complicated I have had to but together... whose idea was this? were they drunk and saw a spiders web and thought, 'yeah i could build that on a plane!'. anyway its well engineered but still a complex structure. I had Ced's advice of a micro saw ringing in ears as i tried my best to remove all the bits from the sprue unharmed, but i still broke two of them. Untitled by robert mulvey, on Flickr it came out ok in the end i think. here it is fitted to the firewall Untitled by robert mulvey, on Flickr then seat belt added and all fitted in place Untitled by robert mulvey, on Flickr after that it was wiggled around a lot to get the best fit i could in the fuselage, again tolerances were rather tight and i could have removed the paint better. there is still a gap in the nose of the AC which will need to be dealt with! Untitled by robert mulvey, on Flickr I also got it lined up better as the tube glue dried, better then the below anyway Untitled by robert mulvey, on Flickr Untitled by robert mulvey, on Flickr due to this there is another small gap in the two piece extension to the engine. cowl dry fitted. Untitled by robert mulvey, on Flickr and tail plains glued in place no problem Untitled by robert mulvey, on Flickr engine all glued in place, i used mr hobby iron and gave it a bit of a buffing... not that you can see in this pic Untitled by robert mulvey, on Flickr and then the main wings were added! Untitled by robert mulvey, on Flickr Untitled by robert mulvey, on Flickr Untitled by robert mulvey, on Flickr Untitled by robert mulvey, on Flickr this will now get a tidy up and micromech, bit of filler here and there ready for painting. second Academy: ooooohhh crap... Untitled by robert mulvey, on Flickr that's the sum total of the detail, other than the seat that needs adding.... a shame as external detail looks nice! I will need to do something about this Rob6 points
-
Damn you... I'm trying to be good and stop adding to the stash until I complete a few more kits but you're making want to get one of these!6 points
-
To whit; despite my earlier moaning about this (not entirely tank-friendly) GB, me having one (well one and three quarters TBH) of these in my stash: & one of these: And this one (with a plethora of aftermarket): Not to forget: Or: Or indeed: & then there's all the float-planes. So.....Having totally destroyed my own credibility as a Trackhead, I guess I'd better pick one!6 points
-
Takom 1/144 scale Maus and resin base.5 points
-
And now for something completely different............ I usually post mostly vehicles on the forums (with added lighting, etc) but I decided to go for something different this time. My eldest daughter kept pestering about doing this pirate ship and so, for a quiet life, I went with it. I've done a couple of galleon builds before but I was suprised at the size of this beast and the complexity of the rigging. Always up for a challenge I looked at how the rear 3 lamps could be lit and maybe also the insides. Rather than go for bright lighting I am going to go for a dull flickering effect so as to give the effect of cold drafty lower decks. Well, less chat and on to the build........ Firstly, the Big Box.......Compared to my size 10 boot at the bottom. Work station ready with the tea supply. A lot of kit and surprised at Revell supplying actual plastic sails. They look quite good actually. Starting with the decks and end panels. Not going for a weathered look with this one Picking out the fittings details Canons built. There's a lot. Assembled, painted and awaiting action.5 points
-
It's pretty old - a Fujimi offering, originally from 1985. I obtained mine on EvilBay some time ago; I've finally found the WIP thread, which was as part of a Helicopter group build in 2013 I'll take some proper photos in the next couple of days and post a proper RFI, but here she is restored to her full glory. XZ938 / 45 of 705 Naval Air Squadron, Lt C P Morton RN first rotary wing solo, 21 October 1985. Happy days! And now back to the Sea King (& Bulldogs...)! Crisp5 points
-
I like the way the decks go together before inserting them into the hull. Preparing for the lighting by adding foil to reflect the lighting. As they are not to be seen, I just knocked up some LED holders on the quick. Cannons on the lower deck fitted. Side panels on, so nice that they fit perfectly. Well done to Revell. The rear panel will be the last to be fitted as that will give me access to the lower hull to store the wiring, etc.5 points
-
A significant step... While waiting for the etching primer for the hoods to arrive, I decided it was time. Partial final assembly where no more work need be done. I had decided NOT to secure the bolts, studs and nuts with either CA or thread locker. It turns out I took apart and reassembled many times the trunk, fenders and body on chassis. This to make new parts I wasn't satisfied with or improve the fit and locations of some. Good thing because I found plenty to improve. Now I have very good alignment of all the major elements. Chief among the changes was this inner fender panel. If you don't make these, you see the side of the rear seat past the tire. This one needed tweeking so I just made another. Me happy now. Everything back here is final (but removable if needed) and the bolts, studs and blind nuts will only allow that. The Pocher screws would be long gone by now. The trunk lid and front seats are easily removable as is the spare tire. The steering wheel can also be removed for 'service'. I am doing a visual test on the running boards with black-grained strips between the chrome spears on one side to see which looks best.5 points
-
evening folks Still easing myself back into it, so took the panel made earlier this week and started to fit it... first, I annealed it (just held it over a gas flame) to soften it at the front as it needs to conform to the curves of the lower cowling area, then taped it down to burnish the shape with a balsa block before glueing it... ..you can see the outline of the panel under here and how it starts to take the curvature on the left, you can also see all the protective wrapping and foam that stops me dinking panels I have already finished.. ..and the panel glued into position... ..I added the missing panels and some bolts around the little hole that is an outlet of some sort to finish off this central part around which I will orient the rest of the lower wing panels - they lap over the edges of this one which is why it is an irregular shape.. ..you can also see how the forward part of the panel has taken the curvature.. ..the added panels are not a super tight fit, but then nor are the originals, in fact if anything, mine is too neat and tidy! ..and with the chin air intake resting where it will go... ..thats it for now, the rest follows outwards from this panel... TTFN Peter5 points
-
Thanks Benedikt - I didn't go in a tank, but I did get a bit 'tanked up'! Two-part mould started (see below) Thanks Spookytooth - I did have one for you, cheers! Thanks Giorgio - hope you enjoyed yours Thanks Rob - Spitfire? Oh yes, seams attacked and filled: Untitled by Ced Bufton, on Flickr Thanks Tony - 'your uncle' sounds like a bit of a moaner - I hope you haven't got into the habit? Thanks Beard - not to worry and thanks for the warning about the missing wheel; always best to check! Thanks Joe - I'm not really a patient man and, compared to you, certainly not! Very kind though, as always. Time to get on with some rubber action. That's better! Now, where are those moulding bits... Lego frame filled with Plasticine which, disappointingly, doesn't smell! Rats. Initially I was trying to get it very flat but then realised 'almost flat' is probably good enough. Then pilots pressed in very carefully making sure that the arms were 'half buried': Then another frame was built up for the one-part mould and the pilots, who've had cocktail sticks glued to their heads, dangled in at an angle so they're 'vertical' in the frame: How much to mix? The deep frame looked smaller than a 60ml pot so I used that, adding 50ml of rubber and 3ml of catalyst. Really gloopy stuff. Mixed very well with the supplied spatula (my coffee stirrer broke half way through) and then poured carefully into the mould. It settles really well, hopefully around the parts - we shall see! Leaving now for 8-24 hours: May as well go over the pub again - neighbours gathering this time. There goes the diet!5 points
-
Still trying to get some pictures in better light, but in the meantime I have managed a few with my ASW Merlin and my Cormorant: FredT5 points

.thumb.jpg.0bac681e0da8e4ed7557610e98fda908.jpg)


.thumb.png.6e11fc11af5645499ae76cb59fcfb788.png)


This leaderboard is set to London/GMT+01:00