
Leaderboard


Popular Content
Showing content with the highest reputation on 15/01/17 in all areas
-
This is the 1/72 Aeropoxy resin kit of the DH.83 Fox Moth. It is finished in one of the kit's three decal options and represents a 1930s aircraft used for air taxi work by the Yugoslav airline Aeroput. Cheers Cliff20 points
-
Hello, Here's my just finished 1/48 RF-84F. It's the Tanmodel kit, and I used Caracal Decals to do it as one from the 38th TRS, 10th TRW, based at Spangdahlem AB in West Germany between 1955 and 1958. This is part of a little project of mine to build all the different planes and units that were based at Spangdahlem at some point. This is the 5th build for that, after an F-4G, A-10A, F-15C and F-105F. The Tanmodel kit is a lovely model, in my opinion. The panel lines and rivets are a bit deep, and a little inconsistent, and the camera assembly in the nose is a bit tricky to build, but overal it builds up very nice. The decals are a mix of the kit ones, Caracal and the USAF decals on the wings come from an Eagle Strike F-102 sheet. It was painted with Vallejo Metal Color. Thanks for looking, Pete19 points
-
Hi folks, this is the Vautour IIN no.67 nicknamed "Cyclon" built in his late-carrier guise. The Azur kit is quite complex with lot of filling and trial fitting, but I enjoyed it anyway as the result is an unique monster within my collection. Built out of the box with addition of Kora resin drop tanks (I guess Special Hobby includes them now as well). Painted with Gunze Aqueous as per instructions. Cheers Libor18 points
-
The photos on this slightly dull January day are a little disappointing and have shown up a few minor issues that need to be resolved (winter modelling in artificial light never quite works for me), but my first full build of 2017 is effectively finished! This is the Italeri 1/72 AW-101 (the James Bond Issue), updated to become one of the Royal Navy's ex-Danish Junglie Merlins. The additional bits and bobs, including the spectacularly ugly nose, are all home made from sprue and Milliput, and some of the decals are inkjet printed; I'll do a full write-up of the build on my website once I sort out the piccies and get some better daylight, but I'm very pleased with the way this has turned out so couldn't resist posting some early pictures now. There is a seagoing (blades folded) HC.3i on the stocks as my next build, plus another HM.1 (I built one a few years ago) to follow, plus goodness knows how many others in the stash just singing out - looks like it might be a Merlin year in prospect. FLY NAVY!!! FredT18 points
-
Hi everyone, This is my last build of 2016. The Hasegawa 1/48 Kit F-104G Starfighter This was my second try to build a "Marine-Star" .This time a real one of MFG2 Painted in the german Navy camo-scheme : NORM76 : - RAL 7012 : Basaltgrau / ( stonegrey , navygrey ) - RAL 7001 : Silbergrau ( Acryl-colours from : "Oesling-Modellbau" / Germany ) hasegawa kit upgraded with : - CMK -resin : underwing fuel tanks , engine & electronic boxes -Eduard : Cockpit incl.belts -Verlinden : differenrt parts from the big F-104 kit -Air Master : Pitot Tube × Your link has been automatically embedded. Display as a link instead Your previous content has been restored. Clear editor17 points
-
Hi my name is Mark it's my first time posting on here. I thought I'd should you some of my recent completions. As a school teacher here in Australia I get good chunks of modeling time every 8 - 11 weeks. Here are three that I've been able to polish off in the last 4 weeks over summer hols! First up is the Eduard Mk.VIII from the weekend edition. I added the Zoom set (it would have been cheaper to just buy the Prof Pack edition) and masked and sprayed the large codes in white as the decals provided are the wrong colour. The 'grey nurse' text should also be white but I couldn't replicate that. The paint chipping is not great and I think i might use a silver pencil next time. This is the Hasegawa Harrier with added zoom etch and a Pavla seat in the cockpit. The decal scheme was not on the sheets specifically but all the decals needed to make this jet can be found on the sheet. The green on the port drop tank came out to vivid and i didn't trust the decal det cord so I left it out. Compared to the Spitfire this was a tricky bugger to get together! The last one of the holidays, so far, is the Airfix Hawker Hurricane Mk.I Trop. I built this out of the box and only added a foil seat belt, considering how little can be seen thorough the cockpit opening I'm glad i didn't waste any money or time on etch. I have mixed feelings about this kit, on one hand it went together great and had reasonable detail, on the other hand its a bit clunky in certain areas (trailing edges, finer detail parts etc) and the plastic had a consistency and texture I wasn't fond of. Anyway it turned out well, I think, and only took a week to complete. I hope you enjoyed these models. I'm about to start work on the Kinetic Harrier Frs.1 which i understand can also be a bit of a mongrel!16 points
-
Not far to go now, although fitting the exhausts & props has fought me. I used the Rebecca antenna's from the new Airfix Lancaster as they are much more refined than the chunky Revell parts in the kit. The result of the weathering using pastel, airbrush and Tamiya smoke on a fine brush to create the oil runs The extra undercarriage parts that are missing from the kit made from stretched sprue Cheers Neil16 points
-
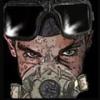
Been a long time since ive been on the forum..nice to be back T.C's chopper from MAGNUM P.I. 99% finished..just need to root out some suitable serial numbers from the decal bank Academy 1/48 hughes 500 with resin interior15 points
-
Something I've wanted to build for a long time was Phantom FG.1 or FGR.2 in the Grey/green camo. I wanted to do either a 23Sqn or 43 Sqn but decals seemed non-existent. The 1/48 kit is also difficult to find at a reasonable price these days. I found out that Hasegawa do a limited edition Treble One Squadron boxing so I ordered it from HLJ in Japan considerably cheaper than a Hasegawa or Revell was priced at in the UK. Anyway, here it is. Finished with a brush in Xtracrylix Dark Green and Dark Sea Grey with Light Aircraft Grey undersides. I changed the roundels for Xtradecal ones as the Hasegawa roundel red was too dark, too like the WW2 brick red. Thanks for looking14 points
-
Hasagawa 1/48 Mk IXe Just a simple single color Pretty Aircraft Mostly out of Box, Eduard Steel Belts for Cockpit, EZ line for Antenna Decanted Tamiya Rattle Can Black with Gunze Clear Gloss sealer Smooth Thanks for Looking Comments Always welcome Cheers Bill14 points
-
Matchbox 1/72 Boeing P12e first one finished this year. the 1974 boxing so nearly as old as me. detailed the cockpit and added some PE seatbelts. for the age of the kit it went together really well. painted with with vallejo and mr hobby. the kit decals were very old, faded and useless. used the starfighter decals sheet, which were not the easiest to use, but went on ok, but needed loads of set and sol. rigged with EZ line. turned out ok.14 points
-
So here we are right now: 20170114_213904 by Edward IX, on Flickr I accidentally left some Barry White playing when I turned out the lights, and now we have three, puttering along. In tonight's issue of Poor Design Choices, Eduard Edition, there's a tiny plastic pole connecting two of the frames in the cockpit, with, naturally, a HUGE sprue gate dead in the center of it, ensuring it will never not look like crap. I cut up a pin and used that instead: 20170114_214959 by Edward IX, on Flickr Not much progress lately, as we had two house showings today and another one slated for tomorrow.13 points
-
Tad more done this morning. The different base coats require a different pre shade colour. So we have browns for the nose, blues for the under side and drag grey green for the top. next up is the whites. I'm doing the middle of panels and high point that I want to pick out. I love this look. hopefully the yellow should really PING on the cowl. hopefully this should work and not look like my previous bruised bananas. last pass is are the dark shades. Basically darkerer versions of the mid tones. In the really deepest panel lines. Almost like an old school pre shade without the faff. top. and bottom. I'm happy with that. unfortunatly I'm on dinner duty so that's it for now and we have Sherlock later so base coat next week. Well tomorrow. thanks for dropping by. take it easy Sunday dwellers. happy modelling. Johnny paint pot.12 points
-
Hello This is my first finished kit of this year with this Grumman F-14A BuNo 159446 from VF-142 aboard CV-66 USS America in 1977. Decals came from the Furball Aero Design Sheet N°48-021 "Tomcats part one". I chose this one to match some of the Tamiya parts like the beaver tail second type. I had to scribe the gun events with seven groups according to the decal instruction sheet. It was a real pleasure to build this kit as usually I am in the 1/72 scale world. She should soon be published in Tamiya Model Magazine French Edition. Patrick11 points
-
Just wanted to get these up now quickly as time is not my own. The (corrected) tailplane assembly with shortened struts (since taking that shot I've angled them forward slightly so that the attachment point overlays the panel line more accurately: ... and at more more acute (accurate) angle: I'll remove all those unsightly hairs left by cotton-bud swabbing later! Your antlers need gluing - they're blowing about in the wind!11 points
-
Afternoon folks - my first 1:32 jet and it was an enjoyable build. This represents Sqd Ldr Black from 1965 - XR711 of 111 Sqd Wattisham. It is OOB except I got some Xtradecals to supplant some of the kit decals as they were incorrect in size. I also need to mention 'Keith in the UK' and 'DHDove' who kindly stepped in with some spare kit decals after I made a hash of the fin! Cheers guys - much appreciated. I decided early on to have this hanging from my ceiling in my office at home so built it wheels up and sourced a pilot from PJ Productions. I have put it up this afternoon and it looks great! Also the good news is I reckon I could get another 4 up there so happy days! Etched in my mind is the Lightning displays at RAF St Athan in the 70's & 80's and the excitement of them coming in low and fast - left to right along the crowd line. I've always wanted to recreate this and hence the reason it is hanging up! Hope you like it Chris10 points
-
Hi All, I got round to taking some photos of my Acaoncagua 1/48 Pucara. Great fun to build. The aircraft is that flown by Major Carlos Tomba, and shot down by Commander Nigel 'Sharkey' Ward's Sea Harrier on 21st May 1982. This famous incident is one of my favourite stories from the war. The Pucara soaked up enormous damage, Ward proclaiming that he couldn't believe it was still flying and that Tomba hadn't ejected. Tomba did eject, at the last moment, and Ward later paid tribute to his bravery, airmanship and determination to save his aircraft. Tomba made it to the airfield at Goose Green on foot, where he was taken prisoner when the airfield was captured by 2 Para a few days later. He spent the rest of the war at the hospital at Ajax Bay, volunteering as an interpreter to ehlp the injured. Ward was informed by the CO (Rick Jolley) that Tomba was there, he passed on a message to Tomba saying that he was relieved he was "alive, well and useful." I've always wanted a Pucara in my collection, and was very happy to purchase a copy of Aconcagua's all resin kit. It's an intimidating kit in the box, and it sat unbuilt for a good few years. On starting it, I found it wasn't anywhere near as difficult as I'd thought, and it went together really well.10 points
-
This is my first build of 2016! The Original Airfix 1:48 EE Lightning F2A release. I have upgraded the cockpit using the superb Neomega resing tub and seat, along with the Eduard PE set for the undercarriage. The decals are from the RAF Germany set by Model Alliance. This is my first build portraying a bare metal finish. I have read ,amy stories about the success and problems with Alclad, so I decided to have a go with the new Vallejo Metal colours which are acrylic and I prefer to work with. Although an old tooling this kit is sublime to work with and goes together beautifully. I had no issues at all, although I was slightly concenred how old the decals in the kit which I was going to have to use for all the airdcrafts stencils. Once primed with Tamiys light grey I painted the blue spine and fin, post shaded and when cured masked. I then applied the Vallejo gloss black primer. I did this in light layers, sanding with fine grit to keep a smooth surface until it was like glass. I left the primer to cure for 3 days and then plunged into the world of Bare Metal, again lightly spraying the base colour of aluminium and once dry highliting and sccetuating indvidusal panels with a varisance of Durillium, white alluminium and steel. The under belly was done with chrome and again highlighted using different colours. Whilst this was left to cure I ventured into another realm of modelling I have never attempted! Using metal foil I managed to get a decent finish on the nose and exhaust rings. This was an important step for me as I have not come accross a chrome paint that comes close to this sort of finish, and the polished metal nose ring of the Lightning which it is famous for! The whole model was then given a coat of vallejos metal gloss coat, patience is definatley required for this metal finish look, so after a couple of days to nsure everything was cured I started on the decals. This brought the model to life, once completed another coat of gloss clear was added and I then finished of with a light grey panel wash on the metal and a dark wash on the blue spine and tail. I am really pleased with how it turned out. The Vallejo paints worked very well and in my opinion are as good as Alclad in finish.9 points
-
Airfix 1/72 scale P-51D in the markings of Captain Ray Wetmore's "Daddy's Girl" of the 370 Fighter Squadron, 359 Fighter Group based out of RAF East Wretham in Norfolk. Paints are all Tamiya mixes, decals a mix of kit and SuperScale.9 points
-
Here's some photos of my really long term project finally finished. It lasted 5 years 3 months and 20 days.... These are paper models, but after the treatment they got I'm not sure if they should be classified as such. I wasn't going to post them here, but I was told that they SHOULD be here, so here you go Besshumnyi: Kit: Together: That's it i hope you'll enjoy it Cheers Mick8 points
-
I love the kits coming out of the Czech Republic for their quality and unusual subject choices and I could not resist the attractive boxings of Valom's L-17 Navion. The only problem I find is choosing which of the attractive subjects to take home with me. At Scale Model World I had the chance to study the different offerings and I chose the Olive Drab US Army boxing. When I arrived home and went looking for photos of Navions on the web I changed my mind and decided to model a USAF aircraft instead. The main parts were nicely moulded in a sand colour and there were two lovely injection canopies, one open and one closed, etched brass parts for such as the instrument panel and flap actuators and some small resin parts. You get two very tempting flight control wheels for the cockpit but photos of the military Navions seemed to show that they had control sticks instead which are also included. The control wheels are for the civilian versions. Construction of this small model appeared quite straight forward at first but for some strange reason Valom have you make up a big box section from the etched brass which you glue to the lower wing centre section which basically boxes in the undercarriage bays. If I were building this model again I would not bother with the etched box as the wheel bays on the real aircraft were boxed in individually and I would do this with plasticard. Anyway construction of this midget proceeded quickly and I soon had it complete and stood on its wheels. Then I noticed that something about its stance looked wrong when compared to photos of the real things. It looked too high off the ground, the undercarriage legs seemed too long. I cut them down as much as I dared and still things did not look quite right. Then I realised what was wrong, the wings dihedral is too flat and that is why the model sits too high off the ground even though the undercarriage legs are the correct length. And something else seemed wrong too, it's the vertical tailplane, it is not tall enough. So I increased it slightly with plasticard. There was a bewildering number of Navion versions and trims. The instructions tell you to fit undercarriage doors but the military versions appear not to have had them so I left them off. There are many tiny etched flap actuators to fit under the wings and for such a small model with few places to get hold off they are a real problem when handling the model. I wanted to be able to display the model with the canopy open or closed so I fitted small brass pins to the opening part of the canopy which fit into holes drilled in the fuselage at the open and closed positions. And then it was time to paint the model, the part of model making I like the least. I wanted a shiny Navion and as an experiment I brush painted the model with Humbrol 191 Chrome Silver and when it was dry I then buffed it with a soft cloth. I then managed to find some USAF decals in my spares box and then finally three weeks after starting it was finished. cheers, Adey8 points
-
Very strait forward build being the Hasegawa kit And the 74sqn decals went on a treat. To see the full build on how it was built please look here. http://www.britmodeler.com/forums/index.ph...t=0&start=0 Happy Modeling Phil8 points
-
So, after a thoroughly cold and miserable afternoon yesterday watching Sunderland get plonked by Stoke City, I thought I'd give myself some modelling therapy and get back to the Lancaster. I've had a go at making some new bombsights. I always make two of everything, as the second one sometimes comes out better than the first go. Also I'll probably be making another Airfix Lanc at some stage so I'll need another anyway. So, here are my two, which I hope are bit more to scale: Now that's done I've added the bombsight computer to the fuselage: Next up I thought I'd start on the four turrets, starting with the rear FN20. Having made the older Airfix kit and the Revell Lancaster I'm a bit more prepared than I might otherwise have been for some dretailing work. Anyway, here's what I've managed to get done so far: The way the turret parts have been broken down, combined with the very tight fit of the glazed front to the base make things a bit more difficult, but I think once it's all painted and put together it should be okay. I've got some Quickboost gun barrels too, as the kit ones look a little to thick. On to the nose turret next, so more soon... Simon8 points
-
Finless Jim On 17th May 1961 Flt Lt Jim Burns flying XM141 EE Lightning F.1 was number 4 in a high speed low level ‘finger four’ pass over RAF Coltishall. At an approx IAS of 575 knots, Jim got high and close into the jet wash of the lead aircraft resulting in the rudder and parts of the tail fin to separate. Fortunately the aircraft remained controllable and Jim (using aileron control) landed it safely at Colt As well as the fin and the rudder, the radio aerial on the spine had disappeared too thereby preventing any communication. English Electric's conclusion was that it was the effects of aerodynamic pressure which had built up during the course of the four aircraft's high speed low level manoeuvre which had exposed a structural weakness and caused the rudder and part of the fin to sheer off. It would seem that Jim had a big boot full of rudder on when he entered the engine jet wash from the lead aircraft. All Lightnings were subsequently strengthened and Jim became known on the squadron as Finless Jim thereafter.8 points
-
Greeting everyone, Finally able to save an old kits which was in terrible condition however some portion of the canopy could not be saved. Some scratch build parts gave her a fresh new paint, stencils are home brewed and borrow from other aircraft. Hope it turned out okay, also today is the day the lord kicked me out and landed on earth Regards8 points
-
My Airfix and Tamiya 1/72 Mustangs. Kit details for both kits are in the build thread. Build thread is here. Had lots of fun with these kits. I can say that both are outstanding kits. I cannot pick a winner here. But I must say that for the price Airfix's kit does do a better job. The Tamiya kit has more detail but not enough to justify an almost 2X price. Check the build thread out were both are built. I chose to gloss coat the Tamiya kit and weather it slighltly and chose not to seal the decals and not weather the Airfix kit. Build Thread http://www.britmodeller.com/forums/index.php?/topic/235014643-172-mustang-airfix-v-tamiya-side-by-side-build/ Final Photos8 points
-
I didn't make it back to Aberdeen at Christmas time but I'm back there now so time for a belated update. One of the last things to tackle are these radar antennas, my first inclination was to scratch build them entirely using brass and soldering but instead decided to use the kit support part (I might still go down the brass route though). The moulded verticals are of course grossly overscale at 0.5mm in diameter: Much better replaced with some 0.2mm nickel silver rod: First I carefully made some mounting slots with a razor saw: Cut lengths of the rod were then glued on using CA and this arrangement: Here they are both done: I think I'll let the glue harden up overnight before attempting to remove the jigging. The very last part left on the sprues was this attempt at a DF loop which has this strange moulded block on one side: This is definitely better replaced outright with a scratch built part. A loop was soon made by wrapping a scrap of PE round a 2.2mm drill, this was then jigged up ready for soldering like so: Here it is finished, ready for some paint after a thorough degreasing with fine Tamiya cotton buds and cellulose thinner: The missiles were also readied for some paint by drilling 0.5mm holes and inserting sharp cocktail sticks: Next I wanted to mask up the main wheels so that the hubs could be sprayed, unfortunately there was a slight problem with the 5.5mm punch hole. I had a look at trying to remove the pin but it was firmly fixed in place: Anyway I proceeded to make all four masks: The short edge wasn't really a big issue, I just infilled with more tape: The hub of the nose wheel was masked with a 2.5mm disc of tape: I'm not going to mask anymore of the strut or hub on the other side but paint the tyre with some careful freehand brushing. Everything that needs to be is now ready for some paint which I will get on with tomorrow. Bye for now, Nigel7 points
-
Internals detailed and ready for assembly (trying out the new camera again) DSCN0071 by Ced Bufton, on Flickr Stop taking close ups! Trying out brass tubes thanks to Miggers detail shots.7 points
-
The tyres. Do not chip the tyres.7 points
-
"Eye of a hawk, heart of a Lion and the hands of a laydee". Same requirements for modellers (??) For those not in the know: Cut it out man, cut it out! And the all time classic "What's the bleeding time?" Great stuff Tony and good to see the Barra succumbing to your skilled hands Sah!7 points
-
1/48 Accurate Miniatures A-36 Apache WIP here :-) Thanks to the hosts, nice STGB7 points
-
Hello All Here is the latest kit off my bench. It was for the 80s Nato Europe vs Warsaw Pact GB Kit. Its a really nice kit considering its age, few errors entirely my fault. But was pleased with the finish. WIP is here Kit - Airfix 1/48 AM - Quickboost Seat - Airwaves Etch Paints - Xtracrylix, Revell, Vallejo, Citadel Thanks for looking Simon6 points
-
My Tamiya 1/48 P-51B with Superscale decals. Aircraft is Shoot You're Faded from the 20th FG, 8th Air Force. I also used a Malcolm hood canopy from an ICM kit I've got in the stash. Enjoyed the build and glad I could finally finish something for a GB. Thanks for looking.6 points
-
Don't let me dissuade you lads from the 'unique' experience that is the Fairey Barracuda! In all seriousness, aside from the tail diagonal I noticed yesterday, it is a lovely little kit with excellent surface detail OOB. I dug around the interwebs last night but only really found box reviews that aside from mentioning the issues of the wheels being a little small (Mmm. Barracuda make Barracuda resin wheels...) were generally very positive as well. At least this seems to be the best job until the Airfix 1/48 version arrives.... Knocking them out like good-o! Cheers Bomber. 80s air...bad dancing at the school disco to The Cure, tabs round the bike shed...jumpers for goalposts..don't remember this track though: Thanks for your kind words young Philip. Once JRJ's in your head, every statement becomes a command! GrassyAss Ced! As Swiss Tony might have demurred: 'Building a Barracuda is like making love to a robust and very well-built woman.' Allegedly Cheers Tomo. I have this uncanny sensation that new parts appear in the box overnight as well each time somebody puts a new reference photo up on the web... Top man Rob! It's as if the others aren't really serious about modelling at all isn't it? You won't regret doing it. I'm off to swab something with Mr.S now before the day runs away on me....6 points
-
My body is nearly OK, after so many hours spent on that piece...6 points
-
Welcome Ian! Five pages it may be but the poor Spitfire's still in bits. Thanks Benedikt for the mould release agent picture AND for the great Elephant video - it's encouraged me to address the "Elephant in the room" and realise that my moulding (molding?) skills are below par and I need MUCH more practice before I tackle sorting as tricky as a pilot. (Mold or mould? You know I worry about these things. This says that mold is to mould as color is to colour and references the Cambridge English Dictionary which says 'mould' can be used for both. I'm going to stop worrying about it. Soon) Thanks Spookytooth Thanks Alex for the detailed method - very helpful summary and bookmarked. I think, looking at the video again, that temperature was a major problem - at one point the stuff was sticky and clumped together but later it was too hard (is that a problem? Fnaar!) Thanks Keith - I think you're right. I realised that I need to think more about the gates and mounting the pilots (steady boys) to make sure the resin goes in AND I can get the things out again. The PJ ones are gated at the feet so that seems to be the way. Hi Johnny - follow away, do; you haven't missed much Spitfire! Thanks Jaffajake Thanks Jeffers - they were OK, just OK, but not useable (assuming you meant the molds) Thanks Tony - I'm not feeling cocky ( ) but I am feeling better so time to get my ducks in line and get on with your Spitfire! Thanks John - "way beyond my comfort zone/skill set" sums it up for me too. Time to put aside mouldy things and get on with it! Wooksta you are my saviour (and Beard too who's sent me some more). PM sent, thanks! Moulding aside for the time being then (although I'll put rubber, release agent and plasticine on the shopping list) More Spitfire, hopefully, later! Thanks chaps6 points
-
First completed model Airfix P-51K 1:24 Build thread (short!)6 points
-
Mainly just some tidying-up and fixing to report back on today. Last night's efforts with the Mr. Surfacer seem to pay-off ok, the undersides have been smoothed down now and re-scribed: Same treatment to similar issues on the upper works: I'm really coming round now to using the scalpel more as a precision carving tool instead of occasions in the past where I might have started sanding and caused more harm than good. The only draw back so far is a voice in my head (not unlike James Robertson Justice's baritone) that says: 'Nurse. Scalpel.' each time I reach for it... Friends re-united: I got the holes drilled for re-attaching the deflected rudder later on. You're probably eyeing-up the tailplane attachment point there and thinking the same thing I did - a bit shallow, especially when you view male and female fittings: Note also what looks like a blob of Mr. Surfacer (at least that's what I though it was...) just below the tail on the fuselage: Don't shave that off ( as I did!) - that is SHs guide-mark for attaching the diagonal brace for the tailplane; although clearly shown on the drawing for the instructions they don't indicate clearly enough that this is the attachment point on the fuselage so be warned! One the tailplane itself there are no guides at all for attachment: I elected to build a small jig to glue the tailplanes on first, and add the diagonal bracing struts later: Having a triangular brick under the wing let me slide it back and forth to get the vertical angle right: Voilà! Coming back to this later on revealed a siginificant problem with the kit. Dry-fitting the diagonal brace between the tailplance and fuselage reveals the part to be too long: The point where the top of the part meets the tailplane is too far out! A giveaway is if you look at it fro mthe front view: That triangle should be much more acute rather than equilateral as you see here. I laboured on this matter for a while, checking my visual references, and as far as I can see, the brace is simply too long to give the correct diagonal. Using some sacrificial plastic rod as a template, this is what it should look more like: Apologies for the blur (trying to shoot one-handed whilst holding tweezers is not something I've mastered!) but even so you can see that the brace should attch on the inboard side of that panel line, rather than outboard of it as the kit part does. The instructions are also clear on this point: Some surgery on the kit part ('Nurse. Scalpel!) is called for at this stage of the proceedings. Having cut the brace, the overlap shows by what amount the part is too long: BTW, I haven't done a search on other builds of this new SH Barra but I presume others have noticed the same issue? Some CA and another use for the Lego jig as a brace-station: They remind me of something in that state - not bones - but I can't think what it is...eye stalks for Cedipede? Either way, I've left those to harden for now - I'll carve the joints back and mount 'em on the aircraft tomorrow. The last job today was simply to apply some Mr.S 1000 to the tailplane joints, prior to a rub-down with cellulose thinner in the morning: We seem to be in non-dramatic adding of final structures and tidying-up at present. There's a lot of small and spiky parts to add yet but I need to prioritize what goes on before and after paint - certainly the radar antennae will be a post-paint addition, whilst I can't put the canopy masking off for too much longer. I'll mull over the 'to-dos' for the night and see if I can fit an hours or so tomorrow afternoon. I hope you all have good days/evenings, depending on your location. Night all, Tony6 points
-
I have seen TSR.2's at Duxford and RAF Cosford so I thought I would have a go at building one so here it is. The box has a picture of a TSR.2MS from a kids TV series but the kit has an option for the TSR.2 at both museums.I have bought Eduards photo etch set as well to add a bit more detail.As I usually do I am going to have this in a flying display with the stand made from brass tubing mounted on an oak base. So the first thing I am going to do is to workout how I am going to do it. After a few hours of studying the instructions and examining the fuselage parts I decided to mount a long steel bolt through the centre of the part that made up the rear wheel well and bomb bay. So I hand drilled a hole to take the bolt and I attached it to the part using epoxy. The epoxy is fast drying but I left it over night to cure.As you can see from the photo's I have added the epoxy at both sides of the hole for a bit more add strength. The I glued the wheel well to one fuselage half along with the front wheel well. Then I added some photo etch detail before I attached the cockpit tub. The reason for doing all this is because the fuselage halves are a bit bent and twisted so I wanted to make sure that the part holding the mount has a really strong bond.To help the fuselage halves line up better I also attached plastic tabs made from thick plastic sheet.After test fitting and test fitting and test fitting again I still have not attached the fuselage halves as there were other things to do before I could attach them together.Because of the way and location of the mounting bolt I glued the doors of the bomb bay in the closed position. Then marked and drilled the hole through the bomb bay doors. Again to add more strength I glued a piece of thick plastic sheet to the back of the doors. The width of the plastic was cut to allow the plastic to fit inside the bomb bay housing again add strength.Then again I did more test fitting.This time I tried test fitting the wings to check the symmetry with the fuselage.My attention then moved to the air in-takes. These had a few gaps that required filling and then sanding to try and get the inside of the in-takes as smooth as I could.I then moved to the jet exhausts assembly which went together without any problems.So with all this done I sprayed the inside of the cockpit and then I finally got around to gluing the fuselage halves together with the help of a few clamps.Once the glue was dry I attached the air in-takes to the fuselage. I also glued the bomb bay door assembly to the base of the fuselage lining up the steel bolt with the hole in the bomb bay doors. As this is a flying display I had to glue the undercarriage doors in the closed position. The doors are not a good fit so I used right angled plastic rod to help support the doors.Then in was just a case of filling the sanding then filling and sanding until it looked right.The cockpit tub and the fuselage had a few gaps that required filling thats why I haven't added the seats, pilots or instrument panels.I decided to use a pin for the pitot tube instead of the plastic kit part. I drilled a hole in the end of the nose cone then I dropped a few drops of CA glue into the cone then I pushed in the pin. The pin was one of those with a bead on the end which helped it attach a touch better to the cone giving the pin head more surface area for the glue. I then trimmed the end of the pin with a pair of wire cutters taking the length from the kit part. Out came the filler again and I sanded the nose cone smooth.The wings were then attached which was an easy job and the fit wasn't too bad. The fit for the tail plane was a bit too loose so I added a copper pin to the rudder and elevators which was just a case of drilling a hole in the base of the rudder or elevator. Then attaching a small piece of copper wire with CA glue then cutting to size. Then I gently pushed the rudder or elevator in position on the fuselage so the newly installed copper makes a mark. Then I just drill a hole at the mark on the fuselage for the copper pin. Its then just a case of attaching the rudder, etc using normal plastic glue.After I had attached the rudder I glued in position the jet exhaust assembly then I did a bit more filling.Now its is starting to look the part.5 points
-
G'day people, My other F-16 is getting close to painting so I though I may have enough time for another F-16. This one was already started, so I submitted the already built work to the mods to make sure I would be okay to participate with this one. Approval granted so on with the show. I have already completed the cockpit and some assembly of the upper fuselage. The cockpit is the one from the kit with the addition of some hoses The cockpit sidewalls painted up and some detail work added to the rear instrument coaming cheers, Pappy5 points
-
Hi guys Thanks to Mike's amazing Infiltrator build up recently, I went out ant bought the Revell Easy kit and also a Bandai TIE Interceptor kit. Taking the things I liked from both ships to make my own alternative Star Wars ship - in this case the obvious name for it being the Sith Interceptor. I went with metallics for a color choice because I think they look good. It was Alclad, Tamiya and Gunze as thew choice of paint. Some scratch building on the wings, gun barrels and mechanics went on as well - nothing too fancy I even made a clear cast of the engines in case I was going to light it: And here it is: That's enough pictures I think but as always, thanks for looking Si5 points
-
If this is in the wrong section could a mod move it please ...thanks. Some little time back I made a 2 seat Lightning http://www.britmodeller.com/forums/index.php?/topic/234955996-148-lightning-t5-ltf-binbrook-1982/ and was left with a spare front end. So what could I do with it? So I had a think On the bench was also the Airfix Snatch Land Rover part completed. Then it came to me.............Cockpitfest tlme. The trailer is scratched built with the wheels from the Land Rover, and replacement wheels for the Land Rover from A2zee. (Thanks Alli). Markings are for an F6, XS897, 5 Squadron, Binbrook 1987 ( It still exists in Doncaster) Hope you like. Comments are most welcome. Thanks for looking.5 points
-
Hello Britmodellers here is my last finished build for 2016. Its the new tool Spitfire Mk.I from Airfix in 1:72 scale. Build out of the box. Everything is written about that kit is most probably right, deep and wide panel lines, crude details, squadron codes too light but a very nice and relaxing build and the right stuff in busy times to keep the mojo running. And it looks pretty much like a Spitfire. Painted with Humbrol and Model Master enemals. The kit was primed in black so not much washes only on the upper sides. Chipping applied with a thin brush. This build was declared as finished some days ago but the unvorgiving eye of the camera revealed a large gap under the canopy. Filling and sanding seams around painted and fixed clear parts is not really my strongest point and it can be seen. A picture of the look before is included too. Looked way better without digicam.. The antenna wire is made from Uschi von der Rostens "rig that thing" superfine. A happy, peaceful and healthy new year to all Britmodellers and their families ! Cheers Bernd5 points
-
Hi all, good to get this one finished, it's been partially built for over 7 years! So it's the Mid Production kit, with Masterclub resin tracks, used Tamiya acrylics. Hope you like it.5 points
-
Evening all... I've got the outer wing sections finished off and attached to the inner wing sections this week. My first job after the last update was to finish off rectifying a few blemishes on the new wing tip extensions I'd made, as well as completing the shaping of the wing tips with various shades of sandpaper: With this completed it was then time to attach the outer wing sections - this was done by cutting slits in the inner wing ends and allowing the spar stubs from the outer wings to slide through and interlock with the inner wing spars I'd made earlier in the build. The outer sections are quite chunky, and I wasn't confident that normal poly cement or superglue would be strong enough in the longer term, so instead I've used this stuff: It's actually are two-part exposy-resin glue that dries so hard it's like concrete. It can be sanded/sculpted and with a workable drying time of 20 minutes, it allowed me to set the wings level and then they could be left overnight to harden. The join is now absolutely solid, and there's very little flex across the entire length of the wing which is rather pleasing for a model of this span. It was important to get the correct dihedral, and because the Shackleton's outer wing sections have a less pronounced upward lift than the Lancaster, the fact I was using Lancaster wings meant I needed to modify the join - you can see in the picture below the plastic card spacers I added to each wing to get the correct angle: I then set about blending the inner and outer sections together, and applied a liberal coating of my trusty P38. This was then sanded back over a couple of evenings. Building a model this size requires thinking out of the box, and sanding it over the sink was the only option because 1) it keeps the amount of dust to a minimum and 2) it's one of the only spaces big enough to maneuver it properly! The wife wasn't best pleased, but I explained this was a better option than coating the rest of the house in an inch or two of sanding dust... And here we are - it's suddenly become a lot bigger... about three-and-half-feet-across-the-wings-bigger! You may have noticed that the fins are missing - this was because one was broken off when it had a too-closer encounter with the wall adjacent to my workbench, and thus I removed the other one as well before that took some irreparable damage, too. They will be reattached when the main filling and sanding is complete. In the photo you can see the amount of filler needed to correct the warping on the left wing - it's more or less corrected now but it will be clearer to see if further work is needed when it's been primed: So the next step will be to have a bash at the outboard engine nacelles... should be fun Until next time, Tom5 points
-
Good evening (2) Tamiya P 51 D Miss Miami Lieutenant Rep JONES 20 Fighter Group Yahuu Models Instrument Panel True Detail seat Superscale decals Humbrol paints Build Thread here http://www.britmodeller.com/forums/index.php?/topic/235015016-p51-d-miss-miami-lt-rep-jones-20th-fighter-group/ Patrice5 points
-
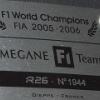
M.D 450 OURAGAN by Heller 1:72 Version: ISRAEL. HEYL HA. AVIR 1956 The first jet fighter developed by Marcel DASSAULT aircraft, the OURAGAN was also the first French jet fighter to be mass-produced. The MD 450 was designed and conceived by the engineers DEPLANT, CABRIERE and ROUAULT. The prototype made is maiden flight on 23 February 1949. The French Air Force ordered 350 OURAGAN. Abroad. Israel purchased 51 MD 450`s which took part in the 6-days war in 1967. Best regards. Andrii.5 points
-
5 points
-
Platz 1/144 North American P-51D Mustang QP-O, 'Red Dog XII' ,473108 and HO-M, 'Petie 2nd', 414151 These were out of box builds with some scratch built interior details for Petie 2nd, I also split the kit canopy into its sections for use on this aircraft. I used Mr Metal Color Aluminium to paint Petie 2nd and this was buffed with cotton buds whilst Red Dog XII was painted with Aluminium from Vallejo's Acrylic Metal Color paints. Decals are from those supplied with the kit. Link to build is here. 1/144 P-51D Mustang5 points
-
Good evening (3) Tamiya P 51 D Ridge Runner III Major Pierce MC KENNON 4Fighter Group Yahuu Models Instrument Panel True Detail seat EagleCals decals Humbrol paints Build thread here http://www.britmodeller.com/forums/index.php?/topic/235011912-p-51d-ridge-runner-iii-maj-pierce-mc-kennon-4th-fg/ Patrice4 points


.thumb.jpg.0bac681e0da8e4ed7557610e98fda908.jpg)


This leaderboard is set to London/GMT+01:00