
Leaderboard


Popular Content
Showing content with the highest reputation on 01/01/17 in all areas
-
35 points
-
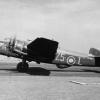
Morning all and Happy New Year from Canberra. It's been a little while since my last post in RFI, so here's some photos of the last four models completed for 2016. All 1/72 in case you're wondering. By the way, this post has taken about an hour to put together due to the delights of Photobucket. Any suggestions for an alternative that doesn't give me time to start and finish a Lancaster?? First is Airfix's Blenheim If from 226 Squadron at RAF Digby, Lincolnshire, spring 1940... The second ever Mosquito built - W4051 from 1 PRU, RAF Benson, August 1943. This is the Tamiya kit with AlleyCat engine nacelles... An Airfix Beaufighter from 404 Squadron RCAF, RAF Strubby, August 1944... and finally MPM's Boston III from 88 Squadron, RAF Oulton. This aircraft was piloted by F/Lt Johnny Reeve on the Eindhoven raid, 6 December 1942.33 points
-
I finished this build earlier this month. This is my first biplane kit and my first attempt at rigging. I know the rigging should have been flat wire but I didn't learn that till after I bought the EZ Line so I stuck with that. This probably won't be my last biplane but I'll be sticking with Spitfires and Corsairs for the near future. Thanks for looking in and Happy New Year! Carl28 points
-
Another one to add to my Gulf War collection this is the venerable old Airfix Puma kit with added bits from Rotorcraft (main rotor blades plus white metal undercarriage - thanks Colin!!), and Whirlybits - cable ducts, intakes, ECM lumps and bumps etc. I started this so long ago that its build is somewhat of a hazy memory but there are various bits and bobs that need to be added to the basic kit to update it to the Gulf War era. The kit also has working sliding doors which meant that the rails are massively overscale and were replaced with thin plastic strips. Cockpit glazing needed a lot of fiddling and sanding to get it to fit flush. The cabin windows had nasty sink marks in them so they were replaced with clear perspex cut to shape. Paint is all over Xtracrylix Gulf War pink and the minimal decals are from the spares box. Later in the war these got identification stripes but this machine is portrayed shortly after arrival in theatre. This was partly prompted by the loss of the "Disco Light" jammer to the lawn monster (I was building outside!) - it looked like these were not fitted until later in the War so I went with a machine prior to ID stripes being added. Hope you like!24 points
-
Hi All. Hallo from Ukraine. One of exhibits and one of works in 1: 144, that I did in 2016 - it BOEING VC-32A. VC - 32A is a military passenger transportation version of the Boeing 757 for the USAF. One of preferred my producers - Minicraft. Interesting airplane and most optimal to my mind scale. Total utilized man/hrs = 178 (during 1,5 months). Paint: Humbrol, Pactra (acrylic). Thank You. Happy New Year!!!20 points
-
The old Airfix B-57 (with raised panel lines!). Made awhile ago but thought I'd share... First couple of photos are filtered to try and replicate a late 60s/early 70's photo. The ones below are unfiltered. Kit was made as a fast build, for grins, straight from the box. The main black scheme was applied with Chaos Black rattle can from Games Workshop, the rest is hand-brushed. In some of the photos is the Airfix Jeep. Unfiltered...19 points
-
Hi guys, first of all a happy new year! The last few weeks I have been lurking on this forum, looking at all those fantastic aircraft being build. Just at the years end I finished my jug. I am not the fastest builder with an average of 1,25 models build per year (due to work, private life and other interests). So dont expect me to put up lots of models now :-). But I will post what I finish to get some tips and trics from you guys. Enjoy the viewing.. gr TC18 points
-
My only build for 2016, Trumpeters 1/32 Su-25A. I really struggled to find references for an Afghanistan based aircraft so a lot of it is informed guessing! Completed using Aires cockpit, Master pitots, Quickboost antenna and airscoops, Armory wheels and some of the Eduard exterior photoetch. Painted with Mr Hobby and Tamiya paints with MRP for the cockpit. Ammo Panel Line wash was used for a lot of the 'grime' effect. The kit overall is really nice, the fit is excellent although the halves of the fuselage and nacelles bow inwards slightly I can't comment on the accuracy but there's some bits I wasn't a fan of, I didn't like the fact that the airbrakes, flaps and slats are all molded in the extended position and it was quite a bit of effort to get these all retracted cleanly. I altered the kit fuel tanks to have the smaller tanks more often seen in combat photos, added the very prominent brake lines to the undercarriage and closed all of the bay doors, which again, the kit gives you as all open and I wanted mine all closed. Brass pipe was used to add several of the pipes and vents on the underside of the engines. The aftermarket was mostly excellent however I really didn't like the Armory bits. The pitots were soft and bent so I returned them and used the excellent metal and resin Master item. The front wheel was way too big for the kit so I've used the kit item. https://www.facebook.com/breakermodels16 points
-
Hi Guies, wish all of you a happy new Year. I would like to show you the last Bird, i got completed in 2016. It`s another replacing build for my Seeplane Section, it`s the, quite old, Kit of Supermodell`s BV-138, in Revell-Version. If anyone likes to build this Bird, he should use this Version, because of the superb Decals. But be aware: It´s quite a big "Sanding Monster", nearly big as the Matchbox DO 18, i did several Month before. Paints are above RLM 72+73 from Agama, below RLM 65 from Humbrol, done, as allways by brush. I replaced the MG 131 in top defence position, with a better one from the stash, and replaced the tubes of the other two guns with brass ones. I hope you like the result. Any comments are warmly welcome. Best regards Stefan16 points
-
Happy New Year everyone, I spent most of my schooldays on the edge of Salisbury Plain where Wessex, Lynx and Gazelle helicopters were almost a daily sight. I opted to model one from each of the main services in 1/72 scale. All are out of the box (apart from seat belts), brush painted but spray varnished. Need more practice on my masking! They were great fun to do. RAF Wessex (Italeri) - XS517was scrapped in 2002 RN Lynx (Hobby Boss) - XZ238 was last believed in storage at White Waltham Army Gazelle (Airfix) - XW844 is preserved at Fleetlands Hope you like13 points
-
This build was actually finished the week before IPMS nationals at Telford. It subsequently made it to the LSP display table but due to extensive building work taking place at Phartycr0c Towers, I have not been able to take any decent photographs, even these are a poor show ith half my living room in shot. Anyhow, following the purchase of a MENG 163 and a discussion around replicating the box art the plan was to produce an in flight B17 diorama including the 163, To that end I obtained a crew and proceeded to produce a rubbish in progress thread. Well this is the result, a little photo intensive i know but there is no way I could get the whole thing in with any success so you have lots of bits. Ladies and Gents, "In Peril"11 points
-
I had a bad feeling at the end of 2016 that I did not finish so much, so I have decide to finish this small F-14 from Revell in 1:144. It is OOB, colours Revell aqua.11 points
-
I want to show another of it finished aircraft. This project was similarly complete in 2016 One from "V" bomber serie AVRO VX-777 in 1:96 By "Lindberg". I invite to look. Pleasant impressions. (UKR): "Шануймося, бо ми того варті"11 points
-
Dear fellow modellers, here you are my last built of 2016: a real British classic. The Tamiya kit is not latest standard but still a good and enjoyable one. I just added some details in the cockpit,landing gear and engines, but for the rest is definitively OOB. As usual painting has been done with airbrush using Tamiya acrylics. For weathering I used oil colours and pastels. The matt finishing has been obtained with a Tamiya spray can. Comments and suggestions for improvements are more than welcome. Enjoy the pictures and happy new year Cheers Andy10 points
-
Hi, With they year rapidly running out I managed to finish this Corsair off before 2017 is with us. It's Tamiya so easy to build. I used some Decals from Barracuda for 'eightball' Dangerous Dan from VMF 213 on Guadalcanal. Its painted in Gunze acrylics thinned with lacquer I freehanded the demarkation line on the fuselage. Weathering is reasonably restrained a bit of staining on the underside and some pastel representing dust on the upper surfaces. Corsairs on the Islands did have a hard life but were maintained so I went for moderate wear and tear. I make my own stuff for this so its probably not as good as the MiG stuff. I did chip the wing root and cowl area by making some salmon pink primer painting this then adding the top coat colour and then scratching through with care nothing represents chipping like chipping... Hope you like it.. Cheers Plasto10 points
-
Good evening everyone,will get in slightly early and wish you all a happy and prosperous new year. Although i don't get the time to build as much as i would like to,due to the size of this years builds i found the need to purchase another display cabinet which i thought i would post a few pictures of along with my original one.Everything in them is 1/48 and have all been posted individually over the last few years. Currently awaiting on the bench i have an airfix javelin and an old monogram catalina to get my teeth into,much to my dismay i cam see another cabinet coming later this year,1/48 for everything may have been a bit ambitious. All the best,Chris10 points
-
Hi fellow modellers, Just in the nick of 2016, I’m able to post these images of my latest completion. It’s the 1:72 Zvezda MiG-21bis built up as an izdelie 75AP in Hungarian Air Force colours in the early half of the 1980s, just before the camouflage pattern was standardised throughout the MiG-21 fleet. I took this kit out of my stash completely contrary to my initial plan, which was to build something Phantom-ish. But I went with it and here it is. After market stuff: Kuivalainen (Eduard) MiG-21bis PE cockpit set, True Detail’s KM-1 seat, and two HAD models decal sheets with MiG-21 stencilling and generic Hungarian markings. I also used a length of copper tubing both as an exhaust can and as a way to forcibly deepen the aft fuselage, to make it more in line with what I saw in pictures. Gaps were filled with plastic and filler. Paints used: Gunze Sangyo Mr Hobby, different colours, all mixed to approximate photographic info. I wanted to reproduce a weathered finish. Especially the green used for the camouflage faded quickly; this is -approximately!- what I was going for: The kit as a kit is fairly nice. Parts fit together quite well, and if I had avoided modifications this would have been a comparably quick build. The plastic too is quite good overall - not too thick which pleased me. Especially the wings and horizontal tail look suitably thin. The wings are molded as one piece and the main gear leg housing is molded in the plastic; which is where the ejector pin marks are located. Filling these is difficult without damaging the surrounding surfaces but the marks can be hidden by overlapping added detail. However I discovered most of the panel lines on the kit were either misplaced or completely fictional; the tail fin in particular being a tableau of criss-crossing lines to nowhere. I always thought later MiG-21’s fins looked fairly distinctive, in part because of the big vertical panels in the centre. Remedy: filling, rescribing. The wheel chock was made with plasticard using the HADmodel PE part as a template. Thanks for looking! Have a nice 2017! Jay10 points
-
I've had this in the stash for a little while now: Here are the main sprues, there are two sets of these: Clear parts, the resin replacement forward engine section for the F2A-3 variant, instructions and decals: I'll be using the resin nose and building the USMC aircraft shown on the box cover, MF-15 of the Marine's VMF-221 squadron which was flown by Captain William Humberd in defence of Midway Island on 4th June 1942 in the course of which he claimed a Zero and a Kate destroyed and a second Kate as damaged. VMF-221's losses were terrible as their F2A-3's were underpowered, overweight and lacking in manoeuverability compared to the Zeroes that they faced. Most of the Marine pilots had little or no combat experience, but Captain Humberd survived the day and was awarded the Navy Cross; I haven't been able to find any reference to his subsequent career or later life. I was quite tempted to build the other box-art aircraft as I believe it was flown by Jimmy Thach and I have already built an Airfix Wildcat in the markings of the aircraft he flew, but I wanted to build a Dutch ML-KNIL (Royal Netherlands East Indies Air Force) - I had originally bought the Special Hobby boxing for this purpose: ...but having read that it is something of a challenging build (this being the politest way I can think of putting it) I chickened out; Bill 'Navy Bird' built a really lovely RAAF Buffalo I from the basically same kit, but I am no Navy Bird... I shall keep the kit and perhaps one day will be man enough to take it on, but in the meantime I will use some of the transfers to complete the second Hasegawa kit as a B-339C No.3100 as flown by Lt. August 'Guus' Diebel of 2-VLG-V based in Java in early December 1941. This unit was later moved to Singapore where the Dutch B-339's flew alongside the RAF and RAAF Buffaloes. Lt. Diebel claimed 2 Nate fighters in a Japanese raid on Singapore on 12th January 1942, though he was subsequently wounded and forced to bail out. He survived the war with three credited kills and in 1948 was awarded the Military William Order (the highest honour awarded by the Netherlands) but died in 1951 when the Gloster Meteor he was flying crashed at Uithuizen in the Netherlands. The aircraft in question is the top one shown on the back of the box: To build the kit as a B-339 I will need to replace the naval tailcone with the land-based version featuring a larger tailwheel - this is not provided by the kit but at some point I had bought the Quickboost replacement along with a couple of Eduard mask sets - good work, Past Me, your foresight is appreciated: The paint scheme for the USMC F2A-3 is USN Blue Gray over USN Light Gray, the interior will be Bronze Green, all by Sovereign Hobbies Colourcoats: For the Dutch aircraft the scheme was Oudblad (old leaf) and Jongblad (young leaf) with Aluminium-painted undersides. If I understand correctly Oudblad and Jongblad were Olive Drab 41 and what would become Medium Green 42 but I can't swear to it - fortunately for me Jamie of Sovereign Hobbies is a near-neighbour of my folks up in Aberdeen and some time ago as a result of some persistent wheedling, cajoling, whining and snivelling he got me a couple of samples of the colours in question: Close to a brownish OD and Medium Green, as it happens. These colours and the European Dutch LVA colours are not currently available but I think Sovereign will get a new batch made up at some point in the future. As noted above, the F2A-3 kit has a resin extended lenght nose to represent the 10-inch extension added to this variant to include additional fuel tankage... this requires some surgery to some of the kit parts, which I shall start with as if I am given the opportunity to mess something up I will usually take it and if I am to ruin everything I would rather do so before I have invested too much time and effort into the rest of the kit... Sorry for all the blurb and congratulations if you have made it this far Cheers, Stew9 points
-
Hey all Righty-ho, I'm calling this one done and I'm glad to finally get it off the workbench. I think I started it in late July with only a minor break for the Albion refueller in October. This is the good old 1/48 Airfix kit with some parts of the Flightpath etch set thrown in, and of course the Buddy Store. I have a photo of this aircraft in this configuration which I think was taken at RAAF Pearce in 1967, and I used decals from Model alliance and the spares box. I know it's not 100% accurate but it's as close as I'm going to get it. I fiddled a lot with the wing fold mechanisms, and the pylon for the buddy store was made from thick plastic card. I admit that I rushed things towards the end so much that I've hardly even weathered it; I just wanted it finished. This is my second Buccaneer this year. Basically I got so enthusiastic when building the RAF one earlier that I decided to get myself another so that I could show the aircraft with wings both up and down. Of course, with a new tool on the horizon I had to crack on with this one else it might end up hidden in the dark corner of the stash along with some other obsolete mouldings. The main reason it's taken so long is purely having to concentrate on work and study, otherwise any problems were mostly of my own doing. I hope you like it. Comments good or bad welcome as usual. Cheers Gaz ps you'll notice that it's sporting the 'special' nosewheel cover........the flat bit is at the top ! pps Ok Tanmodel.........you can bring it out now Yes the engine and exhaust blanks are removeable.......I couldn't decide !9 points
-
Happy New Year everyone! Thanks Tony, Keith, Cookie and Alex Thanks Johnny - I brush painted Tamiya Flat Black and then masked and sprayed Model Air Yellow and the brushed Hu24. Silly me. Thanks Sean and Greg - enjoyed 'Rogue One' a lot. No spoilers here though! Thanks Benedikt. I want one of those paper 'plane guns! Bought myself a new camera. Now everyone will be able to see my mistakes! First shot of the Mr Hobby Iron exhausts and AK paste steel on the plate thingies:9 points
-
Happy New Year everyone, here's to a productive 2017 Got the fuselage stitched up last night and added the Freightdog mid upper fairing. The H2S dome was taken from the Airfix Lancaster as the Revell one is horribly wrong. Some sanding was necessary to make it fit due to the different fuselage profiles, but most certainly worth it. Also did some test fitting with the clear parts and tidying of joins up. One thing I will say about the Revell kit, the transparancies are beautifully formed, the side windows in kits often have sink marks, but these are very flat. A photo with the light off to capture the riveting work and aileron improvements on the wing...9 points
-
After debate on here regarding the Spitfire Mk.XVIII (or Mk.18, for clarity, it will use Mk.18 in rest of post) the late Edgar Brooks started this quest when he posted this diagram from the manual Spitfire XVII access hatches PICT0119_zpsb6ff0585 by losethekibble, on Flickr which shows the deletion of the outer 0.303 gun access panels, and new upper wing panels added for the provision of desert survival equipment. this came up in this thread http://www.britmodeller.com/forums/index.php?/topic/235013933-spitfire-mk-21-kitbash/&do=findComment&comment=2580541 as a result I contacted Peter Arnold, who has been salvaging Spitfires and Seafires for many years to see if he has any clear photos of the panels in the mk.18 wing, and if the differ from the standard E wing, which is how the Mk.18 wing has usually been described. All photos kindly provided by Peter Arnold. the below are Spitfire Mk.18 recovered in India. 18- wings OAHB India Spitfire expedition Peter Arnold Collection 01 by losethekibble, on Flickr photo from ‘Peter Arnold Collection ' 18- wings OAHB India Spitfire expedition Peter Arnold Collection 03 by losethekibble, on Flickr photo from ‘Peter Arnold Collection ' 18- wings OAHB India Spitfire expedition Peter Arnold Collection 02 by losethekibble, on Flickr photo from ‘Peter Arnold Collection ' 18-TP367 Recovery from India002 by losethekibble, on Flickr photo above by Peter Arnold. 18-TZ219 Chandigargh 4 June 1991 Image by Peter R Arnold 003 by losethekibble, on Flickr photo from ‘Peter Arnold Collection ' 18-TZ219 Chandigarh 26 June 2015 Polly Singh 23062015017 (2) by losethekibble, on Flickr photo from ‘Peter Arnold Collection ' 18-TP276 July2009 S2dsc00369-small by losethekibble, on Flickr photo from ‘Peter Arnold Collection ' as can be seen the outer wing has been revised, of note is the survival equipment bays use the same wing space as formerly used by the 0.303 ammunition boxes, except the access hatch was in the lower wing. this is a Mk.XIVc (14c) wing diagram. Here's the E wing gun layout the other area of Mk.18 confusion is the rudder here's John Adams on this matter This information is not in any of "the books" AFAIK, so hence reposting it here again. John Adams posted the tail/rudder comparison drawing a few years ago, but I have not seen clear photos of the revised wing panels and skinning before, so thanks again to Peter Arnold. HNY T EDIT - to re host photos8 points
-
Here is the next victim of my "I've worked on that" collection. Phantom FGR2 XV430 'A' of 19F Sqn. Yes, sorry to those DG/DSG camo fans- it's grey! I've not seen the Hasegawa original for quality, but the Revell version was full of flash and seam lines to clean up. I did my usual, throw lots of AM at it to boost my abilities, I'm pretty happy with the result. Thanks for looking. Rob.8 points
-
Happy New Year All. Update: Green camo on, mistakes resolved, several clear coats and decals added with chipping hand painted. Got to say I love Microset and Microsol. I had been holding off buying them for ages as I was using Decalfix but there is no comparison! The roundels, especially on the wings really do look like they're painted on - marvelous products. She's now ready for her oil wash and weathering. Hope you like. James8 points
-
Hi All Started this ages ago just decided to finish it over the holidays. Tried a few different things with the model, fairly happy and at least it is finished. That makes it 2 models finished for 2016 (just in time for the second). That is a huge improvement for me over the last few years, oh well see what 2017 brings. The kit is built OOB, it is not bad, but I found that the actuator arms/ linkages could have been better, also not convinced about the little piggies the artwork is a little simplistic and I think they should both face forwards but not 100% sure on that. cheers Ali7 points
-
Two and a half for me this year (1,5 more than 2015) All Grumman with Pratt & Whitney engines Academy 1/72 F6F-3 Hellcat Airfix 1/72 F4F-4 Wildcat Fujimi 1/72 F-14A Tomcat (wip) Happy new year!7 points
-
Like quite a few others my modelling this year has almost totally revolved around various Group Builds, which helps keep things on track and gives me the inspiration to actually finish some of the stash. Anyway here's my 2016 in plastic. First off was an Iranian F-5F built from the excellent AFV Club kit. This was followed by a F-47N Thunderbolt in Taiwanese markings built from the Academy kit. There's also a Hasegawa P-47D which never got finished as I still can't make my mind up which scheme to finish it as! It was off to the helicopter GB next and for this I finished a couple of the venerable Airfix CH-53's, the first one was done as an aircraft from the Islamic Republic of Iran Navy. And the second one was done as an Israeli machine in the earlier camo scheme. Then we were odd to the 1980's NATO/Warpac GB which I built a Hasegawa F-104 as a Canadian CF-104. A Fuji/Bell AH-1S Cobra from the JGSDF was next for the Huey GB, built from the old Monogram kit. Then came the new Airfix Spitfire Vb in the markings of 352 Sqn (Yugoslav) RAF. Followed by one of it's partners from 351 Sqn, a Hawker Hurricane IIC built from the Hasegawa kit. And to finish off the year (I finished it last night) an Italeri CR-42AS. There was also a 1/72 Airfix Lancaster built as a commission which for some reason I don't have any pictures of so quite a busy 2016, hopefully 2017 will be as good. Thanks for looking. Craig.7 points
-
Hi - Happy new year to all! Bit of a poor year with only three efforts from me - still, better than the last two years with zero output s things might be looking up! So, here they are. From August - Hasegawa 1/24 Toyota Corolla WRC - Monte Carlo Rally winner 1998 from September the Monogram Lotus Esprit Sport 300 converted to RHD and slightly lowered. Fnally the gorgeous Airfix Lancaster B.II built for an elderly chap who figured it was beyond him Sorry for 2 pics but I like both sides of this one! Here's to a more productive 2017! ATB Rick7 points
-
Finished model. куда залить картинку7 points
-
not the most productive of all years, but that is what I finished in 2016 all 1/48 Guess you can find all of them here on BM, incl WIP some were done in the fantastic Britmodeller Group builds here Classic Airframes Meteor Mk7 of the Egyptian Airforce using CA modified decals Classic Airframes F-5B modifeid to a F-5M of the Spanish Airfoce using Aztec decals Kinetic MQ-9B Reaper with Caracal decals, modified to -5 version with new sensors and strenghtened landing gear Scratchaeronautics Casa C-101 Mirlo in Patrulla Aguila colors: build during more than yer but finally finished this spring: Revell Mi-24D Hind modified to Mi-35V of the Czech Airforce using CMK resin conversion, Pavla Cockpit, Rupurator rotors, quickboost BM-8 rockets, and HAD decals Airfix Harrier GR.3 with Neomega cockpit, Pavla intakes, nozles and pylons, and Xtradecals 25th anniversary Falkland decals Italeri AH-1W Super Cobra NTS with Olimp Models conversion, Master M197 cannon and Caracal decals Revell TAH-1F cobra in Flying Bulls colors: thanks for looking! Happy new year to all! Werner7 points
-
Egad. At least with you it requires the coercive powers of a Hypnotoad Keithski. My wife will be happy to confirm that it was me who originally put the pun in punishment... The internet being what it is, there is no doubt an entire part of it in which you are going right! Rule 34 I believe. To create a frisson of interest at the start of this rather prosaic update, I'll start by announcing that since 11 am I have already drunk sufficient coffee that my heartbeat is currently registering on seismometers across the Northern Hemisphere. No doubt Rekjavik is being evacuated as we speak and various New Age forums across the web are alight with speculations of calendrical Inca prediction. Odd therefore that I should have alighted upon some delicate card and strip activity (no, not that kind, wash your minds out) but first, some modification of yesterday's work. As you can see here in the shot from the IWM archives: ...that rear wing-fold element with the flaps on doesn't flip over all the way onto the main wing, but sits canted up at an angle. A little filing down of the hinges needed therefore to allow for the angle of this posture: That would seem ok now: Now the only outstanding job on the trailing edge is to finish off final detailing: Basically Slaters' microstrip and 0.2mm card. The brown higne-details I've added will be filed down to the required depth later: I've learned that if you're trying to fabricate something equal on both sides (like an imitation hinge-bolt), that it's initially easier to make it slightly bigger to give you a more accurate gauge of alignment in three dimensions, and then reduce them down later. Again, Slaters to the rescue on that bit, with their micro-plastic-rod. Finally a view that shows you both working and fixed hinging in relation to each other: When you see this kind of structure (or even attempt to build it yourself!) you really get an appreciation of just how ingenious the Fairey design team were in working out how to cram the dimensions of the Barra down those of the deck lift - kind of naval-aviation-origami. This shot makes my breath catch every time: Modernist art as far as I'm concerned. Have a good evening friends. Sherlock tonight! The game's afoot again and I am so looking forward to it. Tony7 points
-
And the year after that everybody would be wondering why Airfix went bust...again.7 points
-
My modelling year has been spent in GBs and, although I've had a great time, I have missed just being able to take my time with a build. I have plans to do a few more builds outside GBs next year so we'll see what happens! First completion of the year was a 1/48 Tamiya kit built in the Made in Britain GB: Crusader Mk.III / British Cruiser Tank Mk.VI T126799 - 6th Armoured Division - Tunisa Kit: 1/48 Tamiya Paints: Humbrol and Revell - all applied by brush. The tank is built OOB but I have added some stowage items WIP: Here RFI: Here The next kit to be finished was another 1/48 Tamiya kit but this time in the Republic P-47 Thunderbolt GB: Republic P-47D Thunderbolt - WZ-P - No.226551 As flown by Lt.Col. Benjamin Mayo, 84th FS, 78th FG, Duxford Air Base, 1944 Kit: 1/48 Tamiya "Bubbletop" Paints: Citadel, Humbrol and Revel - all applied by brush. Built mostly OOB apart from a few bits of scratch-built plastic and wire in the cockpit and wheel wells. Work In Progress: Here Ready For Inspection: Here The Hawker Hurricane STGB was next and this was my chance to build the 1/72 new tool Airfix kit: Mk.I Hurricane - L1592 KW-Z No.615 Squadron, RAF Kenley, England, August 1940 Kit: Airfix 1/72 Starter Set Extras: PropBlur, EZ Line aerial cable and some scratchbuilt bits and pieces - gun-sight, struts in the radiator, etc. I also thinned the trailing edge of the wings and removed the fabric moulding behind the armament bays - this work included a small amount of re-scribing. Paints: Revell and Humbrol acrylics all applied by brush. The base was made a while back for my first 1/72 Spitfire and all I have done is add the clear perspex rod to display the Hurricane. WIP: Here More photos: Here The Starter Set GB was next and my entry was: Airfix's 1/76 Cromwell Mk.IV WIP: Here The Spitfire Tribute GB for Edgar Brookes was next and I decided to build Tamiya's 1/72 Mk.Vb: Mk.Vb Supermarine Spitfire EN821 from No. 243 Squadron, Fighter Command Kit: 1/72 Tamiya (No.56) Extras: Eduard Photo-etch Zoom Set SS213 and EZ LIne Paints: Humbrol, Revell and Citadel acrylics all applied by brush WIP: Here RFI: Here The Great Patriotic War GB started in May and I decided to build two IS-2s - Tamiya's 1/48 version: Russian Heavy Tank IS-2 - Model 1944 ChKZ 88th Independent Guards Heavy Tank Regiment - April 1945 Kit: 1/48 Tamiya Extras: Hauler Photo-etch HLX48324 and stowage from a Tamiya Jerry Can set Paints: Humbrol, Revell, Railmatch and Citadel acrylics - all applied by brush WIP: Here RFI: Here .........and the 1/72 Italeri version - which was a gift from Sgt.Squarehead: Russian Heavy Tank IS-2 1943 Version Unknown unit - Berlin - April 1945 Kit: 1/72 Italeri Extras: Tow cable produced from 0.2mm Lead wire and stowage from a variety of other 1/72 figures sets. Paints: Humbrol, Revell, Railmatch and Citadel acrylics - all applied by brush WIP: Here RFI: Here Then in the Vignette GB I made a base for the Tamiya 1/48 JS-2: "Road to Berlin" - 1/48 Tamiya IS-2 Kit: Tamiya 1/48 IS-2 (built for the Great Patriotic War GB). WIP: Here. RFI: Here. Figures: Tamiya and ICM Base: 4mm MDF mounted in a Wilkos 7in x 5in picture frame Scenery: Filler over expanded polystyrene, painted with Humbrol Dark earth and then a variety of turf scatters, grass tufts and trees from Woodlands Scenics, Greenscene, etc. applied. The fencing was wooden coffee stirrers mounted on square strips of softwood and the road sign was created in Photoshop. The Vignette: One of the IS-2s in the Russian tank column, en route to Berlin, is passing the female army traffic controller who has just given permission to proceed. Just at that second there's an alert that there's possibly German troops/armour in the fields/forest to the south. Some of the IS-2 troops/crew are more alert than others and instantly spring into action - the others are getting there more slowly as the tank commander smiles as he brings his large gun around ready for firing. More photos here. Next, in August, I completed my first Fw.190 in the STGB of the same name: FW190 A-8 'Brown 6' WNr 175140, JG26, Melsbroek, Belgium, July 1944 Kit: 1/72 Airfix Starter Set Extras: Tamiya tape seatbelts and EZ-Line aerial wire Paints: Humbrol, Revell and Citadel acrylics all applied by brush WIP: Here RFI: Here Also in August I spent one frantic weekend building this Tiger 1 in the Blitzbuild GB: German Heavy Tank - Tiger 1 (Early Production) No.931 - 3rd Panzergrenadier Division - Totenkopf - Kursk, July 1943 Kit: 1/72 Zvezda - OOB Paints: Humbrol, Revell and Citadel - all applied by brush Build time: approximately 19 hours WIP: Here My four final builds of the year have been in the MTO GB which is, as of posting this thread, is still ongoing. My first completion for this GB was: Pz.Kpfw.III Ausf.L No.1 10th Panzer Division 1943 - Tunisia Kit: 1/48 Tamiya Panzerkampfwagen III Ausf.L Paints: Humbrol, Revell and Citadel all applied by brush Extras: Stretched sprue aerial and Tamiya stowage items from the Jerry Can set. The rope for the stowage was made from some of Mrs PlaStix's thread. WIP: Here RFI: Here Next completion in the MTO GB was: Panzerkampfwagen VI, Tiger I (E), SdKfz 181 No.131 in Tunisia Kit: 1/48 AFV Club Tiger 1 Ausf.E Early Version Paints: Humbrol, Revell and Citadel all applied by brush Extras: Skybow Tiger 1 tracks, plus wire and plastic strip for the grab handle and step that were a feature on the front of the hull WIP: Here RFI: Here The next two are just about finished but I haven't taken any RFI photos yet. First off is another Tiger 1 - this is the 1/48 Tamiya Initial Production kit: Tiger 1, No.731, 'Norbert' This model below will probably be my last completion for the year although I intend to make a base for these 4 which I hope will be done in the next week. I will add some pictures in this thread when it is finished. The final one is this one: Fw 190 A-4 of II./JG 2 Flown by Hauptmann Dickfeld, Tunisia with working propeller The diorama for the above models is now complete and the full set of photos of it can be found in the Diorama section Here. Here are four photos as a sample: Well I have completed 14 projects this year - that's the most I have ever managed - more than one a month!!! All my kits this year have been brush painted and I thoroughly enjoyed making all of them. I have had fantastic advice, encouragement and support from loads of people on Britmodeller who, I believe, make a great deal of difference to my modelling - so thank you to everyone who has taken the time to comment in my threads. I have already got some ideas of the kits I want to make next year and I'm looking forward to taking part in some more GBs - possibly not quite as many though! Comments and Suggestions welcome. Kind regards, Stix6 points
-
This is my only build for the year. It took me ~ 450 hours to finish it. I finished it the morning of Christmas Eve, and delivered it to him that afternoon. My modelling friend had volunteered to build a 1/72 C-130H for a friend who was a TSgt in the USAF Reserve, and a Flight Engineer on a C-130H at Maxwell Reserve Base. Because of my friend's Parkinsons, I stepped in to build it. I used Italeri's 1/72 C-130E/H as the basis, and used the following aftermarket items: Attack Squadron Engine Nacelles & Props and their Wheel Well Extensions and Brengun's PE Flare/Chaff dispensers. I used portions of decals from Vince Maddux decals (Thank you Vince!), Authentic Decals and Warbirds Decals. All the chaff "buckets were scratch-built, as were all the antennas on the nose, tail and Top & bottom of the aircraft. The static discharge wicks were made from Econoflex .014" 7-stranded beading wire. Paint was ModelMaster Air Mobility Command Gray. I also used the Eduard canopy masks (first try, very nice stuff). Some of the windows had to be filled in and new ones made in the correct locations. Measurements for scratchbuilding were based on loads of photos I took as well as online pics. i haven't had time to resize my WIP pics and upload them to Photobucket, so I only have a few pics to show. The base is a poster frame, with an official USAF map of Qatar, which is where TSgt Gross flew out of. (P.S. I know the flags on the tail are backwards. I didn't figure it out until the morning of delivery, and the customer wasn't concerned about it.) Larry6 points
-
Hello fellow modellers, this is a couple of Finnish D.XXI's of the Wasp Junior powered 4th version, built with earlier slot-less (FR-125) and later slotted wing (FR-129). The Special Hobby kit needed some extra work to adress too short cowling, which was extended by 1.5mm thick strip and the fabric on the landing flaps was sanded down as these were all-metal. Otherwise, pretty nice build with just few adders here and there, especially around the engine and in the cokcpit. The FR-125 markings for 2/LLV 30 machine depicting it in early July 1941 as flown by T.Mattila came from the box, while the markings for FR-129 representing mount of the most succesfull pilot of the Wasp powered D.XXI , V.Karu (6 kills), was assembled of decals coming from Stratus book on Finish AF, and partially from the kit. Public thanks must go to Kari Stenman for his invaluable help with the markings of the latter kit. Cheers Libor6 points
-
Last one for the year is Bandai's Death Trooper from Rogue One. Another great, easy to build, fun kit.6 points
-
At some point in the history of our species, somebody thought 'I wonder what will happen if I lick this frog?' I dread to think what will happen when a manned mission finds life on Europa or Enceladus. Presumably there will be a transmission back to Earth that says 'I'm just licking the life-form now.', followed by 23 hours of giggling. I can see this working as an animated TV series. Split the profits? A final image this evening. Just been out the back to watch the conjunction of Venus and the Moon setting behind the trees. Crystalline air and very cold:6 points
-
I did it.......and it didn't affect me at all...............just smell the salty air every one...............6 points
-
A Martian insurrection? Time to clamp down on this crazy talk before it gets out of hand. Hypnotoad commands you! Look into the Hypnotoad's eyes and repeat 'That second fold ain't happening...': All glory to the Hypnotoad! In all earnestness esteemed Son of Ares I don't have the nerve or the urge for a last minute surge of urgency on that section. At this stage I'd have to tear out that rear section again to add reinforcing, and TBH I want to keep then momentum going as - both with the cantilever and existing hinged part - they took so long to get right that I came dangerously close to faltering. Besides, there's glory in it for the next person to come along and succeed with a solution to that part...particularly at1/48... I used to know a joke about stooping but blowed if the only bit of it I can remember is the punchline. No wonder I'm left off the New Year honours list yet again... That sentence is either: 1. The most complex and overlapping set of euphemisms yet devised. or: 2. The worst sex tip ever. I can't decide... HNY to you and yours James! Truly kind Seán Óg. I've a lot of blessings to be thankful for. HNY to you! Good man Chris. You sound as if life is very busy so sincere best wishes for you to get some peace at the bench soon. And HNY to yourself and family too. I'm glad we're not the only ones using the Beatrix Potter book of chicken names. 'Marie Hentionette' is one of our most dependable layers. Mrs. B. has however put the kybosh on me putting an Egg Station Zebra sign up over the chicken/duck compound... Muchos gracias Don Roberto. Happy Nuovo Yearo to yourself and clan.6 points
-
What a lovely chilled New Year's Eve. Apart from setting the Hens up for 2017 it's been plastic fantastic. first off the guns got tidied and primed. Then paint, black and some aluminium dry brush action. takes me back to being 15 and painting Games Workshop figures. Then fitted. take a good look as it's getting buttoned up under half of the cowl. there it is painted on the inside. I know you won't see it but you might.....a bit.. I taped the halves together to see how it fitted. Erm..... honestly does nothing fit? it seems like the guns and pretty much all the engine parts stopped the cowl touching home. Here's the other side. Rubbish. I shaved some off my newly painted machine guns. (Not fun) alas no dice. The best course of action will be to fit the sides and shim the middle. mind the gap! connecting pins removed and shim added. Not a bad fit in the end. A few gaps but a lot better. masked and ready for Mr S 500 and filled. that needs some proper drying afore it gets sanded. I'll leave that till next year. Masking off it looks sandable. I'll let it be now. Canopy next. How do folk go about painting the inside of these things? My prowler had sections stuck inside so it was a no brainier but this is a whole different story. any info or help would be much appreciated. first, this scratch or mould line. annnnnnnd gone. I am going to mask both sides and paint.... I think. I'll make that the last bit in 2016 any ideas are welcome. thankyou all for making 2016 a great year, this my first year as a part of BritModeller. It's been such a great deal of fun watching your builds and working through my own. Have a truly wonderful evening and here's to a plasticky filled 2017. happy new year and as always........ Happy modelling people. Johnny boy6 points
-
Hiya Folks, After getting the Hurricane`s & Spitfire`s out of the way in part 1,......here it the other stuff that I built in 2016,.....again all are brush painted apart from the silver ones which are don using a rattle can. First off is; 1/48th Monogram B-26B converted using the Lone Star resin conversion into a Marauder Mk.I of 14 Sqn RAF in the Middle East; DSCF9355 by Tony OToole, on Flickr DSCF9359 by Tony OToole, on Flickr 1/72nd Hasegawa Mosquito FB.VI, 21 Sqn, Post War, Germany 1945-46 DSCF8229 by Tony OToole, on Flickr 1/72nd Mosquito FB.VI, 82 Sqn, SEAC, Burma 1945- Tamiya kit DSCF7936 by Tony OToole, on Flickr I`ve built a few Beaufighters this year; 1/72nd Airfix Beaufighter built as a USAAF NF.VIf of the 416th Night Fighter Squadron, USAAF DSCF9548 by Tony OToole, on Flickr 45 Sqn Beaufighter TF.X, x 3, Post War, Far East,.....Airfix & Hasegawa; Airfix; DSCF0527 by Tony OToole, on Flickr DSCF8301 by Tony OToole, on Flickr DSCF8291 by Tony OToole, on Flickr 1/72nd Airfix Beaufighter TF.Mk.X, A19-192, EH-T, `Pistol Packin Mamma, 31 Sqn, RAAF, Australia,, 1944. DSCF8260 by Tony OToole, on Flickr 1/72nd Airfix Whitley Mk.V of 297 (Airborne Forces) Sqn, RAF Netheravon, 1941 DSCF8477 by Tony OToole, on Flickr 1/48th Hobbyboss kit as a Fleet Air Arm Corsair, 1836 NAS, HMS Victorious, 1944 DSCF7545 by Tony OToole, on Flickr DSCF7544 by Tony OToole, on Flickr 1/72nd Matchbox Boston Mk.V- 13 Sqn, RAF, Italy & Greece 1945 DSCF9072 by Tony OToole, on Flickr Tamiya 1/72nd Thunderbolt Mk.II- 73 OTU in Egypt DSCF8069 by Tony OToole, on Flickr Tamiya 1/72nd Thunderbolt Mk.II- HD265, RS-G of 30 Sqn DSCF8085 by Tony OToole, on Flickr Thunderbolt Mk.II, KL849, FJ-G of 271 Sqn, SEAC in 1945,.....built using the Revell 1/72nd scale kit DSCF7635 by Tony OToole, on Flickr 1/48th Revell Mustang Mk.III 213 Sqn, Egypt/Italy 1944- old ICM kit. DSCF9246 by Tony OToole, on Flickr 1/48th Hasegawa Mustang Mk.IV, 112 Sqn, Italy 1945 DSCF9275 by Tony OToole, on Flickr Hasegawa 1/72nd Kittyhawk Mk.IV, 76 Sqn, RAAF, South Pacific DSCF8734 by Tony OToole, on Flickr 1/72nd Hasegawa Kittyhawk Mk.IV, 450 Sqn, RAAF, Italy 1944/45 DSCF9143 by Tony OToole, on Flickr 1/72nd Airfix Blenheim Mk.If, 30 Sqn, Greece, 1941 DSCF9475 by Tony OToole, on Flickr 1/72nd Martin Baltimore Mk.IV, 13 (Hellenic) Sqn, Italy & Greece, 1944-45 DSCF7283 by Tony OToole, on Flickr Some Martlet`s! The new Airfix Martlet Mk.IV;, 893 NAS, HMS Formidable 1942. DSCF8724 by Tony OToole, on Flickr 1/72nd AZ Model- Grumman Martlet Mk.I x 2,....804 NAS, 1940-41 DSCF7678main one by Tony OToole, on Flickr DSCF7668 by Tony OToole, on Flickr 1/48th Czech Model, Cessna Crane, 132 (Fighter) Squadron RCAF, WAC, Canada, 1942. DSCF7752 by Tony OToole, on Flickr B-17 With A Difference Part 2- 1/72nd B-17F Fortress 9202 `Mailplane', 168 (HT) Sqn, RCAF, but now in its later overall silver scheme; having earlier done the same aircraft in its camouflage finish,..seen here; b17-3 by Tony OToole, on Flickr Last January I built another model of the same aircraft in its later guise, stripped of camo; 45 by Tony OToole, on Flickr Also had the Revell and new Airfix B-17`s on the go,....but due to a fairy rubbish end of year they won`t cross the line this year! Well I think that this is it for this year,.......although I may remember some others later! Happy New Year to you all and good luck for 2017 ,.. Cheers Tony5 points
-
Happy New Year and thanks for adding me. I just want to introduce myself as a new member. One of my main topics is western allies of the ETO in the slightly unusual 1/87 scale. Market Garden Dragon Wagon And pics from my recent project, Eighth Air Force Cheers Macki5 points
-
This is my first model of 2017, and the last Tiger Model kit in my stash. I hope they come out with more of these "egg-esque" little models. Between Hasegawa, Meng, and now Tiger they have many subjects covered, but there are a lot more that can be done. I'd love to see a Stormovic, an Me262, a razor back P47, a Betty bomber and maybe a seaplane or two. Just wishful thinking. At any rate, here is my Tiger Models kit of the Bf109. Built OOB and painted with MM enamels. All decals are from the kit. Assembly is straight forward. Added tape seat belts. Recommended!5 points
-
Happy New Year everyone! To start off 2017 here are pics of my Sopwith Tabloid, the second half of the double build (Sopwith Baby) started in August. This was my first vac kit and I learnt a lot from it. It's a fairly easy kit for a first so no major problems. My biggest challenge was the wings, which were not very well represented. I removed the surface detail and added the ribs with plastic strip, sanded down to reduce the thickness. The aircraft represents number 168 of the Royal Naval Air Service, based in Antwerp up until October 9th 1914. On that date, Sqn Commander Spenser Grey in 167, and Lt RLG Marix in 168 left the airfield, (now deserted as the squadron had already withdrawn) to bomb Zeppelin sheds in Köln (167) and Düsseldorf (168). Bad weather stopped 167 reaching its target so Commander Grey bombed railway yards instead, but Lt Marix in 168 found the airfield and bombed the sheds, destroying Army Zeppelin Z.IX. His aircraft was damaged by ground fire, including a hit on the fuel tank, and he ran out of fuel on the way back to Antwerp. He returned to the airfield by train and bicycle, arriving to find the airfield being shelled, so he and Sqn commander Grey abandoned 167 and a BE2a and left. I hope you like her! Ian5 points
-
Good afternoon everyone, What with 2016 being a year of great changes, (moving house, new job, my wife having weight loss surgery), I've not had the time to be as productive as last year, but then again last year I had 4 enforced weeks off and then lost my consultancy contract, so ended up with a huge amount of time off. So here, in no particular order, are the builds I managed in 2016. Revell 1/32 Fw 190 F-8 Untitled by simon_rw, on Flickr Tamiya 1/32 Corsair (with a pilot figure, which was the first attempt I'd made at figure painting for a while. IMG_1281 by simon_rw, on Flickr Hasegawa A-4M Skyhawk, which was one I pulled off the Shelf of Doom. IMG_1283 by simon_rw, on Flickr Airfix 1/48 Spitfire Mk. V, from the new kit, which went very well, apart from slight awkwardness with the undercarriage legs. Untitled by simon_rw, on Flickr Tamiya 1/32 Spitfire Mk.16e, which was a bit of testbed for a natural metal finish (still don't think I've cracked it). 1/32 spitfire Mk16e by simon_rw, on Flickr And finally, Eduard 1/48 Spitfire Mk.16 e in the colours of Air Vice-Marshal James M. Robb. 1/48 spitfire Mk.16e by simon_rw, on Flickr Thanks for looking.5 points
-
Using clear resin to get depth of water. So the RANS website has had a few really cool pics showing how I can display the subs with the underwater hull areas visible. doing this has been a major headache but I think I have it sorted now. and from a couple of weeks ago images showing five Collins birthed. Something that doesn't happen very often. love the detail in these shots with all the gangways and mooring lines etc. I am so setting up something like this with mine. So after my first failure trying to get water at depth, I have been very nervous trying it again with clear resin. But another series of pics on the Navys Facebook page inspired me to try a little diorama as a practice run for using it. Having a spare Collins and Taipan I thought I would have a go. The white thing is a plasitc tube covered in cotton wool. The first photo of the chopper and sub show the wake being more under water with the lighter blue tinge instead of more white with the prop closer to the surface. looks crap now but wait for it. and the resin poured and hard as a rock. I love this stuff. theres a couple of airbubbles but thats only because I tried to move it before it dried. Then the surface is spray with these clear paints. I love these as well. Mixed together and thinned down with some clear coat they make a great water colour. I even mixed a little into the resin. But that is pretty close to what I want for FBW To finish it off I have added a bit of white paint to acryilic gel medium for the white water areas then some acrylic gel with out white for the rest of the surface water. Couple of dudes chopper attached to the thinnest bit of brass I could find that would hold the thing up and bobs your unlce (or auntie in this day and age ) I tried to use cotton wool for the mist from the rotors but it didn't work out too well. should have left it off. Other than that I am really happy and relieved this has worked out and as I said I love clear resin now and can't wait to get it done on the FBW dio. I know the sub and chopper are a bit off topic but they are related. Cheers Callum5 points
-
Well, folks, I managed to get this one done today as the last completion of 2016! A little bit of touching up here and there but that's it. More pics in completed models tomorrow when I have some decent light. Thanks for looking in, and Happy New Year everyone! Ian5 points
-
Well she finally here, seems like ages since I proposed this GB! Ok after a few minor issues I think I have this one all sorted….even if I have a complete F-16 now spare, more on that one later. For this build I plan to build a Polish F-16CJ in 2015 Tiger Meet colours….well Grey in a tiger pattern! I’ll be using Tamiya’s lovely F-16 for this build, …and yes I know this one is a Block 50 and I need a Block 52, that’s why I now have a second one (and I know I should have just built the second one instead….but that would be too easy for me!). I need a few bits to turn it into a Polish F-16 so it gets Wolfpack’s Dragchute set. Plus while I’m at it a new resin cockpit and exhaust from Aries. There was a bit of a mix up when I ordered Tiger Meet scheme set, I wanted the masks but were sent the decals. I then received the masks once the supplier was advised of the error. The decals are lovely but I really want to paint the scheme, it’ll look that much better. Like my “Splinter” MiG-21 this will require painting the reverse of usual painting! More of that when the time comes. Plus I now have a complete spare F-16, so what will I do with it??? A Whiff! It’s not allowed in the build so there is a thread running in the WhatIf section….though there may be the occasional photo-bomb! I’ll be away for the start of this GB but can’t want to start, for a change I have an almost empty bench!4 points
-
Well that's me done for the night - Sherlock on in ten Its nearly there. Once I've cracked this one, I wont bore you with piccies of the other one4 points
-
Happy 2017 one and all, I think I have FINALLY got the RLM 80 splotches to the point I am happy with it! Moving on has been bits and pieces in preparation for the gloss coat. I have detailed the MG17 gun bay and a test fit of the MG 17 showed the port one was fine but the starboard one would not seat properly, being about 1 mm too far forward. The rear end of the MG fouls the instrument covering and I will need to carve a "groove" or fold in the material to allow the MG to sit properly: The splotches of what I take to be RLM 63 light grey on either side of the fuselage have also been added: My attention then turned to the underside, with the PE radiator and oil cooler flaps added their respective positions: The rudder control wires and guide horns, horizontal stabilisers and supports were added in that order and fixed in position after ensuring they were true: Lastly, the MGFF barrels were inserted in their openings and set to their correct protruding length using the handy scale plan that comes in the Master Barrel set. The antenna mast was then set into position atop the rear cockpit: Now I think I am ready for gloss coating! Regards,4 points


.thumb.jpg.87669a5ffb8b13672a3d675087a46d42.jpg)


.thumb.png.6e11fc11af5645499ae76cb59fcfb788.png)


.thumb.jpg.0bac681e0da8e4ed7557610e98fda908.jpg)


This leaderboard is set to London/GMT+01:00