
Leaderboard


Popular Content
Showing content with the highest reputation on 29/08/16 in all areas
-
Here is my finished Airfix Shackleton MR2. I used the Xtradecal set to complete it as a machine used in the Suez crisis. The only picture i could find did not show if they had wing stripes or not. Various discussions I found were pretty inconclusive too. So I put them on, helps break up the grey anyway. The stripes were painted with Vallejo Beige with a touch of yellow mixed in. As I believe the stock of yellow paint was low. Overall grey is Mr. Hobby and some of the upper panels were faded my mixing in some light grey. All flattened down with Humbrol matt from the spray can. The props were replaced with a set of Aerclub ones from a previous build of the old Frog/Revell Shack. I couldn't be bothered to mask and paint the kit ones when there was a set already done and sitting on a shelf.33 points
-
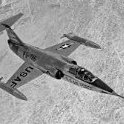
Well, I got it because I was tired of waiting for new Airfix releases. This summer was bone dry, I surmise due to their financial troubles. So when they said they were rereleasing the Cannie, I said what the hell. Turns out there is just took much disparity in the quality of older Airfix and new Airfix. It's night and day. This wasn't a very good kit. I mean I enjoyed the build, but not nearly as much as I have their new tool stuff. This kit is just too big to be this bland. The for was good, but not so good as the new tools. The bomb bay doors were terrible. Party due to my mistakes, yea but I haven't had that kind of issue with other bay doors. Could I have made them fit better? Yes. Was I too lazy to even bother? Absolutely. At any rate, she's done, two star kit.27 points
-
Attached are a few pictures of my recent model - the B-17G-40-DL ”Flying Fortress” A/C # 44-6117, LG-Q 'no name' from 322BS / 91BG depicted as it may have looked during its fifth and last mission on 21st June 1944. The bomber crashed on 21st June 1944 in Stolsko lake, Ger. name - Schlosssee, (near the place where I live in Szczecin, PL), where most of its wreckage remains until today. Source information about the aircraft and its crew: http://www.americanairmuseum.com/aircraft/15193 Source information about 8th Air Force activities on 21st June 1944 - very interesting!: http://www.8thafhs.com/old/get_one_mission.php… It is likely that the wreckage will be salvaged next year and displayed in a local history museum. Example site with information + pictures about the aircraft (in Polish): http://lotniczapolska.pl/B-17-Latajaca-Forteca-z-Jeziora-St… I have built this model on request of a local Internet TV portal for divers, but also because I was very much inspired by the story of the real aircraft. To detail the model I have used resin engines, propellers and main wheels, vacu glazing, brass barrels as well as bits and pieces from various Eduard PE sets. The major modification is the tail turret, which I have borrowed from the 1/72 Revell kit. The model is painted with Alclads on Tamiya gloss black base. I have retained the original raised panel lines to achieve a specific look of a new bare metal aircraft without camouflage. I also attach a compilation of the existing pictures of the real aircraft for reference. I am going to show this kit to the public at E-Day model show in September and hopefully on SMW exhibition in November this year. Thanks guys for watching!22 points
-
Dear Fellow Modellers Stimulated once more by the wartime film of Lancasters based at RAF Hemswell being prepared for a raid, I decided to try and bring the Airfix Matador Refueller up to scratch. Cue much time sanding down over thick mudguards and returning tread to the tyres. Steering wheel from Hauler and driver, wing mirrors and bridge weight marker from Dan Taylor modelworks. Am pleased to say that the Matador is still a nice kit given a bit of love and care, hope you agree? Hope you are enjoying your bank holiday? I spent part of mine working on the Airfix C-47 which strangely seems to need lots of filler, at least in my case Regards Andrew18 points
-
This one has been a must-do project for a while, having built it twice previously: once as a kid, with no additions, alterations, rigging, or anything else not supplied in the box, and once about 5 years ago when I got back into the hobby. That time I added some basic detail such as interior, rigging, and a little engine detail, but when I looked at it later on I realised it was nowhere near what it should be...Once I got hold of a Choroszy engine and Miniworld guns the project was all set to go! So, what was needed? Here's what went into this transformation: Choroszy resin engine Miniworld brass guns and Scarff ring Barracuda resin pilot's seat PE stitching, control horns, and seatbelts Aeroclub prop and wheels. Everything else was either scratchbuilt or corrected from the kit parts. The fuselage had the tip of the nose removed to bring it back about 1mm and I removed all hints of the "engine" and cooling air scoop. It was cut through the middle of the pilot's cockpit to shorten it, and again just aft of the gunner's cockpit, to both shorten it a little more and to raise the rear decking to the correct height. The underside was then sanded to give a straight line from the bottom of the tail to the rear wing spar (the kit fuselage slopes from the tail to about 1cm aft of the rear spar) - I had to add some plastic inside the fuselage just below the gunner's position to provide enough plastic for the change in the profile. These corrections gave me the straight line I needed for the upper longeron, all the way from the top of the tail to the nose, just below the front cabane strut - the upper line of stitching follows this longeron. The gunner's cockpit was then moved forward by about 2mm. The wings were thinned considerably, the span and tip shapes corrected, and the rib detail added with 0.5mm Jammy Dog masking tape - I won't use that method again as I feel it is still a little over done. especially towards the rear of the wing where it should be very subtle, if not invisible. The lower wing was cut into 5 sections: the centre section was attached to the fuselage once that had been completed, and blended in to be a part of the fuselage. The inner stub wings were drilled out and corrected for their shape, then added to the fuselage with brass pins for strength. The main wings were also pinned with brass rod. Wing struts are kit items, thinned, reshaped, and with brass pins added for secure fitting to the wings. The undercarriage is scratchbuilt from brass rod, with plastic card CA'd on for the fairings. All tail surfaces are from plastic card, including the little vertical fin on the underside. Rigging is 1.5lb test Gamakatsu monofilament fishing line of 0.06mm run across a silver paint pen to give it some colour. I'm not quite sure why I omitted to add any panel detail on the nose, it should certainly have some. It looks a little bare, but I'm not going to do it now! That, in a nutshell, is it....I hope you like her! Here are some comparison pics with the unaltered one I did a few years back.... Thanks for all the support and good wishes during this build! Ian17 points
-
Airfix 1/72 Spitfire PR XIX. built as part of a double blitzbuild but only managed to complete this one due to unforseen circumstances. OOB apart from quickboost exhaust and super fabric seatbelts. finished with Flory grime wash. Build time 20 hours (building two kits and includes meal breaks and tea stops). build thread http://www.britmodeller.com/forums/index.php?/topic/235007639-airfix-172-spitfire-pr-xix-complete-mk22-ongoing/ cheers Aaron14 points
-
Klemm Kl.25 Bolivian AF, 1936 1/72 Huma kit with Blue Rider decals Build time: 18 hours (including meal breaks) Cheers Cliff13 points
-
F-80A-5 LO (44-85464) 62nd Fighter Squadron, 56th Fighter Group Assigned to: Col. David Schilling, July 1948 Hope you like? Full Build here13 points
-
German Heavy Tank - Tiger 1 (Early Production) No.931 - 3rd Panzergrenadier Division -Totenkopf - Kursk, July 1943 Kit - 1/72 Zvezda - OOB Paints - Humbrol, Revell and Citadel - all applied by brush Build time - approximately 19 hours WIP - http://www.britmodeller.com/forums/index.php?/topic/235007635-zvezda-172-tiger-1-early/13 points
-
Not much to say really. The missus spotted it while I was dragging her around the model shop and asked me to make it for her. Only my second model (after my messy Miles Master Mk.II) - out of the box build and I made up the camo myself and replaced the kit decals with my own.12 points
-
Hello all A few pics of one of my latest completions - Revell's Arado AR 196 in 1/32. All built out of the box with just a Montex Mini Mask for the canopy, and what a lovely kit to build. Loads of lovely detail inside and out, so I've posed it with everything open and with one wing folded. Eventually painted with a mix of Tamiya and Mr Hobby acrylics. I had intended to go with Humbrol's range of RLM colours for the RLM 72/73 topside camo, but these proceeded to block my airbrush in no time at all, and the paint i managed to get onto the plane had a horrible gritty finish to it that i could have sanded down another model with! I'm sure others out there have got good results using these paints, but I don't think I'll ever use them again... The eventual colours used for the splinter camo were a mish mash of greens and greys which I played around with until I ended up with something I was happy with, even if nowhere near the actual colours specified. Kept the weathering light as I usually do, with just some pre-shading of panel lines and oild-based washes applied. Overall I'm quite chuffed with how this one has turned out - a real pleasure to put together. Thanks for looking. Cheers Adam12 points
-
Revell DHC-6. Spread over two days but under the 24hour rule, paint from citadel, Tamiya and army-painter. Built OOB.12 points
-
I'm calling this one done. And apart from a couple of little things I've just spotted she is. Eventually she will be on a base, which is under construction with a crew of half a dozen figures that are being worked on (and currently look well dodgy) and I'll post again when it's really done done. This has been a long time in the planning project and was pencilled in for this summer when I knew I was going to be laid up becuase of a foot operation, which has happened and it has all worked out for the best. She started out as this: M109 DOHER - 1 by phil da greek, on Flickr It's a good kit, worth the money although not a beginner's kit, it goes together well but some of the instructions are vague and you spend a lot of time studying instructions and references to see where the best guess fit is, but we got there. Together with the Black Dog resin conversion, which, quite frankly is a dog. If you followed my WIP you will know I lost my humour with it early on. One of the main visual differences between the Doher and other variants is the large generator that sits on the rear of the turret, it's very prominent. The Black Dog one is a piece of ..........so I scratch built that bad boy and it turned out okay. More pics: M109 DOHER - 45 by phil da greek, on Flickr M109 DOHER - 46 by phil da greek, on Flickr M109 DOHER - 47 by phil da greek, on Flickr M109 DOHER - 48 by phil da greek, on Flickr There is also a conversion set for the interior, but little can be seen when closed up so I opted for getting busy from the spares box and having Billy no mates in there with his maps. M109 DOHER - 49 by phil da greek, on Flickr There is, in no particular order, some AFV Club, Accurate Armour, Milliput, Academy, Tamiya, Trumpeter, Black Dog & Live Resin involved in this build, she's finished in Humbrol enamels by brush and Winsor & Newton varnishes. It has been (now it's finished) fun to build and one I am actually quite happy with! I guess there is about 200 hours work in it sofar if we allow for some drying and setting up time, add research and we're pushing 300! By the time the base is finished - who knows. Thanks for looking in, hope you like it, I'm not saying it's the most accurate Doher you'll ever see, but I bet it's the most accurate one you'll see today!11 points
-
Hi folks, Long time no post. Lots of stalled builds, so I tried something simple for a quick build and as a leaving gift to a colleague who is shortly returning to New Zealand. Zvezda 1/144 Boeing 787-9 kit with f-dcal decals. I figured there'd be tons of these on here, but surprised I couldn't find any. Kit is deceptively simple but very good. The engines, with separate fan blades are exceptional. The entire lower wing is a single piece moulding, significantly aiding the wing/fuselage join and the wing dihedral. The only downside are the overly shallow panel-lines, which all but disappear under paint and varnish. I replaced the landing gear with the Scale Aircraft Conversions white metal gear out of preference. The f-dcal decals are mostly silk-screen printed, with just the engine exterior decals and cargo doors on a supplemental laser-printed sheet. The silk-screen decals are exceptionally thin, like to curl up and stay put, so need some care, but survived quite a lot of abuse. They responded well to MicroSet and Sol without any adverse reactions. The rear fuselage fern is printed integral with the rear set of windows (aids positioning) but was challenging to get into position and remove wrinkles/air bubbles. Patience is most definitely the order of the day. Which I had run out of by the time I got to do the wing walkways. Oh, and to note, the kit decal windows do not fully align with the kit windows, so these need filling completely or one has to resort applying the windows individually. I found out the hard way. :-/ Paints were my usual Zero Paints white primer, white and black, AlClads metals and Alclad Aqua Gloss varnish, latter applied with a wide flat brush. On the with photos. Regards, Darren11 points
-
Hello all This is the Airfix kit with the Eduard etch set, plus some sprue for the wing fold piping and a 90 degree pipe that protects toward the front face of the port rad. I really enjoyed this build and now fancy having a crack at some of their other 1/48th Spits, so if any of you have any in your stash you want to sell, let me know. Quite fancy the PRXIX next. My intention on this build was to make this with a factory fresh look, really taking my time on the paint job. The result is probably my neatest build yet. I have to say I thought the PE set really was essential. The improvement to the cockpit was really something, and did make it look wonderfully busy, typical of a British aircraft of the period. I don't know why it didn't open the cockpit door In addition, if you wanted to fold the wings, it provides proper ribs for the wingtips. If I made this one again (I probably will by cross kitting it with the Spitfire XII to make a Seafire XV) I would attach the catapult spools after the roundals are applied and use black newspaper print instead of the decal to make the walkway. I have done this before and it makes a much more realistic appearance.11 points
-
Finished! 22 hours and 51 minutes! My Fiat Ansaldo M13-40 in 1/72 scale. I will post the build thread in the next couple of minutes and come back and add some finished photos. Greg in OK11 points
-
Hello! This is my take on Bandai's excellent 1/12 Sand Trooper. These kits are superb and the quality of the parts and fit is fantastic. I will certainly be buying more of these!10 points
-
Old tool Airfix 1/72 Airfix Hawker Typhoon Fleet Air Arm What if. Following the end of the Second World War and the expiration of lend lease the Fleet Air Arm found itself short of effective fighters when Hawker announced a lengthy delay to the delivery of the Sea Fury. The Seafire was more than capable as a fighter/interceptor but a dedicated ground attack aircraft was required. However, along with the delay of the Sea Fury, Hawker offered a navlised version of the Typhoon to help fill the gap. Similar to the Sea Hurricane it featured a strengthened rear fuselage and a arrestor hook was added. It's long nose was initially thought to be a problem but for a generation of pilots raised on Corsairs and Seafires the actual issues were minimal. It was not a particularly suitable carrier aircraft and many pilots missed their dedicated naval aircraft. Its greatest failing was a lack of folding wings, a feature Hawker was not able to institute and the Navy decided it could live without in what was essentially a stop gap. Because of this, it was difficult to get the aircraft into carrier hangers and they often were left on deck for extended periods with a tarpaulin cover for the cockpit. Decals from the spares box and scratch built arrestor hook. Tarpaulin and rope are stolen and painted felt and wool from the good lady wife. Great group build guys. Thanks.10 points
-
Finally fin ished. Was put of the shel for a while this year after decal issues useing a old bare metal foil decal sheet. . There is a little silvering i could not get rid of. Hoped final coat of future would hide it but no luck. but you can only notice it if you have it close to your eyes. A friend made me some ADC grey mixed using Tamiya pints. This is not the perminate base for it. Just need to figure a better base out and intall fuel tanks later. Enjoy Cheers Brian9 points
-
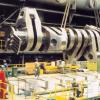
evening folks ..have had a bit of a busy weekend so only a few little bits done.. ..first the uplock fittings that go on the U/C legs - these are tiny and a very distinctive shape.. ..I also made some discs for the wheel hub where the brakes are and added some brass tube to them for a nice clean fit to the axles.. ..I shot some enamel black over all the parts.. ..and then alclad - I hope enamel & alclad can co-exist together, one on top of the other? until next time.. TTFN Peter9 points
-
This SBD is a Confederate Air Force Edition Monogram 1/48 scale SBD Dauntless that was boxed in 1988. The only thing different about this kit from prior boxings is the decal sheet really. I decided to take this kit on largely because I built this thing when I was 12 years old( as I'm sure a lot of us have if we are aircraft buffs) using minimal paint which consisted only of "no name" acrylic black and "green apple green" (no zinc chromate but it was real close), silver enamel, acrylic yellow for the prop tips, some enamel red for the dive flaps, and an enamel grey for the undersides, thinner (which consisted of gasoline-hey gimme a break here, my dad was a mechanic) , and basic model glue. I swabbed the paint on the interior (what little it had) and the undersides. No paint on the top because it was molded in blue, didn't paint the tires or the prop(except for the yellow ends and the silver hub) because they were already molded in black and I guess I did try my hand at painting the canopy frames with some blue paint that I ended up with. Back then I was as happy as a clam! By these days standards it was a disaster! Hasegawa has a hand in this, even though it too has some inaccuracies, because the cockpit is SO lacking. I robbed a lot of parts from this spare Hasegawa kit and used decals from it and some decals from Yellow Wings as well. Was it my best build?? No. But I had fun taking a trip down memory lane building this plane. Almost the whole cockpit is from the Hasegawa boxing as well as the forward firing gun barrels and main landing gear wheels. There is some PE from Toms Modelworks and the rear gun ammo belts were donated by a fella by the name of Stikpusher. Awesome guy. I drilled out the dive flap holes and did some scratch building throughout the build. This build fairly instrumental to me because it was the first build where I really started getting comfortable with my airbrushing. All exterior paints were Vallejo and interior paints were Model Master. a small comment about the next picture. I took this one with the purpose of showing the model/ replication of 22-C-14 after it was first loaded onto the carrier Independence. I tried to get the paint scheme as close to this bird as possible so I'll have this pic and then following that the actual pic of the plane(which you all have seen here already but not right next to one another). The now so obvious thing that sticks out to me like a sore thumb is the fact that there is actually only one roundel on the upper wing surface on the port wing. I aint going to worry about it now. If this would have been a build for extreme accuracy I wouln't have been very happy. Pictures offer great help in modeling I continue to find out. and then finally the cockpit with most of the upgrades from Hasegawa's SBD-4 kit, Toms Modelworks and PE ammo belts for the rear flex gun: All in all this was a fun build for me. Accuracy was really only there in the paint and there are flaws throughout the build that I would normally take care of. With fun in mind I mixed accuracy with original Monogram intent,however, none of the features that I wanted to work in the beginning of the build work in the name of getting things to fit right and proper so I left alot of Monogram signatures on the aircraft such as the copyright year on the elevators, part numbers in the middle inside portion of the dive flaps and the incorrect centerline bomb and bomb strut. Thought I'd include a couple of shots of the interior of this thing. First the OOB pit. Here it is minus the crappy molded pilot and note its molded in black. Yep this is it folks! All two pieces of it! .............and here are the first of many robbed interior parts from the Hasegawa kit. The pilots seat, control column, rudder pedal pedestals and the pedals themselves. If I were to just add these parts and nothing else to the interior it would be a VAST improvement over the stock Monogram cockpit area. There are some that may wonder, "How come he didn't just build the Hasegawa build?" . The whole point is to take a kit that looks awesome from the outside with all that rivet detail and try to make it look just as good on the inside. On to the rear gun and turret assy. This kit was supplied with a rear gun but it has absolutely no accuracy at all. A half moon shaped gunners ring is supplied along with what looks like a modified "potato gun" for the rear firing .30 cal machine gun. I don't know what tha hell this is supposed to be! This is how the gunner ring is supposed to look: I am going with a twin .30 cal setup in the back so heres a so-so photo of that : Here is the cockpit flooring and related parts as well as the gunners ring with the twin .30 cal setup. I first painted the seat with "rattle can" Testors Metallic Silver enamel followed by a coat of Model Master acrylic Zinc Chromate Green. I then took a toothpick and chipped the Chromate as to provide a scratched seat back surface from parachute buckle and seat belt buckle contact for that worn in look. The seat belts were made out of lead foil with PE buckles from Tom's Modelworks. I must have worn that stupid visor for 30 minutes trying to feed those belts through the buckles and through the seat belt end latches! I painted the seat belts a linen color from Humbrol and after the paint cured out hit them with a dry brushing of ground up black pastel to dirty them up. I also applied a black wash to the cockpit tub for the used effect as well. I had to be careful with that because carrier based aircraft are usually corroded and not dirty. The raised detail on the side consoles was completed by using a white lead pencil to bring out the details. The gunners ring , while not totally accurate, at least resembles the reference!!! Seat belts for the gunners seat were made from lead foil as well with PE belt latches/ ends. As you can see, this is a FAR cry from the out of box offering that the Monogram kit offers!! The only thing missing from the gun at this point is the PE gun ring sight and the PE .30 cal ammo leading from the ammo boxes to the guns. Those got installed later.8 points
-
Hi all, Bit late in the day but I've had an absolute mare trying to get photos out of Flickr via my Android tablet..... Here we have the HB easy build Komet. Happen to have two kits as the first purchased 2nd hand was missing the decals, options are Luft and RAF so it made sense in my twisted little mind to buy another. Build started at 11pm uk time on sunday so it'll be the 24 hour option I'm aiming for.... World clock set to GMT so deadline is 11pm BST or 10pm GMT. On with the builds. They were quickly assembled as promised by HB and took about an hour each. One is in flying mode as part of the undercarraige was eaten by the shed monster, as the cockpit is too shallow for a pilot I've had to black out the glazing. Didn't fancy the Luftwaffe scheme provided so went for something a little more, er, distinctive. In this case, courtesy of Peugeot Cherry Red... Flew just the once in that colour scheme according to the pilot The other one is more conventional, although it will have a yellow underside, first time I've attempted mottling freehand with an airbrush, This was the state of play at 02:35 BST on Monday. Should make the finish, family and Flickr permitting...8 points
-
Good evening everyone! I present to you my last finished (honestly not fully finished: I bought and waiting for а US Navy P-6 catapult ...) model: Thank's for your attention, Sergiy (48).8 points
-
Hi all, Got back on the Komets about 2pm and this is the current state of play just as I break to get the curry cooked for the family's tea.8 points
-
Gents, thanks so much....I now declare this build CLOSED! The tail rigging was completed today: guide pulleys are .010" card and I used a 1mm punch. They are clamped in some waste PE from a set of control horns which was just folded in half and slipped over the stamped out "pulleys". The Lewis and prop were all that were needed after the rigging was finished and they went on without any hitches. The finish is not my best, I really need to pay more attention to that in future. I tried for the double rudder wires, but I couldn't get a consistent gap between them so I left it at one wire per side. Anyway, here are some pics: I'll try for some decent outdoor shots tomorrow and post a completed build. Thanks for all the support and encouragement on this one, I certainly think she's a little bit of an improvement over the basic kit! Thanks for looking in. Ian8 points
-
The 1:72 Trumpeter kit of the Harbin H-5 built in the markings of the Albanian Air force. No major problems with the basic build, but if you want the bomb bay closed, there are a few gaps that will need filling. I try to keep all that sort of thing closed as the interior won't be seen easily once it's in the display cabinet and with everything closed up, makes painting a bit easier. Overall colour used was Tamiya XF-16 Aluminium. Decals are a mix of Blue Rider Albanian Air Force decals and the numbers are off the kit decal sheet. H-5-44 by Ryan Hothersall, on Flickr H-5-45 by Ryan Hothersall, on Flickr H-5-46 by Ryan Hothersall, on Flickr H-5-47 by Ryan Hothersall, on Flickr H-5-48 by Ryan Hothersall, on Flickr7 points
-
Revell(ESCI) 1/72 CASA SF-5B, ALA 21, Spanish air force, early 1970s. 2016-08-29_09-48-00 by mudkiper, on Flickr Build thread Thanks for a fun but intense group build.7 points
-
I played prop at rugby and I'm now an offensive lineman in American Football. I did in fact eat all the pies. Also, my father in law is a butcher so I'm never short of a few in the freezer. Anyway, all done and dusted with an hour and a half to spare. Could have been quicker but I forgot the arrestor hook. Didn't have anything in the spares so ended up quickly fasioning one from a spare missile rail from I know not what. The paint could be neater but I like it. The cover will be explained with the Whif story in the gallery but its a bit of felt and some wool pinched from the wife and painted with olive drab to hide the horrible cockpit and canopy. Thanks to everyone for encouragement and setting this up. I've had a lot of fun with this one and really needed something like this to get me going again after my holiday layoff.7 points
-
7 points
-
Revell TIE Interceptor. (not pre painted) The grey is Halfords grey primer, painted with Humbrol enamels & Tamiya acrylics. Weathered with Flory wash & Mig Black panel line. Built over two days but well under the 24hr rule.7 points
-
M4A1 Sherman Battling Bitch, B Coy, 31 Btn, 7th Armored Division Chartres, France. 16 August 1944 Kit: The Plastic Soldier Company, 1/72 scale Decals: Aleran, Shermans in NW Europe Extras: Armourfast detailing set Build thread: http://www.britmodeller.com/forums/index.php?/topic/235007949-m4-sherman/7 points
-
Hi There! My name is Pete Mortlock,I come from the town of Burton-on-Trent in Staffordshire England,and this is My first WIP on Britmodeller! As to the topic title, those in the know will see where I'm coming from, for those who don't it's -- --- .-. ... . , which spells out M-O-R-S-E....... Yes, I'm doing a Tamiya Mk.2 Jaguar in what must be the best known one around, in memory off the Late,Great John Thaw, who left Us (Unbelievably) 12 Years ago, and sadly missed. Modifications to the kit will include:- Vinyl roof ,created with semi-gloss black paint Steel wheels, modified from Fujimi 14" wheels up to 15" diameter Chrome hubcaps, My first go at plunge moulding - Scratch-built Wing mirrors And printed number plates. The Kit:- The wire wheels are stunning,but unfortunately not being used on this build :- Using these instead with modification:- Decals (including woodgrain), metal Decals and carpet included:- I will be cracking on with this from Today! Keep Sticking! Cheers, Pete6 points
-
hi all, Here are some photos of my scratch-built Meggit RM-30 target towing pod in 1/48. My friend Markus mastered the pod and target holder and i did the fan. I then made masters of these parts so that i can cast more in resin if required. The overall assembly was done using flattened Albion Alloys tubing. I know that Markus has one on his forthcoming Skyhawk that will be on show in the competition in Telford this year (no pressure to finish it !!). Hope you like it and if you are interested buying one, pm me. Mods - sorry if this is in the wrong place but the for sale section didn't seem right. thanks Andy6 points
-
hi all, i guess this is the place to post this as it is aiurcraft related rather than a target! It is the old Kendal Model Company MJ-1 bomb loader used by most USAF bases and other air forces around the world. It is 1/48 resin with a lot of etched copper for the loading arms and other small fiddly bits. Quite a challenge to put together but it came out quite well in the end. Hope you like it Andy6 points
-
Hiya Folks, I don`t appear to have posted this model on BM before and as my MAC Ship Swordfish proved popular I thought that some of you might like to see my Airfix 1/72nd scale Swordfish floatplane? Some may have seen it in Airfix magazine some time ago, but hopefully it is new to most people! Due to the soft plastic and plethora of struts it was harder to build but I`m very happy with the result. For my subject I chose to replicate K8363 `Mitzi’ from 700 NAS which was one of two Swordfish floatplanes that constituted the catapult flight based aboard the battleship HMS Valiant during July 1940 at the time of the unsavoury but unavoidable action against the Vichy French fleet off Oran at Mers el Kebir, following the fall of France. During this operation Force H of the Royal Navy had been ordered from Gibraltar by Winston Churchill himself to attack units of the Vichy French Navy in harbour if they failed to agree to British proposals to sail to a neutral port or French territories further afield or align themselves with the British in the continued fight against Germany and Italy. If the French fleet fell into enemy hands this would have left the Royal Navy heavily outnumbered and at a distinct disadvantage so this uncertainty had to be dealt with, no matter how unsavoury the result may be. Unfortunately the French declined the British terms leaving them no option but to open fire on the 3rd July 1940, causing great loss of life amongst the French sailors during a fifteen minute bombardment and air attack which sank the battleship `Bretagne’, crippled the battleship `Provence’ and the battlecruiser `Dunkerque’ while also causing substantial damage to smaller vessels, port facilities and barracks. Obviously this led to much ill feeling towards the British from within the French Navy and the entire nation as a whole but the British sailors who were involved took no pleasure in their actions and found the entire incident highly distasteful. Prior to this confrontation the British and French fleets had been working together closely in the Mediterranean for years and many of the `matelots’ had French friends in Mers el Kebir. The role carried out by K8363 `Mitzi’ in this operation is open to question but the undisputed fact is that this floatplane was catapulted from HMS Valiant on the 3rd July 1940 and was forced to make a landing on the deck of HMS Ark Royal after the arrester wires were disconnected and soap was smeared over the landing area to help reduce the friction between the steel deck and the keel of the metal floats! Some accounts say that Captain Holland of HMS Ark Royal was catapulted in a Swordfish floatplane from HMS Valiant to convey the British terms to the French Admiral Gensoul and that he landed back on the flight deck of his own ship in this aircraft so that Vice-Admiral Somerville who flew his flag in HMS Ark Royal could be quickly informed of the French refusal, however most authorative histories of this action state that the British terms were actually taken into Mers el Kabir harbour by motor boat! One of the men who flew as part of the three man crew of K8363 `Mitzi’ on this day was Roy Tolley and he makes no mention of the carriage of Captain Holland. What he does say is that the name `Mitzi’ referred indiscriminately to either of the two Swordfish floatplanes operated by the catapult flight aboard HMS Valiant, these being K8363 flown by Petty Officer Ben Breese, himself and Sub Lieutenant Peter Starmer and P4197 flown by Lieutenant`s Hugh Davenport and Vernon Graves with Leading Airman Bungy Williams. Roy Tolley goes on to say that on the 3rd May 1940 whilst the tragic action took place ashore at Mers el Kebir both Swordfish were overhead directing naval gunfire but with fuel running low they received a coded morse message simply stating `Land on Ark Royal’. It appears that their home ship HMS Valiant was busily engaging the French warship Strasbourg and therefore unable to recover them both, so despite having floats rather than wheels they both safely landed aboard HMS Ark Royal instead. Some slight damage to the top of a float on K3463 “was repaired with a hammer and a tube of Bostik” and upon arrival back in Gibraltar the Swordfish were craned down onto the water and then water taxied back to their home ship ready to continue their usual catapult flight duties. Anyway I won`t bore you anymore,...so here is the model!; Massive thanks to Ian G for his help with photos of the real aircraft to use as reference,..cheers mate, All the best, Tony6 points
-
Hobby Boss Me163 Komet (x2) 23 hours 45 minutes...... Thanks all.6 points
-
Thank you for the comments! I found a tutorial on a thing called focus stacking, where photoshop will assemble a bunch of images into one all in focus one, which is helpful as I only have a macro lens with a very short focal range. I should also paint these pipes up seeing as took the trouble to get them printed...6 points
-
Peh - done. Sorry for the lousy pics: Thanks! René6 points
-
Good Evening one and all, Just thought I'd share a few pics of this build hot off the bench this afternoon. Airfix new 1/72 Defiant built straight out of the box, my only deviation being a set of Eduard Masks for that pesky greenhouse turret and canopy (there was no way I was doing that myself!). This was an on/off build for me but could easily be done in a couple of days. I chose the night fighter scheme as I like black aircraft and the shark mouth was a bonus. Painted Tamiya NATO black and certain panels picked out in slightly different shades to break up the plain finish. Panel wash was a mix of light and dark grey Flory washes, panel edges and chips done with a graphite pencil, and some pastels for exhaust streaksand underside dirt/grime. Anyway I hope you like her, need to get back to some jets next, enjoy the pic's and feel free to comment/critique as you wish. Thanks for looking, Eng5 points
-
thank you chaps and good evening managed to spend the Bank Holiday at the bench, so a little more done... I noticed from the pics that the 3D print layers can be seen on some of the recesses of the wheel hub so these were dressed with thick mr surfacer... while they dried I made a start on the gear doors... again the fabulous monforton plan helps me cheat really easily by scaling and copying...here the door gets transferred from printout to metal.. ..soon had both outer skins done... ..the bottom of the doors are actually curved so after lining the lower inner areas with another part with raised rivets I made a curved former for each side from thick card.. ..the gear leg sits in a curved recess so I pondered and practiced how to make it - the top pic shows a test where the litho is bent in a folding tool to give neat edges to the curve and then it is impressed with a rod onto a foam pad.. ..the lower pic is the real part having been pre-detailed with raised and recessed rivets ready to have the curved recess formed... ..the part was then backed with plastic and the depth skinned with litho... ..the bottom edge needs finishing, but you get the idea... ..the leg sits in channels on the upper half so that is a job for tomorrow... ..the curve of the door may be seen here along with the door relative to the leg & wheel... ..and a dry fit to give me some encouragement it all fits... ..hopefully soon I will get the airframe sat on it's wheels TTFN Peter5 points
-
This is the Tamiya 1/72nd scale Corsair with the wings clipped to represent a Fleet Air Arm machine. I used a Eduard etched zoom set for the cockpit. The paints are all Xtracylix, and the decals are by Techmod. Vought Corsair II. Set 72014. The Aircraft is from 1834 NAS HMS Victorious 1944. Thanks for looking, Joe5 points
-
Thanks Simon Thanks Stew You're right, the levels of rage were quite high but, despite the thought that "... that's enough to call it a day" I thought I'd blast the Stynylrez on: It covers really well this stuff and dries quickly. You can see how well it's covered the masks, resin parts and the windows - GAAAAAGGGHHH! What an idiot, forgot to mask the windows. A rapid transit to the bench, a few cotton buds, water and IPA and we're back to this: I am definitely calling it a day now. What an idiot...5 points
-
Thanks Benedikt - great shot of lightning. Have you seen the 'live' lightning map here? Hi Jonny - don't worry about going off topic, happens all the time and I like it! Hi Geoff - seconded. Thanks Stew 'Beaufortesque', love it! Not that I'm loving the kit as I've had a small disaster, described later (jeopardy again, dum dum dum...) I'm never sure how many sticky out bits to apply before painting. It's a trade off between sticking them on later, with necessary touch ups, and the risk of knocking things off. Some are strong, like the fuel dump tubes. WDBD? Drilled them out, so I had a go too: Untitled by Ced Bufton, on Flickr Not too bad. The torpedo 'racks' were fiddly and there's only a vague indication of location so I took the easy route: The resin aerial (why, oh why?) was a pain. There's no holes for this so I had to drill them and then fiddle with the damn thing before filling the holes with CA: And then the only bits left were all small so I decided to stop. I had this idea of pushing a stick into the bomb bay to support the model whilst priming, so I got a big stick and pushed it in, too hard: Insert appropriate Anglo-Saxon here. Lots of it. I had to drill a hole in the bay roof and use a paper clip to pull it back into place: That's emptied my patience tank. Although the next thing is primer and I'd like that to dry overnight... I may summon some more and get that done.5 points
-
Thanks for the kind words people. They are much appreciated. I'm stuck with enamels because acrylics are instant migraine for me but that's the last time I use Humbrol except for detail stuff. It's 18 hours since the second coat went on (and only thinly) it's still tacky but is starting to dry in places. The flat is at 29 Deg C. I rest my case M'Lud. It will be in RFI as soon as I can get it there. This could be the fastest I've ever built a kit at least since I was 10!5 points
-
thank you very much guys. I took some better photos,, although the lighting in some is not great, so shadows galore in some; bit of a rush job. as I had the booth out. I took some photos of the mk.22 this is its current state. I reckon I could have finished both in the time but it would have been close. the decals slowed me down in the end. thanks for all the support guys. it really was a fun GB but next time I'll stick to one build!!! cheers Aaron5 points
-
Morning all,Spitfire decals on and settled nicely now ready for a bit of weathering,looking around at finished models on various sites most seem happy just to leave as is or one I saw was weathered to the point that the base colour was barely to be seen so something inbetween will be my goal,no panel wash as this has been my downfall on a few of the various Airfix Spitfires due to the deep panel lines I,ll have a think about it as I try to remove the Bl***y fly that landed on my Tu-144 while the white gloss was drying!5 points
-
****FINISHED **** F-80A-5 LO (44-85464) 62nd Fighter Squadron, 56th Fighter Group Assigned to: Col. David Schilling, July 1948 I have chosen to add the Long-Range Wing-Tip Tanks and also Drop-Tanks My first completed reality based aircraft build in over 30 years I quite enjoyed myself - wasn't sure I would finish in time It's up there in the Gallery here And, just for the record5 points
-
Thanks Francis I've added a bit more weathering to the wall, and also some plant roots to represent an ivy or creeper. I'll be adding more leaves to it, but I may well call it a dead ivy, just to avoid having to paint all the leaves green later Andy5 points
-
Got the side skirts on, some muddy pigments, very close to being finished. It's amazing how this green dulls down after some weathering. Cheers!5 points
-
Yakovlev UT-1B 1/72 NeOmega More pics and WIP: http://www.britmodeller.com/forums/index.php?/topic/235003397-yakovlev-ut-1b-172-neomega-complete/5 points


This leaderboard is set to London/GMT+01:00