
Leaderboard


Popular Content
Showing content with the highest reputation on 23/08/16 in all areas
-
This Airfix Spitfire XIX was built to bring good luck - as Spitfire builds invariably do - to a troubled Vignette GB entry. The decals depicting a Malaya based 81 Squadron PR XIX are from Freightdog. Interestingly, this aircraft was not finished in an Aluminum lacquer, but was bare metal. I've attempted to replicate the finish with brushed on Model Master lacquer metalisers. I saw Ced's Airfix XIX build and Beard's (Simon) silver Airfix F.22 build recently and knew a silver Griffon Spitfire would be just the thing - thanks for the inspiration fellas. Here's a link to the only reference pic I could find online.23 points
-
Hi all, here are a few pictures of one of the kits I completed this year. It is the Eduard Spit VIII kit finished as the well-known 'Hava-Go Jo' from RAAF 79 squadron. I used a Barracudacals decal sheet for the kit markings. I used the Eduard 1/48 scale kit, which is a beauty, and a Barracudacals decal sheet for the markings. The build went without problems, I added a few details with plastic card and fuse wire in the cockpit, although it is not really necessary. The painting was done with a Sparmax airbrush and Tamiya and Gunze acrylics. The chips on the wing leading edges and on the tail were done with AK interactive Heavy chipping fluid. The weathering is done with Mig Ammo Panel line washes, some inks applied with airbrush and pigments. Here are a few more pics taken on a diorama base I had done before for another Spit (an ICM Spit VIII this time). have a good day, I hope you will like it, Christian.21 points
-
Hi all, This is my first RFI so I give you the Revell 1/32 Lynx HAS 3 done as the HMS Endurance bird and it was an out of the box build apart from some details in the cockpit , and of coarse the scale warship rotor fold, it was painted with Vellejo Acrylics and a bit of Humbrol enamel with a Humbrol matt varnish. A couple of things to finish off (just noticed ). Guy14 points
-
Hi there, I would like to share another old build, an early version of Panzer 1 from Hobbyboss. I like Panzer 1 for it's a cute little tank, so when Hobbyboss released this early version, I just grab it from local hobby shop. But I must say this is quite a disappointed kits, a lot of missing/wrong details, not to mention the kit tracks can't even fit into sprocket teeth. I had replaced them with metal tracks. For the blue periscope, I followed the instruction but someone told me there was no such periscope during WW2... haha. Please fell free to comment and critic, thanks for viewing.13 points
-
Hey guys. My latest model. I hope you guys like it! More photos can be found here: gasperpodbregarminiatures.blogspot.com Cheers!12 points
-
I've finally, thank goodness, finished the canopy masking: Untitled by Ced Bufton, on Flickr I sometimes enjoy masking but often don't. I've learned that waiting until I'm 'in the mood' (cue Glenn Miller) is far better than trying to discipline myself to do it; the results are always much neater. Of course, it doesn't quite fit: That masking on the back two windows will be re-done. Rats. Something is stopping it sitting nicely - something will be removed. I think I prefer this as 'stage 1' now rather than just clamping it to death, although this may happen as well. As a break, I've applied Mr Metal Color Iron to the engines, one of my favourite bits: When that's dry I'll paint the gearbox gloss black (of course, it's a Bristol) and then shine some bits up.11 points
-
Thats it, now I'm finally finished with the beast. Built with Airscale cockpit placards, Eduard Cockpit etch, RB Productions seatbelt, SAC white metal landing gear, Eduard Brassin wheels and painted markings from Miracle Paint masks. Work in progress can be found here: But now, over to the all the pictures I started it in November 2014, and finished yesterday, august 2016. The kit is nice, the the constant scraping of mold seams isn't. Will I build the Car-Door version? Sadly no, since I'm out of room... But there'll be more Tiffies in 1/48 and 1/72 though!10 points
-
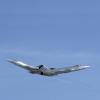
I tend to overdo things just a little bit.... It's exactly the same with my P-61 build. I can't help myself, when I try to build things out of the box I end up scratchbuilding most of it. So I thought to myself why not start a second long term project that involves a lot of scratch building. I take my inspiration from the likes of Airscale, tomprobert and roymattblack on these forums, all you amazing scratch builders out there inspire me to try on pretty much the worst best idea ever. A 1/32 Handley Page Victor K2. This all being said I could not even have started out on this project without the help of Antti_K and his mountain of resources on the Victor. You truly are a hero Antti. I shall be using the plans that were provided to me as a reference to the build along with my Wilhemshavener Modellbaubogen cardboard model plans that I recently acquired. The plastic required for this build is going to be epic in volume so I've gone ahead and ordered a few 1000x600mm sheets of the stuff in various thicknesses. All the plans and references have been scaled up to what can only be described as 1:31 scale. So let's just call it 1:32. I am not going to be aiming for 100% correctness as long as it looks the part. That's the main thing here. I am in love with the looks of this magnificent aircraft. So no more words and just a single picture to prove why this might be one of the worst ideas ever:9 points
-
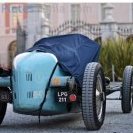
I got this little beauty at Tyneside Model show from those nice chaps at MJW and though it has been a bit of a cinderella whilst I concentrated on family matters and holidays,a few days at home got me to this. I did her straight from the box and if I had my time again I think I would have got some replacement wheels as the Hasegawa ones are split vertically and are a fiddly job to fill and sand. The finish is a mix of Halfords, Humbrol and Tamiya rattle cans. She is basking in the South Yorkshire sunshine Thank you for looking9 points
-
Thanks PC Ah, the Curate's Egg... it is indeed! Actually my slowness on this one is part care and part work stress - just had another email from a client that's made me want to smash something... Sell Winnie? Surely not... first steps = out with the safety equipment; you'll never be able to open a cupboard again without releasing the catch first. How many sharp edges in the house? Stairs with no gate? Time for a risk assessment. Tantrums are merely a toddler's way of showing that they don't like the parameters you're trying to impose. It's a sort of test. Firm and fair that's the way (... I like my women). Well, 'something' has been identified: Untitled by Ced Bufton, on Flickr The top of the i/p is shaped so that it fits nicely behind the slope in the canopy... if it's far enough back and down. It isn't. Right, out it comes: Very unusually I had one of those rare moments where I did something that Bill did. I knocked the lamp off. The canopy sits very nicely with the i/p out: (more wonky masking in that shot) so it's been sanded on the bottom, re-glued and repainted. I'll fit the canopy when I'm sure the lamp's dry.9 points
-
It's taken longer than expected - I started it in March as a quick build straight from the box. Time went into removing the fuselage join while preserving the raised lines and into decalling - all the black walkway lines are individual pieces of Superscale stripes as the kit decals were unusable due to cracking and Print Scale do not supply the correct layout for a silver aircraft. Most decals are Print Scale - very good for adhesion but need a lot of fluid to float them into position. I had to buy a second sheet because I folded the upper wing insignia and couldn't get it back. Stencils are from the kit sheet - lots of Micro Sol and Set needed to get them to stick at all! If I was doing it again I would paint the fuselage band (yellow, not red as per Print Scale, ref photo in Robert Mikesh book on the B-57) instead of using decal. None of the photos shows it but the flaps were dropped, an option provided for in the kit although you have to cut them out. Edit, photo of flaps added see post 8.8 points
-
evening my friends Thank you! I punched out 6mm holes with my biggest punch and made up the five parts into a flat sandwich in a mini-vice and just worked all five with a file until the right diameter was reached - then I started cutting and bending them to shape - did it a few times before I was happy Good spot Dave, it is a scar from my attempt at one yes - I ballsed it up and got it off-centre so filled it back up with mr surfacer and will give it another go once I have worked out how to do it right while I was fiddling about with the blades, I thought I might just paint the tips as they are quite decorative and looked quite hard to do (I hate painting...).. ..first I printed out a front on view of the blade to get the size, shape and scale of the tip markings and then made a litho template I could use to cut out tamiya tape masks.. ..white was to go on first and this is only on the fronts so that was the first mask.. ..then I got part way through masking for the red to put that down next when I started to think about how to flat down the masked edges with micro-mesh without getting colour bleed (I did on my Sea Fury when using red) - if it tainted the white it would be immediately obvious so I pulled off all the masking, used 4000 grade wet micro-mesh to just polish out the masked edges and then dipped all the blades in future... ..then I masked and shot the red... ..I repeated the process but before I dipped it for the last time I just brought out a tiny bit of the leading edge sheath - it is very subtle but I am particularly pleased with it... perhaps you can see the sheath and screws here - I can find no pics of the sheath itself was a different colour, or even brass, the only one I have got that does is it reflecting the light I think (I hope...) ..and here they all are completed.. ..a bit of fettling and they were a press fit into the hub - it's a pretty big prop... ..the time invested in getting the blade shape right was satisfying as the fit and tolerances ended up better than I expected.... at least I think it looks like my refs ..and in place on the airframe.. ..thats it for now, will have a think about whats next TTFN Peter8 points
-
More of an announcement than a rumour, this was posted by Jan Polc in the WW2 sub-forum. 'Jan Polc Today, 09:07 AM Hi all, there was a lot of tips....... We decided not to keep the secret and tell you what aircraft we prepare for Telford show. Yes, it is injection moulded Martin-Baker MB. 5 in 1/72nd scale. We promised some action. OK, here it is - We will prepare extra decal sheet with what-if camouflages (better say liveries) for "Boscombe Down aircraft", including colourful blue-white-red scheme and all black Qinetic plus some more. This decal sheet will be available only at Telford show, cost approx 4.50GBP. You have chance to preorder your MB.5 kit on e-mail [email protected] from now. All preordered kits will include this extra decal free of charge. This chance is available also for modelers who will not attend Telford show, we will send preordered MB.5 worldwide. Do not miss your chance to get free extra decals. Our stand at Telford you will find at Guidelines Publishing with some people from our company, me and our chief of distribution Petr Safra.'7 points
-
I built this a couple of years ago and it took me a good 7 months to complete. I used an Aires cockpit update set with a modified Hasegawa flooring to fit right due to the Aires flooring not being the right dimensions , Eduard canopy mask set and Tally Ho decals. I had mixed feelings about the decals as they laid down great but to me they seemed slightly out of scale. I ended up having to splice in a section of the snake from an old set of Cutting Edge decals that I had that were mostly unusable due to their age and where I had them stored. Paint is all Model Master Acrylic. The oil reservoir access opening and the wing mounted machine gun details are out of a Verlinden update set I had tucked away for 15 years and had forgotten about until I started building. It's a tough crowd when you enter "Stuka land" because there's so many great builds out there. Here goes anyway:7 points
-
Hi all, After showing you the Lynx I thought I would share my Trumpeter BF-109G4 Trop which was built last year and is straight out the box, painted with the Vellejo acrylics and finished off with a Humbrol matt clear , I have not long gone over to acrylics from enamel and have to say I do enjoy using them so does the wife (no smell ! ) Guy7 points
-
" "Gentlemen,as of 11 A.M. This morning this war is over" Masterbox 1/35 British Infantry7 points
-
Had to stay away whilst people were grilling pineapple. If Dante didn't have Virgil pointing out the specific location in which such behaviour is acceptable, then it can only be a poetic oversight on his part. Fruit should not be grilled. It should come in cans, preserved in syrup. I grew up in England in the 70s and know this to be true.7 points
-
Thanks everybody! Tony, you described my feelings about the reference perfectly - although there is no way I can capture the look on Capt Balch's face in 1/72 (unless I mailed his 1/72 likeness to Stew Dapple or Giemme, hmmm.) It's almost caught up to the point where disaster struck. This time I did use enamels, even though the temperatures has dropped quite a bit from a few weeks ago - flat black for the metal areas, and Ocean grey for the fabric ones. Also, the good luck Spitfire is done - I'll have to start another before I add any more paint to the Corsair! The RFI is here.7 points
-
This morning me and the wife went to check how our other WIP is coming along 12 weeks in. IMAG1588 by Mark Inman, on Flickr When we got back I cracked on with chopping the exhausts off and sanding them down for gazza l's turned brass replacements. IMAG1574 by Mark Inman, on Flickr I decided to have a tape fit to get a feel for how things will look. IMAG1575 by Mark Inman, on Flickr No step to worry about with the wing to fuselage fit. IMAG1576 by Mark Inman, on Flickr IMAG1577 by Mark Inman, on Flickr The underside wing fit. IMAG1583 by Mark Inman, on Flickr IMAG1584 by Mark Inman, on Flickr The exhausts in place. I will have to look at reference shots how to tidy up the fairings around them. IMAG1579 by Mark Inman, on Flickr The underside. IMAG1580 by Mark Inman, on Flickr Intakes. IMAG1585 by Mark Inman, on Flickr IMAG1586 by Mark Inman, on Flickr Thanks for looking.6 points
-
Dolphin, grab his stash while you're there!6 points
-
Thanks Martin! I had another good day at the bench today. I tidied up the underwing areas where the rigging had been fitted by gently sanding them down, and then spot treated the dark ares where the ends of the rigging lines are with a tiny dab of white before gently applying thinned CDL to the areas - I am now much happier with how those look. The exhausts were fitted and the support struts added using .010" plastic rod. Tiny dabs of Mr Dissolved Putty blended the exhaust manifolds into the exhausts and the support struts to the wings, they were all then carefully touched up. I still need to give a little dry brush of rust colour to the manifolds to finish them off, and add the carb heat pipes to the left side. The wing decals were then finished off, both upper.... and lower...although unfortunately Airfix still supply all four roundals with a white outer ring, so I had to carefully remove it from the underwing ones with a scalpel....even then they only JUST fit - a little too big actually, but since the colours don't match any of the aftermarket ones I have I had to go with them. My final job today was to finish painting the prop, just the decals to go now on that. Ian6 points
-
Hi all I made this little vignette, all scratch built using moulds from Form-U-Lay http://www.form-u-lay.co.uk/Buildings.php using plaster of paris, I even scratched built the stained glass windows Emu5 points
-
Hello all, I'm really a slow builder, and when I finally manage to finish something or reach the finishing stages, my sausge fingers do produce chaos ... So thiis kit bgan its life in the guise of a Djibuti desert color scheme and it reached decals stage, but then I spilled some isopropyl (sp?) alcohol on the camo, thus leading to paint removal and the blue air defense scheme. This is the 1/48 Hobby Boss kit, paints are Gunze acryls and AK metallics for the undersides. Enough banter, on to the piccies ...; Comments and crits most welcome. Stef (#6)5 points
-
First ever submarine First attempt at water5 points
-
Hello, here's my 1/72 Hasegawa Junkers Ju-88 G6 "Nachtjäger" of 6./NJG2, Fritzlar 1945. I used Eduard photo-etch, True Details resin wheels, Schatton antennas and markings from Authentic Decals. Painted with acrylics from the Gunze/Mr.Hobby range. The Hasegawa kit has some fit issues, which is strange for a modern HQ tooling. The fuselage halves need some filling and blending, the nose cap is over-sized, the wing tips and the belly insert with the guns don't fit very well either. The antennas are metal pieces from Schatton (http://www.modellbau-schatton.privat.t-online.de/). They are much finer than the kit's plastic parts. Since the antlers are a major focus point on this model I think they are well worth the investment! The colour scheme is mostly guesswork, as I've found only one conclusive period photograph online; this shows only a part of the fuselage section broken up at Fritzlar airport, Germany, May 1945. The markings come from Authentic decals, they aren't the best I've ever worked with. They break easily, have a yellow-ish carrier film and are slightly misprinted with 'shadow lines'. Luckily, this doesn't show after a couple of gloss and matt cotes. The camoflage was painted using Uhu Tac sausages: Exhaust fumes painted with Gunze/Mr.Hobby "Smoke" with drops of Black and Dark Brown added: Delicate work on the undercarriage, adding brake lines and scissor links: "Schräge Musik" ("Jazz Music") guns on the fuselage spine: All photographs by Wolfgang Rabel, IGM Cars & Bikes. Thanks for your interest. Greetings from Vienna!5 points
-
Thank you Crayons, I'll keep an eye out for it.I've cleaned off most of the Flory wash. I have some more touching up to do, then I will highlight some areas with a silver pencil. Thanks for looking, Joe.5 points
-
Another short update this evening... On with the clingfilm and ffffftttt withsome primer on that rear cockpit: As per previous wild statements, I finally got round to adding those headrests out of Milliput as well: I'll give them a final carve and profiling when that's gone off tomorrow... Tony5 points
-
In all seriousness, Buffers, it's looking really good so far. My eyes turn longingly to my two Beauforts in the stash...one more, erm, two more things I need to get to. Would anyone like to buy a baby? He is ten months old, has a winning smile, just took his first steps, and is starting to lean how to throw a tantrum. In a very literal sense, it's not going to get better than this.5 points
-
Just remind me, I did say that I was giving Ark Royal a break because I could only take so much tiny detail...? Hmmm. Working on bits of the head - the solid bits (i.e. before looking at any wiring). I have finished all 5 of the pitch change links (as per yesterday - post 124), and dabbed on a bit of paint just for a look. Happy with that. Then I started on the blade roots themselves. Just to remind you, the actual thing looks like this: Herewith a before (top) after after (bottom). Getting there...5 points
-
Hi all, Here's my Revell F-101B Voodoo, Texas ANG. The kit was built OOB, except for the cockpit area taken from the Pavla Models set. Probably should have opened up the cockpit, and also done the yellow canopy framing, might consider doing this. Anyway, hope you like. Cheers John5 points
-
Hi again, Here's the update of last night's work. I assembled the structure holding the armoured glass in the canopy of the K4. It's made up of three PE parts, that'll replace a plastic part from the kit: IMAG4357 The parts were bent according to the instructions: IMAG4358 It was a bit fiddly to glue the parts together but here's the end result: IMAG4359 The K4 is almost ready for cockpit painting but I still have to cut the canopy and wind-shield part, so that I can pose the canopy in the open position. Before doing that, I decided to start the G14 to take it to the same point in the build and be able to paint both cockpits at the same time. So, I took the main parts for the fuselage, wings, tail and cockpit off the sprues: IMAG4360 The Academy kit lacks the finesse of the Fine Molds kit but it's not bad. A dry fit shows everything fits very well. The tail is just inserted into the fuselage, without any tape or glue holding it in place: IMAG4361 IMAG4362 The rest of last night's session was spent cleaning the sprue gates from these parts. Thanks for looking. Cheers Jaime5 points
-
Hi all, there was a lot of tips....... We decided not to keep the secret and tell you what aircraft we prepare for Telford show. Yes, it is injection moulded Martin-Baker MB. 5 in 1/72nd scale. We promised some action. OK, here it is - We will prepare extra decal sheet with what-if camouflages (better say liveries) for "Boscombe Down aircraft", including colourful blue-white-red scheme and all black Qinetic plus some more. This decal sheet will be available only at Telford show, cost approx 4.50GBP. You have chance to preorder your MB.5 kit on e-mail [email protected] from now. All preordered kits will include this extra decal free of charge. This chance is available also for modelers who will not attend Telford show, we will send preordered MB.5 worldwide. Do not miss your chance to get free extra decals. Our stand at Telford you will find at Guidelines Publishing with some people from our company, me and our chief of distribution Petr Safra.5 points
-
HI. I did it. I've now finished my Suez project, and with two months to spare. I'll get a better groupphoto of them in daylight some other day. This has been an exciting project. I've learnt some new thing about the conflict. And I've found some very interesting documentaries on Youtube. My youngest son awarded me a Gold Medal, and with that I'd like to thank all of you who has followed this project. On to the next build. /Bosse5 points
-
OOB, Aeromaster decals.4 points
-
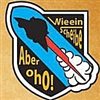
Aaaand now its good old rattle can! Had a go at putting my masks down but the flat red is very flat and they didn't want to stick so i rattle canned on some gloss red. Then i cut some more masks. For these I created vector artwork in Illustrator then used a vinyl cutter to cut them, here they are weeded and laid up on application tape. I got the chest one on, this is actually the second one after a tweak to the size and a bit of warping to help it look right in his crouched position. I need to re do the face as its not quite right, so thats what I'll do next and also mask out the arm stripes. Thanks for looking, more soon4 points
-
I knocked my lamp off about a gazillion times. You must continue to strive in order to reach a state of Billdom, young grasshopper. Regarding the IP, I seem to recall having to sand its borders to get a good fit within the canopy. Not too much though - I was actually surprised at just how well the canopy fit on my 'fort. Being short run and all, plus having experience with other MPM/Special Hobby/Azur kits, I was expecting much worse. I think I might have put a shim in the top fuselage seam right behind the aft end of the canopy in order to have it and the fuselage match in width. I always prefer altering the fuselage versus trying to bend or spread a canopy. Cheers, Bill4 points
-
Tinned mandarin oranges in light syrup served with ice cream. If someone says fruit grows on trees, they're lying, it only comes in cans.4 points
-
I consider myself lucky and happy when I get the Bf 109 glass head armour - the one piece plastic supplied in the kits - painted cleanly. Then you go and build the bugger from four pieces4 points
-
OK. Thankfully my model making abilities are greater than my photography. However Shermaniac has offered to induct me into the Halls of Digital knowhow and lend me his old camera...which will be the Starship Enterprise to me. So for the last time rubbish pictures but if you squint and read the text you may get the idea. God's teeth that's poor. The one error I have found in this kit concerns the later constant curve tail piece Part N3 HB haven't quite got it right as this picture from the excellent DISHMODELS walkround site for discussion and promotion only shows The kit part doesn't rise high enough and has a fudged hull side to try and compensate. The fix is relatively straight forward; 1) At the top rear of the hull sides sand off the semi circular bump to make the rear part a straight line sloping slightly down. 2) On the inside of Part N3 is a pair of rectangular depressions starting at the forward edge score deeply three or four lines across the plate 1mm apart working to the rear/lower. Remove the flange from the rear of Part N2 and front of N3, remove the moulded in bolted strip from the bottom edge of N3. Paint the inside of both parts and the hull side that will be visible, there's no way you can get in properly afterwards! 3) Glue the front edge of N3 to N2 and push the rear of the N3 into line with the hull sides and glue. There will be a gap of 2.5mm at the lower edge, fill with 40thou card, blend with filler and smooth when dry. Lightly sand the top/rear of N3 to remove any kinks that may have developed. 4) Add weld bead to the top of the hull sides as photo above. This has taken longer to explain than do and it makes the rear look a lot better. The running gear is now done and 'distressed' using ordinary pencils and an artists silver pencil. Very quick and effective. The tracks are fitted loose to position the idlers properly and the tank is suddenly enormous! The transmission hatches have locking bars added from my drink can so they can be shown slightly open as seems to be very common. The five fuel tanks are Plastruct 7.9mm dia tube delivered extremely quickly by the lovely people at EMA Hobbies. The ends were opened out to take recessed 7.0mm dia discs and the fillers are contrail tube. The tiny white bits are 40thou rod and 10 by 20 by 40thou strips to make the filler caps and 'handles'. Top tip now. The tracks are not handed and slightly different each side. I use a drill to put a couple of depressions on the inside of each track to make sure they go back where they should. Next is adding the rest of the hull parts, more Tango can, Plastruct and even a few kit parts (I assume). Finish the fuel tanks get my head round the turret and do my Blitz Build GB Lightning. Victory in the West!4 points
-
I was right! (Although I would have preferred a Spitfire XII or Tempest)4 points
-
Thanks for the nice comments chaps! The red had been done weeks ago and I was scared the masking tape would have stuck really strongly to the model. I thought it would bring the green and tail colours off, but it didn't Tamiya tape is great stuff; I know some say it's generic and others are just as good, but I stick with it because I trust it. One thing I've realised after getting properly set up with an airbrush is just how important good masking is. To have trustworthy tape gives a head start. I managed to get the blue on last night, I'll post pictures later today. No disasters (and camera safely away from the airbrush Sarge ). I'll use the green cutting mat as the background tonight Ced. I lost my spectacles a couple of months ago and basically everything is currently a bit blurry to me, so I must apologise; I know my photos often aren't very good. I've altered the brightness on the last photos using the Photobucket editor; does this look a bit better?: And: And here's a new one of its bottom (before I'd touched it up - fnaar yip yip): I think the white surface (recycled polystyrene fish and chip tray!) was affecting the exposure too. Something to have a quiet play with tonight. I'm afraid I'm rather fond of these huge fish and chip trays for modelling. Things can't fall off and, knowing my 'Colonel Blink, Short Sighted Gink' record of spillages in the past, they're a good way to ensure any future spillages are somewhat contained. . I hope to paint these little chaps tonight: If all goes well I should be up and about by Friday . It is fine today after a nice half an hour in my favourite seat (the one in front of the modelling bench). By taking it in stages, and going for the so called 'wuss/oap' option I hope to take part in the 'Blitz' Group Build this weekend. Yes, I know . I will mostly be building; An ICM Heinkel He-70 Blitz. I'm going for an easier colour scheme: If anyone knows if the black extends as a stripe on the underside on this scheme, please let me know. Thanks for reading and for the encouragement; it definitely helps the old mojo! Best regards Tony Edited: corrected photo link.4 points
-
From Warpaint No.50 The Bristol Beaufort: Chris4 points
-
Well I was going to build my UH-1 OOB (with floats of course) but after seeing all this scratch building and detailing I have decided to have a go on mine. The Hasegawa kit is very limited in what is supplied. More in my build thread....4 points
-
Back to this one for a few days to take it a little further . Before i forget ,thanks to all who have left a post . This Newish Revell kit is really well engineered and on the whole the fit is near perfect . a few small niggles would be concerning lots of very small imperfections in the plastic as the plastic seems to have run unevenly through the mold resulting in some short shot parts (none of them not too serious but a bit of a shame ) I think the engine is superb but takes an age to remove all the seams . there is a lot of seam removal with this kit but most is light . The pit is finished apart from the seat . iI have some fabric belts on order . have used the revell decal for the instrument panel as it will hardly be seen . It has conformed to the molding with the help of lashings of micro sol . Have used some of the Airscale luftwaffe cockpit placardsaround the pit to liven it up The engine mounting is attached and painted RLM 02 The engine and prop have been completed . first gave the cylinders a coat of black primer then a coat of Alclad aluminum . the spinner spiral is from the Eagle Cals sheet and went on perfectly . This is where i'm up to now . Wings are attached and so far no filler has been needed .4 points
-
Evening all, The radome section of the big Shackleton has progressed well over the last few days. The forward bomb door section I'd made earlier had a skimming of filler and was sanded smooth: This then received a few coats of filler primer, and when dry I added the slightly raised ribs on the exterior of the doors from 5mm Tamiya masking tape, cut to the correct shape. These were all completed together to keep the cutting consistent, and when done applied one side first, then its opposite number in order to keep them all correctly aligned. The radome itself has had the excess resin that enabled it to fit the Avenger removed, and I've amended the shape slightly in order to make it more like the shape seen on the Shackleton. The rear is still too 'pinched' if I'm being honest, but there's not enough resin left to sand away without going through it. I imagine the shape is different at the rear of the radome due to the narrower nature of the Avenger fuselage/bomb bay structure. The flat spot has also been sanded into the lower part of the dome and the rubber skirt that is present between the radome and the bomb doors was replicated with Milliput - there certainly isn't a smooth join on the real thing so I didn't spend too much time neatening the join here either. Finally, I added the rivet detail with a Trumpeter riveting tool - this served as a good practice for the rest of fuselage when the time comes! A splash of Halford's grey primer finished the job: I'm afraid I've not had time to get the proper camera set up out as I'm everything is packed up ready for my impending house move, but the following images give an idea of how it looks on a test fit to the fuselage: All in all, it appears to look close enough to the real thing for my liking. This will be the last update for a while now as we move into our new home on Wednesday so the modelling equipment (Shackleton included) is all boxed away ready for the move. And then I imagine the wife will have me decorating rather than modelling so it may go a bit quiet here for a bit Thanks for stopping by, Tom4 points
-
After some careful sanding and two light primer coats this morning it all looked good. I thought I'd get away with adding the antenna and pitot tube before a final coat of primer. I can't see what antenna configuration the real plane had, so I just picked the version in the kit that looked best to me... Here we are after the final primer coat had cured later in the day. And here is after the white has been sprayed on the fin and top fuselage. The camera, or my lack of skills in using it, completely fails to show any difference... I decided to once again try Lifecolor. I didn't want pure white, so I mixed in about 25% of a very light grey. It made a good difference, but I could probably have toned it down much more. However I can't for the sake of my life come to reliable grips with airbrushing Lifecolor, even when using Ultimate thinner which made a huge improvement. I love it when spraying skin tons on my large scale figures, but apart from there it mainly clogs the airbrush 683 times per session... However at least it dries fast so in the afternoon I could mask (no, not fun) for the blue. There was no chance I would manage spraying all that blue with Lifecolor without losing my sanity, at least not today, so I reverted to Humbrol enamel despite its shortcomings. It worked quite well. What exact shade of blue to use? No idea, so I just used #25... After a gloss coat before decals and a final mix of flat and semi gloss I expect it darken somewhat. Here's what I got after unmasking. I couldn't find a single place needing touch up, better than I dared hope. It's time to leave this over night to cure before a gloss coat and decals.4 points
-
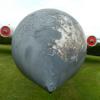
Drum roll ....... After adding over 200 pieces of photoetch ... the construction of the Space Station is finally finished. Phew, time for a long lie down in a dark room. Just a few bits of tidying up to do then she will be ready for a coat of paint. I plan to spray an grey undercoat followed by Satin White top coat. The framework on the unfinished ring is going to be in a Brick Red colour. I prefer Brick Red rather than the garish bright orange as suggested in the build notes. Thanks for looking4 points
-
I'd settle for a sensible pricing policy for their existing range.4 points
-
Well got these two small planes done. I have used the rockets from the revell I-153 set to get it correctly fitted. I have not been able to find a photo of the the black/green plane do had to trust the decal producer "Print Scale" Cheers Jes4 points


This leaderboard is set to London/GMT+01:00