
Leaderboard


Popular Content
Showing content with the highest reputation on 19/08/16 in all areas
-
Dear Fellow Modellers, This is my rendition of Revell's 1/72 Ju 88A-4, in the scheme used in Sicily, in 1941. It was my entry to the Ju 88 STGB. Unfortunately I didn't managed to finish it in time, even after an additional week was given to finish the GB. The WIP thread is here. Anyway, it was finished last night and here are a few notes, before the pictures: It's my first two-engined bomber model and my most complex model until now It was super-detailed using Eduard's BIG PE set, with details for the interior, exterior and surface panels The kit's engine exhausts were replaced by Quickboost's resin exhausts, much better detailed I scratch built the inner ribbing structure of the tail section, using strips of plasticard, and the instrument boxes and wiring on the back of the instrument panel, using pieces of plasticard rods and very thin copper wire Masking of the transparent parts was done using the pre-cut masks in Eduard's BIG set The kit has a few important fit problems: the join of cockpit underside and top parts, the join of the front fuselage and nose glazing, the join of the wing tips with the rest of the wings, the insertion of wings in the fuselage and the join of the the wings' leading edges and fuselage Painting was done mainly with Gunze acrylics and a few Tamiya, all airbrushed. Alclad Aluminium was used for a few NMF parts Alclad's Aqua Gloss was used as clear coat before decaling and the wash, and Alclad's Flat Klear was used as finishing coat Weathering was done with Vallejo's washes and pigments using period photos as references Now, the pictures of the finished model. 1. General views IMAG4282 IMAG4283 IMAG4284 IMAG4285 IMAG4286 IMAG4287 IMAG4288 IMAG4289 IMAG4290 IMAG4291 IMAG4292 IMAG4297 2. Engine detail IMAG4293 3. Kill markings and aerial IMAG4278 4..Cockpit and canopy views IMAG4294 IMAG4295 IMAG4296 5. Cockpit before being closed IMAG3971 IMAG3975 IMAG4001 IMAG4060 6. Instrument panel and the detailing of its back IMAG3979 IMAG3978 7. Installation of machine guns and ammo belts IMAG4045 IMAG4051 8. Internal ribbing of the tail section IMAG3815 IMAG3816 IMAG3817 IMAG3818 9. Details of bombs and access hatch IMAG4298 10. Landing gear: IMAG4299 IMAG4300 11. Oil, fuel and exhaust stains on the wing IMAG4301 12. With the other German "cousins" in the display shelf. IMAG4302 Thanks for looking. All comments, suggestions and criticism are welcome. Cheers Jaime EDIT: picture of kill markings and aerial added21 points
-
Vickers Valiant. 7 Sqn. RAF Honington 1961. 1:144 Mikro Mir Second in my planned group of the 3 'V' bombers is the Valiant. Well known as the first of the trio to both enter and leave service, it was the simplest of the three, but no less attractive. Doing them in 1:144 is more practical than 1:72 for space reasons, and they also make an interesting comparison with my airliners. The kit is from Mikro Mir, and has more of a 'limited run' look to it than the Victor and Vulcan from Great Wall Hobby. It requires a little more care and preparation than the other 2, but is a perfectly buildable model. A brass etch fret provides several detail parts. I used the wing fences as patterns to make copies from plasticard, and also the vortex generators on the outer wings. The only reason for this is that I believe that a stronger bond is possible with plastic-to-plastic than brass-to-plastic, but the kit parts are perfectly good. Lovely box art too! Could go without a shot of the 2 completed so far; along with next one to head for the workbench. Although it is the tanker boxing, it also contains all parts & decals for a Black Buck version. Thanks for looking, John19 points
-
Hi all, here my latest model: GWH`s T-33 (here as a Canadian CT-133 Silver Star) in 1:48. Nice kit I built OOB, just used the Canadian Belcher Bits Decals for the markings and some RBF tags by Eduard. The two helmets are out of the DACO F-104 improvement set. Hope you like my small walk around with some more pics.18 points
-
La plus vieille de la vitrine... maquette revell + planche eduard + Part + mitrailleuses quikboost... bcp de boulot pour affiner le tout...j'adore le 72 pour les bi-tri-quadri-moteurs!!! c'est tout en finesse!!!!!! Devait paraitre dans WM à une autre époque..finalement sorti dans Replic et Air modeller...15 points
-
Decided to take a break from complex builds and do a "quick" build. I normally stick to 1/48, but I read good things about this little Airfix kit, so I figured I'd try it. It was indeed a good kit, with decent detail for the scale (much better than the Academy kit). The fit was very good. The gear was a little fiddly, but that is to be expected when building a Wildcat. I tried some new to me weathering techniques, and am pleased with the result. Unfortunately, the photos do not show the tonal variations well. The model was painted with Vallejo Model Air and Model Master Acryl. Weathering was with enamels, oils, and pigments.15 points
-
"Detroit Miss" 375th Fighter Squadron, 361st Fighter Group Tamiya 1/32nd scale Haven't posted anything in quite some time, partly due to a fall in output due to work commitments. However, I thought I would share my most recent completed build. I won't go on about the kit as plenty has been written already and there are some fantastic examples already in RFI. The kit was almost OOB with the exception of the following: Barracuda cockpit upgrades HGW seat harness Eduard Brassin replacement wheels Wing rivets and panel lines were puttied over as per the original and it was painted with metallic shades from the MR Paint range, augmented with Gunze and Tamiya paints. Markings were a mixture of Montex masks and Zoukei Mura decals for their own P-51. Hope you enjoy the pictures and look forward to your comments. Regards Howard windows 7 screen shot13 points
-
Pe-2 Dive bomber in 1:48 scale. 34th Guards Red Banner Regiment, 276 Bomb Group, 1945 Built from Zvezda new tool kit. painted by Tamiya and vallejo paints. sealed by mat varinish. more pics12 points
-
All, Just completed this today - built straight from the box. Not a great deal of parts to this kit, but it all fits together beautifully - a nice little kit. My first attempt at chipping using some off the counter 'Worn effects acrylic fluid' by AKM. Not sure this works that well on a brush painted finish but I think the result looks reasonable. May just need to practice this technique more. Regards Dave12 points
-
My latest completion after 4 months on and off! A lovely kit from Airfix and my third 112Sqn type! Airfix really have hit the nail on the head with quality! Sabre 112Sqn by [email protected], on Flickr10 points
-
More mob than throng, I fear! Keep in mind that the operational Buccs had covers across the folded nose, so a lot of the detail you see in museum cabs doesn't have to be done. Can't find a clear shot, but it's just about visible in this one: And a further contribution to the intake and radome colour discussion (plus it's a cool pic):10 points
-
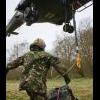
As my ludicrously long Sea Vixen build finally shows signs of drawing to a close, thoughts turn to what to build next. I always try to have two things on the go at any one time, with the other being my never-ending Ark Royal build - but there is a limit to how much 1/350 scratch building and detailing I can stand at any one time, and I need to have something in 1/48 (my aircraft scale of choice) to keep me going. I thought about a twin Buccaneer build - an Anti-Flash White S1 and an Ark Royal (4) final commission S2D. Those will come at some point, since I have the kits and the necessary conversion materials. But watching the splendid work of Steve (Fritag), Debs (Ascoteer) and others has convinced me that it is high time I built something that I actually flew myself. Sea King or Lynx, Sea King or Lynx... much indecision was finally tilted towards the Queen of the Skies by all the press coverage of its retirement from RN SAR service earlier this year (though the ASaC7 Baggers will soldier on for a while yet), and by markdipXV711's excellent build of an 819 SAR cab which he and I flew in together 20-odd years ago. So, since 819 (my other Sea King squadron) has just been done, I have finally plumped for an aircraft from my first tour. Pull up a bollard and listen to a true dit. 820 Naval Air Squadron, 1988, 18 months into my first front-line tour. We were part of Ark Royal (5)'s CAG (carrier air group) throughout my time on the Squadron, and in July 1988 the ship plus 801 (8 x Sea Harrier FRS1), 849B Flight (3 x Sea King AEW2), a detachment from 845 (2 x Sea King HC4) and 820 (9 x Sea King HAS5) set off for Australia, via Malta, Singapore, Hong Kong, Brunei and Subic Bay (Philippines), and home via Mumbai and Gibraltar. 6 months away, and a bloody good time was had by all... Less than 2 weeks after we sailed, we were taking part in a NATO exercise in the approaches to the Med; basically we were playing the bad guys trying to force a passage through the straits, and a number of RN, USN and Spanish units were trying to stop us... including HM Submarines Torbay, Otter and Opportune. The aim of these exercises is not to be 100% realistic, but to make sure that there is maximum interaction, so occasionally there would be a 2 hour pause where the submarines, having come right inside the screen and "attacked" the hell out of the ships, would withdraw 30 miles and start again. We would knock off tracking them and leave them alone to reposition. In those long distant 1980s Cold War days, ASW was our bread and butter, and on the whole we were pretty good at it. Most of the time we did passive ASW - chucking huge quantities of sonobuoys out of the aircraft and finding submarines that way, often working with our Nimrod and P3C brethren, and often working against USSR boats rather than friendly exercise ones. In my first few weeks on the squadron we rippled 3 (3 cabs airborne 24/7) all the way from Norfolk VA to Harstad in Norway, including several days of tracking 2 Victor IIIs that were taking an interest in our games. It was pretty exhausting, but we could keep it up almost indefinitely. For the guys in the back, passive ASW was often good fun; 3-dimensional chess, and all that. But for the pilots it was skull-shatteringly dull, flying around at 4-5,000' (nosebleed territory for any self-respecting helicopter pilot) and stooging at 70kts for maximum endurance for hour after hour after hour. But on this occasion we were doing active ASW, the task for which the Sea King was originally designed. Active ASW in the daytime is enormous fun for the pilots, especially when you are in contact. At night the aircraft flies the profiles for you, closely monitored by the pilots (since you are down at 40', you want to keep a close eye on things in the pitch black; it can be a tad buttock-clenching at night). In the day, however, you generally fly it all yourself ("manual jumps" as the jargon goes) without any assistance from the AFCS (automatic flight control system), and it's a blast. So there you have the scene. I am 18 months into front line flying, and have reached the dizzy heights of being captain of my own crew. My P2 for this trip is a hugely experienced USN exchange pilot (way more experienced than me, but flying as second pilot while he gets up to speed with RN procedures). We do 45 minutes of active Torbay bashing, but then reach the pre-briefed pause while she repositions. Rather than disrupt the flying programme, we simply keep going, so we have taken a plastic milk float with us (hi tech, I tell you) and are doing some grappling training; chuck the milk float out of the back and practice SAR with it - much harder than it sounds, cos the milk float thrashes around in the down wash, so it is great training for the back seat in conning the aircraft and the front seat in hovering it precisely. A few minutes into the grapple work, with Jim the USN guy on the controls, the port engine stops... or so we thought. The Nr (rotor speed) decays as the good engine runs out of puff (too hot and too heavy to hover on one engine) and we subside rapidly onto the water yelling Mayday and punching the windows out. Phil Smith, the Observer, says he had never seen anyone strap in as fast as poor old BJ Sandoe, the Crewman who had been lying on the floor of the aircraft with his head sticking out, conning Jim onto the milk float, when suddenly the Atlantic Ocean came up to greet him. As I reached up to shut down the No 2 engine (cos you sure as heck don't want to abandon a helicopter while the rotors are still turning) it became apparent that the No 1 engine had not in fact failed, but simply run down to flight idle. The fuel computer had developed a fault and tried to shut the throttle, but there is a physical interlock built into the system for precisely this emergency, called the Flight Idle Stop, which is basically a screw jack that prevents the throttle from closing beyond a certain point - the very last thing you do when starting up is to engage it. So we over-rode the computer and managed the throttle manually, the Nr came back up to where it should be and shot off the surface of the sea like a startled rabbit, downgraded our Mayday to a Pan, and flew back to Mum. A Green Endorsement much later (still on the wall of my loo) and very shaky legs for a few hours afterwards. Well, it has to be this cab, doesn't it? So I present to you ZE419 / 014 / R of 820 Naval Air Squadron in July 1988; a bog standard Sea King HAS5. Dark blue (this was just before the days when everything became grey), black markings. Photos of the real aircraft to follow, I expect, but for now she is one of these in the distance (photo taken the day before we sailed from Pompey, so about 2 weeks before the ditching): The aircraft will be built much as in this photo, actually; folded, included the tail, with engine blanks in. The cabs in the photo have tip socks on, but I will probably build mine with the more robust blade support system known as "Forth Road Bridge" gear (as in this Mk 5 at the Fleet Air Arm Museum): The basis of the model will be the Hasegawa 1/48 Sea King, using the "Ark Royal HAR5" [no such thing; it should be HU5] edition (which for some reason Photobucket refuses to rotate, so turn your head): ...and the excellent Flightpath conversion set, which contains all sorts of goodies important to this build - notably weapons carriers, assorted aerials and a tail rotor much better suited to having a gust lock fitted to it. Herewith statutory sprue shot: ...and pic of the contents of Flightpath box and a couple of other aftermarket goodies: As it happens, I also have a Hasegawa AEW2a kit (acquired before the Mk5 kit was released, as the only game in town for a future Mk5 build). This will also be useful, since it contains a number of applicable bits such as Orange Crop ESM aerials (removed from the HU5). And since all the Hasegawa boxings are variations on the same theme, the kit already contains some parts that I will use - e.g. the HU5 has the sand filter in front of the engine intakes, but in my era we simply had the "barn door"; similarly the HU5 has the sonar removed and a blanking plate fitted. The kit contains both a barn door and a (sort of, -ish) sonar. [i also have a second complete "Ark Royal HAR5", designated eventually to be an 819 SAR aircraft... but not yet]. There will not be much progress for a few days, while I get the Vixen over the line.... Herewith photo of the appropriate log book entry (bottom line:8 points
-
Comment transformer un avion en ouvre-boite.... pour infos: -planche eduard cockpit -le reste en scratch -déco hivernale acrylique + crayon de couleur pour les ailes; peinture à l'huile + essence F pour le fuselage... Article paru dans Replic et Air modeller8 points
-
19/8 update: Grab rails, hatches and other fittings being added. Have started assembling some of the figures I will be using. The Friuls progress slowly but add a nice chunky look when fitted "Wotan you naughty dog, vy did you lay a brick ofer zere for ze Oberst? Now he has ze sticky poopoo on his bootses" "Heinrich, please to pickingen up ze dog turd over zere before I steppen in it" I will probably start on cobbling up the big fender that is fitted to the LWS this weekend, have a game plan for this worked out.8 points
-
On the final stages of the fuselage, just time to pick a filler(s) for the seams and bomb bay: Untitled by Ced Bufton, on Flickr Crikey, I seem to have gathered a collection... including sprue soup in the Liquid Poly bottle. Hmmm. Went for the favourites, Liquid Green Stuff on the seams and Vallejo for the bomb bay (after taping down the cables): I keep thinking I should scratch some doors for the 'bomb' bit of the bay, like this reference shot: But that would mean MAJOR chopping of the model. You can clearly see the separate sections for the torpedo though. Too much for me, sorry, I think I'll just leave the doors off.8 points
-
Thanks Keith - I hope you find your scribers (and Tony's!) and get the chance to try them out! Thanks Alex - glad you got yours together thanks for the tip about not using them out of the handle; noted. Thanks Tony The torp is finished now and here are some pics with a rule: Untitled by Ced Bufton, on Flickr Complete with black (live) warhead and handled finish. Happy with that. Thanks John The angled scribers are for gouging carefully scribing panel lines / slots with one side angled. I bought them after the Liberator nose wheel door bodging so that I can cut, er, neat angled slots rather than trying to 'sculpt' something with a blade. Steve (Fritag) used them to re-scribe the aileron gaps on his Hawks, although I don't think I'll be trying things like that anytime soon. They come with four angles so one should work, I hope. The manicure set sounds interesting... envious! I will admit to having manicures when we go away on a 'deal break' that includes 'treatments'. Some years ago Mrs B talked me into a manicure in Jersey and a very, very nice young lady tidied up my nails and massaged my hands, which I enjoyed... a lot. That sounds mucky but it wasn't, honest! My Dad used to keep his nails tidy and he instilled in me a need to do the same. Not sure why - it's one of my least favourite jobs.8 points
-
Finless Jim On 17th May 1961 Flt Lt Jim Burns flying XM141 EE Lightning F.1 was number 4 in a high speed low level ‘finger four’ pass over RAF Coltishall. At an approx IAS of 575 knots, Jim got high and close into the jet wash of the lead aircraft resulting in the rudder and parts of the tail fin to separate. Fortunately the aircraft remained controllable and Jim (using aileron control) landed it safely at Colt As well as the fin and the rudder, the radio aerial on the spine had disappeared too thereby preventing any communication. English Electric's conclusion was that it was the effects of aerodynamic pressure which had built up during the course of the four aircraft's high speed low level manoeuvre which had exposed a structural weakness and caused the rudder and part of the fin to sheer off. It would seem that Jim had a big boot full of rudder on when he entered the engine jet wash from the lead aircraft. All Lightnings were subsequently strengthened and Jim became known on the squadron as Finless Jim thereafter.7 points
-
hi all, Here's my latest creation, the Airfix 1/72 Lightning, built straight from the box for a commission. As a kit it was not that special as i found it hard to finish, partly because i have no real interest in the subject (not the kit's fault!) and partly because it just didn't seem to go together smoothly. The decals were a bit thick in that they wouldn't settle into the panel lines even using Daco strong. I ended up using a hairdryer to warm them and all was well. The final touch was a Flory models wash which was something new for me and something i will be doing in the future too. Anyway, hope you like it Andy7 points
-
Nouvelle et dernière série de photos... Pour infos: -vieille planche eduard pour le fujimi + scratch -camouflage réalisé avec des masques flottants...7 points
-
Built for the Nato 80'S GB till it was pointed out on another thread 41sqn gave up there phantoms in the mid 70's, so instead of the gallery in there I'll post an RFI. Paints are ( to the immense surprise for those who follow my builds) Xtracrylix, and for the first time I finished it with a coat of Winsor and Newton Satin Varnish Alongside a Revell F-4F that I also build for the GB and actually was eligible for it, can see the difference between W&N Satin and Matt Varnish7 points
-
That splinter camo didnt turn out as I hoped.... Feel free to coment and cririsize, I'm trying to better my skills. Thanks, Tom7 points
-
After seeing the excellent Fuad's Sparviero shown recently, I have decided to show you mine.It was finished two years ago. Model is made OOB, with the exception of the antennas. Painted with Gunze and Alclad. Hope you like friends. Regards Fernando6 points
-
Hi all – this is my latest, the small 1/72 Hasegawa Polikarpov I-16, built straight out of the box without any modifications. The kit is painted up to represent a machine from the Spanish Republican forces, “Alas Rojos” Esquadrille, c1938. I tracked my build time on this one - I spent just on 12 hours overall for this build – around 4.5 hours for construction, and 7.5 hours in painting. Paint was done with Gunze acrylics and oils for weathering. There were no issues whatsoever with the build itself. Overall a great little kit, ideally suited to a reasonably quick and easy build. Comments / Criticisms welcomed! Cheers6 points
-
Hello, This is my last project. The model is made right in the box. I added to the model of a metal rope and tarps from the resin of Eureka XXL and cartons for food rations from Jadar Hobby. Model sticks together very nicely. I would recommend. Maciej6 points
-
Hello Finally completed my B1 Victor since I started it in March with on and off sessions. Using a cheap Revell kit and the Flightpath converion. The tailcone and bomb bay are the B2 accessery parts of Ebay. I wanted to build a B1 a bit different to the rest. There was only 1 photo of how my model is represented so I didn't have a lot to go by. A lot of plastic surgery and filling and sanding together with plenty of nose weight to counter balance the resin intakes. Everything was done to the instructions and advise from here for the wings and undercarriage leg shortening. I added jet pipes to the resin inner wings, a sprue part the fairing on the port side of the rear fuselage and of the brass parts, I only added for the wheels. Paint was rattle can Tamiya primer and Aluminium silver with added medium sea grey to the relative fuselage parts. Hardly any of the original kit decals were used, 26decal Valiant and Victor decals were used but had to use the "A" from a Royal Navy set for the under wing. Together with a coat of Klear, I thought it turned out well for my biggest conversion I've done. Dave6 points
-
Hi again, This is the final update of work done on the model, as it is finished now I applied the last decal, which was a set of inclination lines on the lower left window of the canopy, on the pilot's side. The pilot should align one of the lines with the horizon in order to perform a dive bombing with the corresponding inclination: Next, I finished the weathering by applying, first, various pigments. Here's the set-up: I used the following pictures in order to determine how to weather the aircraft: https://1.bp.blogspot.com/-xY1yVZ2Jsv0/Vs_CWPDAdAI/AAAAAAABlMw/_lg4gBXzUOk/s1600/A%2Bcolor%2Bphoto%2Bof%2Ba%2B%2528F%2529.123%2BJunkers%2BJu%2B88A%2Bbeing%2Brefueled%2BSicily.jpg http://www.warbirdphotographs.com/LCBW13/Ju88-A4-LG1-(A)-Over-Sicily_09af+s.jpg http://www.warbirdphotographs.com/LCBW/Ju88-A4-KG77-Sicily-1942-142.jpg http://www.worldwarphotos.info/wp-content/gallery/germany/aircrafts/junkers_ju88/Junkers_Ju_88_A-5_of_7-KG30_Adler_Italy_1943.jpg The pictures show that the exhaust fumes heavily stained both the top and the undersides of the wings around the engine nacelles and even the top and undersides of the tail plane were heavily stained. The side of the nacelles, above and below the exhausts, also got characteristic stain marks. I tried to reproduce these stains using black pigment. Next, I used brown pigments (earth and desert dust) to add more dirtiness to the wings, landing gear and tail wheel. Here's the end result on the top surfaces of the aircraft: and on the underside: My attempt at reproducing the characteristic exhaust marks on the sides of the engine nacelles: The landing gear, covered with earth dust, though not very noticeable in the picture: After applying the pigments, I used AK Interactive's "Engine Oil" enamel paint to create a few oil stains (on the small circular panels over the engine nacelle) and Gunze's clear yellow to reproduce fuel stains (on the larger circular panels, next to the yellow triangles). The exhaust stain marks on the top of the wing are also visible in this picture: Here's another oil stain: I also used the clear yellow to paint the cover glass of the landing light: With the weathering concluded, I moved to the installation of the access hatch and its machine gun. Here are the parts: The barrels of the machine gun were cut, as they'll be replaced by the PE barrels already prepared: The machine gun was installed in the hatch: The ammo belts of this machine gun were put in position, ready to be glued to the gun: The hatch was installed in the open position: The ammo belts were glued to the machine gun, which was a bit fiddly to do: And the PE barrels were glued in place: Side view of the hatch and machine gun: With the aircraft in its normal position, this is how the hatch looks like: Next, I installed the barrels of the back machine guns of the canopy, making sure they were aligned with the gun bodies inside the canopy. The following pictures show several views: To finish with the machine guns, I installed the barrel of the front machine gun: Next, came the propellers. Here they are, already unmasked in the centre hub: They were installed in the shafts: and covered with the rotors: Then, I installed the aerial mast on the top of the canopy: The antenna wire was made of 0.02 mm-thick Uschi line. It was first glued to the mooring point on the front of the canopy and to the top of the mast: Then, it was stretched and glued to the tail fin: To finish the aerial, the vertical line was installed and a drop of CA was applied near the tail and painted black to serve as the isolator: The last part to install was the PE access ladder: Here's the view from the front of the aircraft: and from the rear: So, it is done! Here are a few pictures of the finished model. I'll put the "official" RFI pictures in the RFI section of BM and provide the link later. Thanks for looking and for all interest and support during the build. I'm pleased with the results and think it's my best effort till the moment Cheers Jaime EDIT: the RFI thread is here6 points
-
Right, exactly when I'm there However, I don't think we could have fit Colindale in the middle of our schedule ... it's my daughter's gift trip, so she's planning most of it Didn't know about that, thanks Keith! I'll have to search for it A little more progress done on the tub; I did some detail painting on the bulkhead and side consoles Now I only need to add a dark wash and probably a bit more of dry brush on the grey parts, and it should be done. Comments welcome, as ever Ciao6 points
-
It's finished I'll post the last WIP update here and the final photos in the RFI section during the day. Cheers Jaime6 points
-
Mr. Perdu - you deserve an award or summat. It looks like it's going to be Postimage.org from this point forward (and I did send a nastygram to Google about their hamfisted photo storage. I don't expect to hear anything but it made me feel better) Well, things are progressing albeit very slowly. In fact, there isn't as much progress as opposed to me progressing on making slight progress towards making progress if you get my drift. It's all been very time consuming and forward slightly, back more, forward slightly and back to square one etc but at last I feel I am making some headway. Example 1 - these darned panels on the undercarriage have been driving me nuts. My first attempt (after my last attempts) was to sand everything back, and try again using the tried and tested dymo tape. I wasn't very happy with the result and after some more sanding I tried a different approach. This time resorting to trying to take a mold of the area using oven drying modeling clay. Basically I slapped a spoonful of clay over the part, removed it as gently as I could without deforming the clay, then stuck it in the oven. Then, when hard, I sanded it so shape - the idea being that I could sand the amorphous lump to the shape of the panel, then it would slip over the locating area on the undercarriage. Oven cured lump on the left, final piece sanded to shape on right - I tried highlighting the edges with pencil so it shows up in the photo better. That didn't work either! After much cursing, filling, re-sanding, and yet more sanding and filling I arrived at the simple method of cutting a template from styrene sheet. This worked! (and I forgot to take a photo of the final scribing!) as if that wasn't time consuming (and soul destroying) enough, I decided to attack the wings - specifically the front slats. The resin parts I have from Eduard just don't fit so you know what that means.... I have to make my own. Out came the silicone casting - only to discover that part A has started to go off (it's been lying around for a while and it does have a limited life), however, I managed to get enough mixed to cast a mold of the two wing leading edges. A few bubbles appeared but only small issues which can be overcome. The resin was in better condition and by the following evening, I had these parts. I ended up making 4 wings as I needed to cut them up to fit in the vacuformer. Actually forming the parts proved to be a bit more difficult than I anticipated, and consequently, ran through a wad of styrene (note to self... order more wads!) I've since remade all the parts in the following photo's as I wasn't completely happy with the quality of the parts but these photo's will give you an idea.... As always, the resin picked up all the detail captured by the silicone - just visible on the white styrene here. These parts are just rough cut but have captured the look I am after. - The "slats" now follow the curvature of the leading edge. It's finicky trying to sand/cut these parts to the final size but I am getting there. The biggest issue I now face is that I need to remove the upper half of the leading edge all along the wing.... .... to which end I purchased one of these thingamabobs... So far I have spent about 3 nights scraping just the inboard portion of one wing..... one wing!!!! and it hardly looks like I have touched it! I can see the scraping taking me a few weeks to get to where it needs to be :wall: I should just have left the leading edges and no-one would have known - but now I've started I have to do them all .... back in a few weeks time6 points
-
One more thing... in the video here (great CGI eh?) they explain the air rudder (actually 'aer ruddah') and cables. I needed to slot the rudder slightly onto the fins, so I cut a little slot in the PE: Untitled by Ced Bufton, on Flickr Of course one of the fins broke off, so that got re-glued and is now drying. Food time...6 points
-
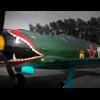
Good evening gentlemen, It's been quite a while I haven't posted anything on this beautiful forum, the reasons being, well, first, as a french speaker, it is easier for me to communicate in french speaking forums, and also because of a lack of time as I am studying right now, but here I found some free time so I decided to show some updates of my works. I built Bronco's new 1/48th scale P-40C, in the Flying Tigers paint scheme. The kit is well detailed, it contains the full engine, very crisp panel lines and rivets, 6 painting options, detailed flaps and so on. It was quite easy to assemble, except for the engine, if you decide not to show it open, you will maybe have to cut of some parts (which would not have been seen). Here are the pictures: I know there are some mistakes on my model; the red band should be further back, and apparently, the colors are not 100% exact (I followed the instruction sheet and some websites but in fact, it looked more reddish brown on the pictures I realized later) but well, that was more a "weekend" kit as Eduard would say Thanks for reading, and sorry for my english, I try to do my best Daniel5 points
-
Here's my attempt at SH's Skua in 1/72nd. I haven't finished a build for 20 years (not counting wargaming models). It went together well, I have learnt a lot since coming back to the hobby last year or so. Its by no means as perfect as I'd like it to be but I'm impatient to get some kits done! Colours are Vallejo, except Dark Sea green was Xtracrylix, but I had some trouble airbrushing that, Vallejo were perfect straight out of the tin. The scheme is a complete mess-up as I went off two of the drawings, and also got the colours the wrong way round! But just carried on regardless, used it as a practice build! Ariel wire is stretchy USCHI stuff, 0.001 OD, easy to use. New Airfix 1/72nd Defiant to come soon.5 points
-
He's a Dedicated Follower of FAAshion Sorry... Cheers, Bill5 points
-
We seem to have reached what Winston Churchill would have called “the end of the beginning” and G-AOVC has now received her first coat of white. In accordance with my usual practice the paint is Halfords Appliance White decanted and airbrushed. It’s a matter of personal choice but where the fuselage is two colours I always mask the division from the outset. I know others are happy to spray the whole fuselage white and then mask but I just find it easier to do it this way. Once the paint is fully cured (24 hrs minimum) I’ll remove the masking and get to work with Micromesh. In my experience some adjustment is usually needed to the demarcation and I’d rather do that with the white than the natural metal. When I’m happy with everything I’ll re-mask and apply the final coat of white before starting the natural metal. In between masking and spraying I assembled one of the props to see if I had the same issues as MiGFan79 and Stringbag. Trying to remove the blade section from the sprue without damaging the actual blades was interesting and the joint with the spinner is poor. After some work with Mr Dissolved Putty and Mr Surfacer I thought I’d got it looking OK but a squirt of primer showed otherwise. I suspect the Welsh Models metal props may be an attractive alternative. I’m off on holiday at the weekend so there won’t be any more progress for a couple of weeks. Back at the beginning of September5 points
-
Just a small update before the weekend. Both sides of the belly are trimmed now and the gap where this belly was and will where it will be back hopefully soon was closed with 1.0 mm plastic sheet: René5 points
-
Dio, imo, you are absolutely right. Just see what I have done with the old Monogram RF-101B Voodoo. Full rescribe and rivetjob and some elbowgrease to make it all fit and hey presto!! And I had a blast making it all fit, what I think is what this hobby is all about. Joe!!5 points
-
If you haven`t noticed already, I`m a bit partial to doing a build with a unique or interesting story even if the build itself is not quite `professional` as such. One such story caught my eye when ready July`s Flypast magazine and it`s Avenger profile within. On the evening of July 9th 1944 on an English Channel patrol, Avenger JZ554 of 854 Squadron RN flown by Sub Lt Davies and with Leading Aircraftman Fred Shirmer occupying the Gunners position, spotted a V1 approaching from the rear. As it started to overtake them, Fred took the opportunity to fire at the doodlebug from his turret at a range of approximately 700 yards. His aim was that good that it is reported that only 20 rounds were expended before the V1 went down. It is the only recorded victory of a Fleet Air Arm aircraft over a V1 flying bomb. It`s at this point that I`m going to ask that if anyone has any further information on the event or profiles of the Avenger involved, this would be very helpful and much appreciated. As so onto the kits....., The V1 kit is very, very simplistic containing only 8 parts. ..... and so 10 minutes later I find myself looking at this. The Avenger kit however is a very different beast..........4 points
-
A question for people. I know there are lots of people on here who know every bit as much about helicopters as I do. Equally, there are a lot who know very little - including some aviators who seem to regard them as a cross between a Device of Beelzebub and one of Heath Robinson's more dangerous jokes (you know who you are, Debs...). I REALLY don't want to patronise anyone, but if people want I will attempt to explain what some of this mundungus actually does. Please tell me to STFU if I am teaching you to suck eggs. Not to mention the fact that I am digging stuff out from a part of my brain unused in almost 20 years! Not going to happen! Yes, it is partly because I am too intimate with it - but it's for that reason that most Sea King models just don't look right to me; the rotor head just looks completely wrong with no pipework at all. As I said, there is no way I am going to reproduce that faithfully, but if it doesn't look convincing to me, then I will never be happy with it.4 points
-
...and for the first time she stands on her own two feet. Still a tail-sitter, even with the tanks and Firestreak; hoorah! Now to get measuring to fit the arrestor hook on which the entire structure depends! This, however, gives a pretty reasonable idea of what she will look like in the end.4 points
-
Thanks Rob for the details of WRE - wish we had something similar close by! Hi Leon - enjoy the scribers Hi Keith - short on filler? Rats, I must catch up... I've stopped using the Vallejo except for small gaps which it's quite good for, probably due to the tube! Hi Jim, Giorgio, John and Dennis - Liquid Green Stuff? OK. This was recommended to me by Stew and I'm still getting used to it but here's how I use it. I shake the pot and get a damp synthetic brush ready along with paper towel. Yes, it's water based so cleans up nicely. I just blob it down the seam and brush toward any steps so it builds up. No need to be very tidy: Untitled by Ced Bufton, on Flickr After a few minutes it's dried, exposing any areas that need more filler. I apply the second pass wetter, let it dry for a few hours and then sand off with wet MicroMesh, wiping off the spare with the paper towel: Then a quick re-scribe with a sewing machine needle. Easy (has to be for me!) HTH4 points
-
Thanks! Yes, that is correct, this will be a J 32E electronic warfare aircraft. In fact - I doubt that Hobbyboss is aware of this - is J 32E the only version that can be built OOB - although the decals are completely wrong for this. I thougt Lansen was odd enough - but they have chosen almost the most odd version of them all. I will build 32512, F 16 - 03. And here it is with decals: Most of the decals are from Maestro Models Lansen sheet (se earlier in this thread), but some are also from my decal spares box. The chaff dispensers and other pods are also - almost - finished. Next is landing gears and a coat of matt varnish. I also decided to replace the aft instrument panel, which is wrong for a J 32E. Originally I thought that I should not bother about it, but... You know...4 points
-
I have the straight RB Scribers and it did take a couple of attempts and some head scratching to assemble one. I'm not sure what the advantage is of the angled variety, perhaps you can enlighten us. Great work on the torpedo rear assembly. John PS I recently inherited a ' manicure and pedicure ' set from SWMBO because she didn't like it. The motor has variable speed and there are lots of attachments, I'm sure I will be able to find a modelling use for it, if not I'll have the best kept finger and toe nails in the Limousin4 points
-
Glue a chunk of Brillo Pad on there and you'll have a fairy good representation I think Crisp.4 points
-
Just after I wrote the above I stuck ZE419 into Google, as you do. One of the things that came up was this picture: ...taken at Fairford in 1991, by which time she had left 820 (probably to be converted to HAS6) and joined 814NAS, known as the "Flying Tigers" by themselves and the "Soggy Moggies" by the rest of the Pinging world. Much more sobering, however, was an accident report. A few weeks before I joined 819 as SPLOT in 1994, this cab ditched at night off the Southern coast of Islay. The two pilots and Observer managed to get out, but the Aircrewman was killed. The accident was before I joined, but the whole Squadron was still very much in shock when I arrived. This build will therefore also be dedicated to all those Sea King aircrew who were less lucky than I was the day that most dependable of aircraft decided to let me down. There but for the Grace of God...4 points
-
Thanks Rob WRE sounds great - do they have a website where I can check for local branches? Grab some of those clamps! Finally, with CA and lots of Anglo-Saxon, got the air rudder fitted: Untitled by Ced Bufton, on Flickr If you don't think that's 7o then keep it to yourself mate - it's not going to get moved! I've also got the bomb bay fitted; another fiddly job as it was fouling on the floor and had to be sanded. I've also done some research on the doors and this post (sadly with missing photos) and pilot's notes shows the kit is not accurate - there were three sets of doors... some open that moved, some closable and some folded back and locked. Can I get some more reference shots? Can I be bothered?4 points
-
Thanks Leon When I posted the arrival of the angled scribers, Keith posted: "Can we have a build thread when you put those together Ced? I fought with one for about an hour, & am still not sure who won! Haven't used it since either (in fact I don't actually know where it is. I'm on a scriber hunt, I'm not scared....)" - which scared me silly. So I had a go and thought I'd post it here. I can see Keith's problem - the instructions have been copied about a hundred times and are very small: Untitled by Ced Bufton, on Flickr I got lucky, inserting the blade into the holder with the 'bend lines' downwards: then I just kept bending, carefully, until the back clicked into the slot on both sides: then you need to find a box to put them in! Sharp! HTH4 points
-
"Fighting the Mud" - Soviet Soldier & Maxim Gun - Warriors 1/35 Lonely soviet soldier trying to move is maxim gun to a better position...but has to fight the heavy mud on the battlefield! It was a pleasure to participate in the GB! Regards, João Mendes4 points
-
Hi mates, Bear with me a bit here. Most of you fine folk are unfamiliar with American short track oval racing. That's OK, I have no clue about all of the motorsports in Europe other than F1. Let me introduce you to something we Yanks call a "Supermodified" or "Super" for short. When I was growing up, I went to the races with my Dad every Saturday night, and I continued going with him even after I got married and moved out. From 1962 until the late 80s, we didn't miss a race. We went to the Oswego Speedway in Oswego, New York which was about an hour and a half drive. The best way to describe most supermodifieds is that they are what Indy roadsters would have become if they were still running them today. My favourite driver at the time was Jim Shampine from the Syracuse, New York area. He built his cars himself, and he was the most innovative guy out there. In 1976, he introduced what became known as a "radical offset roadster" which featured a tube frame where the engine was bolted to the frame. What was unique about Shampine's car was that the engine was also outside of the tube frame. Here's the car at Oswego back in 1976: And a few years later with a large wing, allowed at some tracks but not all: Oswego Speedway is a 5/8 mile paved oval, and back then the top cars were running 18 second lap times. Today, it's more like 15.5 to 16 second lap times. These cars may look "run what you brung" but they were, and are, mean fast. The engines are typical Americana - big block fuel injected pushrod Chevy engines. There is no gearbox, per se. They have what is known as a dog clutch, and they are either in gear or out of gear. No on-board starters - they must be pushed to be started. Changing gear ratios for different tracks requires changing the actual gears in the rear "quick change" differential. The suspension during this time period was typical solid axle torsion bar, borrowed from the famous Kurtis and Watson roadsters at Indy in the early 60s. When I decided to build a model of Shampine's radical offset roadster (his cars were always numbered 8-Ball) I knew right away that it would be mostly scratchbuilt. However, I did have an old 1:12 scale model of a Formula 5000 car which had a small block fuel injected Chevy engine, and a lot of nice Goodyear tires, sorry, tyres, that I think would work great. I figured with the right window dressing, I could make that small block look like a big block. Luckily, today Shampine's supermodified is in a museum in Syracuse. I spent the better part of a day taking detail photographs so I have a good idea of how the tube frame was constructed. Here are some photos of the restored car at the museum, with its current owner: The first step was to prepare drawings for the tube frame, buy some styrene tubing and build the thing. Although this seems like a big part of the work, it's not. I had no other references than photographs, so I had to make measurements from them. (I didn't do any measuring of the real car - dumb!) The frame took about three days to build and paint Shampine's favourite colour of 1959 Ford pickup truck turquoise. For scale, one of the shots has half a crown in it. Shampine ran this car from 1976 through 1979, winning tons of races and championships. Needless to say, the other competitors copied the design. So in 1979, in order to stay one step ahead of the competition, he introduced what could only be described as a "radical offset rear engine car." Here is Jim posing with the new car and the roadster: And I do mean offset - remember, these cars only turn left so it's good to have all the weight on the left side. Shampine managed to get the rear engine car into victory lane in mid 79, but it was plagued with reliability issues. So, the rear engine car was driven at the 1979 season finale 200 lap race by Canadian Warren Coniam while Shampine drove the dependable roadster. Coniam pitted early and lost several laps. However, due to the amazing handling of the car he made up those laps and was on his way to the win when he developed an oil leak and was black flagged just a few laps from the end. He was passing cars three wide in the corners - I've never seen anything like it before or since. Here's Coniam prior to the start of the big race, with the car now re-numbered as the "6-Ball": The overwhelming dominance of the car caused the Oswego track management to ban rear engine cars! (Very dumb move in my opinion.) This in turn caused Shampine to sit out the 1980 Oswego season in protest, but he came back for the 200 lap finale with the roadster and led every lap, thoroughly destroying the competition. Jim was a gentleman, and did not flip off the management as he took the checkered flag. Tragically, Jim Shampine was fatally injured in a NASCAR modified race at Oswego in 1982. I felt like my heart had been ripped out. In tribute to him, I'm building this model. I imagine that this will take a long, long time - many of the parts are going to require 3-D printing I think. That means I have to figure out how to use CAD software (after I find some) and then find a vendor who can print the parts. So like I said in the beginning, bear with me. We'll get there eventually. Cheers, Bill PS. I may build it with the wing. Looks mad cool. By the way, these wings flattened out on the straights, and popped back up in the corners (linked to the throttle). Kind of like a poor man's DRS.3 points
-
There`s forty two parts been added so far this afternoon to the hull. Like I said, It`s busy underneath, and there's probably another thirty or so to go, before we get to the wheels! And six to the turret Jeez, I wonder what goes in all those little holes? Guess, go on, Guess................Yeah,all the tiedown points! So from having no opinion either way I`m starting to formulate one, did the designers get paid per part? And did they have a say about where to put the sprue gates or did they turn that decision over to someone who had never seen a model kit let alone built one? Now I`m not an engineer, but I do understand why some things have to be done a certain way in engineering moulds for kits, but some of the solutions they have come up with are bonkers! It`s a good thing you get extra parts is all I can say! But that is in my opinion a work of art! DEF Model weighted wheel for the Saladin..............It`s lovely! Well, I`m debating whether to pile in now and start removing the wiring for the indicators..................on the other hand there`s some ice cold cider in the fridge! Ta for lookin` Granto3 points
-
Better than not bouncing!3 points
-
This might help: http://www.dehavillandmuseum.co.uk/aircraft/de-havilland-dh115-vampire-t-11/ The gun fit would be removed for a/c used in the AFTS role but retained for the weapons training role. The wing dipole antennae were the Rebecca Mk8 aerials.3 points


This leaderboard is set to London/GMT+01:00