
Leaderboard


Popular Content
Showing content with the highest reputation on 23/07/16 in all areas
-
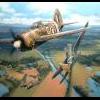
So another one with a background story: Max Guedj was a French Jew born in Tunisia, a civil amateur pilot before the WWII. He joined RAF using a "nome de guerre" Maurice (to protect his Jewish relatives in France) and in 1942 he was a member of No. 248 Squadron, Coastal Command, with Beaufighter Mk.VIC’s. On March 10, 1943 he shot down a Ju-88 over Bay of Biscay but his Beaufighter was hit by the Ju’s rear gunner. With a help from his navigator Charles Corder he managed to belly land at Predannack base - they both were awarded DSO and a Croix de Liberation. Guedj was killed in action in January 1945 while flying his Mosquito as a No. 143 Squadron leader, Corder died in 2005 aged 87 - BTW he named his son Maurice as a tribute to his friend and pilot (they completed more than 70 missions together). The Hasegawa model is probably worse than the new Airfix one but it has been in my pile of kits for ages so I gave it a go. Almost from the box, just the Eduard Zoom and Marabu PE landing lights were added. Decals are from different sources, Tamiya and Gunze paint mixes. I discussed this particular plane on different boards: hence no wing guns (extra fuel tanks were installed) and no squadron codes. There is just one photo of this very plane taken from a distance, in that photo the plane is burning on the Predannack runway. My photos have been made in a hurry, sorry for the quality. I may try better ones later.26 points
-
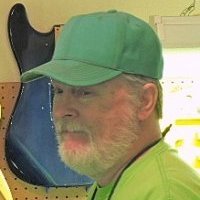
Hello gents, long time without posting, I have been just checking in daily and boy there have been some amazing post, kudos to the authors. I admit , I'm a fan of HobbyBoss, I really like the engraving the subtle details in panel lines, rivets and so on, very low or zero flash or ejection marks most of the time. Decals are good in register, the stick to the surfaces very well and I never have silvering. On top of that they are cheaper that the Tamigawas and others, yeah I'm a budget modeler. Now I cannot say about accuracy, I haven't checked dimensions or shapes against drawings, I hear on the grape vine that here lays the issue for the brand. Anyways, this particular kit is a beauty, even though is packaged as a trainer it includes the antennas, radar display and guns to make it a night fighter. There are some beautiful details included that once the halves and closed will be gone out of sight, so guess what, I didn't go for them. Build completely out of the box, just added the pitot made out hypodermic needles, the brake lines out copper wire and nav lights carved out of color acrylic. In regards the color scheme, uhmm, well I found this one over Wings Palette and instead of being red 12 I made it yellow 2, please forgive the heresy. Finishes with Model Master enamels and varnishes, weathered with acrylics and pastels. Hope you approve, thanks20 points
-
Morning all! I've always rather liked the Gulf War Tornado ZA465- otherwise known as Foxy Killer and so it would have been absurd if I was to pass up the opportunity to model this fabulous example of British aviation. Kit: Revell 1:72 Tornado Gr.1 (From my LMS- Mike's Models) Extras: Print Scale- Tornado Gr.1 Gulf War nose art (From Hannants) -Scratchbuilt RBF tags made from paper and FOD covers made from tissue paper. Paints Used: Vallejo: Black, White, Medium Olive, Barley Grey, Red. The "Desert Pink" colour was created from a variety of Vallejo paints mixed together. AK Interactive Dust Wash used for weathering the wheels *Note: I can't guarantee that this model is entirely accurate: Thanks for having a look! Kind regards, Sam14 points
-
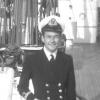
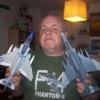
This project started last winter as FGR.2 XV436 of No. 6 Squadron. Then I read Aircraft Artificer Lionel A. Smith's "Phantom at sea" from the book "Phantom from the cockpit". It was "hook-up" for the FG.1 and "bolter" for the FGR.2. Lionel Smith was sent ashore to NAS Roosevelt Roads (Puerto Rico) on June 1971 when XT861 was diverted to the island to make some repairs on the "Cab". His style impressed me at once and I started to build my first ever RN aircraft. I built the model using Aires seats, jet pipes, wheels and air scoops. A lot of scratch building was required because I made the keel box and engine air intakes myself. A lot of re-scribing and rivetting was also required. Finally I painted the model with a brush using Humbrol enamels 27 and 34 and when the decals were on (343 of them to be precise) two final coats of Hu 135 was applied with a "Leonard's" brush. Weathering was made with "Caran D'ache" oil baesd crayons. As this was FGR.2 boxing the decals came from Alley Cat, Extra Decal, Hasegawa, Icarus, Impact Models and Model Alliance. It's a shame that no one provides good quality stencils for the British Phantom. Let's see some photos. I hope you like them I add a couple of WIP photos also if they are allowed to show you some details I mentioned about... Here is the home made Keel Box and engines. Intakes made from styrene sheet, Milliput, a pair of surplus tanks and Compressor wheels. The air brakes were closed in parked aircraft but this was too good a detail to miss... Note also the scratch built Auxiliary Air Door. Best Regards, Antti12 points
-
1/144 Boeing 777-3M0 (ER) (kit - Zvezda) Aeroflot Russian Airlines VP-BGF D.Davydov12 points
-
'The Devonshires held this trench. The Devonshires hold it still.' One of the many epitaphs of The Great War to the sacrifice. A nod to my adopted county. Here it is, finally finished. I haven't made any 1/35 small dios since 1997 and this was highlighted in the figure painting. A really good kit from Masterbox and I enjoyed creating the finished result. I don't think I would have been able to replicate unit insignia so didn't try it. Instead I left the figures anonymous. You get a lot in the box and you can use some of the spare bits how you want. Mud and clarts were made from cat litter, PVA and water mixed in various consistencies to create different styles of terrain. Barbed wire was two thin strands of wire twisted with smaller lengths wrapped and trimmed at various lengths. The poppy is an RBL reflective one nabbed from Mrs Darby's motorbike jacket and hung with more replicated wire.10 points
-
Hi Everyone, whilst waiting for paint and glue to dry on some other builds, I thought I`d give my old Hobbycraft Hurricane builds a bit of a refurb` First up is my attempt at making a IIB from the IIC/IID kit, based in Burma Added extra 4 guns and filled in the panel lines on the wings The second is a IIC based in India Which you saw a year or two ago which I`ve refined the weathering a bit Thirdly a Burma based IID, which I initially painted with Grey and Green Camo` Also added a few details I`d left off And finally, a Malaysian based IV Which has got a resin armoured radiator which was meant for the Hasegawa kit and rockets from a Tamiya Mossie or Beaufighter I know the Hobbycraft kit has a few faults but it`s easier to get hold of, cheaper and because they`re all the same.... none of them look out of place Hope you enjoy, thanks for looking Cheers Russ10 points
-
Airbus A319 - Frontier 'Mickey The Moose' Revell 1:144 with Draw Decals Another Revell A319 finished in the attractive Frontier scheme. Each of their fleet features a different animal on the tail fin and is named after it. These are another set of the superd Draw Decals and my fourth in Frontier. This one is slightly different as it features the modified 'Fly Frontier.com' billboard. And with something else, else, and else! A319's 'Perry the Puffin' and 'Chloe the Fawn' and converted A318 'Stu the Rabbit' Thanks for looking, John7 points
-
HI EVERYONE, JUST FINISHED THIS PAIR OF MINICRAFT 707'S THAT HAD BEEN LANGUISHING IN STORE FOR MANY YEARS, IT WASNT UNTIL PART WAY THROUGH THE BUILD THAT I BECAME AWARE OF SOME OF THE SHORTCOMINGS OF THESE KITS AND MUST ADMIT THAT I COULDNT FACE THE THE HASSLE OF TRYING TO CORRECT EVERYTHING SO HERE THEY ARE OOB WARTS AND ALL.7 points
-
HI all, My last model. I hope you like. Thanks7 points
-
I haven't had any time at the bench to work on this project, but thought I'd share some 3D printing that's been helping with this build... I'm indebted to Kev67 for his help here - he's done some beautiful prints of the main wheels: And the engine nacelles, exhausts and spinners: And after a gentle sand and priming: In sort, this'll save a whole lot of complex scratch-building Tom7 points
-
Decalling almost finished, just have the wing walkways to do, install some clear parts and HF wire antennas and it should be done (who knows when that will be!)7 points
-
Hi Nick and Alan, Goodness gracious! I chimed in to help with answers to questions about the origins of a photo and walking into a feces storm. Before today, I’d no idea that there was any doubt that US aircraft and paint manufacturers were confused about what colors to apply to export aircraft. Having been digging in US archives for several decades, my definite impression is that our guys were confused. First, let me address the issue of the red centers in that Buccaneer photo: they look red to me. If they looked blue, and the outer ring red, I’d suspect we’d found a very unusual application of French markings, but they don’t. However, I would never guess at which red was applied - you can trust color photos for some things, but not everything! Next, Dowding’s visit to the US: he didn’t arrive here until late 1940, more than two years after the US had begun building and painting aircraft for the UK. In fact, the painting of RAF Hudsons is what convinced the chief of the Air Corps that America needed to apply permanent camouflage to its aircraft too. But even with Dowding in the US, I can’t imagine him whipping out a color chart, holding it up to a newly completed aircraft, and complaining that the color was wrong. (BTW, there was a MASSIVE panic to fill US requirements. Air Corps correspondence files are full of “we need more FAST” memos as the military found itself way behind Europe and Japan.) Now I don’t know who the “Heavy Weights” are, so I can’t really defend myself on that one. From what I’ve seen, the Sand and Green thing began with Harleyford in the 1950s and continued with Kookaburra in the ‘60s. Considering the documentation available at the time, I believe the folks who wrote that analysis actually were heavyweights. Somewhere over 35 years ago, I took that Sand and Green stuff as gospel, but by the early 1980s I had moved on. I’m sorry that someone on ARC added to your confusion. I actually got into the P-40E-1 argument several years ago when the ‘common knowledge’ had the aircraft painted Dark Olive Drab and Medium Green - something I also fell for briefly. But as for "confusion" being an attempt to rewrite history, well, I’m guilty of that. Four-and-a-half decades of digging through US archives has convinced me that we were confused about those colors - the questions remain about the level of that confusion, and the effects that confusion had on the aircraft produced. I believe my evidence is real, not a myth, and I find myself surprised when others “pooh whoo” my findings. I’m not perpetuating a myth here, I’m continuing to search for more facts and evidence. So let’s go back to the beginning and those Hudsons bound for Britain. In 1939 a batch of Hudsons were completed for Coastal Command wearing light grayish undersurfaces. We know the color Sky wasn’t used - that color didn’t exist until 1940. We don’t have documents spelling out what that underside color was, but I suspect it was a US attempt at Sky Grey. If it wasn’t, we must have been confused, right? And if it was, then in 1939 the US was using some color believed to be Sky Grey. In fact, the British representatives in Washington continued to call for Sky Grey until mid-1942, long after the RAF had switched to Sky on many of its aircraft. That too sounds like confusion, with a possible indication of its source. Many US color charts show “Sky Gray” to be a greenish color - as Nick has pointed out, neither really Sky nor really Sky Grey. At some point, probably in 1942, the du Pont Sky Gray chip was simply renamed Sky. Sounds confusing. Then there’s the whole Duck Egg Blue issue. Most of the Americans think of that color as blue, not green. When Grumman began painting the undersides of Martlet Is Duck Egg Blue (per factory drawings), the color looked like a pale pastel blue in original 4x5 transparencies. Some have argued that the color couldn’t have been blue, but blue is what the FAA museum found during the restoration of their Martlet I. (And I still don’t understand the Extra Dark Sea Gray/Light Sea Green upper surface camouflage! Confusing.) Other original transparencies seem to show aircraft with pale blue undersides - perhaps the color wasn’t blue, and the photo was badly processed. But to deny that other aircraft could have used blue seems to me to be hanging on to the real myth - that American manufacturers couldn’t have gotten the colors wrong. American factory drawings are full of questions. For the P-40E-1, every color is defined by du Pont number EXCEPT Sky. I argue that Curtiss would have used the correct identification number if the company had no doubts about what that number was. And as the P-40E-1 is one of the aircraft that appeared to have blue bellies in some original transparencies, I have to consider the possibility that some of the aircraft were light blue (perhaps a US Sky Blue) on the undersides. Later Ventura drawings have similar problems - all the colors are identified EXCEPT the undersides, for which we are to see “Report R-211" (which I’d really like to get my hands on)! Other evidence - if we got everything right, why did the RAF have one color called Dark Earth, while the US had two different colors with the same name. The RAF also had a color called Deep Sky, but the Americans had Deep Sky and Deep Sky Blue. It sure sounds like confusion to me. So I’m not telling you we got everything wrong. But what’s coming out of the US record is that we got some things wrong - and it’s not a myth. All I’m trying to do is find the evidence that clarifies what we got wrong and what we got right. I won’t find those answers if I give up and accept that the US wasn’t confused over the application of British camouflage... Cheers, Dana7 points
-
evening folks I am still plodding along with the radiator fairings and in fact the intentions I have for them are probably equal to me sitting and building a couple of kits! The first thing to do was to add some rounded stock to the nose of each intake - there is a subtle difference in width between the sides and the lower lip of the intake, so I got two sizes of rod and scraped half of it away to get some semi circular stock to add to the forward edge I have already added... ..I tidied up the rod and started to make the upper halves that sit in the wing recess - this has taken hours of trial fitting and fettling today to get the front and rear walls to sit as neat fits to the intake roof... ..these form the foundation for skinning the interior later on.. ..I have tried to get close tolerances so they make good pattern shapes for the metal linings to come - you can see inside an intake here (you can also see a lot of dust and crap too)... ..the very first bit of metal skinning on this Spit was next - I stuck some masking tape on an inner face and outlined in pencil the border of the skin part.. ..that results in a part shape to which rivet detail can be added... ..and you might just be able to see it inside - the fit is closer when the part is pressed home so, lots more to do - I will skin the inside of the fronts plus there is a lot of gubbins in the rears that control the radiator flaps, and then there are the rads themselves which I still haven't figured out yet.. ..until next time.. TTFN Peter7 points
-
Today i tidied up the last few bits before calling this build finished. I gave the nose a matt coat over the aerial refuelling point and sprayed over a glue make from attaching the engine nozzles. I decided to not give the whole air frame a panel line wash as it doesn't really need it. I did however decide to do it around the dark areas on the engines. For this I used Mig ammo enamel wash over the unsealed paintwork. According to AK this paint is very resistant to weathering products. I applied a pin wash to the seams and left it for a few minutes instead of the usual 10-20 minutes before removing it with a damp cotton bud. I then noticed the enamel PLW was eating into the paintwork. Not something I will be doing again over an unsealed metallic paint scheme. IMAG1422 by Mark Inman, on Flickr Here is the result. I'm glad I decided against doing the whole airframe. That will teach me for not testing it before. IMAG1421 by Mark Inman, on Flickr The Hustler is now finished.. I will take some final reveal pictures for the RFI over the next few days. IMAG1423 by Mark Inman, on Flickr7 points
-
Recently knocked up some 8th AF models for a display that ultimately didn't happen. Apologies in advance as I justshot these on my garden table, and hadn't realised how scruffy it had become, so the photoshop came into play to remove the crud. Apart from the Razorback P-47, which is Testors, the remainder are all Monogram, and all in 1/48. I may re photograph them with a better background, but no time tonight. They look a lot better in the flesh.6 points
-
Thanks Alex - I think (hope) they're keeping the paste, I love it! Thanks John and good luck with the peg hunt; if you find any please let us know. Thanks Adrian (hope you're enjoying the middle of Nowhere!). I adopted Robvulcan's tip for slippy clamps and stuck some BluTak on the jaws - works a treat. Keep the advice coming though, all help appreciated! Hi OT - I can't say this has been fun but it's not as frustrating as some kits. This morning I listened to 'Saturday Live' (Radio 4) as usual whilst doing some modelling. I love this programme... it's just nice entertainment with no snidey comments or point scoring, rare nowadays. They had Charlie Higson on and talked about the relationship between Ralph and Ted on the Fast Show: Great stuff. Anyway, I sat down for a nice therapeutic session with the AK True Metal (the 'paste'), aluminium and dark aluminium: Untitled by Ced Bufton, on Flickr I use an old brush for this as it takes some battering rubbing the paste around. I also leave the paste in the tubes as, if you squirt some out into a pot, it starts going hard almost straight away. I've also got the white spirit handy for thinning. How far does this go? I blob it in the middle of two or three adjacent panels and then spread it out in both lines and circles until the pigment is almost gone - that is very thin: Goes a long way - you can see on the lower row of panels that it's not covering anymore but that the others are well covered. If you don't like the patchy finish (I do) just don't rub it out so much. Also, be careful not to go back after it's dried unless you want a shiny finish - it's designed to be polished, if required, when dry. A couple of pictures of the completed lower wings showing how the effect changes with the light: Hopefully you can see the difference between the normal and dark aluminium on the first shot and how subtle it is on the second. That's the 'dirty' finish I was going for and that I used on the Airacuda. If you want a 'factory fresh' finish then you can spread it less and polish it when dry. I posted my test here a while ago and then used it on the fuselage of my Lightning, polished in places. At 10:30 Mrs B wanted driving around town and we went out to find a flat front tyre. Guess what I'm going to be doing this afternoon...6 points
-
Oscar EW 5894 Phallus Lightweight Tactical Fighter Bomber (or Folland Gnat) from the film Hot Shots. Based on the carrier USS Essess. This is the special hobby kit which goes together really well, all apart from the canopy, the fit there was terrible, but might have been me?5 points
-
Just some unashamed nostalgia! I used to quite like Airfix's branded enamels.Made by Tunbridges (Joy), apparently: I remember using Joy polystyrene cement and some of their specialised paints, like the 2-part luminous paint that stank to high heavens and didn't really work. The pot on the right was made by Humbrol during the Palitoy era. John5 points
-
Well that isn't entirely correct. One of them is an H-19 from Sikorsky. I wanted to build a H-19 helicopter to accompany my SAAB Tunnan's in UN marking from the Congo mission in the early 1960's. I decided to build it using an old Airfix kit. It is a Westland built craft while the UN helicopters were Sikorsky's but I decided to let the differences of the air intakes on the sides pass and started to build. Then I saw that the version was totally wrong. The tail boom was straight when it should be pointing downward. I learned that Italeri made this version so I bought one and built my UN-craft. But I wanted to finish the Airfix kit that I started and found decals for a civilian machine from Sabena so I bought them. The decals could be used on a Swedish machine from Ostermans. The stripes were the same on them, I only needed to change some text. Sadly the decals were for an Italeri kit and didn't fit the Airfix windows so now I bought another Italeri kit. But again. What to do with the Airfix kit? On the decal sheet was an alternative for a machine from BEA. I decided to finish my kit with those decals. One alternative was for the machine used in the Beatles movie A Hard Day's Night. But the problems wasn't over. The registration letters were to large for the Airfix kit but I just let that pass. I wouldn't change the scheme again. So that is why I built three helicopters even though I'm not interested in them.5 points
-
Well, that's the first step taken. I just had a lively hour de-flashing the beastie. This is what came off: And this is what emerged: It's roughly cleaned-off at this stage, the finer sanding will wait until the asssembly stage. I really just wanted to get this part done as soon as possible in order to see what needs remedying. One of the wing-roots doesn't look too clever at the rear: I'm not sure if a straightforward glue n' clamp manouevre will be robust enough here. Hmmm - any ideas? The region at the front where the intake meets the fuselage doesn't look quite right either: In reality there is a slight scalloping on that flat lozenge-like raised panel that sticks out in advance of the intake, forwards along the fuselage. I'm not sure is this part some kind of anti-noise or vortex feature, but it will need rectifying on the model. I've no file this fine so another solution of some kind will be required. Grind it off and build something myself perhaps? As to the bits that go bang, those cannon ports will need drilling out. These look particularly blunted in appearance compared to the real thing: Anyone know if the cannon nozzles were actually visible? I've no contemporary close-ups and any photos I've seen of restored SVs in museums presumably have the weaponry removed. The whoosh parts also look a bit beefy: As you can see, in cross-section those rocket fins ( as well as possibly the rails mounting the rockets!) look far too thick. There's some etch for the fins but it'll be a bugger to fix them square without some kind of jig at this scale. Another head-scratcher as to a solution... Genuinely not sure how this arrestor hook compares to the real thing: If anyone has any pictures of that rear underside of the tail where the hook is mounted, as well as the engine exhaust, I'd be most grateful for the info as I've a blank in my visual research on those bits. I may actually get to stick something together before the weekend is out! Thanks for looking Tony Update: Your message popped up just as I was writing Chris: looking forwards to seeing that Meteor. Is your train build up on the forum as well?5 points
-
I use an unconventional method that always works for me: https://jonbryon.com/2016/03/15/decals/ I can get decals to conform to some pretty serious surface detail using this method. Jon5 points
-
T-18 Light Tank Model 1927 Hobbyboss 1/35 It occurred to me recently that, what with all the Bandai Star Wars kits I've been doing recently, it's been a while since I've done an armour build on here. In fact I think the last one was the SS-23 and that was over a year ago. Time to change that then, and something Soviet and inter-war seems like a good idea. This is the new Hobbyboss T-18, which was the first all Russian tank, albeit heavily based on the French FT. It's a pretty standard Hobbyboss kit, moulded in sand coloured styrene with non-working indi links and a splash of PE. This isn't meant to be an in-box review (I'm sure Mike will be doing a proper one soon), but I'll post some sprue shots so you've got something to look at until I start cutting plastic. It all comes in a smallish box (12" x 8" if you're curious) with just four sprues for the tank and another 2 for the tracks. There's a separate lower hull, upper hull and turret, and a small sheet of PE. Sprue A's got some of the hull panels and the fenders, along with a few details including, annoyingly, a solid moulded headlight. It's not even moulded with a separate solid lens, which would at least have made swapping it for a clear replacement easier. Rather it's got the housing and lens as a single solid piece, so to replace it I'll have to drill it out. Not much on sprue B. Just the turret base and main hatch. It looks like the sprue's been designed to be modifiable to take alternate part for future releases. I seem to recall Hobbyboss having more than one version listed in the 2016 catalogue. Two sprue D's carrying duplicate parts for the running gear. Two sprue T's (T for track, get it... oh, ever mind). Indi links aren't everyone's cup of char, nor mine for that matter, but these don't look too bad. No separate guide horns or pads to add, and the runs are only 51 links long. The single piece lower hull... ... and the upper hull and turret. Last up there's the small PE sheet. Mainly the perforated shroud that will need bending to a curved profile. There's no jig provided for that, so I'll probably end up doing it round a knife handle or pencil. I don't like the look of the tiny individual bolt heads. Don't know where they go yet, but I'll more than likely substitute some Meng bolt heads for them. And that's it. No decals as there's only one scheme provided, and it carries no markings. From a cursory glance everything looks well moulded. I've not really started checking references regarding accuracy, but I'll get on to that in the build. It looks like a T-18 which is the main thing. And, just so you know, this is a tiny tank. How tiny... this tiny More soon Andy4 points
-
Hi Next "odd and old" German - Dornier Do 18. Kit by Revell (named D-2/G-1) rebox of former Matchbox. The kit is not very accurate (as was already discussed several times I think on BM). The main flaw is that In real thing variants D-2 and G-1 had different noses (G-1 more sharp or "cruiser-like") and side-floats (G-1 larger) as well as engines and turret, whereas the plastic parts are the same in box (except the turret). After looking on photos I came to conclusion that side-floats are rather that of D variant but the nose is neither of them (but closer to G). So I decided to do D-3 variant, which from what I've lerant had smaller engines, sharp nose like G but small side-floats - so it should look like D-2 with G-type nose. The propellers in my model are resin copies of A-model Do-26 ones, front prop spinner is from drawer, rear spinner is also from Do-26 (civvie variant). I added fabric structure on fin, enforcement ("side walk") on top of fuselage, added new coolers, bombs, relings, add EZ rigging, reshaped air intakes and a made out of scratch beech buggy (or rather two buggies). The surface was sealed and re-scribed, and the nose was also corrected a bit. Painting scheme is from late 1939-early 1940 where large additional white crosses were introduced on all D-18s. The k6+IK is from 2/Ku.Fl.Gr. 406. The machine was lost on 28.09.1940. The unit emblems I took from Revell BV 138 (the unit use BV-138 after Do-18). Paint - Humbrol 243, 244 and 65 Here she is: (Edited on 23 July - I removed one photo and added four new) Comments welcome Cheers Jerzy-Wojtek4 points
-
Hi all, I've been asked several modellers if I would create a build log for my next build, which is the WNW Sopwith Triplane. I thought I might try something different in that most build logs are only available from the web site hosting that build log. This means if any modellers want to use the build log during their particular builds, they need to keep visiting the web site where the build log is located and open it each time they wish to refer to it. Most PC users can open and read a PDF documents, using free Adobe readers. So my idea is to create my build log as a PDF colour document, which can be dowloaded by anyone and then opened on their PC, as and when they want to refer to it, rather than having to go on-line and log-in to a web site build log. I shouldn't cut down web site visits for the web masters, as the PDF would still need to be linked from the site concerned. Anyway, I've started my Sopwith Triplane build log and uploaded it (using hosting server used for my wife's cake site) - it's OK as I pay for it anyway Here's the download link, if anyone want's to try it out - constructive feed back/comments are welcome. HERE For those interested, please remember the build log will be updated regularly as I progress through the build and will include the display base and ground work/figures etc. Mike4 points
-
Scratchbuilt. 25 feet to 1 inch.4 points
-
Allow me to remind you all of the good old Matchbox Hurricane kit. I gave this model an Airfix canopy and put in a little work to sharpen up the panel lines. ]4 points
-
Another of my recent Matchbox builds. Just a bit of panel line sharpening was done on this otherwise built straight out of the box.4 points
-
Here is the recent Academy kit of the FIIIc. This is painted in SEAC with markings for No6 Sqd RAAF from Novascale Decals. The Base was made by my daughter at school from raw Jarrah wood accompanied by a 6 Sqd Crest.4 points
-
The first job of the day was to prepare the masking for the fuselage band. Although the fuselage here is not a circular cone it is quite close and I had a hunch I could get away with a single circular arc of tape so I marked up some 18mm wide tape: Then I cut out a 5mm wide strip with my compass cutter: With the bit of give that tape has I was able to get it where I wanted it: Now I could apply the RLM76 over all surfaces (except for the engine which made for a handy holding point): When that was dry I was able to mask around the gear bays ready for some RLM02 in the morning: I used quite a bit of scrap tape for my cutting mat for the above hence some of the odd shapes. Bye for now, Nigel4 points
-
Latest update: brasswork finished. On to the figures now! Cliff4 points
-
An old airfix Swordfish given to me by a friend who found it in a box of ebay stuff. And since his very young daughter wanted to send me something too I've named it after her. Thus the non original naming of it Jess.4 points
-
Hi guys, Sorry for the lack of updates. I have been taking my time with this build. Immensely frustrating and enjoyable at the same time. It's frustrating because of the number of parts Airfix left out, but enjoyable at the same time as it allows a lot of additional details to be added. A lot of parts in the pics are just put in place without being glued on. It's just for some test fitting. Any feedback is much appreciated. Regards, Jeremy4 points
-
That's a great effort you are putting in there but I suspect you might have done better with the Sword kit or even this Probably less effort than the Pavla and probably more accurate. I have seen one done with a CMR interior and it looked very good.4 points
-
Hi Dana, I suspect I've contributed to the proverbial storm since it was me that observed the pinkish tone to the roundel centres. So...to make it clear (for all concerned), i wasn't suggesting that Brewster applied pink instead of red. I was simply noting that the appearance of the roundel centres had a pinkish cast, and that there was a degree of difference between the 2 versions of the same image included in the OP. In short, I was highlighting the problems of interpreting colour from colour photos, particularly when someone has "improved" the image before posting it. Per my previous post, I'm hoping there's some original documentation of the colours Brewster applied to these airframes. That would at least give us a starting point and might provide some insights into the undersurface shade. However, as I noted, these Bermudas look rather different tonally from the Buffalos delivered to the RAF, the latter showing far less contrast than the Bermudas. The following monochrome pic seems to show the same aircraft seen in the OP and demonstrates what I'm saying: Now...we can't be certain the upper surface camo doesn't use the same paints as applied to RAF Buffalos because of different lighting conditions, use of filters etc. However, the appearance in these photos suggests that at least the Dark Earth shade is lighter on the Bermudas than on the Buffalos. Again, original documentation would help here. Hopefully Jim Maas will see this thread 'ere long and may be able to shed some additional light ('cos he's a nice chap like that). Cheers, Mark4 points
-
No ID, but shows there were some...4 points
-
Thanks Leon - "Looking like a Liberator"? I hope so... Thanks Adrian. I think the canopy fit ill be OK with a bit of blending - it's been sanded a bit since the photo. The wing fit is really tight and I intend to smother it in glue, just like the old days. It won't get handled much but thanks for the advice. Thanks Benedikt - I'm not sure if you meant 'half cut' (= somewhat drunk) or cut in half but it's an idea... I had a look in my RAF crew set but the only suitable candidate had been used for 'T Tommy'. Oh well. De-icing boots. The boots are well defined on the wings and tailplane: Untitled by Ced Bufton, on Flickr (BTW those elevators show the sort of finish one can get with thinly applied AK paste). Not so the fins. I searched for a tool that would let me scribe a line, circle cutter won't go that small, couldn't find one so bent a paper clip and used that: Good idea, but didn't help with my shaky hand (just age probably) and the resultant boots are in need of some tidying up: If I can't tidy the lines while using the paste I may mask them, then I'll pull the mask off and the paint will probably come with it, and then I'll have to mask the paste etc etc etc. Better be careful Ced or we could be here all week!4 points
-
Manchester Regiment. Scrathbuilt. 32 feet to 1 inch.4 points
-
And it has begun..the Airfix decals fighting me all the way. The wing ID are made from an xtrdecal set of RAF numbers and letters.4 points
-
I got a set of transfers from Print Scale which has markings for two FAA Marylands, both of 771 squadron. One AR720 was the one that spotted the Bismark breaking out, so this is the one I will be doing. I've two Azur Marylands, both in Free French guise but that just means spare transfers. I've also picked up a set of Maskol masks. So here's the raw materials and the intended markings Obligatory sprue shots Some resin And clear transparencies Detail is engraved and quite fine. Chocks away and ready for take off.3 points
-
Hi Guys. I'd like to welcome you all to my latest build, hot on the heels of my 1/72 vampire I checked the stash for a likely candidate. I have a few choice Tamiya kits that I'm eager to build but having built a few lovely models of late I'm really looking for a bit of a challenge. Taking cues from some of my friends on here, (you know who you are) I was intrigued and fascinated by the way you guys revel in bringing older kits kicking and screaming into the most wonderful states of fruition. One kit I bought on E-bay a few months back for the princely sum of £10 I think was the "Grumman ea-6b Prowler" I knew nothing about this kit but I loved the plane, such an unusual and lovely shape, to be fair being a 1/48 I expected it to me medium sized, how wrong I was. This thing is mahoosive. it's also super old, I didn't realize how different older models can be from today's lovely kits, all the better for what I have in mind. Any way as this is my biggest build to date and possibly my most challenging I'm going to document it here warts and all, There aren't many builds of the Airfix kit as from what I have read it was a scaled up version of a 1/72 with not very much detail but a rather good shape. I'm not looking to keep super accurate here but I'm aiming to have a fun time digging around trying to bring out the inner charm of this wonderful kit. It was all bagged up when I got it, I believe its the mid 80s kit, staples in the instructions and everything. The decals look good but I worry that they might disintegrate as they look a little flaky on the star and bar, we shall see. Any road up, as I'm back from my good friends leaving do at work, one pint as I was driving , the kids are in bed and the wife's out I'm going to make a cuppa and get cracking. ( I do wish I had an airfix mug like Phil's ) Ladies and gentlemen I give you the "MASSIVE and OLD" It's only a ruddy GRUMMAN EA-6B Prowler 1/48 by Airfix. First off a very old and dented box, with a bit of a rubbishy picture on the front. Good start huh. next up the sprues, I cant fit them all in one picture as they are the size of a small football pitch so have a few. Ther are two options with the kit, I'm going to opt for this one. as it looks a bit like this, and this looks ace. Here we go first thing as I pick up the parts and notice all the panel lines are raised This is my first encounter with such phenomena but hey how difficult can it be? I had bought some tools to help me out a while ago as I have a Tamiya F14 in the stash and was aware of some of its pitfalls. so re-scribing here we come. first off a good sand with one of the wife's old nail files. I know this makes me look like a maverick but I'm not, I used the straight edge of a try tool to get the lines then free handed them later to get them hopefully right. Here we are with half of one wing, I't took me about an hour. this is going to be a long and dusty road. But i'm sure it'll be worth it. wont it? Right i'm going to put the kettle on. Wish me luck, and if you wanna tag along for the ride feel free. hopefully it'll be fun, educational and emotional. See you next time and thanks for taking the time to look over and see what I'm up to. All the best and as ever Happy modelling. John3 points
-
Hi Guys, This isn't completely done yet, but i've been itching to share it. A320 Easyjet 250th Airbus livery, made from the 1/144 Revell kit. Proved a little less cooperative than the 3 x A319's i've built, but generally not bad! Decals from Draw decal, can't remember for the life of me the site I ordered the winglets from. Chris3 points
-
Here's my Boeing 717 as promised.... What do I have to make it? Fly DC-9 kit (many of them in fact.........) but I only need one. The one I will use has been around the world a few times as a decal and part fitting mule so it will need a good clean. A decent set of drawings is good. These have been verified from actual dimensions A Contrail 717 - very heavy resin kit. Appears to be reasonably accurate but not as fine detail as Fly kit. Various bits and pieces from the Contrail kit and elsewhere. An Ozmods conversion... made for the old Airfix kit and not of much use. Okay, that's a start3 points
-
My old kit fetish continues with Airfix's 1958 Hawker Hurricane MkIV RP kit. A very basic kit with jolly thick wings but still fun to build. I built this straight out of the blister pack. Some work was put in to reducing the raised detail without losing it, this mostly involved a rub down after painting which removed the raised detail revealing the silver plastic underneath as its only trace.3 points
-
Been a while since I've posted a build on here. Not through lack of activity, hut everything I've done recently has gone horribly wrong for one reason or another. So, in an effort to stop my mojo completely disappearing I needed a couple of quick no nonsense builds. And this was one of them. Just a straight forward OOB build, with no bells and whistles. And I'm glad I did. What a great kit. Certainly the best Airfix moulding I've built so far. Only addition was some basic Tamiya tape belts. Hand brushed with Revell aquacolours (y)3 points
-
Well I had some time to do the pictures, so here they are. the first picture is after all the masking done. Boy that was a job. And the second picture after pre shading the underside. And finally the model after the painting of the underside in RLM65. The paint is from Gunze. That is it for today. I hope to do tomorrow the RLM 79 (sand gelb). Cheers,3 points
-
... sshhh... Don't tell everyone, but I've got undercoat on this thing. Tamiya white primer, rubbed down with 4/0 steel wool, and hopefully I'll get first colour on it tomorrow (if we can dignify grey by calling it a color). Photo when I get my laptop back together. Remember, mum's the word...3 points
-
Hello, Quite a lot done in the last few days, good warm weather in the evenings helps with the painting process, and I've repaired my airbrush at last (dropped it while cleaning, tip down - bad). So, first coat of blue-grey: I don't know what the exact colour should be, but I felt this was a little too blue, so lots of different shades went on in random manner, all mixed from various Revell and Xtracrylix, leading to something, that, to me, looks 'right'. A Klear coat gave just the slight sheen I wanted. Some decals also on and some weathering with line washes, chips with a mid-grey paint and dust and exhaust from pastels. Nothing too much as these planes sadly didn't last long in service. The decals are ultra-thin, so need to be slid off the backing onto lots of water or they fold up, but they bed down fantastically. So, fiddly bits next - Undercarriage, and that multi-part canopy with tonnes of framing. Ordered a Montex mask set for that one! There's also an incredibly fine resin rear gun, let's see if that survives being built. More soon, welcome any constructive comments. Take care, Matt3 points
-
Hi Folks Another straight off the production line,Tamiya's 1/48 Mosquito FBVI converted into T3 from 204 AFS at Driffield circa 1950 Minimum mods required to do this although I would say the kit fought me all the way. A little bit of personal history in this one my father flew this aircraft twice whilst on detachment from his base at Celle.Why he was detached for three weeks is a mystery.The only thing that provides a possible explanation is his return from Rhodesia after instructing on Harvards but that was three months before the detachment. Anyway here it is ,the photos I worked from show it to be a very tired airframe. Ian [/url ]3 points
-
I've spent the last few days pondering how to do the cannon. Airfix mold the outer pair far too short (they look like Hispano MkV, which were used on the Mk24), I have bought the Freightdog upgrade set but, as it was the last one on Hannants, I want to use it on a better-built model. Master brass barrels are an alternative and I have several but I'd have to fill the attachment points down and drill the wing and I'm too far in to the build to do that. There are spare 'long' barrels in Special Hobby's Seafire 47 but they fit differently. So, as I have several other Airfix Mk22s in the stash (and I'm hoping my local Home Bargains may have some in stock), I decided to take the inner pair from a kit I have earmarked for a Mk24 conversion and cut them to size. Here's the result, I know I'll have to re-attach them. Opinions are most welcome.3 points


.thumb.jpg.d17ff607fc7e89ed057e63fcb6f2a888.jpg)


This leaderboard is set to London/GMT+01:00