
Leaderboard


Popular Content
Showing content with the highest reputation on 21/07/16 in all areas
-
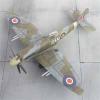
Here is the recent Academy kit of the FIIIc. This is painted in SEAC with markings for No6 Sqd RAAF from Novascale Decals. The Base was made by my daughter at school from raw Jarrah wood accompanied by a 6 Sqd Crest.26 points
-
Hi Folks Another straight off the production line,Tamiya's 1/48 Mosquito FBVI converted into T3 from 204 AFS at Driffield circa 1950 Minimum mods required to do this although I would say the kit fought me all the way. A little bit of personal history in this one my father flew this aircraft twice whilst on detachment from his base at Celle.Why he was detached for three weeks is a mystery.The only thing that provides a possible explanation is his return from Rhodesia after instructing on Harvards but that was three months before the detachment. Anyway here it is ,the photos I worked from show it to be a very tired airframe. Ian [/url ]18 points
-
When my son asked me to build him a Defiant (he lives on the site of the old Boulton Paul factory), I thought it would be a good opportunity to try out the latest 1/72 Airfix kit, along with some Eduard PE details, Quickboost resin exhausts and Master brass machine gun barrels. Here's the result: I enjoyed the build immensely, but it was 'full on' and left me with the problem of what to do with the original release Airfix Defiant kit that was now languishing unloved in my stash. As an antedote to all the detailing, I decided to make it straight from the box, using just a sanding stick (well several actually ) and filler to get a result.... One for my seven year old gradson I think ! Cheers Cliff16 points
-
Here is the 1/350 Trumpeter Prinz Eugen as the "USS" Prinz Eugen IX-300. The scene portrays the Eugen a day before bomb test Able at Bikini Island and most of the crew is waiting to disembark. Enjoy the pics. Steve11 points
-
The 1953 film "Sabre Jet" starred Robert Stack and was one of the quasi USAF films of the time. As they were fairly short of MiG-15s at the time they repainted some F-86As out of the Fighter School at Nellis in the film. This is the Matchbox kit but the Canopy, seat, wheels etc came from a Heller kit.10 points
-
A couple of minor updates for today - first, the brass armament from Master was installed into the wings. I don't know if any of you have noticed this before, but Master puts some very fine lines on the brass pieces to show you how far into the wing they should be installed. If you're old and decrepit like me, it helps to use a magnifying lens to see these lines. Caps off to Master for thinking of us. I had to enlarge the holes in the leading edge of the wings in order to make the brass pieces fit. First, I drilled them out but then found myself in the situation where I needed to go larger, but the next size bit that I had was too large. I ended up using a very small round file to gradually open the holes. Needless to say, the seam along the leading edge kept popping open while filing - I had to put a clamp on the wings to stop this. Take a look inside the machine gun fairing and you can see the barrel of the gun, which is a separate brass piece from the fairing. I hope I can figure out a way to highlight this detail when I'm in the painting stage. Next up was the tail wheel - AZ give you absolutely nothing to attach this to. Since the Mk.XIV had a retractable tail wheel, AZ properly moulded the openings in the fuselage for the tail wheel doors. However, there is no tail wheel "well" to hide this opening and provide a mounting spot for the tail wheel strut. I took the easy way out and just used some styrene stock to make a crude well, and then drilled a small hole for the strut to go into. This likely bears no relationship to the actual thing, but I think it will work. Once the tail wheel doors are in place, you really won't be able to see much of anything here. I also spent some more time with the canopy - I decided to use the forward windscreen from the AZ kit, which required me to use a razor saw to cut it out. This was cleaned up, dipped in Future, and will be attached shortly. I thought about also using the fixed rear portion of the kit canopy, but on close inspection it seems to be too narrow for the fuselage. I don't want to take the chance of it breaking if I try to spread it apart, so I went to my Falcon set of Spitfire vacuform canopies in search of something that will work. (Has anyone besides me noticed that since the Falcon canopies are all on one sheet of clear plastic they look rather like a Spitfire canopy jello mould?) I found a suitable vacuform that will match the AZ model almost perfectly - it's the Mk.VIII/IX that Falcon designed for the Hasegawa kit. It's formed in three pieces, thereby already sectioned for display in the open position. The fixed rear portion was removed and trimmed and has just now had its Future bath. Amazingly, it's almost exactly the same width as the fuselage, and the height is right on too. Farm out! Tomorrow I'll mask off the front and rear canopies and get them on the fuselage so I can start painting. I decided to use the Gunze acrylic colours that Chris Wauchop and Brett Green used on two of the models in their book on how to build the 1:32 Tamiya Spitfire. These are H75 (to impersonate Ocean Grey), H73/330 Dark Green, and a 60/40 mix of H307 FS36270 and H11 White for Medium Sea Grey. I like the look of these colours in their book, so why not give it a shot? I have a ton of these paints, I might as well use them up! Cheers, Bill10 points
-
evening ladies thanks for stopping by and leaving such kind comments I have been continuing with the radiator fairings. I remade the vacforms after modifying the master to add a bit of a flat at the bottom I hadn't noticed on the plan, and also cut out some big housing holes in the wings where the radiators themselves will go... ...you can see here how the hollow has been routed out with a dremel in the wing... ..the holes needed lining with skin and actually these panels have quite prominent raised rivets so these were added before bending & forming to shape.. ..and soon the linings were done.. ..the vacformed fairings are very weak so needed building up so I can sheath them in litho. I marked out the radiator position which is at an angle and used some laminated balsa sheet to form the body - I will face these with the radiator detail... ..I added some inner walls from plastic sheet and flooded the cavities with thick CA to give strong walls, I also bent some square brass stock which was going to form the leading edge.. ..in the end I didn't use this as I decided it is too hard to work the shape needed... ..I built it up from hard plastic square stock instead.. ..it needs a lot more work as there are some subtle features to capture, but its a good start... as I suspected the PE I made for the radiators doesn't fit the deeper Griffon rads so I need to think about how to make the grille and the core next... thats all for now.. TTFN Peter10 points
-
Scratchbuilt. 25 feet to 1 inch.9 points
-
Hi Folks It's been a busy few days at the workbench. This is the Monogram version of the F86D finished as the Squadron commanders aircraft from the 37th FIS based at Ethan Allen air force base in Vermont circa 1953. As usual this kit is a delight to build,decals from SuperScale Ian [ URL=http://s1158.photobucket.com/user/camper1231/media/IMG_9901_zpsssdwxxbr.jpg.html][/url]9 points
-
Here is my completed Bandai Falcon. This was built for a friend of mine who has supplied me with a lot of Bandai SW kits direct from Japan. The kit is lighted and powered by a single 9v battery hidden in the rear. The base was made up of the two tiles from the X-Wing and two Vader Tie bases. And a few more...9 points
-
Thanks Benedikt - I do like those videos; strange ephemeral attraction perhaps... Hi Leon and welcome! Heard on the local radio today that it's the funeral of Percy Beake DFC, one of the last of 'The Few', who was a local resident. I'm ashamed to say I hadn't heard of Percy before now but I will be researching his aircraft and building a Spitfire and (perhaps) a Typhoon in his honour. The BBMF flew a Spitfire and Hurricane over the crematorium which is about a mile or two from me but in a valley and out of sight. I stood in the garden and heard them though. RIP Sir. Slowed down by the heat (wimp) but the fuselage is done. For some reason I'm not glueing the wings... too heavy to lift perhaps... soon, soon. On to the empennage - nasty, nasty ejector marks: Untitled by Ced Bufton, on Flickr but they were savagely dealt with and a coat of W&N gloss applied to the yellow bits ready for the transfers: That hair has been removed. Airfix very helpfully mark the tailplanes 'Port' and 'Stb': which helps a lot. Until you glue the parts together. Best laid plans... I may finally glue the wings tonight (maybe) and then I can start the NMF. The beginning of the end.9 points
-
Here is Bandai's non scale X-wing fighter painted as Red six. It is displayed with the laser turret from the new Bandai A Wing Fighter kit. I will remove the stand and add a clear rod to make the stand less conspicuous. Hope you like it.8 points
-
Hello all, today I am going to show you more cockpit related stuff; namely the Martin Baker Mk 3J "bang seats". The kit seats are pretty basic but they provide a good starting point for detailing. I bought the Eduard PE set for the cockpit which includes also the seat harnesses. I also considered buying resin seats but they didn't convince me at all. Let's have a look on the real thing. These pictures are from Javelin FAW.9 "Pilot's Notes". As you can see the seat is a pretty complex affair. I recommend that you read the "Strap in procedure" from Pilot's notes. Together with the photos it gives you an idea how everything works. I decided to build a "working principle model" from paper strips just to confirm I got it all correctly. For example there are two crotch belts on both sides (four per seat). When you are strapping in you must check that one goes between your legs and then pull it through a "D- ring" on the "outer" crotch belt. After that you need to pull the inner shoulder strap through a loop which is an integral part of the inner crotch belt. Finally you are ready to fasten one buckle into the central lock. Phew... confusing. And this was a very critical step because it formed the most important connection between the occupant and his parachute. To be exact: only half of the job is done as the other leg is still "free". During Cold War Javelin was criticized because the strap in took so long; several minutes at least. Far too long for QRA duty. But back to the kit! Once you find out how the seat harness works you'll realize that Eduard offering falls short. Of course I have seen beautiful models built using these extra PE parts but I decided to go a little further... At first I opened the recess in the middle of the parachute pack. The outer and inner shoulder straps go through this opening. In reality the head rest is a separate piece; not an integral part of the parachute pack so this was corrected using a knife and a small sanding stick. At this point I also added the missing drogue gun from 0,6 mm plastic rod and thin wire to seat frames. I decided to make the harness myself from scratch. Using photos of the real thing, a pocket calculator, a ruler and a set of water resistant crayons I drew these. Here are all the required seat belts for one seat. Only thing left is to scale them down to the correct size using a simple photocopier, cut them out and attach to the seat using CA. I painted the seat frames with Humbrol enamel 33 and the parachute packs with Hu 118. The seat cushion got Hu 85. The primary firing handles were striped using Hu 29 and RLM 66. The important thing is: don't use bright yellow! I also made the drogue chute cover flaps from Tamiya tape and drogue extraction and drogue lines from thin wire and tape. The seats are almost complete and look like this. BR, Antti8 points
-
These photos are the result of a GB diorama that I built earlier this year. This depicts a routine field service of a Rhodesian Air Force Alouette III K Car undergoing a periodic tail rotor shaft and gear box lube + refuelling. During this period of the Rhodesian conflict, these aircraft carried very little in the way of insignia and very limited service stencils. A key element of the 'Fire Force' concept, the K Car was equipped with a side firing 20mm Hispano canon and carried a crew of 3, the pilot, technician (gunner) and the army commander who would direct the operation. The K Car was identified with the letter K formed from masking tape/duct tape hastily stuck to the side of the aircraft. These helicopters were highly modified for operation in the bush environment with the most obvious mods being the 'elephant ears' dust filters and anti strella exhaust shroud. Please enjoy the photos .... Thanks for dropping by.7 points
-
Hello all, Here is my recently finished Tamiya F-16 'Thunderbirds' boxing in the markings of the Polish Air Force. Colours are Model Master Neutral Grey over Model Master Light Ghost grey. The former painted freehand. The build thread is here Extras used included a Pavla seat, Kinetic CFTs, Kinetic/Wolfpack dragchute housing, Attack Squadron JSOWs, Master Pitot tube, Master Static dischargers, resin FOD insert, Wolfpack Sniper pod and a mixture of Two Bobs and Caracal decals. With my other 'advanced' Vipers to date: Still have a UAE, Omani, Hellenic and Pakistani example to add. Comments welcome, thanks for looking. Dave7 points
-
Here is the Airfix 1/72 C-47 when based at Sembach with the 66th TRW. It is not an easy build due to my mistakes (both the build and decals) and some tight tolerances but will have a go at another and avoid the pitfalls. The decals came from XVTonker on here, who produced some decals for USAFE C-47, Furball Decals for the stars and bars and a Scalemaster sheet for the USAF titles. The metal finish was done with Tamiya Aluminium spray can and various panels with Vallejo Metal Color. Robert7 points
-
Hi again, Here's tonight's update. I started by sawing the resin exhausts off the moulding blocks. Here we see the exhausts still on the blocks and the saw I used: WARNING!!!! Resin dust is cancer inducing. So, I sawed the exhausts on a damp paper towel, to fix the resin dust, and used gloves, a respirator mask and the headband loupe served also as eye protection. Here the first exhaust is off the block: After sawing the four exhausts, I washed them with water and dishwasher detergent and let them dry for a while. Then, I glued them to toothpicks in preparation for painting: The following two pictures compare the resin and plastic exhausts. The enhanced detail of the resin parts is apparent, namely the exhaust holes at the end of each exhaust tube: There's still some work to do on the engine cowlings, as some raised detail must be removed and replace by PE strips, as shown in the PE instructions: In this picture I had already removed the raised detail from the two parts on the top: Here the raised detail is removed from the four parts: To apply the PE strips properly, I installed the exhausts temporarily and fixed them inside with blu-tack: The process was repeated for all cowling parts and here's the result: Finally, I masked the PE frets, since I decided it would be best if some of the parts were painted still on the frets. There are indications on the masking tape of the RLM colours I'll be using: I'm not too far away from priming, now. Thanks for looking Jaime6 points
-
Started on the detailed painting and touch ups.6 points
-
Hi Folks here are a few photos of my entry for the recent Hawker Hunter Group Build. This is the Revell 1/72 Hunter F Mk 6 kit back dated to an F Mk 1 using various aftermarket parts and decals. More details can be found in the WIP here: http://www.britmodeller.com/forums/index.php?/topic/235000770-a-hunter-from-fife-finished/ Not one of my best but it fills a hole in the display cabinet. Duncan B5 points
-
Ta dah: Untitled by Ced Bufton, on Flickr Heavy lifting complete. The other u/c needed support at the other end - go figure - and the peg on the top had to be chopped. That'll teach it. Both wheels now (more or less) level with the wing and glued in place. Sorry, no playing.5 points
-
Hello Ced. Not from yesterday as it wasn't that spectacular, but cooled the air very well. Mayby today. One from 9.6.14 here in Münster at night. This was really noisy with the howling wind:5 points
-
Released. Src: http://www.72news.eu/2016/07/sword-supermarine-spifire-mk-xiv-ce.html5 points
-
I have the following reference book: But as I'm building a fictional ship, where two real ships were used for the filming, the main reference is the show itself. And the Nathan James has the rear CWIS and the flat stack tops. Quite pleased with how my scratch built platform came out: And also started painting the decks And that's it for evening 6! Unbelievable progress for me. But it will slow down once I get on to all the detail bits5 points
-
I now hate white decals, not really. Well they are just about done now. Had a few more mishaps but I managed to salvage it. Just gotta sort out the belly ones and a few others and the decals will be done. Thanks Simon5 points
-
Continuing with my theme of building aircraft I worked on during my time in the RAF. This is the Buccaneer from 1984-86 starting at the time the OCU moved from Honington to Lossiemouth. XX899 came from the RAFG fleet to the OCU. After going through the avionics update it was used by 12 Sqn and was one of the Granby aircraft, marked as P "Laser Lips Laura". I've built it in the war role fit for Pavespike designation. We went on many detachments to Laarbruch for maxivals or tacevals, practising the role. I had to source an AIM 9B Sidewinder and Lau 3B launcher for the self defence armament. Again I threw lots of aftermarket bits at it to hopefully improve the end result. I went through the usual well documented trials with this kit, but with sheer perseverance it was finished Along with the photographed AM stuff, the aircraft specific decals were made by Paul at Parkes682decals. Thanks for looking. Rob.4 points
-
In contrast to the GWH Victor kit I built earlier, this was a little bugger to put together. It was much older designed kit with lots of fit issues and the props were a nightmare as they broke as soon as you touched them. However I thought it would make a good East vs West picture with the Victor.4 points
-
HI all, My last model. I hope you like. Thanks4 points
-
Academy F4F-4 first kit in a year or two i have managed to finish decals were awful i know academy decals have a bad name but they were absolute sods. Not the best ive done but thought id upload it anyway4 points
-
Thank you guys for the kind words, I think I've finished them now.I took a quick pic in between showers with my phone. I'm still waiting for my decent camera to be fixed so when it is ready I'll take some proper photos for the gallery, hopefully won't be too long! In the meantime I might knock up a step ladder provided in the Italeri kit for the open jet for a little more life to the model. The Eduard fabric RBF tags were easily the best ones I've ever used, very realistic and highly recommended! One issue I had an idea might be the case is that the models seem to sit too high. The wheels are certainly oversized by 2mm or so, but I think also the landing gear legs are modelled as if very little weight is applied from the jet. Comparing it to my Hasegawa 1/32 model they are about 3-4 or more mm taller which is quite noticeable side by side, not that I can do anything about it now however (I'll take pics of this issue in a RFI thread). Another point if anyone wants to have a crack at this kit, the plastic is soft and hence the landing gear legs do not seem to be the strongest especially the front one. I thought I could get away with it being clean airframes but if I wanted to make a tooled up one with resin Kormorans, tanks and Aim-9s I'd probably opt for some white metal legs available as that would make a relatively heavy model once built to which I wouldn't be confident of the front leg being up to the task. Just my thoughts on the kit, hopefully not coming across as moans! I do have a question for the mods however. Should I enter them as a pair or as individual models? They are the same thing really but some difference between them. Not sure which one adheres to the rules better Thanks for looking and as always very grateful for the comments and support you guys give, much appreciated. David.4 points
-
Hello, the tractor received some first steps of weathering with sand colored pigments.... The trailer is also fully built in the meantime... and painted in German Grey by Tamiya (after black primer, brown wooden color, salt). The decals followed, also a light grey dry brushing, painting of the details and a layer of clear coat. The weathering started also with sandy pigments ... Cheers Micha4 points
-
Cockpit is finally done - but it was a bit of a journey to get there. The fuselage came together with a bit persuasion. I fitted a new Eduard Russian steel harness which has harnesses for LaGGs and Yaks. But something just didn't look right Well it seems Eduard is not only having scale issues when making kits, but also with PE parts Left Eduard, right GoNzA - what did I say about scale, about 1/3rd too small so close to 1/72. And yes, I checked if they sent me the wrong scale PE, but it is the 1/48 set. here the comparison on the seat. What a difference. Sorry I had already removed the back harness before I took the picture. Now the GoNzA harness is maybe a tad over scale. But as the ModelSvit seat is a bit too large, they work well together. I used Gunze Mr. Metal Primer for the first time (applied by brush) on the GoNzA harness and I am impressed - no paint pealed off when handling, folding and attaching the harness - a rather tricky venture in the closed cockpit. Finally the Fuselage and wing with the cockpit floor was ready to go together As with the fuselage assembly, this needed a bit of pressure to make it fit. And here the finished cockpit. I am glad I added the coolant pipes as they can be seen rather well. I will fit the gunsight with mounting bar later in the build when attaching all the other small parts. Cheers, Peter4 points
-
Hello again. Just two links: The last one must be same postion as the first storm video I have posted to you but from 2013. So again it's about 800 m up north where I live. Cheers4 points
-
Thank you gentleman for the comments! I hope you like the bird Finished the main decal job, now started with the stencils (also a large number) The "shark mouth" and the sideviews After decaling a final clear coat and a wash will go on. Oliver4 points
-
Hello chaps. Ok so as promised i've been back at the bench and been making headway on the engine deck and on the left side with the tool racks and gun cleaning rod case. I didn't go overboard with the etch here for 2 reasons. 1, some of the kit parts were suitable and i think sometimes etch can look too thin or underscale and 2, the etch sheet includes a lot of bits that weren't often seen on Panther G's apart from a few specific vehicles. This is where the book comes in handy for research and it's wealth of photographs. So here we have a top shot of the engine deck, problem free so far. I always use a small steel ball bearing when applying the mesh debris screens. Essentially glue them in place then roll the ball bearing around on them to press them into the detail underneath. I find it gives them the look of being walked on over time or of having had heavy stowage or even bricks land on them from urban fighting. Just my little thought process! You can also see the addition of the aerial base. In this next couple of shots you can see the gun cleaning rod case. This required some skill to produce with the etch as the kit part had to be assembled and then sanded back to a blank cylinder for the addition of the etch enhancements. The plastic detail on this part was quite thick so the etch really improved it i reckon. You can also see the left tool rack in situ with very little etch other than a plate for securing the tow cable. Note also the bracket to the rear forming the base of the spare track hanger and also the gun travel lock is now in place. The Bosch headlight is in place and i have drilled a small hole in the rear of the mudflap for the armoured cable to pass through. In reality the cable would pass through this hole then travel back to an armoured inlet on the underside of the left sponson. I haven't added the cable yet but when i do this will become much clearer. And so that's that for now. I had to stop last night as the heat at the bench with the lamp etc was unbearable thanks to the Carribean weather we're having at the mo! More to come tonight hopefully. Many thanks for your comments so far, and as always keep them coming. The beauty of the forums is that we can all share experiences and learn from one another. Cheers, Ben.4 points
-
The surgery went fine - as far as surgeries go, a hernia repair is pretty lightweight. The only problem I had was an allergic reaction to some prep fluid - the area around the incision turned a bright red. I thought it might be infected at first, but it was just some kind of dermatitis. They gave me a topical salve, and it's improving nicely. Cheers, Bill PS. Speaking of rashes, I'm itching to be painting that Spitfire!4 points
-
It's a bit more complicated than the Eye might suggest... Linc Taylor (ex-Harrier mate with a bit of carrier experience... [and stealth, as he was an F-117 exchange chap as well] was asked - not for the first time - about this and gave a fairly broad answer: “What we will do as we go forward into the next SDSR – we have reaffirmed our intent to buy the 138 in the last SDSR – we will look at air force mix,” Taylor told journalists at RIAT. “There is an absolute benefit to maximising combat air power with interoperability with [Eurofighter] Typhoons and the capability from the [Royal Navy's future aircraft] carrier. “We will look at all of those options as we go forward into the next SDSR.” (Source - Flight) He went on to add: “The F-35A offers you a greater range and greater payload. There may be space for an 'A' variant so we will look at 'A' and 'B's in the future, but not the 'C's,” ...The F-35 and Typhoon have complimentary qualities but the Typhoon is not low-observable, it can’t get to where the F-35 can get to." (source - Defense News) So all he's really said is an entirely sensible - 'we'll look at this because we want to keep our options open'; the key word in the last quote above, I would suggest is 'may' - there 'may be space'. The only clear thing he's ruled out is a buy of the C-model. The unit cost projections for the B model weren't pinned on a buy of 138 for the UK anyway, since no-one believed post SDSR 2010 that we'd ever actually have a Secretary of State for Defence who stood up and confirmed that yes, that's what we're planning to do (well, we didn't, since it was the PM who stood up and said it). The reason it makes sense to keep options open is because we're buying the 138 (or at least planning to) over a long period - the last new F-35 won't enter British service until the late 2020s at the earliest, and some projections have pushed this into the early 2030s. That, in turn, raises a number of questions. If the maximum number of F-35s which can ever be embarked is 72 (assumes both carriers at sea at the same time, and a surge of carrier-based air), and this will be the exception rather than the rule (the last public statement was that 12 aircraft would be the routine embarkation), then does every last one of the remaining 66 airframes need to be a STOVL model? Bear in mind that an awful lot more of the training for the F-35 is going to be done in simulators - this is already becoming more common, since squadrons heading off to Red Flag no longer ramp up the amount of live flying they do, but go into the sim to practice (including things which wandering Bears with ELINT gear might take an interest in). That's going to have implications in terms of the F-35's longevity in service because of reduced fatigue index issues; if the aircraft is in keeping with the level of attrition experienced by the most modern types of aircraft, then that'll mean that more of the force is available than would've been the case previously (I very much doubt that we'll be in a situation whereby the RAF and RN have a grand total of 138 airframes in service, though, since the last F-35 we get will enter service 10-15, or possibly even 20, years after the ones we're currently flying, and the chances of not losing a single one to accident, fatigue life running out or even on ops seem really rather slim). So if you have the chance to buy (say) 100 B-models, giving you more than enough capacity to put two 36-strong air wings aboard 2 QE carriers at the same time (which is not a top RN requirement at the moment, and is unlikely to be for a while) while maintaining the OCU, OEU and possibly one other squadron of B-models, and to buy 38 A-models as well, thus giving you the means of deploying a 16-strong squadron on ops alongside the USAF whether or not you deploy the carrier, then it make senses to at least keep that option open. Also bear in mind that when the last British F-35 is projected to enter service (and there's no guarantee that the production line won't stay open for longer than planned - see the F-16, F-15, F/A-18 [Legacy and Super], for instance ) we'll be looking to replace some of the Typhoon force at about the same time. Although you lose the ability to operate from the carrier if you buy the A-model, the difference between that and the B-model might justify a split buy if looking at the aircraft to be a predominantly Typhoon replacement. I'd imagine that having both QE and PoW at sea at the same time, and each with a full complement of F-35s aboard is quite unlikely - as opposed to (say) 40 F-35s between them, along with AEW Merlins, Jungly Merlins and some Chinooks and/or AH-64E, with one of the pair embarking the CHF plus other JHC elements and operating a much smaller number of F-35s . In truth, manpower issues within the RN may mean that getting both carriers to sea at the same time is the sort of thing which occurs once in a blue moon/Falklands-type-war. The question is whether it makes sense to have an all F-35B force by the time we get to the late 2020s, or whether it would be more sensible in terms of providing options, to go for the split buy which seemed a most unlikely possibility only 12 months ago. There have to be enough B models to ensure that the carrier capability isn't compromised, but whether splitting the buy (say) 60:40 between B:A models offers a better overall capability has at least to be considered.4 points
-
Thanks guys, you're all very kind supporting this, er, illness? Hobby? Madness? Who knows... A bit cooler today (25) so I've tackled the fuselage and the wings. The 'never to be moved again' gear doors (remember those) were stuck together with tape on the back and dry-fitted with a sticky stick: Untitled by Ced Bufton, on Flickr Nice fit, except the gaps, and there's no support at the back. So I cut some Plastruct (ooh, get me!), applied the glue and positioned it in the gap. Dropped it. Repeat x 4, but eventually: I was thinking I'd get my first use of Milliput but, as the gap wasn't that bad, used my trusty Humbrol filler instead, shaping it as it went off. I've also done some work on the wings. The wheels are 'designed' to go up and down so they're, how do you say, loose and the doors aren't flush enough: So I've put a tiny block under the inner support to hopefully straighten it out: Can you see it? Top of the picture in between the three pegs. I said it was tiny. Probably enough fiddling for today, but the runners are almost empty so I must have made some progress and be close to the end of the glueing.4 points
-
This feels as though it has taken about a month, but the transfers are all on! LOTS of stencils, but they really do busy the place up and start to make the thing look like a real aircraft. So, topside: Underside: Flaps, tank, buddy refuelling pod and a dummy Firestreak: ...and the Firestreak again, this time with its seeker head in place: I will now give it a couple of hours, then do a bit more MicroSol/Set action. Next will be a bit of work with a new scalpel blade and some Clear to get rid of the final silvering on the no step marks on the spine, before a sealing coat... ...and on to the weathering, before the flaps, undercarriage and load-out gets added and we find out whether all this resin has really given me the tail-sitter that I want! I have cut the piece of wood which will be the deck, and worked out how I am going to most of it. More soon Crisp4 points
-
A couple of days away visiting family gave the oils a chance to dry. A gloss coat of Tamiya clear orange followed: Clear orange glaze added by jongwinnett, on Flickr This worked ok, but the graining effect has been somewhat lost. I think it will do once the fuselage is closed up though.4 points
-
Many superlatives have been expended on Wingnut Wings kits but for me, a committed 1/72 modeller, this was a voyage into the unknown. I have started gently, with some tentative steps towards reproducing a varnished wood effect: Snipe beginnings by jongwinnett, on Flickr Snipe beginnings by jongwinnett, on Flickr Snipe beginnings by jongwinnett, on Flickr4 points
-
Thank you all! My model was awarded at the KYIV SCALE MODELS FEST 2016 https://www.flickr.com/photos/137315648@N04/sets/721576690450024064 points
-
Hi all! My new model. WIP: http://www.greenmats.club/topic/320-convair-b-58-hustler-148-monogram/3 points
-
Here as promised, here are the photos of the finished model ... very nice and mount (too) fast ( I made a few blunders that I just saw in editing the photos ... ) the weathering under the aircraft is to paint the oil worked with gasoline F and pigments ... otherwise it amounts alone! next !!!3 points
-
Hi Folks This is Trumpeters 1/48 scale F100F finished in the markings of Col F Gabreskia a well known WW11 ace. The markings from SuperScale depicting the time he was Squadron commander of the 354th TFW at Myrtle Beach South Carolina in 1959. No problems with building the kit which is straight from the box,the intake is a bit of an odd shape but the rest of the kit doesn't look too bad[to me anyway] Ian [ URL=http://s1158.photobucket.com/user/camper1231/media/IMG_9895_zpsuzn0djwu.jpg.html][/url]3 points
-
Woot! Quick post before I start the final, "fingers crossed", scribing session. The pit turned up today here's the box. I rushed it up to the cave and checked to see if it would fit the kit, looks like it will, well at least it's the same size as the old one, just needs some serious sawing and sanding. Here is what you get in the box. A lot of resin parts, some PE parts some nice wire for ejection handles and some acetate IP sheets. All in all is pretty sexy. here is a few Shots to show the difference between kit and Airies parts. The main tub, the difference is huge. Here is the main IP. Once again as the canopy shows so much of the internals this is really going to be worth it. Great isn't it. Now I saved the best till last, You have to see these seats. This is my first ever experience with resin but I'm beginning to wish everything was made of the stuff. Cool eh? Not going to think about what I have to do to get everything into the fuselage until Mr Scribe is done. Well time to bath the kids and then get started. Hope you like the pit, I do hope I chose the right one? It seems like it's a pretty good fit. Thanks for your interest. Happy modelling guys. Johnny.3 points
-
A 1/48th Strikemaster with all those foreign marks would be great! Another natural for Airfix, IMHO...3 points
-
CL-605 variant in progress Sources: https://www.facebook.com/BigPlanesKits/photos/a.1752633181681084.1073741836.1509837872627284/1752633195014416/?type=3&theater https://www.facebook.com/BigPlanesKits/photos/?tab=album&album_id=1752633181681084 V.P.3 points
-
I've been working on the cockpit. Here's the control column that AZ provide with their MkI. Here's the one they provide with the MkIb/ IIb/ Vb/ VI.3 points
-
And then I went outside and looked up at the moon. I wasn't the only one who said to herself "from now on we live in a world where men have walked on the moon."3 points
-
As anyone who cared to give it a moment's thought might have guessed, my recent absence was because got distracted by the new Brengun 1/72 Yak-1 kit. I don't feel guilty mentioning it because it is, after all, a Yak-1! In fact, here's what the assembled cockpit looks like: It's easily the most complicated cockpit I've ever attempted, and I hate doing cockpits! Just as an FYI, here's what the instructions for this part of the kit look like; note in step 2 how all that holds the seat pan in place is the two microscopic slivers of photoetched brass PE2 and PE3: Thanks to Hladik.lada on Modelforum.cz, here's an easier, simplified way of achieving the same results, unless you plan on leaving the canopy open. Note that he's included some extra p/e detail not included in the kit's photoetch, probably from the excellent Part set intended for the Amodel Yak-1: I'll certainly be following his example on the next one I build! Okay, now, I promise I'll get back to the ZTS Yak-1b in my next post! John3 points


This leaderboard is set to London/GMT+01:00