
Leaderboard


Popular Content
Showing content with the highest reputation on 03/07/16 in all areas
-
Hello everyone Just finished off my Italeri Stirling dio. Started in the middle of February, finally done and dusted today. I'd decided to put the Stirling in a diorama, with some work being done to resolve a 'sticky' starboard wheel that is portrayed semi-retracted. The interior has had a load of work done to it, and the Work in Progess can be found here: http://www.britmodeller.com/forums/index.php?/topic/234997690-italeri-172-stirling-i/ Firstly, a big thank you to 12jaguar, without whom this project could not have been possible - many thanks indeed John! Anyway, on with the photos. Firstly, some overall views: And some close-ups. Maintenance crew having a look: More technicians, studying some diagrams: The complex Stirling maintenance jack: Flat bed AEC Matador, converted from the Airfix gun tractor: Bedford MWC from the Airfix Bomber Resupply set, converted into an early version with canvas doors and fold down flyscreens: The base is my own done in Photoshop, printed out and mounted on a sheet of foam board, with the grass is RG5142 'Green Grass' from the Woodland Scenics range, with a light spray of brown to tone it down a bit. Figures are from MMS Models and the Revell RAF Personnel set. Ladders are laser-cut wooden ones from Ancorton Models. It's been an enjoyable and at times frustrating exercise, but I'm happy with the result. Cheers Simon35 points
-
Scratchbuilt Scottish ferry. Bob13 points
-
My 3rd catch up post. As I've lagged behind my building to posting. Wanted this model since it came out finally got it cheap from Hobbycraft a while ago and finished it just before a 2 month airbus course! Decided to go a little different with Simon's circus version. Those drop tanks are damn hard tho!13 points
-
Hi peeps Just a quick small build from me, I've not posted much at the moment due to building some magazine builds which the editor has asked me to limit images on here. So this is a personally build of the new Revell 1/72 F4U-4 Corsair which is a re-boxing of the F-4U-1A, purely just wanted to build something small and not spend to long on it. here are some shots The kit is straight forward to build, but in some areas I think it has been over engineered. But I enjoyed it.12 points
-
Just finished this one for the Great Patriot War GB, and build thread can be found here: http://www.britmodeller.com/forums/index.php?/topic/235002587-polikarpov-i-5/ This ICM 1/72 kit was built straight from the box, but did add a Quickboost control stick (from the I-153 set), along with brass rods for some details, and some light bombs cobbled from another kit. This early 1930's fighter was pressed back into service to replace losses suffered during the opening stages of Operation Barbarossa. While factories geared up to produce modern equipment, the I-5 would be employed mainly in the ground strike role. regards, Jack11 points
-
Good afternoon, the Rafale has been finished a few days ago, and today I took the pictures. It's one of the Rafales which did the first live shooting of a Scalp cruise missile in Libya, March 23 2011. The kit is from Hobby Boss, it's ok as a base, but some things need to be changed, as they are not 100% accurate. It's still not, as I left some minor things out like the shell shute for the gun. The cockpit has been upgraded with the Eduard set, and the decals are from the excellent Syhart sheet. Colour was mostly revell light grey, which I think looks nice. Nose gear with some brake wiring. In the intakes, I added some sheet to avoid eye contact with the gear bay. Nice detailing of the Eduard cockpit. Displays, mirrors, grips And lots of seat belts! The HUD may be a bit too steep. Burner can with nice rivet decals, and the added chaff launcher Live ordnance. 4 MICA, 2 Scalps and 2 Tanks. Not bad at all. I think the MICA will fire straight into the tank... are they dropped before launch? they are slightly bent outside, but on the kit it's a bit excessive. All in all, a nice kit which was fun to build. To have a realistic model, I highly suggest the Syhart decals, they are very good to work with, and you get plenty of other decals you could use on other models (like decals for 6 GBU-12, for instance) Alex11 points
-
Hi there chaps I am having a real hard time since I finished the scratch built front end of a B17G....for some reason I just cant motivate myself into doing another scratch build .....I've had this problem before but not this bad!...I hoping that by building a few kits it might fire me up again....and so....... Here is my attempt at the Tamiya 1:72 Mossie....not perfect I know but I had a good time building it!...I hope you all like it Cheers lads for looking in!11 points
-
I swore off 1:72 many years ago, but do still build the occasional one as a small (in all senses) diversion from 1:48 and 1:32 Here's my latest, a Lightning F2A of 19 Sqn, RAF Gutersloh, 1974, in characteristic Lightning pose, accelerating almost vertically. It's the Airfix kit, bought as an impulse buy, and built straight out of the box; the base is from my "materials for bases" box; the acrylic rods from eBay; and the aerial photo of Gutersloh was found via Google. A rather enjoyable build as a change, and if I do my WNW Snipe in the 19 Sqn markings from the Pheon sheet it will make an interesting contrast - 50 years of progress! I have no idea what the black mark is on the starboard fuselage below the roundel, but having spotted it for the first time after posting these, I've now removed it. Thankfully it was nothing permanent like paint sealed under the matt coat! Perhaps I'll do some proper "beauty shots" later. Thanks for looking, and please excuse the rough and ready "workbench" shots.10 points
-
Hi guys! Well as part of my bench clearing escapade that I've had going on, I have been trying to clear 5 projects off my bench. Starting with the Willys Jeep which some of you might have seen I've pressed ahead with this peculiar build leaving the Easy 8 Sherman and JSU-152 for another day. I say it's a peculiar build because it started in 2012 when I had never actually built any armour and decided to ease myself in with this kit (place heavy sarcasm here). Lets just say I built it, but was scared off by the running gear so left it on the shelf of doom for about a year until my dad (HL-10 on here) felt sorry for it and finished off the running gear, painted and weathered her then got bored of her half way through the track and left her on the shelf of doom for another 3 years. fast forward to a week ago when i peeled it off the shelf and finished the track, painted the co-ax barrels and did the cabling down the side. So basically its an unloved co-op build between me and my dad, which finished surprisingly well actually considering it took 4 years to complete... The exhaust is HL-10's work so credits to him because it is pretty fab Thanks guys! Sam9 points
-
So A levels were about as fun as I'd expected but now they've finished I've celebrated the start of the summer with this Tamiya Challenger 1 in Desert Storm scheme, built with the up-armoured skirts- it was a great kit that I have absolutely no complaints about, it also comes with a great commander figure that I have built and will at some point paint and place in the open hatch. Done mostly in Tamiya acrylics with Citadel washes for weathering. I tried to use the washes to build up a multi-shaded impression of sandy dirt on the hull. I believe the kit dates to the 80s originally, and is superbly detailed even regardless of the age- no complaints! Please bear in mind this is only my second ever armour build so please be gentle! Hope you like it. And with my first armour build, a Tamiya T72: -Flash9 points
-
Calling this down. 1/48 Tamiya P-47 Razorback flown by Lang and Punchy. When Punchy first arived to Bodney Lang shared his Tbold with Punchy till more Tbolts arived . Painted with Tamiy paints and weathered with Mig Dark Wash. Decals are from Superscale . Enjoy Cheers Brian9 points
-
Hi All, This is my first build for the Great Patriotic War Group Build, posting it in here as well for those of you who do not look in that section of the forum. This aircraft was one of 10 P-39's that were purchased thanks to fundraising efforts of Kristina Shumkova, a Collective Farmer from Krasnoyar City. This aircraft was flown by Lt. Col. Nikolai Sobolev of the 21st GIAP from April 1942. He is credited with 17 victories. This was a fun build, weapons and exhausts were drilled out to make them a little more realistic, otherwise all is straight out the box.8 points
-
Just finished my 1/144 scale model of Walrus L2247 that was on loan to the Australian cruiser HMAS Australia whilst on operations in the Med, as it's usual Walrus was under repair. Unfortunately this plane was shot down by Vichy French Hawk 75A-3 and lost with all crew. Here is a picture of it on board HMAS Australia prior to it's last flight. And pictures of the model:8 points
-
Eduard P39 in 1/48. This aircraft was one of 10 P-39's that were purchased thanks to fundraising efforts of Kristina Shumkova, a Collective Farmer from Krasnoyar City. This aircraft was flown by Lt. Col. Nikolai Sobolev of the 21st GIAP from April 1942. He is credited with 17 victories.7 points
-
Hi Everyone, I`m relieved to say that this one is finished, my attempt at Academy`s 1/48 scale F-4J kit Finished to represent an aircraft of: US Marines, VMFA 232, the `Red Devils`, based at Nam Phong RTAB, circa 1972 The aircraft itself is mostly what is in the box except for the rear view mirrors and some added seat belts but I added some different armament to fit the units mission and theatre of operation These being some Eduard Brassin` Zuni Rocket Pods and some Rockeye Cluster Bombs from the spares box . The decals came from Furball `USMC Rhinos` set 48-012 Hope you enjoy, thenks for looking Cheers Russ6 points
-
.6 points
-
Bandai 1/72 scale X-wing starfighter (Luke Skywalker's Red 5) commission. Finished in Tamiya and Vallejo acrylics; 502 Abteilung oils; and Tamiya weathering pastels. I didn't do a WIP log for this build because it's more or less the same as the one I did in October of last year. I tweaked a few of the colors and weathered the panels a little more but other than it's pretty much a repeat of that build, though I think it came out a little better than my last one. The best thing I changed was using a 3mm clear acrylic rod instead of the supplied flight stand to hold the model. I just wish it was a little easier to source those rods here in the States; to get one at a reasonable price I had to order it from Hong Kong.6 points
-
Hello all Some pics from my most recent completed build - Tamiya's Dornier 335 in 1/48. Another superbly engineered kit that goes together like a dream, and they even supply a shaped nose weight, which was a nice touch. This kit also comes with the little towing tractor, which also slots together beautifully. A joy to build from start to finish. Built out of the box other than a Montex canopy mask. Splinter camo was done in RLM81/82 Gunze / Mr Hobby acrylics, and Tamiya acrylics for the rest. I went for minimal weathering (just a panel line wash and some exhaust stains) as the Pfeil was a very late entrant to WWII and saw limited service before the end of hostilities. Thanks for looking. Adam6 points
-
Hasegawas famous LoveLiner Series had lots of classic airliners/liveries to choose from in the 80's and 90's. Sadly their offerings have been reduced to a mere few and many of the classics such as the DC-10s,TriStar's 747's are long sold out and are now sold at sometimes ridiculous prices. Luckily i managed to get hold of some of Hasegawa's early releases and the Japan Airlines DC-10-40 is one of them. Like all of Hasegawa's airliners,they consist of only a few parts and the fitting is very good as well as the accuracy.This one was built OOB,using only kits parts and decals. Hasegawa even included the original DC-10-40 Pratt & Whitney JT9D-59 engines chosen by Japan Airlines.A nice touch that is not always the case with other manufacturers.. The decals were still in good condition and went on without any problems. This is my last airliner post for the time being as I am forced to stop production due to our house renovation. Cheers,6 points
-
Hello all. As an antidote to building plenty of wingy and floaty things, I thought I would try something different. This was bought for me at Christmas by family members (they also got me the Airfix 1/32 Crusader tank). I am not good at armour (I did build the Tamiya BMW bike and sidecar combo, making it as a version with the Red Cross on, but added a machine gun -whoops!). I built it straight OOB, but found one or two issues with it. I probably got the two front seats in the wrong place, as the framework for the partition between driver and Monty would not fit in except at an angle of about 45 degrees, bashing Monty under the chin. I also could not find a place for the driver's side wing mirror - the instructions showed a location hole over the wheel arch but there was none, and the painting guide showed it was fitted to the side of the fuselage body shell near the windscreen. I drilled a hole in the arch as the shape of the wing mirror showed it went there. Some of the kit showed quite nice detail I thought, although it does show its age. I did not do anything to improving it, I just had fun. I tried to 'weather' the upholstery a touch, but I decided that the rest of the car would be in quite good nick considering the passenger, and the fact that the real thing is preserved. I really enjoyed masking the cockpit glazing, I wish hairyplanes were as easy to mask! I used a bit of filler over all four wheel arches where the body shell fitted. Anyway, enough waffle, here is the result: This was brush painted with Humbrol and Revell acrylics. The main body was Humbrol 30. I did not gloss it before adding the transfers, but they did not silver at all. I was pleased with the way the badge on the back went over some raised detail (even though it seemed odd in its positioning), but the yellow circle with 2 in it did not like settling down onto the double curvature of the front and needed slicing. I really enjoyed building this, even though the result is not up to the exceptional standards of all the other builds here on BM. Thanks for looking, Ray6 points
-
Airfix MkIa 54SQN Alan Deere July 1940, Xtracrylix Camo, with a Humbrol Mix for the Eau-de-nil underside http://www.britmodeller.com/forums/index.php?/topic/235003849-1finished-not-done-yet-with-spitfires/page-1 [iimg]http://i870.photobucket.com/albums/ab270/BigStu08/Spitfire%20STGB/0C224C18-E743-4E5B-8A48-579503E14A83_zpspx2hcbiz.jpg[/img]6 points
-
I think we're just about there on this one. I'm going to raid the stock room for some Infini rigging line to finish it off, but I'll do that after the MG15 arrives from Duncan. The inside of the glazings have some milky paw-prints which need cleaned up, and I will perhaps wash the underside in medium grey as the panel lines reflect some light which looks a little odd. I don't want to black them up, but equally I think they need something.6 points
-
3/7 update: More work on the turret and it's innards: Think I'll have one of the "Hob Goblins" from my cellar to celebrate a fantastic Austrian Grand Prix, I hope Lauda, Wolff and Rosberg's sprog Nico enjoyed that, seeing it wasn't quite the ending they had engineered6 points
-
RAF No. 91 Squadron, Hawkinge, August 1942, piloted by Lt. Jean Maridor. To make my waiting for Eduard’s Spitfire shorter I built this pointed-wing one. I used Tamiya Mk.V as a basis with Falcon Mk. VI canopy, Quickboost propeller, and Master cannons. I also bought the Italeri Mk.VI second hand kit (somebody used just the No. 310 Czechoslovak Squadron decals and sold it really cheap) so I could use the wingtips with some modification and the decals which were just great. Tamiya acrylic paints were used. Thank you for looking.6 points
-
Plasticart's interpretation,thats all I can call it, of the famous DC-8 was by far the worst kit I had/build so far from that manufacturer. Totally wrong noseshape,cabin windows much lower on one side of the fuselage than at the other,twisted parts...and so on,this one gave me more than once nightmares.It's on par qualitywise with Heller's DC-8 kit that I built some time ago. More than a year in the making,I finally got it finished. Most of the work went into the correction of the nose,to get it as accurate as possible.I reshaped the whole cockpit area,flattened and widened the "witch-nose",sanded it back as it was also too long and rescribed the air-intakes.. I rescribed also some panel-lines and flaps on the wings The rest of the look was created with decals. As the model looked very poor on its landing gear,I decided to make an inflight model,somehow like one of those from travel agencies. The display stand was obtained from a Revell 747 Panagra was a joint venture between Pan American World Airways and Grace Shipping company and was formed in 1929 and operated throughout South America until it merged with Braniff International in 1967. I found the livery quite appealing so I ordered this decal set from F-DCAL. It matched on the kit with only little adjustments. Hope you like it, Cheers6 points
-
I've been lacking in enthusiasm the past week. I'm not enjoying the day job a huge amount and it's taking a toll. Still, this afternoon I finished the stencils, and have just given it a coat of enamel matt clear and demasked the glazings. I've now got to do the fiddly bits including finding or making replacement aileron mass balances. I removed them all and can't find them now.6 points
-
Hi all, although I am not a mainstream aircraft modeller (I normally make military and civil vehicles), I just had to make a Beverley. The reason is that as a youth, I was a member of 2121 Abingdon squadron, Air Training Corps, and RAF Abingdon was the home of the Beverley, there being 2 squadrons based there (47 and 53). This meant that the cadets had access to flying in the Bev, and I have clocked up a fair few hours in them, as well as Hastings, Argosy, Chipmunk, Anson and Varsity. The Bev was my favourite, and the best flights were the low level cross country (LLXC) trips. The first was in XB285 in August 1962, (gosh, was it really that long ago!). Normally when you went in a Bev, if there was no more than 2 of you, they let you on the flight deck. We had to sit on an equipment locker opposite the navigators position (no seat belts there, wouldn't happen today would it). If there were a few of you we had to go into the boom which was normally equipped with rear facing seats. On this occasion the navigator said to me, to stay in the freight bay, and I could join him in the position in the nose. He said that we would be flying as low as 100 ft. The pilot laughed and said, "you may well be at 100 ft down there, but we will not be, you had better call us and tell us what it is like"! I do not know how low we were but it was a fantastic view and we were very LOW at times. We flew out over towards East Anglia and crossed the coast near Lowestoft, out over the North Sea then returned inland back to Abingdon. At one point we flew over some boys fishing in a large pond and they actually ducked! I guess 162 ft. of wingspan roaring over you very low is an impressive sight. The Bev was after all the largest aircraft in the RAF until the Belfast came along. In August 1963 we took the RAF cricket team to Jersey in XB291, it was the largest thing that had been into Jersey and half the island came out to see it. We went on annual camp to RAF Kinloss, and our CO managed to get a Bev which was going to Leuchars, diverted and pick us up to fly home. I asked one of my friends if he had been in a Bev and he said no. I said to him he was bound sure to be sick as the boom was always a bit bouncy. Sure enough, he was fine and I was very airsick! Its not often I am right and I was wrong again. According to my log book I flew in 267 on 27th August 1963, and we did 1 hour and 30 minutes of continuation training (circuits and bumps) at Brize Norton, but I do not remember that one much. Happy days The model. This is the Mikro-Mir kit, and this is the first short run kit I have made, as well as the first one to have an aluminium finish. The kit is not easy to make as some parts do not fit very well and there are very few locating tabs or pins. However the decal sheet is superb. There are a couple of errors in the instructions, one did catch me out and it was too late to correct it. This is that the diagram shows the roundel on the fuselage in the wrong position, it should be 2 "port holes" further back towards the rear. I had applied them and given them a coat of Humbrol clear by the time I noticed. The other is that XB267 at the time it was at Abingdon and had day glow paint on it, was coded B and not T as stated. There are no decals to show the Abingdon coat of arms which was on the nose of all aircraft based there. It also requires an lot of weight in the nose. I am not very happy with the silver finish, I tried 3 different paints and ended up with Humbrol metalcote polished aluminium.The Beverley always has a problem with oil consumption and oil leaks over the wings. They were always either dirty, or very dirty. They used to say it was easy navigating a Bev, you navigated out and followed the oil slick back. I think I may make another at a later date, (I still have the Welsh Model vac-form kit which I never got round to attempting, so if anyone wants one! ), maybe I have learned some lessons with this, and will make the camouflaged one next. By the way, the Commer bus is from Oxford die casts and is very nice, and well worth the few quid it costs. Sorry for all the waffle, thanks for looking. Laurence Cassidy5 points
-
Hi all, I've gotten back into modelling after a 40 year break and have started to build a collection of WW1 aircraft in 1:32 scale. I thought you might like to see my latest build. This is a Roland C.IIa (Li) ‘Walfisch’ Black III operating with Schusta 13 during early 1917, as flown by Vfw Hesse. • Manufacturer: Wingnut Wings. • Scale: 1/32 • Type: Roland C.IIa (Later version) • Paints/Weathering: Tamiya (by brush and Airbrushed), Flory clay washes and AK weathering washes. • Aftermarket: HGW seat belts, Gaspatch weapons, figures from Kellerkind and Model Design Centre, ground accessories from Historex and ground cover from Scenic grass mats. • Rigging: Gaspatch turnbuckles with micro nickel/silver tube from Albion Alloys. Rigging wires from monofilament (0.12 mm diameter). • Engine ignition leads: Created using fine lead wire. • Display case and plaque: Made by on-line specialists. My next build will be the Wingnut Wings 1:32 scale Sopwith Triplane.5 points
-
This was an on and off build that I worked on in between my many other projects. Due to the mentioned house-renovation I wanted to get it done before the shut-down. AZmodel's DC-9 is one of their short-run kits,and it shows in some parts.The plastic is quite soft and some of the parts are molded a little too close to the sprues. The fit is good and the kit is very nicely detailed and accurate. The decals are nice as well,the only thing is that they are too long by about two window frames.Same goes also with the Swissair option thats on the decal sheet as well. I opted for the JAT livery as I gave the Swissair decals to a friend.I have 2 other DC-9 kits that have Swissair decals and they will be build in Swissair livery. Some slight weathering was done on the wings,stabs and the rear by dry-brushing and using a pen. Somehow I managed to mess up the front gear,maybe I should have it installed before fitting in the gear-box into the fuselage... But the DC-9 is also nice to look at "inflight" On with the pics Cheers,5 points
-
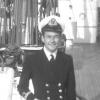
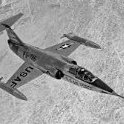
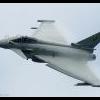
The Messerschmitt Stiftung is a collection of Messerschmitt-Planes in flying condition. The Planes home is in Manching AB, near Ingolstadt.5 points
-
Got some paint on at last, the photo only shows the top white that I sprayed on using Tamiya rattle can, micro meshed down and finished off with Tamiya gloss sprayed through my airbrush, I have since sprayed the light grey on the wings and the bottom part of the fuselage, as I have run out of space on Photobucket, I can't show you any photos, but I had some problems because when I had unmasked the Tamiya tape to protect the white it peeled some areas of the white away, this was due to me using Stynylrez primer as it probably reacted to the Halfords filler primer I had used previously and may be didn't allow it to cure properly, or it might of been because I thinned it, it also didn't allow me to sand it back and either peeled off or left a step. Although Stynylrez is a great primer I think I need to use it next time on a scrap model to really check its capabilities. Anyway I was able to sort the problems I had, and the next stage is get the hockey stick Sandstone and Turquoise painted, plus make up some cut templates for the BUA logos for the tail and along the fuselage5 points
-
GAZ AS-1 Airfield Starter kit: Unimodel 1/48 WIP thread here More photos here Extras - wheels by Hauler, some plasticard and rod (Evergreen)5 points
-
Part 2 of Islander schemes. Can't get more British! This is the Airfix Islander done as G - AXDH which was used by the Parachute Regiment Free Fall Team, better known as the Red Devils. Build is straightforward, the door was omitted as the aircraft had this removed. Decals were home made on decal paper. (The red didn't photograph as well as the APA White Islander for some reason?). With the Army Parachute Association Islander G - AYRU. I do have the Airfix magazine article for a conversion to a Trislander, plus and extra couple of kits. I may give it a go in the eye-watering Aurigny Airlines yellow. Best Rich5 points
-
Evening all, Well, now that I have finished my Sparkvark, time to crack on with my next project, a 36TFW F-15C. This is my fave all time jet plane; the highlight of Mildenhall airshow was finding where the Eagle was! I have assembled the following for this project.... Hasegawa F-15C Eduard photoetch, although I will probably just use the HUD frame Montex masks (really surprised to find that Eduard don't do masks for this kit, or at least if they do, Hannants don't stock them!) Aires resin exhausts Two Bobs Eifel Eagles sheet. Osprey Superbase Bitburg as reference I want to build an airframe from around the late 80s to fit in with my EF-111A, and with the A10 and F111F that I want to add to my 80s USAFE shelf. The plane I want to do is this one - 79-025, the 525th TFS CO's plane. Pics are taken from the Osprey book printed in 1989, and captioning the picture as having been taken in 1988. By luck, this is the self-same plane on the Bitburg decal sheet, and although the decal sheet references it as 1991, the markings clearly hadn't changed since they were applied in 1988. So; that'll do nicely! Tonight I shall be doing some priming, and having a look at the cockpit and easy to do bits like the pylons and tanks.4 points
-
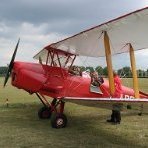
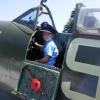
Due to work commitments, I am ashamed to say that this was my first air show of 2016! Here are a few of my favourite pictures from a wonderful day at the Shuttleworth Collection. Yes, some of the aircraft seemed further away than last year and there were fewer topside passes, but Old Warden remains one of the most wonderful air show venues in the UK! Thanks for looking.4 points
-
A spectacular and beautiful model, but a faint resemblance to the original color. Colors have little in common with the original camouflage scheme so as far from true .... for materiel will not describe the errors, I can only say that here, these pylons on the Su-33 are not used. Brake shield in red, and its niche zinc chromate ... and much more. Overall a very high level of skill on the application of various painting techniques, but unfortunately all this has little to do with the selected prototype. Apparently they paid little attention to the search for materials and information on the aircraft. http://scalemodels.ru/modules/photo/viewcat_cid_104.html http://scalemodels.ru/articles/6685-pokhod-po-zapoljarju-2-chast-pervaja-severomorsk-3.html4 points
-
Alley Cat is to release a 1/144th Hawker-Siddeley HS.125 Dominie resin kit Source: https://www.facebook.com/AlleyCatModels/photos/a.332251853642016.1073741828.330656630468205/522415751292291/?type=3&theater V.P.4 points
-
All I’ll say about our elections is don’t blame me and the Pirate party didn’t get up!! Anyway…. a small update but important for this project, I’ve sorted out the canopy issue! It’s not 100% perfect but at least it gets it back to a stage where it start to look right…..or better than it was. The brass lower frame parts had to me removed, there was no other choice and really that detail cannot be seen in the end. The remaining brass insides of the frame then needed to be ground back level to the bottom of the canopy, not an easy task and a bit scary! As can be seen there is a tint gap between the canopy and the internal frame, as this cannot be seen some careful should sort that out. That weird looking brush at the top is my Fibreglass brush, best abrasive tool you can have for clean-up work. So it now sits better and I don’t have the really flat outside edge or bit protruding below. To get a sharper edge to the canopy I’d have had to sand it down even further but the canopy then becomes a bit too shallow, so for now I’ll leave well enough alone! The actual canopy is supported in three places, at the rear buy the opening/closing drive assembly and at the front by two rollers. Just before the canopy reaches the end of its travel the channels for the front guides raise up. This allows it to clear the ejection seat, hence why it appears to sit up so much. I just need to set that position up and she’s done. Now I just need to chase off all the Dust & Brass bunnies and it should look much better. Really close up photo’s just show up all the tiny flaws, it’s actually not that bad looking at all…..much better than the original plastic one! Edit.. I just found a good photo of the real canopy to show how it should look. So I got it pretty close!4 points
-
Thanks, Beard. It looks like I'll be safe using the standard Sutton harness. Although you should be carrying your Spitfire books with you wherever you go. Today I spent some time cleaning up the wings. AZ give you separate wheel wells that attach to the bottom wing as shown here: I like what they're trying to do here, but it leaves a rather nasty seam on the walls of the wells. Here's another look at it from the other side: I guess I'll have to fill this seam, so that the walls of the wheel opening are smooth. Kind of a pain, but I think it will be worth it. I've also done some more work on the cockpit, finishing the seat and its back cushion. This has been glued into the seat support, and I've added a bunch of gubbins to the cockpit sidewalls. I decided to use the Yahu instrument panel instead of Eduard's, as it matches the contour of the bulkhead better. I have the 72069 Quickboost British Gunsight (labelled Mk. XX) - is that OK for the XIV? I selected a vacuform canopy from the Falcon set, and it's not the one for the XIV. I wanted an open canopy, and the one that matches the AZ plastic best is the canopy designed for the Hasegawa XIII/IX. It's No. 11 in the set. Next up is to add the harnesses to the seat and then put everything together so that the fuselage halves can be joined. I'll have some more photos soon. Cheers, Bill4 points
-
OK... Not everyone's cup of tea, and not many are into scratchbuilding - but here it is. All done. It was great fun, lots of research and experimenting with 3D printing and stuff I've never done before. I know I lost a few interested parties along the way but if nothing else, it taught me that our hobby IS changing and the 'Luddites' who can't get on with it will eventually lose out. Sad? - maybe, but it's the times we are in. Hope you like my beastie - on to the next one! Roy.3 points
-
Hopefully next will be a 1/72 Starlifter3 points
-
Thanks Stew and Phil, I'll try and pick up some inexpensive magnifying glasses. I probably should have done so before attempting this: I chopped up the resin elevator to match the damage in the picture. And began to cut out plasticard ribs. The mechanical pencil eraser is not there for scale, I just have messy bench. Ribs attached, and trim tabs properly askew. I then added some stretched sprue to represent the various internal braces and what I think are the trim tab cable housings. It's a bit of a mess in there, but it's supposed to be! Now, to figure how to go about the fabric.3 points
-
Hello My latest work ready to be inspected. Thanks3 points
-
BTW - it is for MiG-31BM/BSM, for all other MiG-31s decal now in design Corrected - now Begemot have two different decals for MiG-31 1\48 scales : 48-040 MiG-31BM(BSM) "The Upgraded Foxhounds" http://www.begemotdecals.ru/showpos.php?lang=2&id=143 48-044 MiG-31 "The Standard Foxhounds" http://www.begemotdecals.ru/showpos.php?lang=2&id=1483 points
-
Left side tracks completed and Upper hull glued to lower. It is now ready for weathering. Tanks for looking Phil3 points
-
Polikarpov I-5 summer, 1941 kit: ICM 1/72 extras: - Quickboost control stick (from I-153 set) - various size brass rods for scratch build details - KV Decals for insignia - bombs cobbled from another ICM kit Wip thread here more photos here regards, Jack3 points
-
Hi modellers! Time to update this topic. The 109 has received his camouflage and the decals... Of course I had some surprises and issues.... unwanted chipping, fingerprints, problem with the gloss clear.... but after all I love the result, even if I'm still far from the end! Pics !!! (comments are welcomed) I show you only few pictures because I would like to conserve the final surprise effect !!! A good Week end to all and happy modeling. Cheers.3 points
-
Weapins going on....apologise ref the colours etc, in the garage under fluorescent lights: Some touching up needed up around wheel wells. Just some Aes, Pave Penny, Twin Winders to go on....son be done!3 points
-
Released 1/48th - ref.2764 - Cessna 172 Skyhawk - Landing on Red Square (1987) Source: http://www.italeri.com/scheda.asp?idProdotto=2562 Mathias Rust bird: https://en.wikipedia.org/wiki/Mathias_Rust V.P.3 points
-
British topsail schooner Mary Sinclair. Bob3 points


.thumb.jpg.d17ff607fc7e89ed057e63fcb6f2a888.jpg)


.thumb.jpg.ba34a9f6ddce411193946dbdcc7b5fe8.jpg)


This leaderboard is set to London/GMT+01:00