Leaderboard
Popular Content
Showing content with the highest reputation on 17/06/16 in all areas
-
Another fairly recent but protracted build, started to try to unblock myself after a disaster with an Airfix Shackleton. I'm a bugger for tinkering and it ended up being a bit of a time vampire and left on the shelf for long periods. As a kit it's a bit dated and I wanted to sort out the panel lines and add a few rivets as the original was covered in them. The kit I have dates back to the early 80s and the decals were pretty much shot, I ended up glueing them down with pva. I also ended up losing the optical sight thing in the front door so scratch built a new one from some tube. All said I'm fairly happy with it; the weathering and snagging was probably the most fun phase over the course of a weekend in company with a Peaky Blinders box set. I've got a transport version somewhere as well but I'll need to recharge before getting back into that amount of upgrading. Cheers Liam18 points
-
There can't be that many people of my age who haven't build the Airfix Whirlwind HAR.1 in its Antarctic markings at one stage or another- I think I have done about three over the years, but in truth it really isn't a very good kit! So; this is the much nicer Italeri S-55 kit, modified to represent an early Westland based machine and using a set of cobbled together markings to make it look a bit like the old Airfix kit. Although the base kit is very well engineered and easy to build, the conversion is a lot more difficult than I had expected, from removing the spare frames on the windscreen, through to flattening out the cabin underside, removing bumps from the tail pylon and fuselage, then adding lots of non-US lumps and bumps instead. And of course, I've done another blade fold - this one was a lot easier than either the Wessex or the Dragonfly. Here she is with the old Airfix kit in its most recent guise: Here she is with a more recent Antarctic flyer: [picture lost to Photobucket] And here are all of this year's 'earlycopters (so far) together. more to come. FredT15 points
-
Hi everyone this is my latest finished model, I'm quite happy with it so I though I would show it off! Any suggestions for improvement welcome! Sorry about quality of the images only have my phone to take the images with! Thanks for looking Joss13 points
-
1/72 SG-28 gliders from KP. They come two-in-a-box, and there are several boxings with different markings and options, though all of the spurs are the same. Really simple kits – the Polish version with the gondola only had 11 parts. (I admit the camo on the Polish version is somewhat spurious, the KP instructions were quite vague and I couldn't find any other references.) Rigged with Uschi van der Rosten fine thread, turnbuckles are from Bob's Buckles. SaveSave13 points
-
i bought this as a started kit...the previous modeler had done some nice work so i chose preserve as much of his work as i could. he had plannes to fit a CMK engine set,but i couldnt get it in the cowling,lucky for me he had a tamiya engine in the box and i adapted that,the canopy is an after market clear resin one,and as far as i can tell the rest of the kit is pretty much out of box. i touched up the paint where it needed to be,and then played around with weathering. i'd like to think i did him proud.9 points
-
Revell 1/35 T-34/76 originally an ICM mold,excellent fit of parts in general and some superb surface detailing.9 points
-
Hi again, With my last German test of the school year behind, I managed to return to this build. First I took the following part off the sprue. This part is installed under the large port-hole on the aircraft's spine and has moulded detail which is to be replaced by a PE part. So, it had to be filed away, as shown in the second picture: The following pictures show the plastic and PE parts side by side and, finally, the PE installed: Then, I decided to build as many sub-assemblies as possible before starting to paint. Starting with the wing tips, these are made up of two parts each: The ailerons and tail fin are also made up of two parts each. The parts for these sub-assemblies were glued together and held by pegs while the glue cured overnight: Here's the result: The plastic that oozed off the joins still has to be cleaned. I did this on purpose, to serve as filler for the joins and minimise the need for putty. Next, I had to drill holes on the underside parts of the wings for the bomb holders and dive breaks: The result is shown in the following picture. There are four 0.9 mm holes inboard of the landing gear area, for the bomb holders, and two 0.7 mm holes outboard of the landing gear, along the leading edge, for the dive breaks: The wing parts were, then, glued together: Resulting in this: The flaps are also made up of two parts each: The flaps were glued together (pegs were also used while the glue cured), resulting in this: Here are the two parts that make up one of the horizontal stabilisers: After glueing the parts (once again, pegs were involved), here's the result: Finally, I took the parts that make up the landing gear wells off the sprues. Here they are after cleaning the remains of sprue gates: I still have to treat several ejector marks on the insides, as they are visible through the well openings: There a few other sub-assemblies that can be built (e.g.: bomb holders, main wheels, bombs) and parts that can be taken off the sprues (e.g.: main gear legs, wheel well doors) before painting. There are also a lot of PE bits to apply to these parts before painting can be done (e.g.: surface panels PE, interior detail for the wheel wells and canopies). So, I'll be progressing with all that in the next few days. I'd also like to start my Harrier GR.3 during the week-end, as the NATO vs Warsaw Pact GB is less than two months from its end. Thanks for looking. Jaime9 points
-
9 points
-
Evening all... well I've completed it finally after what feels like months! Here is a Revell F-4F (Phantom Pharewell) built as an F-4E USAF of the 307th TFS operating out of Udorn, Thailand during the Vietnam war. Following some great advice from here and some research I've ended up with a half accurate bird and I'm quite happy with the result. I used two sets of decals from Print Scale which had their good and bad points. The technical stencils went on like a dream with only the occasional silvering but the flight group and custom markings were very twitchy. I almost lost one of the shark mouths when fixing and had to call upon the wife and her patience to recover the ZF marking which had folded up on itself! I customised the cockpit as the detail was non-existent OOB and purchased brass pitot and ram tubes. The Revell canopy's suck and I cannot locate a replacement so they'll have to do. Thanks to PhantomBigStu for the correct central tank replacing the Revell supplied F-15 style one. I may return to this at a later date to add some chipping but I'm quite happy with the result at the moment. Hope you enjoy and comments as usual are welcome8 points
-
Airfix kit with resin seat and Isradecal decals for a Target Tug aircraft. HATAKA paints, Flory wash. Chris8 points
-
Hi, usually I do not touch "Snap Fit" kits, since I had some rather disappointing experiences (with tanks) before. Now the new Zvezda model of the Yak-3 is a totally different league. Apart from the fact that you actually can assemble the whole model without a drop of glue, it also provides sufficient detail and good measurement - and there's even aftermarket accessories available from the likes of Eduard, Rob Taurus and CMK. I confess I did use glue on some parts, like the landing gear and some small pieces, just to make sure they don't go astray. The model was painted with Gunze/Mr.Hobby acrylics, the decals are from the box. I had some reservations about their quality, as there was a yellow-ish tone on the carrier film. All of this disappeared when I put the markings on, so no worries here. There seem to be different interpretations of this particular scheme, some sources recommend a red spinner with white tail lines, while Zvezda suggest grey spinner and yellow stripes. I went with their instructions. It represents the plane of Lt. S. I. Rogovoy, of 64th GIAP / 4th GIAD, on the 2nd Baltic Front, autumn 1944. The pitot tube was replaced by a piece of wire. Thanks for your interest. Best wishes from Vienna, Roman7 points
-
Hi everyone, I finished this one for the April issue of Airfix Model World magazine. It's the 1/48th limited edition Hasegawa J35 'Draken Demonstrator' boxing with a few added goodies and home made improvements. Firstly I cut out the wing flying surfaces and drooped them as seen on parked Drakens when powered down and drilled out the lightening holes, I also scratch-built the RAT unit and box details and used the Eduard J35F/J cockpit set plus the superb Aires resin seat to spruce up the cockpit and used Master metal pitots to replace the over-thick kit parts. The Afterburner unit was replaced from a PE Lightning Avon set as the kit parts were a little too basic for my taste. I also added the excellent Maestro ladder and some home made wheel chocks.... The editor wanted a clean build for this one so the weathering was kept to a minimum to help emphasis the clean lines of this wonderful machine. Ironically F-10 Wing's '66 demonstrator' was actually a heavily faded machine only weeks away from retirement when the red painted fin was added for a brief series of airshows Though the aircraft was subsequently scrapped the red fin was salvaged for a local museum. Painted using Gunze acrylics I used Olive Drab (H-52), Navy Blue (H-54) and neutral Grey (H-53) for the main camo colours with major panels lightened slightly to add a little tonal variation. The kit's decals were used throughout. The undercarriage and external fuel tanks were painted using a variety of Alclad metallics and oil washes and the airframe given some MIG Ammo pastel powders and AK Interactive washes. As a finishing touch Little Cars lenses were used for the taxi/landing lights. A great little kit and fun to build, really fancy a heavily weathered Danish two seater at some point. Hope you like it.... Cheers all Melchie...7 points
-
Built this for the 80s GB that's been going on for a while now. The kit was relatively easy to put together except for the applique armour panels on the turret as they had no guides to assist in placement. It was painted with Gunze acrylics and weathered with oils, enamels and pigments. Hope you enjoy the photos. Mark7 points
-
This build started out as a 1991 414 bird, however, a disaster with the rub-on transfers negated that and forced me to alter the paint job and go back to the stash of T-33 decals. Right after the paint got altered, I realized that the '99 version of the T-bird had the AN/DPT-1 emitter in the nose, so one was fashioned from Contrail tubing and putty. Leading Edge decals were used and a luggage pod was cobbled together from plastic sheet and sanded to shape. Other after-market are True Details seats, Microscale cockpit decals, and a RES-IM nose wheel. Canadian modifications were the engine vent on the aft section, scoops and vents on the nose doors and changing the main wheel hubs to a later style with a drill and pin-vise. Paint is Humbrol Black and Testors AL with a Humbrol 27003 MetalCote at the transition. Cheers, Tony7 points
-
Here is my completed su-22 painted with Tamiya acrylics and I tried to weather it as best as possible to represent Russia's old and rugged fleet of aircraft. Hope you enjoy..6 points
-
Thanks Tony and Alex, sounds like I got away easy! iPhone all done now and some patience back in the tank so I decided I could tackle the engines and cowlings. Taking care to remove the paint and flash from the joins (the parts were springy without it) and carefully positioning the two assemblies on the instructions so I didn't mix them up, I stuck them together: Untitled by Ced Bufton, on Flickr I was very aware of Stew's warnings about getting the cowling parts on the right way and dry fitting the dreaded B28 'T piece'. I decided the best way to start was to line up one coming side with the slot in the front part: When you position the second part you can see why this is 'a challenge' - the parts naturally fall apart. Rats. Also, B28 doesn't fit in the gap anyway (Sorry, this is the best shot I could get: So, as Stew suggested, I dry fitted and sanded it until the fit was OK. With both cowlings assembled (though not dry) I offered them up to the engines. Nothing doing. I carefully eased the cowling over the engine. Still nothing. So I PUSHED the cowling over the engine, trying to ignore the screeching noises. Seems to fit with a gap at the back. Hmmm. How big should the gap be? No idea. Does B28 help? Oh dear, it doesn't seem to fit between the exhausts. Better gently pull it off then. Half the engine came with it. Double rats. It's comforting to know that Stew had similar problems and I'll re-read that bit later (again). Patience tank empty now so I'll come back to that later. When all the glue will be dry. What could possibly go wrong?6 points
-
Thanks Ced, Alex, Jaime, I got the mottling done in one fell swoop; it's a bit untidy here and there and there were a couple of splats and runs, but I think it is probably as good as I am going to get it. The mottling on the real aircraft I will be representing was smaller, tighter and tidier but I have had to settle for a 'representative mottle' as I lack the skill and patience to replicate the original: I hope that as has proved the be the case before the transfers will draw the eye away from the mottling in any case However I'm on holiday next week and will be having a few days in Aberdeen from tomorrow morning Cheers, Stew6 points
-
Sorry I have trouble trying to post multiple pics from photo bucket, so bare with me here..lol6 points
-
Cheers, after 2 months of work i call this one finished! - Eduard Kit Lim. Edition Danger Zone, 1/48 scale - Eduard F-14 weapon set - Eduard RBF tags - Quickboos intake covers - Revell spraycans and RAL spraycans - Oilwash and weathering with Tamiya pigments made as VS-84 Jolly Rogers5 points
-
Hello all, I have just completed my second Airbus (my first A319, last one I did was an A320). The kit is Revells 1/144 A319, and the US Airways Star Alliance decals are by Draw Decal. I found the kit to be ok, I did end up putting the front wheel gear arm on afterwards, I noticed you are supposed to put it on first when you put the fuselage together, and I could see that being a pain, and with a bit of trimming I managed to fit it in. Most fiddly bit was those darn aerials! I hope you like it, and and constructive criticism is welcome James.5 points
-
Thanks Duncan, Alex and Keith. Another thing to look out for is that the instructions are, I think, asking for trouble. See this: Confusing - left or right? by Ced Bufton, on Flickr If you look carefully you'll see that the diagram on the left is for the port engine and the one on the right for the starboard. But they're shown from the front so are 'the other way around'. I bet they had a long meeting about that at Airfix. Anyway, things don't fit well here and I don't think it's the CAD design. I double checked the part that the exhausts are on and that was fitted properly (couldn't not be) but there's still a problem with the dreaded B28 fitting between the exhausts: Not quite by Ced Bufton, on Flickr In the end I trimmed some off B28 around the exhausts but there;s still lots of gappy bits. I achieved the best fit that I could: Ho hum. A bit of filler here and there...5 points
-
What was originally supposed a test build as a means to getting to grips with my airbrush post a long break, ended up becoming a small pressie for my Old Man on Sunday. Noticed that he'd somehow dropped and broken his 1/72 Corgi Spitfire so figured I'd give him this as a replacement. Few mistakes here and there with decals and so forth, but nothing he'd notice. Hope he likes it. Maybe now I can get back to work on my 1/24 Spit.5 points
-
Лавочкин Ла-5 (Lavochkin La-5) Eduard (Zvezda) 1/48 88th GIAP (Guards Fighter Air Regiment) This aircraft was captured by German forces in September 1943. Build thread.5 points
-
Well it seems like ages since I’ve updated this or even done any work on them! Well I have managed to get quite a lot done in the past two days and am ever edging closer to finishing the first one. So first up the beast was given a clear gloss coat to help protect the finish (not that it helps too much) as it’s quite fragile. Then the decals, the OZE ones are quite thick but unfortunately they are all I have, that said they go on quite nicely and are very tough. All the smaller incidental markings are from a MiG-21 decal set, as the OZE ones are really bad. Then the first of the panel line washes, in total there have been three so far. She doesn’t look too bad, the gloss clear coat helped even up the finish quite nicely and the washes help break the flatness of the finish. The wheel wells and air brakes were masked off and painted. As soon as I’ve done the wheel wells and air brakes everything will be given a coat of flat clear. The undercarriage and wheels are pretty much done, just some final detailing to be finished. The weapons and RATO pods are pretty much done as well, the RN-28 Tactical Nuc. For the Soviet one is nearly complete as well….looks so harmless! I’ve started working on the canopy, being VacForm it needed a little bit of work so as they fit correctly. There are about 20 odd bits to go on both pieces which will not be fun, but should look awesome once done. So this is how she looks at the moment, still very shiny, once the dull coat is on I can then play around with the finish a bit more plus all the engine a hydraulic leaks etc will help achieve the look I’m after. The Tac Nuc is just for show, this the Czech version will have the 240mm rockets, these two photos show the two different configs I’ll have, the Soviet one with just the two drop tanks and the RN-28. I’m hoping to have the second one ready for painting before I head back to work on Tuesday, and time permitting I may even get to do some work on the Dora as well!5 points
-
Tadaaa! Heartbreaking to read of Jo Cox's murder, by the way. My deepest sympathies go out to you all.5 points
-
Track pins for the spare links on the casemate. 0.5 hole punched out of plastic card and then using a 1.0 punch I punched another hole, does that make sense Probably not ! Really hard to get the 0.5 hole centred so most of the track pin heads are not central. I have tried a few dozen times but I just cant get them bang on ... But close enough for government work in my book Cheers Dan5 points
-
5 points
-
Hi. Yeah i know, another Bandai. Build number 6 so far, i think. Nearly caught up! Finished about a month ago. Yet it again its to grey in the most part. Need to leave things lighter to take the weathering into account! Will i build another Y? Hmmm … the pipe work was a job and a half. Probably get a plumber in to do that next time. Managed to find a white background for me photos. Still missing a fill light though. Thanks for looking. Cheers4 points
-
So, I finally decided to try airbrushing for the first time, and this is my first attempt. I'm using an Iwata Studio Series compressor with a Harder & Steenbeck Ultra airbrush and Vallejo airbrush paints. As a newbie, I was rather dubious about airbrushing,.... but now after a few weeks later,... and I'm hooked. Pre-shading, blending and using blue-tac worms makes the models looks far more professional, even at my amateur level of skill. So all and all,... glad I made the jump. So here is a little diorama featuring Airfix's Battle of Britain - Ready for Battle Gift Set 1:48 The hurricane was a joy to build. I decided to go with a darker Battle of Britain themed camouflage on this. By the time I had oil washed and dusted the entire aircraft, the tones had gone quite dark. But that was intentional as I love the dirty look of the old warbirds, rather than the shiny aircraft you see at airshow's today. The Bedford wagon and most of the spare ground crew I have plans to use on other models, so I didn't use them on this. I think it would have been slightly too overcrowded anyway with all the additional parts. The only modification I did was to use real rubber pipe carefully threaded with stiff wire so I could make the hose sag realistically off the fuel truck and onto the aircraft wing. This worked so well I used the same technique to replace all the hose on the diorama,... included that on the fuel trucks unused refueling arms. The diorama base is scratch built using foramx and plaster and few items in my spares bin. The groundwork is model railway ballast glued with watered down PVA and MIG Realistic ground mat, heavily weathered with MIG pigments. Hope you like. All comments, gratefully received. Ed.4 points
-
One of my favourite aircraft and colour schemes. I was looking forward to the Kinetic release and experienced the same issues that other builders on here encountered, so I shan't repeat them here, but I'm fairly happy with the end result. It's a fairly clean build, and OOB except for a Tamiya tape harness. The base came from Coastal Kits ebay outlet. I think it needs some figures to liven it up, but although the deck tractor was included with the kit, the figures were not. Oh well, that's something to think about for the future. All references came from the interweb, many of the photos being monochrome, so any mistakes are my own. It made me happy anyway. Cheers, Paul4 points
-
Hello, The project I'm working on. The challenge is to achieve an interesting white finish. Here, an option. Captions are not important, everything is in the pics. But if you need to get a point, let me know. My pleasure. Thank's for loooking at ! Anis.4 points
-
Hi folks,just completed for the excellent Great Patriotic War GB,Revell's re-boxing of ICM's kit,no real issues with the kit and you end up with a fair chunk of kit for your money,only the track's may disappoint here's the WIP. http://www.britmodeller.com/forums/index.php?/topic/235002680-revell-135-soviet-t-34761943-tank/4 points
-
Thanks very much gents, I was a bit uncertain of it but I do feel better about it now that I had some time away from it; I'm back from work now and it does look a bit better than I remembered... Jaime, yes, I airbrushed with my rather ancient but trusty Badger 150 with a fine nozzle and needle. The problem with schemes like this is not so much the mottling itself but keeping it more or less consistent in size and density over quite a large area during a fairly prolonged painting session - I'm used to the 150 and know reasonably well how it will perform. However, if I am ever asked I always advise other people to fix stuff on their models that they are not happy with, on the grounds that they will regret it later if they don't because the bit they don't like is the only bit they will ever see on the model for ever afterwards, and with that in mind I did re-spray the couple of blotches on the port wing that had gone awry... Yes. Better. Hope you all have a good weekend gents, I need to turn in for an early start tomorrow... Cheers, Stew4 points
-
Here's my take on the Takom Leopard 1A5. Painted with Gunze acrylics and weathered with oils, enamels and pigments. Mark4 points
-
Hi guys More masking and painting this morning went a lot smoother. 3M 371 pinstripe tape to mask the curves with Tamiya tape to fill behind to cover for over spray. IMAG1139 by Mark Inman, on Flickr Titanium was used on the very tips of the wings top and bottom. Also on the underside of the elevons. Matte Aluminium forward of the diagonal line from the cockpit. Dark Aluminium on the front tip of the fuel tank. Steel on the front of the engine cowlings. IMAG1140 by Mark Inman, on Flickr IMAG1142 by Mark Inman, on Flickr IMAG1143 by Mark Inman, on Flickr IMAG1144 by Mark Inman, on Flickr IMAG1145 by Mark Inman, on Flickr The engine exhaust nozzles although basic will suffice. These were given a coat of Jet Exhaust. IMAG1147 by Mark Inman, on Flickr Until next time.4 points
-
Hehe, you might not go for this then (click for bigger) I think it looks cool though Needs weathering still, and I drilled a couple of holes for cables but haven't fitted them yet. Will4 points
-
Hello, and thanks for your interest in this topic. Here's my rendition of AZ Model's latest release of the 109 Series - this is the G-14AS. As far as I am aware this type has never been available as an injection molded kit before. I added Brengun phot-etch for various details, such as antennas, flaps and interior pieces. The pitot tube is from Master Models. The model was painted with Gunze/Mr.Hobby acrylics. This patricular aircraft is well documented. There are a number of period photographs. Some of the technical details visible are: - missing cover of the tail wheel well - T3 rudder without trim tabs (these were removed from the plastic) The aircraft patricipated in "Operation Bodenplatte" in January 1945. Piloted by Uffz. Herbert Maxis, White 13 was shot down by an American AA battery. Herbert Maxis' tragic faith is documented here: http://www.findagrave.com/cgi-bin/fg.cgi?page=gr&GRid=97812831 "White 13" was buried in a trench and re-discovered in 1987. The remaining parts of the airframe were restored with parts from other German aircraft and is currently on display in the AVIATICUM Museum in Wiener Neustadt, Lower Austria. Creating the characteristic "sawtooth pattern" on the leading edges of the wings is quite a challenge, in this scale. The rudder has some light colored blotches over the RLM75/83 camoflage. To replicate this, I painted the entire rudder RLM76 (Light Blue) first. Then, small pieces of Blu Tac were applied to cover those places to remain in light color. Then, the other colors were sprayed over. The fuselage has a different tone of RLM76. This seems to be the greenish variant, sometimes referred to as "RLM84". This color was mixed using RLM02 (Grey/Green) and pure White. The undersides are natural metal, I used Alclad paints here. Note the black Balkenkreuze without outlines. All photographs: Wolfgang Rabel, IGM Cars & Bikes Vienna. Thanks for lookin'! Have a good day! Roman4 points
-
Good to hear the phone is repaired Ced I feel I must share the story of the very iPhone I'm typing on now. A year ago, I was stuck in bed, a little ill. I use my phone a lot. I had been eating a bowl of salad. It had a lot of salad dressing on it, oily vinegary lovely salad dressing. At night I would always put the phone down at the side of the bed. I did. In the morning I woke to find this iPhone in the bowl of salad, drenched in oily salad dressing. How I laughed! Since then People have marvelled at the wonderful 3D mountains and clouds I have as my wallpaper, until they realise it's the screen :shocked: ! It sends me completely bozz eyed, but I'm happy! Best regards Tony4 points
-
This might look pretty much the same as the past day or two, but it actually represents a lot of work; been round the whole airframe looking for blemishes, sanding away little bubbles or bits of fluff, and then misted another coat of EDSG over the top - final inspection tomorrow, and if it's OK then I will remove all the masking - closer all the time to a clear coat and some decals. Speaking of which, note the single yellow Firestreak, which will sit on the starboard inner pylon. This has just received its clear coat, ready for decals tomorrow to represent the intricate slots around the nose which were some part of the seeker head. For those of you who have forgotten, the load-out will be a Mk 20 "buddy" refuelling pod starboard outer, the Firestreak starboard inner, and a normal wing tank port outer. The reference photos I have show this as a pretty standard load when flying from the deck.4 points
-
Thanks everyone - I went into the Apple store to check if they could fix the screen (you can't 'phone them to find this out, go figure) and apparently they always have 'walk ins' so I now have a fixed screen and a wallet £99 lighter - that'll teach me. At least now I can have a calm down and get some more modelling done... Mine too Keith. My lectures on 'looking after expensive things' have come back to bit me! Yep. My only defence for them is f you measure the power and capability of the iPhone (or whatever) against what I used to pay 'in the old days'. Ho hum. Shaved ears sound painful Charlie - ouch! I shall pass that one on - thanks Marcel! Thanks lyn. Thanks Phil. I have a Vulcan in the stash and I'll use your thread as a reference, although I'm not sure I'll bother so much with the internals! Thanks Leon, great ideas! That should keep them going for the iPhone 7, 8, 9 and 10! Thanks Alex. I'm like you as far as being stuck... when the Genius said 'leave it with us for 90 minutes' I had to text Mrs B to make arrangements and then realised I couldn't go and have a coffee and read my book or check my email. I just went home and back to fill the time! I don't know what you mean Charlie... Thanks Rob, all sorted. Now, where's that Dornier...4 points
-
A few more bits need doing yet before paint chaps Soz Just adding the nuts and bolts for the missing side skirts so these were probably removed by the crew to ease track maintenance. Other side next and the soldering up the side skirts that will remain on the hull. Dan4 points
-
Just got paint on the kitchen last night, finally. With a little luck, I may finish this damn Fw190 before July. And I can stop eating in the Kitchen-in-Exile.4 points
-
4 points
-
Thank you everyone for the comments Tool clamp tastic !! Again... Still more to make Dan4 points
-
and in front of a white Background please note: - Ladder is not glued in - left NAVY decal will go on when Mr. Parabat (thank you sir) will send it to me Thanks for watching, enjoy the pics. Oliver4 points
-
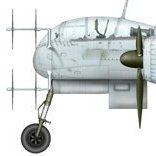
We have discovered a lot of interesting new information and photos of the RAF He 115s during work with my forthcoming book on the He 115, but mainly of BV 185 in Malta and BV186 in England. Their technical configuration and markings/camouflage is actually quite complex and especially BV186 was heavily modified. Here are a few premilinary profiles. We have new information on the colouration of the malta Heinkel that was photographed, but these can serve as teasers. And yes, there is a special emblem on the starboard side of the nose of BV186! If anyone has specific questions or requests for modelling purposes I will of course help. You need only ask!4 points
-
When I see how fast some build their models, I start to get a bit concerned about my snail speed. But I did manage to add some more bits to the Yak. The wing trailing edges are rather thick, so the obligatory thinning was in order. The next step was to add the oil radiator intake mesh. Actually I didn't replace the mesh as it was again too coarse, but I added the PE showing the solder joints. Had to make a groove in front of the mesh as the PE part was a bit too large. Then it was time to add some wires after the Armory PE part side consoles had been fitted. And in place. The other side looks a bit more busy. Still have to tidy up and add some additional small parts before I can start with painting. Cheers, Peter4 points
-
Hi, I finished this one a couple of weeks back. Finally got her into the photo booth. Xtradecals leave a lot to be desired, with mis numbering, brittleness etc to deal with, but gentle coaxing with X-20A did the trick... 1:48 Airfix meteor F8 NEW TOOL Paints used: Gunze Light Aircraft Grey, Tamiya XF-3 Flat yellow, XF-69 NATO Black Extras: Pavla Mk 4 Seat, Albion Alloys telescopic Aluminium tube for Pitot Decals: Xtradecal X48160 Cheers Chris3 points
-
The Adversary. Another joint project featuring F-15K Slam Eagle and MiG-29 Fulcrum. This MiG-29 is from Tamiya, it's an Italeri tooling imported into Japan by Tamiya and reboxed for the Japanese market. It has recessed panel lines, adequate detail for the scale & a full missile load. The plan is to replicate the dogfight scene between ROKAF F-15K 004 and KPAF MiG-29 in the R2B: Return to Base movie. I'll use my own decals for this project - Rogue skeleton, KPAF logo & aircraft number 504. Yea it's the power of customized decals - do anything you wants. Decal by Fishbone Inc. #315 Grey FS16440 as the main color and Gunze #331 Dark Seagray BS381C/638 as the camouflage pattern. Calling it done! Cheers, and thanks!!3 points
-
The following pics Shows the parts with paint and the first Color PE And that is all of my work (4 hours) today! Hope you like it, excuse for the bad Quality of my pics! Oliver3 points
This leaderboard is set to London/GMT+01:00


