
Leaderboard


Popular Content
Showing content with the highest reputation on 16/06/16 in all areas
-
Hi. Finished build numero 7! This has been an EPIC, personal build and TOTALLY beyond me skills wise. I guess thats why its taking me so long. My grandfather was a pilot in WW1 and this is the plane he flew and, unfortunately crashed in to an orchard. He survived! In fact he didn’t pass away until the early 80’s. There aren’t many pictures of the plane but some are featured on the Wingnut Wings website. I didn’t go down the whole turn buckle route with the rigging, don’t have the eyes for that but i did the best i could. And hopefully my dad will like it, as its his fathers day present. Hope you like the pics. Thanks for looking. Cheers20 points
-
Cheers, after 2 months of work i call this one finished! - Eduard Kit Lim. Edition Danger Zone, 1/48 scale - Eduard F-14 weapon set - Eduard RBF tags - Quickboos intake covers - Revell spraycans and RAL spraycans - Oilwash and weathering with Tamiya pigments made as VS-84 Jolly Rogers17 points
-
Airfix kit with resin seat and Isradecal decals for a Target Tug aircraft. HATAKA paints, Flory wash. Chris14 points
-
Hello, and thanks for your interest in this topic. Here's my rendition of AZ Model's latest release of the 109 Series - this is the G-14AS. As far as I am aware this type has never been available as an injection molded kit before. I added Brengun phot-etch for various details, such as antennas, flaps and interior pieces. The pitot tube is from Master Models. The model was painted with Gunze/Mr.Hobby acrylics. This patricular aircraft is well documented. There are a number of period photographs. Some of the technical details visible are: - missing cover of the tail wheel well - T3 rudder without trim tabs (these were removed from the plastic) The aircraft patricipated in "Operation Bodenplatte" in January 1945. Piloted by Uffz. Herbert Maxis, White 13 was shot down by an American AA battery. Herbert Maxis' tragic faith is documented here: http://www.findagrave.com/cgi-bin/fg.cgi?page=gr&GRid=97812831 "White 13" was buried in a trench and re-discovered in 1987. The remaining parts of the airframe were restored with parts from other German aircraft and is currently on display in the AVIATICUM Museum in Wiener Neustadt, Lower Austria. Creating the characteristic "sawtooth pattern" on the leading edges of the wings is quite a challenge, in this scale. The rudder has some light colored blotches over the RLM75/83 camoflage. To replicate this, I painted the entire rudder RLM76 (Light Blue) first. Then, small pieces of Blu Tac were applied to cover those places to remain in light color. Then, the other colors were sprayed over. The fuselage has a different tone of RLM76. This seems to be the greenish variant, sometimes referred to as "RLM84". This color was mixed using RLM02 (Grey/Green) and pure White. The undersides are natural metal, I used Alclad paints here. Note the black Balkenkreuze without outlines. All photographs: Wolfgang Rabel, IGM Cars & Bikes Vienna. Thanks for lookin'! Have a good day! Roman12 points
-
The Adversary. Another joint project featuring F-15K Slam Eagle and MiG-29 Fulcrum. This MiG-29 is from Tamiya, it's an Italeri tooling imported into Japan by Tamiya and reboxed for the Japanese market. It has recessed panel lines, adequate detail for the scale & a full missile load. The plan is to replicate the dogfight scene between ROKAF F-15K 004 and KPAF MiG-29 in the R2B: Return to Base movie. I'll use my own decals for this project - Rogue skeleton, KPAF logo & aircraft number 504. Yea it's the power of customized decals - do anything you wants. Decal by Fishbone Inc. #315 Grey FS16440 as the main color and Gunze #331 Dark Seagray BS381C/638 as the camouflage pattern. Calling it done! Cheers, and thanks!!9 points
-
Ok, well it does technically have a fin. A big fin! OOB, with the No.33 Squadron markings.9 points
-
Greetings to all. Here's a 'quick and dirty' one, just for fun. This is a tribute to my favorite Matchbox car of my youth, the famous BP Alvis Stalwart. I slightly-modified the chassis and wheels from an old Airfix 1/76 Saracen armoured car, and built up the body with styrene sheet, with clear acetate for the windows. I didn't get it exactly right---there's a bit too much 'hang' in the back, and the green in the home-made decals came out a bit blotchy---but I enjoyed every second of it, and it's fun having that 'pug' shape squatting on my model shelf. Hope you enjoy it as well.8 points
-
Hi, usually I do not touch "Snap Fit" kits, since I had some rather disappointing experiences (with tanks) before. Now the new Zvezda model of the Yak-3 is a totally different league. Apart from the fact that you actually can assemble the whole model without a drop of glue, it also provides sufficient detail and good measurement - and there's even aftermarket accessories available from the likes of Eduard, Rob Taurus and CMK. I confess I did use glue on some parts, like the landing gear and some small pieces, just to make sure they don't go astray. The model was painted with Gunze/Mr.Hobby acrylics, the decals are from the box. I had some reservations about their quality, as there was a yellow-ish tone on the carrier film. All of this disappeared when I put the markings on, so no worries here. There seem to be different interpretations of this particular scheme, some sources recommend a red spinner with white tail lines, while Zvezda suggest grey spinner and yellow stripes. I went with their instructions. It represents the plane of Lt. S. I. Rogovoy, of 64th GIAP / 4th GIAD, on the 2nd Baltic Front, autumn 1944. The pitot tube was replaced by a piece of wire. Thanks for your interest. Best wishes from Vienna, Roman8 points
-
What was originally supposed a test build as a means to getting to grips with my airbrush post a long break, ended up becoming a small pressie for my Old Man on Sunday. Noticed that he'd somehow dropped and broken his 1/72 Corgi Spitfire so figured I'd give him this as a replacement. Few mistakes here and there with decals and so forth, but nothing he'd notice. Hope he likes it. Maybe now I can get back to work on my 1/24 Spit.8 points
-
Hi mates! She's not finished yet (lots of fiddly stuff yet to do) but I thought I'd give you a preview of how she'll end up now that the wings are on. I think she looks OK. The colours are so much better with the new camera. This is what she looks like in real life. Plus, I can shoot at a much higher f stop to get increased depth of field. The old camera would only go to f/8, these shots were at f/16 and I can go farther than that if I have a really big model. I'm off to chemo tomorrow, but I'm taking my laptop with me so I may check in to make sure you folks are behaving. Cheers, Bill PS. It was a right pain in the whatever getting the wings on and (somewhat) aligned with each other. The final alignment (based on the tank separation and the angle of the jury struts, both from the front and from the side) was like solving simultaneous equations with multiple variables. There turned out to be no solution that satisfied all conditions, so I settled for a Gaussian best-fit, minimizing the sum of the squares of the errors. Wait a minute - I'm retired now! No more regression analyses!8 points
-
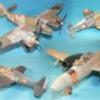
Hi all i give you two Su35. I was build them in 3 months These kit was very cheap (about 25$ for two kit) so that the they was not so good of course. It's took me alot of time and puty to fix them. The first is a Mini Hobby's product . The kit is Su 37, i was paint ít in Su 35 version. Both the nose of two kit was very very bad, i must replace them with two resin nose. The second is Su 35 - Kitech Enjoy and Have nice Weekend !7 points
-
I had a lot of fun with this old kit from rescribing to making a new canopy but as kits go for its age it gets my vote. You can find the full build at http://www.britmodeller.com/forums/index.php?/topic/235000432-172-airfix-gloster-javelin-t3/page-1 Here are a few photo's of the finished article.7 points
-
Hello, here's another hapless attempt of mine on "heavy metal". This is also the very first Trumpeter kit I ever laid my hands on. I had the 1/76 Matchbox Char B.1 when I was a kid, and when I saw Trumpeter's offering I just couldn't resist, even though it's way out of my comfort zone in many ways: I do not have any good reference material on the Char B.1, just a couple of color drawings; I don't know much about French Tanks of early WWII in general, so please forgive me if the colors are off or I missed a detail! I did like the triple-color-camo-schme though as it looks "different". Had problems with the tracks (again) on this one. They are of the "rubber-band" design and they snug around the drive wheel. Doesn't look very realistic, I know. With no replacements available, I used them. Thanks for looking! Greetings from Vienna Roman7 points
-
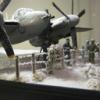
A few weeks ago we had a long weekend here in Western Australia, so I thought I might have a go at a quick build. I had been itching to do the new Airfix Beaufighter I picked up before Christmas last year. It was an absolute joy to build. Brush painted Italeri Acryl acrylics for the top side camouflage, Tamiya Acrylics for the rest. WIP thread can be found here. Apologies for the rather dark photos, not much sun in the yard this late in the afternoon. Thanks for looking. Even though its winter time here this little fella came out for a look.7 points
-
Unit one is down, i repeat, Unit one is down! The core fight is out but the Gundam is down. I had a great time putting this together as my first diorama, it depicts the start of Star Dust Memories as if Zeon managed to take down Unit one in Australian. I hope you like it and as usual any comments welcome. I really struggled to photo this so excuse the crap pictures, I really must get a proper camera. and a terrible video as well, http://vid1145.photobucket.com/albums/o513/brian07900/Mobile%20Uploads/20160612_183026_zpsq2me3ank.mp46 points
-
1/72 Academy kit + Aires, Eduard, Master. Regards, Alex.6 points
-
This is my 1/72 T-34/85 from Ukrainian manufacturer Unimodel (aka UM). According to my research this was built at Factory 112 in 1944. Markings from the box, towing cable from the spares box (probably of Dragon origin). Metal gun barrel from CMK. Not entirely happy how this turned out. Being primarily an aircraft modeller, I still need to learn a lot about link-and-length tracks. These do not sit right and produce a 'kinky' look which is unnatural. May have to go through more military vehicle models to improve my experience! Thanks for looking, anyway. Since the prominent welding line along the turret was lost during sanding, I replicated this with a piece of stretched sprue, molten in liquid glue: Photographs by Wolfgang Rabel of IGM Cars & Bikes. Greetings from Vienna! Roman6 points
-
This build started out as a 1991 414 bird, however, a disaster with the rub-on transfers negated that and forced me to alter the paint job and go back to the stash of T-33 decals. Right after the paint got altered, I realized that the '99 version of the T-bird had the AN/DPT-1 emitter in the nose, so one was fashioned from Contrail tubing and putty. Leading Edge decals were used and a luggage pod was cobbled together from plastic sheet and sanded to shape. Other after-market are True Details seats, Microscale cockpit decals, and a RES-IM nose wheel. Canadian modifications were the engine vent on the aft section, scoops and vents on the nose doors and changing the main wheel hubs to a later style with a drill and pin-vise. Paint is Humbrol Black and Testors AL with a Humbrol 27003 MetalCote at the transition. Cheers, Tony6 points
-
Today I got on with fabricating replacement shock absorbers. My starting point was some 0.8mm rod sleeved over with 1mm tube: Then I made the springs using 0.2mm wire wrapped slightly loosely round a length of 1mm brass rod: The spring and two slivers of plastic tube completed the assembly: Here's the first one installed: Rinse and repeat here's all four done: With the shock absorbers in place I could now see that my efforts on the ski brackets were too chunky and I wasn't that happy with the quality of them anyway. Hence I started on a new manufacturing concept using slightly bent 0.5mm angle this time and a strip of PE from my Extratech "Structural Elements" set in this soldering set-up: This approach was easier and quicker and gave better results than I managed yesterday. I can see from the engineering drawings that Philp found that the rear legs are slightly shorter than the front ones. The front ones are 5mm high and I reckon 4.25mm is about right for the rear ones: Here's how the new compare to the old ones and the kit part: The front and rear legs were then soldered onto some 1mm tube: See the kit parts don't even fit, they're rubbish. Here's how it looks mocked up on the vehicle: When I make the rest I'll give a bit more detail on the steps required to make them. Overall I'm quite pleased how things have turned out today. Bye for now, Nigel6 points
-
Light weathering and EZ-line.... and finished Thanks everyone for your nice comments during the build Most of the PE not used and my mediocrity modelling skill, but a fun build.. i like the detailed interior and good fit My fourth soviet ww2 airplane now on the shelf6 points
-
1/48 Trumpeter Supermarine Seafang F.32 Finished as VB895 using Lifecolor and Tamiya paints, Xtradecal and Ventura decals Build thread: http://www.britmodeller.com/forums/index.php?/topic/235000020-148-trumpeter-seafang-f32-finished/6 points
-
Why not mention the March 1984 crash of a Hawk when the pilot hit the ground during a practice, or the death of another team pilot in 1988 during a practice? Or the deaths of four pilots during a mid air collision in 1971 at Kemble in a practice session? I believe these bear as little relevance to the 2016 team and routine as those accidents you have quoted, as does the recent unfortunate run of accidents among national aerobatic teams. The Red Arrows have performed over 4,700 public displays and, as I have noted, in that time just one aircraft has been lost, in an incident caused by the stupidity of a spectator in a yacht. That enviable record proves that as a group of highly trained, motivated professionals with thousands of hours of flying experience between them -much of it in a high threat environment- backed up by one of the highest standards of airworthiness and technical excellence found anywhere in the world, flight safety is paramount among the team, and speaks for itself. What a shame that some spineless cretin with egg on his hat does not recognise that professionalism in his own organisation and is far more worried about his own pension and never-never land rather than standing tall and advocating for and supporting his people. He also ought to be aware that the last time an RAF aircraft crashed during a public display took place 21 years ago. I've had enough sitting on the fence about this stupidity. It's a pathetic decision, made by a pathetic individual or group of individuals, guided by flawed and knee jerk decision making and based on a freak occurence with little or no comparison to how the Royal Air Force Aerobatic Team -to give the team its full title- goes about its daily business. Thank all that is holy that these twerps weren't around to make decisions in 1940.6 points
-
Newsflash 2017.....Airliners to be banned from Heathrow due to growing safety concerns. Meanwhile in other news, the recently formed Ministry of Bottom Wiping has published a £3m, 654 page, White Paper which recommends using the right hand.....Personally I still use toilet paper but there you are.6 points
-
Hi To complete my presentation here are some models of submarines . 1/700 2 chinese Type 039 (Hobby Boss) USS Barbel SS 580 (OKB Grigorov) : Project 955 Borei K-535 Y.Dolgorukiy (OKB Grigorov): Project 627 Kit K-3 Leninskiy Komsomol (OKB Grigorov): Project 661 Anchar K-162 (OKB Grigorov): Project 667A Navaga K-137 (OKB Grigorov): Now I changed scale models (maybe my eyes are too old for 1/700 ) 1/350 : 2 first Soviet Nuclear submarines K-19 and K-3 (Zvezda and Flagman model) Some US SSN (up to down) SSN 23 Jimmy Carter (Scratchbuild with 2 Bronco Seawolf)/ SSN 21 Seawolf (Bronco) /SSN 774 USS Virginia (Hobby boss) SSN 688 Los Angeles with DSRV (Riich models) Cheers Pierre5 points
-
Thanks very much for saying guys. It's turning out very well from my point of view. Main colours finished. Bit annoyed that the blutac masking slipped between the tan and green paint going on. Very happy with the overall finish though. All the other bits now painted and ready for final assembly! Decals next.... Alan5 points
-
Finally got my two CH-53's out the way and I'm able to make a start on the F-104. I've been doing a little bit in the mornings before I go to work and I am impressed with this kit so far, quite nicely detailed and well engineered. Having spent longer than expected to being able to make a start on this I've decided to forgo some of the detailing in the cockpit and I have built the cockpit pretty much straight out of the box, as very little can be seen inside the cockpit when the fuselage halves are this isn't going to be too much of a problem. This is how the cockpit tub looks prior to fitting it into the fuselage.... The instrument panel has also been painted and weathered, the only addition here being a small yellow and black handle next to the main armaments panel, and it looks like this.... Just noticed this pic doesn't have the handle fitted, will take another later, off to work soon. I have a resin seat which I think is from Aries which I have painted, unfortunately it doesn't come with seat belts fitted and they are quite complicated for the C-2 seat but I will give it a go. I have also managed to break off (and lose!) one of the footrests but I am sure I can make one of those. This is the seat at the minute.... The only addition to it so far is the yellow and black handle made from some wire and painted up. Hopefully there will be some more progress over the next couple of days. Off to work now so no more for today. Thanks for looking in and as usual all comments and criticisms are gratefully received. Craig.5 points
-
Thank you everyone for the comments Tool clamp tastic !! Again... Still more to make Dan5 points
-
Morning folk's last update before she goes in the gallery,the towing hawser and tools have been added and a final "dusting" of earth has been blown on the hull slightly heavier on the base and wheel areas after three attempts I finally got the other track to settle,just the antenna to fit then I can give you a good look round the whole thing,thanks for all the support and info especially Sarge for the "Bible" it certainly will be used again. Next one up will be the Chaika but I,ll hold of till mid July and the Holidays are over,of course there is a superb Model shop near where I,m going and if a nice piece of Soviet armour turns up.................................5 points
-
Smartphone: a device which taught men to pee in a sitting position (sorry for hijacking the thread Ced).5 points
-
Little update - Lots of filling, sanding, filling sanding.. but the tail is now on. However I'm not happy with the leading edge, it's too chunky so I'm going to sort that out before I go any further, it needs to be more pointed.. Wing spar attached that will be trimmed with a dremel, it's all marked out but I won't touched that until the cockpit is done, cut out and glazing added. Some pics.5 points
-
Good evening ladies and gentlemen, I have sadly been rather busy and lost a little enthusiasm for modelling the past month. Partly that's also because I have lost my big lever arch binder full of decals which contains the sheet of swastikas I need to finish my Stuka WIP. It's here somewhere, but I am suffering from man-vision where things sat right in front of me are invisible. Anyway, I went to the Aberdeen Modellers' Society meet on Tuesday as I try to do every month since I restarted going, and spotted this little white box sat in a pile of unloved kits. When I were a lad, there was a man named Steve (who also goes to the AMS meets now) who used to run a stall at a Sunday market nearby. The market was rubbish, frankly. My parents used to drag me along. It was full of tcheuchter tat and music vendors specialising in Danny O'Donnell cassettes and sometimes CDs. Steve's little stall however sold, as far as I can remember, pretty much only Welsh Models kits. In exchange for my good behaviour, my dad would usually buy me a one of the simpler vacform kits. Hence in my teenage years I built a surprising number of vacuum formed kits. Mostly these were Welsh Models things such as the SA Twinpin, Valetta, Hs748, Beverley, Boeing 757 and so on. I also conquered (although in retrospec, it wasn't the masterpiece I thought it was at the time) the 1:72 BAe Nimrod from Formaplane?? (the fuselage was split behind the wing - Aircraft In Miniature I think re-did it with a one-piece fuselage - I have one in the stash) and some 1:72 prototypes including the Republic Thunderscreech supersonic turboprop and de Havilland DH.110. I saw the Valiant and decided I really, really wanted it. I haven't built anything in this scale in a long time. It's cute, and it really appeals. I am hoping to get this finished quickly. I'm absolutely not about to claim to be any sort of authority on making vacuum formed models, but since some fellow modellers have not yet had the satisfaction and seem reluctant to try, I've taken a few snaps along the way to show how I do it, if only to show that it really isn't a dark art and they are surprisingly satisfying to build in an age where kits generally fall together and somehow I personally am still never content with what I produce. So, what's inside? It says it has resin wings and tail on the box, but I didn't read that. I was pleasantly surprised to learn that the sanding would be limited to the fuselage. The resin castings are of good quality. To work with vacuum formed parts, I like most start by drawing around the parts with a permanent marker, such as a Sharpie pen. Next, I use a fresh scalpel blade and score around the part around 1~2mm away from the part. The surrounding styrene can be cleanly snapped away. To prepare the mating surfaces, I use a fresh piece of fairly coarse (180grit) wet and dry paper on a hard flat surface, used wet. I rub the part against the paper. This is why you want the paper wet - imagine the dust and clogged paper otherwise! When the pen can be seen through the reverse side of the plastic, you're almost there, and the 1~2mm surround left just peels away. That's pretty much all there is to it. I tacked the wings on with a small blob of medium CA. This revealed that the wing roots moulded on to the fuselage are not symmetrical. Not a big issue really, but best prepared for now rather than later. The under camber of the resin wings also doesn't match the aerofoil on the fuselage: I made a tool (a cleverer person would just buy one) to sand the cockpit and bomb aimer's fairings: The tail castings are nice but the tailplane sat slightly too far forward on the fin. This was easily rectified by filing the backs of the slots slightly to let them engage deeper. The acid test where you get to see if your fuselage sanding was correct - this is good enough for me ! Also, the panel lines on the resin wings are assymetric, so the offending line was filled, the jet pipe fairings adjusted to suit and a new line scribed. To address the wing root issue, I backed the roots with Milliput, inserted the kit supplied fuselage formers (I changed their positions to suit my preferences) and taped it up to harden whilst I went out to lunch. It's not often I get a day off my day job so thought lunch with my wife was in order. I'm now about to attack those wing roots ...4 points
-
Hi everyone this is my latest finished model, I'm quite happy with it so I though I would show it off! Any suggestions for improvement welcome! Sorry about quality of the images only have my phone to take the images with! Thanks for looking Joss4 points
-
So, I finally decided to try airbrushing for the first time, and this is my first attempt. I'm using an Iwata Studio Series compressor with a Harder & Steenbeck Ultra airbrush and Vallejo airbrush paints. As a newbie, I was rather dubious about airbrushing,.... but now after a few weeks later,... and I'm hooked. Pre-shading, blending and using blue-tac worms makes the models looks far more professional, even at my amateur level of skill. So all and all,... glad I made the jump. So here is a little diorama featuring Airfix's Battle of Britain - Ready for Battle Gift Set 1:48 The hurricane was a joy to build. I decided to go with a darker Battle of Britain themed camouflage on this. By the time I had oil washed and dusted the entire aircraft, the tones had gone quite dark. But that was intentional as I love the dirty look of the old warbirds, rather than the shiny aircraft you see at airshow's today. The Bedford wagon and most of the spare ground crew I have plans to use on other models, so I didn't use them on this. I think it would have been slightly too overcrowded anyway with all the additional parts. The only modification I did was to use real rubber pipe carefully threaded with stiff wire so I could make the hose sag realistically off the fuel truck and onto the aircraft wing. This worked so well I used the same technique to replace all the hose on the diorama,... included that on the fuel trucks unused refueling arms. The diorama base is scratch built using foramx and plaster and few items in my spares bin. The groundwork is model railway ballast glued with watered down PVA and MIG Realistic ground mat, heavily weathered with MIG pigments. Hope you like. All comments, gratefully received. Ed.4 points
-
LIttle more than a declaration of intent at this point, but after the Hungarian 109 and the MiG I-210, I will build a Macchi Mc.200 serving in Russia as part of the Italian contribution to the war on the Eastern Front. I will also add some historical notes on the Italians in Russia during WW2. Italy's contribution was small compared to the size of the armies fighting on this front but this campaign had a very strong effect on the Country, an effect that was felt for many years after the war and that spawned a large body of literature. While it was the Army, and in particular the mountain troops corps, that made up the bulk of the Italian forces, a small number of air force units were sent as support. The war in Russia was not as tough on the airmen as it was on the ground troops and losses were not as dramatic but as aircrafts are my main area of interest I've thought that building an Mc.200 would have been a good way of remembering the lesser known participation of Italian forces on this front4 points
-
Hi. Build number 4 on the journey. Had a lovely old time putting this together. Really enjoyable. Have to thank AndyRM101’s Snowspeeder build for inspiration & help along the way. His build was invaluable. Many thanks Andy. Had a few fit issues with the engine pods around the rear cockpit, but that was my fault by glueing in the front gun pods before i had everything painted & sorted. My dad bought me a 1/32 Hawker Hunter, which is huge, so i built the speeder while contemplating what i was going to do with that, apart from build it. Here’s some pics of the speeder in its natural environment … of cardboard. Cheers.4 points
-
This is the base from a plexi display case; enter all sorts of bits and pieces, and hopefully we've got the Death Star surface the same way the original was made by ILM.4 points
-
Hi all, Here you are my latest build,the NORD 1002 M (french version of Bf108"taifun") from Fly kit. I hope you will like it Best regards Thierry4 points
-
Track pins for the spare links on the casemate. 0.5 hole punched out of plastic card and then using a 1.0 punch I punched another hole, does that make sense Probably not ! Really hard to get the 0.5 hole centred so most of the track pin heads are not central. I have tried a few dozen times but I just cant get them bang on ... But close enough for government work in my book Cheers Dan4 points
-
Last tool clamps fitted, Phew !! Cheers for looking Dan4 points
-
and in front of a white Background please note: - Ladder is not glued in - left NAVY decal will go on when Mr. Parabat (thank you sir) will send it to me Thanks for watching, enjoy the pics. Oliver4 points
-
Thank you gents ... and thank you Rob... I think I got the RLM76 applied, I need to have a good look at it once it has dried as (despite the appearance in the photo's) I feel the pre-shading still might be a bit over-visible and need toning down a bit more - at least on the underside, the topside will have the blotches of RLM75 applied so will probably be okay: So there is definitely some mottling looming in my immediate future... Cheers, Stew4 points
-
Evening, Finally got a bit of time back with the Spitfire, first off, apologies for the pictures, I took them, then stuck the fuselage together before I checked how they had come out, they're not the best but should give you the general idea. Got to work on the cockpit walls. Used the Airscale placard set, but to be honest I don't know if I've made the best of it. As it's a generic set there are no placement instructions and there's only so much that one can turn up online before all the conflicting versions run together in the mind, so I've pretty much gone with what felt more or less right at the time. The transfers are fine and settled down over contours well with a bit of Micro Sol and then some matt varnish to take off the shine, not that you'd know it from the pictures. Paints are Vallejo Modelair Interior Green, wash is Vallejo Grey, and the weathering is drybrushed light grey. And the fuselage sidewalls. And with the cockpit all built up, once again apologies for the picture quality! Bit of a short update so that's about all for now, I almost started to add some wires and tubing to the cockpit, but then thought better of it. My rate of build is so slow already without complicating things. I've accidentally picked up a few more kits over the last month or so and I need to make some space on the stash shelf if want to be able to hide a Lanc and a B17F up there. Hopefully tomorrow I'll get the wings built up and make a start on the engine cradle and firewall. I'm going to make an effort to crack on with things a bit quicker and get a few more kits built up. Thanks for looking. Regards, Peter4 points
-
Latest path into insanity....... 'I feel the need' for a flag locker I've tried in the past and got no where so a cunning plan was needed. Working around Evergreen strip sizes I've made a start This shows a test piece to confirm the width. Its all about jig a jig This is the cutting jig on the chopper set for cutting the verticals Spacers being used to ensure the correct/constant spacing Two rows completed and the plan seems to be working Right hand side and bottom left off in case of creep. Two rows completed five to go giving 49 pigeon holes 1.7 x 1.7mm and a locker underneath Thanks for stopping by..... Kev4 points
-
This might look pretty much the same as the past day or two, but it actually represents a lot of work; been round the whole airframe looking for blemishes, sanding away little bubbles or bits of fluff, and then misted another coat of EDSG over the top - final inspection tomorrow, and if it's OK then I will remove all the masking - closer all the time to a clear coat and some decals. Speaking of which, note the single yellow Firestreak, which will sit on the starboard inner pylon. This has just received its clear coat, ready for decals tomorrow to represent the intricate slots around the nose which were some part of the seeker head. For those of you who have forgotten, the load-out will be a Mk 20 "buddy" refuelling pod starboard outer, the Firestreak starboard inner, and a normal wing tank port outer. The reference photos I have show this as a pretty standard load when flying from the deck.3 points
-
A few more bits need doing yet before paint chaps Soz Just adding the nuts and bolts for the missing side skirts so these were probably removed by the crew to ease track maintenance. Other side next and the soldering up the side skirts that will remain on the hull. Dan3 points
-
Just got paint on the kitchen last night, finally. With a little luck, I may finish this damn Fw190 before July. And I can stop eating in the Kitchen-in-Exile.3 points
-
More info than I'd normally share but so true!! If Apple are so good why haven't they fitted an airbag that senses rapid acceleration and deploys a nice pillow like cushion to protect our devices... Or even have SIRI to automatically deploy on hearing the normal expletives that we shout as our phones hurtle towards the floor.... So many ideas....3 points
-
I've given the Hunter a coat of Mr Paint primer/filler to get it ready for painting. All was going well but half way through the session I noticed that the primer was starting to go on quite rough which was a bit strange. I'm not sure if it was starting to react with the remains of the Ultimate Primer or if it was due to a change in humidity but it's never done that before. Anyhow it polished up ok. After having been redundant since October and having come to terms with the thought that I'd probably never be going back Offshore a possible short term contract has appeared on the radar. If I get the job I could find myself away as early as this weekend coming and the consequence would be that, once again, I would fail to finish a GB entry before the deadline! I'll plough on with it today though and hopefully get a coat of HSS on the undersides. I have a few choices for the paint but might try an old pot of Methyl silver that I acquired from my son's Warhammer stash as it looks like a nice greyish silver and sprays nicely using Tamiya thinners. Duncan B3 points
-
Got the crew compartments painted interanlly so I could finish assembling them and fit them to the chassis. While at it I added some extra detail to the undersides. Once the compartments were fitted I could start on what to me seems the hardest bit, the tank. There must be an easy way to make an object like this but I dont know it! After much deliberation I made a crude jig, and assembled some 1mm formers on a couple of 5mm tubes. Then I tackled the skin. I did not think this one through, but by the time I was in trouble it was too late to go back! I opted for 20 thou sheet as being thin enough to roll around the formers. Of course this also carried the risk of 'sag' between the formers. Somehow managed to get it wrapped then resorted to cable ties to hold it while the glue dried. Currently I am working on the support frame to attach the tank to the chassis. Apologies for the photo quality. I recently acquired a Galaxy that my daughter discarded for the latest iPhone, and I find it easier to use than my camera and usually gives me better pics. Hardly ever use it as a phone.3 points
-
As in Austin Powers: "Good God, the fat b*****d left a floater".......................................... or in a previous reincarnation at sea, (at anchor actually), when the sparks went swimming. The spine chilling cry was heard from outboard: "Aghhhhhh,............Who's the moron that used the head and doesn't chew his peanuts", ah,.........the joys of nostalgia3 points


This leaderboard is set to London/GMT+01:00