
Leaderboard


Popular Content
Showing content with the highest reputation on 11/06/16 in all areas
-
I haven't posted here in just about forever because of other commitments but I've continued to build and lurk. I completed this earlier this year but just knocked the base together this morning as a technique practice. The kit is the Revell Lanc, not without its faults but looks the part to me. I picked it up in a Wonderland sale for about a tenner and the decals are from Hannants. It's pretty much OOB apart from the thimble radome which is a drawing pin soldered to a bit of microbore. The fuselage is finished in various shades of Alcld and then polished with a bit of rub n buff for depth of shine and tonal variation. The canopy is done with thin strips of Bare Metal Foil because I couldn't be bothered masking it, and the wings are done with Tamiya acrylics with a bit of a go at salt weathering. The fit of the kit is pretty good and the wings are actually detachable. The base is just a bit of MDF with unpainted squares of b&q sandpaper and some thinned enamel and grass scatter. I liked the tone and texture of the sandpaper although next time I'll probably use a lighter grade and different glue.28 points
-
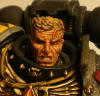
Dear Colleagues Back to something quintessentially British - the Hunter F6. This is where Hawker got the whole aircraft to really work and fight like it was supposed to (without the engine stalling when the guns were fired!). The 1/72 Revell kit is getting hard to find but it does justice to the original. I used a resin seat and Eduard PE. I indulged in the expensive Houchin starter from Flightpath to go alongside. The pilot is from PJ and the figures from Gunthwaite The markings are 208 squadron from Xtradecal Hope you like it? Andrew26 points
-
Hi all i give you two Su35. I was build them in 3 months These kit was very cheap (about 25$ for two kit) so that the they was not so good of course. It's took me alot of time and puty to fix them. The first is a Mini Hobby's product . The kit is Su 37, i was paint ít in Su 35 version. Both the nose of two kit was very very bad, i must replace them with two resin nose. The second is Su 35 - Kitech Enjoy and Have nice Weekend !25 points
-
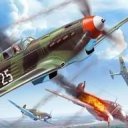
#16/2016 Noooooooo, not another 109.......well, my dad will always build another one It still takes some time until the real Eduard G-14 comes, but their new G-6 kit includes all neccessary parts. Only filled the compressor access point for the here not existing 3cm engine gun (U4 version)on the rear right fuselage side and added the GM-1 filler cap on the spine after the canopy and the flare-pistol outlet on the right side of the windscreen. If only Eduard had created this kit the first time....a wonderful kit, to recommend! Eduard Super-Fabric seat belts added, EZ Line for the antenna wires......speaking of....thanks to the fellow modellers who explained the canopy-locking-antenna-wire-tensioning-system my dad knows a lot about 109s but as it seems there is always something new to learn Painted as ususal with Gunze and Tamiya paints. Decals from the kit and Kagero (mini Topcolors 28, Luftwaffe over the Far North). The Model shows the a/c of Unteroffizier Karl-Heinz Erler, 16./JG5, Rygge/Norway in April 1945. Cheers, Franz and Reinhard20 points
-
The X-Wing's finally finished with today's last minute addition of all new mini Nigel, the mouse droid. Bandai's X-Wing is a great kit, easily as good as all their other releases. The custom finish was down to wanting to do something different to a red squadron fighter (ironic that I painted it red then). The open panels were also done to give it a bit of individuality. The base was my first snow scene, and a bit of a learning curve, using different materials. If I'm honest neither the X-Wing or the base are my best work, and are a bit scruffy in places. I was quite pleased with the astromech though, which recreated U9-C4, the R5 droid I depicted with Bandai's 1/12 kit. (wip here) I'll post some shots of the X-Wing on it's own first, as it's easier to see the details when it's off the base And all together on the base (if you get bored you can always play 'Where's Nigel') Thanks for looking Andy17 points
-
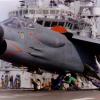
When I was a student in London in the late eighties, my digs in Battersea shook every evening at 6pm to the sound of Concorde coming over inbound for Heathrow after a supersonic dash across the Atlantic. It's long been one of my favourite aircraft, and the Landor scheme is by far the classiest livery it ever wore, so it was about time I built one. I bought the kit from a fellow Britmodeller, and have been working on it off and on for the last couple of months. I was at a loss which airframe to model, when it struck me that the last two letters of the registration were my late girlfriend's initials. Those who saw my Marauder recently will know why I chose Alpha Golf as the airframe to model. Also, it was the last one to travel supersonic over the Atlantic in 2003, and is the subject of the only known photograph of a Concorde actually supersonic, taken from a Tornado at Mach 2. It looks a bit like this: Here she is on the ground though, giving us a pirouette: Before heading out to the active for another deafening takeoff: Heading out to do what she does best: It's not a bad kit overall, a bit chunky in places and the wing fit isn't brilliant, and whoever designed the undercarriage should be shot, but it's Concorde enough for me: Hope you like it, Dean17 points
-
Matchbox's McDonnell Phantom FG.1, 892 Squadron, Fleet Air Arm, H.M.S. Ark Royal: Built right out of the box with only a swop of the plastic ejection seats to metal aftermarket ones. The nose wheel is not correct. But the version with the nose so weird high I did not like. The ageing transfers unfortunately leave their mark on the result, but despite that it was really fun to build this old kit. Thanks for watching,17 points
-
Dear forum members; Based on your wishes and feedbacks, we changed and improved the box content of our RF-84F kit, which we released to international market in January 2016. Therefore, new kit no. of our RF-84F is now 2201-1 and its barcode number is renewed. As TANMODEL, we put great importance to your feedbacks about all kits that we release. Plus, we are very glad to be in contact with you for our new projects. We strive to present the best for you, with support we receive from you. Please do not hesitate to contact us about technical documents, pictures and decal options you consider that may be useful for our new projects. First we would like to give information about decals. Content of our decal set is changed and printed by Cartograf. Dutch Decal prepared a multiple-choice decal set once again. We’d like to thank Daco Products (Belgium), Mr. Kim Zimmerman and Mr. Jens Jensen (Denmark), who assisted us for decal drawing. Decal options : 53-7571 KA-E No.729 Sqn. Kastrup Airbase Royal Danish A.F. – Denmark 1958 FR-27, 42e Smaldeel, Bierset Airbase. Belgian A.F. – Belgie 1970 FR-34, 42e Smaldeel, Bierset Airbase. Belgian A.F. – Belgie July 1971 “Adieu a Toi Petit Dernier” with farewell badge. 51-17056, AZ-O No.717 Sqn. Rygge Airbase. Royal Norwegian A.F. – Norway 1956 52-7367, 171st Tact. Rec. Sqn. Detroit Airbase. USAF Michigan National Guard – U.S.A. 1968 53-7566, 33-TJ ER 3/33 “Moselle”. Cognac Airbase. Armee de l’Air – France 1956 7450, 1. Havaussu 114. Taktik Jet Kesif Filosu, Eskisehir, Turk Hava Kuvvetleri – Turkiye 1956-1972 arasi Modelers liked profile poster and mouse mat but your expectations were different. As our kit has many clear parts, you asked for mask set in your e-mails. We evaluated your requests and prepared a wonderful mask set. As we are modelers ourselves as well, we added Anti-Glare Patch to the mask set in consideration of beginner modelers. We used a special paper for the mask set. Plus, we added a detailed application sheet printed on double-sided paper. From now on we will not give profile poster and mouse mat. 2201-1 box will include a detailed and high quality mask set. We corrected our minor issue on part no. 18 (Ejection Seat) of F sprue. We re-polished the moulds. Instruction Sheet was very well acclaimed by everyone. We corrected some numbering issues, added color names next to color codes and printed it on glossy paper. Decal Placement Guide is also printed on glossy paper. This way, the good became perfect. We added a download link to our official Facebook page for instruction sheet of previous 2201 kit, for those who haven’t built it yet. Everybody can download. Download link : http://www.dosyaupload.com/Vot Box-art was re-drawn in order to make changes noticeable. The new box art drawn by renowned Dutch illustrator Mr. Ronnie Olsthoorn (http://www.aviationart.aero/) is very well acclaimed. We thank him and now he is preparing a great box art for you for the 1/72 T-33 kit that we will release. (Homebee I’m sorry, we developed a re-box project without taking your permission. I hope you can forgive us ) Our 2201-1 kits have landed in USA, Germany, United Kingdom and Croatia. Japan is next. Boxes are being prepared for other distributors. If you’d like to see TANMODEL kits in countries where we don’t have distributors, please support us and encourage your local companies to contact us. Best regards, (Mr) Baris TANSOY Owner of TANMODEL Plastic Model Kits http://www.tanmodel.com/index_en.html https://www.facebook.com/tanmodel11 points
-
Hi all, Some who heard me prattle on at Telford might know that I am lucky enough to work in the wonderful environment of Sabah, Malaysian Borneo, doing my PhD research on small mammals in tropical rainforest. I've just come back from my second field season having been out there since January - it's great fun but very tiring and draining. I came back nearly 2 stone lighter! Anyway, I established last year that there were few practical obstacles to taking a few modelling projects out with me, thereby dealing with the problem that ordinarily a third of my year goes by without reducing my stash, and also helping to give a bit of light relief in the evenings. I carefully chose three small, easily transportable aircraft which had the same silver scheme (weight and space, and thus the number of paint shades, were at quite a premium). This little Vampire is the only one I managed to get finished. It's the recent Special Hobby 1:72 kit built reasonably OOB apart from some scratchbuilt additions in the cockpit. Paint is brush-painted Revell Aqua Silver over some extremely dubious enamel car spray paint (primer is impossible to get in Sabah, and definitely comes under the disallowed contents of hold luggage list!) I managed to not lose too many parts or my sanity, although one undercarriage door did fall through a slatted balcony floor, and had to be replaced with an 8-part plasticard replacement. Hope you like it! I'm still amazed it got back in one piece... Lastly, here's the kind of view I got while doing my modelling in the evenings... ]11 points
-
Good morning! This build was one that I had wanted to do for quite a while, so my LMS had one in stock the other day so I thought it would be silly not to get it This bulid also marks the end of my AS exams (culminating with Chemistry on Friday) and "liberation" from schoolwork for at least two or three months...... Kit used: Airfix 1:72 Hawker Siddeley Harrier GR3 Paints used: Vallejo "Model Air"- Barley Grey, Medium Olive, Fire Red, Black and "Metal Color" Duraluminium. The nozzles, heat-shield and gear legs were painted with Alclad Aluminium. Vallejo "Model Wash" Dark Grey was used as a general wash and also sprayed in my first attempt at post-shading. Decals: The kit decals were perfect, with no splitting at all and no excess decal film being visible once applied. Edit: Thanks to Airfix for supplying me with a missing half of a cannon-pod! Thanks for having a look! Many thanks, Sam11 points
-
This is a redo of a very old build. Nothing earth shattering to report, but running out of cabinet space I am refurbishing some of the elder residents, you know, those odd ones we hate to talk about, but have fuselage seams showing. Had a sheet of Jet Set decals, older than Methuselah, but I've always found them to be very well behaved. They are very basic though, so it was with a sense of 'spares box don't fail me now' as I went in. ( and of course, the obligatory Authentic Airlines cockpit decals ) Always had a soft spot for Braniff. They started out in 1928 ( lasting through to 1982 ) and, especially in the 60s were always up to something different. They had their "jelly bean" period with the fleet painted in wild colours - the slogan, "The End of the Plain Plane". They operated the Concorde ( more on that below ) and then went through a period of major celebrity endorsements - "If you've got it - Flaunt it!" Some corporate customers felt a little uneasy with all the hoopla and pizzazz, and booked away from them, but their name was known. Had fun doing this one This what she looked like as I tentatively checked which pieces I could pull off. Then came the days of putty and sanding And with something else - the Concorde. Braniff actually operated the SST for a year (1979 - 1980), between Washington Dulles and their home base in Dallas TX. In an agreement with both BA and Air France, when the Concorde arrived from Europe, Braniff crews, both cockpit and cabin, would take over the plane and fly to Dallas - subsonically, being over land. Registrations had to be taped over, actually transferring ownership of the plane to the US based carrier, to operate domestically. Upon return to DC, the US registration was pealed off, revealing the British one, and BA crews resumed control. No Concorde was ever painted in the Braniff livery though. Cheers, Mike10 points
-
As the first of the slow pokes, please allow me. Spitfire Mk XII converted from a Jays, ex Ventura Seafire XV, build thread here For all the frustrations I had with this & the small things I can see that are not right, I really enjoyed the challenge, probably the biggest of my later modelling career. The one thing I'm still working towards is the Nigeria sign carried on these 91 sqn aircraft forward & below the canopy in the port side. Plan A didn't work. Steve.9 points
-
Eduard P-39. My second model aircraft Took ages to finish. learnt new things, made many many mistakes, tried to weather a bit, matte varnish (Mig Ammo) stains but I think I'm happy http://img.photobucket.com/albums/v37/adsalamon/20160611_114617_zps8wy0puhb.jpg8 points
-
Sorry for the state of the photos but My normal camera is on the blink so had to use the Iphone. The base is scratch built apart from the hut which is courtesy of scaledale,8 points
-
Last finished model .The kit is from ACE:7 points
-
Well, I was getting everything together earlier, ready to take the final photos, when I heard an all too familiar beeping. Yes... it was Nigel. Frankly he's getting more and more out of control lately, and he's been very sulky that U9-C4 has been getting more attention on this build. He insisted that I shrink him down to 1/72 so he could appear in the diorama so, to quell the incessant beeps and whistles, I've had to do it. Now where did I put that restraining bolt So, with him happily running around on the base, it's all finished. Thanks to everyone for following along and contributing ideas and suggestions. I'll get the final photos up either later tonight or in the morning Andy7 points
-
Another in my long series of BAe Hawks. Also, the third in a series of Red Arrows aircraft. Still to come: the 2000 season special markings and a what if of a Red Arrows Eurofighter. This is the Revell new-tool kit. Though it does have some options that others don't (like the pipes that provide the smoke above the exhaust) I do think the most recent Airfix kit is a better build. Decals came from the kit. All in all, a positive experience. But then I've built so many of these (like, 19 altogether) that they start to blur together after a while! This is completed aircraft #464 (#31 for the year), finished in May of 2016.6 points
-
11/6 update: Not the most exciting job but it is necessary for the final effect, road wheels and lots of them including two spare's. Nearly done though so progress still being made. A short update due to ultrasonic bath for my collection of airbrushes which seem to gum up very quickly with warm weather and acrylic paint6 points
-
Thanks Martin. With the canopy attached I then masked it with tape and Mr Hobby Masking Sol R and I also attached the aftermarket pitot tube. With that done I then sprayed on the primer. Once the primer was completely dry I first sprayed the underside with the base coat and then I masked and sprayed the camouflage on the upper surfaces. I didn't use any templates or masks for the camouflage as I prefer to spray freehand. As you can see there is a little bleed when I spray freehand but I can live with that. I then gave it a coat or two of Klear ready for the decals. I used the kit decals as I couldn't find any new ones for a T3. The reason why I prefer to use new decals is that sometimes the decals from an old kit can be yellowed or even just fall apart but sometimes you have to use what you get. The problems I had with the kit decals were the black panel line decals would rip really easily and Micro Sol or Mr Hobby Setter didn't work very well to pull the decals down on to the surface but apart from that they weren't that bad. For the jet exhaust I just hand painted Vallejo Metal Color - Jet Exhaust which I think doesn't look too bad. Then I gave everything a few coats of Tamiya X22 Clear varnish thinned 50/50 with Mr Leveling thinner which is excellent stuff.6 points
-
Hi all, Here are some pics of my recently finished Airfix 1/72 CH-53 built and painted as an IRIN RH-53 using decals from Print Scale. For an old kit it went together very well and has lots of nice raised rivets, just like the real thing. More pics can be found on the build log here :- http://www.britmodeller.com/forums/index.php?/topic/234997643-airfix-172-ch-53s-65-double-build-iran-and-israel/ And if you haven't visited the Helicopter GB then go and have a look, there are some fantastic builds on there and it's well worth a visit. There are more piccies on the build log. Thanks for looking, and all comments and criticisms are gratefully received. Craig.5 points
-
Hiya Folks, I`ve wanted to make a Spitfire wearing this scheme for a long time with the Desert Air Force insignia in a triangle on the nose and its multi coloured codes with the unit QJ finished in flight colours and a decent photo appears on page 71 of the Osprey Spitfire Aces- North Arica & Italy which was used as reference. As usual it was brush painted and as I`m running out of my usual Polly Scale acrylics I used Humbrol enamels for the upper surfaces this time, but with Polly Scale Azure Blue undersides..Anyway,...here it is; All the best, Tony5 points
-
- By no way an easy kit to built , the imprecise notice being no help even if the part fit is reasonnably good . Painted with Akan colors according to the early scheme which explain the rather heavy weathering5 points
-
Tamiya spray can primer Tamiya light blue + white + blue tamiya cockpit green tamiya rubber black + german grey5 points
-
Hello folks, I have something to show you. It's Revells T-90 A. I started building the kit about 2 years ago, then I lost the motivation and the tank was attending a parade on the square of the forgotten kits. About 2 Months ago I felt sory for this almost completed kit and completed it. Brush painted with Vallejo acrylics and sealed with Vallejo matt varnish which was applied by airbrush. I applied no washing becasue I can't. My tries were complete failures. The so often mentioned problems with these new bending tracks were not present with my kit, I was able to bend the tracks without hot water. All you need is patience, I glued the roadwheel to roadwheel and fixated the part with clamps untill it has dried. An now, fire away the critiques.5 points
-
hi guys ok i'ts going slow but forward I was distracted by few sunny days and a new Dlc to the Witcher game I have decided to focus on a car first and then carry on with tank. I have fill panel lines and make some dusting on tyres. It will go bigger later one. I'm planning to make muddy wheelarches as well... cheers Later on i will add missing elements and tools. Wheels are not glued yet see ya later5 points
-
So some progress. 99% of the construction is complete. I under coated the hull parts in a mix of Tamiya flat black cut with mr levelling thinner then a light dusting of Ammo 4BO as a base for further work.. More later Cheers Plasto5 points
-
decals are now on fuselage the tail is actually the decals from the zvezda 767 kit as the 777 ones i bought were pretty awful . ive also used others like the red stripe - you can see were the existing 767 door was meant to be, im going to try a bit of magic on this area to cover it up. the 777 decals supplied were ok on light coloured surfaces but are transparent on the blue surface - not good! the red stripe on the engine is also pinched off the 767, obviously the original decal was too small5 points
-
Bit of a break for various reasons,but back on it now...5 points
-
Progress is slow, but steady and more importantly (apparently) solid: Three more of these and then it's the fiddly bit.....Getting the rest of the L&L to play!5 points
-
Well I finally finished this build today. I started it for the Made in GB group build but business trips and holidays got in the way and it never made the deadline. It is mostly straight from the box with the exception of a couple of handrails replaced with wire and stretched sprue and of course the propellers which are just acrylic discs sprayed black. The decals are also home made as the ones with the kit had yellowed so much with age they were all unusable except for the warning signs on the stern. The sea is from Daz modelling clay and the spray from some cushion filling stuck down with clear epoxy and teased out into shape. A few in progress shots can be found here. http://www.britmodeller.com/forums/index.php?/topic/234995177-airfix-1144-srn4-hovercraft/4 points
-
Helicopters are not normally thing but here we have my recently completed Rega Helo built OOB. The reason behind the build came about after a 2014 visit to see the Swiss Air Show at Axalp. Wildgarst was our target for viewing the show but unfortunately the show was a no-go, so down we came. Well, I made it up no trouble but down was a different matter, and legs started to cave in a third of the way down. Needless to say, my fellow enthusiasts gave me lots of support with 'Rega'...and here we are. As I said, this was built OOB. Some parts didn't particularly fit well, mainly the glazing. I used the Revell red as suggested but it wasn't a good match, . No problems with the decals. BUT, when I tried to remove the Maskol from the front glazing , it was coming off in bits and seemed to be taken chunks out of the glazing! It transpires that Maskol has an ammonia base and it 'attacked' the Clear polish I'd dipped the glazing in! After about 5 weeks, Revell kindly supplied not just the requested parts but the glazing sprue . The damaged glazing was levered off with little damage and the new bits fitted and paintwork touched up. Job done.4 points
-
While conducting an inspection for defects this morning I noticed there were a few areas where the Aqua Gloss had dried with this craquelure appearance: Strange, I've never seen it do that before. Anyway, a second coat of Aqua Gloss certainly seems to have lessened the effect: Hopefully it will disappear completely under the final matt varnish coat. With the gloss dry I got on with a Paynes Grey oil wash for the panel lines: Here are the finished panel lines: Now I could start on final assembly. The first thing I noticed was that the mounting pin had broken off one of the main legs so I doweled that with some 0.6mm rod: When the main legs were assembled I added brake pipes using 0.2mm black enamel coated wire. I used 0.1mm copper wire to hold them in the right place while the CA set: To remove the jigging wires I just pull on both ends with pliers and they always snap at the knot point. The front undercarriage had to be assembled off the model, fortunately the fit to the model was spot on: Here most of the sticky out bits have been added. I have decided to leave the wheels off until after varnishing and also note that the front wheel has pinged off, luckily the parts were quickly found: Right, here we are ready for the matt varnish: And here she is after the varnish: Part of the swastika on this side came away on the gloves I was wearing, fortunately I managed to retrieve it and put it back together. I am also pleased to report that the crackly effect has completely vanished. I think I will let the varnish harden up overnight and add the wheels and do the final weathering tomorrow. Bye for now, Nigel4 points
-
Here is my last finished model ;It a kit from ACE ,not easy to build ( putty & sanding !!!!!) but the result is a not so current AFV at this scale .4 points
-
Here's the progress so far on the interior. I'm planning to get both kits to the stage of painting the interiors then doing them together. Can't comment on how accurate the interior is on the Hampden, there's creative license here to make it look busy. As per Jims comments earlier, I've also preferred to replace the recessed frames for raised ones out of plasticard. Whilst I'm happy with how the front clear parts fit, the rear lower gunner position is going to be more challenging. Neither the Valom or the Airfix parts fit particularly well and with the curves, filling the gaps neatly will take some care and attention. I'll worry about this later on.4 points
-
starting to take shape4 points
-
This post is especially for brianthemodeller, since I promised him some snaps of the arrestor hook detail: 1. Attempted close-up of Seafire arrestor hook resin part. Despite my best efforts, the phone camera persists in revealing my parlous photographic "skills" 2. Side view of arrestor hook part: slightly more in focus... 3. Ventral surfaces of arrestor hook part. Awful focus, again. Maybe a hammer will improve it 4. Aft-ends of Seafire fuselage arrestor hook area. Note the flashed-over corner in the starboard-side part. Flashers-R-Us, this kit (I have seen much worse, though - many years ago) Follow this link to my Flickr account The phone camera is driving me up the wattle. This is the best that it's going to get unless I get a new camera. This latter event is highly unlikely as I really truly can't afford a new one. there is a little Nikon digital happy-snap (Coolpix L-something) camera lurking around somewhere. I will try and locate it as it can't be worse than the stupid phone camera, and my poor Canon's late macro function (RIP). Got the first coat of zinc paint on the welding bench today - I will be able to put coat no. 2 on tomorrow or Monday - then I will be able to flip the bench over when dry and load said bench up with stuff. Hooray! Single snap of the first coat up on Flickr.4 points
-
All decals and some white paint are on :-)4 points
-
I have been busy doing the running gear, I am still waiting for the photo-etch so I will not be able to do much more until that arrives. There are some points that may be of interest to those with the Dragon kit and they nearly threw me at one point . Anyway, I began by cleaning up all the running gear and getting it ready for fitting to the hull... I wanted to be able to remove the whole running gear and tracks for painting so I used Blu-Tac to attach it to the hull... The tracks that come with this kit are some of the best injection moulded tracks I have seen and are beautifully done... There are some complete sections for the top and bottom runs and an awful lot of single links for the sprocket and idler sections. The tracks consist of two types of link, one with the guide tooth and one plain, you must take care to get them in order and ensure that when the sections for the sprocket and idler, which you make up match the link they will be joined to, plain to toothed and visa versa. The completed sections are made up as per the instructions. On the first side I only made up the bottom run, which proved to be not the best idea, you really need to make the top and bottom runs to fit the tracks without hassle. I stuck some greaseproof paper on my cutting mat to ensure that no glue would seep onto it and cause the runs of individual links to adhere... You are advised to use 10 of each type of link for the front run, so began the careful glueing of the links. I used Revell Contacta cement as I wanted a long set time to allow for manipulating the track run... It continued until a full length was completed... The rulers are to ensure the length is straight. This is when I discovered I should have done the top run as well as the bottom one . It is easier to fit the made up length over the sprocket by attaching it to the top run and bringing it over the sprocket to the bottom run, I hastily made up the top run to do this. Now all that remained was to make up the second length from individual links and this is where the snag occurred. You are advised to use 8 of the track links with guide teeth and 9 without. I duly made up the length of track and attached it to the sprockets, I could see right away that there was a problem... There was this gap in the tracks, a bit of a shock really. I counted up all the remaining individual links and put aside those that are required in the instructions, I had a lot of links left. I assume that the amount of links quoted in the instructions is incorrect and used the spare links to fill the gap. If you are doing this tank you will need 3 of C1 and 2 of C2 to fill the gap. I managed to fill it and finished the track run... I realise that the track sag is not prototypical, but given the method of creating the tracks I think it would be difficult to get the correct hang, however I think this looks ok and I am happy with it. That's it for now, all comments welcome. All the best, Paul4 points
-
Most of the main decals are now on, still need to add the one which goes on the Pitot tube, and then the ones on the tail fin. Most of the decals went on ok, but had a few problems with one of the ones on the spine, on a close look there are a couple of small creases which I wasn't able to get rid of.4 points
-
1/72 Academy kit + Aires, Eduard, Master. Regards, Alex.3 points
-
Hello, under assessment I give the last model: Airfix 1/48 Buccaneer - operation Granby "Desert Storm" 1991 Irak - WX533 - "Glanfarclas" from Lossiemouth Added: Eduard PE exterior/interior, resin cockpit - Neomega, pitot and refueling probe - Master, AIM-9 - Eduard resin, PaveSpike - Hasegawa, decals - ModelAlliance - MA 48100. Engraved missing lines, corrected bays wheels. I invite you to opinion3 points
-
Greetings fellow modelers! This is the Hasegawa 1/48 F-15E converted to a TF-15B Demonstrator AF no.(71-0291). It took me almost one year to complete and used lots of aftermarket to help me during the process. Verlinden cockpit for the Revell F-15E was used and adjusted to fit this kit. Eduard Pe for interior and exterior. The most work was done one the Mk.20 Rockeye bombs, x22 times.. The AIM-9L Sidewinders are from Eduard. The front wheel strut was cut and a brass rod was inserted with a slight angle to it. Burner cans from Aires. The CFT's where treated with 0.03mm fine plastic rod to represent the sealing rubber around them. The air-brake was cut to shape and epoxy putty was used to achieve the characteristic hump at it. The Vulcan cannon was removed and epoxy putty was used to reshape the area. All antennas are made from PE frets. Angle of attack probes are from master. Flaps where cut and put in the down position. All nav lights where remade using epoxy glue and painted with clear blue and red accordingly. All the colors used are from the Gunze acrylics range. Cant remember which ones exactly at the time. Alclad II colors of various shades where used for the burner cans and its housings. And I believe that's it! I hope you will enjoy the pics and keep up modeling...!3 points
-
Hi all After taking part in the Starter Set Group Build, I sort of got the interest back into making stuff. One kit that has remained with me, from when I started it about forty years ago, is this red monstrosity. Only by getting it out again can I remember why I gave up plastic kits and turned to electronics. Anyhoo, I felt I should exorcise my demons and see it through to completion. NOTE:- This was not to be an enjoyable build, more of a construction of attrition. Thso, this is what was in the Time Capsule Starting on the top deck And the bottom deck Sides on And the top Those side guards were interesting... But at least they stayed on! Now, the rear stairs Still, not too bad A couple of paper signs on ...and that's it Every visible surface seemed to have an ejector pin mark, decals and paper signs the wrong size, lack of locating pins, the drivers left hand just a stump (Pirate, anyone?), but at least it's out of the "Cupboard Of Doom"! What to build now? Cheers Steve3 points
-
Not usually a fan of Soviet armour but there's something about Tamiya's new SU-76M I found appealing. This is a straight OOB build. I used Xtracrylix Russian Tank Green for the overall colour and this was weathered with filters & washes. The figures were painted with Humbrol enamels, and yes, the commander does have a remarkable likeness to Vladimir Puttin! image hosting 5mb upload pic greenshot adult image adult photo sharing photo hosting 20mb image hosting imgupload Thanks for looking3 points
-
hello, Thanks all. As I presume, ringing this little thing was...interesting..... That's all folks.3 points
-
hi,calling this done ,not how i wanted it,but can get another one ,i liked this kit,but the tracks were a vocation,..,theres some pics here with the ref i used for the build,the kit bits are in the progress section, i like the pic of this packed up for dropping,i may do that one soon?..theres a pic at the end of this with the BMD-2, different rockets, DID I SAY ITS GOT A ROCKET/MISSILE...heres the pics... cheers don3 points
-
Thanks again lads. I am on the last leg now. As I always do I have highlighted the panel lines with a wash made from oil paint and thinner. I applied the wash with a brush and then taking off the excess using a cotton bud dipped in oil thinner. Most of the thinner is removed from the cotton bud using a paper towel just leaving the bud slightly damp. Then I brush the bud front to rear over the panel lines. With that done I sprayed the model with a matt varnish to slightly take a bit of the shine off. Once dry it was time to remove the canopy mask which came off without any problems. For the stand I bent a brass tube and polished it then I used a base I had made earlier for oak flooring which I had routed the edges and polished. Then using CA glue I brought them all together. Finished! Thanks everyone for your comments & support throughout the build which are always welcome as ever.3 points
-
Two bits of exceptionally good news. Because of the risk of BREXIT, its started raining really heavily which means she cant put me on general duties in the garden, and its going to continue to rain for 8 days (apparently). That said, the Met office couldn't forecast a sandstorm in a desert.... micro-mesh has come. Woo hoo! its incredibly fine and used for glass polishing apparently and a gather you lot in here use it for canopies? The rain means I can hopefully crack on a bit is the good news Queens fly flew over. Should have seen the size of the big ones. Absolutely mahoosive!! Bit disappointed they are some distance away. They normally go straight over the top of us. Last time they flew over the palace, a spit flew over us and circled round then dropped and tipped his wing at me and mrs. It was jaw dropping3 points
-
Clumsy heavy handed eejit quotient.3 points
-
Nope..... But it's sorta working Out of interest - those lumps and bumps on the front of the rear coaming can clearly be seen on the photo by Nick Turner in the BM walkround section: It looks like the front of the coaming is a removable thin moulded cover - presumably for the access to the back of the instructors instrument panel. This one looks in pretty poor shape! Anyways - it was easy enough to cut a section from a resin cast and sand it down from the back: And then glue the bump to the front of the vac-forms: I decided to cut off the little rectangular bits and add them separately with offcuts of plastic strip. This was in any event how I made them for the resin master and they'll look crisper and neater if just do the same again on the vac-pulls. I also had a play with refining the back end of the hawks. Here's another close up from the BM walkround - this time by Graham James - ignore the red arrows specific smoke dye pipes: I've started to open out the jet pipe hole at the back. The in-progress one is at the top and the bottom one is as provided by Airfix: When finished I think it'll be a big improvement to how it looks. It's easy little things like this that make a difference. What I really need now is a plastic straw of exactly the right diameter to be the jet pipe.........Absent that I haven't figured out how best to represent the jet pipe yet...... It gave me a chance to play with my new modelling toy - a Tamiya battery powered router. It's just powered by a couple of AA batteries and so it's a whole lot less powerful (or noisy) than my old dremel and easier to control for small jobs on plastic like this Steve3 points


This leaderboard is set to London/GMT+01:00