
Leaderboard


Popular Content
Showing content with the highest reputation on 01/06/16 in all areas
-
Gleed's steed. I used the new Tropical kit, but since I already built a tropical one last year, I stayed with simple this time.24 points
-
Another eternal Tamiya's Spitfire in my collection . Mk.IIb in markings of 306th RAF Polish Squadron. Plane flown by mjt. Tadeusz Rolski, England 1941. I used Aires resin exhausts, Eduard small FE for the cockpit, also their masks and Techmod decal sheet. Tadeusz Rolski, first from the left, awarded the highest Polish medal of Virtuti Militari. Also awarded DSO as the first non British citizen during WW2.22 points
-
G'day All The Martin P6M Seamaster was conceived as the bomber part of a water borne strike force for the US Navy, along with the Convair Sea Dart fighter and Tradewind Transport and included all the associated beaching gear , bomb loading equipment and Seaplane Tenders. All of this was built and tested but in the long run, was far over budget and not needed anyway, due to the available land bases that US forces were able to access. Apart from an early "Fit the Box" scale effort from Revell, this 1/72 scale kit from the French Mach 2 concern is the only choice. I was a bit apprehensive about the brand but the actual plastic was not too bad and I really did want a Seamaster. The clear bits are the real problem with these kits although the P6M has only the canopy to worry about, un like the Convair Coronado which I have also built. An invaluable build article in Scale Aircraft Modelling pointed out the lack of "Toe Out" on the engine nacelles, done on the full size aircraft to prevent the jet blast from damaging the skin on the rear of the hull, this was the only alteration I made otherwise she is OOB. As a point of interest, the beaching gear was designed and built by the Aeronca Company and could be manoeuvred under the hull and clamped on with airbags, enabling the Seamaster to be taxied in and out of the water with the greatest of ease. Thanks for looking Trev IMGP7844 by Trevor Putterill, on Flickr IMGP7843 by Trevor Putterill, on Flickr IMGP7842 by Trevor Putterill, on Flickr IMGP7840 by Trevor Putterill, on Flickr IMGP7839 by Trevor Putterill, on Flickr22 points
-
This went together beautifuly, it has the Eduard interior and seatbelts added . Painted using CJ Aerosols BS matched Olive Drab with a few panels brush painted with the same colour from Hataka, blades are CJ RAF dark green19 points
-
Hi guys, Its been a LONG while since I last posted, please forgive me. Here is my latest effort, a Revell 1/144 scale F-14A Tomcat, which is a great kit. The photo's aren't great, so it may have taken out some of the errors!! I photoshopped out the stand on the first 2 pictures, but nothing else, as I don't know how to do anything else? Comments and critics welcome. F-14-1 by tonyrichard24759, on Flickr F-14-2 (2) by tonyrichard24759, on Flickr F-14-2 by tonyrichard24759, on Flickr F-14-4 by tonyrichard24759, on Flickr18 points
-
G'day All After WWII, there was a considerable shortage of US Dollars in this country. Australian National Airways were on the lookout to purchase new equipment and while new aircraft were out of the question, they managed to get hold of two low time Douglas DC-6s purchased from National Airlines in the U.S. They were delivered to Australia in their National colours with just the added ANA titles and at a time when airliners were painted in rather conservative schemes, the brightly coloured newcomers were something of a minor sensation, so much so that when then first of the newer DC-6Bs arrived , it too was painted in the same scheme. VH-INH the subject of my model, was named "Bungana" (meaning Chief in the local Aboriginal language) following company policy of using names ending in "ana". She later served with TAA before being on sold to Sterling in Denmark and converted to a swing tailed freighter. I have read the long list of "Inaccuracies" associate with the Heller kit but she looks enough like those that I saw every day through the classroom window , knowing there was only 30 minutes school time left, to suit me. The kit is a trouble free build and needs no filler, paint is Humbrol with 2001 dull aluminium for the metal work. The decals are by Hawkeye and went on without a problem. Now I need someone to make a set for a Conair Fire Bomber. Trev. IMGP7849 by Trevor Putterill, on Flickr IMGP7848 by Trevor Putterill, on Flickr IMGP7846 by Trevor Putterill, on Flickr IMGP7845 by Trevor Putterill, on Flickr17 points
-
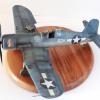
hello guys ! After the Tmiya birdcage 1/32 .... the brother the F4U-1A 1/32 tamiya, beautiful kit , as the birdcage a real pleasure has to build... Having seen the excellent corsair of Spencer in the tamiya magazine last year, my interpretation of the kiwi corsair harness textile HGW ,resin wheels barracuda ,decal ventura and xtra-decal , painting gunze , wash AK intercative , pigment AK and tamiya ,water colors pencil , (I have another birdcage tamiya 1/32 in the hiding place ,.... maybe F4U-2 ....to be continued ) brother in arms... in show case .... best regards Pascal14 points
-
A lot of mods, scratch-building and corrections went into this one (please see list at end of the post), far from perfect but it'll do. Here's a link to the build in the Work In Progress forum: http://www.britmodeller.com/forums/index.php?/topic/235000785-trumpeter-172-beriev-be-6/ Here's a list of the mods I ended up making: Engines: Remove ventral nacelle/wing panelling and scratch-build cooling air ducts from plastic-card. Replace kit cowl front with inverted B-29. Modify shape of cowl upper intake mouth to Be-6 shape using plastic-card and filler. Scratch-build cowl intake trunking to prevent see-through. Scratch-build small scoops in cowl mouth and add drain pipes outside this. Use R-3350 from B-29 after removing ignition harness and scratch-building magnetos. Scratch-build new inlet mouth for air intake scoop underneath cowl. Hollow out rearwards facing vent on top of nacelle. Scratch-build rear part of exhaust pipes. Replace kit propellers with B-29 items. Do not use kit parts ? & ?, they represent turboprop exhausts! Wings & Floats: Reduce size of circular inlet in starboard wing, add matching inlet to port wing. Fit fuel-dump pipes and cut way when dry to fill their locating holes as not required. Shorten fuel-dump pipes and re-locate further back along wing chord. Cut rounded tips off pitots. Fill engraved leading edge-lights located mid span. Scratch-build clear landing lights in leading edge near tips. Round off and refine slab-like wing fences near tips. Replace slab-like kit float struts with scratch-built streamlined section items. Drill holes in back of weapons pylons and wing to attach weapon release cables made of wire. Fuselage: Scratch-build left side control column (not supplied with kit). Move pilots’ seats closer to control columns. Remove TV-style antennae represented by solid blocks moulded either side of cockpit. Scratch-build new TV-style antennae and their mounts. Remove port-side vent below cockpit and carve new open-mouth example from scratch. Drill out mouth of air-scoop mounted on canopy. Dill out mouth of air-scoop mounted on rear fuselage. Remove rear of small vent on fuselage rear and replace with open mouth made from cut tube. Replace nose cannon barrel with scratch-built item using hypodermic needles. Replace kit mid-upper turret with B-29 item with modified Soviet style gun mantlet. Replace turret cannon barrels with scratch-built item using hypodermic needles and plastic tube. Raise rear gunner’s seat from keel to correct height to look out of his canopy. Add plastic-card rear wall to rear-gunners compartment to hide seams where tail-plane joins. Scratch-build rear-gunner’s gun-sight. Replace rear cannon barrels with scratch-built item using hypodermic needles and plastic tube. Remove and refine sea-rudder, and add bottom hinge structure. Replace several antenna masts with scratch-built examples (kit ones look like power-poles). Don’t fit APU exhaust part F63, it’s a feature of the turboprop version, but fill in engraved lines marking its location.13 points
-
Hi folks: I know - they're not aeroplanes. I popped them here as they're not 'AFVs' and commonly hang round airfields. Just had the pleasure of completing the new tool re-supply set for US aircraft in the one true scale. A build account is in Issue 68 of Airfix Model World, out in the UK this Thursday. The diminutive Cushman trike, airfield runabout. Chevy bomb truck and M5 bomb trailer. Autocar and F1 fuel tanker. TTFN Steve :-)12 points
-
Eduard reedition ( Zvezda sprues ) with resin AML convertion set. Painted with acrylic Gunze C paints. Markings for 2nd Czechoslovak Fighter Regiment, summer 1945.10 points
-
This is my Revell Hurricane in 1/72, this one being in No. 336 (Greek) Squadron, Desert air force, RAF, LG 8 Mersa Matruh, Egypt, 1944. The kit is good, with great surface detail and nice cockpit. Fit of parts is average, with the panel on the bottom of the fuselage and sand filter being the worst. Other than that, it's a great little kit. It was airbrushed with tamiya acrylics, weathered with tamiya acrylics and humbrol enamels. (Ask if you want to know details) To some it may be over-weathered, but I'm not too fussy I would hav liked to make it more dusty, but I'll live with it for now You'll probably notice that one of the cannon flash marks is a bit crooked, and the canopy frames may be in the wrong place, but this is my first time ever (I know ) masking a canopy!!! Enough of my yapping, on with the pictures! Hope you like it (Sorry about the pictures... it was cloudy for once!! But WOOHOOO! [You will by now know I'm not a Brit, but I am a modeller..... ]) Oh yeah... base was wood, ground cover was sand, water, PVA glue, and Humbrol 93 acrylic paint.... Thanks for looking!!9 points
-
These are what they say straight out of the box with the kits decals. I have never posted a model on any forum ever so I will be interested to see what people think, good or bad obviously. I have tried the wood grain effect with various techniques but mainly the traditional way of applying oil paint with a hogs hair brush over a pale cream base and then a coat of clear Tamiya orange over the to when it is dry - one month later! Ha!9 points
-
Thanks everyone. Sorry for the lack of updates. Hopefully it should speed up a bit now. The base and revetment wall have both had a grey base coat over the pre-shading. These were mostly mixed from different Tamiya greys, with white added to lighten them. The revetment was intentionally darker, and had a little aluminium mixed in with the grey as I wanted it to look more like a metal structure than the concrete on the hardstanding. Both the hardstanding and the wall have had mottled over-sprays in paler tones to give them a more weathered look To try and get a more mottled, concrete-y look to the base, I sponged some masking fluid on in as random a fashion as I could The base then had a patchy spray with a darker grey tone. Some areas had more coverage than others, again to make the whole effect as random as possible The effect of the sponge masking inevitably looks a little obvious in places, so I'll probably do a second (and maybe third) round of masking and spraying, which should make the effect subtler but more complex at the same time (hopefully). Since I'd got a bit of the darker grey left over, I speckled it over the surface to give some finer detail, then thinned it and brush painted some corners and along panel lines to add more shading, and knock back some of the contrast from the masked shading That's helped it look a little more natural, but it'll still need the second layer of masked shading to blend it together better. At the end, I'll give it all a thin mist coat of pale grey to further blend and soften the effects as, being 1/72, I don't want the textures to be too strong, or it'll all look out of scale. Hopefully I should get some of that done tonight Andy9 points
-
Cheers Rob, thank you, you're always very kind Here's another small update, right before my very long WE commences (actually starting tomorrow, Republic Celebration here in Italy); adding more bits to the underside, wheel legs and wheel bay doors Air brake actuators cut to size and glued in place: I decided to glue them first to the air brakes because I did some test fitting and it turned out it was almost impossible to fit them in once the brakes were in place. So, once the air brakes were positioned, I just gently pushed down the actuator end with a toothpick, gluing it to the main structure with a drop of CA gel: Front bay: As you can see, I've also fitted the small black blade antenna; now I still need to glue in the sensor. Sandy Bay-Bee has got wheels, now And she's obviously standing on them: That's it, comments welcome Ciao9 points
-
Dear Colleagues The Hasegawa F-15C is pleasant though slightly dated kit. It is well engineered and fits pretty well. My only angst was getting the decals to set on the missiles from the Hasegawa missile set, ooof! The missile load out I got from very magazines and internet searches. Sorry it is not very British, but it set against a backdrop of photos of my local RAF base! Yep, those are resin exhausts! Andrew8 points
-
Finally got round to finishing a model!! Bandai's superb TIE Fighter from the original trilogy. Painted using Vallejo Model Air, lightly weathered with a Flory wash as TIE fighters were mass produced by the Empire and usually didn't last long enough to get overly dirty!! Final coat of Alclad Semi Dull to seal it all. There is also the obligatory lighting in the cockpit and ION engines! Comments welcome as always. Cheers, Warren7 points
-
This is my new project and I have wanted to build it for awhile, it is going to be a fun one. I seem to have a knack for old cruddy kits this will be the third large bird I am doing after the B-1B and SR-71. To start off I washed all the sprues in soapy water because they were very oily from whenever they might have been molded. The kit comes in a couple different color sprues. The panel lines range from sharp and crisp to wide trenches with no form so some filing and rescribing will defiantly be needed. The tires are rubber and not very good but I don't really care because I'm doing it in flight gear up. The clear parts are okay, I have seen worse. They are a bit scratched up but nothing a polish and some future can't fix. The decal sheet is huge, one of the biggest I have seen. I plan on getting some AM decals for this so I don't have to deal with these if they are cruddy. Stay tuned for updates hope to have one up soon7 points
-
Revell 1:72 Handley Page Victor K2 XH672 Maid Marion(04326), Nos 55 Squadron, RAF Marham U.K., Operation Desert Storm, 1991. Finally a couple of pictures of Handley Page aircraft development in the 22 years between the first flight of the Heyford in 1930 and the Victor in 1952.6 points
-
another week and another build just finished, and brings this years tally so far to 23!!!!! picked this kit up part started earlier this year for £5, though later found out the decals were also missing but managed to source some. But due to no decals and the ones id have weren't 100% would be ok I went for the nmf loom, plus I need to try and learn to use alclads better so this would be my chance. The kit went together well and yes is an old kit and has raised panel lines but that don't bother me as would be doing a clean bird, the only issues I had was the paint stage and that did try my patience as after each colour I gave it a coat of alclad gloss yet once dried Id mask off some panels to do the next colour and no matter how low tack I made the tape or what varnish I used paint still came off with the tape.... so what I hoped would be a simple job ended up being several re-dos.. but despite the paint issues I've finished and may not of go the best results like I have seen others get with alclads im happy with it, there is a drone with the build and will be putting on the blackbird but ran out of one the alclads and will do it at a later date..6 points
-
This is a model I have wanted in my collection for over 10 years. I have never seen this Revell kitset before, and when a customer of the shop I work for offered me one I jumped at the chance. Thanks Doug. The box says it was made in 1972, making it 10 years older than me, and I've got to admit, I'm glad technology has moved on. However, not to be beaten by an old kit I set to scratchbuilding parts, and modifying it. I started on the engines. The intakes have had a metal tube inserted into them to get rid of any join lines, and a cut down photoetch fan blade (intended for Revell's 747) was mounted at the far end of the tube. I used 1/72 1000lb bomb tips for the spinner hub. I've got to admit, seeing light through the bypass and fan blades is very satisfying. The exhausts were next. I have cut down some spare 1/32 droptanks to the correct sizes and lengths to get the exhaust ducting more 'scale' like. All of the metal surfaces were painted with Alclad. The decals are the old Microscale ones, which despite their age went on fairly well. I mixed my own colours using Gunze paints for the Air NZ scheme. Given what I started with I'm very happy with the results. Thanks for the use of the camera John Darlington. Regards, Alan6 points
-
There's still time to make more mistakes John, quite good at scoring own goals on the finishing straight!!! Got the decals on and done some weathering up top. Still more work to do below. Decalling has been troublesome. The Airfix decals were very translucent so had to put double layers on. Fortunately, I had some Tamiya white discs from a Spitfire set that went under the wing roundels to hide the stripes but they're still slightly visible. The Modeldecal ones suffered badly from silvering and had a yellow gunge which needed removing. Anyway, as it stands today....6 points
-
To answer the last post, there was not a sole to be seen on the south side of the field on Sunday, not even a fire truck. I know several of the traders at Duxford and they were most unhappy on Sunday morning at the lack of visitors (around 8,000) on Saturday to go with the increased charges for their pitches. It was most disturbing to hear that some people had been turned away on Saturday who had not been aware that it was an advance ticket only show. Even worse (if true) that an odd few arrived without a car park ticket (a fiver on top of the entrance price!!!) and were turned away too. The need for a car park ticket could easily be missed when buying a ticket on line. Given the vast amount of white space on the A4 ticket sheet when printed, did someone not think to add a bold note - Have you bought a car park ticket? Why on earth, given the low take-up of tickets for Saturday, did the organisers not put in place the facility to take money from those turning up without a ticket? I guess that casual overseas visitors to Duxford, unaware of the air show could not get in either??? There are many reasons why advance ticket only is a good idea but not so for a show that is never full. Although a good afternoon's flying, there was nothing of note to attract a good crowd. It makes sense for the busy Flying Legends show or for when a Vulcan or a couple of Lancasters are due to pitch-up. Knowing the fickle British weather and the price of the ticket that could be wasted if the forecast is bad, many must think twice before buying. Imagine if the shocking weather in that area had been a day earlier!! Maybe the organisers need to put on a commercial hat and have a plan B should ticket sales be underwhelming as they were on Saturday. If people without a ticket were turned away on Saturday, every four extra sales would have been more than £100 into the museum's kitty for very little extra effort. Anyone running a business would not turn that down and maybe the Duxford team need to be a bit more creative in their thinking. in future.6 points
-
A few update images... Wings and prop on... So looking like a Seafire at last. A bit of detail painting and the canopy needs fitting and it's pretty much done... Stay tuned.... Cheers Plasto6 points
-
The decals are on the CMR XII. Dang it, forgot the fin flash. PIC LOST TO PHOTOBUCKET There we go, better. Got some matt varnish on the Brigade/Sword. PIC LOST TO PHOTOBUCKET PIC LOST TO PHOTOBUCKET Next up, I need to mask and paint the molded on exhausts, and maybe another matt coat.6 points
-
Busy weekend! Not on this but everything else. Main build now finished though and I'm very happy with it. Just a couple of quick pics to update before the primer goes on, probably on thursday evening as I'm busy tomorrow. As mentioned already, I can't recommend this kit highly enough. A couple of little touches of filler, then prime it and start the painting. EDIT: Late night shopping weakness means the canopy mask is on its way and as I needed to bump it up for free postage I now have decals for my intended Black Mike Phantom build and a selection of Vampires, Tornadoes and a couple of other things.6 points
-
Hi there, Just finished this one and thought I'd put it up. It's built out of the box apart from opening up the wheel wells a bit to show the detail under the cockpit ( Revell provide the detail under the cockpit, and then decide to close the wheel wells for some reason! ). The kit's over 15 year old now and the mold is getting a little old, there was a fair bit of flash and lots of mold seam lines. It went together well enough though. I'm quite happy with it, the camo on the fuselage turned out better than I hoped it would with a brush, and for once I have got rid of most visible seams. I'm raging about the glue smudge on the inside of the windscreen ( noticed *after* I'd glued it on ). Nice little kit though, with good detail for its size. The cockpit is well detailed but as usual almost invisible under the canopy. Apologies for all the pics, I went a bit mad! *Kit: Revell Me 262 B-1a/U1 *Scale: 1:72 *Paints Used: Brush painted with Revel Aqua Colours, Panel washed with Promodellers Wash *Extras Used: None5 points
-
Good morning! I picked up this kit from Bruntingthorpe on Sunday along with a 1:48 Airfix Lightning. I will be quite honest- this kit is a mixed blessing: Pros: -Great surface detail -Resin exhaust cans and seats -An Eduard photoetch fret included (this contains the instrument panel, belts and various aerials -A large decal sheet (which was barely used, decals sourced from the spares box for my alternative scheme) -Relatively straightforward to build and paint -Positionable flaps Cons: -Almost nothing in the way of guides to tell you where you should place the various parts (cockpit tub, intake cone and nose gear bay) -Nothing in the way of guide pins for the rudder and elevators -Main wheels with no hole through them (a hole had to be drilled to fit the axle through) -A myriad of ejection pins inside the fuselage, specifically of concern were those in the intake area -Wing-fuselage locating pins did not fit at all and these were subsequently filed down -No option to have open airbrakes!!! What I've done: Well, with a bit of fiddling around I apparently managed to get the intake cone, etc and the cockpit to line up correctly in the fuselage- once that was done I closed it up, added the various surfaces and painted her in Alclad. It's my first time with Alclad! I put down a coat of black Vallejo paint followed by a coat of Alclad gloss coat. I then sprayed on the Alclad, building it up to what it currently is. I didn't need to re-paint the black rudder because that was masked over before I sprayed the Alclad. I then masked and painted the yellow stripes on the wings and rear fuselage, added the IFR probe, small intakes and attached the PE aerials. Kit: Sword Lightning t5 1:72 Paints used: Vallejo model air: black, gold yellow. Alclad II Aluminium Note: Decals used and colour schemes are based off reference pictures but are to some extent fictional Thanks for having a look! Many thanks, Sam5 points
-
Thanks guys A bit more masking and painting has happened. As Will suggested, I masked off some of the panels so the patterning from the masking fluid doesn't extend to adjacent panels The masking fluid was sponged on as before, then it was sprayed with a mix of Vallejo white grey and aged white. I then sprayed some Vallejo grey wash around the edges of the panels. When I rubbed the latex off, the pale grey had knocked back the contrast a bit, but there wasn't as much mottling as I wanted so I sponged on more fluid and gave it another spray with Tamiya ocean grey, then some patchy areas of Tamiya buff. All these paints were quite heavily thinned, so they were pretty transparent. With the latex rubbed off again, and the masking tape removed, I thinned some Vallejo pale blue/grey, and misted it over the whole surface. The panels with the extra coats are noticeably darker, and I was intending to spray the other panels as well to match them up more. Now I'm thinking I may leave it as it is. I'll have a fresh look at it in daylight, and decide whether to add any more to it. It'll still get some discolouration, stains etc. along with the ground markings Andy5 points
-
Primer on - frames first: then the main grey: Off for a bit of family time in Devon tomorrow, so preshade etc will be either Sunday or maybe next week(end?!).5 points
-
Morning folk,s started work on the turret while waiting to get the Green I need,the breach of the gun and fittings are supplied with the kit and I have assembled the pieces ready for painting I will spray the turret interior so that the hatches can be posed open.5 points
-
First sprue shot is up.5 points
-
Another..5 points
-
Constant Endeavour As I type this, the nation is marking the 100th anniversary of the Battle of Jutland. The outcome of WW1’s largest naval battle may have been indecisive, but it marked the final fleet action between battleships. Subsequent naval engagements have tended to be on a more tactical level, with small groups of hunters and killers at work. But one thing above all else changed the face of naval warfare. Air Power. Once planes became more than string and sealing wax, they took new tactics and threats aloft with them. Nothing personified this more than the actions of the Banff Strike Wing, as it sought to deny the Axis powers the use of the Norwegian Coast and the North Sea for raw material transport. ROYAL AIR FORCE 1939-1945: COASTAL COMMAND. © IWM (C 5212)IWM Non Commercial Licence But they were not the only units operating from Scotland. Many other flights across the unforgiving North Sea also operated, and among these were the famous Mosquitos operated as fast transports, by BOAC. BRITISH OVERSEAS AIRWAYS CORPORATION AND QANTAS, 1940-1945.. © IWM (CH 14389)IWM Non Commercial Licence One of two memorials to the crews of Coastal Command is situated in North Berwick RAF Coastal Command Memorial by jongwinnett, on Flickr The text of the memorial reads: TRIBUTE TO ROYAL AIR FORCE COASTAL COMMAND IN SCOTLAND During the Second World War, aircraft of Royal Air Force Coastal Command operated from the 27 Scottish bases depicted on this map display under control from a headquarters at Pitreavie Castle in Fife. The British Isles presented a physical barrier to the submarines and ships of the German Navy, around which they had to navigate before they could operate against Britain’s vital shipping lifelines across the Atlantic Ocean. The first task of the maritime and photo reconnaissance squadrons, operating from these bases, was therefore to search for and attack enemy submarines and warships attempting to sail around the north of Scotland or through the Faeroes-Iceland gap. Patrols from bases on the East Coast also swept out across the North Sea towards the coasts of Norway and Denmark on reconnaissance and anti-shipping strikes in the face of fierce opposition against German convoys sailing down the Norwegian coast. Others, took off from the West Coast and flew far out into the Atlantic constantly searching for U-boats and raiders deployed to attack our convoys carrying food, war materials and men to Britain from Canada and the United States. German naval units were also based in Norway, following the occupation of that country, making the tasks of Coastal Command yet more difficult with its aircraft operating over the inhospitable waters of the far north, to stop the U-boats reaching the Atlantic and also to support our convoys sailing to Russia round the north of Norway. Among other roles, the meteorological squadrons, operating at long range over the Atlantic in all weathers, were pivotal to the success of Bomber Command and in preparing for the Allied landings in Normandy in 1944. While the Air Sea Rescue launches, deployed around the Scottish coastline, played their crucial part in the rescue from the sea of airmen and seamen, both friend and foe. In their long and demanding patrols across the featureless expanse of the ocean searching for the enemy, the crews of Coastal Command faced danger not only from enemy attack, but also from extreme weather. In contributing to the Command’s overall task, and its magnificent record of 189 submarines sunk and a million tons of enemy shipping sunk or disabled, many made the supreme sacrifice. But by their courage and perseverance - as for those of a later Cold War age - they helped preserve the freedoms we now enjoy. The self-sacrifice of the crews of all units was enormous, and my humble skills will, I hope, produce some fitting tributes to them all. Some of the raw materials can be seen below: Next projects by jongwinnett, on Flickr4 points
-
I just finished this, build thread here. It's a kit I've had for nearly 30 years and it's nice to get it done. It was quite toy like and I've done my best to enhance it and make it more like the "real thing". The rocket nozzles were moulded in polythene and horrible to work on so I cast new ones in resin, I scratch built the landing feet, added the rollers and I also opened up and glazed the windows: I hope you like it.4 points
-
Hello all, Here is my entry for this GB. Tamiya's great little T-34/76 1943 production. I had planned to do completely OOB but the decals are scrap. Suppose I can't complain as the kit was less than £10 on eBay. I know these have nothing on the newer Dragon examples but I love these older Tamiya kits. Remind me of my younger days when my late father and I used to sit and build them on a wet and windy Sunday afternoon. Kit will be all buttoned up, with a rough snow-camo pattern applied. Dave4 points
-
Hi all, I finally gathered the courage and decided I'd join the group build. Common sense prevailed and I stuck with a project that would not take up too much space. Namely, I'm going to clean my stash of all remaining Hobbycraft I-16s. I made a few of these in my youth, unfortunately they were dumped in the bin by Mother dear after I left home . Only one survives and that's because it was being refurbished. Unnecessary bits from the Eduard and Ark kits ought to simplify things and improve accuracy. Unfortunately it seems I'm already off to a rocky start and today's work will be mostly undoing the damage I've done yesterday. The first specimen is meant to be a Type 5 and has had some work done on it, well below the 25% threshold I'd say: (In the background you can see the lone survivor, but it will not enter this GB). Reinforcements from the rear: the Eduard type 29 does not need these. I still need to raid the Ark kit for any piece it can shed. Now for my own embarrassment:undersurfaces from the other kit which I mean to build as a rocket-armed Type 24. I must have been modelling DUI because I thought at first that I could move the entire exhaust area to its correct location and only later I saw the folly of my actions. So I blanked the existing exhaustes and drilled holes in the new wrong position! I have plugged the holes with stretched sprue, now I'm left with the reinforcement and rescribing of the port side. In short I made a dog's meal of the piece. I'd like to say things can only improve from here, but I know myself...4 points
-
This small tank I've been working on for half a year or so. While Dragon's plastic parts fit nicely, the photo etch side skirts need a lot of tender-love-and-care to get them positioned correctly (something I've not entierly achieved). However I feel they look much better than the kit's oversized plastic parts and you can add some 'battle-damage' with a pen. The vehicle was painted with Gunze/Mr.Hobby acrylics and weathered with pastel chalks and artists' oils. It represents a tank from 6. Panzerdivision at Kursk, 1943. Photographs taken by Mr. Wolfgang Rabel of IGM Cars & Bikes.4 points
-
Just completed this, a 1/72 scale Trumpeter Sturmtiger. Had issues with the tracks not sticking to any glue, of any description, and with the lighting in my photo booth pulling out the rust run colour that isn't as strong in day light or my modeling lamp , but here are the pictures Ive taken anyway, enjoy..... [/url] ATB Sean4 points
-
With the encouragement of having Mark's photos I decided to tackle the airbrake modifications. I'd already scalloped the airbrake petal but I'd taken it too far, more akin to the F6 than the F1 so I had to rebuild it using putty. While the putty was hardening I tried reshaping some quarter circle Evergreen strip, not easy to photograph but here it is. I've still to shape the fixed part where it will fit the petal and to shorten it but the cross section is getting there. This is what I'm aiming for, this is an F2 but the airbrake is the same. You can see the slot for the airbrake ram in that photo too so I thought I'd better incorporate that. I chain drilled a series of 0.75mm holes then cleaned up the corners with a sharp blade. The 'extra' hole (or cock up as we in the trade call them) was filled. I've applied a coat of primer, in this case I thought I'd try the Ultimate Primer and it went on well enough but I had to keep unclogging my 0.5mm nozzle. ....and just to prove to Col that at least one of my Phantoms is still making slow progress, I'll be painting this one in DSG/DG at the same time as the Hunter. Duncan B4 points
-
And finally the end of this build has arrived. After a bit of research and looking at my pictures through a magnifying glass I have produced a drawing for the Cochrane banner which was flown on the port outer yard: I printed this onto some inkjet decal paper (along with some other items for future projects): After applying a couple of coats of acrylic varnish, I cut out the decal and added it to the model: And that is it; my model of HMS Somerset as she was in 1998 when I served on her is now complete: Thank you very much for following this thread and the kind comments along the way. I hope it has been useful for all those wishing to build a Type 23. I will post pictures in the Ready for Inspection part of the forum in due course. Thank you.4 points
-
Im back decals,filter and postshading done.I will do white turnet stripe again its too dark-one step for two back Some shade will come but first white stripe.Hope you like it-live looks better its only phone photos sorry4 points
-
Hey guys, just quickly some progress, step by step 1. layer of chipping fluid 2. glossy sea blue, not fully covered, just to make somehow "patchy" look 3. make patches of medium blue, white, yellow (that was bad choice, wont use it for blue camo anymore) and few patches of black here and there While waiting for it to dry, i took shots of the sharkmouth, made by homemade masks aand lets continue glossy sea blue, work gently with the airbrush, build up opaque layers 4. first gently layer of glossy sea blue 5. ... aaand 2 more layers later 6. and finaly after few hours spent on chipping the surface - also, i did not smooth out the rivets earlier and here is the reason why - at this stage i did run gently over the slightly raised rivets edges with fine wet sandpaper (4k ish), so the rivets are now slightly better visible, i have pushed more here and there I ll continue at friday thanks for watching guys and have a great day4 points
-
The base is almost finished, the palm trees arrived yesterday and the launch platform got attached to the base I also dusted over the damp claycrete with buff coloured pastel chalk, ground up in a pestle and mortar to deduce the orange-ness of the original colour I'd mixed up in the claycrete.4 points
-
evening folks thanks for dropping in Thanks Rene - yes it is Rhino, I have it on a 90 day free trial so don't have long to get the bits and bobs I want done! John - no need to apologise! I am grateful for your kind help whenever and wherever you care to give it. Thanks for the dimensions, I can go back and re-scale the spinner now.. so..... the wings.... I want to make clear before I start that it is only because I am forensically anal that I decided to mess with them. This type of big kit from HpH (unlike the new 1/18 Bf109 Emil) is meant more as a collector / museum / desktop model (the stock-in-trade for them with these are they are pre-built & pre-finished for the customer) than a super high fidelity replica, so me taking brutal measures with it is more me than the 'kit'. I don't want to diss HpH as I see every model kit, from every manufacturer as a canvas - they all need work to get what we want out of them.. ok.... no negative waves man.. ..the changes I wanted originally were to flatten the underside and reduce the thickness - I tried sanding (like forever..) but it really wasn't making much difference, so in the end I hacked out the bottom surfaces (having filled them with rigid foam)... ..then I screeded it with P38 Car Body filler (think its called Bondo in the US)... ..I did actually refine this to quite a good finish, and was going to be happy with that, but all the while I knew that compared to the plans the wing planform was slightly out. This has driven me mad for the last few days as I wavered between "shall I / shan't I" - well today I decided I couldn't invest the time in a project like this (especially a Spitfire) without putting it right. It would also make all the skinning & detailing later on easier as the wings will accurately match all the plans & drawings Tony has been kindly providing ..so, how to add 5 - 8mm to a trailling edge? it needs to be sharp, strong and flat.. I went for some brass sheet profiles (in two parts as the sheet I had wasn't long enough...) using the Monforton plan while I get Tony's printed, the outline also matches the Cooke plans... ..this is how they change the kit profile as laid on the plan.. ..and carefully taped into place so I could start to CA them onto the wing bottom face - this may adjust the trailling edge height by 1mm but I can live with that.. ..and CA'd into place.. ..lots of filler and the new profile starts to get built out.. ..will let that go off overnight.. I am a much more contented modeller now I think sometimes you just need to bite the bullet and crack on, otherwise the build might get clouded with regret.. TTFN Peter4 points
-
Morning folks,after a rest from this project I thought it time to move on a little so after masking I brush painted the yellow front cowl's using Humbrol enamels which took a good four coats to achieve the desired finish.also road tested the new table only a tenner from Morrison's and look how much stuff I can get on it no more aircraft hanging over the edge like a carrier deck and I can get a cuppa on their too! Oh,heres the Mitchell.4 points
-
The front gear door followed the profile of the original nose so I bent it to the new profile with flat jawed pliers: Filling round the engines, I protected this bit of detail right next to the seam with tape: I then got to work cleaning up the remaining parts, mainly for the undercarriage. This main gear door had to be folded, I first gave it a light scribe on the outside and then applied liquid poly to both sides to help soften the plastic: Both sides look identical to me but Revel has given them different numbers so I marked them up accordingly. Here are all the remaining parts off the sprues (apart from some aerials and the pitot which I will be scratch building anyway) ready for some primer: Some of the smaller bits I'm leaving attached to a section of sprue for ease of handling. Here's the primer done, white on the doors, grey on the rest: Then I added a bit of detailing in the front wheel well: I also tidied up the wing roots and gaps round the engines with some Perfect Plastic Putty: The final job of the day was to attach the tail planes: Those can now harden up overnight unmolested. Bye for now, Nigel3 points
-
Sat down tonight and worked on finishing of the upper cowling. After some mucking around I finally got it all painted and fitted all the little bits with surprisingly little drama. You'd think CA would be great for this but I have very mixed results with it. (zap medium). I ended up fitting all the bits by putting a very tiny blob of extra thin onto the correct spot then carefully placing and wiggling the piece until it looks right. I finish off by running a little bit more extra thin in from an inconspicuous edge, painted surfaces don't seem to faze it at all. And the finished product. The next step is to get some paint onto the main fuselage sidewall bits, add the oxygen hose and a couple of little wires, then I can look to close it all up.3 points
-
The aluminium is done (although the close-up reveals that there's some touching-up to do). I'm unlikely to get much more done today as I'm going to be recording drums for an EP I did a while ago. Before the aluminium: After: (Edited to correct spelling.)3 points
-
G-usa called it a stashette. Compact and bijou although I doubt if I'll build them all. No way can I compete with Sargent Squarehead's +2000 kits. That's bonkers.3 points
-
Hi everybody; here's my usual WE progress report. Been working on details; doesn't seem much work, but took a lot of time First thing was to re-position port side vari-ramp; before (see red dotted circle) and after Luckily I hadn't used much CA glue for this, so snapping it off was relatively easy; I trimmed down a bit the mounting tab and fit it back to place, gluing again with CA. Then I installed and painted the two GIB's rear view mirrors: Speaking of which: here's little Jerry completed: and little Gene too (added some details and a wash to the helmets, plus a gloss coat) I the glued in the pilot's seat top part: and started working on the speed brakes actuator arms: cut a brass pipe to size inserted a steel rod, glued with CA a bit of Tamiya tape: They were then primed with Vallejo Grey Primer, painted Lifecolor Matt Red thinned with Future, washed with a dark acrylic mix and dull coated with Lifecolor Matt Clear, all by brush: Now I only need to cut the steel rod to size. Bombs: main body sprayed with Tamiya Olive Drab: then a Light Grey drybrush on the fins and a dark wash (plus I repaired the broken fuse) Canopy arms: More details on the fixed bomb fuse, and a couple of other tiny bits primed and ready for paint: and painted It was then time to start gluing all the bottom side missing parts; here's where I am so far, with gun pod, aux air doors and inboard pylons fitted and glued with CA: Comments welcome Ciao3 points


.thumb.jpg.3c5b41eb004e624ff9bdf837868ecbb6.jpg)


This leaderboard is set to London/GMT+01:00