
Leaderboard


Popular Content
Showing content with the highest reputation on 21/05/16 in all areas
-
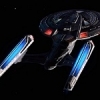
Kinetic's newest kit. OOB. It was an absolute delight to build!30 points
-
Good day to all! Here's another one of my model. Model pleasantly surprised. Almost everything was going fine. Cannon "Vulcan" looked awful. I replaced her. I used miniguns barrels in 48 scale Mini World production . It seemed to me, they are very similar. It is also used aphotoetched set and resin pilots seat. The model was painted Tamiya and MR Hobby paints. Weathering- oil dots, pigments and salt dots.23 points
-
Tomorrow at Newark Air Museum there is a V Bomber tribute event. As part of a display in have built the three bombers, in flight. As I'm waiting on glue to dry, this is the only one in a fit state to be photographed. It's the ubiquitous Revell/Matchbox kit, converted to B2 with a Freightdog conversion kit. Flightpath Resin intakes replaced the kit's ones, which are painfully inaccurate. Airdecal decals for 139 Sqn have been used. Overall, a horrible experience, which I never intend to repeat.... On to the pictures.22 points
-
De Havilland Comet 4c - 1:144 Airfix (Updated pictures) Dan Air - 26 decals [Edit] New pictures as I had forgotten a few final details on the model. Added this morning are nav lights, aerials, aerial line from fin tip, taiplane black tips, and some panel lining/weathering. [/edit] The Comet is one of the most beautiful airliners ever. In the 4c version with extended wings and pinion tanks it looked at its very best. To further emphasise its beauty and pure shape I wanted to model it in flight without the clutter of undercarriage. The idea of doing a 4c was inspired by Phil 'Vulcanicity's lovely model in BOAC colours. Phil used 1:72 drop tanks from the Airfix Vampire for the pinion tanks, so I nicked his idea! It's appropriate too, from one DH aircraft to another! Decals are from Two-six, and as usual are top quality, settling down beautifully. I used the cockpit decal here, although I normally prefer to kit the kits clear glazing, but there was no hope with the tiny, ill fitting part supplied with this old kit. I used one from my stash, remember this bit of nostalgia from the 1980's? The decals were yellowed and curled though, so I'm glad that Ray at two-six sells a far superior set for the 4b and 4c. This is the major part of the conversion. Extended wing tips, and slots cut for the pinion tanks which were also shortened by cutting a section from the middle. Starboard side mostly complete, port side in rough format. Thanks for looking, John19 points
-
This is a kit I have always wanted to build. I am the lucky owner of the Airfix twin kit so I wanted to be able to show this amazing airtcraft as best I could. I have decided to depict an aircraft from 208Sqn whilst it was on the Red Flag exercises in the 1970's The Buccaneers had never been seen by the Americans and during the exercise the RAF re-defined to the hosts what low level flying was. Ity was a superlative display of low level fast flying. Not one Buccaneer was intercepted! The kit has its issues, but forms a superb basis for super detailing, so here it goes! I wanted to show an Engine and the bomb bay, all my efforts are from refrence photos and are built by the eye, not plans, so it wont be 100% accurate. The photo etch is from Flightpath.15 points
-
This is my recent OOB build, a Trumpeter kit in average quality. Please follow the link for more pictures: https://www.facebook.com/liu.andy.3701 Hope you all enjoy it. Cheers13 points
-
Here is my latest build... and sadly the first finished build of 2016, but the year isn't over yet. No complaints with the kit, it's just Tamiya's Jug. I used Eduard placards, TD wheels, Aeromaster decals, and a quick boost seat. Colors are OD over Neutral gray with medium sea gray camo on top. It's a scheme that's been done before, but I like how much color it has. Brewer took the pictures for me, thanks!! Thanks!13 points
-
Latest of the bench. The old Hasegawa kit revisited, in the markings of 778 NAS, Arbroath, 1946/47. The FAA had one of these from the RAF for evaluation. Added a "hook"......(they do that in the FAA). It was the last Airacobra to see service in the Uk. It did not live up to expectation. Decals are from the spares box. It's a bit different and will be a talking point at the next club night. Hope you like. Please feel free to comment. Thanks for looking Dick12 points
-
Vulcan and Valiant to go with it.12 points
-
Sometimes it’s nice to take a stroll off the beaten track and that’s exactly what I’ve done with my latest offering, the Rus-Air resin Yak-42D in the simple, attractive scheme of Kazan-based Tulpar Air. I’m no expert on Russian airliners and I haven’t done any checks on dimensional accuracy but to my eyes the Rus-Air kit really captures the character of the Yak-42. The kit itself is gorgeous and one of the easiest kits in any medium I’ve ever built. In the usual Russian style the fuselage is split vertically like an injection-moulded kit but with a separate one-piece fin and central intake. There was a small bit of slightly awkward filling below the intake and the split engine pylons were a minor irritation (think Airfix BAC 1-11) but otherwise everything assembled easily helped by Rus-Air’s thoughtful provision of marks to drill for locating pegs. In fact the only issue I had was with the undercarriage. I managed to break both main legs while I was cutting away the surplus resin and had to resort to pinning with fuse wire. The side struts were useless and I replaced them with plastic strip. Enthusiasts of super-detailing could go to town on the undercarriage but in light of experience I decided to play safe and content myself with drilling out the torque links (very carefully!) and adding lamps to the nose leg which I promptly lost and had to fabricate a replacement. Needless to say, as soon as the replacement was finished the original part turned up. Although they provide a choice of several schemes including Cubana and Aeroflot, the kit decals are thick, matt, yellowish and utterly horrible. They went straight into the bin. The Tulpar Air decals are by Ascensio. I had seen rather mixed reports about Ascensio decals but I found them straightforward to use and anybody with previous experience of laser printed decals should get on fine. Ascensio are one of the very few manufacturers who provide after-market decals for the Yak-42 so we should be grateful to them even if the decals aren’t without their flaws. Although the sheet says it was designed for the Rus-Air model, some items such as the windscreen and the large grey anti-glare panel (which I ended up over-painting) bore only a passing resemblance to the kit and required significant modification. Ascensio have mistakenly printed the main cabin door the same size as the other doors instead of the bottom edge being noticeably lower. I dealt with that by using a section from one of the doors provided for the alternative livery on the sheet. It’s actually dark grey rather than blue but the subterfuge isn’t noticeable on the model. The decals generally are a little stiff and virtually impervious to decal solvent. Drawdecal’s trick of pressing into place with a cloth dipped in just-off-the-boil water helped considerably. On the plus side they are very robust and will take a lot of abuse as I discovered when I had to reposition one of the Skynet Aero titles after it was firmly stuck. Mistreatment like that would have made most other decals disintegrate but the Ascensio decal took it in its stride. Overall I was much more impressed with the decals than I had expected. I kept weathering to an absolute minimum since all the photos I could find of RA-42555 in this livery showed her looking immaculate. That might be because Tulpar Air, apparently a rather dodgy operation, was grounded before their four Yak-42s had time to get dirty! I enjoyed building the Yak-42 so much that I have bought a second one to keep it company. I intend to finish it in Kras Air livery (again by Ascensio) but with the forthcoming Group build and various other ongoing projects it will be a while before I get round to it. Thanks for looking and as always constructive criticism is welcome. Dave G .... and with the PAS An-7210 points
-
Afternoon all!! Here's the first one finished - for which the WIP is here - http://www.britmodeller.com/forums/index.php?/topic/234999662-meteors-first-one-now-finished/ Finished as the WA785 the CO's aircraft from 66 Squadron with hand-masked & painted squadron markings, and mostly Airfix decals for everything else. Painted in my own mix for High Speed Silver with decanted Tamiya aerosols, and a medium/dark grey oil wash to add just a touch of wear - as the CO's crate I don't expect it ever got too dirty at all, but the wash does help lightly accentuate the panel lines just a tad and stop them catching reflections of the HSS finish. It's a lovely kit, though not without its foibles. I've got two more to finish now All comments welcomed as ever, I hope you like her! Heres how she looked when first posted..... Since the above were shot, and with thanks to Roger Lindsay who sent me what appears to be the only photo of this machine - the tail has been repainted to match. So now she looks like this. I'm also relieved to say that it appears the squadron marking blue was different to Roundel blue - being "Royal" blue - so by luck I got it right. Note the Squadron Leader nose pennants and the individual aircraft letter L now on the nose gear door too. Cheers Jonners9 points
-
Hello Her is my latest flight off the workbench, Revell's 1/72 Fairey Gannet T5 from 849Sq, RNAS Culdrose in the mid sixties. No aftermarket items were used, however, I did do a little scratchbuilding, wiring and other items were added in the main wing wheel bays from lead wire and plastic rod. Also, a new pitot tube was made from Albion Alloys brass rod and PE fret as was the probe under the starboard horizontal stabalizer, my main concern was with the 30kg...sorry, 30g of lead ballast in the nose, I was not sure if the supplied plastic item might sag so made a new one from Albion Alloys brass telescopic rod and PE fret. I was pleased with the end result as it looked crisper than the kit item but I forgot to paint the chrome telescopic section that depresses under load, drat and double drat. Construction was pretty straight forward which is more than I can say for the painting. The main colour is Alclad Airframe Aluminium which went and stayed on a treat, much to my surprise as it can be a little delicate.Then came the fun, the Dayglo was a mix of Valleo Red and Yellow painted over a primer coat of yellow to show a little fading. The first problem was with the yellow which had gone off and caused blockages in the airbrush resulting in an issue on the tail end. Next came the peeling of the dayglo every time it was shown masking tape resulting in 3 repair jobs, I hope it is not to obvious where they are. A coat of Alclad Aqua Gloss was applied and a home made wash was applied but I think this went a little awry, I think I know why so we will see how the next model turns out. This model was a mix of delight and frustration but on the whole I like the end result, hope you do too. Thanks for looking. Gary.9 points
-
Here is a recent completion from the 72 Land workshops. It is the relatively new Airfix Hurricane ragwing. It is a very nicely done kit, and I'm well into building my second one now. Some nice detail, esp in the wheel wells. I wasn't hugely interested in yet another RAF early war version (since most of these differ just in squadron codes and the occasionally multicolored underside) so decided to go for a Belgian example. Sorry about the focus; I have been distracted by other issues and have not reset up my background, tripod, etc. So just more taken on the couch This is completed aircraft #459 (#26 for the year so far), completed in March of 2016.8 points
-
Hi, Another archive model - from a deep past. Fairey Firefly FR I in markings of 1770 Sq FAA based on HMS Indefatigable, Pacific fleet, spring 1945. I made it i 1993, so many years before much nicer SH kit appeared. As usually I was trying to do small improvment to the kit. Some are perhaps still visible. Now - before posting I had to change roundels and lettering - the original were bad quality did not stand time. The present are taken from Techmod sets (for FAA Wildat and a white lettering). Comments welcome and regards Jerzy-Wojtek7 points
-
The duck egg green was a little rough so I smoothed it down all over with a fine sanding stick: Next I masked for the yellow stripes on the other one: Then the masking for the red fins: Here are the colours applied: Masking removed: With gloss coats applied I could then start on the decals. Like the other Meng kit I've build I found the decals very stiff and would not sink into the panel lines even with Daco strong solution, in the end I pushed them in with a blunt knife but they invariably broke with this treatment: It was even a struggle to get them to conform to the curvature on the fuselage: So here are all the kit decals applied: I then went hunting in my spares box few a few additional decals. I got as far as applying this Japanese script on one side then decided it didn't look right and removed it: In the end I just applied serial numbers and a couple of stencils: These are now ready for another coat of gloss and a panel line wash which funnily enough is almost where my TB2 is at. Bye for now, Nigel7 points
-
With my Telford builds under control (for now) and having taken delivery of a load of Albion Alloys slide fit brass tubing, I decided to take some time out and get some more work done on the Karel Doorman project. The main thing that has been bugging me about the Tracker is the strength or more to the point, lack of, of the wing fold hinges and I decided that the best thing I could do to boost my mojo was to sort this problem out for once and for all. I began by getting the hinge parts from my other Tracker kit and examining them very closely to see where the main weakness is. I concluded that it is the point where the shafts that enter each wing section join the actual hinge. I further concluded that the hinge section of the parts in question is way too thin, being both under scale in this respect and in no way being strong enough for the job it is expected to do. I have seen pictures of this kit built with the wings folded using the kit supplied parts but there is no way I would want to try transporting the completed model to a local club meeting let alone all the way to Telford. I therefore took the decision to ditch the kit parts and start from scratch. I began by tracing the actual hinge section of the kit parts onto some 80 'thou plastic card and cutting them out. I then drilled holes through the hinges where the mounting spigots were due to be fixed. Then using the parts from the second Tracker kit as a guide to the correct angles, a length of brass tubing was super glued to each end of the hinge to act as a core for the spigots. Once this had all set and cured overnight, I slid differing diameters of tubing over the core so that they matched the thickness of the original kit parts. Once this was all set, I then used some 10 x 20 'thou plastic strip to replicate the detail on the original kit parts. Actually I think the detail came out a bit sharper. The final task was ensure that the locating holes on the wing sections were drilled out back to their original diameter so that the new hinges would fit properly. A test fit of the new hinges showed that they are now nice and strong and with the wing stays in place, the completed assembly will not be going anywhere. I will be gluing all this together with five minute epoxy at the end of the build which will also avoid and brittleness in the assemblies. Phew! That was a lot of waffle wasn't it? Still I think it was important to describe this bit in detail so that anyone else contemplating finishing their Tracker kit with wings folded can strengthen their models as well if they have to do any travelling. About time we had some pictures methinks so thanks for looking in and hopefully the next update will be along a bit sooner as getting over this hurdle has rather boosted my appetite for this project. Martin7 points
-
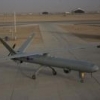
I bought this kit ages ago at the Tank museum in Bovingdon and around Christmas time I started building it, but then other things came along like 22" Eagle Transporters and Garret Showman's Engines that distracted me somewhat. Looking aroudn the stash last week after finishing the Flying sub, I realised this was still sitting in its box 80% built and 10% painted, so it seemed a sensible thing to get this out again rather than start something new. I'm very glad I did because in the end it was fun to paint and weather this - sadly the lighting in the photos hides most of the subtler weathering, which is rather annoying. I suspect this will be added to my model show inventory for a while. at least until the carbon fibre aerials have been broken off and lost The AFV Club kit itself is a good kit but the instructions are a bit lacking - no detailed unit information or decent paint schemes. All Khaki green was the general paint scheme they suggested, which was a bit wooly. I suppose it gives motivation to do some research and get more detailed information. This was my first AFV kit for a while and it was nice to get back into that genre, having spent most of the last few months doing SF and weird stuff Anyway, here are the photos:6 points
-
Ok, this isn't "Armour" but since I've seen a Kübelwagen here, I suppose this is the right section to present my 1/72 Profiline Steyr 1500 Truck. I have a special interest in this vehicle as it was built in my country - in the town of Steyr in Upper Austria, to be exact (https://en.wikipedia.org/wiki/Steyr). Profiline seems to be a subsidiary of Special Hobby, and the same kit is also marketed under their 'Special Armour' range. It comes in various set-ups, as a cargo truck or ambulance vehicle. When CMK/Special Hobby attended IMPS Austria's Go Modelling in March 2016 they had some version of this kit reduced -50%. I got myself three. Here's the first one finished. As it is of short-run nature, some fiddling and fettling is neccessary to get everything lined-up. Cargo are resin items from CMK, my spares box and scratch built tarpaulin (from rubber gloves). Painted with Gunze/Mr.Hobby acrylics, weathering with artist's oils and pastel chalks. Windshield wipers and rear view mirror are scratch built from photo etch scraps. Hope you like this tiny truck!6 points
-
Thanks Keith, me too! Thanks Squibby, good tips Thanks Phil Congrats to the daughter! Hand paint the frames? You're a better man than I am, some of them are really, really thin... Leaving off the landing gear AND the pitots is a good idea (see below) Thanks Stew, great tip I do wish I could think ahead like this... and remember things I'd already thought of (see below) Thanks Rob Not too bad, but bad enough (see below) "What better way to spend Saturday Morning than masking a Stuka". Volumes I and II now available at good bookshops everywhere. Nightmare. I decided the only way I could get the very thin points on the nose and behind the canopy was to use paper masks, so I scanned and printed the scheme and cut out the bits I thought I couldn't tape (easily), spayed the 3M RemountTM on the back and, when it was dry, positioned the bits on the model: Untitled by Ced Bufton, on Flickr Then came a few happy hours (not) of trying to get the sharp lines on a knobbly model, one side and then the other: Messier than usual as I used Nigel's tip of keeping the odd bits of tape on the bench and using it for jobs like this. The bits under the canopy were challenging and the ones on the nose, over the exhausts, just a pain. Eventually I got to spray the Donkel Dunkal other colour: I then waited the minimum amount of time before the best bit, ripping taking off the masking carefully, but not carefully enough: Rats. Other than that quite pleased with the results: except where I'd used the 'tape for curves': and the undercarriage, which I'd completely forgotten to mask and spray. Double rats. Daughter down this afternoon so I may not get much done but you'll see the results of the touching up hopefully tomorrow.6 points
-
I previously was mistaken in section, sorry.5 points
-
Oki, another one then... Buildt this a few months ago and it was pretty fun, a great kit imo. Figures from Dragon and base from Mini Art. Any feedback welcome Thanks.5 points
-
This morning I applied a Flory black wash to the rocket nozzles and engine intakes: While that was drying - the double stripes on the wing tips did not quite meet on the trailing edge so I mixed up some green tinged yellow and retouched them plus one or two other areas that weren't quite right: This is how the nozzles looked after I swabbed off some of the wash with a damp cotton bud: They were then glued on with some Gator Grip. This is how the engine intakes came out: Bye for now, Nigel5 points
-
Anyone noticed yet? I just have. I have masked the wrong colour and the model scheme is completely reversed. No, I'm not going to do it again, I'll just keep quiet. :weep:5 points
-
Thanks Gaz Thanks Bob. Yes, you're right. It is a bit too clean. I'll put a bit of wash over it to tone it down. Thanks Little bit of work done tonight I've given the ground equipment a base coat in yellow. These will all get pretty heavy weathering, along the lines of the support thingy I made for the Snowspeeder. I might add a chipped, faded Imperial logo to the generator, to make it look like old Imperial army surplus I won't be adding any figures to the base, but I wanted to have a bit of life on there, so I'll use one of the Astromechs that came with the kit. You only get decals for R2 and, rather bizarrely, R5-D4. How he's ended up in an X-Wing, I don't know. Anyway, I didn't want to do either of them, so I decided to give U9-C4 a cameo instead. The figure's too small to realistically think about masking, so I just sprayed a white base coat, then hand painted his orange markings, followed by a grey wash Andy5 points
-
Finnished my Camaro this morning! Nice Revell kit to build, everything but the side windows fit good. Colour is Zero Paints Audi Phantom Black. Thanks for watching! Mike4 points
-
Hi All, Here's the latest kit off the workbench. I bought this off my old mate Troffa back in late 2009 or early 2010 and consigned it to the stash as soon as I had looked at it. It scared me. The fuselage is in eight separate pieces; upper left and right and a bottom section for the rear fuselage, left and right for the cockpit section, the nose section for the gun ports and then a two piece radome which can be exchanged for a two piece RF nose. I was going to do it for the lesser built airforces GB but I was still put off by the multi piece fuselage, then the F-5 GB which I didn't get time to do. Well I finally plucked up the courage, and overall it went together really well. The cockpit section needed some care lining it up with the rear fuselage assembly. I made sure the sides lined up and were level at the top, which left a gap between the rear cockpit halves. This, and the underside join of these sections, were the only place I needed any filler at all. Paints are a mix of Model Color, Lifecolor, and plain old grey primer for the interior of the cockpit. The photos I found of the Venezuelan F-5As showed them to be very clean so I haven't weathered the paintwork. The pitot and the gun barrels are made from Albion Alloys tube, so much better than the plastic bits in the kit, but otherwise it is out of the box. Decals are a mix of kit decals for some of the stencilling and Colorado decals for the national markings. Despite a nice glossy coat of Klear and loads of Micro Sol and Set I still got some silvering on the decals. Everything was sealed with W&N satin varnish. It looks like this: The underside is really boring: But the cockpit isn't too bad straight out of the box: Thanks for stopping by to take a look.4 points
-
New Kinetic kit with small Eduard FE for the cockpit and canopy masks.4 points
-
Good evening to all. Here the plane that I am madly in love, and the model that has hated when assembling (four months !!!) WIP you can see here : http://www.greenmats.club/topic/709-douglas-a-26-invader-revell-172-%D0%B3%D0%BE%D1%82%D0%BE%D0%B2%D0%BE/ Thank's for your attention, Sergiy (48).4 points
-
Just a quick photo of my BB-8 that I finished up a short while back while taking a break from my AT-ST. A (semi) Pro shot, and where he resides now, sitting proudly "thumbs up" on the shelf in his own teeny tiny display case.4 points
-
ICM Model plus some goods and scratch to Cavalier. Aztec decals. Camo - 100-hour war between Salvador and Honduras on the border areas, also known thanks to Ryszard Kapuściński as the Football War. Aircraft on both sides remember IWW. Often the conflict is referred to the last battle of piston aircraft. El Salvador gained Cavaliers to quickly and from what I read it flew them American mercenaries. On delivery all had wingtip tanks , in the operation have been removed to improve maneuverability. I invite you.4 points
-
Hello! my Jean Navarre ace 's plane collection is growing up! after the Morane Saulnier type L the Morane saulnier type N the nieuport n°576 Here is the nieuport ni-16 n°830 two other nieuport are comming soon, le 872 et le 1130... Xan4 points
-
Hi folks,this is my final build for the Edgar tribute GB and a couple of firsts for me,first Eduard Spitfire and first time I,ve ever finished one in USAAF colours.this the instructions tell me was an early Mk ix flown by 1st Lt. Leonard.V.Helton of the 52nd fighter group 4th fighter squadron.A superb kit as expected it's been good to compare this with Airfix's equally good Vb as I built both at the same time,this one,s more "over" engineered in places but presented no issues apart from a short shot main canopy as can be seen in the WIP.http://www.britmodeller.com/forums/index.php?/topic/235001265-eduard-usaaf-mkix/page-1 Thanks for looking in. And a final shot of all three.4 points
-
Further to my recently finished T-33 just added the finishing touches to this one too - AFV's Tiger II One scheme that epitomises the Cold war for me above many others was this known as "old Lizard" and one of several different schemes operated by the 527th TFTAS based at RAF Alconbury. Representing the late 1970s............ Into the ever expanding Cold War cabinet she goes.....................4 points
-
Two shades of green like this one (in the A type scheme) and they should be very low contrast like that, hope that helps. Duncan B I hope you don't ind me sticking this photo in your thread?4 points
-
Inspired by Bengalensis build when taking part in the helicopter group build a while ago I decided to give this a bash. Its not as neat as his- ( see here http://www.britmodeller.com/forums/index.php?/topic/234941132-148-sea-king-sh-3d-66/page-1) but I still like how it turned out, apart from touching up the white which never turns out neat for me. I have fond memories of building the old 1/72 airfix kit with the basket and so this is a trip down memory lane Hasegawa Kit Old 66 Decals scratch build cameras and aerials beltcher bits resin for the sponsons ( which were a mare to line up ) Humbrol acrylic spray paints Eduard cockpit etch and airways etch for tail fold4 points
-
Hi Gary, the topside white is Halfords Appliance white, the red and blue will be xtracolor enamels, as you can see I've started with the red. I'm a bit unsure as yet if it's working, even though it's over a white undercoat it looks patchy and not very solid, I guess it's my ineptitude with the airbrush? John4 points
-
Nobody would have noticed if you hadn't said, it's the type B scheme. Duncan B4 points
-
Built for the Edgar Brooks Spitfire GB. (WIP here) If you want a Spit VIII and you've got the Hasegawa kit and Aeroclub conversion, consider buying an Eduard weekend VIII for an easy life. The Hasegawa kit and Aeroclub conversion have great detail but it's not a shake and bake job, you need to put a bit of effort into it. My build also has the Ultracast spinner/prop and the decals were Almark 48-5 'Victory in Sight' As this build fought me all the way, I decided not to weather it as that would be tempting fate but I did experiment with some pastels to tone things down a bit. Many thanks to Stephen who donated the Aeroclub fuselage and Ultracast spinner/prop, this is as much his tribute to Edgar as it is mine. And thanks to Col and Giorgio for hosting the GB.4 points
-
The two fuselage halves went together without na hitch until I realised that I had fed the rear wheel through the wrong damn hole. Ended to having to prise the rear apart a little to slot it into the right place. Not sure what the other hole was for..maybe the Mk 1 variant, who knows. The wings were another story. Clamps, vices you name it, the wings just kept wanting to come apart. Part of the problem was the undercarriage. Whenever it was stowed the top of it would push the two halves apart. In the end I cut them short and have now glued it again to leave overnight in the hope that it will stick firm at the third time of asking.4 points
-
Before getting the gloss coat on I spotted a few more jobs that needed doing - like painting the back of the rocket nozzle mountings with some matt black: I had also spotted that the green finish on the nose and wing edges was a bit thin so I masked up for them and there was also a slight chip by the pod aperture that I could deal with at the same time: Here is that done: After unmasking I got a coat of Aqua Gloss applied to all the parts to receive decals: The decals aren't numbered and the placement guide is of limited use but with the help of reference photos I got it all worked out: I thought that these double stripes that go at the top of the fins were best separated as the contoured surface on which they sit would most likely throw them out of kilter: The decals responded well enough to Microscale solutions but had the notable downside of having way too much adhesive including the front, not just the back which made them tricky to work with, they also tended to grab the surface and were hard to move around: Nearing the end I managed to trash the number two on the underside but I selected the best one from my old sheet and applied that - its a slightly different style than the others but I think it's fine: OK, here are all the kit decals applied, some are still settling down: Next job is to add some detailing ones of my own devising. Bye for now, Nigel4 points
-
Thanks Clive. I actually gave that a try last night and realized quite quickly that the Squadron green I was using was drying out too quickly and crumbling. Guess I need to add Milliput to my list... Thanks John. I slept on the dish problem last night and think I've a workable solution, albeit in my usual Heath Robinson style...I thought I'd start today's (rather long) update with a quiz. Can anyone see a 1:72 photo etch lap harness in this photo? No. Me neither Even using the latest in forensic technology here (kid's bicycle light) I couldn't see it for the life of me. Oh well. Back to the PE salvages to make a replacement. Having got that sorted, on with the pilot's and observer's harnesses: The tops of the straps won't be left sticking up like that; once the fuselage is fully joined these will tuck in to the frame behind each seat like this: Next job was to glue and clamp the top of the fuselage on: Yeesh. The two ends meet flush but the centre on either side is somewhat aspirational, hence the glue-fest to try and hold it down. The last thing I want it to do is spring up 'Buckaroo' style later on. That was left to cure whilst I finally got on to the job I'd been putting off so successfully to this point - the radar. What I need to scratch up is something like this (thanks Jun in Tokyo): Steve (NAVY870) most kindly hoiked out a more detailed view of a similar FAW.22 AI.21 installation from his archives. I've mentioned before the lack of photographic documentation on the AI.21 out there. (Of course as soon as I finish the build someone will post a sheaf of hir-res full-colour closeups...) Anyway. First I had to get the nose cut up in order to produce a detached radome. You can see where it detaches (this is the Mk.12 nose, not the incorrect Mk.14, yes, I've been through all that) by the raised lines on the right: About 7mm in I reckon: For the cutting procedure here I am in debt to the venerable Hendie. Over on his Lyzzie build: http://www.britmodeller.com/forums/index.php?/topic/235001898-148-lysander-mk-ii-the-1960s-hawk-version-more-procrastinno-wait-a-minute/page-1 he's posted in most timely fashion a splendidly elegant way to cut a cowling. Brilliant. Post 14 is the one you want. Here's my version: I have to say this technique was incredibly effective. I'm on the verge of suggesting to the Mods that 'to Hendie' should become a verb, as in 'You Hendied that cowling well'... A quick dry fit to check all is as it should be; you'd almost swear there was an aircraft in there somewhere: For reference in building the mounting for the radar I've been studying the restoration work that the lads at YAM have been doing on an NF.14: They've a detailed chronolgy of the work they're doing here: http://forum.keypublishing.com/showthread.php?137187-A-W-Meteor-NF-14-WS788-Restoration-Thread Compared to the original, the inner walls of the radome and instrument bay need grinding out to reduce ithe inner diameters to something more realistic. Initially I used a circular grinder on my Drone (dremel clone...) upright in a vice, slowest speed to avoid grinding through: Please note that I'm only holding this here for the camera - to do the grinding I mounted the plastic in a kind of stretcher between two cocktail sticks so that my fingers weren't going near the head itself. Why cocktail sticks? Well I found both pliers and gripping tweezers squeezed the plastic ring too hard and deformed it into an oval. With the cocktail sticks you could keep the pressure on manually yourself. I didn't think it wise to try grinding the whole thing out with a power tool in case of going too far. I got it to roughly to the inner diameter I wanted and then reverted to sandpaper of various grades on a superglue lid to do the final grinding down by hand. This give a more controllable rate and lets you check you're keeping it circular. I'm posting the following pic as a trap for M. Hale as I know he will be unable to resist a double-entendre Where was I? Oh yes. Both radome and instrument bay got the same treatment until the inner diams. seemed consistent with reference shots. Getting there.... Next Having got that taken care of, time to scratch up a bulkhead for the radar gubbins to mount onto. Just a plasticard ring with a disc of the same behind seemed to answer the job: The other disc under the Blu-tack is my plan to build the scanner dish. After grinding down a circle of plasticard to a very thin cross section (rather in the same manner as grinding a lens...) it was off to the kitchen (wife out so no embarassing questions about 'what are you heating up this time?') to heat a steel ball-like fishing weight on the cooker. This sphere seemed the right diameter and removing it hot from the gas ring, dropping the plastic on it to mould, and them chucking both ball and plastic in cold water before the plastic melted, seemed to produce a usable blank: It wasn't as straightforward as that. You have to move fast because of the heat and I burned my hand (twice) juggling hot balls Anyway. Moving on. The initial result isn't pretty, as you'd imagine, but with a little filler and sanding down it becomes scanner-like enough at this scale: In Steve's FAW.22 graphic the bottom of the AI.21 scanner is clipped at the bottom, whereas the NF.14 PN's show it as fully circular, so unless anyone knows of any reason why not, I'm going to use the latter shape for a Meteor build. That's it for this instalment. Next up is to build the triangular mounts and the rest of the modulator, receiver etc. parts of the radar, hopefully this weekend. I was lucky enough to have a half day today and the weather here is so ghastly at the moment that the bench was the only place to be. Good to see John's son taking over his Meteor thread with his Lanc last night Next generation and all that... Cheers for looking as ever. Tony * Added some hours later: Aarrggh! Guess who forgot to put a bloody nose weight in?4 points
-
Fairey Swordfish Mk.1, (E)5H/P3999. 824 Sqn. Taranto raid, Nov.11, 1940 Pilot: Lt(A) J. Welham Observer Lt. P. Humphreys Model: Matchbox 1/72 When I began this Matchbox build back in March, WIP here: http://www.britmodeller.com/forums/index.php?/topic/234999297-another-matchbox-swordfish/page-1 I naively assumed it would be a relatively simple undertaking. Nearly six weeks of research and obsession later I feel able to present my first RFI on this forum of a Swordfish from the Taranto raid. I'd like to start start with the words of the pilot, John Welham, describing the run in as part of the second wave: 'There was some light cloud but it was a beautiful starlit night with a rising moon, and I remember that it was surprisingly cold. When we were more than an hour's flying time from Taranto we could see flickering lights on the horizon, and when we were closer this was clearly the mother and father of all anti-aircraft barrages.' (Sturtivant, Ray. The Swordfish Story p.60) A Matchbox mystery... I don't intend saying anything derogatory about the limitation of the kit - it was fun to make as a teenager in the 70s and just as much fun to do again now. However, as I started doing a bit of research online about the 824 Sqn aircraft option offered in the kit (and featured in the typically evocative box art) I started to get rather confused at the lack of clarity on aircraft 5B/K8419, as an aircraft seconded from HMS Eagle with this designation didn't seem to have taken part in the Taranto raid. Not being a naval historian, I put this down to my inexperience and duly posted a query on this forum about the matter. I'm greatly indebted to 'Seahawk' who solved this conundrum, pointing out that John Welham's autobiography (p.85) clearly states that (E)5B was ashore at Deikhela airfield in Egypt at the time of the raid. Indeed, the last page of Stuart Lloyd's magnificent Fleet Air Arm: Camouflage and Markings reproduces a photo of 5B undergoing repairs in the Western Desert in late August of 1940. For the Taranto raid in November, Welham was flying (E)5H instead, so by a process of elimination regarding aircraft from Eagle, the Matchbox box art and decal option would appear to be wrong. The individual aircraft histories in Sturtivant's Swordfish book backs this up by indicating that 5H/P3999 did take part in the Taranto raid. 5B's only engagement is listed as the Bomba Bay raid on 22/23 Aug (when presumably it sustained the damage seen being repaired in the photo in Lloyd's volume?). Last night I discovered an apparently correct illustration of 5H from Replic magazine (issue 100), reproduced online here: http://wp.scn.ru/en/ww2/b/564/9/3 Mentioned in dispatches.... A number of other individuals have also been provided invaluable help on the build: 'iang' did his best to keep my colours and markings matching the historical record (though I'd already applied 'Sky' undersides by that time and decided to live with the shame..). 'John Aero', 'Ex-FAAWAFU' and Nick Millman also weighed in with info and images on the Observer's 'monkey-chain' that stopped him pitching over the side. 'Seahawk' also confirmed the weapons loadout. 'Spadgent' just made me keep buying more gear - watch that lad.... The build... This marked a number of firsts for me: airbrushing, scratch building, photo-etch, custom decals, rigging. Some plan views: And some obliques: Technical matters For those interested the following changes were made to the basic kit: 1. Opened up rear cockpit and added long range fuel tank. 2. Cut Observer in half and rebuilt him as standing figure. 3. Built a new arrestor hook and carved out a recessed channel for it to sit in. 4. Added sleeves to oleo legs. 5. Rebuilt torpedo with more detailed prop/fins at rear and added detonator. 6. Built new torpedo cradle. 7. Added a pitot tube and wiring to port wing. 8. Added torpedo sights. 9. Built a new rear cockpit interior, including a (slightly) more accurate mounting for rear Lewis gun. 10. Added control horns for elevators and rudder. 11. Added control cable shrouds, ballast inspection hatch and catapult attachment to mid/rear fuselage on either side. 12. Scribed sides and undersides of fuselage/wings, added fastener details. 13. Added dinghy housing to port topside wing. 14. Added x4 mountings and azimuth compass to rear cockpit. Also added leather trim. 15. Built (Marabu M72011) PE flare racks and a flare. 16. Added folding wing tie-backs onto underside of tail planes. 17. Added canvas cover to housing for rear Lewis gun. Decals Roundels and tail flash were OOB, serial and tail number added from Ventura V7252 RN number set. (I'm aware that the tail number/letter should be a bolder style but I only had the ones in this sheet to work from...) Weathering Tamiya acrylics for paint scheme, home-made pin wash, various W&N black/umber/sienna oil washes for detailing. Powdered lavender chalk for final fading/weathering prior to final matt varnishing. Thanks for reading and to all who pitched in on the WIP. Now to try and choose the next build. Meteor or Stranraer - anyone any preferences? Regards to all, Tony3 points
-
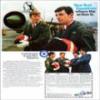
Yes it is a Top Gun F-14A. With all the hoopalah over Tamiya's new F-14A and the 30th anniversary of the Top Gun movie I am inspired to do good old Maverick and Goose's fabled F-14A from the fictitious VF-1. I am using the old AMT 1/72 kit, I did this kit a few years back and it's not half bad. The decals I found on e bay. Here goes.---John Tomcat 1 by jvandeu53, on Flickr Tomcat 3 by jvandeu53, on Flickr3 points
-
A nice barrel A complete kit And the result Have a nice day3 points
-
Well I failed to resist buying one of these excellent little kits after seeing Andy work his magic on one. I picked it up from the post office this morning and although I was expecting a small box: I wasn't expecting it to be this small lol: And I couldn't hold off and started it immediately. I started at 8:40, as the time data for the picture told me. By 9:15 it looked like this: I have to say if the plastic was moulded in a darker grey colour then I wouldn't have bothered to paint it. As it happens I couldn't leave it as is so I reached for various Car primers. I started with a base coat of Etch primer as it is the darkest. Sprayed from a good distance so as to mist it on. Then I blasted on spots of white primer from a greater distance and then used an in-between distance to do the same with a normal Grey primer to blend it all together. And by 9:30 I had it finished: It is a bit spotty up close but from a normal viewing distance it looks good. Anyway that's my first Bandai kit and I have a feeling it wont be my last. But I have a NASCAR to be getting on with so... TTFN Ashley3 points
-
While building the CA Meteor T7 I thought I would see if the Airfix intakes would fit As you can see the fit is not too bad,the intake will have to be glued on in stages and allowed to set and then 'squeeze 'it to follow the existing contours of the CA parts. I know its a deep breather intake but was curious to see what it would look like,has to be better than the CA one even with a bit of filler. Cheers Ian3 points
-
Stirling work as ever Ced. I'm interested to see your experience with the paper masks as I'm considering trying this procedure out for myself. Tony PS. The paint scheme isn't a mistake. It's correct in the other universe3 points
-
Agreed, and well put. Still too early to speculate about the causes, we are once again dependent on snippets of digital evidence, just like AF447 and MH370. At times like these, I feel the need to wheel out this flowchart.3 points
-
And on fantasy kit world we have these beauties.... https://www.facebook.com/fantasykitworld/photos/a.1472166033022419.1073741828.1472157599689929/1689137501325270/?type=3 https://www.facebook.com/fantasykitworld/photos/a.1472166033022419.1073741828.1472157599689929/1689100237995663/?type=3 If only.3 points
-
As promised I've masked the main model this afternoon. Nightmare. Getting under the struts is a pain (why aren't they RLM65?): Untitled by Ced Bufton, on Flickr and for future builders, do yourself a favour and leave the undercarriage off for painting so you don't have to try and mask it: I think / hope I've improved on that after the photo but we shall see... Finally done with some red pen to remind me not to rip off the pitots: and on with the Dunkelgrun* - I chose to do this first as both colours are dark and this one is the bottom of the undercarriage so that should be easier to mask off, I hope. I'm not convinced about the new Tamiya 'Tape for Curves'. it doesn't seem to stick too well, I can't curve it as I would like and look at this: Untitled by Ced Bufton, on Flickr and that's after my usual careful go around pre-spraying to make sure there are no gaps. Hmmm. Anyone else had any problems / successes with it? We're here now: Untitled by Ced Bufton, on Flickr * Edit: Schwarzgrun, it's Schwarzgrun3 points


.thumb.jpg.158e2e086d45b8f96b7d93b8bee8dc21.jpg)


This leaderboard is set to London/GMT+01:00