
Leaderboard


Popular Content
Showing content with the highest reputation on 05/05/16 in all areas
-
Hi Guies, another Seaplane, this time a german Transport. This build is a few years old, but i am quite satisfied with. Oob, paint (Humbrol enamel) by brush. Hope you like her. Best regards Stefan22 points
-
1/48 kit, still hard to beat a tamiya kit after all these years, their decals continue to frustrate me though. Eduard cockpit set but I forgot to take photos. I used the wrong windscreen. Thanks for looking.18 points
-
Hi Guies, today my last completed build. An early PBY-2 Catalina in pre war colours. Oob, except new engines from Quickboost and added Pilots, as always paint (Agama) by brush. Hope you like her. Any Comments are warmly recommend. Best regards Stefan17 points
-
Due to other priorities, and sometimes mojo not working, a long drawn out build for me. Glad I have finally completed it. The Special Hobby Whirlwind Mk I is a great little kit with nice detail supported by some resin, PE parts, and excellent decals. Weakest part for me was the undercart and associated doors which the instructions failed to provide enough information on regarding attachment points. Painted with Mr. Hobby lacquers.11 points
-
Hello people This is my first RFI. I feel strange in putting it here as it is the last model I completed. The thing is, I completed it 13 years ago. I was in the UK then and I didn't know much about the internet modelling wise. At the time I relied utterly on my LMS. That was M.G. Sharp Models of Attercliffe Road in Sheffield, the city I was living in then. I had started modelling again for the first time since 1979 as I had become a widower and, well, thought I needed to find something pleasurable and nostalgic of better times upon which to focus my thoughts My first model upon returning to the hobby was an Airfix Mosquito. I have to say, it wasn't easy! Nothing fitted very well and I found myself buying filler for the first time since the age of 13.. I also did the Australian all silver option, meaning, sand, fill, smooth...and repeat. I got there though and it builds into a lovely model doesn't it, not at all bad for an old Airfix? I had been to Spain in a professional context (1989) and really loved it. I had been introduced to the recent history of Spain, above all, as I went to Barcelona, I became aware of the very recent Spanish Civil War. As time progressed, back in 2003-2006, I researched this from a personal interest point of view, rather than anything to do with work/profession. I loved the intrigue I found. Clandestine air forces (Russian, German and Italian), aircraft being smuggled in from Mexico, 'Golden Age' art deco passenger aircraft being used as bombers! Anyway, this little Heller Bf 109 B was about the best I could manage at the time. I know now it might be classified as a B1. I also know this kit isn't 'rivet counter' perfect, but I can tell you, I utterly enjoyed making it. It is a pleasure to build and yes, it is almost 'Shake 'n' Bake'. It goes together so well, extremely little filler is needed and if one is fine with raised panel lines; they don't need to be sanded away. This is a model of BF 109 B1 6*16 of Legion Condor 2J/88, based at Vittoria, Spain as it would have appeared late March 1937. It is based on a Profile shown on page 130 of 'Jagdwaffe', Luftwaffe Colours; Volume one section 2, 'The Spanish Civil War' by E. Mombeek with J.R. Smith & E.J. Creek. Classic Publications, 1999, ISBN 0-9526867-6-7. The transparencies are kit parts, absolutely lovely, clear and in three parts. I have tried to build the Avis/AML/Amodel (all the same) BF-109 B/C/D/V3-4 prototypes and I can honestly say that I feel time is far better spent 'tarting up'/rectifying this Heller kit to the level you desire. The other kits, and the Aeroplast kits, simply don't cut the mustard (this is Britmodeller isn't it? ). The model is OOB with the exception of decals. I used the kit round black spots and wing spots/crosses then handpainted numbers and tail cross with the help of Tamiya masking tape cut finely (using slightly lightened Humbrol 33). All colours were enamel. I still have a jar of (useable) grey-green colour from this build! I mixed the grey/green. Why this shade? I have no idea, it seemed right at the time . It is a long time ago, I may have done 6*16 as I was pretty sure it was the first number Bf-109 B To be a real 'B'. I guess it should have the Hamilton propellor, but I just thought; "First use of Bf-109, Spain, anything could and would have happened in war, regularly". I still think that about all wartime aircraft to be honest. Also, it isn't an 'A', prototype or anything else with long leading edge slats, the Heller kit has the shorter slats, so 6*16 seemed a reasonable compromise. It is completely brush painted, even the varnish. I liked the way the Humbrol Matt varnish sealed the decals, and I also liked that the kit roundels didn't silver onto an, essentially, satin coat with no decal solvents (I didn't know they existed). No weathering - I simply didn't (and don't) know how to do it, and I also think at the time, there may have not been many washes/tints/other trendy things on the market? Enough chat, here it is, I hope it is bearable, perhaps likeable as a window into what was ok 13 years ago? Thanks to The Spadgent for encouraging me to post this Port view I forgot, I stole the 'Top Hat' from an RPM Bf-109 E-1 Legion Condor kit. Starboard..hmm, the Humbrol Matt coat went a little white, as seen over the black roundel. Nice big prop . I hand painted the canopy. I can see the paint was too thin. Never mind, I was happy at the time. Thanks for reading All best regards and happy modelling Tony Edited for spelling a friend's moniker incorrectly8 points
-
Hi, A second vintage, a 40 years old model posted by me today. This is Yokosuka MXY-7 Ohka. Model by Hasegawa, from set with G4M1 Betty (which I did almost 15 years later...) painting scheme for machine found in Okinawa in 1945 (that what I have in my notes about her). Only cleaned from dust after 40 years from constructing her. Regards and comments welcome Jerzy -Wojtek8 points
-
Maybe not so bad. First, we protect the areas around the "intake that doesn't belong" (looks like we're preparing for a vasectomy): (You may have noticed that the squadron markings and national insignia are now on the model.) Next, use a very thin razor saw to slice off the offending protrusion. Some cleanup with fine grades of sandpaper, and we're here: The only thing left is to paint the repair site, and hope that we can make it match the surrounding area. This, of course, is the hard part. My plan is to brush paint the area first, being careful to cover only the area seen in gray, to build it up a bit. This will be sanded when dry, and blended into the surrounding area. Then we'll get out the airbrush and do some additional paint blending. Looks like I need to do some scribing, too. However, all of this will have to wait until later today as I have yet another appointment with my doctor. It's my one month follow-up to getting off of the pain meds. In the meantime, I will say to Steve that he has nothing to apologise for, as CMR also make no note in their instruction book regarding the removal of this intake for FAW.53 variants. It is however, interesting that they do not show this intake in any of their camouflage scheme markings, even the FAW.21 or 22 variants. Odd. Cheers, Bill8 points
-
Here are some pictures of my model of HMCS Goose Bay, a Royal Canadian Navy Kingston Class Mine and Coastal Defence Vessel MCDV which I have recently completed. The model is 1:700 scale a straight out of the box build of the Dodo Models kit with minor enhancements for rigging and signal flags. A detailed build log can be found here: http://www.britmodeller.com/forums/index.php?/topic/234996793-dodo-models-1700-canadian-navy-kingston-class-mcdv/ and pictures: I hope you enjoy.7 points
-
Hi, Another vintage model from my shelvs, Ki-27b by Hasegawa. I made this model about 1976. Then, in early 80-ties a catastrophy happend - a glass shelf above it collapsed and this was the worst devastated model: broken u/c leg, canopy, even wing etc.... It underwent immediately rapair including new canopy...- BTW the repair was done by my brother since it happend when my collection was in his house for some almost eight dark years when I was not doing models and he informed me about whole accident already after he repaired... Then, sometime in 1990 I made some weathering upgrading model to style of finishing. Recently I cleaned it from dust and made some small tuning mostly with hinomarus which were in bad condition. I added Vallejo matt cover finally. The painting scheme is of machine of 2 Sq., 246 group JAAF, Homeland defence 1942-3, I followed profile published in book: Munson, K.; "Fighters, attack and training aircraft 1939-45," Blandford, 1969. NB this book and whole Blandford series was a "bible" for my brother and me these years... Comments welcome and regards Jerzy-Wojtek7 points
-
Hi guys Apart from the whip aerial behind the cockpit she is done. I had a minor issue while gluing the undercarriage when I got a blob of Tamiya extra thin on one of the radiators. It has eaten away a bit of the surface detail unfortunately but I have sanded it back, repainted and re-weathered it so it's not too bad. Overall I have really enjoyed this build. Here are a couple of shots until I take the proper pictures tomorrow for the gallery and RFI. DSC_6769 by Mark Inman, on Flickr DSC_6772 by Mark Inman, on Flickr7 points
-
Thanks Giorgio, very kind Thanks Keith I will be careful not to overdo it... and I'm happy the post has brought a little joy into your life! I found the missing dial when I reached for my current piece of kitchen towel: There it is! by Ced Bufton, on Flickr I have glued some bits together: Stuck by Ced Bufton, on Flickr Question. Aluminium either side of the IG, or carry on the green? Finally some good news. I tried scratching the i/p dials with a needle to see how fine it was and the plastic showing through looked OK so I continued doing tiny scratches and pokes. Added some colour with the Liquidex pens on a tiny brush. Enough! by Ced Bufton, on Flickr Happy with that especially, as Keith says, it'll be on the ceiling.7 points
-
Some bits, here and there, PE, I opened up these ballast vents (kingstons?) I soldered up this tube that goes on the prow, the little bracket holds the main rigging line, os I want it sturdy Goes in here. I also packed in the bottome of the guns with styrene so I can fit a tiny magnet in. I have one magnet in the deck and another on the bottom of the gun. Works great, I can swivel it and everything. Looks like a messed up some measurements. There is supposed to be a pipe that runs from these holes along the foot of the conning tower. I'm going to do the guardrails in brass, these otherwise perfectly good kit ones are a little too thick. I need some help to hold them in the right shape. So I engraved some channels to place the brass into. Here I am using 0.5mm brass rod, which is half as thick as the kit rails. I am also removing the magnetic compass housing. It looks like a wierd toe, and I prefer the later boats with the separate Askainia housing that sits in front like a little dalek. The boat on the right has the Askania dalek housing in white. Also it has the exterior pipe at the foot of the tower I was talking about earlier. There is a kind of lap weld here between the pressure hull and the plating, sort of looks like this, I also carved out the edges of the pressure hull shape it's supposed to sit behind the plating. Examinging the oil canning in a harsh light bears witness to all these scrape marks, I Am going to try and sand them out to make it look more like steel plate. A bit better, I have rivets to replace too!7 points
-
Hi All one of my last kits to finish, the Meng ME410 bomber version Built totally out of the box and painted with Vallejo acrylics If you have one of these in the stash build it it really is a peach of a kit. panel lines are a bit heavy as are rivets but i goes together with no filler and just a bit of mr surfacer. it was based in northern France 1944 and involved in the "mini blitz"6 points
-
Ah, the patent wars. Living in the city where Kodak was founded and has its headquarters, we got a daily dose of that story for many years. Polaroid - a company founded on indirect serendipity. Their first product was polarizing film (hence their name). The story I heard was that Land discovered, by accident, research done in 1852 by a British chemist who had accidentally mixed iodine with dog urine, produced after the dog had accidentally drank some quinine. Upon analysing the green crystals that formed in the solution under a microscope, he discovered that they were birefringent. In other words, light passing through them became polarized. This discovery led Land to develop a method to create a film that did the same thing, and earned him his first few millions. My question is this - how on earth do you accidentally mix iodine and dog urine? Or for that matter, why would you do it on purpose? And why is your dog drinking quinine? Oddly enough, during WWII Polaroid made anti-glare goggles - for dogs. Cheers, Bill6 points
-
Thank you Patrice. Yes the three day weekend meant I got a lot more done on this than I normally do. I also managed some time on it during the afternoons - which is a bit of a luxury! Back to only two days of weekend this coming weekend. Hi giemme and thank you. Yes I did enjoy the three days off - it meant I got a lot further than anticipated. With regards the pre-shading - I think it may just be on the photo it looks washed out on the underside - the lighting in our kitchen isn't great and on flat, light surfaces of models I have to take the photos at a bit of an angle to stop the surface just being all shine. I think this has reduced the effect of the pre-shading. Thank you as well for your comments about the canopy and painting. The canopy sat a bit higher than it currently does but I managed to file off some of the insides of the bottom edges which seemed to do the trick. Hi Jaime and thank you. And no problem - hope it helps if you ever find the wing root join isn't as good as it could be. Hi Rob and not quite! I can make these last few stages last weeks.......usually because I missed something! Thank you. Hi Cookie and thank you too. For the leading edge yellow strips I usually cut some Tamiya masking into thin strips - about 2 or 3mm wide. Because it's in thin strips it is easier to get it to follow the curve of the front of the wing. I then look at a combination of the decals provided and the diagrams in the instructions to try and get an idea of how wide the space is I need to leave clear from the front edge - from where the yellow strips start near the canon to where it ends towards the wing tips. I then carefully apply the strips of masking tape - lining them up by eye - to the top and bottom of the wing. I then put a strip of masking tape at each end of where the painted yellow wing strip starts and finishes. I then apply additional masking tape around the strips of masking tape to stop any over-painting going onto the rest of the wing. To paint the area I slightly thin some yellow acrylic paint with water and then, using a fairly old flat brush, I get some paint on the brush - dry it a little on a paper towel and then dry brush the areas. On the first application the yellow doesn't hardly show up at all over the painted areas. Once that layer has dried I just keep building the thinned layers of paint up until I get the look I require. Towards the end I use less thinned paint, but again I keep dry-brushing it until the yellow is deep enough in colour. If you decide to try this method my advice would be be to practice on something else - I practiced on several bits of scrap before doing it on any of my planes. HTH. Hi John and thank you. Yes that extra day was a real bonus! Hi Ced and thank you very much. Thank you Beard. Thank you Nigel - yes I have been busy and it was good fun too! You are too kind. Thank you to everyone for taking the time to comment. Kind regards, Stix6 points
-
Hi, I've just finished it. So it is not from the shelf but it goes on the shelf right now ...Next odd German of this year production - number ten. Fiesler Fi 167 was a very rare German machine designed as torpedo-bomber for Graf Zeppelin aircraft carrier. Only 14 were produced and in 1943 they were sold to Croatia where they saw military service against partisans https://en.wikipedia.org/wiki/Fieseler_Fi_167. The model presents Fiesler Fi 167, ex-Croatian 4807 in colours of Yugoslavian partisans. Yes! Poland has underground state and army, French has Resistance, but only Yugoslavian partisans had their own aviatian! It consist mostly of airplanes and pilots, who flies out from Croatian army. There were many leaders of partisan - the most well known is Josif Broz-Tito, but another charismatic general was Vlado Cetkovic. He was killed during "friendly fire" attack of some Mustangs when he was flying on board of this Fiesler. Most likely it was on 20 October 1944 - there are some doubts if the accident not hapend three days earlier but the general died for sure on 20th. It is not sure which exactly Mustang shot Fiesler down - no pilot climed victory on this type since Fiesler was so rare machine that was misreconized as Fiat CR 42. Most likely it is said, that this was during attack of SAAF four Mustangs. But on Internet fora you may find discussion on other possiblities and there are photos of shot down Fiesler. In many languages : http://www.jet-manga.hr/012station/lipovscak.html http://www.paluba.info/smf/index.php?topic=19724.15;imode http://www.lasegundaguerra.com/viewtopic.php?f=240&t=10035 Going back to model. This is a Pavla kit with small modifications. Namely I worked a bit on inlet to cooler an small inlet below propeller, I made also some details on front of exhaust pipes, and modified (shortered in height and a bit changed geometry and modified position) of central struts of upper wing and made rotable propeller as always. The changes were done mainly done following analyses of photos not of drawings, which has apparent mistakes while compare to photos. Decals are from Serbian Lift Here (many thanks to my friend Zora for getting them! ) with modifiaction of adding partially overpainted fragment of red star on red belt on rudder, which is clearly visible on photos of shot down wrecked machine. Colours are by Humbrol new 244/243 (RLM 72/73) and old 65. Vallejo matt coat. Comments welcome and regards Jerzy-Wojtek Edit (immediately): I noticed on photos above that two cables of rigings glued by varnish -it was not difficult to repair immediately5 points
-
Hi all - as some light relaxation while I build 2 more Meatboxes, I had a sudden attack of Suezcitis ( it's that 50s jet mood again, and it is the anniversary this year too), so dusted off this little gem from JGMT. It was kindly supplied a year for two ago by my good friend Rowan Broadbent, along with the excellent Isradecals sheet. I had rather annoyed him by threatening to build it "en robe Francaise", but in the end the promise of a whacking great big shark mouth and narrow suez stripes with red lightning flashes on the tips tanks, all over a natural metal surface won out, so it will now be "a la mode Israelienne". Weighing in at just less than the mass of a collapsing star, it's not a lightweight model, but fortunately the rather sturdy white metal landing gear seems up to the job. At the moment I'm just cleaning up a few areas, etc etc, but I've made a start on the cockpit - adding a new coaming as the model lacks one. Stay tuned for more heavy-weight Kadesh-based 'Urricanicity Jonners Nose intake splitter needs a quite bit of work to add detail and refine.....in prog here.5 points
-
Hi, This one is not so much vintage as two others posted today - it has only 23 years... This was the second model which I done after more than 10 years pausing in modelling. This is Mitsubishi A6M3 Raisen, model 32 named by Allies "Hump" - this was a conversion of Model 21 from Jo-Han by cutting and reshaping ends of wings and giving another cowling. Painting scheme from 6 Kokutai, Ballale, Salomon Islands 1943 Comments welcome and regards Jerzy-Wojtek5 points
-
Today I have been knuckling down to the not very exciting task of sanding all the filled joints but first I stashed away the parts I'm not using and could not resist having a look at the diminutive tube of glue supplied with the kit. After 30 years in storage it has almost completely dried out and I was surprised to find the tube was made of lead when I cut it open: There were substantial gaps on the underside of the wings which were best dealt with using Perfect Plastic Putty: That gap was so wide a shrinkage crack developed and it needed a second application, here it is sorted: A couple of my panel lines did not match up very well so I filled and rescribed them: With all the main joints done I could now glue on the tail assembly: That revealed several gaps including this whopper: That was again sorted with PPP: The final job of the day was to get some white primer on the areas that will be red: Clearly the seam in the intake needs a bit more work first. Bye for now, Nigel5 points
-
Thanks guys! I had plans to get a post ready for May the Fourth be with you. But I spent most of my waking hours workin at the bench. So instead this post is going up on Cinco De Mayo at around 2am local time. Not sure if anyone will actually notice what's changed since the last post. I'll try to point out the more obvious stuff. Remember that insert piece for the top of the fuselage? Holds the BB unit? Well I painted her up. 20160504-MJS_4150 by _m_sinclair, on Flickr According to three beautiful high res pictures I have of Black Leader, these exposed technical looking areas have an overall warm tone to them. So I finally had a chance to use my brown Mig wash to tint the whole thing. Worked a treat I'd say. The fuselage while also essentially black, will have a cooler tone. Again, this will match the pictures I've chosen as my main guide. 20160504-MJS_4149 by _m_sinclair, on Flickr Did a bit of work on the cockpit today. I know last time when I was painting the various bits it was pretty subtle. Anyone actually see a difference? You may have to squint. 20160505-MJS_4174 by _m_sinclair, on Flickr Well it's bigger now! 20160504-MJS_4168 by _m_sinclair, on Flickr I think I'm calling the cockpit done. And I figured once Poe is added and the canopy goes on this is probably the best chance to have a look. So LOT's of cockpit shots now! And yes I know! I need something other than a white background. Stop yelling! 20160504-MJS_4169 by _m_sinclair, on Flickr 20160504-MJS_4162 by _m_sinclair, on Flickr 20160504-MJS_4160 by _m_sinclair, on Flickr Many many layers of paint went into painting the cockpit. Kept trying to add various highlights and shadows. Trying to imply switches, panels, placards, screens, etc. Not going off of any specific reference here. Just trying to get a feel for a busy cockpit. The kit cockpit only comes with the one, well I'm calling it a multi function display screen. Just the one, right in the middle. But I decided to add two more on either side of the cockpit tub. At least, that's what those little green square things are meant to be. 20160504-MJS_4159 by _m_sinclair, on Flickr So this is what kept me busy for several hours today. 20160505-MJS_4178 by _m_sinclair, on Flickr Tomorrow work will resume on teeny tiny Poe Dameron. And I will have to figure out whether to leave everything seperate for painting. Or do something similar to Andy's T-65 and modify the wings so they can be added after the fuselage is assembled. What to do, what to do. -matt5 points
-
Spitfire Mk.Vc KJ-Z ( serial unknown) of No.4 sqn SAAF, Italy 1943. Airfix 1/48th scale with Alleycat Mk VC wing conversion. Cheers Jonners5 points
-
Hello! here's one of my model for today. The model is easy and pleasant in the assembly. There is only one problem you need to put a lot of load on the nose. The center of gravity is shifted far back. Therefore, it is necessary to load a lot. All other problems in the assembly are related to my inattention. In the assembly used a of photo-etching set/ Paint- tamiya.4 points
-
I have just finished these 2 civil a/c, wich is a bit different as i normaly build military a/c, but was talk into the project by some of my model freinds Vicker Viscount 800, S&M Models, Decals from 26decals. build out of the box Hawker Siddeley H.S. 748, fra Welsh Models, this is a vacuform set wich needed a lot of work, propeller, undercarriage was whitemetal. cheers Jes4 points
-
Here's my take on one of my childhood favourites, the Airfix 1/72 Westland Scout. I've added to it an Airwaves vac-formed canopy and also one of their PE frets (which mainly provides seats etc for the cabin). I've also provided some extra detailing to the engine area using bits and pieces. The model depicts the ex. ETPS Scout XP849 in it's later civil guise, G-CBUH. When I saw the Raspberry Ripple scheme it was love at first sight, although I've had to accept a few compromises to accuracy (most notably the lack of large rear cabin doors), in order to model it using the Airfix/Airwaves combo. I hope this doesn't detract too much! The model was built under the auspices of the Helicopter III Group Build and the build thread is here, if you fancy having a look. Cheers Cliff4 points
-
Clearly you've not been going to the right parties.. ...but your dog has!4 points
-
Hello All, Well it's been a hectic this year, and I've only got about five days at home between now and the end of the GB so I need to crack on. I also lost my camera last month so all the pictures are taken with an iPad. I was advised that my canopy tint was the wrong colour, so I hedged my bets by mixing up a turquoise-blue from acrylics and Future, and applied it to the cockpit to give a slightly deeper tint than before: It looks a bit rough in isolation against a white background, but it looks fine in place, and I must say I'm happier with the re-do: The vent at the back of the engine housing needs a bit of love to get over the moulding short cuts. I will be adding the numerous gratings using squares of black decal film later in the build: Undercarriage next. I think the legs are a bit short but I haven't done anything about it because mine will be retracted. I drilled some lightening holes in the webbing to emulate the real thing: "Uh-oh, the wheels have come off..." The kit is missing this bump so I added it from balsa (picture is pre clean-up!): Somewhat belatedly (after I'd started the white topcoat), I decided to enlarge the intakes. So there's a selection of wheels from a Gnat, 1/144 He 111 and Frog Gannet: The Frog Gannet wheels are made from unbelievably tough plastic, but we got there in the end... The replacement compressor cones are from Airfix Il-2 missiles. I also reduced the size of the exhausts using little cones made from paper and superglue, all blended in with putty. Should have done this earlier, too! You can't see it in the photos, but I started with a base of my "dirty white", a pot of white polluted with a tiny amount of grey and brown, and then built up successive coats using progressively whiter mixes of that and pure white. The last coat was a dry brush of almost pure white over the highlights: The anti-dazzle black does a good job of hiding the too-small windows below the canopy: The underside was Humbrol acrylic Gull Grey. You can only get this in the old acrylic pots and it's a bit thick. I should have done thinner coats with more time between them, but time is something I don't have at the moment! For anyone else considering this build, the struts up from the sponsons to the upper fuselage could do with replacing and fairing in to the sponsons with putty, because the bottom end looks a bit weird. My consolation prize for all this travelling is that I will be across the Bay from the USS Hornet museum in a couple of weekends time, so I can go and look at a real Sea King on the deck! Thanks for looking, Adrian4 points
-
thanks for the links folks. I've been scouring t'interwebby for more photo's and also downloaded two books from Amazon, one on 28 Sqn Lysanders, and another on Lysanders in India during WWII - both pretty interesting but the few photo's that are included are (as can be expected) not of great quality. As per Troy's suggestion, I think I'll be heading up to the WWII forum and asking some questions up there. As indicated above, after much hours of scouring the ether and scrunching my eyes up to try and connect the photographic grains, I came to the conclusion that the MkII did have that cooling grill thingy on the port undercarriage. It appears that it is a hinged mechanism so can be either opened or closed - of course I chose open! of course I did! I only took a few photo's of the process so bear with me. On the Hawk kit, the two halves of the leg are molded solid with no space in between the halves, so that necessitated filing out a portion of the leg to accommodate the grill. I then took some 0.005" brass sheet, scored that with a blade and folded it up to make the duct. My second attempt at the duct came out pretty reasonable. I then had to hack out a corresponding void in the top half of the undercarriage - this is my *ahem* second attempt - as I hacked out the starboard leg by mistake on my first go around I've now marked the inside of the center portion so I know which way it faces. a slightly better photo of the same thing.... - yup, I'll end up cutting out the lights as well (and all those rivets will come off... eventually) I then searched around my stock of scrap, spares, and general doobries, and thankfully I had ordered a range of brass mesh sizes during the Dauphin build to make the intake grills - that mesh now came into good use. The finest mesh I had looked about right, and I found that by simply folding it over a knife blade, it gave me the right thickness to insert into the duct. Which, when all fitted together, looks passable. The big question is, that with mesh so fine - will I be able to paint it without clogging the mesh up. Ah, that's probably a year or so away so I'll worry about it then. Now I must go and put these little trinkets in a safe place. :pray:4 points
-
Before filling the seams on the main body I thought it would be a good idea to get the exhaust nozzles to fit. The were rather tight and quite a bit had to be sanded off to achieve a nice snug fit, I also drilled a hole on the end face so that no plastic could be seen through the nozzle: The joints on the engine pylon weren't great and Milliput was the best way to sort them: While all the filler was hardening up I had a go at knocking up the feet which also double as rocket nozzles. I decided to make a complete one as a proof of concept: This is how I made the rest. First I punched out some 8mm discs from brass shim stock (0.12mm): I felt that was a thick as my punch set would handle. Next after some cleaning up a 1mm flange was bent at the edges: Then I "centre punched" them with the tip of a file on my cutting mat: Holding them to drill out a 2mm hole was tricky until I came up with this arrangement: The holes were then opened up and centred with rat tail files until a nice snug fit was achieved on some drilled out plastic tube: I left the burr on the back face as it would be hidden and could contribute to the joint's strength: Finally tube and foot were united with some extra thin superglue: Here they are all finished ready for some paint: This gives an idea of what they should look like in position except the feet should be nearly flush with the pad but they are quite a tight fit and don't want to risk breaking them: Tomorrow I forsee a lot of sanding. Bye for now, Nigel4 points
-
Thanks chaps, I thought that was hard.. I have found another small thing that is nails to put together ...... The workable tool clamps, these are from Aber and this thing, only 3 parts of photo etch took me over an hour to put together. Its going to take a while to add all of these, I've glued it up now but it worked like the real thing when I added the shovel. Dan4 points
-
This is the 1/72 new-tool Kovozavody Prostejov Spitfire IIB - a very nice kit, not quite as easy a build as the Airfix Mk.I but better in some ways - in any case the KP kit is the only game in town if you want a Mk.Ib or a IIb and highly recommended if you want a Vb. I used the Peewit masks designed for the kit and replaced the kit guns with some Master brass cannons - there was nothing wrong with the kit supplied ones but I had the Master barrels in the stash and it seemed a good opportunity to try them out. The markings are one of the kit options for a 616 Squadron aircraft based at Kirton in Linsdsey in the autumn of 1941 - a presentation aircraft titled "Rochdale and District 2" (being the second of two purchased by the locality); I liked the combination of the 'new' camouflage scheme with the 'old' national markings. The AZ kit has the same decal option and notes the pilot as Pilot Officer Alan Hodgkinson but I cannot find any further information about either the aircraft or the pilot. Usual rambling build thread is here. Thanks to all who participated - here is the end result: Cheers, Stew4 points
-
Here's the next project, about 3/4s built and waiting paint. It's the first boxing of Fujimi's 1/72 F-4K in the "Yellow Bird" boxing. So far the airframe is almost done, drop tanks, missile rails assembled and Sidewinder missiles painted. I am using the kit's decals for plane number 152 of 767 Squadron. Now all I need is to purchase the paint this week.---John Phantom 19 by jvandeu53, on Flickr Phantom 20 by jvandeu53, on Flickr3 points
-
Here is an old school F-84F (Italeri or Revell maybe...?? box has been binned). I have a collection of early jet diecast aircraft and wanted to fill some of the gaps in my collection with plastic where necessary. As no F-84F exists in 1/72 diecast I built this old thing. Detail is to be expected from such and old mould and as I wanted to depict a USAF aircraft I use decals from the spares box. Nice straightforward build with no major problems and another one ticked off the list. The last 2 photos show the rest of my USAF early jet collection. Cheers all, Phil3 points
-
Hey guys, after quite long time i m back here with some WIP thread I found out, i have problems with time-limited builds, with my inconsistent time for modelling So it is hard for me to follow the group builds here on BM, as much as i love to be part of these ( But.. the irony of fate strikes again and i want to build something as a bday gift for my soon-brother in law as he is big fan of WW2 airplanes.. which is, obviously, nothing less than time limited build.. again.. I would have enough time (1-2months), but still i wanted to chose some nice kit, so i chosed one of the Eduard´s gems, F6F hellcat Im not sure which camo i m going to make, still chosing.. mostly i m thinking about some of the all around glossy sea blue F6F-5(N). As usualy, i started with cockpit I made new sidewalls (used just the prepainted PE with instruments), thinned the fuselage halves and added some construction details there. Made new radio equipment from scratch, adjusted the pit floor and headrest with some more details added there too. Seat belts are from HGW, the instrument panel is from the kit (prepainted PE). I see i took the shots before adding levers to the side walls I wanted to add something to the kit, but i was not sure i would be able to make complete engine area in time, so i made just the tank and firewall with construction - or well, the part of it what ll be seen when opening the little cover All made from scratch. So far i made also new rivets to the fuselage halves and started on the wings3 points
-
Hi here is my build of the Bandai Y-Wing. Great kit and a fun build. Cheers Plasto...3 points
-
Finally finished Enyoj ... Youtube video:3 points
-
This is done with acrylics, OOB with a few scrap box decals. Thanks for looking, Mark3 points
-
One Airfix Harrier finished to my usual standards! The kit gave three options for finish and I went for the GR9A so I could display the sniper pods and paveways... although I nearly went for the GR7A as I wanted to put the Lucy Pinder pin-up decal on! Although the kit went together well for the most part, I had some difficulties with the seams between the wings and fuselage on the top of the kit which took a lot of filling and sanding! I'm also not overly happy with the exhaust nozzles and if I had the chance I would re-do these. I'm limited to Tamiya paints due to local supply and I had a nightmare mixing the colours for the lighter shades but after several re-coats I'm happy with the finish. I tried some new techniques on this such as adding my own seat belts, experimenting with lighter shades picked out with the airbrush on the main colours, plus oil washes and matt varnishes. Also used translucent colours on the clear parts for nav lights. Comments welcomed and enjoy!3 points
-
Here's my latest build - the old Airfix 1/24 MkI Spitfire. Paints used were vallejo model air & the matt coat was humbrol acrylic matt rattle can. plenty of mistakes to be seen here - the rear view mirror is missing as I've put it somewhere safe, I have no idea where that safe place is ! Biggest problem I had with this one was the decals, I reckon the water I used was too cold, this caused them to shatter as I applied them to the model, and so I had to go ahead & give here some severe weathering. WIP is available here Thanks for looking WP_20160505_18_35_02_Pro by Andy Moore, on Flickr WP_20160505_18_35_39_Pro by Andy Moore, on Flickr WP_20160505_18_36_01_Pro by Andy Moore, on Flickr WP_20160505_18_36_08_Pro by Andy Moore, on Flickr WP_20160505_18_36_34_Pro by Andy Moore, on Flickr WP_20160505_18_36_56_Pro by Andy Moore, on Flickr here she is in her final resting place .... WP_20160505_18_38_56_Pro by Andy Moore, on Flickr WP_20160505_18_41_54_Pro by Andy Moore, on Flickr WP_20160505_18_42_14_Pro by Andy Moore, on Flickr3 points
-
Hello mate. Its coming on there. How obsessively mad are you intending to get on this on re attention to detail? Cheers Si Oh. I just said to the mrs 'I've ground to a halt on my Wokka'. Her response? 'Good'3 points
-
A quick mock up of the TARDIS and the forced perspective doesn't look too bad ( I honestly didn't think it would work ) when the door goes on it will restrict the view a little more I think as it doesn't open right back to the side wall I'm certain things will end up a bit dark once everything's in and the lids on so I'm toying with lighting it up. I did a quick test just to see if the console would allow enough light through It's not too bad Getting the LEDs in will be easy and I don't have to worry about hiding wires as the real TARDIS has them all over the place but getting power to them and hiding the battery pack will need a bit of thought. The roof of this has batteries in it as this kit has a light and sound feature but I'm not sure how easy it will be to pinch a feed off of that, I think I will need to investigate that3 points
-
Good evening Today I placed and painted the canopy , I also placed the exhausts and the tail wheel I hope I will be able to place the decals this week end Patrice3 points
-
The Italeri kit is correct for a RAF Mitchell II, the RAF ran the Mitchell pretty stock, single nose flex .50, no fixed .50 on right of nose, , no side gun packs, mid upper and the RAF persisted with the Ventral turret which most other users removed, many RAF Mitchell II's also had the later multi pot exhaust engine cowls. Some late B-25D's delivered to the RAF had the single .50 gun position in the tail and waist gun positions with single .50's with no ventral turret, I read stories of old Mitchell gunners with 2nd TAF who said the tail gun position on the late B-25D (Mitchell II's) and B-25J's (Mitchell III's) were rarely manned, most gunners hated the position sitting on a bike like seat with your legs under you, almost kneeling. Only Mitchell II's had invasion stripes as the Mitchell III's were delivered after D-Day, but Mitchell III's did run ID stripes (black and white invasion like stripes) on the fuselage only not the wings, these were applied in Oct 44 till Jan 45 as the increases of friendly fire attack's on 2 TAF Boston and Mitchell units by US fighters who thought they were German Bombers (JU88-Boston, DO217- Mitchell).3 points
-
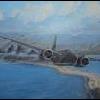
The aircraft in the video is the warbird I had mentioned in a previous post. It was painted in a great scheme but is quite inaccurate.. not only because of the tone of pink but because it's a PR.XI and these aircrafts did not use pink. Pink was used by low level recce aircrafts (the so called "dicers") to blend with a cloudy overcast. The XI was a high level recce type and PRU blue (sometimes with medium sea grey) was the colour of choice. In any case PRU Pink is one of those subject on which discussions will rage on forever, what's important is building a model in the colour that you think is right3 points
-
Thanks bob I did some more research last night to keep me away from the bench - there are several hammers and a lot of sharp things there... I searched the 'net for posts to see if I could find anything more on PRU Pink and on SpitfireForums.com found an interesting thread on Pink Spitfire FR.IXs where a very wise man has posted a comment (#3) to the effect that later PRs may well have been a different colour... although, in 2009, 'gingerbob' was a newbie on that forum... hey, wait a minute, 'gingerbob' was that you? I now declare that I entirely agree with bob's post and that this one will be pink, not dirty white (I'll save that for the Ig). I wanted a pink Spitfire and I shall have a pink Spitfire, so there (what a brat!) Thanks bob! We'll still have some fun with the paint though. Try not to get it on your clothes. Thanks John and PC I will, from now on, never complain about delayed deliveries (especially as eModels despatched my order last night). It does beg the question as to whether we should allow the continued attacks on the 'Royal Mail' in the name of 'competition'. They do a great job IMHO - where else can you stick a (relatively) cheap stamp on a letter to far off places and expect, yes expect it to be delivered the next day. Good on you, Royal Mail, long may you continue. (Now I have the Postman Pat tune in my head - rats). Note that eModels have despatched my parcel. Others dispatch them. Mrs B (English teacher as you know) says either is acceptable. I will add 'as long as you don't pronounce it dee-spatched' Hi Simon I think Royal Mail (bless them again) may have relaxed their rules now back to 'the old days' - the parcel from Hannants came via Parcel Force 24. It's your if you want it. Good luck with the Estate Agents - moving far? I met an Estate Agent at a party in London years ago. A proper one. He managed the Estate for 'the Duke'. I berated him for selling London to foreigners. 'Leased old boy, leased. We'll get it back in 999 years'. One of my best mates was one of the other types and collected phrases from the details his colleagues circulated and we all had a good laugh over them. Two favourites were 'deceptively spacious' ("It looks spacious but...") and 'entrance hall having mat well', presumably some sort of sexual deviation Thanks for the 'like' on the G&T too - I enjoyed it! Thanks Stix! Thanks Keith! I'm so sorry - I seem to have passed on my obsession with pink (still in a manly way!). Thanks for taking the time and trouble - much appreciated and helpful in making my decision I am very pleased with the punch and die set - see below. Thanks Giorgio Edgar is already missed; I'm sure we'll be taking about him for years to come. Right, I'd better post that lot and start another just in case...3 points
-
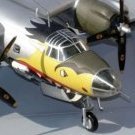
A few additions for tonight: Finally, the prop decals arrived, a set of 1/72 U.S. Propeller Markings by Authentic Scale (Olimp). They are shown here, along with the ol' trusty prop jig box, to which has been added two ink marks to assist in aligning the prop logo and data decals into the same place on all the prop blades Next, we have the decaled props, after the decals have dried and a coat of flat clear acrylic has been added to seal the decals. Note the prop hubs, which are masked with Parafilm "M", applied as several small strips per propeller. I felt that after the broken prop blade described earlier, I wanted a very gentle masking medium, which I could slit and easily remove with the aid of a sharp #11 blade. Next, the hub masking was removed, and the blades were masked with strips of Parafilm "M" folded over, so that the hubs could be shot with Alclad II Polished Aluminum. And, at last the propeller blades are finished, save only a little chipping and weathering to be done later. When last seen, the tail 20mm turret had been given a rudimentary seat assembly, and the had been attached to the fuse. To finish up this area, I wanted to add some sort of gun-sight, but no one makes a K 20 Mod 6 in 1/72 scale. Thanks to Mr Turtle's kind photo offering earlier, I had a decent idea what it should look like, but soon found that even with 10X magnification, I lacked the tools to fabricate such a small item. So, I took a dive, and ordered a set of K-14 gun-sights from Quickboost. These are really little jewels, and I can't even imagine how in the heck they made them that small, but good on 'em! The kit consists of six moulded gun-sights and a sheet of clear plastic upon which the K14 reflectors are sized and marked. I found that buy cutting off the "half-moon" or headrest-looking part on one side, it looked close enough to my K20, that I could live with it. I also had to cut a strip of the clear from the side, as the K20 reflector parts looked more like a triangle from the side view. Bending two creases into this tiny strip was a real bear! After painting and fiddling, it still took me two days to end up with this: but at this point I decided to settle. I still bet that even though the reflector is too tall, mine looks better than anyone else's P2V-3! Anyway, I then took a strip of 32ga wire, and bent a little "shape" that faintly reminiscent of the sight mount, and painted it interior grey. I then glued the gun-sight to the wire "mount", and then spent the next two days trying to glue the thing into the turret from the outside. (I wish I could have mounted it before gluing the turret onto the fuse, but it would never have survived. Eventually, I got it to this stage and decided to quite while I was marginally ahead. I would have added some wiring, but even my 32 AWG wasn't tiny enough. Finally, I glued on the tail turret bubble with some CA glue and let it dry. Now comes the filler, sanding, primer, etc. routine to get the darned thing to blend into the fuse properly. It will eventually look better. Gotta go mow the lawn, will do more soon. As soon as this part is done, I will glue on the tailfeathers, fill, sand, prime, etc., and some day, it will be ready for paint and decals. I only ANTICIPATE two more problems: 1) finding a secure way to fasten on the rockets to their mounts, which are so thin that it's hard to drill a hole in them for a wire, and (2), I need a better photos showing the sides and/or top of the power steering mechanism on the nose gear strut. Any help or suggestions would be appreciated. Later, Ed3 points
-
thanks guys.. Well production is about to start again this morning but I just have to show what was waiting for me when I got home... I think parts of the warning notice probably can relate to the real thing as well!!3 points
-
Spent most of the day wandering around the wildlife park at Port Lympne. It was a beautiful day and I saw all of their Malaysian Tapirs for the first time, I swear they normally hide when they hear me coming. Here's a photo to prove it: Two more coats of Medium Sea Grey, with a Micromeshing between each, on the Spitfire leads us to this: (That's an AZ MkVIII, that I'm currently wrecking, in the background.) I'm pretty happy with the coverage and the fact that you can't see the seam on the top of the nose because the photo is slightly out of focus. Obviously, it's Dark Green next. I'm planning on using Colourcoats ACRN09 which, I believe, is a good match for the original colour.3 points
-
Cheers folks. Gremlin, I used my old Expo A/B she got a 0.3 mm nozzle and sprayed at 1 bar 15 lb/sq in. It leveled out quite well, I will wait to see how it performs later. Anyhow, after a nice curry, a little report. Got some priming done today, to se what needs remedial work done, ( most of it by the looks of it) Also laid down the base coat for the cockpit. And the I.P.s got a coat too. Now, how to mask the side panels on the cockpit walls? I could be a long time LOL. All comments welcome. Simon.3 points
-
Thank you Oliver! I'm having some camera troubles atm (my main one is committed to over exposing everything) so these are taken on a 10 year old little camera that I forgot how to use , so apologies for the lack of photos! I want to try and get the 1/72 one finished this bank holiday so probably the last WIP update for it unless I can get decent photos of what I'm doing. Anyways I placed most of the decals on, they performed very well, only maybe just a tad thick for this scale. I chose the jet '26+72' which was fitted with the chaff dispensers and also had, at this time, a limited amount of stencils compared to earlier jets. Luckily for this jet there are quite a few photos to see which ones to apply and not. This jet also was repainted later on in the red/blue/white 'Viking s'scheme. After applying them they had to be toned down in this scale, for example, And subtle weathering on the undersides, all the weathering is still a WIP but I need to get a matt layer on first. The aires nozzle Some weapons, the Eduard Kormorans are really nice. Over all with a wash applied. Lots of other things to do now but incase I don't manage to get any more WIP photos for this, this pic shows how toned down the stencils are. Hopefully I can get some more pics of the seat, landing gears etc... Thanks for looking, David.3 points


This leaderboard is set to London/GMT+01:00