
Leaderboard


Popular Content
Showing content with the highest reputation on 10/03/16 in all areas
-
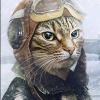
Hi everybody, here is my recently finished Hurricane Mk.I in 306, Polish RAF squadron markings. Very pleasant kit to build. I added Eduards PE, exhaust, whells, Techmod decals and some scratch-building details (riveting, anti-glare plates etc). I used dedicated MrHobby paints of C-series. I hope you enjoy, Artur31 points
-
Enjoy !!29 points
-
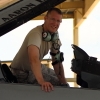
Well it's bright and it's done. This is my second Hasegawa Phantom depicted as a jet (37-8322) of 302 Hikotai based at Naha Okinawa in December 2008. It was specially painted to commemorate the transfer of the unit to Nyutabaru after 24 years on the island. The aircraft was scrapped 3 months later in March 2009. Lessons Learnt Not all Hasegawa Phantoms are the same. Even though the Sprues for the Wings (sprue L) and Fuselage (sprue J)are labelled the same there are 2 different versions of the same sprue depending on the boxing. As such I really should have used the F-4EJ Kai boxing, which has the proper fuselage and wings with the correct antennas. My biggest disappointment was the Wolfpack resin nose. I wasn't happy with the depth of the lines /detail so I re-scribed it, and didn't do a good a job. I'm not sure what it offers over the kit nose to be honest. A close second was the True Details Pylon's, The engraved detail in these is pretty fine (non existent) and also needed re scribing. Thirdly was the colours chosen by Model Alliance for the bright green decal text. It's nothing like Tamiya X-15, which seems to very closely match the green on the actual aircraft. Enough rambling, onto the details The Kit 1/48 Hasegawa RF-4EJ Recon Phantom (HSG 09923) Aftermarket Wolfpack Nose and Pitot True Details Pylons AMS Resin Intake Blanks Aires Exhaust Eduard PE Quickboost Seats Royale Resin Wheels SAC Landing Gear Decals Model Alliance and Hasegawa for the stencils Painted with Tamiya Acrylics and Gunze Lacquers. Gaianotes and Tamiya Gloss coats Winsor and Newton Galeria Matt Varnish with some Dullcoate thrown in. Vallejo and oils for the details Weathered with Oils and Pastels. This is probably a bit underdone but I'd lost interest by this stage The Photos. More photos at my blog or facebook page Build thread is here25 points
-
Just finished, no problems building the kit, but it is quite basic. So, I've also bought the Revell Gannet which has much more detail. Dave15 points
-
A German friend commissioned me to build a model of a FW-44 Stieglitz flown by his Grandpa. The kit is a Silverwings'. Scale is 1/32. Overall RLM 63, as speculated by the pictures I was provided with. The resin kit although expensive, is great. Probably the best resin one I've ever built. Delivery time from Silverwings was a nightmare though.14 points
-
Hi all Here are some pics of my Dragon Heinkel 162 Mistel. The model represents a Heinkel He 162, which has been re-deployed from JG1 to a new bomber unit. Hence the painted out previous markings and the application of new bomber unit codes. The Me 262 represents a tired, in-service fighter which was sent back to the Messerschmitt factory to be reconfigured to a drone aircraft with a new warhead nose cone. As this combination of a Mistel never existed, it allows for some latitude in terms of historical accuracy. It also afforded me an opportunity to use the markings seen on the Me 262, which to the best of my research never existed. He 162 - Eduard photo etched detail set used in the cockpit - kit pitot tube replaced with hypodermic needles - FuG25a IFF antenna added - photo etched DF loop added - landing gear doors modified to allow them to fit in the closed position - machine gun barrels drilled out - airframe painted with Xtracolor X210 Brunviolett RLM 81, X211 Dunkelgrun RLM 82 and X208 Lichtblau RLM 76 - model is weathered with chalk pastels - markings are from various sources and AeroMaster 48-334 Reich Defense 163’s and 162’s Part 7 Me 262 - kit pitot tube replaced with hypodermic needles - fuselage rescribed to depict where the cockpit was removed and new sheet metal added - aileron trim tab linkage added airframe painted with Xtracolor X210 Brunviolett RLM 81, X211 Dunkelgrun RLM 82, X212 Lichtgrun RLM 83 and X208 Lichtblau RLM 76 - model is weathered with chalk pastels - markings are from AeroMaster 48-336 Me 262 Sturmbirds Part 3 Trolley - drag chute cables and breakaway retaining ropes added References Aero Detail No. 9, Messerschmitt Me 262A Aero Detail No. 10, Messerschmitt Me 163 and Heinkel He 162 Classic Publications No. 7 Mistel German Composite Aircraft and Operations 1942-194511 points
-
Chieftain Mk.5 Takom 1/35 I finished Takom's Mk.5 last December (having started it all the way back in September) It's a nice kit, although the BATUS markings supplied should in fact be for a Mk.10. I think Mig J. was a little lax on his research for this one. Built OOB apart from the MG and smoke discharger covers. The base used one of the AMMO branded model scene grass mats. It'll be nice to see how it stacks up against the Meng one, but that seems to have disappeared again, after having a brief revival late last year Thanks for looking Andy11 points
-
As well as the Tadpole I have also managed to finish this one as well, but do plan on putting it on a base just toying with a few ideas as don't want to do mud again, im thinking of doing a dusty cobblestone track???? did enjoy the build to a degree but got admit was really put off with the tracks and felt that Hobbyboss had done a bad job on these as each pad was in 3 parts and trying to get them to line up and all fit was a nightmare and half would clip together only to keep falling apart, due to that drastic action was forced to be taken and had to glue them to the wheel and there was no way was able to do a hole track, and the scheme flip it was testing on the eyes before was able to tome it down with the weathering lol..again the weathering products used can be seen in the build thread!!! the scheme was all done freehand and then went around it with black paint and brush after !!!!!! the last bit was the storage which was two-part Tamiya epoxy.10 points
-
Morning folk's,I picked up this kit just after Christmas at a cracking £12:99 and what struck me was the quality Eduard give you for such a silly price! I raked around my magazines for some references and found an article in MAI which included a small b&w photo and colour profile by Richard Caruana of AH651 which retained it,s early colour scheme as it was never sent to a squadron. As soon as I saw it I had to try and replicate it as I love the look of this aircraft in RAF marking's thankfully the spares box yielded all I needed even though I had to make up the serial with individual letter's/numbers,might not be 100% accurate but It is at least a bit different,thanks for taking the time to look.9 points
-
Airbus A319 I completed a month ago. Not perfect, but getting better. I'm currently building the same kit again in a personalised livery (will post on here when done, if it succeeds) Goes together relatively easily. On my second time round i'll be paying more attention to the join lines on the engines. If you go for the CM56 option, i've noticed the starboard engine on both kits didn't fit together. The IVAE engines (pictured) seem to fit consistently. Chris8 points
-
I've long been a fan of the Beech Kingair & so decided to take on two, very different kits--Mach 2's RC-12 & RVHP's MC-12. The Mach 2 kit was a pig (surprise, that!) and basically required a complete re-work. The engine nacelles represent the very-early C-12, with the round profile and had to be re-sculpted with milliput & profanity. The undercarriage was unusable, and I swapped them for part from the spare bin. Most of my effort was expended replicating the various structural reenforcements, lumps and bumps of the RC-12--I decided to model the latest RC-12X, instead of the kit-intended K-model, which required sculpting the ironing-board SLAR antennas on the aft fuselage & building-up new wingtip pods. I used the spare vacuform canopy from the RVHP kit--they pack it with two!! RVHP is the exact opposite of Mach 2, and the MC-12 Liberty is no exception--it's lovely! Warning on the vacuform canopy though, it fit the Mach 2 aircraft, but was too wide for it's intended kit!! In retrospect, I should have shimmed the resin fuselage with styrene sheet before joining! Lesson for next time. Only major mod was cutting out the crew door & adding an operator's station--I still aim to sculpt the aft SATCOM hump to make it a later version of the MC-12, though it's finished as an early version for the time being. Both kits were expensive, but the MC-12 set a record for damage to my pocketbook! I think it was worth it & my wife has come 'round Amazing what flowers will do!! And the MC-12!8 points
-
Hello all, Here is my recently finished 1/48 Hasegawa F-16D Block 52+ in the markings of the Iraqi Air Force. The build thread can be seen here Extras used included Pavla ejection seats, Aires exhaust, Master Pitot tube and static dischargers, Steel Beach FOD covers, Eduard RBF tags and Caracal decals. The Sniper pod is from Hasegawa Weapons set E and the GBU-12s are from a Kinetic F-16. Some extra work was added to the landing gear wells and cockpit area as these are a little bland. This kit goes together much better than the Kinetic example, but lacks some touches that the Kinetic kit has. Fingers crossed for a Tamiya two seater! Anyway, the pictures: Beside my 1/48 Sufa: Comments welcome, thanks for looking. Dave8 points
-
Hello, I just finished the Trumpeter 1/48 Italian Air Force Grumman Hu-16 Albatross . I like this plane so I added a lot of features like engines, sound and lights. I had a lot to rework because nothing was "italian", but just a base version with italian decals (wrong and lacking). I had to add or modify a lot of antennas and other details and add or build lacking decals. I hope you like it. Find a movie here https://www.flickr.com/photos/angelomoneta/24955771903/in/photostream/ and more pictures here https://www.flickr.com/photos/angelomoneta/with/24955771903/ Angelo8 points
-
Ok fellas. I just completed the trailer to the 142H tractor unit I had built for the Steel Haul that I was supposed to use but did not. The boom is from a toy digger I bought at a cheap store. I had planned on using it as a load for my heavy hauler rig, but the amount of work I had to do on it to get it looking right, would have taken me ages. So I opted to salvage what I could and use the parts for something useful. So now I had a use for the boom. I added hydraulics using soldering iron wiring and styrene tubing. I wanted it to look alive. The trailer is the Italeri curtain trailer kit. I only used the chassi and bottom half of it. I then scratch built the extra floor and added tie-downs. So now this tractor has a trailer, I think, goes together pretty well. Hope you like the results. Thanks for looking. Lots of detail pics: -------------------------------- -------------------------------------- ------------------------------------------- ----------------------------------------------7 points
-
Hi all managed to finish this one and was built as part of the Made in Great Britain sig, but thought would post on here as well. I got over the fear of doing a diorama !!!!! just going have push myself to do more. I personally feel very happy with the results and did learn few new things /and how to do few things better. build thread can be found here::: http://www.britmodeller.com/forums/index.php?/topic/234998112-135-emhar-tadpole/7 points
-
Finished this model day before Huddersfield show but finale photo just made now. Build topic is here http://www.britmodeller.com/forums/index.php?/topic/234992281-messerschmitt-bf-109e-1-airfix-148/ and here https://goo.gl/photos/DbfZAaTLBvqrL4pD7 Hope you enjoy it7 points
-
Thanks Darby - I'm tiring a bit now but must push on... nearly there! Thanks Ian and welcome! Er, fnaar fnaar, score 1 and LoLs from Nigel - kudos! Thanks Obe Wan Vacform? Not me! More photos? What like this? Oh, sorry, you probably want a close up? Just teasing, sorry, feeling a bit wicked... here's the state of play after what I hope is the final sanding: Untitled by Ced Bufton, on Flickr The NMF will obviously show up more faults - it's just whether I can be bothered to do anything about them! I also need to 'fit' the wheels and stick on the resin door thingys. And the lights. As you can see I'm having some R&R by applying the AK True Metal from time to time. Looking forward to more of that. By the way the AK TM on the fuselage seems to have dried (or whatever it does) and hasn't been coming off on my fingers for a couple of days. I think a thin coat is the answer, 'rubbing it out' well with the brush until it stops covering. Perhaps I'll post a step-by-step.7 points
-
Hi all - this is my second post and it is the Fisher 1/32 Hawker Sea Fury - completed in 2014 - I hope the rumour of Fisher's 1/32 Firefly come to fruition as it would be great to have the stable mate to the Sea Fury - the Royal Australian Navy markings are home made - hopefully Fisher's Firefly will include RAN markings with their Firefly & a post Korean war option - looking at doing a Wyvern next but may take some time before I can complete it & post pictures of it. The aircraft is WZ649 106/K 805 Squadron RAN mid 1950's6 points
-
Revell P-47D-30 1/72nd Scale Airbrushed (poorly) with Alclad Aztec Decals F-47D-30 Escuadrón de Persecusión y Combate "10 de Mayo", Campo de Columbia Air Base Fuerza Aérea Ejército de Cuba The first F-47D-30 received February 1952 and US support withdrawn during 1955 These aircraft were obsolete and not employed by the post-Revolutionary Air Force Tony6 points
-
I imagine sirens are blaring at Valom HQ, and someone's running through the building screaming, in panic-stricken tones, "SOMEBODY BUILT ONE!"6 points
-
Hi all managed to finish the tadpole, and got over the fear of doing a diorama !!!!! just going have push myself to do more. I personally feel very happy with the results and did learn few new things /and how to do few things better. build thread can be found here::: http://www.britmodeller.com/forums/index.php?/topic/234998112-135-emhar-tadpole/6 points
-
Thanks Martin! and today's progress.......landing gear built and attached! Just the rollover hoop to add and then I can get started on painting! Thanks for looking in! Ian6 points
-
Here are the compelted phtoos of the brand new Aoshima 1:48 scale Thunderbird 4. I ordered this direct from Hobby Link Japan late last year and it arrived in January. I didn't do a WIP thread for this but its a nice kit without any major faults. The kit comes with a choice of underside plastes to allow you to add wheels and a the kit includes a small electric motor that can be used to turn this into a toy. It also comes with a light bulb to put in the lighting panel at the front, but I replaced this with 2 Surface Mount LEDs. You also get a selection of tools that can be fitted to the front, including the rams that are used to free the trapped Martian Probe capsule in "Day of Disaster". There are also 3 torpedoes and the two central tubes have springs that can be used to fire them. The shape is excellent, much better then the old Bandai kit, my only complaints being the scaling of the Gordon figure and the way the thruster tubes are attached to the main body. I also think they are too long (they are the red tubes st the rear). The kit somes with a nice base and even some lichen to stick to the base. I just painted the base brown and dry-brushed some grey over the rocks. The kit provides decals for the red stripes, but I masked and painted them. I had troubel with the decals as they were VERY delicate and the "Thunderbird 4" decals on the sides and rear rolled up on me during application never to be usable again, so I had print my own using th etemplate I'd created previsouly for the Bandai kit. So here are the photos And now for a couple with the Bandai kit In this one you can really see how bad the shape around the cockpit is on the Bandai kit!5 points
-
Hi all,last photo update before the gallery,the canopy is painted and added as is the flat type fuel tank,just the prop which suffered a broken blade and aerial post to add tomorrow.5 points
-
Hi folks,she's up on her feet with the U/C complete and painted I just want to run a thin wash in the detailing. And after a night to dry after a lost decal sheet scare I started the decals,I have cut the combined roundel/code decals up for easy application as I want to trim off the clear areas of the letters,thanks for looking in.5 points
-
...and here is how it looks now. On it's legs and final varnish coat on (Humbrol Gloss mixed 50/50 with Humbrol Satin Cote, then cut with distilled white spirit): With a little luck, I can get it over the 'piano keys' tomorrow. Thanks for taking the time to look and/or comment. Ian.5 points
-
Mr. Color 368 BS381C/210 Sky.. not bad.. Mr.Color 369 BS381C/450 Dark Earth.. Mr.Color 361 BS641 Dark Green.. Some uhh.. underspray..5 points
-
Good idea, thanks Benedikt Check stash for suitable scratch material. Don't have any. Oh well, use some sprue then Willard*... dry fitted with very thin tak: Check the profile: I'll 'correct' the oversize before fitting. Glued in the sprue with CA gel. Drying. Done. * Non Bob Newhart fans can listen to this. I just listened to the whole thing again4 points
-
I'm really getting tired of this childish behaviour, so this thread is being locked forthwith. 22 pages of arguing about a subject that the most important aspects of are secret, and for better or worse, we can do nothing about other than watch and wait to see if we're right. TBH it's the same old entrenched points of view that have been trotted out time after time, and I can identify a LOT of the same people that have been involved in previous debates, and can't abide someone having a different opinions on the aircraft than their own.4 points
-
Alley Cat Models is to release a 1/72nd Beaufighter Mk1/6 early conversion set Source: https://www.facebook.com/AlleyCatModels/photos/a.332251853642016.1073741828.330656630468205/477489225784944/?type=3&theater V.P.4 points
-
I had seen this before but after listening to some parts again today, I'd say that Sprey is far from a donkey but actually a very clever man ! In his description of the weaknesses of the F-35 he uses all the right clichès: - too much reliance is put on technology, we have to go back to the simpler technology of better, earlier days. Luddism never dies and most important, hinting at the past always work with those who are uncounsciously afraid of the fact that the world is changing (that is 99% of people) - the enemy will defeat us if we go this way, oh dear, the enemy weapons are simple but invincible. The Vietnam syndrome seem to be another thing that never dies, we went too hi-tech and were defeated by peasants.. Doesn't matter if the Vietnamese suffered losses that no Western society would ever tolerate - the crusade of a few forward thinking man against the weight and might of bureaucracy (when he blatantly lies about how the F-16 development started). Isn't this perfect material for a Hollywood movie? The "single scientist has discovered the truth against the will of the establishment" always works well with the audience, pity that things are usually never like that. - the generals only think of their career and don't know what real soldiers/pilots really want. Replace the term general with boss, CEO, teacher, this works anyway. For some reason the ones in charge are always felt as incompetent while those down on the hierarchy know best. Again, how many movies have been made on this ? - most important: the government is corrupt, they don't want to give our soldiers the right weapons because they have to make money thanks to the defence industry. We have to do something against this to free ourselves from the dark powers above us that want to enslave the world. Circulate this on facebook and other social networks, and don't forget to add a "like" under the post. If we get 100,000 likes the industrial-military complex or the freemasons, illuminati, reptilians or whatever the enemy of the real good people is at the moment will magically dissolve. The man knows what has an impact on the audience of a TV program and uses all these bits very well. Of course anyone with a knowledge of military aviation would only need a couple of minutes to debunk his statements but he's talking to people who don't know zilch or only have a superficial knowledge. He doesn't have to talk tactics or advanced aerodynamics, just has to throw in a couple of numbers to show that he has some technical knowledge, mention a couple of types to show he knows military aircrafts and the trick is done. And someone will pay him for interviews, maybe he'll write a book and the pension is sorted.4 points
-
Wings going on! Saw no reason to wait for anymore time to pass, so they are glued and taped. There will be a slight gap to fill with some dissolved putty. The spinner mount is fared in. Shouldn't have to do anymore on that. And I've added some material to the spinner itself. It is just slightly out of shape. I noticed it as I was lining it up with the fuselage, and rotating it showed a slight 'wobble' in its circumference. Once dry, I'll sand it smooth and into better form.4 points
-
I added the black trim color .. I need to add the red and white strips on the wings .. Enjoy Rick4 points
-
Hi - this is my first post of a Seahawk I finished last year - plenty of reworking of basic kit - nose wheel bay extended to nose, Wolfpack outer wing panels but scratch built inner wingfolds and Pavla cockpit amongst them - painted with Xtracrylics - decals cobbled up from kit and some home made done on a Cannon inkjet printer - photos are taken on an iPhone and the nose looks a bit more elongated in some of the photos than it actually is . Cheers CJP3 points
-
Sci-fi is not really my thing but I've always been somewhat attracted to the fighters used in Star Wars. This is my take on Luke's Red 5. I deviated slightly from the painting instructions provided by Fine Molds and painted the spine area and engine pods in a metallic colour. Could have done a little more weathering though. Anyway, enjoy the photos. Feedback is most welcome. I have a Bandai T-70 in the stash as well as another Fine Molds T-65 but in 1/48 and could use some input as to how I can make them better. Cheers! Mark3 points
-
Since times immemorial I feel like I have been hacking away at this Classic Airframe kit. the interior and the resin for it fitted really well but the rest of the kit didn't. Anyway I'm off for some therapy and eyeing up my Classic Airframes Venom FB1 as the next challenge. The decals are a mix of Oldmodels and Ventura. Thanks for looking3 points
-
Yes, indeed! I can almost hear Charlton Heston (as Moses) declaiming, "Behold His mighty hand!" as the seams are filled.3 points
-
Well, off we go. Already, I'm astounded at the engineering quality of this kit. It absolutely leaves Pocher - even the 'new' ones - for dead. It really is a Caterham in miniature. There is virtually no clean up of parts needed and the pieces fit together like a Swiss watch. Chassis frame painted satin black, steering rack built up and fitted and some parts of the ally panelling added. ...And so far, NO glue! Everything goes together with miniscule screws that make the Pocher screws look like 6" coach bolts. A minor bit of scratch-work: I added jubilee clips around the steering gaiter ends. A serious challenge for the old eyeballs but I can tell this is going to be a fun build. Roy.3 points
-
CedB De Mille surely! I'm really glad you've stuck at this C, it shows perseverance, talent, and sheer bloody mindedness, will win in the end. Not long now before a swan emerges from an ugly duckling, Sean3 points
-
Today I have been mainly making holes and slots. There are also four pairs of handles up on the roof, I roughly marked their positions and also the correct position for the light beacon: While on the roof that dome thing in front of the existing light should be circular in section and somewhat bigger. I think I'll have a look in my spares box for a replacement. Here are the drilled handle holes and a big 1.8mm diameter one for the light, I blanked that off with a disc of tape to prevent dust ingress and also added a disc of plastic behind the hole that removing the light exposed (to back up some filler later): Then I got to work on the meshed holes of the RHS, first thinning the surrounding plastic with my motor tool: Mesh installed: From the outside: This emergency escape door handle is moulded in the wrong place and facing in the wrong direction, it should be where the dot is: I removed the moulded handle and drilled a hole for the replacement but won't fit that until after the glazing is in. These moulded handles also have to go, again the top one is slightly out of position and facing the wrong way: That's those done using some shaped 0.4mm rod: I also replaced the ones on these front side doors: There was then a pair of these slots to make on either side of the tail and also add a tiny 0.3mm drain tube: I remember there were some very similar slots to those on my Hormone, clearly a Kamov design feature. There should also be a light beacon identical to the one on the roof on the underside so I made a hole for that when I'd worked out its position. I have also drilled out holes for hydraulic and brake lines to the main undercarriage and a diagonal pair for electrical cables that will go to the ordinance: I have also drilled out this light on the front, one on the left for a probe and hydraulic lines to the front wheels: Finally I drilled a 0.5mm hole for another probe and started to open up these slots on the engine fronts that will later be backed up with some fine mesh: This gives an idea of what it should look like: Sorry that was a bit hole intensive but I trying to get all the drilling done before the fuselage is closed up to try to avoid any swarf getting trapped inside. Bye for now, Nigel3 points
-
Finally having fought me way through all the rubbing down, filling, riveting and masking, I can now start getting some paint laid down. Heres a pic. More pics to follow as more paint goes on.3 points
-
Thanks Benedikt, good explanation Thanks Ashley, PC and Cookie - nearly there! I've applied the AK TM to the joins (and around the nacelles - do this before you attach them!!) and it seems there is some more work to do: Untitled by Ced Bufton, on Flickr Please don't look at those joins on the nacelle glazing... no OVER HERE!! The final (??) problem is the gear doors. They're pathetic: Untitled by Ced Bufton, on Flickr Any ideas that don't involve the bin? I'm thinking about filling the hole and using the part to shape the filler. Madness.3 points
-
Hi everyone - thanks for the comments! I'm working on the design and content of Issue 3 at the moment, but have to say early on that I have no plans to expand the scope to feature anything other than aircraft. There are plenty of magazines out there that cover these subjects, so I don't want to tread on their toes too much. So, for the moment I'll stick with aircraft and then maybe work on additional releases if I get the inspiration and time to look at other areas. Cheers! Spence3 points
-
Yes you're correct it is however, in one last comparison between the respective marques, when I see people complaining about Airfix trench like panel lines, I can't help but compare them to some Matchbox kits, now those really were trenches, by comparison the Airfix kits are quite fine. Airfix has made great strides with its tooling of late, the panel lines are consistently better with each release and long may that continue. Whilst they may still not be to some tastes, trenches they ain't!3 points
-
Hello Ced. As far as I understood the true metal works like an oilpaint. That means it dries very slowly by air from the top to the bottom unstressed. The thinner the coat. the faster it dries. If you thin it further with acryllic thinners, then it dries again faster, but will loose some depth or brilliance. When I use oil paints for a final finish, normally I leave it to dry for a week or more. Cheers Benedikt3 points
-
I have to add LOLs to this!!3 points
-
Hi Ced, not sure how I missed this but I've now a) caught up, and stopped chuckling and getting funny looks in the pub! I must say I'm so glad the canopy solution worked....not even your stated love of Bristols would help if it went droopy!! And Airfix made a Fouga Magister, I built one as a kid....maybe not brilliant but compared to Valom....... Ian3 points
-
Cheers Rob, thanks! Thanks Cookie, I'll definitely give it a try. Thanks Martin See below for getting her dressed, I did start on the bottom camo Thanks Jaime I think I'll have to do multiple pre-shadind, with the three tones camo So, speaking of getting Sandy Bay-Bee dressed up, I started spraying Lifecolor Light Grey for the bottom camouflage, and here's where I stopped: The pre-shading effect has been killed a bit by the light source I used when taking this pic, it's a bit more evident "in real flesh". I also painted the drop tanks and the gun pod: The paint was thinned with water and Future, and I got a very nice flow, spraying at around 0.8 bars. I'm probably going to attempt some post-shading, not sure yet. I did some more polishing on the stabilators, in next pic you should see the difference between the inner and the outer portion: and this is the other one, with a bit of weathering started (basically going along the underlying layer imperfections): In the middle of all this, I'm trying to complete the setup of all the small bits and bobs that need priming, and I had to do a lot of tidying up to eliminate ejector marks from the wheel bay covers: Question for Gene: looking at Sandy Bay-Bee photos, it looks like the top camo is wrapping around the wing leading edges a little bit. Is that true, or am I seeing it wrong? Would that be the case for the stabilator leading edges too? TIA Ciao3 points
-
Hi Folks, Thanks for the clarification on the flare dispensers. The mounting for the main rotors was a simple piece of construction, I inserted some 1.25mm brass rod to ensure alignment while it dried though: These are the two options for the exhausts, although I don't have any reference pictures I am going for the ones with the vanes. My thinking is to remove the moulded vanes and replace with thinner plasticard ones which should look more realistic and make cleaning up the parts easier: By scratching the vanes I can also extend them further into the opening (this is also a reference for me so that I can position the replacements properly): Most of them were snipped off with cutters: Most of the rest was removed with a burr in my motor tool: Removing the vanes also made it easier to thin the edges to a more realistic thickness: The vanes took ages to make with repeated sand / check / sand a bit more and so on. Here are the first three done. I also had an idea to mount the exhausts on the other style but they needed reducing in size a bit so I cut them in half and then glued back together (the 0.5mm width of the saw cut was enough to reduce their size): Then I cut them in the other direction: After a bit of fettling that gave a nice snug fit: While the filler was hardening I thinned the plastic around the mesh holes, again mainly with my trusty motor tool: For the mesh I used some more of Keith's copper square mesh: I found the mesh could be deformed into a diamond pattern which better matches reality: Next for the pipes, I thinned down the walls of some 2.5mm plastic tube, finishing it off with a fine file: Here's how they look from the back: And here from the front: Back to the exhausts I found with just a small amount of filing the exhausts would slide into their apertures: At this point I abandoned the idea of using the other exhausts as they weren't really needed now. These rounded edges at the joints are best dealt with using some superglue and talc filler paste: Here they are sorted: With all the filler cleaned up I could now install the vanes: Here's how they look in situ: That's it for today, bye for now, Nigel3 points
-
A long time at the bench today for not much obvious progress... the first step was making and adding the small fairings for the aileron cable pulleys. Then I spent rather a long time measuring and marking out the undercarriage mounting points. The reason being, that although it measured out ok, they didn't look right. It turned out that the fuselage is a little too fat, so my measurements from the centre line left the mounts too far down on the side. A little adjustment to get it to look right and they were then drilled. After that, the tail surfaces...and then I found that I hadn't got the measurements right there either. When I attached the fin, the rudder didn't meet the bottom edge of the fuselage, so I had to break out the sanding stick and correct the depth at the rear end! Hopefully the primer hasn't peeled to the extent that it will be noticeable - I went around the edges of where I'd sanded with a fine sanding stick to try to blend them back in. All that sanding did have a positive side as it does mean that I now have bare plastic mating surfaces for the fin and horizontal stabilisers - I had to remove the wing struts to clean the paint off as they kept coming adrift! I definitely won't use that primer again.... Thanks for looking in! Ian3 points


This leaderboard is set to London/GMT+01:00