
Leaderboard


Popular Content
Showing content with the highest reputation on 02/02/16 in all areas
-
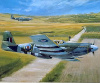
Hi all Included are a few images of a 110 nightfighter I have wanted to build for over 30 years. However, I could never locate any definitive info regarding the uppersurface camo. But,recently I stumbled upon a few photos of the nose and cockpit area of this machine, which provided more info. So, with that new information, I was finally able to fulfill one of my modelling objectives. The model represents a Messerschmitt Bf 110G-4/R3, flown by Major Wilhelm Herget of Stab 1/Nachtjagdgeschwader 4 while stationed at Deelem-Arnhem, Holland in the Spring of 1944. In keeping with my usual modelling philosophy, I performed the following minor enhancements to the kit: Fuselage - all gun barrels and shell ejection ports drilled out - MG 81Z replaced with Aries resin gun - Eduard photo-etched seatbelts added - FuG25a IFF antenna made from piano wire - FuB12F blind landing antenna made from piano wire - antenna wire made from stretched sprue Wings and Landing Gear - landing gear modified to sit at proper angle - exhaust pipes drilled out - pitot tube relocated from wing tip - FuG16ZY Morane antenna made from surgical wire - FuG101 altimeter antenna replaced with wire - FuG227 Flensburg antennae added Paint and Decals - airframe painted with Xtracolor X206 Graugrun RLM 74, X207 Grauviolett RLM 75 and X208 Lichtblau RLM 76 - sharkmouth is painted on - model is weathered with chalk pastels - markings are from Cutting Edge 48045 References - Famous Airplanes of the World No. 41, Messerschmitt Bf110, Bunrin-Do - Aero Detail No. 21, Messerschmitt Bf110 - Walk Around No. 22, Bf-110G, Squadron Signal Publications - The Defense of the Reich, Hitler’s Nightfighter Planes and Pilots, by Werner Held - Monogram Close-up No. 18 Bf-110G, Monogram Technical Publications Cheers Randy24 points
-
This was a "bucket list" model for me, as a young RAAF ATC I would be up at all hours of the day and mostly night in the RAAF Base Pearce Tower controlling these. This was 1972 - 74 and from that time line it was after Apollo so they were probably supporting the Skylab missions. I saw and controlled them (this airplane on all occasions, they usually deployed in pairs) at Perth as well in the mid 80's. The runways at Pearce were too short for full fuel takeoffs so the jets would position at Perth International (a short hop from Pearce) to top up their tanks and depart on their mission) From Perth Tower I witnessed this aircraft making one of the scariest takeoffs I have ever seen. 3000 meters of runway, temperatures in the high 30s© and little wind they took RWY 02 because it was ever so slightly "downhill". The noise and the smoke from the water-meth injected takeoff is something permanently etched in my mind, the picture of the jet rotating on "the numbers" dragging it's bottom off at the opposite end especially so. I made the stand base to give a little reminder of that hairy takeoff. I bit off more than I could chew with this build, wanting to picture that takeoff I had to put in some takeoff flap, I still shudder at the trouble that gave me.. I mean the standard build was appalling on it's own. I finished last year and put away on the shelf but always having the intention of dulling it down and weathering it as the jets always looked beaten up when I saw them. The model is too big to sit in my display cabinet but I hate the thing collecting dust so I made a new stand today (it still needs painting) so that the aircraft can be posed in a 30 degree bank whereupon it just fits in the cabinet. I took the opportunity to finish the jet weathering and dulling it down, most of the original pain and faults of the build having been forgotten. Not my best work, but jeez it does look impressive.20 points
-
Hi all, here is my 1/48 scale Ju -52 from Pro modeler. I it was a pleasure to build it. I think that Monogram did a tremendous job with this kit. I build it as one of the many Ju-52's that was shot down over Holland during the 5 day Blitz in 1940. I believe that this one made a forced landing on the beach at Katwijk, Any way I hope that you like it. Pictures are taken as with all my other models by Hartdeco.16 points
-
BTR-60PB Upgraded Trumpeter 1/35 First finished model of 2016. It's a nice kit apart from the rather fiddly headlights, which put up a bit of a fight. I've had the kit hanging around for over a year so I'm glad to finally get it built. I've got a long term plan to build a collection of some of the various 8 wheeled APCs and related vehicles that operate around the world, so this makes a good start to that collection. The wip is here Thanks for looking Andy12 points
-
Hello chaps The model presented was a part of the F-5 group build. More on the build can be found on this link: http://www.britmodeller.com/forums/index.php?/topic/234991709-afv-148-f-5f-tunisian-af/ for more info and pics of the finished model, please check: http://militaryaviation148.blogspot.si/2016/01/f-5f-tiger-armee-de-lair-tunisienne.html Thanks for looking in12 points
-
Hi All, This is my 1/72 Tamiya F-51D Mustang built as an Israeli Air Force P-51D circa 1956's Operation 'Kadesh' (aka the Suez Crisis). This was built OOB, and was painted with Vallejo and Model Master paints. The markings are from Sky Decals 'IAF First Fighters' set. The weathering was done with a combination of pastels and Testors CreateFX panel washes. Thanks for looking!12 points
-
Hello everyone! I'd like to share with you the predecessor to my last submission here, the Italeri 1/72 Sea Harrier FRS 1. It was completed around 4 months ago. The Hawker Sea Hawk played a pivotal role in the 1971 war between India and Pakistan. Deployed aboard the INS Vikrant (formerly the HMS Hercules), they flew successful sorties destroying or disabling vital installations in what is today Bangladesh, with no loss of aircraft. In honor of the role played by the Indian Navy and to a large extent, the Sea Hawk, December 4th is celebrated as Navy Day here in India. The Sea Hawk is part of my Indian Navy build theme, starting from the Vampire T55, the Kamov-28, the Sea Hawk and finally the Sea Harrier which replaced the Sea Hawk in the Indian Navy. These aircraft flew out of, or were based at Dabolim Goa, very close to where I spent my childhood. She, along with many others like her are now housed at the Naval Aviation Museum in Goa. The Sea Hawk bearing registration 076 piloted by Lieutenant RH Tahiliani was the first Sea Hawk of the Indian navy to land on the INS Vikrant. So it made for a unique choice of subject matter for this iconic aircraft. The kit itself was a joy to build. Along with the Eduard photoetch set to add in some extra detail, some custom riveting (which I took oodles of creative licence to place), and some hydraulic lines in the wheel bays (A big thank you to Vulcanicity here on britmodeller), the end result is a very sharp and detailed model for it's size. Boo-boos include the color- mixed it up from primary colors, and it ended up being too blue, and not grinding down the MLG bay doors before installing the PE panels which resulted in the doors touching the external tanks, and thus the wheels bend excessively inwards. The masking of the canopy also messed up unexpectedly. The Leaping Tiger was placed further aft on the original 076, and later painted forward on other aircraft. Lesson learnt. Anyways, on to the pictures! Two generations of fleet defense posing together: Thanks for watching!! Cheers, Alex.11 points
-
Hello all, Tamiya 1:32 Mustang with all of Roy Sutherland's extra bits and Xtradecal 3 Squadron RAAF decals. It fought all the way and I didn't help much by doing dumb things on more than one occasion. Anyway, feel free to comment- I know I have the wrong prop, the seat is a different green just because I wanted a little variation and I missed the "W" on the undercarriage doors, the macro lens is really really punishing, plus a whole heap of other "oops" moments. And cockpit shots from earlier in the build11 points
-
I have finally managed to get Photobucket to co-operate so here is the update from Sunday. Using some Archer resin decals I added a couple of access panels to the underside which are hinted at by the original plastic: Now the skids and tail fins could be added: Then I got a first coat of white primer on to see where there were issues that needed sorting out: While that was drying I did a little detail painting on the main rotor hub: I also got some Alclad "Exhaust Manifold" on the er well, exhaust: Under a second coat of primer I think the rivets are looking pretty good: I then applied some "Hotmetal Blue" to the exhaust: The effect is pretty subtle but is perceptible in reality. Now the first of the exterior colours, light blue on the underside: Now I had some blue, red and yellow stripes to apply to the rotors, taken from a surplus decal sheet: It was one of the fiddliest decaling jobs I can ever recall but I got there in the end: I also glued on the blades - but why is the red banded one missing you ask? Well during blade drooping operations the blooming thing snapped on me without so much as a hint of warning. I hastily cobbled it back together: I did have the option of using a blade from my old kit but decided to persevere with a restoration attempt: Amazingly after all that sanding the glue held and it looked pretty acceptable after a coat of paint: Now the rotor could be finished apart from maybe a wash and a coat of matt varnish: To finish the lower part of the hub I needed a 5mm plastic disc. The new punches gave an OK result with some tidy up but look at the nick on the edge and the 5.5mm punch has fallen apart completely (it was just glued together): Drilled and assembled I got to this: Then added the three link rods from some angular stretched sprue: Well that's as far as I got. Its probably a good idea to let the underside harden up over the week before masking for the rest of the camouflage next weekend. Bye for now, Nigel11 points
-
This one was a 'palate cleanser' build of the Trumpeter 1/48 scale Hawker Sea Fury FB.II in RAN colours, circa 1950s at RAN FAA Nowra. Included the Barracuda cast wheels and 90 gal drop tanks, and Aussie Decals for the markings. Used up the last of my WEM RAF Sky for the undersides. Did it with one wing folded to add some visual interest and also take up less space in my display cabinet. Built and finished relatively quickly over Christmas/New Year period, and interesting how the flash and camera lens brings out aspects of the finish not readily evident to the normal human eye. Now back in the mood for some more interesting and challenging builds. Enjoy.10 points
-
Hi This is my finish model of my Northrop N-3PB A little slideshow of the Northrop N-3PB10 points
-
Just a small update. I remembered I had some white oil paint and tried a white oil pin wash on the black painted sections of the etched panels: The etched radios etc have picked up the white wash and it's brought out the detail quite a lot compared with the previous photo's. Quite pleased with that thought. Gonna stop for now.10 points
-
Hi all, I finished dusting and photographing my Cosmo Fleet ships, they're still pretty dusty and even after removing some more digitally I think I'm going to have to draw a line under. I also managed to knock off one of the torpedoes from the destroyer and spent a while getting it attached again and fixing the chipped paint. I think I need to clean my office from top to bottom and remove the dust from the environment before doing any more painting! Anyway... These are half of a Bandai 1/1000 scale kit of the UN Cosmo Navy from Space Battleship Yamato. I have another of each to finish building and painting at some point in the future. Fairly easy to build but difficult to build cleanly owing to the dense snap fit construction. I found a new way to do the cutting out in Photoshop (Quick Select tool is awesome!) so they're all on white backgrounds again (click for bigger pictures & more angles) This is what the stands look like - modified kit stands using brass tube for the pin instead of the provided plastic fin: And this is for scale - the little one has 42 parts in a really tiny space: I have a baddie ship in pieces at the moment, I'm hoping to finish the Guntank I'm working on and do some preparation on that before too long. Oh yes, I almost forgot. I did a Photoshopped picture of the two ships in their natural environment: Which I am rather pleased with to be honest. Time consuming but fun, I will try and do more of these when I have spacey things to show. Cheers and thanks for looking, especially to those who helped with suggestions and such on the WIP thread. Will9 points
-
Had some fun doing this, converted scout with scratch built landing gear.9 points
-
Hi everyone I've just completed my 2nd Airfix 1/72 Avro Shackleton, another aircraft that my grandfather served on which was stationed at RAF st Eval in 1955. I built this for the Made in GB group build and thought I would share it here, for the peeps that aren't interested in GBs which would otherwise miss it. Kit build oob, http://www.britmodeller.com/forums/index.php?/topic/234994313-airfix-172-avro-shackleton-wg557-ll-raf-st-eval-october-1955/ And for those that would like to see the 2 Shackletons together And both together in their new home Hope you all like it I've had to redo the pictures, some numbty left the nose masking on8 points
-
Good evening everyone, Latest completed build incoming. Quite possibly the worst kit i have built,the revell monogram huey hog in 1/48.The flimsiest see through molding,the twisted tail section,the clear parts that fall through the holes in the fuselage. Built out of the box,brush painted as usual with revell email colours. Kind of glad it is done but sort of enjoyed the challenge. All comments gratefully received.8 points
-
Hawker family_2016_02_01_07 by johnrieley, on Flickr Hawker family_2016_02_01_11 by johnrieley, on Flickr P1040 scratchbuilt from old Airfix Sea Hawk P1052 Maintrack vacform P1081 Heritage resin P1067 Prototype Hunter converted from PJ Models F6 Hunter F6 Revell All 1/72 All involved something of a struggle apart from the Revell kit and the first three have all appeared in the RFI section. This collection should have appeared a while ago when I finished the P1052 but I was not happy with some aspects of the P1081, particularly the fit of the canopy, so I decided to 'tweak it' - not my best idea as it ended up having to strip it down, repaint and reassemble with a new u/c and I am still not happy with it! I hope this collection is of interest. I have wanted it for years. John Someone wanted more pictures so I have put them here. I did say the some appeared in the RFI section but when I looked they did not turn up (Britmodeller search function is rubbish so used Google instead) so here they are http://www.britmodeller.com/forums/index.php?/topic/48519-hawker-p1040-another-of-johns-prototypes/ http://www.britmodeller.com/forums/index.php?/topic/234977721-hawker-p1052-maintrack-172-vacform/ http://www.britmodeller.com/forums/index.php?/topic/234907199-hawker-p1081-heritage-172-resin/ Hunter1 by johnrieley, on Flickr7 points
-
I started this build last year thinking it would be a relatively straightforward build to get me back into modelling after an enforced break due to a house move. Oh dear, I really could not have been more wrong! This is a lovely in the box, but due to Hobbyboss' determination to model all versions of the Mig 17, and by their adoption of a Hasegawesque approach with inserts, the fit is appalling! Needless to say I lost the will to continue after a few months of constantly filling, sanding and re-scribing, and despite the fact that it was almost ready for paint it ended up on the shelf of doom. That is until the KUTA VIII GB gave me an opportunity to try and finish this kit. Detail on the kit is pretty good, however the coming fore and aft of the cockpit is pretty much devoid of detail so I ended up scratching these areas based on a Hungarian Mig 17-F. The bit with the prongs is the base of the sliding portion of the canopy, and the other bit is the rear deck it sits over. The prongs by the way are air ducts to de-mist the canopy, there are similar vents for the front portion of the canopy. Paintwork is all acrylics, mainly Gunze & Tamiya acrylics thinned with cellulose thinner and sprayed through my trusty Badger 100s. Certainly not the most pain free of builds, but definitely one where I have learned a lot in the process. Karl7 points
-
G'day people, This is my just finished Cobra. Things were going well until I manage to drop it off the bench. remedial work followed but I lost little motivation for a while but it got to the finish line eventually. The scenic base is from another and probably not appropriate, but it does provide a little contrast to better showcase the kit, cheers, Pappy7 points
-
Hello, friends! My next model.7 points
-
"It's been a long road, getting from to ..." However after a little over two years of on-and-off (mostly off) work, my Mosquito is finished at last. Photos don't really bring out the size of this thing, but I'm happy with the result even if it doesn't match up to the masterpieces others have built in far less time. The build thread is here: Overall shot of the nose. The machine gun access panel is detachable, which is why there's such a gap along the bottom. Looking down into the cockpit. That isn't a glue smear just above the windscreen wiper; it's the bombsight or something similar inside. Looking over the port wing Looking forward from the tail Oh, you get the idea Crew access hatch. The little white square is a notice warning of the adjacent propeller It's a wheel. What did you think it was? Starboard engine Another view of the cockpit, showing the radio The whole reason for the aircraft existing And this.6 points
-
British !!! Here is the 1/48 scale Hawker Hurricane Mk.IIc. It has been sold under the label Revell of Germany, but the moulds are from Hasegawa. It's a nice kit to build with a rather detailed and beautifully looking cockpit and wheel wells. As you can see it is brush painted; I had not yet an airbrush. I think the paint is somewhere a little thick. Please let me know what you think about. Have all a nice afternoon and evening. Cheers. Polo. As you can see, these pictures are from three different photo sessions: the first two ones are indoor and the last is outdoor.6 points
-
Ta all. I like messing about with the little stuff. Always nervous of painting em tho'. Yeh - I'm quite pleased with the side walls. I wanted to do the framework but didn't want it to look to clunky - so I was pleased to think of scribing in the frame position and then gluing in 0.2mm strip edge on. It's as close to scale sickness as I could manage. But Tom - did you not recognise the air condition pipes underneath the cockpit sill strip ? and the little round vents either side in each cockpit? Clunky modelling I guess I've got a bit more painting to do yet. For example the map cases at the back of the starboard side consoles should be black. Also the control column and seat will add a bit of colour (the rear seat will have a solo flight apron on it) - as will the blue leg restraints. I seem to remember wrapping them around the control column (like I did in my JP build) on getting out of the jet - but photo's I've seen have them stick to the instrument panel. So it's fading memory vs photographic evidence...... I have the Eduard colour PE set for the Finnish Hawk mk 51 - which is gorgeous but unfortunately a different avionics fit. I was looking longingly at it, comparing my painting efforts unfavourably, and wondering if anyone but me would care if I gave my T1/T1a a Finnish avionics fit. Then I remembered I had the white oil paint and thought that maybe I could get a wash of white to settle down into the etched detail and so highlight the individual etched holes that depict the switches/knobs etc.......... I'm content with it now. Not up to colour printed standards of course - but better...... Time to stop fiddling with it probably. Just another flat coat to protect the latest wash....and.....NO - stop!6 points
-
Thanks Debs Thanks Simon Masking mojo returning in phases (see below). Thanks Cookie, I shall soldier on Thanks Stew I'll be interested to see if the pre-shaded roundels work... I must resist the temptation to coat too much over those bits. Thanks John I have some Halfords for 'big jobs' but, as I spray inside, I need something non-smelly. Stynylrez is my new friend (used for the black) and I'll stick to that in the future! The Hurri is masked up now and I've started on the Blenheim. Pity there's not guidance on the transition between the front line and the wing root but I guess it's like the back, sort of curved up at the last minute. I've also done the matt black bit on the port side. Fiddly bits by Ced Bufton, on Flickr I tried the 'tape for curves' on those bits and, although you can see it's good for curves, it's not very good for sharp bends - that'll have to come off I'm afraid. I've checked my Mk I thread and it looks like I used cut Tamiya so I'll try that again, mojo allowing!6 points
-
This is my gallery of Lavochkin's famous WW II (and later) fighters in quarterscale. Hope you like it. LaGG-3 (South Front, bad short-run model) La-5FN (Zvezda with Karaya engine - both excellent kits) La-7 Gavia (very good kit) La-9 Special Bureau (resin, one of the best (and most expensive) kits I've ever build) ...and La-11 (MikroMir - the worst kit I've ever build) ... and all together:5 points
-
This is my first build on the site, so it's in at the deep end with the Airfix Vulcan. I'm about 18 months into my rekindled hobby (after a break of about 20 years). I have recently invested in an airbrush and this will be my third airbrushed model. I am also going to re scribe the kit (only the second kit I've attempted this on). Other than that it's going to be pretty much standard kit. I've got a VIP tour of the real aircraft booked for mid April, so intend to take lots of photo's to assist with the build. This is going to be my big build for the year, taking my time, dipping in and out of it, so please don't expect rapid progress. I've made a start by washing all the parts and taking the wings and fuselage off the sprue's. As I'm re scribing, I though this would be more easily done as the first job. There's lots to do on the wings and it seems easier lying them flat on the desk. As a point of interest, this is my workspace. And this is the work I've done so far with the scribing, and removing some flash from around the edges. I've started on the wing on the right. I know there's been some epic Vulcan builds on here, I'm just hoping that mine doesn't let the standard drop too far.5 points
-
Thanks for all the kind comments Quick update from the weekend, added a wash, highlighting and most of the railing on the sub assemblies. Fixed the gun, sea wolf cell and the harpoons in place Also very lightly oversprayed the deck markings particularly on the flight deck to get a worn look (hopefully). Bridge Midships And hanger And the overall effect dry fitted Matt varnish next so I can weather the main deck with pastels, touching up railings etc, then final assembly. Thanks for looking, Cheers Nick5 points
-
mmm the Metalizer paints do tend to not provide a stable base for the next coat, which isn't so bad if you want a "chipped" finish, but will get me issues as I want a more worn/faded look. I might have to use a coat of sealer to see if that helps. The first couple of times I used LifeColor paints I could stop raving about them......but this time the Green I'm using is giving me grief! It was a bit too thick and after carefully adding water I got to the stage where I needed just a teeny bit more....and it went to watery crap........I then added alcohol and stormed off...as in I had a beer and went and played on the web! Anyway....... Well I hadn’t planned to do any more for the moment after yesterdays one forward two backwards sort of day but I had to wait for things to dry on my distraction so I did a wee bit as I waited. The rudder, which for some reason the LifeColor Int. Green went all watery when applied, was stripped back with over cleaner. This time an undercoat of white was applied, then masked and Tamiya Yellow applied…no issues at all. Next the LifeColor, (even after I’d even started to thicken it up) went on thin lumpy and washed out looking! I may end up using enamel for this, the colour I need to match the decals is Interior Green. That aside I worked on the wheels, I finally noticed that I was using the wrong ones, I should have been using the covered ones for this aircraft… so a quick trip to the spray booth and a wash…much better! Just a touch up on the black needed...maybe replace with tyre black? The cowling was the next bit (while all this was going on I was still playing with the F1), this was to be the main trial piece for the paint job. First off a coat of Model master Metalizer Non Buffing Aluminium (that’s a mouthful and a half! ..to be called now MM Aluminium). Then some masking, before LifeColor Neutral Grey (no problems with this one), and then Mr Hobby Olive Drab. From this test a couple of things, I’ll need to use a sealing coat to help the acrylic paint to go on smoothly, plus it will help keep the paint from chipping off when I remove the blutack! The finish I’m after is a very worn and faded look, patchy but without a lot of ”chipping” from the photos I’ve seen. As can be seen the OD is a bit blotchy I will play a bit more with this, if it turns out ok I’ll keep it, if not I’ll strip it back and start again! The rudder section, wings and elevators, in that order were fitted next. I haven’t mentioned it yet, bit this has to be one of the best models I have built in a very long time where everything just fit perfectly!!! Tamiya just did a perfect job in making sure everything just fitted, this would have to be one of their best models! That said it then takes an oaf like me to try and ruin all their effort but trying to fit some AM resin bits that weren’t actually needed in the first place! Yes the wing joins that were originally perfect did need a bit of persuasion and some clever trickery to fit nicely…..no telling what was require….. Am more than happy with the result, not the slightest bit of filler needed, am very happy with that! And here is where we stand before I head off again. She does look really cool…if I can just get the finish I’m after right! Oh and the prop was finished….until the paint lifted off, so had to start again. Well I now have a week to plan my next steps, I know in my head what I need to do, I just think I need to practise the painting bits!5 points
-
Just wind the wee handle in the appropriate direction, surely? (That's a compliment, BTW, given the loveliness of that pit I'm assuming that all the bits work as Mr Lockheed intended.)5 points
-
After the F.MK.3/.5 ( http://www.britmodeller.com/forums/index.php?/topic/234944522-172-de-havilland-dh100-vampire-fmk35-by-special-hobby-released-new-fmk3-boxing/?hl=vampire) Special Hobby is to release a 1/72nd de Havilland DH.100 Vampire F.Mk.1 kit - ref.SH72339 Source: http://www.ipmsdeutschland.de/Ausstellungen/Nuernberg2016/Bilder_AT/Special_Hobby_09.htm V.P.4 points
-
Well, while waiting for warmer weather and parts to arrive for another project I figured I would start on this, the all new tool from Fujimi, James Bond's Lotus sub car from The Spy Who Loved Me. Its a simple curbside (seaside?) kit with a basic tub interior. All the parts are crisply molded in various colored plastic.The body and window louvers are very nice. All lights are clear lenses with separate chrome buckets. Door panels are molded in place and are the only low spot in the kit, lacking detail. Fujimi has also announced there will be a street version released later this month, probably not as a Bond car though. Got most of the body assembled and primered and the first few coats of white laid down. Primer- Base white applied-4 points
-
Thoroughly enjoyed this build. Excuse the pics, but my photo tent is perfect for 1:35 scale, but a tad to small for 1:16 scale!! Hope you like them, and thanks for looking.4 points
-
Eduard's kit with Brassin cockpit and wheel bays sets. Chechoslovak Air Forces markings. 11th Fighter Regiment, Zatec Air Base 1991.4 points
-
Does that mean you are going to fit a wee blue bag in the map stowage?4 points
-
Morning folks,sadly it's back to work after a long weekend off but got a bit more done last night and this morning,after noting the colour conversation's about the interior I,ve gone a shade darker added harness from masking tape and dry brushed the detail's,she's all glued up now wing's and tails on drying till tomorrow,thanks for popping in.4 points
-
Source: https://www.facebook.com/media/set/?set=a.1049900775061016.1073741847.195078093876626&type=3 V.P.4 points
-
Just thought I would post a few pictures of some very common sights of the seventies starting with Britfix and Airfix polystyrene cement and Revell paint jars. Notice the solid tops on the Airfix polystyrene cement tubes, us kids were always told not to bite the tops off them but we always did and got glue in our mouths. The Revell paint jars were sold in our local paper shop although I think under a different name. These old things can now fetch strong money on ebay if anyone still has them.4 points
-
The A-Model one definitely looks a trickier build, Matchbox are pretty good at making the struts easier to align and attach, which is nice! I find I spend a fair amount of time just pondering what to do when I'm building bi-planes, rushing into it always seems to end badly, or thats my excuse anyway! I spent most of my building time this weekend just planning the rigging and drilling attachment holes. The Fury has a fair amount of rigging, which I don't mind, as long as I've planned it out before hand. The fuselage is all zipped up so thats the last we'll see of most of the cockpit! Here's a close up of that lovely instrument panel from Yahu Cheers Segan4 points
-
Hi All, I started my Spit Vb a couple of weeks ago. It's proving to be as pleasant as other new tools in the Airfix Arsenal (well, apart from the landing gear) and I thought I ought to share my progress so far... Masked and Primed I painted the underside in a mix of Hu 90, and 34, to tone down the green tint of their sky Painted topside in Tamiya Flat Earth I tried my luck with free hand camo on the HU 27, a bit poor but I tidied it up with blu tac, and more flat earth And this is the result after tidying her up Sitting on her wheels (after a little swearing and superglue) A shot of her undercarriage And last update from yesterday, the landing gear still hadn't settled, so I used a little more glue and then had her resting on two nail files acting as support struts. That worked like a charm4 points
-
First cuts done! Now to match them to the Tamiya parts.4 points
-
Some slow progress made on this one. The handrails are now finished and I have removed the moulded door darts from the smokebox door. These have been replaced with a pair of Alan Gibson turned brass ones, I still have to shorten the pin on this. Next job will be the etched steps for the tender.4 points
-
now then chaps, we need to have words... ..not wishing to single you out, but there is no way anything I do is remotely beyond what you already do.. I have seen your models, I have witnessed the perfection in execution, I have sat there with my jaw agape at your achievements - lets get this right it is you who inspire me... piffle...so stop it... (though it means a lot to me coming from you..)..and thank you to everyone who leaves pearls of inspiration for me so.... I have been fiddling about again... first up I decided to change the upper parts of the cockpit sides into litho sheathing, just so i could scratch the paint off and see metal underneath just like the real one.. ..i bent a piece with a couple of folds so it sat over the top of the upper beam... there is a canopy slide bracket that also goes here so needed to make that too. It is a rivetted 'U' shape channel and after trying & failing a few times as the flanges were soooo thin, I realised if I rivet it, score the fold and score the channel I could fold it as a much wider part and just snap off the waste... make sense? ...then it all needed painting so I took the throttles off and masked up.. ..shot a much blu'er grey'er black'er colour than I used last time so I could try for the faded weathering.. ..also thinned out the side walls a bit... ..and painted it up to mount the headrest bulkhead.. ..after having a bash at faded weathering, and with the bulkhead in place a few things need sorting out - the litho around this area has taken a beating, and it needs to fold down to meet the bulkhead.. ..I mounted the bulkhead and folded over the skin, also added a row of rivets along a dymo tape guide.. ..also added a bead around the edge, and the part is now in place.. ..and with some of the other parts dry fitted - the tops of the cockpit linings are there with their litho skins all weathered & scuffed.. ..and thats it for now - fingers crossed photobucket stays up long enough for you to see it... TTFN Peter4 points
-
Right that's me done for the night Cut the window out. Ir will be interesting to see what the visibility is on the inside Another small step..4 points
-
For those following my WIP, here is the finished article. Massive thanks to those that helped me out along the way with advice and suggestions. It's a huge help and really appreciated, as is all C&C. So please let me know what I've done wrong and how I could do it better next time. This is really only the 2nd kit I've properly put my mind to (the 1st being a Tornado F.3). I really enjoyed the build, but have to see the kit could be better designed. I've just started work on a Hobby Boss Land Rover and the difference in quality is remarkable. There were a lot of ejection pin marks in silly places and mould lines that required cleaning and basically no clear parts at all. (I can't say I'm a fan of painting windows). Anyway here it is:3 points
-
Hi All, The Hasegawa 1/48 A-7E Corsair is a wonderful example of the state of the art in the late '80's as far as the mainstream injection Molded manufacturers are concerned- it has a level of detail and features, such as detailed avionics bays, separate flaps and detailed cockpit that set Hasegawa at the top of the tree in those heady days, and as a kit it outstrips it's contemporary's such as the Hasegawa 1/48 F-16 and F-15. It also sports the finest injected molded AIM-9's I have encountered in any kit to date, although more modern toolings may have overtaken this aspect of the kit. This is the Revell of Germany boxing of this venerable classic, and I snapped this edition up around 10 years ago, being familiar with the contents and harbouring a soft spot for the good old "SLUF" (Perhaps I feel a certain kinship with it's sobriquet!) I utilised the Superscale VA-97 Corsair decals, to depict the aircraft as it appeared in April 1980, part of the USS Coral Sea's air wing, and sporting the identification stripes applied to the US Navy aircraft as part of Operation Evening Light, which itself was the Airpower component of Operation Eagle Claw, the mission to rescue the Americans held in Tehran who didn't make it to the Canadian embassy. The sheet is still around in various outlets, and I also understand that Hasegawa released the kit with these markings as a special edition some years ago. Many hours of searching the web for the few photographs of the VA-97 aircraft of the period resulted in the identification of the weapons load as a pair of Rockeye II CBU on the middle pylons, two fuel tanks on the inners and a pair of AIM-9's for self defence. I used the kit's AIM-9D as they are superb, although some grainy black and white shots hint that AIM-9L's may have been utilised at the time, although I am unsure as to the Lima's in service date. I added a pair of the Eduard Brassin Rockeyes and Bob's your Uncle: I am very pleased with some aspects of this build, although there is a lot of room for improvement, but overall an enjoyable build. As always, thanks for looking, Cheers, Troffa (edited to correct Photobucket ineptitude)3 points
-
Cheers Chaps/ A bit more progress for you. More work done on the figures Cast effect redone on the front decks. Jerry cans added More work done on the rear Cheers for looking Dan3 points
-
Hi all RFI for my F-5 STGB efforts - all completed together so I thought I'd post together. #1 - Revell F-5F as Bu.No. 840456, CAG bird, 100, VFC-111 Sundowners. Finished with Lifecolor, Tamiya and Revell paints and using kit decals. Finished with Alclad Gloss Kote. #2 - Revell F-5E as 74-1537, 64th Aggressor Squadron, Frog Scheme, 1983. Finished as above but using Afterburner RedFlag Tigers decals. #3 - Revell F-5E as 74-1566, 64th Aggressor Squadron, Snake Scheme, 1983. Finished as above. All comments welcome and thanks for looking.3 points
-
I think Neil has cracked how to do weathering to perfection, as it is just right for the scale3 points
-
Yet another off the bench. This time an easy brainless build, the Airfix Vb. Markings are for Major Robert Levine, 4th. FS, La Sebala, Tunisia, 1943. The decals are from Tally Ho. Hope you like. Please feel free to comment. Thanks for looking Dick3 points
-
My Wessex collection.3 points


This leaderboard is set to London/GMT+01:00