
Leaderboard


Popular Content
Showing content with the highest reputation on 17/12/15 in all areas
-
This is the Tamiya 1/48th scale Douglas A-1H Skyraider in What If Fleet Air Arm markings. I added a Eduard Zoom set for the cockpit, Quickboost resin sets for Pylons, Gun Barrels, Boot Cockpit Enclosure and Antennas. An assortment of after market and kit decals all in 1/48th scale were used. The model is painted with Mr Hobby Paint in Extra Dark Sea Grey and Sky. This is the link for the WIP thread Thank you for looking, Joe.32 points
-
Ladies and gentlemen, Iet me present you my next model. Used some Eduard set. Navigation lights sawed from clear plastic. All edge was sharpened. Riveting, the gun in the wing from the needle. Paints - Mr.Color, Alclad, Tamiya. Primer - Alclad, varnish - Futura and Tamiya. All identification marks was painted. Washing - MIG, postshading X-19. Finally spread a little matt lacquer tamiyas "yellow sand" and walked a bit around the edges of the panels.21 points
-
I've just completed my 1:72 Heinkel He 111 from Revell, a second part for the diorama (the first part was this Stuka). It was very nice build without the major problems. In fact the set is so good that there were no problems at all. You can see the progress here Here are some pictures of the finished model. More when the diorama is finished.19 points
-
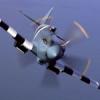
Merry Christmas everybody. I've just finished up one of my Battle of Britain GB entries, just a hair past the deadline (OK, two months). Yes, it's another 1/72 Airfix Spitfire, which you may be sick of seeing, but no one should ever tire of building. It is one of the most enjoyable kits to build of any I've attempted. The plane represents a Spitfire I flown by Ralph 'Titch' Havercroft serving with 92 Sqn during the Battle of Britain. Most of the build thread is here, but there's a little more here. And because I always enjoy it when people put a bonus build at the end, here it is next to a 303 Sqn Mk II from the same kit.18 points
-
Hi all, Some of you may have followed the WiP I did for this little Spit way back in late September, I managed to complete it in October, however I have been so busy with uni I haven't had time to get back home to get my camera. I just got back from uni today and I used the remaining sunlight to capture a few pictures! This build was bought about because I decided that I had built all the significant marks of Spitfire, except the first. I picked up an Airfix 1/72 Mk.I and simply went about rescribing and reshaping, that's all there is to it really. My thanks to the late great Edgar for providing me with information on this build (and all my other Spitfire builds for that matter). This one's for you Edgar! IMG_2905_zpszx14v1cl by Ben Standen, on Flickr IMG_2906_zps3hcdmy84 by Ben Standen, on Flickr IMG_2907_zpsbmu8fxq2 by Ben Standen, on Flickr IMG_2908_zps8qrzyeef by Ben Standen, on Flickr IMG_2909_zps5fvgepuz by Ben Standen, on Flickr IMG_2910_zpsmet7arl3 by Ben Standen, on Flickr Thanks for looking! Ben17 points
-
Hello All, not sure if I posted this. Completed it earlier in the year - a Tamiya 335 kit with some owl resin Ju88 SN2 aerials. A bit of a what if night fighter. The build is not great but I am happy with the finish. Thanks for looking and have a great Christmas, Ian16 points
-
Hello all, Here is my recently finished Monogram 1/72 B-52D in the markings of 55-0677 of the 25th Bomb Wing, based at Andersen AFB, Guam during the Linebacker II bombing campaign in 1972. Built for the Vietnam II group build, the build thread is here The windows have been painted gloss black as the fit is poor and some filler was required, resulting in dust getting in behind the transparencies. I'm also missing the walkways for the horizontal stabilisers, as these broke up on application. The bomb tally is fictional, but i couldn't have my BUFF without one! Built completely OOB, except for the inclusion of Warbird decals for the walkways. It's a big bugger with poor fit at times, but a great addition to the collection and one of my favourite aircraft. Would i build another? Yes. I've an AMT/Ertl H model to build then i'll probably add a B-52B in there (when I get the space!) Comments welcome, thanks for looking. Dave13 points
-
Monogram 1/48 SB2C Helldiver USS Hornet November 194412 points
-
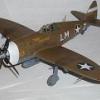
This is a little something else I turned to due to my disappointment with the Dc-4 build I was working on on an occasional basis. Its the new tool Airfix Wildcat F4F-4. I basically used the kit decals but finished it as an anonymous aeroplane flown by 26 kill ace, Captain Joe Foss USMC. I read that he flew a number as a number of the Wildcats he flew ended up damaged from combat etc. So this representation depicts one of those Wildcats. An enjoyable build.All parts fitting pretty well really. I ignored the criticisms landed on this kit including my own and just went for it. I did fall into a trap by joining the fuselage together before fitting the undercart assembly.... "what a mistake a to make a!" But all was not lost as I managed to prise apart the join where the doors fit and before adding the engine bulkhead etc which added to saving the day and fitted the sub assembly successfully. I also attempted to represent the much faded top side colour a bit and darkened the top side colour a tad to represent the overpainted red white striped rudder and a bit to other parts of the airframe. Cheers!11 points
-
11 points
-
Just finished the AT-AT for my son (for Christmas). It was the snap fit kit. As you can see I repainted it and weathered / dirtied it up jut a bit. First time trying my hand at pigments. Also first time doing the ground work. I used dry wall joint compound as it was what I had lying around. The kit was fine for a snap fit kit. As you can see I added some LEDs. There are several more (two on bottom and another couple on top). I wanted to get a few quick shots up, plan to take much better pictures with a real camera and upload soon. Thanks for looking.10 points
-
I think I've done all I want to do in this first tub before it gets painted. This morning I added some simplified plumbing to the front cockpit port side and made up and fitted the map case/plumbing cover to the rear cockpit starboard side. I also stripped of the rear cockpit starboard side PE console panel whilst I was at it. This panel in the T1 and T1A is practically bare yet all the PE panels I've seen including the eduard one I fitted - have etched-in lumps and bumps representing non-existent control panels and switches etc. It began to bug me so in the end replaced it using some Tamiya plastic paper in 0.2mm and 0.1mm - just a flat panel with a couple of flat featureless raised sections - covering I don't know what - like you see in the full size aircraft. Sorry the photo is rather dark but I had to reduce the brightness so that you could see the raised sections on the new rear-starboard side console panel.10 points
-
Here's my last build before taking a break for the Holidays. It went together nearly flawlessly. The main gear was a little tedious, but other than that, it was pretty straight forward. I used the paint set from Ammo of Mig Jiminez for the first time on this build. The paint is a little temperamental to work with. It was very thin, a little too thin for my taste. Do not add thinner! You have to do very light coats, else it will pool and make a nasty bubbly orange peel. Luckily, I tested it first on a pylon that wouldn't be as visible. Despite all this, if you learn its properties, it will make for a very nice paint job. It is just not very forgiving. In addition, it does not brush paint well out of the bottle. It has a watery consistency, so a drop of something like lacquer thinner will be required to break the surface tension. I also used Eduard Interior photo etch and Brassin ejection seat and exhaust. Merry Christmas!9 points
-
Well, it has been a weird "bitty" kind of day, but I managed to get a bit done. After faffing about avoiding the masking of the dielectric panels around the airframe, I decided to paint the little ones by hand, after which I found they were also supplied as decals! I then set about masking, taking care to mask up the right fin leading edge, as only one has the dielectric grey down the front. The strakes under the fuselage were done too, inside of the tramlines, and finally, the nose was masked with tape and the had a poly bag with a hole in it draped over & tacked down with more tape to avoid over-spray, which is something I'm paranoid about, having suffered from it a few times. I lightened the radome colour and did a few weathering streaks, which I'm pleased to see just show up in the photos. I've also been tinkering about with the weapons, and after spraying the R-33s all white, then masking off the various panels, I sprayed the body colour Alclad dark steel, but I was unhappy with the shade after I'd done it. After I'd taped up the body to spray the shiny metallic ring behind the nose cone, sprayed the thing Alclad Chrome, the poor adhesion of the body colour resulted in lifting of a lot of the metallic particles, leaving dull patches. I resprayed it a darker colour, but most of the chrome came off, so my faith in Alclad is on the wane yet again. Instead of trying to mask and respray the chrome, risking more paint lifting, I cut a strip of kitchen foil and glued it to each missile with some Micro Metal Foil Adhesive, burnishing it down as I went. Using the shiny side has resulted in a nice finish, through which the depressions can still be seen. I covered it with a coat of Klear to protect the shine, and washed the missiles with some Ultimate Dark Dirt, which I've only roughly removed yet. I decided to have a bit of a test run of how they'll look under the aircraft, and here's a quick pic More tomorrow, hopefully. I'm running out of things to do to avoid starting decaling!9 points
-
Hello All, Here's a new Airfix Wildcat with folded wings: Build thread here. Thanks for looking, Adrian8 points
-
Gents, thanks again for the support and kind comments. So after an evening spent wrangling it Photobucket, here is todays update... After yesterdays decal session, it's time to get the stencils on.... And after an hour, they're all done. So attention turns to the turret. For complicated masking jobs, I use Eduard masks as I am not good enough to cut my own. Before using then, I rub them with a bit of charcoal so I can see the edges easier.. Turret glazing masked.. And then sprayed.. Prop got done today too... Just could resist seeing what the turret looked like in place.... That's it for today, hopefully I will make a start on the weathering tomorrow... Thanks for looking Steve8 points
-
Hello everyone! Now I want to show you my model, which I gathered for 2 weeks. First I presented It on the exhibition Lviv Scale Model Fest 2014. Have a pleasant viewing experience! And some photos of this work in progress...7 points
-
Hi there; Here is my latest kit build. It is my first 1:32 scale Wingnuts. I spent 6 months working in this project. Amazing kit!! Here are some pictures of the finished model. Cheers!7 points
-
I have spent the last few days adding the remaining plumbing to the main undercarriage legs and sorting out the nose leg. Although it was fiddly and time consuming work, the main legs were really more of what I have already done. I also added some separating brackets to the hoses leading to the brake units on the main wheels. The nose wheel was a bit easier as the kit pars are pretty well detailed. All I really needed to do as adjust the nose wheel door brackets to allow for the new wheel well and the opened nose cap. I did however, replace the actuating arm for the unit with a stronger item made from Albion Alloys aluminium tubing. I may even re-do this with some slide fit brass tubing. Anyway, everything seems to line up on a dry fit which is very satisfying given the extent of surgery the kit has been subjected to in these areas. On to the pictures and as always, thanks for looking. Martin7 points
-
[/u URL] Added most recent photos;7 points
-
Thanks Keith! They'll hopefully look a bit better after a primer coat Thanks Leonl, trying to You gotta start somewhere ... Cheers Stix, thanks . Fingers: mmhhh, see for yourself ... but I'd be lost without this: and this: :D Cheers Simon, thanks! Slowly proceeding with detailing the interiors, here some more work I managed to do last night: added the backseater canopy lever, now I think I can call starboard side completed, as far as detailing goes throttle handles for both pilot and GIB, just to add a bit of 3d Then I started working on port side; I have no clear pics of this part, so I basically copied some of the MONO kit details Canopy mechanism That's it. Comments welcome Ciao7 points
-
Thanks everybody! Thanks PC, now I won't be so scared to attempt my FAA Corsair. You have any links to your build? Hope you're getting a little sleep my friend. Giemme and Tomoshenko - thanks for the advice about using Future to seal up an acrylic layer. It looks like I'll have to put it to use, as my attempt to clean up the walkway lines ended up a little ragged. I got the parts where the masking stripped the paint redone OK, but the walkways will require masking in order to clean up, but the masking will then pull away paint and then I'm in a masking and painting infinite loop. Future to the rescue. On the bright side, I got Titch Havercroft's BoB Spitfire done. The RFI is here.6 points
-
Thanks for the comments, chaps. Well, I've pressed on with my intended weathering as I wanted this to be for developing my skills. Post-decals, I've done a panel line wash, followed by flat coat and then overall filter and oil paint weathering. I thought I'd messed the whole thing up when I had a slight misty look after the flat coat but I think the weathering has salvaged it. Airfix 1/48 Hurricane Mk.I by Phil Jones, on Flickr Airfix 1/48 Hurricane Mk.I by Phil Jones, on Flickr Airfix 1/48 Hurricane Mk.I by Phil Jones, on Flickr Now on to some Eduard wheels and exhausts Phil.6 points
-
OK, pull up a bollard; dit on. I couldn't decide whether to put this here or in Steve/Fritag's outstanding Hawk thread (with its tales of Elsans and pampers). Eventually here won. It is, you will be glad to hear, nothing to do with lavatories of any description. I cannot, however, guarantee that it is in 100% good taste. So anyone who is fully squeam, or even a bit squeam-ish, should probably look away now. A lot of old matelots seem to want their mortal remains to return to the sea, even if they left the Navy decades before their death. Every ship at some stage gets a call asking whether they would mind scattering the ashes of some old gentleman at sea, especially if they'd served in some previous war canoe of the same name. Of course we do it, it is a privilege to do so, and even the sailors - an irreverent lot in almost all circumstances - treat such things with enormous respect. My last proper job in the RN (i.e. not counting the "thank you and goodbye" job I did while I worked my 18 months' notice) was at 819 NAS based at Prestwick (HMS Gannet) in Scotland. Our primary/war role was to provide ASW protection for the Clyde submarine base, but we also provided SAR cover for the whole of the West coast from the top of the Isle of Man right up to Stornaway - a huge area of sea, islands and mountains which therefore offered some of the most fun (and occasionally challenging) flying to be found anywhere. Not long after I joined the Squadron, we received one of these calls from the padre. An old gentleman had recently died, and he'd served in 819 during the war, including maintaining the 819 Swordfish that flew on the Taranto raid. He was also a mad keen fisherman, so would we consent to scattering his ashes over [insert name of well-known but very remote Loch here; let us allow him some dignity]? Yes, of course we would. The ashes were duly delivered and, as luck would have it, they were in a canister almost exactly the same size and shape (though not weight - you may be well ahead of me here...) as a sonobuoy. "That's fine", think the assembled experienced RN aircrew who were planning this sortie; "we can undo the lid at the last minute, and then drop the canister through the sonobuoy chute in the floor of the aircraft". We couldn't just welly it out of the window, you see, in case it hit the tail rotor or similar; to use the sonobuoy chute (which sounds dead sophisticated and that, but is in fact a hole in the floor) meant that we knew it was safe for the aircraft provided we flew in a certain way; we dropped thousands of buoys every year, so what could possibly go wrong? What indeed? Off we bimbled to our Loch. We assessed the local wind and ran through the plan once more inside the cab, before slowing the aircraft down to about 60 knots at 200' over the water. The Aircrewman and Observer did their double act and despatched the ashes in the prescribed manner, carefully retaining the lid. Job done, we went on with whatever else we were briefed to do (cannot remember). All Naval aircraft face a constant battle against corrosion, but especially those that spend copious amounts of time hovering 40' over the sea in a self-generated cloud of salt water spray. Naval helicopters, therefore, are coated every day with a thin film of oil, to protect the airframe. A couple of hours after we'd landed, the watch Chief came up to my office. "What on earth were you doing in Zero-Seven today, Boss? The entire tail is covered in a layer of grit, and it is really difficult to shift.". I never did have the heart to tell the boys what the "grit" was (though they found out in the end, of course). I did, however, eventually help design a better system for scattering ashes, which involved lowering them 50' below the aircraft on the winch wire and only then removing the lid. Oooops.6 points
-
At least your aircraft had fixed wings. Can you imagine the disdain with which the drivers of flashy, pointy, whizzy things that went 'whoosh' regarded those of us who flew aircraft whose wings went round and whose maximum speed was around 100 knots? One of my earliest proofs that there is a God of Aviators, and that he has a sense of humour, came this way. The Shar guys on 801 when I was a Sea King first tourist on 820 were mostly great blokes, and included at least 3 ex-rotary pilots anyway, so the 2 squadrons got on well. There was, however, one jet pilot who obviously suffered from erectile dysfunction or similar, because he was deeply obnoxious: "I hate chopper pukes" was his mantra - such a charmer. He even had a T shirt bearing this hilarious slice of wit. This went on right up to the moment when he had a bird strike off Tiree, his engine exploded and he had to eject PDQ. My aircraft happened to be nearest, so we fished him out of the oggin to take him back to Mum for tea & medals. It was a bit choppy, but it was a simple enough winching exercise, but my Observer succeeded in 'accidentally' dunking him several times in the balmy January Atlantic water before we finally rescued him. Strangely we heard rather less about the inferiority of rotating wings thereafter. As the old FAA song "Rotary" (to the tune of Que Sera Sera - first written in Ark Royal 4 days to counter the Toom & Brick majority in the wardroom) has it: "Stovies are dull / Stovies are boring / Think they sound punchy / On the RT / But when they bang out / Fifty miles out / They call for rotary / Rotary-tary / The Sea King's the bird for me / She flies so gracefully / Rotary-tary".6 points
-
Hi Everyone, This is the Revell 1/72 Hunter F6 finished as a member of the 'Black Arrows' aerobatics team using Xtradecals. The last 2 photos show it beside the Belgian 'Diables Rouges' Hunter F6 that I built way back in 2005. I want to go on and build five aerobatic Hunters in this project. Cheers Tony6 points
-
6 points
-
Just long johns actually....... Very uncomfortable it was too. Ok so. I like mucking about adding cockpit bits and bobs. Might actually be avoidance behaviour - don't have to get on and make any decisions or do any real modelling like sticking fuselage halves together and painting and so on and so forth. Tonight I had a bash at making the rather large map case that's visible in the front cockpit. I think it's part map case and part cover for untidy plumbing. Anyway it has a rather prominent lid. Good old fashioned work shaping plastic strip of various sizes and adding a bit of wine bottle foil: Little bit of fettling: Slots into place: Add a bit of simplified plumbing. Enjoyable hour's modelling. Steve6 points
-
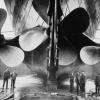
Hello Britmodellers here are pictures from my current build on my bench ( or better one of them) Its Trumpeters H.M.S Hood in 1/350 scale. Its my first attempt to add more details on a 1/350 warship. The kit was started right after i got it in my LHS, as an intended oob build, like my other ships i had at that time. While building her ( that was in 2007 or 08 ) i discovered modelling sites like Modelwarships.com or websites about the real Hood, learning about the wrong main gun turrets and the posted ships had so much more details. After i became unhappy with my idea it quickly stalled. Filling and sanding the seam running around Hood hull didn t helped either. Some month back, i decided to give this one a second go, with some more budged and some more skill, i ordered an photo etched set from Eduard, gun turrets in resin from WEM, just before they went out of business, and a detail set from Trumpeter with beautiful turned brass gun barrels. Adding PE stuff proved difficult and progress was slow, a bit later i gor me a self adhesive wooden deck from Pontos and my Hood project was running well until live stopped this in summer 2015. ( incl. two BM Group Builds ) Now i have some days of until the new year and Hood is back from the mothballs.5 points
-
This is a 1/72 scale dio. I did a Panzer III with figures on a board. Pillars are plaster cake stands with real slate and mini bricks to create the ruins. Si:)5 points
-
As were the last years, also 2015 was a busy one for my dad. 38 models so far, probably two further ones will make it until the end. So, here is his factory output until now, all in 1/48. Although only being around here since summer I gotta say Britmodeller is a great forum with lots of nice people and a good source for information. Also enjoyed everybody´s nice shown work here, keep it coming! My dad and I wish all of you and your beloved ones nice holidays and all the best.............and many new kits under the tree or in the socks or whatever Cheers, Franz and Reinhard Messerschmitt Bf109G-6, Hasegawa kit with Delta One decals M4A3 (76)W Sherman, Hobby Boss Curtiss P-40F, Hobbycraft/AMT with AmTech resin nose Focke-Wulf Fw190D-9, Tamiya with MDC wheel well conversion, decals from sparesbox Brewster Buffalo, Tamiya Daimler Dingo Mk.II, Tamiya Pilatus PC-6 Turbo Porter, Roden kit with Max Decals Republic Thunderbolt Mk.I, Tamiya kit with Rising Decals Mitsubishi A6M5 Zero, Hasegawa Mitsubishi G4M1 Betty, Tamiya Kawanishi N1K1-Ja Shiden, Hasegawa Josef Stalin JS-2, Tamiya Bedford MWD, Airfix Supermarine Spitfire Mk.VIII, Hasegawa kit with Eduard decals Nakajima Ki-44-II Shoki, Hasegawa Saab 91D Safir, Tarangus kit with Maestro Models decals Messerschmitt Bf109G-14/AS, Hasegawa kit with Aeromaster decals Messerschmitt Bf109G-14/AS, Hasegawa kit with Stormo decals Jagdtiger, Tamiya Hawker Hurricane Mk.IIc, Hasegawa kit with Italeri decals Hawker Hurricane Mk.IIc, Italeri Nakajima Ki-84 Hayate, Hasegawa Albion, Airfix Messerschmitt Bf109E-1, Eduard kit with Kagero decals Polikarpov I-16, Eduard Nieuport Ni-17, Eduard Beechcraft Expeditor Mk.I, ICM kit with Caracal decals Pzkpfw 38(t), Tamiya Autoblinda AB41, Tamiya/Italeri Messerschmitt Bf109F-4, Zvezda kit with LF Models decals Hispano Buchon, Academy kit with Hasegawa canopy Fouga CM.170 Magister, Kinetic kit with rocket pods from AMK Opel Blitz with Flak 38, Tamiya truck, Ace Flak, Gaso.line flakbase North American P-51D Mustang, Hasegawa Curtiss P-36C, Academy kit with H-Models decals Fouga CM.170 Magister, AMK kit with Kinetic decals Douglas TBD-1 Devastator, Monogram kit with GWH decals Flakpanzer IV Wirbelwind, Tamiya Horch Typ 1a, Tamiya Douglas TBD-1 Devastator, GWH kit with Uschi van der Rosten masks5 points
-
Recently completed this one - my last civvie of the year. This is the Revell 1/144 A320 kit built oob except for using Classic-Airlines decals to depict Aer Lingus retro-jet EI-DVM, which I bought at SMW. I like this kit, though I still have to build one of the newer Zvezda examples, and the laser-printed decals went on really well, my only criticisms being that there is no decal placement guide, just a colour diagram from one aspect, and there are one or two things missing, most prominently the 'Airbus A320' script above the cheatline at the rear of the fuselage. Constructive critiques welcome5 points
-
Hi all. Managed 26 this year and I have 6-7 on the bench which (realistically) will see the light just after New Year. Was an interesting year...having been a confirmed aircraft modeller in 2013...two years later and I've done 1 in the whole year! I'm really enjoying my subs and AFV's although I will continue to model winged things, they will take more of a back seat as time goes by...maybe some cars in 2016? On to the models...thanks for all the support and encouragement from various BMers (you know who you are!) and a happy Xmas and a great modelling 2016...in order of completion... 1. Hasegawa Egg A-6 2. Hasegawa Egg F-14 3. Hasegawa Egg Su-33 4. Hasegawa Egg F-22 5. Hasegawa Egg Harrier 6. 1/350 AFV Club USS Gato - great kit 7. 1/35 Italeri SLC "Maiale" 8. 1/35 Tamiya Pz.Kpfw. II Ausf G - Achtung Panzer GB 9. 1/144 Pegasus War Machines Attack - Sci-Fi GB 10. 1/35 Tamiya 11CV - French Fancy GB 11. 1/350 HobbyBoss Surcouf - French Fancy GB 12. 1/35 Academy M3 Stuart "Honey" - Achtung Panzer GB 13. 1/35 Trumpeter NKL-16 Aerosan 14. 1/350 AFV Club Guppy IB 15. 1/350 HobbyBoss Type XXI Elektroboote 16. 1/35 Trumpeter SA-2 Guideline 17. 1/35 Tamiya "Schwimmwagen" 18. 1/350 Parc Models "Shchuka" Type X 19. 1/48 AMC Resin 16Kh missile - Non-plastic GB 20. 1/72 Revell Tornado - Tornado III STGB 21. 1/35 Tamiya Sd.Kfz. 7/1 c/w Flakvierling 22. 1/35 Academy M50A1 Ontos - Vietnam GB 23. 1/35 Italeri Pz.Kpfw. 38(t) 24. 1/350 HobbyBoss Deutsche Marine Type 212 25. 1/35 Tamiya Sd.Kfz. 223 (Fu) 26. 1/35 Academy M551 Sheridan - Vietnam GB5 points
-
The Ship. The USS Enterprise-B - featured in the movie Star Trek: Generations - was technically the third ship to carry the name Enterprise, and was an upgraded version of the Excelsior class. As well as having a different colour scheme to the standard Excelsiors, Enterprise-B also featured additional engines and a flared engineering hull as well as capped nacelles, all of which gave it a slightly beefier and more aggressive appearance. The studio model was an alteration of the existing USS Excelsior model, with the flared hull intended to accommodate a hull breach without damaging the existing model (as it turns out the glue did that anyway and the alterations ended up becoming permanent). The model. The model is by AMT and is in 1/1000 scale. For hull markings I purchased a set of aztek decals by Acreation for use in conjunction with the supplied decals, which give the finished model a more realistic and detailed appearance. They are also somewhat tricky to work with and tear very easily - I made many errors, but most of the imperfections are concealed by a coat of Humbrol matt acrylic varnish. The decals also negate the need for most of the painting, although I had already painted most of the model before I decided to opt for the additional decals. An unsettlingly small display stand is included in the shape of a Starfleet logo with the name of the film in moulded detail. I shall be keeping this one away from sources of wind. By way of size comparison, here's the Enterprise-B alongside her older sister (Polar Lights 1/1000 USS Enterprise NCC 1701 refit): And that's my last build for 2015! Thanks for looking in, and as always any comments/questions are most welcome. Regards, Ross.5 points
-
Thanks for the kind words everyone! Paul - Wish granted. I did build a 92 Sqn Phantom this year, and a 92 Sqn Lightning last year. Alan - the Tornado is not forgotten!5 points
-
Hello all, Well, after doing my last pig, the EasyJet 737-200, I've now finished my B737-400 from the Minicraft kit BA box edition. Of course, I tend not to do the stock decals (with some exceptions), so I used the Skyline Sabena 737 decals. For civil, this was probably the most challenging, enjoyable mind, I don't mind that, but there was a lot of work to do. There was some tricky bits, the worst being the middle gear doors, as the instructions said to put the gear doors onto the wheel's legs, but trying to fit that onto the underside of the wings as once piece could be very fiddly, so I put the wheel sets on then tried to put the gear doors on, but equally that didn't work, and was either falling off trying to put it on place, or was getting jammed on the wheel. I left it out as, to be honest, I'm not too worried about undercarriage detail, I don't put my models on public display upside down! I lost a couple of decals through the build, but that was my own fault, but ither case I am happy with it the way it is For those who may remember, I haven't done a lot yet, so do date this is my 3rd airliner built Got my next kit from the shelf onto the workdesk...yep, another 737! James.5 points
-
OK starting the painting process first a coat of Halfords RED primer and then using Vallejo primers mixed red and dark grey to get some variation on the under coat Some of the added on detail does not look as heavy with a coat of paint on. Beefy5 points
-
Too bad the internet wasn't around during the Middle Ages. Just think of the theological arguments they would have had, pages and pages of how many angels can dance on the head of a pin*, which pinhead are you using, male or female angels, do they have rivets, err, I mean wings, etc. Still, if this keeps us out of trouble, then it can't be all bad. I take a wait and see attitude. I suppose I take a middle ground (which is unusual for me) when it comes to accuracy - gross inaccuracies such as patently bad shapes, I don't tolerate, but a panel line where it shouldn't be (or one missing where it should), I can live with. Regards, Jason *875 points
-
27. Assembled with some finishing touches here and there. Here it is: More pictures here Thanks for watching and all the comments.5 points
-
Here is some more to look at!5 points
-
Bonjour tous le monde, Ceci est un nouveau scratch diorama 1/35 en cours, nous sommes au fond d'un estuaire de la Bretagne, Il y aura un quai liittle en bois et une cabane de pêcheur, un petit bateau en bois et un ou deux pêcheurs (je ne sais pas exactement en ce moment ...) Il est juste le début des travaux, l'altération de la cale et de la hutte est en cours ...... .....To be continued4 points
-
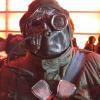
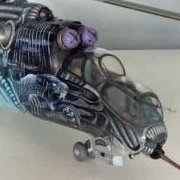
I brought this kit last year from the bargain bucket in my local model shop, I have finally got around to building it. As you can see it's gone together quite quickly, hence these are the first photos of my build. I'm going to build it as one of the Lynx's at Bessbrook mill, south Armagh Northern Ireland as this was the only way to travel in the 90's "well in style anyway" Im going to paint the troops that are in the kit in DPM and have also brought PJ production Lynx Crew to fly it. Thanks for looking.4 points
-
I finished this today, it's Hasegawa's 1/48 Hurricane MKllC. It'll be a gift to my Father in Law. He has a picture of his Dad sat on PZ865's wing just after the end of the war in his study and my plan is to get this model mounted on a plinth. I airbrushed it with Tamiya paint and used Flory models dark dirt wash which I found very easy to use. I should point out that this is the first model I've finished in twenty years!! There are lots of minor inaccuracies which I hope you'll overlook.... I've possibly overdone the weathering a bit but it was such good fun doing it! The decals for PZ865 were generously donated by Thunderjug so my thanks to him and apologies for taking so long to complete it! All Photos-220 by -ade634- All Photos-221 by -ade634- All Photos-222 by -ade634-4 points
-
It hardly feels like long since I was working on my first build of 2015. Revell USS Voyager. I kicked off the year with an out-of-the-box build of Revell's Voyager (I forget the scale). Tamiya 1/700 IJN Light Cruiser Yahagi. This ageing waterline kit was my most enjoyable build of 2015. Photo etch was scavenged from spares to add some detail. 1/700 Trafalgar Class submarine HMS Triumph (Cyber Hobby) I took a quick breather from fidgety surface ships with this sub model, which comes as part of a set with a Type 42 destroyer. 1/350 Imperial Russian Pre-Dreadnought battleship Borodino (Zvezda). PE is by Gold Medal; nameplates by North Star; lifebelts by Dream Model. 1/700 Russian missile cruiser Pyotr velikiy (Trumpeter). PE is by White Ensign Models; lifebelts are by Dream Model. 1/72 F-16 (Tamiya) and 1/72 GR1 Harrier (Airfix) I learned a vital lesson while building the F-16: make sure the canopy is absolutely 100% sealed before blasting varnish at the model! I attempted to cover up the resulting splodges by tinting the canopy with a mixture of smoke and orange transparent acrylics. I also did an Airfix 1/72 Lightning, but it got ruined before completion by cracked varnish and was sadly destined for the bin. 1/1000 USS Enterprise NCC 1701-B (AMT) It was fitting to close the year's build as I begun - with another Star Trek kit. This one had been shelf-o'-doomed from the previous year so it was nice to see it complete. The aztek decals are by Acreation. And that was my 2015; I enjoyed it and my only regret was not doing a vehicle kit at all - something I will have to try next year. Thanks for looking in, and all the best to everyone for 2016! Regards, Ross.4 points
-
The deck spot numbers. Because Lusty has a weird numbering system (7 spot replaced by 'K' spot, for some reason, for instance), I am not using Airfix transfers for this bit. Instead I am using a set of Xtradecal 1/48 numbers, because a) they come out exactly the right size, give or take an insignificant smidge, and they are the right font (Xtradecal even give you options for rounded or squared off 2, 3, 5, 8 & 9 - these are squared off). So here they are ready to go: ...and here they are in place, firstly at the stern (the section that gave me so much trouble a year ago): ...and then the whole deck: You can see in that last shot that I am preparing to do the runway distance to run markers, using Airfix's transfers to give me distance reference. And here are the teeny numbers ready to go (lots of 0s and 5s, since the marks are every 50 yards): [Edit: complete rubbish - it was every 50 FEET; otherwise the ship would have been about a quarter of a mile long] That is a task for later, because this is delicate work (I had two 7s & a 4 disintegrate on me), and that was with the big numbers... None the less, I am really pleased with how this is turning out; I love it when a plan comes together! More later Crisp [P.S. the grey splurge next to the R is the result of some Microsol; it seems too soften the Clear a little (or maybe I haven't waited long enough to do this). I am now going to leave it for several days to harden completely, before seeing if it can be moved. Not a huge problem if it can't, because that part of the deck is a) going to be filthy and almost certainly have an FRS1 sitting on it.] [P.P.S. I am much to old to use Emoticons, or whatever we are calling them this week. Wherever you see an idiotic sun wearing sunglasses, you should infer the letter b followed by a bracket. Modern life, eh? G4 points
-
Gonna stay well out of this. Even a long ago ex-driver of flashy, pointy, whizzy things that went 'whoosh' knows there are some attitudes it ain't politic, or for that matter healthy, to be associated with........ EDIT: Of course much the same might be said nowadays of nearly all the attitudes that young men growing up in the 70's and 80's observed in their elders and were expected to inherit.4 points
-
4 points
-
so, is there any truth in the story of the flashy single seat pilot calling Albert and saying "hey, watch this" and proceeding to throw his mount around the sky..."can you do that?".....to be met with deathly silence...after a while the Albert Captain came back..."sorry.I missed that, I went back to take a leak...can you do that?" Ian4 points
-
So...here it is after a little remedial filling and scribing. Maybe still a little extra scribing to do around that root joint, but I hope it now gives a good idea of the final look. Off to see Star Wars now! regards, Jason4 points


.thumb.JPG.3498f40362ff13ebfc4b2e45abbd545e.JPG)


This leaderboard is set to London/GMT+01:00