
Leaderboard


Popular Content
Showing content with the highest reputation on 17/11/15 in all areas
-
Kinetic kit OOB with FCM decals. What great decal sheets, both the FCM designed kit decals and the FCM full sheet.24 points
-
Hello! So after some time I show you my JU 88 G6 from Dragon/Cyber Hobby- Orange Box in 1/48. Pretty old kit and because of the many re-edtions the moulding suffered from that. The construction was a real challenge. I've tried to avoid filler. So dry fitting is a "must do". I have replaced all MG 151 with brass rods. The FUGs are from Mastermodel. Another challenge, because I tried the solder them. In the end it wasn't that hard, as I've thought. I made a template that helped me a lot.The rear antenna holder is also a brass construction soldered togehter. I've rescribed the fuel hatches on the top of the fuseage. Soon as the construction was finished, the painting started using Vallejo RLM 76 and Gunze RLM75. I really liked the paint scheme done by Chris Wauchop from Hyperscale. That black tail fin really got me! After all I'm happy this project is done. Greetings23 points
-
When I started this kit with the intention of building an E model many years ago I realized it is not possible to end up with a correct F-15E. So I left the half project along with my many others for many years. I was always fascinated with this unique Ferris Scheme. They look very attractive especially on Eagles. The only problem was the tiny tail numbers and very few stencils that bearly can be seen even on the actual aircraft photos. Finally custom decal print solved my problem:-) If you start the Academy kit to make an A or a B model, you will enjoy it and will be happy with the results, but if you try to come up with an C or a D model, that is another story... Best Omer ERKMEN17 points
-
Hi all! So these were part of the resent BofB GB but unfortunately didn't get completed to the deadline. They are all from 151 squadron and were inspired by teddy Donaldson's biography, a cracking read if you have not done so already. In the book it spoke about his own experiences, the aircraft he flew over the battle and those that flew with him. Two of the aircraft mentioned in the book are two types of cannon firing protoypes that were sent to the squadron. The aircraft I decided to go with are Teddy's mki tin wing, DZ-W, his last aircraft before leaving the squadron. Teddy had fought through France and the first half of the BofB with them and got through a number of airframes, leaving two of them in the channel. A brass model of this aircraft was given to teddy by the squadron on his departure. I made this from the new airfix mki rag wing with a cut and shut job on the old airfix wings and a full rescribe. The other two were both flown by Dick Smith who arrived with 151 at the start of the battle. He came across the aircraft DZ-Z which had 2 20mm cannons in underslung pod's not to unlike the 40mm cannons on the mkii d. I used the freightdog resin kit which is a nice set.... but I lost the cannon barrels so I have replaced them with broken bits of lancaster UC legs, not perfect far from it but the best I could do! The codes were hand painted but they are wrong but I don't have the ability to redo them (sorry folks). The other hurricane he flew was the 4 cannon protoype DZ-C which according to him turned up after DZ-Z and was a mki with a C wing grafted on, which oddly is exactly how i did it! I grafted n the airfix mkii c wings onto a the ragwing. It is down as being a mki and not having the upgraded engine so was very underpowered and used a lot less than dz-Z, both saw actin and scored probable hits. Enough of me wittering on here they are. DZ-W DZ-Z DZ-C I am happy with the result, some could say they have been over weathered but I do like them dirty! They are not perfect, and there are inaccuracies, but this is the first none oob large project and feel it's been good! For the wing changes etc the build thread is here http://www.britmodeller.com/forums/index.php?/topic/234984681-151-squadron-3-ways/ any feedback would be great! Cheers for sopping by Rob17 points
-
Hi, Here is my Magister of RS. It's a nice kit, pretty easy except glass parts. Any comments are welcome. And with a american friend Joel17 points
-
Seafire 47 conversion from the old 1/32nd Revell Spitfire Mk I. This was the culmination of a number of conversions of this kit, a Spitfire Mk V, a Mk VIII and a lowback Mk XIV. Tempest II conversion of the Revell Typhoon. Apart from the fuselage from firewall to stern post and a few small items, not much remained of the kit. FGH15 points
-
Even though I end up with a nice result I wouldn't recommend this Corsair to you. I'd suggest to pay double or even three times and go with a Tamiya kit. It is definitely not a bad kit, nicely detailed but suffering with over engineered part brake downs, poor fitting problems and thin, missing, incorrect panel lines and white plastic injection... It turned out a nice kit at the end but takes a lot of effort and time... Surprisingly decals were extraordinary, perfectly printed, well searched and works great on surface without any solvent.13 points
-
I've just finished my latest model of a P-51D of the 359th FG. I have seen hardly any 1/72 (or any scale for that matter) depictions of Ray S. Wetmore's "Daddy's Girl" Mustang, depite being the aircraft of the leading ace of the 359th FG, as well as one of the highest scoring American aces in Europe! It also wears some pleasing colours on the nose and rudder. This is the best picture I have of the subject, and I found 3 more b&w pictures, as well as a WWII colour photo of the plane before bearing the "Daddy's Girl" writing. To build the model I have used the new tool Airfix kit, with decals from the old tool P-51D Daddy's Girl Mustang starter set. I've used the cockpit, seatbelts and part of the landing gear suspension mechanism of a Smer P-51 kit and then I scratch built the rear view mirror. So...not really an OOB build. I've appropriately filled the panel lines on the upper and lower surfaces of the main wings, which I think gives it a more realistic look, although the other panel lines are very deep, as I am sure many a modeller have complained about before me. Another thing about the Airfix new tool kit that is pretty annoying is the aerial mast. It's not clean at all and covered in flash and very flimsy. I broke one in the process of seperating it from the sprue. I had a spare, but this one also broke - even though I was super careful - when I slipped while sanding it smooth. I ended up using the mast from the old tool Airfix kit. Although I don't think this plane was ever very dirty (maybe after a sortie, but kept pretty clean otherwise), I have made use of dry pastels, oils and dry brushing to emulate a plane that isn't super clean. Initially I thought I overdid it, but I think the end result is acceptable. Something I only realised when I was almost finished is the kill markings decal for the port side of the canopy is marked with crosses, and not swastikas like the real subject! I really hope this does not detract too much off the end result... Anyway, enough talk. Please look at the pictures below, and I hope you can enjoy it. Cheers J13 points
-
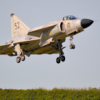
Hi All, Hope you don`t mind seeing some pic`s of my latest effort: Hasegawas 1/48 F-104C Starfighter Completed to represent `Debbie Sue` of the 8th TFW, based at Udorn, Thailand 1966/67 Made a few additions to the base kit, in the form of some RHAWS sensors ( I don`t know what it means ) fitted to the nose and rear fuselage and a small blade antenna just aft of the forward sensor Otherwise it`s what`s in the box apart from seat belts, rear view mirrors and decals: which are from Iliad Design `Starfighters in Combat` sheet the instructions unfortunately show the camo` pattern on the wings incorrectly so I had to do a last minute repaint. Whilst I`m here I thought I`d show some pic`s of an earlier attempt at the same kit Which isn`t really a `nam bird but `Hey, while I`ve got the stuff out` Kit decals but I left the candy stripes and comets off ( it must have looked like this at some point ) And above both together Hope you enjoy, thanks for looking Cheers Russ13 points
-
Hi Folks I rescued this from the shelf of doom a couple of weeks ago,don't know where the word 'special' came from,if this was developed from the Sabre Dog this thing is a real mongrel. Compared to the Revell kit the fuselage is around 2.5mm too deep,the fuselage is too wide and the slats are about 50% wider than they should be and resemble planks of wood as the aerofoil section is practically zilch.The real thing should only be around 203mm longer than the D not deeper or wider. The decals were unusable and i got a replacement set from Hahen which were very good. I'm not a rivet counter by any means but for nearly £30 it should be better. Ian [/url ]13 points
-
With apologies for the finger trouble which caused the post to go up half-cocked, here's the lovely little Airfix Spitfire 22, almost out of the box, but with the following tweaks for a 24: starboard rear fuselage hatch moved forward as for a Mk 24 rear fuselage fuel filler added shortened gun barrels for a late 24 undercarriage doors changed to Seafire type for a late 24 (I think this is correct for this aircraft - VN496, the last Spitfire, had them but it's not an exact science for earlier airframes) bomb racks and rocket rails adapted from Special Hobby items drilled out exhaust pipes added separation hooks for fuselage sipper tank decals from the spares box This great photo (found at http://www.talkmorga...n_veteran_air_)was the inspiration: And here's the model:12 points
-
Ha ha Andy, that's Woody residence to a tee! I'm away for a couple of days with work from today, so progress will stall slightly, but one wing is done now, quite please with the results.... Still got the exhausts to go on, but I'll leave those off until towards the end to avoid an inevitable meeting with the carpet monster! Also need to sort out the rear of the nacelles with some plasticard to meet the edge of the flap line.12 points
-
Hi! Here's my Mustang built as a No 19. sqn machine stationed at Peterhead 1945. The boxart states that the model is a P-51 Mk. IVa (P-51K), but it was in fact a D. I used Eduard photoecth in the cockpit, and Brassin wheels. The model was painted in US equvivalent colors. I used Gunze H52 Olive Drab and Tamiya XF-53 Neutral Grey on the overside, and XF-19 Sky Grey on the undersides. Any comments appreciated Best regards Rune Haugen11 points
-
That would be nice! But I think I prefer the regular old, not-so-quick build kits. I'm in no hurry... Finley, like any five-year old, learned very quickly. I helped her during the first pass at building the kit, but when we took it apart to build it again, she didn't need me or the instructions. Crazy! I let her put the stickers on all by herself, and it didn't matter to her if they weren't in the right place. She just wanted to have fun with her Grandpa and she was beaming! She is talking about starting a collection (I think she got that gene from me.) Here she is with her Raptor: By the way, she wouldn't give me the flying hours token, after her Dad explained what it was. Great memory - my first kit was when I was 12, and that was 48 years ago! And I still remember it - it was a car of some kind, plastic was black, and I used the entire tube of glue on the first couple of parts. Talk about welding them together...melting might be a better description! OK, back to the Firefly. For the FR.1, Special Hobby would have you paint the wheel wells Interior Grey Green, with the struts aluminium. I note that Z2033 at Yeovilton is shown this way - sound right to you Firefly-oholics? Cheers, Bill11 points
-
Hi Folks, I'm Peter and I'm from Germany and like to show you my model of a Dutch Two-Decker from 1665. It made completely from wood, oak to be precise and it is in 1/22nd scale. The hull is about 7 feet Long (2.1m). I've been working on it for two years now, and I hope you like it. Peter ]9 points
-
Hello .... Here's my first finished model since I was a child. I had always wanted to complete a model using all the correct paints and to try to get as much detail in there as possible. I've learned a few things along the way though ... 1. Filler for the gaps would be a good option 2. Shake that paint like it's a a badly behaved <insert object/person of choice here> 3. Dust and wet paint don't mix 4. A good quality brush helps 5. Should probably laquer / varnish to protect the finish 6. Paint the whole body before glueing on the glass bits 7. Patience with a stanley knife is advised 8. Not every moulding is 100% perfect so be patient when cleaning up edges 9. Paint costs a fortune 10. Modelling is fun 11. Hairclips are both a great way of securing glued parts but also a pain when they don't sit still 12. Landing gear is fiddly 13. I really like my magnifying LED Lamp 14. I should take photos in a more appropriate location 15. I can't paint straight lines 16. I'm itching to start another model9 points
-
Hiya Folks, Here is the new Revell Halifax Mk.III with Aeroclub metal propellers and with a few slight modifications including the reduction in the size of the engine cowling openings using plastic card, the clear nose cone was sanded from the inside to remove the unsightly mould marks with a Coastal Craft white metal Vickers K Gun replacing the kits large .5 Browning, the small kit wheels were replaced by a set of Airfix Lancaster wheels, some plastic rod was used to replicate framework below the canopy of the Air Engineers station and after losing the trim weights on the ailerons umpteen times I made a more robust set from metal wire with a blob of Clear Fix on the end. If anybody is interested here is the Work in Progress; http://www.britmodeller.com/forums/index.php?/topic/234990192-new-172nd-revell-halifax-mkiii-nearly-done/?p=2132101D The subject of this model is Halifax Mk.III, MZ500 `Bambi' which was flown by Dutchman Vic Wijnberg and his crew from RAF Leconfield in Yorkshire with 640 Sqn. Originally coded C8-N, following flak damage caused in a raid on L`Hey in August 1944 it received repairs following which it was re coded C8-L as seen on this model. The ventral Preston-Green gun fairing mounting a single .5 Browning machine gun was originally fitted and remained in place for its first few missions following repairs but it was replaced by a H2S radar scanner fairing in mid September 1944, so the model portrays how this aircraft probably looked during the first half of September 1944. The decals for the nose art came from Dutch Decals but the yellow chequered tail markings and yellow outlined codes `C8' came from Xtradecal but after the intended yellow edged` L' from RAFDecal inexplicably disintegrated in the water (every other sheet that I have used has been fantastic!) the `L' was instead made up from a Modeldecal red L with scrap decal yellow edging! Anyway enough blurb,.....here is the model, I hope that there are not too many pics for you to wade through!; So thats the Revell Halibag Mk.III,.......it still has its faults but it is a much better prospect than the Merlin engined versions from the same manufacturer and I have two more in stock to get to grips with soon,......so it definitely has my vote! I also meant to say, for anybody wanting to know more about 640 Sqn Bill Norman`s book "Halifax Squadron- The Wartime Bombing Operations of 640 Squadron, Leconfield" (isbn 0-9547325-1-0) is the place to go and thanks to Norman for his help with this model. Here is the page of his book dealing with MZ500; Cheers Tony8 points
-
Hi all, was going through some old photo's earlier and found these, a model I have actually finished! This was a birthday present from my brother a couple of years ago... Enjoy! Al8 points
-
Hi. My next Swordfish Mk.I - Tamiya 1/48 Additions: Tamiya Etched parts 61069 Eduard Etched parts FE384 Painted with paints Mr.Paint. Enjoy !8 points
-
Just an update. Am going to sort out new wheels, so anyone who has a Manchester of mine will get those for free, they'll be added into the next batch of castings anyway. And I'm going to look at what we can do regarding the undercarriage let matter. I must admit it never seemed there would be an issue with the legs. Hope that helps everyone7 points
-
Good morning to all! finally, I'm glad to present my last work: an israeli Tzukit! The #501 was the firts Magister upgraded to Tzukit standard in 1982. Base kit is the Kinetic with Wingman conversion set & resin wheels. I add some scratch-builded details (like the air conditioned vent on top of fusoleage) to complete the israeli changes. Colors used: for the white, Gunze Mr.Base White 1000. For the International Orange, a mix of Xtracolor 103 & 104. Hope you enjoy. Cheers frome Rome, Italy! Magister 96 by valerio, su Flickr Magister 85 by valerio, su Flickr Magister 91 by valerio, su Flickr Magister 92 by valerio, su Flickr Magister 88 by valerio, su Flickr Magister 86 by valerio, su Flickr Magister 98 by valerio, su Flickr Magister 97 by valerio, su Flickr Magister 95 by valerio, su Flickr Magister 94 by valerio, su Flickr Magister 93 by valerio, su Flickr Magister 90 by valerio, su Flickr Magister 89 by valerio, su Flickr6 points
-
Hello everyone! This is my first post on Britmodeller after a long time lurking. I just finished my my first model in ten or so years, feels good to be back with the paint and glue! So, the model. I made _a lot_ of rookie mistakes, especially which the paint (did not stir the matte coat, and had to redo it several times before I understand what was wrong…) But I am pretty pleased with the result anyway. It is an Airfix 1/72 Hawker Hurricane Mk.1. Not a lot of details, but the fit was OK. Brush painted with Humbrol Enamels. The antenna that’s way too thick is stretched sprue. Base made from scratch with a flowerpot saucer and putty. Thank you for looking! Regards, Johan5 points
-
thanks Perdu. I did not expect to win anything with my previous carrier deck and I am building the 1:144 and 1:32 diorama mostly to discover for myself, and anyone else who is interrested, what can be done with 3D printing. So who knows how this will turn out. On the ESM conference i managed to find a double kit of EA-6B's from Dragon, both flying from the USS Eisenhower. Luckily I also found a hawkeye and decals for 2 F/A-18F's from the same carrier. How difficult it is to find kits of different aircraft but from the same carrier, same cruise! BTW the super hornets are offered by Revell as Growlers, but if you look closely at the plastic then you will see it is by no means a Growler. So no conversions needed to make them into F's. I am planning to design the wing fold mechanisms of super hornets and prowlers, propellors for Hawkeye, boarding ladders, wheel chocks and towbars and more stuff all in CAD and to have them 3D printed. Might aswell add a fire truck too. this is going to me a multi month project... checked their dimensions on the deck. There will be 2 prowlers next to each other and also a 2nd super hornet in que behind the JBD.5 points
-
Well yes I think we all (mostly, Jessica) suffer the 'well if it keeps you happy and off the streets dear' syndrome....you can see the eyes glaze over and the silence is palpable as you attempt to explain just what blood was spilt on the battlefield with your latest creation, they try to look vaguely interested, said eyes wondering slowly across the room towards the TV to see who got through to the next round of Strictly........5 points
-
By sheer coincidence I just completed the same model in the same markings this very evening and I too photographed it in a realistic in flight mode. Revell F4U1 by nolh, on Flickr As you see I've gone for a more weathered appearance and the propeller is depicted worn back to the plastic due to the coral dust on the island base. Controversially my research indicates the Lulubelle name was removed after the famous photoshoot and tapes were added later......................... Actually the first paragraph is true except that actually it's the very first model built, with help, by my seven year old son. He received it from his uncle on his birthday. As it happens the Corsair is my all time favourite fighter and I already had the kit. So I mentally cursed my brother in law for buying the Revell version. It is fiddly to build and over engineered and hardly a first kit for a seven year old. But he badgered me to build it with him this afternoon. He obviously has little hands so coped quite well and even said that putting the fuselage together was easy. He did find that putting on the closed tailwheel doors quite tricky. But he persisted and got them in place. He did most of the painting too. I also found the decals went on well or at least my son did. The unpainted propeller is my fault as I ran out of time and had to cook dinner. But we'll get to that tomorrow. Now I'll have to get my kit out and finish it. Can't let my son beat me. Great work on your one by the way.5 points
-
USS Iowa (BB-61) is the lead ship of her class of battleship and the fourth in the United States Navy to be named in honor of the 29th state. Owing to the cancellation of the Montana-class battleships, Iowa is the last lead ship of any class of United States battleships and was the only ship of her class to have served in the Atlantic Ocean during World War II. During World War II, she carried President Franklin D. Roosevelt across the Atlantic to Mers El Kébir, Algeria, en route to a crucial 1943 meeting in Tehran with Prime Minister Winston Churchill of Britain and Josef Stalin, leader of the Soviet Union. She has a bathtub—an amenity installed for Roosevelt, along with an elevator to shuttle him between decks. When transferred to the Pacific Fleet in 1944, Iowa shelled beachheads at Kwajalein and Eniwetok in advance of Allied amphibious landings and screened aircraft carriers operating in the Marshall Islands. She also served as the Third Fleet flagship, flying Adm. William F. Halsey's flag at the Japanese surrender in Tokyo Bay. During the Korean War, Iowa was involved in raids on the North Korean coast, after which she was decommissioned into the United States Navy reserve fleets, better known as the "mothball fleet." She was reactivated in 1984 as part of the 600-ship Navy plan and operated in both the Atlantic and Pacific Fleets to counter the recently expanded Soviet Navy. In April 1989, an explosion of undetermined origin wrecked her No. 2 gun turret, killing 47 sailors. Iowa was decommissioned for the last time in the year 1990, and was initially stricken from the Naval Vessel Register in 1995. She was reinstated from 1999 to 2006 to comply with federal laws that required retention and maintenance of two Iowa-class battleships. In 2011 USS Iowa was donated to the Los Angeles–based non-profit Pacific Battleship Center and was permanently moved to Berth 87 at the Port of Los Angeles in 2012, where she was opened to the public as the USS Iowa Museum. Namesake: The State of Iowa Ordered: 1 July 1939 Builder: New York Naval Yard Laid down: 27 June 1940 Launched: 27 August 1942 Sponsored by: Ilo Wallace Commissioned: 22 February 1943 Decommissioned: 24 March 1949 Recommissioned: 25 August 1951 Decommissioned: 24 February 1958 Recommissioned: 28 April 1984 Decommissioned: 26 October 1990 Struck: 17 March 2006 Homeport: Norfolk, Virginia (after 1980s refit) Motto: "Our Liberties We Prize, Our Rights We Will Maintain" Nickname(s): "The Big Stick" (1952), "The Grey Ghost" (Korean War) Honors and awards: 11 battle stars Fate: Museum ship Status: On display at the Pacific Battleship Center at the Port of Los Angeles Notes: Last lead ship of any class of US battleship Class & type: Iowa-class battleship Displacement: 45,000 tons Length: 887 ft 3 in (270.43 m) Beam: 108 ft 2 in (32.97 m) Draft: 37 ft 2 in (11.33 m) Speed: 33 kn (38 mph; 61 km/h) Complement: 151 officers, 2637 enlisted Armament: 1943: 9 × 16 in (406 mm)/50 cal Mark 7 guns 20 × 5 in (127.0 mm)/38 cal Mark 12 guns 80 × 40 mm/56 cal anti-aircraft guns 49 × 20 mm/70 cal anti-aircraft cannons 1984: 9 × 16 in (406 mm)/50 cal Mark 7 guns 12 × 5 in (127.0 mm)/38 cal Mark 12 guns 32 × BGM-109 Tomahawk cruise missiles 16 × RGM-84 Harpoon Anti-Ship missiles 4 × 20 mm/76 cal Phalanx CIWS Armor: Belt: 12.1 in (307.3 mm) Bulkheads: 11.3 in (287.0 mm) Barbettes: 11.6 to 17.3 in (294.6 to 439.4 mm) Turrets: 19.7 in (500 mm) Decks: 7.5 in (190.50 mm) Aircraft carried: floatplanes, helicopters, UAVs [Text courtesy of WikiPedia] This then to be my build log of the Trumpeter 1:200th scale Battleship BB61 USS Iowa (1945). I propose taking a little longer than usual over this particular build, not least because having also laid out some hard won cash for the "Pontos" deck upgrade set, I have yet to make my mind up whether or not to spring another £160 for the remaining "Pontos" upgrade sets, bearing in mind that I have just purchased a new airbrush too! I might see if I can sell on a few of my die cast models to raise some modelling capital. I don't really want to part with them but a HUGE project like this will keep my mind occupied whilst undergoing the cancer treatment in the new year and will also stop me from going mad with boredom! Now having said that, the one part of the build that I might start on right away though that is worrying me is the three-piece hull assembly. It looks like Trumpeter have done an exceptional job of the fit but I'm still worried that the single vertical butt joint may show even through the filler and the paint. Trumpeter have not molded any hull plate lines so sanding will not cause any anxious moments but I'm still not over competent about my filling and sanding abilities, so I want to get that particular job out of the way so that I can relax (?) about the rest of the build.. Well, that's started the log, thanks for looking in and I'll update as soon as I have anything of interest to report. Cheers, Pete. The Pontos deck upgrade set arrived today. It looks very nice indeed if somewhat fragile. I chose the kit (1944) as I quite liked the B20 blue decks as applied to "Iowa" during that period, it makes a nice change to the usual oak or teak decks usually found on warships. I have discovered that my original paint plan, (same scheme as Nelson), would be out of time as she didn't wear measure 22 until after her 1945 re-fit and modifications. So fortunately I was able to change my paint order and will now be painting her up in measure 32-1b camouflage scheme as she appeared at the "Battle Of Leyte Gulf". I have finished building the hull and am quite satisfied with the hull joint, after several "fun" hours with repeated rounds of putty, sand, putty, sand, putty, sand, priming, sand, priming and rubbing down, priming and much finer rubbing down, I am quite pleased with the final result and am reasonably confident that it shouldn't embarrass me at a later date! (Joint shown in photo is between the red lines). I got blisters on my palm from drilling out all the portholes and pump scuttles! IF I do decide to spring for the full monty upgrade set there will be further work on the hull, so I am taking stock and thinking hard about which route to take from here. The full set is phenomenal but would likely take a lifetime to complete all the hundreds and hundreds of etched parts and I'm not sure that I wouldn't run out of steam long before I reach the end but on the other hand I sort of relish the challenge, still I havn't got the money until later on so I'm not loseing any sleep as yet... Thanks for looking in. Cheers, Pete. The largest area I have ever airbrushed in one sitting! Acres of "Anti-Fouling" coating... The 5L grey has been applied and is under the masking tape. Next up, the black "Boot Lining" and then the black measure 32/1a camouflage patterns above. Slow going on the Pontos deck upgrade set but it's looking good even if I do have to say so myself... Thanks for looking. Cheers, Pete. Here's an interesting video about Iowa's 16"x50 Rifles: And now a couple of shots of the finished hull. Measure 32-1b is quite a strange scheme as it calls for both soft and hard edges. I will admit to taking one black section too far forward but by the time I realised it was too late. Still, I'm happy that it looks like a reasonable representation of the scheme. I have used enamels throughout the hull build, mixing my own colours as needed. There are also a couple of coats of "Alclad" satin-matt varnish over the top and the jury is out on whether to weather or not... Thanks for looking. Cheers, Pete. A very weathered and battered looking "Iowa" at Kwajelaine: Thankfully no sign of the hull joint! A couple more size comparison photos with "Nelson" for fun. Finally got all the Pontos etched brass goodies attached to the maindeck, there are quite a few more to follow on the other decks as well. I've got to say that I have been very impressed with etched parts by Pontos, it's just that their instructions leave so much to be desired and a lot of judicious informed-guesswork is involved in it's fitting in some areas... Also I could not let my mistake in the camo' markings go, and just had to put it right, much happier now! Thanks for looking. Cheers, Pete.[/color][/b] A major milestone has been reached today! x72x x70x x72x I really was not looking forward to fitting the Pontos wooden decking as I thought that there would be a whole raft of things that could potentially go wrong. I needn't have worried though, the actual fitting was a breeze and if needed the decking is quite forgiving in reality, although I didn't run in to any problems myself, I think it would be fairly easy to sort out if you did. I think that careful planning and preperation is the key to success! In the end I didn't use the "sprayed water and slide into place" technique that I was originally planning on because as I say it was actually a lot easier than I thought. The one thing that I did make certain of was to paint the edges of the decking with the appropiate deck colour, in this case B20 Deck Blue, before fitting the decking down on the model. I would heartily recommend these Pontos wooden decks to anyone, although all the cutting out and prep' does make one wonder if its all worth it but I can assure you it is! I am waiting for the delivery of the Kagero 3D book with baited breath before moving any further along. Thanks for looking. Cheers, Pete.4 points
-
Good day, gentlemen! Let me present you my next model. But first of all - little story) One of the very few fighter pilots in World War II to achieve the “ace” status in both the Pacific and European Theatres, Colonel John Landers is remembered as a skilled pilot and capable combat commander. Landers served with the 49th Fighter Group, in the Pacific Theatre flying P40’s and achieving 6 victories against the Japanese. In 1944, he was sent to Europe, where he joined the 55th Fighter Group (38th Fighter Squadron) based in Duxford, England. Five more victories were credited to him during this tour, bringing his total to 11. John Landers would later become Commanding Officer of the 38th Squadron in mid 1944. Being posted to the 8th Air Force in Europe, he flew in several units including 78th, 357th and 361st flying P-38’s and P-51’s, all of which were named “Big Beautiful Doll”. Colonel John Landers ended his flying career with 14.5 victories, 4.5 of these and an additional 20 ground victories were achieved in P-51’s. His impressive scoreboard and nose art adorned many airframes during his career. His P-51 “Big Beautiful Doll” was one of the most colorfully painted Mustangs of that era.4 points
-
Hello modelers, Finally managed to take nice photos of my recently completed Panther. Best Omer ERKMEN4 points
-
In the closing months of World War Two the Germans came up with some bizarre aircraft designs, most of which never got off the drawing board, There is of course a whole modelling community dedicated to this sort of thing: Luftwaffe '46, so called because if the war had continued for another year then some of these designs may well have seen active service. This book is an ideal introduction to those who want to know more about these aircraft, While some are adaptations of existing designs, others look like something that Gerry Anderson might have come up with the morning after a cheese-and-pickle supper! The Focke-Wulf Triebflügeljäger mit L-Antrieb, as shown on the cover, for instance - you'd never get me up in one of those things! And as for the rocket-powered aircraft designed to ram Allied bombers... I spotted this book in WH Smith's. 132 pages, softback, £6.99, it's a fascinating read. The only drawback is that I now want kits of them!4 points
-
You really should see someone about that lisp4 points
-
Feels like ages since I've posted an update! I've been busy building but I decided to make my life difficult by adding lots of extras and scratchbuilding a few bits too. So up to now I have redone the cowlings (with blue painted rather than decals), radiator is completed, engine is finally completed as well! Here is a quick pic of the main part of the cowling (I havent painted the inside yet of the cowling), I shall post a few more of the rest of the cowling parts when I get a chance to take some more photos Here is the radiator done, I shaped the plastic area that attaches to the frame as on the 1:1 bike it has round bolts like the PE ones I have attached, if you dont modify this part then you will not be able to install the round PE parts. I also added plumbing near the radiator cap, apparently this tube runs up to the front section of the cowling just to the right front of the instrument panel, I wont be displaying this with the cowling on so this tube will hang and look odd lol And finally the engine is complete! This is one heck of an engine with tonnes of wiring and a fair bit of additional details added. From all my reference pics I have seen the area where the intakes are (where the grill bit is) is different to what Tamiya supplies in the kit, in fact even on the detail pics sheet that comes with the kit it shows a different part to what they supplied. So I decided to scratchbuild the correct part, overall I think it came out ok but it could have been better (as is always the case with me!). In addition to the pipework I also added the reddish lines that are not included with the kit, the white plugs look a little overscale but if I went any smaller I wouldnt have been able to accurately drill them for the pipe work. I achieved the reddish line by using MFH 1/12 tube (brown one) and spraying it with alclad hot metal red and hot metal sepia (roughly 3 red to 1 sepia), I also used the same tube painted semi-gloss black for the spark plugs as they are more to scale that what is supplied by Tamiya. If anyone knows where I can find tubing like MFH 1/12 tube (brown) in black colour please tell me! Its such a pain having to paint the tube and having to be extra careful not to handle it too much otherwise the paint can flake off. So please if anyone knows then please tell me So without further delays here are the engine pics Up until now it has been pretty annoying that I've been doing so much work but nothing is really coming together but now that the engine is complete the build should speed up somewhat, as you can see there are lots of sub assemblies completed so now its just a matter of joining them all up! So next update should show the engine installed into the frame!4 points
-
Small update. most of the time has been spent cleaning up the resin parts and removing detail from the base kit. I started this kit last year as I mentioned above but one thing that I have noticed is the plastic has gone really brittle, this makes getting it ready more time consuming. It's an old kit and not up to the new AFV Club release standards on the M60 but hopefully I'll make it into something acceptable. Lots of work to put into this build, probably more than the Challenger. New resin back end, the exhaust louvers are all PE so that will be fun, probably last to go on to save knocking them all off. The new resin cupola has a partial interior. Commanders sight unit Removal of the drivers scopes, the Tamiya kit only gave you the centre scope in the raised position the Legend set gives all three. Enjoy Dan4 points
-
Especially if we should need SAR pilots to go in harm's way in future (not that SAR isn't hairy enough in peacetime).4 points
-
Hi Jaime, thank you very much. Your right, it is a handsome aircraft. A couple of photos of the starboard side. I'll decal the port side in a couple of days. The tail marking needs to be cut round the rudder. Thanks for looking, Joe.4 points
-
There is one part of this build that I have been putting off doing, the 965 Radar Antenna assembly. There are twelve parts in total, eight which have to be folded and then fitted to the front Frame over the gaps in the front Frame. The back Frame then has to be fitted and then two lower Counter Frames fitted to the underside. I could see this being a real test of my patience. The Inner Frames were carefully folded and then one at a time tacked in place using PVA glue, and once I was happy with the fit, CA glue was used to secure each frame before moving on to the next one. After a couple of hours I then added the Rear Frame using PVA glue. The whole thing was then left overnight before I fitted the two lower Counter Frames. In the end the whole assembly wasn't as difficault as I had thought, there are a couple of inner frames that aren't quite lined up properly, but once it's all painted no one will notice, so keep quiet about it. The Radar assembly was then fitted onto the main Mast. Since I took the photo of it fitted, I have painted it but I have left the inner Frames unpainted so the detail shows up. as you will also notice from the above photo I have fitted all the Railings and the two "Ships Boats." The Wasp helicopter has now also been fitted and it's Main Rotor blades fitted having first bent them down at the ends. I just have 16 Life rafts to make, a couple of other bits to fit, the Ship's numbers to put on and touch up the paint work in a few places and then it will be all complete. Andy4 points
-
Hi all, Firstly I must admit that isn't quite finished. But this has now taken over five months and I think this is the best place to put it. Build thread is HERE (Merv "Spike7451" Milliken memorial build) This one's for you Merv, RIP. The build is from the Revell 1/32 Tornado IDS/ECR/RAF versions (I used the remnants of four different part-built kits to make this!) and both the current and old Flightpath super detailing sets. I also used Flightpath's flaps and slats set. Decals were a motley mishmash of Revell, Eurodecals, Xtradecals, Kinetic (Hawk kit) and homemade. I also scratchbuilt a Brimstone triple launcher and missiles, TERMA pod and numerous details on the kit and especially the cockpit. So... not quite finished (still needs pitot, temp and AOA probes, awaiting them in the post; also the scratchbuilt Brimstone launcher and missiles are being cast and I'm waiting for that) but ready for inspection! Nice photos by Chris Bradley of IPMS Farnborough: Remaining photos are my usual woeful back garden efforts! To be honest I'm sick of looking at this, it's been an absolute beast to build. I'm not even sure what I like or don't like about it, so I leave it up to the BM fraternity to pass judgement. I'm looking forward to the next project already. So... enjoy! (if you're into big grey jets, that is...) Al3 points
-
With two GBs under my belt, I fearlessly stumble in to my third. As I want to practise three colour camo and doing weird stuff with Panzer Putty, it will be in in the Marines Aggressor camo. I’ve got a nice resin seat that I will no doubt manage to make look like a mangled jellybean with my customary skill and ineptitude. Some nice Italeri fit etch that will be tormented into fitting with a trusty Tamiya etch file. Or not. Colours will be a mix of Mr Hobby & Mr Color with their wonderful levelling thinner. Scotch will be Laphroaig Quarter Cask for good days and Bells floor polish grade for penury days. Finally, having stalked Nigel Heath at the hotel during SMW 2015, I have discovered his secret; Consumption of a whole bottle of this type of magical potion while eating grilled dead cow. As you can see my bottle is ready and waiting for the build to commence, soon I will have Nigey Powers! Anil3 points
-
Hi there! I know You are all waiting for my flanker, but I've decided to get this build done after 4 years that spent in the box. So here we go. Aires c-pit still looks ok after 4 years... There was some extensive filling, sanding, regraving and riveting done, especially on the nose section. Tailbooms ready Wheelbays done. There are still some minor bits missing Almost ready for black primer.3 points
-
Had this for about a month now and have left it until I finished the Stormtrooper, I posted recently. This is not going to be anywhere as good as Andy RM101's posting from last month which was absolutely stunning so won't elaborate to much on the kit and preparation as Andy's has it all and more some. I will be using a number of techniques new to me and to be honest I know this time I have gone over the top on weathering once again, this something I still haven't learned when to stop. Anyway, started the build and didn't want the bodywork in 'Endor brown' so decided on imperial grey, I wanted to try some chipping so primed cowling and sprayed with Humbrol silver and satin varnish. Once dried and Youtubeing for a couple of hour I decided on using the masking fluid method to create the chipping effect. The chipping went way to far and after weathering the grey is beginning to resemble more of an olive, that being said I thoroughly enjoyed doing it this way and will use it again. As far as I'm concerned if an Evil Imperial Empire cant even supply blasters that shot straight, what makes you think they can supply a decent primer! Regards John3 points
-
I'm not entirely sure of where to put this, but seeing as this is an aircraft mounted weapon (the mount will follow soon), I'm going to go with here, until the mods see a better place for it Anyway, I recently upgraded my 3D printer (an ultimaker 2) with a finer nozzle, allowing me to produce finer detail. As a project I decided to do a 1/4 scale minigun. I found one on 3D Warehouse (model therefor courtesy of a chap that goes by the name of Spoonkiller).. The model however needs a fair amount of work to make it printable.. The material I'm using is Faberdashery's robot silver PLA. Anyway, the work so far: The main housing: The clutch and delinker sprocket: Test fitted in the housing: The rotor, with lightening holes as found on the titanium version.. This is the part that really started to pose some printing challenges.. That is until I started on the bolts and their guides: Bolt guide.. I had to print these, as well as the bolts and feed chute links, on a web with five others: The bolts and bolt guides.. These actually follow the track in the housing: Rotor and bolts in the casing: 3D model of a (previous model) feed chute link. The ones that've been made have a central tab, longer connecting pins and the corresponding tabs have been moved further out slightly to ensure the thing doesn't disintegrate: And a section of feed chute, made up of workable sections clipped together: Overall I'm very happy with all this.. The parts are coming out beautifully, and require the odd bit of trimming, filling and sanding just like any other kit. I'm just making this kit as I go along. Oh, the parts don't just come clean off the printer. They require a fair amount of tidying before they're useable: Bolts being printed: Main housing:3 points
-
Hello everyone, my name is Oliver, 35 years old and this is my first post here on BM. May i present you my Revell 1:32 RAF-Typhoon. Build with Eduard Interior, Eduard Exterior, RBF and Seatbelts. Colors with Revell spraycans (i have no airbrush) After long time studing the walkways i build the Eurofighter in about 3 months hard work. This is my first build after a break of nearly 20 years, please go easy There where lots of problems with this kit (intake, apu, speedbreak...) But finally, i managed it. Now, its almost done (APU, cleaning and a glasbox for the aircraft) and my next build i started yesterday will be a Revell 1:32 BAe Hawk. Please feel free to critise as everyone learns from there mistakes. Enjoy the pics. Oliver3 points
-
Hi gentlemen the new progress ...in first , a dark grey is applied on the letters I do not know when I go the instaled as at my habits ,the railings are temporarily installed after have them formed, and drilled at each foot the ladder bars on the hull ,are glued and painted directly on the hull.railings are placed on a polystyrene piece and separately painted. an additional difficulty ,on the stern , the top of handrails was in wood. I represent the wood with Plastruc profiles painted in brown and glued with cyano .....a timeconsuming step but the result for me is fairly good the next step will on the bow see you soon best regards from France Nicolas3 points
-
I suppose so, but I'm surprised I'm the only one here who has an issue with it. This is a price hike of 14 to 26%, and only for a few different (not additional) parts and decal sets. In a time where there is zero inflation and most people's salaries have been stabile for some time, it's a decidedly strange move, but maybe the market will accept it. I have little interest in these specific kits and I'd rather buy their less expensive but essentially similar older brothers.3 points
-
On the home stretch... I'm getting a bit sick of this build now, which is usual for me as I add up the accumulated errors and compromises that mean it isn't turning out how you envisaged. After a month or two in the display cabinet I'll start to like it again after my disappointment focuses on some new project! Satin clear coat is now on, as are the undercarriage and drop-tanks. I have yet to add the missiles and paint the canopy, plus various final small details.3 points
-
Thank goodness there isn't huge demand for a new Titanic - pity the poor divers....3 points
-
Thanks John I'm in two minds over the Gunze at the moment (see below) but it does seem to spray and brush nicely Thanks Michael It's not me, it's Tim (The PlasticSurgeon) who suggested the MPM and Enzo who pointed me at this kit, mainly because it has the V1. I'm just following orders! Thanks Dave - this one's not for the bin, those suggestions were aimed at the MPM, but both are now nearing completion, thank goodness! I masked up using my currently preferred film and Panzer Putty method and, finally, sprayed something that wasn't grey: [/url A few bits of touching up required, then it'll be on with a coat of Klear before the transfers. Is Klear a good silk finish do you think? If so I'll de-mask the canopy too.3 points
-
Hi folks just off the bench. sorry for the poor pictures as the weather is not conducive. I will take better shots later.....finished OOB paints are gunze and custom mixed. A great kit with wonderful fitting....only areas to watch for is the wings, the nose light .....and that's it I guess really nice to build a 1/32 kit after so long. Got one more to get done as a Thai of Indonesia bird happy modelling mr b3 points
-
The (repaired) undercarriage fitted, along with the larger diameter tailwheel associated with land-based use in earlier Wildcats. The pitot is 10 thou guitar string, and the gun barrels are hypodermic tubing. The prop is ready to install, then I'll be on with a coat of matt ahead of doing the canopy, nav lights, aerial mast etc. Then wires, smoke and it's job done. End is in sight!3 points
-
Sprue shots from the A-7A As you can see, the cockpit will be from the Aires resin set. The same for the A-7D The sprues are subtly different. The intake assembly is different in each kit to cater for the twin Colt cannons on the A-7A and the single Vulcan cannon on the A-7D. Weapons fits are different, with the A-7A provided with a load suitable for an Iron Hand mission while the A-7D has more bombs than you can shake a stick at! And here we have the Aires resin cockpit components. Decals for both options came from Wolfpak sheets. A-7 decal sheets are somewhat thin on the ground. Hopefully the new sheets from Xtradecal will redress the balance.3 points
-
OK, Again a update. This will be the last update till next weekend?! I have to work again from tomorrow. There are some small things I had to do before I could put the wings on. The first one was a gap between the wheel bay and the rear fuselage. I filled this with a piece of plastic card. After this there was also the front wheel bay were ther was also a large gap. I also put some plastic card to correct it. This was the most annoying part of this build. Also the stabilizers had no tab to connect it to the fuselage. This was standard a but joint. I made a few holes and put some brass tubes in. There was also to do something about the cannons. This was original only 2 plastic tubes to put on top. I drilled two holes and placed 2 brass tubes as a replacement for the guns. That is much better. Here are two pictures of the inlets that were placed and the seam was quite good to be honest. I think it will just need a bit of Mr surfacer to blend it all in. And finally the last picture with the wings and stabilizers on. That is it for now. Cheers,3 points


.thumb.jpg.d17ff607fc7e89ed057e63fcb6f2a888.jpg)


This leaderboard is set to London/GMT+01:00