
Leaderboard


Popular Content
Showing content with the highest reputation on 28/09/15 in all areas
-
Hi everyone and as promised here are some pics from this finished build. I've included a link to the WIP thread if you hadn't seen it before and to recap, this all started with me asking fellow modeller and all-round good bloke Chief Wiggum if he considered building his Trumpeter TU-95 Bear as an in-flight intercept diorama. After almost 10 months and a lot of modelling heartache later (99% for Chief), here it is. We were absolutely thrilled and stunned to win Silver in the Diorama class at the IPMS Ireland Nationals with it as well as the 'People's Choice' Award as voted for by the public at the show... Honestly, we were deligthed! (I'm the one not smiling) While neither of us can make Telford this year, we're hoping to get the diorama there somehow for the IPMS Ireland Club table.....gonna need a big roof box Thanks for looking and any questions, will try to answer them! Cheers, Dermot and Barry (aka Chief Wiggum)18 points
-
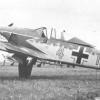
Here is a build i just finished a few days ago hope u enjoy Cockpit installed I decided with this kit to mask and paint the invasion stripes as i think they look better i normally start painting them before i add the cammo All major airframe parts all painted in base colours now ready for post shadding A coat of Future added and decals done and a pin was done Canopy masked and starting on painting under carridge prop and bombs etc All matt clear coat applied and ready for wings to be added Final pictures a very nice kit indead a joy to make and looks stunning Just waiting on a hobby master carrier deck base to arrive in post to finish her off Thanks for taking time to read hope u all enjoy looking at the build as much as i enjoyed building it14 points
-
Hi there, here I want to show another one of my models. It is Special Hobby's "Supermarine Seafire FR 47" in 1/72 scale. I built it in 2014. Kit: The Special Hobby kit is a wonderful short-run kit. A single-engine fighter aircraft in 1/72 with more than 100 parts, that's smashing! Original Aircraft: The Seafire 47 was the last produced version of the long line of Spitfire / Seafire versions of the legendary designer RJ Mitchell. The aircraft itself was put into service after the Second World War 1946-47 and saw except for the UN missions at the beginning of the Korean War no active hostilities. My model: My model representing airplane 178 operating aboard HMS Triumph (800° Squadron), coded VP461, during the korean war. "FR" in the model designation of the Seafire 47 stands for Fighter / Reconnaissance. Because my kit contains except fueltanks no wing loads (Special Hobby offers a separate Seafire-Kit with additional bombs and missiles), I decided to build up my kit as an aircraft in the photo reconnaissance role. Most delivered Seafire 47 were equipped with a photo compartment in the rear fuselage. One camera was looking horizonal slightly downward to the left or right side of the aircraft (the viewing direction has been set before the flight), another one vertically downwards. With built-in cameras, the aircraft wore basically no external loads with the exception of fueltanks. Construction: The Special hobby kit is not easy to build. Scratch were built: - cameras and compartment - landing flaps and wing structure - thermoformed rear canopy and many other small parts. The kit was painted with Gunze acrylics. Weathering: Preshading, postlighting, Tamiya Smoke for traces of oil and gas plume, various oil and pastell colors for dirt and wear. Top view: Bottom view: Details: I hope you like this model. Criticism, notes, and comments are gladly welcome. Best regards. Kai13 points
-
Haven't built a spitfire in years so here's my build of the gorgeous 1/72 scale MK22 from Airfix. Tailplane flaps and rudder were cut and re-positioned and since the canopy was to be modeled open the cockpit door was cut out too. Cockpit was detailed too but its not evident much in the photo. there is only very subtle weathering done to the exhausts and undercarriage. The fit issue with the nose was solved by trimming the sides of the front cockpit bulkhead a little.11 points
-
The X-wing is the Spitfire if the SW and the Y-wing is the Hurricane , at least in my mind! The Y wing is bigger and more rugged the X-wing , but not loved as much. Personally its my favourite ship. Bandai have done such an amazing job on this one. The detail is mind blowing. I did my usual Y-wing paintjob on this. White primer followed by a black wash , then an overspray with my own white grey mix. It was then weathered by airbrush with my own dirt mix. Not only did Bandai do great work on the models but on the Deathstar bases too. I love it.10 points
-
Good day, jentlemen! Let me present my next model "just from box".9 points
-
Following on from my recent posting of my DH-88 Comet and honoring my promise of posting more of my British models here, I would like to present my Supermarine S4 from the Aerotech stables. I finished this kit a fair while ago and it was my first introduction to painting a white civilian aircraft. The kit has been built pretty well from the box apart from a fair bit of work to tidy it up. Alclad paints where used for all the metal work apart from the spinner which I left as white metal although highly polished. Hope you enjoy, Eric.8 points
-
27/9 update: More decals. The air-brake decals needed some care and the cross needed careful alignment: A very enjoyable Japanese Grand Prix this morning8 points
-
Hello All, Just finished another one, WIP here. This was on the shelf of doom for a few years after I realised that the wings were not going to fit in flying position. So I'm glad to get it out somehow, and I had fun on the second leg. It's not the greatest kit in the world but if you want a Shark, that's it! Thanks for looking, Adrian7 points
-
Here is a kit that I completed a little while ago that I thought I should put on this site as well due to its very British flavour. It is the 1/32 Aerotech De-Havilland DH-88 Comet `Grosvener House' as flown by Tom Campbell Black and Charles W.A Scott in the Macrobertson Air Race, London to Melbourne, 1934. They won the race, winning with an elapsed time of 71 hours. During my research I discovered that one of the mandatory stops was at Charleville, Queensland. I have a personal connection with that aerodrome, having flown in to it many times in a DHC-8 and it was a stop on one of the 4 sectors that formed my check to line as a Captain on that aircraft. The Kit: Aerotech (Marsh Models) Resin/Photo etch/White Metal The kit represents the overall shape of the real aircraft quite well but needed some extra work to bring out the distinctive shapes that make this iconic aircraft into a sleek and beautiful racing machine. A lot of work went into applying the fabric effect to the control surfaces and aft of the rear spar on the wing. Similar efforts went into the construction of the canopy to replace the decal framing of the kit with real framing constructed from 43 parts of plastic card and aluminium foil. I worked on this kit pretty well every other day and it took 1.5 months from start to finish. I felt that the kit needed a new front instrument panel and as such this was Scratchbuilt. Here is a list of the mods that I did to the kit. Modifications: Reshaped Fin, Nose cone, rear of cowls, fuselage cross section Modified front of cowl. All fabric effects added with primer Scratchbuilt Front Instrument panel and canopy Seat cushions from Plastic card Aftermarket: RB Productions Sutton Harnesses Airscale instruments Uschi Woodgrain decal Paint and finish: Tamiya TS-8 Italian red (2 coats straight from the spray can) Followed by 2 coats of TS-13 clear over the kit decals and self masked and sprayed `comet'. General photos Pilots perspective Detail Photos I like to do a couple of comparison photos at the end of each photo shoot (hope you guys don't mind) 2 Iconic designs from the De Havilland company Aerotech kits: Challenging but oh so worth it! In its new home (this cabinet houses my 10 completions for 2014)7 points
-
thanks for the comments guys - much appreciated. Today it was the turn of the main rotor to be the focus of attention. It took a bit of wrangling but I managed to get all 10 pieces together without gluing..... Yup, 10 separate pieces - In my excitement a long while back I removed the kit dampers and decided to roll my own, thus allowing me (in theory) to change the angle between the blades. Once I had everything in place, drops of super glue were applied using the end of a needle - hopefully to hold everything in place. Everything that is, except for one of the BIM's which went walkabout during this exercise. Another BIM was duly made up and applied, and the rotor head handled with much care after this. While I was hacking things off way back - with no real plans for moving forward - I also hacked off the pitch rods as I thought the kit effort was a bit agricultural - of course, I forgot to write down the length of the pitch rods between the swash plate and the rotor head.... could one of you kind souls out there, please measure the kit part and let me know how long the pitch rods were ? (just the rod part itself - I can figure out the rest from there) The next sequence of events in Operation FInishTheDarnThingWillYou? was to figure out the winch position - and still allow me to have the trans deck door open. The door was blu-tacked in place over the winch frame, and the winch itself was bonded to the winch frame with 5 minute epoxy (btw - I'm still hating that Archer transfer stuff) This is the result of my first round of weathering.... so subtle you can hardly tell there's actually been any weathering! - I have .... honest 'guv! A bit of dry brushing over the steps and various sticky outy bits, and some Flory dark wash over things like the door frames, hydraulic fittings, u/c swing arm mounting etc. I am very wary of overdoing the weathering - as once that matt coat goes on, there's no going back. I'm probably going to wait a few days before I commit to the matt coat (or semi-gloss or whatever) just to make sure I am happy with the weathering - measure twice and all that!.7 points
-
Well, what a week this has been! An 800 mile round trip to investigate some malfunctioning equipment at a contractors only to have the equipment start breaking apart on me during the investigation - rapid trip back the the plant and headless chicken mode trying to find some replacement parts. It didn't help that the equipment was manufactured in Germany, thus all the fittings are metric and made from materials that we don't have "off the shelf" here. This necessitates yet another trip back up there next week once we have put the broken bits back together with (hopefully) new bits. Just to make things even better, a 6 and a half hour drive turned into a 9 and a half hour trip on the way back due to accidents and Popes! Wonderful. So, let's get things back to normal then. Where were we ? Oh yes, waiting on transfers.... Mucho gratitude goes to Bob aka Moaning Dolphin for sending me some Xtradecal ROYAL AIR FORCE letters in white, without which, this presentation could not have been possible etc. Mucho thanks Bob!!!! Once I had self medicated after the trip, I got down to some serious business - the business of sticking on transfers. The best option were the 4.3mm letters which fitted in just nicely. These were then microsolsetted into the offending Wessi. - Result! As with everything on this build, it's all going to be a bit of a compromise. The spacing of the letters in conjunction with the placement of the Hendie protuberance and the earlier scratched V drain from the beetleback means that the aerial (when it comes to be fitted) is not going to fit exactly where it should in relation to aforementioned scratched bits. Only a rivet counter would notice, along with all you lot who have just been made aware of said fact. However, I think my inner self will be satisfied that it is sufficiently Wessex like to pass the test. In a previous life I had attempted to build the tail rotor and all went well until I tried to paint the assembly - I made a pigs ear of it to be honest. Well, it had to be sorted - so that meant sanding it back again and starting from primer forward. Primer was slapped on followed by the main colors. Now the reason I had mucked up before was that I tried to paint the leading edges first and them mask them - that just didn't work. This time I painted the main colors then masked up to spray the leading edges.... here be the cross of tamiya. And I am much happier with the result this time around. The "silver" blade is actually a home brew of Alclad dull aluminum and Alclad Magnesium. - I found the magnesium to be too dark on it's own but the mixture turned out much better. The leading edges are Alclad semi matt (or semi gloss) aluminum. You can just see the difference in tonality on the silver blade. I then resorted to butchering some of the italeri transfers to provide the requisite coloring of said blades. Of course, they were too long and had to be trimmed back - Italeri would have you wrap the entire blade in reds and whites whereas the leading edges on the 1:1 are not painted. Of course I couldn't resist a dry fit..... The rotor was then given a coat of gloss to seal the transfers, and then given a misting of Alclad matt clear. You can just make it out if you squint hard enough.... I remembered to color code the blades at the root. In the continuing theme of getting all those fiddly little jobs out of the way I remembered I still had the landing light to finish.... well, start actually. I used a slice of styrene tube and a sliver of styrene sheet to make up the light. I figured that standard white paint would have been too stark against the black surrounding so I opted to use "aged white" which had a distinct yellowish tint, but I think it works in this situation. I then slipped a small glass bead in behind the lamp and glued it all in place. - Oh, and I finally remembered to fit the third (middle) bracket for the sand box flappy thing Now, I have heard great things about Archers transfers from many folks on this very website. People seem to rave about them continuously. Well, I spotted that Archers had some "anti-slip" resin transfers and despite the seemingly extortionate cost and against my better judgement, I gave in and bought some. I thought they would be just the ticket for the inside of the trans deck doors. Here's the result of my first foray into the world of resin transfers... not very good. I am very disappointed in this Archer stuff to say the least. This was the result of numerous applications of microsolettery and foul language. The two tattie bauchle shaped lumps on the upper door are actually two small "panels" of very thin styrene. The resin just won't settle around them at all. Okay, I can buy that - these resin transfers are obviously much thicker than your standard transfer - but the things just won't stick at all. I have since peeled the stuff back off and tried a second attempt. I also peeled of the panels and will try to replicate them by the addition of another layer of Archer stuff on top. I don't hold out much hope but we'll see... stay tuned for the next exciting episode. Soldiering on (or should that be RAFerring on... ?) I sprayed the airframe with Alclad clear coat - yes the same stuff that gave me problems earlier on - I figured that since I should not be attacking it with any more transfers and microsolset fluids that it may stand up to the abuse this time.... just some light Flory wash weathering. The blades were given a smattering of Flory's sand colored stuff which was then - according to this photo - mostly removed! Actually, I tried to leave just the lightest of streaks on the blades and it seemed to be working but when I coated the blades with the flat Alclad stuff, the "weathering" to all extents and purposes disappeared into the ether of modelers land. Believe me - it's there, but just very light and difficult to catch in a photo. While all the bulky things were drying / curing / having a day off etc I got back to basics - this time adding the small fold-down step on the starboard oleo. Looks about right I think. So, I am now at the stage of weathering the airframe. As soon as that is done I can get the undercarriage on and start fettling other bits, like the SACRU and all the brake lines etc. There's an entire spaghetti nest that falls out of that airframe at various points and I am going to try and replicate most of them - yes I am that stupid! I have now been at this adventure since November last year but I have a feeling that I'll have it finished before the next twelve months rolls around....7 points
-
Being a Draken addict, the old heavily weathered Danish Drakens have always been among my favourites. They are really hard to resist! More pictures: http://www.flickriver.com/photos/alfblume/tags/draken/ However, I have only built one, a RF-35 in 1/72, as a testbed. But this is a tiny one. Now it is time for a larger one! And this time it will be the fighter version F-35. The build is based in the Swedish edition of Hasegawa's terrific kit, but with the Danish/Austrian fin tip. Decals and pylons are from Maestro: I started with Aires' resin cockpit, and added scratch-built Danish instrument panel. Since this is my sixth 1/48 Draken, I am pretty familiar with this kit. So the main assembly went pretty fast. Normally Draken had closed airbrakes. However, I originally started this build in 2008, but never finished it due to a serious attack of AMS... Before that, I had spent lots of hours detailing the wheel bays with Eduards photo etch set which almost drove me mad. I also cut out the holes for the air brakes. So now i decided to finish them in a half-open position. One of the few problems with this kit (the gun cover parts and the air intakes being the others) is the fit of the nozzle. But following a tip from a fellow modeller, I first glued the nozzle on the upper body half, and then glued the body together- which gave a perfect fit! The small fins on the outer wings were the same length on Danish Drakens, while the Swedish ones had different length. Next step is sanding, mounting pylons and antennas, and soon it is time for primer.6 points
-
I promised Edgar that I would post my build here after he shared his Supermarine factory drawing information on the Spitfire PR.XIII that hints at Sea Grey Medium and Dark Green as the proper colors. I did my best to match the underside PRU Mauve to the Munsell matches quoted elsewhere in these forums. I hope you enjoy! - David PS: I still have to mix up another batch of Mauve for the pitot...6 points
-
This kit was initially started by a fellow Aberdeen Modeller Society club member who sadly passed away before he could complete it. With the airframe substantially completed by John straight from the box I did a few small additions to the cockpit by way of a throttle and its operating cables, some seatbelts, then added a gunsight which was missing from the remaining parts. John had built it with the intentions of folding the wings so I honoured his intentions but added a slight twist by setting one wing in a partially unfolded position with the stay scratch-built from brass tube, piano wire, then some plastic rod details. The decals were also missing so I used those from my own kit; must remember to request a new sheet from the Airfix parts department. The kit is now finished but that's only half the story as I'm currently trying to modify some figures from Airfix's RAF ground crew into the Royal Navy deck crew who will be unfolding the wings. The two characters on the upper line go above the wing while those on the lower line will be arranged below the wing. Still plenty to do to correct their uniforms and position arms, heads, hands etc but hopefully you get the idea.6 points
-
welcome to my latest project a Tamiya 1:32 F4 phantom II on a base of an aircraft carrier .The plane is painted in the warlords colour scheme , I found this kit to fit together really well . the catapult was made from plastic card and elastic cord . I took a few of the picture's by putting the base on a hedge and getting the sky as a back ground it seemed to give it some realism.6 points
-
Hi, My latest builds, three Az model kits. The AZ model kit is excellent, apart from the "skinny nose" . The "in progress" here : http://www.cartula.ro/forum/topic/13705-serbanescu/6 points
-
This is the Airfix Gladiator, finished in Land Tropical (LT) 3 colours (dark sand/red sand on the lower wings and fuselage, dark earth/dark red sand on the upper parts) with markings from the Xtradecal set 72182. This aircraft was flown by P/O Percy Oliver Valentine Green, and the whole of 112 Squadron was involved in fairly intense flying and fighting against Italian aicraft during the East African campaign. P/O Green claimed a Caproni Ca.133 shot down on 1st August 1940 whilst flying this aircraft. She was finally written off on 22nd December 1940 in a take-off accident (pilot at the time not known). Green later flew Hurricanes, was shot down and captured in North Africa and survived the war. She's built pretty out of the box except for added details in the cockpit and the rigging, which is 1.1lb BS fishing line. The base is my standard scrap of airfield, with a bit of soft sand scrubbed into the grass. I have no idea what the exact conditions at Summit in the Sudan were, but I would imagine they were arid at best. Here's a view of the underside. I can't think of a good way of doing this. It shows the tyre grot and gunsmoke though. Other side, with gunsmoke again, and a view of the upper wing colours. All the paints were mixed using Tamiya acrylics. Atmospheric shot of the plane ready to go after Italian intruders.6 points
-
Following my MiG-15UTI and MiG-17F I've finished Trumpeter's MiG-19PM. The nose from the windscreen forward was replaced with a resin correction from SBS Model and the decals are by High Decal Line. The finish is Mr Color 8 Silver. Full story at http://jonbryon.com/MiG19PM.html. Comments welcome Thanks Jon6 points
-
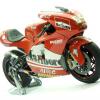
My MB-326, built out of box and brush painted, all comments welcome as I would love to know if I am improving. Thank you all.6 points
-
evening folks Bill - that makes me very happy - I like sharing what I learned in forums like this! well GMK, that is very timely as I was interested in this too keep watching... ah, the reason you are puzzled is because you know what you are talking about, whereas I, just make it up as I go along - my mould / vacforming sojourn need only be viewed as a play school version of what grown-ups do when any actual vacforming needs to be done - I will be following all this great advice in future so, today was for me what I think I would call a seminal moment.. ..I had been looking forward to getting a cowling done as everytime I did a little dry-fit and photoshoot of the model, it just didn't look, well, purposeful, like a Tigercat does.. with a cowling it was like adding the x-factorl, it just made me think, yep, that looks like an F7F.. more of that in a minute.. I added all the nose panels on the cowling and was pleased how they came out after a bit of filing, sanding, and wire wool.... ..how ever much I tried to stay on the panel lines, I couldn't at the back and needed to neaten this line up - I fixed my pencil on some bits on my bench of appropriate height and just spun the cowling round on it's nose to leave a nice neat line to cut to... ..I used a thin strip of Dyno tape on this line to guide a fresh scalpel blade... ..I added a mock-up strip to the rear of the cowling so I could see what it looks like in relation to the nacelle, and to make sure I got the size right... ..I also checked it in relation to the 3D printed engine core I designed - it seems to fit though I think there may be a depression in the inner cowling fairing to allow for a carburetor shaped thing (not seen here) so need to check that... ..otherwise seems ok.. ..and finally, the bit I most enjoyed - putting it all together and thinking I was really starting to get somewhere... there - milestone achieved now it is months of detailing nacelles, engines, U/C bays etc - reminds me, I still haven't worked out how I was doing the engine cylinders - I have a master somewhere.. until next time TTFN Peter6 points
-
Another pair of Spitfires. Firstly the new Airfix Vb with the Silver Cloud floatplane conversion. Finished with Xtracrylix and a brush. Next the new tool Airfix Mk.I. Lovely kit albeit a bit complex.5 points
-
Just a quick post to gauge opinions on my latest modelling work. They are three 1/72 revell red arrows hawks. They went together with no trouble at all. The only issue I had was with some gloss varnish turning the paint pink. I put some all pupose cleaner on it and it cleaned it up for more coats of the humbrol arrow red. The smoke trails are cotton wool glued to some acrylic rods. Let me know your thoughts! EDIT: wow didn't realise how bad my phone camera was up on a laptop screen! Here are some better pictures! and next to the 1/72 A400M..5 points
-
This is my Pitts S-2A built from old LS kit in 1/72. Built from box and brush painted with Mig Ammo. Hope you like, and all comments really welcome for this one.5 points
-
Hello, here is my latest work, the Revell 1/72 Scorpion. I hope you will like it. Thanks for looking.5 points
-
Hi, here's my current wip (for a GB on Flory Models). Somehow I have managed to delete my in progress pics for the hosting site, sorry! Anyway it's the excellent Tamiya kit with Aeromaster decals. For some reason the image appears rather large on my preview, if it's too large can somebody help resize please?5 points
-
Hi folks This is the next which was build OOB ...the new hobbyboss kit. Too many parts and lots of fiddly bits in my opinion....but builds up nice rgds mr b5 points
-
Here's how this one ended up... Base all prepped and ready for the cloud image...we re-drilled one of the forward mounting holes for a better side-on view of the Bear.. The image was printed to A1 and mounted on thin foamex board by the nice printer people. They also encapsulated the top (like a laminating process) so that it's a nice, shiny finish which should be more hard wearing than if it were plain paper... And with a suitable home made sign and the models added, it was finally done....about 10 months from when we started and just in time for the IMPS Ireland Nationals.. I'll post some better pics in the RFI and link from here. Thanks for all your comments, suggestions and encouragement - this was a build with lots of ups and downs but we got there in the end! Cheers, Dermot and Barry5 points
-
5 points
-
Fujimi 1/72 Ju87B-2 T6+HL, Wk Nr 5580 of 3/StG2, St.Malo, August 1940 The aircraft represented here was one of four Ju87s of the 3rd Staffel of StukaGeschwader 2 that were shot down on 16th August 1940 while carrying out an attack on RAF Tangmere. The pilot, Uffz Ernst König and the gunner Uffz Josef Schmid were both wounded and taken as prisoners of war. Build thread is here Cheers, Stew5 points
-
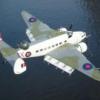
First post from me in a long time, first completed model since returning to the hobby (for about the 5th time, but I think I'm back for good this time) and my first ready for inspection on here. This is the Amodel 1/144 Tu-104A with Boa decals. I started it as an antidote to the frustrations of the Kinetic Sea Harrier (I don't think there are any two parts in that kit that fit together without some fettling). You might think an Amodel kit is an odd antidote to anything, but I really enjoyed this build. Yes it needs work but I don't mind that as long as I'm expecting it, and it was a very satisfying kit to finish. It's got thick trailing edges, everything needs a bit of work to fit together, but the plastic was good to work with and it was never frustrating. The windows are pretty horrible but I was using the window decals from the Boa sheet so that was fine. It's far from perfect but I'm happy with it. A few more firsts: First time I'd used Mr Surfacer (loved it - how has this stuff passed me by all this time?) and Alclad (also loved it, although it really does show up the flaws, such as some of my ham-fisted attempts at rescribing panel lines). First airliner I've built in about 20 years. First Amodel kit and won't be the last. Amodel Tu-104A 2 by Julian Griffiths, on Flickr Amodel Tu-104A by Julian Griffiths, on Flickr4 points
-
Hello All, I recently dug my Revell Albatros DIII out of the stash to compare with an Italeri SE5A+DIII boxing (thread here). The Revell kit is quite nice, but has an inaccurate fuselage, being too rounded and too thin. Since I had the box out I thought I would make the kit, to go with my Airfix DVa. Here are the parts: Ignore the "1981" stamped inside the fuselage - the mould dates from 1963. You can see the pinched rear fuselage very clearly here. The new print decals are for an example flown by Werner Voss, although I note that the clockwise swastika has been replaced by a simple cross. My solution to the fuselage problem was to file the sides flat and provide new plastic card sides to form the basis of the slab-sided look: I needed a new interior to replace the pilot-on-a-stick. Here's one made from plastic rod and card, stretched sprue, wine bottle foil for the seatbelts and paper for the chair back. The engine has been dressed up with new valve gear and inlet pipes, and I've drilled a hole in the exhaust. I will cobble something together and paint it black to support the propeller and engine. Having built the interior, I could stick the fuselage halves together, add the sides, and add dorsal and ventral spines to get the right profile: Then on with the two-part filler (I use Ronseal wood repair filler - very (too) fast setting) and sand away the bits that don't look like a DIII. There it is next to the Italeri fuselage (which is almost exactly the same as the Revell), to show how different it is: The paint is not my wood effect - it's merely a quick coat to expose any flaws, of which there are many! Thanks for looking, Adrian4 points
-
HMS Queen Elizabeth 1941 1:700 Trumpeter HMS Queen Elizabeth was the lead ship of a five-strong class of Royal Navy super dreadnoughts commissioned between 1914 and 1916. At the time of their commissioning they were amongst the most powerful ships afloat, with their main armament of eight 15 inch guns a considerable improvement on the 13.5 inch guns of the preceding Iron Duke class. HMS Queen Elizabeth herself was laid down in the Autumn of 1912 and entered service just over two years later. Almost before her paint was dry, she saw action in the Dardanelle Campaign but missed the battle of Jutland owing to a period of planned maintenance. She was rebuilt during the mid-1920s and again between 1937 and 1941, when a tower bridge similar to that seen on the Nelson and King George V class battleships was constructed. Her 6 inch guns were also exchanged for 4.5 inch guns and extra anti-aircraft armament. During the Second World War, she was based in the Mediterranean, where she was damaged in an attack by Italian frogmen. She retreated to Norfolk, Virginia for repairs, finally rejoining the fray in the far east prior to being paid off at the War's end. The release of this kit marks another important step in Trumpeter's campaign to fill in the blanks left by other manufacturers in the world of 1:700 scale warships. In fact thanks to Trumpeter (and collaborators Pit-Road) we now have kits of all five Queen Elizabeth class battleships as they appeared at various points during the Second World War. In typical Trumpeter style, the kit is tightly packed into a top-opening box, with each sprue is individually wrapped and delicate parts protected with strips of foam. As usual, the tiny decal sheet has the protective paper taped in place, which can make if difficult to remove the decals from the sheet further down the line. The kit parts are spread across nine sprues moulded in grey plastic and a couple of small sprues moulded in clear plastic which hold parts for the aircraft. The upper hull and decks are moulded separately, as are the the lower hull and waterline plate, both of which are replicated in dark red plastic. A small fret of photo etched parts is included, but rather disappointingly it doesn't include alternative parts for the deck cranes, meaning you are stuck with the nice, but comparatively clunky plastic versions. I like the fact that Trumpeter include both full hull and waterline options in their kits and can't really understand why other manufacturers don't do something similar. Construction begins with the upper hull and deck. The deck planking is represented by recessed lines, which are probably overscale but should hold a wash well. The deck is split in two as this class of battleship featured an extended forecastle. The upper hull has portholes and other details moulded in place. Trumpeter suggest that the 15 inch main guns and 4.5 inch secondary guns should be assembled and fitted at this point, although I'd be inclined to avoid fixing them in place until the end of the build. Two different options are included for the main guns, leaving you with a choice as to whether to opt for blast bags or articulation. It's good to see the blast bag option as I've had to make my opt out of Miliput before now and have found it to be a bit of a pain in such a small scale. Trumpeter have made use of slide moulding throughout this kit, and the tower bridge is a good example of this. The basic structure is made up of a single part, seemingly without any compromise in terms of detail. In contrast, smaller details such as the rangefinders are made up of multiple parts, with a seriously impressive level of detail. The aforementioned deck cranes are plastic only, which is disappointing, but hopefully you will have the choice of replacing them with generic or specific photo etched parts from one of the aftermarket specialists. At least the funnel cap is replicated in brass, which is a nice touch. The aircraft hangars are nicely detailed and, if you want to finish one or both with the door open, you can simply cut the corresponding part away. On the deck above the hangar there is space for a handful of boats and anti-aircraft gun positions. The aft superstructure is the last major sub-assembly to be completed, and is made up of the structure itself, the rangefinder, mask and several smaller details such as anti-aircraft guns and searchlights. Once all of these sub-assemblies are complete, the whole ship can be assembled relatively quickly. If you choose to finish your model in full hull configuration, then now is the time to fit the propellers shafts and propellers to the underside of the hull. If you want to finish the model in waterline configuration, then you can just stick the waterline plate in place and call it done. the latter, you can just stick the hull plate on and call it done. The only remaining task is to build and fit the Supermarine Walrus aircraft. Conclusion If you'd told me a decade ago that a major manufacturer was not only about to reinvigorate the 1:700 ship modelling scene, but also produce kits of all five of the Queen Elizabeth class battleships, I would have thought you were a couple of carrots short of the full allotment. That just goes to show what I know though, as all of those things (and more!) have now come to pass. This addition to Trumpeter's range is a nicely produced and superbly detailed kit, with high standards of production. My only real gripe is the somewhat parsimonious approach to the photo etched parts. I don't mind providing my own railing, but a couple of deck cranes would have been nice. That's a minor quibble though, and all-in-all this is a great package. Highly recommended. UK Distributors for4 points
-
TAKOM 03.10.2028 CHIEFTAIN Mk.10 British Modern Battle Tank I have been fortunate to have received an advance release of TAKOM's new Chieftain Mk.10 Within about 20 minutes of it's arrival I had commenced this build Ssssh! Don't tell anyone BUT? ...................... It's an absolute corker! The large kit box measures in at 380x250x85mm and weighs about a kilo. Molded in a light grey plastic and with chunky sprues the parts have good sharp detail. Care will definately be needed removing the parts from the sprues. The plastic is 'a little' soft but Tamiya Extra Thin Cement will be my glue of choice and so-far, it's working fine. It should be noted that although this kit is not necessarily for the beginner, it is not going to be hard work - at least so far? You will need a fresh, new blade in your scalpel. The Photo-Etch parts are very fine, detailed and though there looks a lot, there are some large pieces. The instructions follow the newer exploded CAD view and come in 22 sections across 13 pages. A noticeably smaller manual that would normally be expected. For the Mk.10 you have to remove a few pre-molded parts like the bullet splashes around the drivers compartment. I used my micro-chisel for this. This Guys, is a dream build as the parts generally just fall together - kinda Tamiya Quick! The Stowage Bins though intricate in reality are perfectly atuned to the model builder and the PE is super-fine, so easy to fit and no messing about. The detail is solid and safe with only 2 plug grab handles (like you get with Tamiya) on the searchlight housing. A simple cut off and replace with wire took a couple of minutes. The engine deck grills comprise 6 major parts and 16 assorted PE handles (3-types), easy peazy! Up to now, I have expended some 10 hours on this build and I have a couple more to go before I move on to paint. This will be camouflaged in the Berlin Brigade markings - some serious masking off! This model WILL be on display at the Newark Show on 11th October This is a build summary as I have been doing progress posts on my Club Facebook page I have also done a full build blog on my Club website here, should you choose to take a look.4 points
-
Hi all, A few photos of my latest project. I used the Monogram F-8E as the basis of this conversion into a 'Charlie'. The only aftermarket items were the seat (Aires), decals (Furball), 'Remove Before Flight' tags and a couple of AIM-9Ds from the Academy F-4B. regards Andrew4 points
-
Hi all,just fancied a quickish (maybe a couple of weeks anyway) build just to keep in touch with my 1/72 side so swapped my eldest a kit for this as I only have a couple of 1/72 small kit,s in the meager stash,It,s the old Matchbox kit which accuracy issues aside was one of their better mold's.the cockpit is none existent so a bit of scratchbuilding will be needed just to "busy" it up and It's been a while since I did a biplane.Finish will be for an aircraft that attacked the Bismark flown of Ark royal. the box: The spru'es: and a shot of the fuselage: and my only other bi-plane to date,Revell's old Nieport with streched sprue rigging which I will be doing on the Swordfish.4 points
-
Thanks for the good wishes, everyone. He'll be our first. I won't lie that I'm very nervous about it; I had a weird upbringing and ended up running away from home (as did one of my two sisters, so it isn't just me), and while I am now on pretty good terms with my parents, this weighs pretty heavily on me of late. One hopes to do the best one can, but I certainly know from my own experience that there are things that I can never be fully prepared for or hope to catch. It's incredibly frightening. What would I do to protect this person who I helped to make, and who I've never met? What wouldn't I do? Just watch me, I guess. I am excited for some things, but they're so far in the future it seems almost unfair to have expectations: watching bad movies together; showing him Star Wars (the real ones only, thanks, none of this new crap) for the first time; building a model with him; showing the film Battle of Britain; watching him discover history and hoping he'll feel the same deep love for it that I do, or even if he doesn't, that something bigger than he is will still catch his breath and move him with its power and beauty some day, and being there to see it. It's a lot of work to do, and he's a limited-run kit, short mold. Only one in the world, you know. Hopefully I get to meet him soon.4 points
-
Thanks everyone for the kind words and to Dermot for all the encouragement on a tough build and for keeping you all informed and up to date on progress.absolutely stunned to win the "punters" award..made all the effort worth while4 points
-
Was there ever a kit more in demand?4 points
-
Here's a quick share of a photo I took of tonight's 'Super Moon' from my back garden in France. No telescope was harmed in the taking of this photo. Just a Nikon DSLR, a 300mm lens and a 2x teleconverter. Hope you like it!4 points
-
Soldering is definitely a useful skill to have in the modelling armoury. Its not difficult, it just needs a bit of practice. All you need is a soldering iron (I'd recommend a 25W one), some flux cored solder and flux paste.4 points
-
Hi guys, I call it done, whatsoever. It was my first effort of 2015 and it was my first model finished by airbrush in 15 years. Critique welcome of course, but I know where it's lacking. The Kit was the Hasegawa one. I thought it to be abit tricky, but detail and fit was probably above average. Except for the canopy, which was the horror. There are enough reviews about that. (Ill fitting frame, seamlines on clear parts). I thought I wouldn't build one again. Now I want to. Next time a Marines version The picture quality was bad even though I took them in broad daylight. Need to buy a decent camera. Or a photo booth. I adjusted brightness and contrast but I don't know how it turned out for the most of you as the pictures look really different on my PC vs. Laptop. For the techniques I basically just did some pre shading. After that I applied the dark sea gray I think. After that I applied a very very very dark sea gray, mixed with black, just to figure out that it was way too dark. I then reapplied a dark sea gray with only a drop of black and I think it turned out a little better. Don't worry anyway, it was more of a test shot. The colors, compared to the real one, are just wrong. I think the dark upper side was supposed to be DSG already. Whatever. I'm happy to have finished this one. Thanks for watching. cheers, oh by the way, here are some of the "late" work in progress shots. http://www.britmodeller.com/forums/index.php?/topic/234981614-no3-squadron-harrier-gr7-hasegawa/#entry1982407 Here it is!4 points
-
Thanks for the comments guys. Rodders, If you live in Australia, particularly the east coast then you might get lucky..... Not much of an update today, as I spent a bit of time chasing down the lighting system that will hopefully depict the 4 exhausts in reheat. Have a solution on its way to me via the post. I also spent some time looking through a section of the hobby shop that I am not very familiar with at all, being any other area that isn't 1/32 scale to try and track down a suitable solution to my desire to have a full compliment of flight crew in this model. Unfortunately my search online for `1/48 British Airways pilots and flight engineers figures' provided 0 results, so it was up to me to make it happen. I found this Revell kit. It had a few items that I reckon could be of use like trousers, dress shoes, heads and hopefully some other stuff I could adapt. I have never modeled figure before so this was always going to be a learning curve. Using a new No.11 blade, I was able to carve out a tie, epaulettes, pockets and belt on the torso/chest and also modify the head to depict the headset headband. I then fitted the microphone and ear cups from plastic card. I then modified some legs and arms to fit the captains position. I will cast copies of the body so that I can use it on the other three crew positions and then adapt other arms to suit once I can identify where each crew member would have had their hands at the point of rotation, To add some difficulty I will also give a couple of the crew members short sleeved shirts. Here is a mock up of the Captain. I have to do a bit of filling on the gaps in the arms and elbow where each part has been cut to reposition it.4 points
-
Thanks guys for all your Advice. Well started at last on the Victory again. First picture of the main/proventer stay's, with Mouse and eye. Next the last deadeyes for the Mizzen lower shrouds. My friend has been busy with the sails. They will still need tie's and blocks to complete. Nice to be back on this project. Cheers Foxy4 points
-
Well I had a bit of an interesting weekend... On Saturday I got to sit in on a CPL student's check flight with the flying club and I learnt a few things about managing different in flight (semi)emergencies. After that, I had a superb flying lesson (where I managed to fly the whole flight pretty well) before I found out that my train was cancelled so I had to cycle 18 miles flat out to catch my connecting train (which I did, with 1 min to spare). Anyway, I'm sure you'd much rather hear about work on K5054. It's about 99% finished! All I have to do is add the rudder actuating rod and paint on the nav lights, here's a few photos I took this morning. Thanks for looking Ben4 points
-
My new Ta 152 H-0, Zoukei-Mura 1:32, ....completed.....(because of the bombing, the 152 could not be pre-painted) ...I hope you like it.... Regards Klaus4 points
-
Hi and thank you all for your praise and interest - this whole build was originally founded on my son's interest in the Vikings TV series but he seems to have lost interest in making the kit and left me to it for the last few months. I've given you some more pictures below of where I am - I decided to leave the attachment of the sail until the boat is seated in the completed diorama sea base. I used the last of my plaster of Paris to fill the bottom of the base and found a use for the big tub of tile adhesive that has been kicking around for years and dried fast in yesterday afternoon's sunshine I will be adding carefully sculpted waves using Vallejo clear water effects, foam and snow effects and some clear mastic later this week Thanks to you all for your kind words and interest - John. Gangplank and spare sail guide/tack poles stowed on the Oars T bars When at the tip, always grab some useful timber for the next diorama base It's going to be a bit of a challenge submerging the hull and oars into this so I decided to leave an area for fine detailing once the majority of the sea base is ready - I'll blend the sea area around the hull into the previous work once I am happy with things The tile adhesive is far better to work with an plaster of Paris as it is sticky and lifts back upwards on a pallet knife rather than settles flat - this mass will be fine tuned and built up with mastic and Vallejo products this week. So, not a very exciting update but it's here for those of you who have remained loyally interested and just in case you wanted to see how I go about modelling water (I'm no expert though) Thanks and bye to you all for now - John3 points
-
LZ-FLA, An-26B of Bright Flight LZ-FLA An-26, Birmingham Airport by Radleigh Bushell, on Flickr UR-CKM, An-12BP of Cavok Air seen arriving.... these two were 20,000iso, f/5.6, 1/13 & 1/20th.... If I had a better lens they would be a lot better but I'm happy with how they turned out seeing as it was fairly dark, lit-up by horrible orange ramp lights! UR-CKM An-12BP, Birmingham Airport by Radleigh Bushell, on Flickr UR-CKM An-12BP, Birmingham Airport by Radleigh Bushell, on Flickr Thanks for checking in3 points
-
Well, the painting is all but done. I am now waiting for it to finish drying, then I'll put it all together and then decal it (once they turn up that is) I leave it to you to judge whether or not it's good but I'm pretty happy with how it's all come out and looks like I had in my head. Well, that's it for now. The next update should be the finished item thanks for looking MH3 points
-
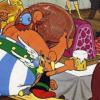
The Arabia is finally complete! Bob3 points


This leaderboard is set to London/GMT+01:00