
Leaderboard


Popular Content
Showing content with the highest reputation on 08/07/15 in all areas
-
Hi all. About a year ago I finished Kittyhawk's Jaguar. I've allways loved the beautifull lines of the Jaguar so I just had to build it. Well, at least I was warned about some fit issues, so I was warned. Now that's quite an understatement. You really have to dry fit each and every part because of the poor fit of most parts (a few fit perfect btw), the kit is massively over engineered and the parts breakdown is simply idiotic in some places. I can imagine that modelers abandon this project or simply toss it in the bin. After I finished the model I found out there are several mistakes in the kit as well. That is something I don't really care about. It looks like a Jaguar, so it is a Jaguar. Aires cockpit set, Master pitot tube and Flightpath External fueltanks were used. The landing gear was detailed and the pylons were rebuilt a bit to make them a bit more like the real thing. Model was painted with Gunze and Alclad, weathered with Mig Productions dark wash and finished with Testors dull coat. Enough said. Here are the pics. Hope you like them. Thank you for watching. René20 points
-
Hi there Although I have been on BM for a while now, I thought it was about time that I actually posted a picture of one of my models. The photos below show my recent completion of the 1/72 Airfix Gloster J-8A which Airfix informs me was used by the Swedish Voluntary Air Force in Finland in 1940. I just liked the skull and crossbones! The colour callouts in the Airfix kit are very handy as they are drawn to 1/72. Tracing the callouts and then transferring to Tamiya masking tape makes the camo scheme just that bit easier to apply - it still seems to take a long time compared to the actual paint spraying and unmasking... Rigging was done with E-Z line and I used Deluxe Products' Snow Flakes for the base. Regards Richard C19 points
-
Hello Everyone I am posting these pics i took ( in my kitchen !) on behalf of a fellow club member Roger C , we both belong to the Bendigo Modellers Guild an undemocratic bunch of die hard's and stash accumulators located in the Goldfields area of central Victoria, Australia ( Straya to us) Roger came to our group around three years ago, i am sure he will very much mind me saying he is a young 70 year old that spent his youth wandering airfields in Britain where he was born, spotting ,recording, and riding motor bikes whilst also picking up the fairer sex in his sidecar, ( hope Jenny aint reading this !) Roger got back into modelling around three years ago , something he had not done much of at all since his teens , when we first met him he had a real thirst to build Aircraft models especially those he had seen fly growing up, and soon decided that the correct scale was one most gentlemen prefer.... 1/48 ( quite right !) he then set about learning seam filling, using etch, weathering, and conquering the airbrush, his appetite for completing models and doing so in record times is legendary, for example its not uncommon for him to have around four models on average completed at each monthly meeting and his standard has grown in leaps and bounds fed by his enthusiasm his credit card and shared cups of tea with me , obviously in equal proportions ! A little while ago over a cuppa he told me he had visited a local model store and had purchased a 1/24 scale Airfix Stuka !!! and asked what add on's i could reccomend ! well.... after the ambulance had left and i was feeling better i said i am sure Eduard do an etch set for it and you will need some swastika's for the tail, The rest as they say is history and here is his lovely model, he did give me a few notes which are set out below...... sorry for the novel i have written Rog !, An ancient kit which showed its age through heavy sprue gates and flash, each part needing heavy sanding and, obviously, test fitting. Randomly numbered parts, [eg part no. 5 adjacent to part no. 186] spread over 5 heavy sprues, made part identification a time consuming process. ( don't ya just love that) In addition, sprue size made space an issue. Anyway, the build went together well, although some contact points needed strengthening with wire for safety. Cockpit and engine bay RLM 2 over cockpit green, dry brushed aluminium and tarted up with various bits'n'pieces, sundry wires and pastels. Engine bay enhanced with wire from the guts of an old telephone. Cockpit seat belts from Eduard Luftwaffe seatbelt set, gunners belts from Tamiya tape with leftover buckles. Canopy masking with Tamiya tape [i enjoy masking canopies !!! A most restful pastime] Landing light backed with kitchen foil. Radio aerial from Ezi-line with white glue insulators. Swastikas from Xtradecal Luftwaffe Swastikas sheet No X32002, remainder were kit decals. Paints - Vallejo Model Air 65/70/71 with desert scheme of a mix of Tamiya Desert Yellow XF59 and Red-Brown XF64 cos the call-out of Tan [RLM79] looked too pale against photos. Gunsmoke and underside - Tamiya Smoke X19 Varnish - Microflat and Vallejo gloss Panel lines - Tamiya panel line enhancer which refused to run over decals. Dirtying it up - sanding stick, dry brushing, pastels, chalks. Pretty satisfied with it, and for an old kit, it makes an impressive addition to the model shelf The Lad and his model http://http:/ / http:// http:// http:// http:// Cheers All !16 points
-
Nice kit to build (not to mention big!!!) I added a few bits of extra wiring to the engine (although not much - the engine is pretty much out of the box) and the gun bay for interest. Added extras are fabric seatbelts and airscale(?) cockpit details. The only problem I had with the kit was having to sand the seam line off nearly every part. Also the landing gear is weak. I decided to open a couple of panels to show off the cockpit and oil tank. Did I mention that it is a big kit?? IMG_20150708_171713 by Richard Page, on Flickr IMG_20150708_171730 by Richard Page, on Flickr IMG_20150708_171808 by Richard Page, on Flickr IMG_20150708_171835 by Richard Page, on Flickr IMG_20150708_171934 by Richard Page, on Flickr IMG_20150708_171943 by Richard Page, on Flickr IMG_20150708_172000 by Richard Page, on Flickr IMG_20150708_172100 by Richard Page, on Flickr IMG_20150708_172140 by Richard Page, on Flickr IMG_20150708_172202 by Richard Page, on Flickr IMG_20150708_172428 by Richard Page, on Flickr IMG_20150708_172511 by Richard Page, on Flickr IMG_20150708_172546 by Richard Page, on Flickr IMG_20150708_172618 by Richard Page, on Flickr15 points
-
I'm posting this for my friend Paul, he is having issues getting on line. "The kit seat and main decals were replaced with aftermarket items.The ladder was scratch built.It does look a bit industrial but I hope it just adds a little interest to the finished model.Thank you,Canberra Kid,for your computing skills once again in setting this post up for me.Happy Modelling to all the Viewers." John11 points
-
My first 'ready for inspection' on Britmodeller, this a model I started over the Christmas break and just about finished a few weeks ago (although there are still a few tweaks I could do to it): A Westland Rotodyne FA-1, i.e. the larger Rolls-Royce Tyne powered potential production variant, also previously called the Fairey Rotodyne 'Z'. I've chosen to model it as if it entered RAF service in the late 60s, perhaps to meet NATO Basic Military Requirement 4 (NMBR-4) of 1962 for a V-STOL Tactical Transport. I've designated it a 'C.1' on the basis that the RAF would have classified it as a fixed-wing aircraft, thus allowing me to use the fixed-wing tactical transport colour scheme of Dark Earth/Light Stone over black which I prefer to the then-current helicopter scheme of dark green and dark sea grey. I used the David Gibbings book on the Fairey Rotodyne as my main reference - most of the design follows the proposed plans for the FA-1, except that the wings are slightly stubbier and less tapered than that design. This was because the wings use parts from the Revell Transall C-160, which is also where the engines came from. The rest of the model is based on one-and-a-half of the Airfix kits (the half being an incomplete kit I bought on eBay!), with the fuselage suitably lengthened (the easy bit, using a section from the spare fuselage), and also made a scale foot wider (4mm plastic strip between the two halves) and taller (two 2mm strips, above and below the windows), to give the right size fuselage. The interior was also detailed with parts from the C-160, including hanging seats on the fuselage walls that obscured most of the view through the windows. The nacelles are a combination of the Revell ones melded into the Airfix parts at the rear. The rotor blades are suitably lengthened, and at the tips I've portrayed the nine-jet silencer system that was tested at White Waltham before the project was cancelled. I used the Airfix cockpit, although the plans for the FA-1 showed a slighter bigger cockpit. after loading trials in the early 70s for the then-new 105mm Light Gun and Forward-Control Landrover: and a few more photos here: http://smg.photobucket.com/user/TimV69/library/Models/Airfix%201-72%20Westland%20Rotodyne%20C1%20XS744?sort=3&page=1 Tim11 points
-
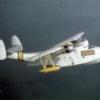
Dear colleagues, I continue the theme of unrealized projects of Luftwaffe. This time it is the main Germany fighter in float version, which has not been built in the metal. The model uses only floats and idea from A-model and a fuselage with the wing of Bf109F-2 from the Russian "Zvezda".11 points
-
Hi everyone, as I explained I am a newbie to this site, but have been model making for a long time. I normally make military vehicles, but now and again I have a brain storm and make an aircraft. I fancied doing a Buccaneer in Gulf war colours, as they got really dirty and weathered in service. I have never weathered an aircraft before, nor have I done the pre-shading bit before either, so thought I would have a go. Of course we all know that the Airfix kit is pretty bad, it takes a lot of filler, rubbing down, patience and perseverance, but we got there in the end. It is sprayed with Humbrol 250 desert sand (or desert pink as it is sometimes known as). The weathering was carried out by using Humbrol washes, weathering powder and some artists oils. The panel lines were done with a pencil. Cheers, Laurence Member of IPMS Abingdon.10 points
-
Hi everyone! This is my MIG-29 (9-12) Fulcrum of Italeri in 1/72. This was a beautiful kit to build, good fit, overall very accurate and detailed. I added some detail to it, Pavla resin interior, Eduard PE, and Authentic Decals sheet. I also added some cables to the landing gear. The scheme belongs to an "agressor" soviet squadron. I coudn´t find any information or photos of these airplanes except for one, and another model built in the ARC forums. i have to say that to be correct to this scheme, it should be a MIG-29 9-13, but I realized after finished, because the decals didn´t say anything about how to paint it or to what model belonged. I hope you like it! Every critics or comments are welcomed. Best regards! Ignacio from Uruguay10 points
-
Hi, This is my version of 681 Squadrons Spitfire IV based on the Airfix Mk.I Spitfire with the Pavla conversion. The only real problem I had was the canopy which was me rather than the kit but on the whole this was a very enjoyable build. Cheers, Russ9 points
-
Latest kit, Xtradecals. Only issue I have with this kit, is the way the main gear are attached. No positive lock. Otherwise, a peach of a kit!9 points
-
HI all , I want to share some pictures of my little Revell 1/72 Phantom. I built it years ago. Paint is all done with Xtracolors in Norm72 color sceme. The cockpit came from Aires. The decals were from AIRDOC. I never want to see any stencils anymore when the work was done! Believe me. A little story: The aircraft mechanics were allowed to do a little sharkmouth on the nose. Quite unusual for Luftwaffe planes at this time. After the work was finished the sharkmouth was over 3 metres lenght. For my taste it looks fantastic! I don`t know if the commander thought the same. So here she comes! Thanks for watching9 points
-
Took me 2 years in the end to complete this due to different things happening at home and me mucking up the windows and having to get a new set from Revell (very pleased with their customer services). Eduard exterior photo etch used, really added to the finish. Bit of lead wire added to the inside of the helo. Also used foil to cover the back of the instrument panel (looked wrong with nothing behind it. Used the folding rotors extra as I thought the span of the rotors were too much (also made a feature of the model) IMG_20150708_173008 by Richard Page, on Flickr IMG_20150708_173019 by Richard Page, on Flickr IMG_20150708_173145 by Richard Page, on Flickr IMG_20150708_173314 by Richard Page, on Flickr IMG_20150708_173334 by Richard Page, on Flickr IMG_20150708_173450 by Richard Page, on Flickr IMG_20150708_173522 by Richard Page, on Flickr9 points
-
My entry into the battle of Britain G/B is my second attempt to build a diorama showing a crashed luftwaffe aircraft from a picture found in the superb Luftwaffe crash Archive series by Nigel Parker and published by Red Kite. I did a crashed 1/48 eduard Bf 110 for the Bf110 single type G/B earlier this year and found it to be very rewarding and even my Wife ,Jenny took an intrest in it . I have chosen the Eduard 1/48 kit as it will fit in with my first diorama but would have liked to have a go at one ofthese in 1/32 . I now know that 1/32 scale sheep are alot easier to find and also cheaper !!! Here is the main photo i will be useing for refrance with the objectve to create the diorama to be as close to the photo as skill and affordability alowe. I have chosen this aircraft as it has some intresting damage and i think has been staged by the Airministry or RAF for propaganda purposes . I will explain my reasons in a later post. Some useful info like the number of .303 strikes will help (15 ) as its easy to go over board on battle damage . though i can find no pictures of the other side of this aircraft. Another inportant thing for me is the pilot Ff. Ltn Heinz Schnabel was only slightly wonded as i wouldnt enjoy the project if it involved a dead airman. I hope the sheep will help tell the story and also provide some humer. I know i could have used the Eduard 109 E-4 but ipicked up this E-7 trop from MJW models for little over £10.00 posted and i'm pretty sure i can get an E-4 out of itfrom all the parts. Chose the w/end version as i dont like Eduard colourd etched seatbelts . Bit of a suprise to find some little fabric belts so hope they work well. Now im thinking this isnt working out too expensive untill i realised that life would be so much easier if i got the two Eduard resin sets for engine and cowling guns as this area will be centre of attension for the project. think the two together came to arond £ 30.00 inc postage , dwalfing the price of the main kit . I think the cowling parts will be worth the money alone. nice and thin so easy to bend and shred. Costs started to sky rocket when i whent to market to buy the sheep 10 sheep and 4 lambs cost £24.00 Ok from the photo's i can see around 30 sheep so i have had to make a compromise These are not toy sheep but serious sheep for serious modellers Hang on iv got a sheep stuck up my nose !!!!!!!!! May use these two home guard left over from first crash Now need to find two 1/48 sheep dogs , a farmer and some white 6 decals with the correct shaped 6. These are my reading materials for the next few months Roll on the 10th Alistair8 points
-
Hello all, It's been about a year since I last posted an RFI, as I have been chipping away at Hobby Boss' magnificent P-61 Black Widow, augmented by... * Avionix resin cockpit and gunner's station set, and radar operator's compartment * Eduard photo-etch interior and exterior * Radu Brinzan seat belts * Miracle Mask custom serials, and stars and bars So, having done all that, what was it like? The cockpit was a real trial, trying to combine the best elements of each of the resin, photoetch and OOB features, as they all have their strong and weak points. Strongest point for me turned out to be the opportunity to make errors... cock it up with resin and it's OK because you can fall back to photoetch. And if you haven't sanded away the plastic, you might yet be able to revert to OOB. Go on, ask me how how I came to this conclusion? It was hard work getting the fuselage to close up with the resin onboard, in the end I had to install a shim of plasticard and fair it in, but having the gun access and undercarriage doors open means you can't tell it is ever so slightly podgy. After humming and hawing awhile, I decided *not* to go for broke and weather it heavily. Instead, I just relied on the effect you get when brushing Klear over extremely matt Tamiya NATO black paint to give it a semi used look. I didmake liberal use of Citadel washes around the interior bays and the engine, though. So, on with the show. 3 overviews... A couple of views into the cockpit. The 'H' shaped radar aerials on each side had the original plastic mouldings replaced with straightened out rioja-bottle wire - it's the gift that just keeps on giving! Drilling holes through the two 0.5mm diameter horizontal arms gave my pin vice and me a slight work-out, I don't usually get that precise! The radar operator's position. Sadly, not much to see for quite a lot of mucking about with very fine tipped brushes and washes, but (all together now) "I know it's in there..." The eagle eyed might have spotted the nose cone isn't a great fit. That's because I thought I would have a go at making up some *entirely ficticious* wiring around the dish, courtesy of more rioja wire, then leave the nose detachable. Same bottle? Who can tell... It took *a lot* of grinding with the Dremel to thin down the interior of the nose cone to allow it to fit, and even now, if you look at it sideways it drops off without a moment's hesitation. I also dressed up the undercarriage with a bit of fuse wire. I originally started with the Eduard PE, but didn't like the two-dimensional effect it gave so replaced it with fuse wire (Rioja wire just doesn't seem to have the strength to carry brake fluid!) One of the engines (they can both be exposed), showing further liberal application of Rioja wire. Yes, I know Hobby Boss neglected to supply exhaust stacks but I couldn't work out how I would plumb them in so did the sensible thing and turned a blind eye! Hobby Boss leave large voids in the leading edges where I suspect lights are supposed to go, so I plugged them. Also, for the first time ever, I acquired some Micro Mesh which allowed me to boldly sand the transparencies flush, and then restore clarity through polishing. Result! Phwoar! Waddaya think of them guns, then? And here she is, parked up with the Luftwaffe's contemporary solution to the same problem. Hope you like... Mike8 points
-
Hi, if you have not heard from me before its because I am a newbie to this site. I made this Land Rover a couple of years ago, it was the first Hobby Boss kit I have done. The basic kit goes together reasonably well, although there are some small difficulties around the gearbox and transfer case fitting to the chassis. The instructions say that the spare wheel is to go onto the bonnet, but research suggested that it went onto the roll cage on the near side, which I did. Then I made the stowage basket for the bonnet with wire and filled it with some equipment. The position for the personal weapons inside the cockpit area is also incorrect. At the time, the colour desert tan from Humbrol was not available, and it was difficult to match the paint, so I think that the colour is not quite correct. Weathering done with oils and washes. Cheers, Laurence.7 points
-
Back in March when I heard that Trumpeter were going to bring out a Scud-A kit I thought, do I sell my 5-Star resin kit and wait for the Trumpeter one to be released or build what I already have? Well I decided to go with the 5-Star kit and now, four months later I have finally finished it! I am not too happy with the rust effect on the spare tracks so will possibly redo them an maybe tone down the dirt on the wheels and tracks. Anyway on with the pictures.7 points
-
OOB.build,painted with mixed Tamiya acrylics and Vallejo acrylic varnish,through and Iwata HP-B and Neo respectively. Thanks to "Nachtwulf" for the combat flap info. There wasnt much interest in the WIP thread,but hope springs eternal that the completed project will attract some comment. Good or Bad.7 points
-
Morane-Saulnier MS 394, 1916 Eduard kit Junkers D.I, Western Front 1918 Roden kit with crappy decals Fokker E.V/D.VIII, probably Jasta 8 Eduard kit7 points
-
Completed towards the start of the year and never got round to sharing. Hope u all like. This kit gave me some serious headaches, mainly with fit issues. Got there with lots of filling and sanding. Very happy with the results but wont be rushing to build another lol All comments are welcome and much appreciated. Pearse7 points
-
Thanks Rob - nice haul you got there too, I've never made the Seafox but I'd like to give it a go if I ever saw a cheap one Thanks Bruce, and yes, you were right, I did a third coat of Dark Green... Thanks Couldn't we all Rob... damn, where is Ced when you need him most? As suggested above, I gave Lizzie another coat of Dark Green: ... followed this morning by a coat of Klear: I finish my shift at a reasonable hour today - 17.00 - so I hope to get the transfers on tonight... Cheers, Stew7 points
-
Napoleon tried it. The Dutch were on the way. A Norman did it – and a Dane or two. Some sailor King may follow one fine day; But not, I think, a low land-rat like you. — “Invasion”, A. P. Herbert, September 19407 points
-
House of Commons 4 June 1940. Prime Minister Winston Churchill gives his speech "Wars are not won by evacuations" Dunkirk is still fresh in the nations memory. The RAF has been given a slatting by the stranded soldiers on the beach. Churchill knows that to fight the Battle of Britain he needs the RAF. He needs the public to believe in the RAF. In this speech he says "We must be careful not to assign to this deliverance the attributes of a victory. Wars are not won by evacuations. But there was a victory inside this deliverance, which should be noted. It was gained by the Air Force. Many of our soldiers coming back have not seen the Air Force at work; they only saw the bombers which escaped its protective attack. They underrate its achievements. I have heard much talk of this; that is why I go out of my way to say this." Later on in this speech he says "May it not also be that the cause of civilisation itself will be defended by the skill and devotion of a few thousand airmen? There has never been, I suppose, in all the world, in all the history of war, such an opportunity for youth. The Knights of the Round Table, the Crusaders, all fall back into the past - not only distant but prosaic; these young men, going forth every morn to guard their native land and all that we stand for, holding in their hands these instruments of colossal and shattering power, of whom it may be said that Every morn bought forth a noble chance And every chance bought forth a noble knight, deserve our gratitude, as do all the brave men who, in so many ways and on so many occasions, are ready, and continue ready to give life and all for their native land." The flowing is taken from the Obituaries section of The Independent Newspaper 29 June 2009 written by David McKittrick "Although Wing Commander Kenneth William Mackenzie shot down a number of German planes during and after the Battle of Britain, he will always be remembered for one particular incident over the English Channel. He was flying a Hawker Hurricane, its ammunition spent. His quarry was a Messerschmitt 109 fighter which tried to evade him by diving almost to sea level, intent on heading for France and safety. Mackenzie knocked it into the sea by the extraordinarily dangerous move very definitely not recommended in any training manual of using his planes wing to shear its tail off, sending it spiralling out of control. When the German plane went into the waves, Mackenzie nursed his damaged craft back to England, crash-landing in a field near Folkestone in Kent. His highly unorthodox manoeuvre earned him a Distinguished Flying Cross for skill and gallantry, the awed admiration of colleagues, and the nickname of Super Mac. The incident instantly established him as one of the aces of 501 Squadron, which he had joined ess than two weeks earlier. On the same October 1940 day as he downed the Messerschmitt, he had already shared in another kill over London docks and attacked a further plane. In all, he was to destroy at least eight enemy planes, including half a dozen Messerschmitts and a number of bombers, before being taken prisoner. Even in captivity, he proved a handful for the Germans, making numerous escape attempts." My build will be Airfixs new 1/48 Hurricane of P/O Ken Mackenzie, as my tribute to all the brave Airman who fought in the Battle of Britain 75 years ago.6 points
-
Quick build almost OOB, only for my own pleasure... WIP (If interested), you can see here : http://www.greenmats.club/topic/553-cessna-a-37a-dragonfly-trumpeter-148/?page=1 Thank's for your attention, Sergiy (48).6 points
-
Hi all, here is another of my older builds, Airfix's Curtis Hawk from the "Under the Red Banner" Club set. The model represents a lend lease P-40 originally intended for RAF use, flown by Hero of the Soviet Union recipient who's name escapes me. The Airfix kit is a well detailed easy build OOB. I applied winter whitewash camo from a rattle can over brush painted basic camo colours. Internet sources show different degrees of white coverage so i used "artistic license" with my interpretation. All comments welcome.6 points
-
Eduard kit with decals from the sparesbox showing one of Manfred von Richthofen´s birds the streaking Fokker camo was done with oilpaints Eduard kit with Dragon decals showing one of Josef Jacob´s planes Old build with ancient Revell kit A yellow canary using the Roden kit :-)6 points
-
This thread started life as one of my entries to the Battle of Britain GB back in 2015. As usual, I didn't finish in time and it remained in the shelf of doom till now. I'll try to finish it now... ------------------------------------------- Dear All, this is my first entry in the BoB GB: Airfix's Defiant from their 1/72 Dogfight Doubles boxing, which also includes the Dornier Do 17z. These two aircraft met over Britain in August 1940. The Defiant managed to shoot down the Dornier but was, in turn, itself shot down next by an escorting German fighter. The aircraft I'll be building was based in Martlesham Heath, where BT Labs were later built. This is quite meaningful, personally, because I did my MSc. Project there in 1993-4 (on self-pulsating lasers for fibre optic communications systems, by the way). Here is the box, the Defiant sprues, the PE and masks I'll be using for the build: IMAG2300 I won't be starting this any time soon, because I still have to finish my three British Phantoms for the Phantom GB. I'll start planning the building of the Defiant (and Dornier) this coming weekend, however. This is a very ambitious build for me, since I still haven't used any PE in my previous builds. So, with three kits to build (the Defiant and the Dornier of this box - WIP here, plus a Tamiya Bf 109 E4 - WIP here), limited time and a lot of PE without previous experience of it, what can go wrong? Cheers Jaime5 points
-
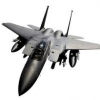
Hi Folks, this time I introduce you my F/A-18C Hasegawa 1/72. I read several reviews of this kit and were all positive, at least the in-box reviews. When I started it was a very promising kit, althought I saw the assembly problems on the fuselage joints and the vertical fins. There was a gap of about 1 mm all along the lower join in one of the wings, the intakes had terrible fit and the quality of the main undercarraige is very poor. I actually don´t mind this too much as long as I can build it with some pleasure, but there was none... When I wet the eagle decals, these cracked in microscopic pieces.... I´ve should choose the Marines version... Anyway, this is the finished model. I used Eduard PE for the canopy and made the intake covers. The HARM missile comes from the Academy F-16C. The pre and post-shading almost went gone when matt varnished. I hope you like it and every critics/comments are welcomed. Best regards. Ignacio from Uruguay5 points
-
Finished this excellent kit quite recently and thought I would share with u all. Had a few glitches along the way but think she turned out ok. Hope this and pics post ok as the is first time posting pics from phone. Im sure if they dont Ill soon find out lol All comments much appreciated, thanks for looking. Pearse5 points
-
Old build of the ancient Revell kit No.43 Squadron Royal Flying Corps 1918 SE.5a, Capt. J McCudden, No.56 Squadron RFC Roden kit5 points
-
Right, I think it's time I posted a bit of modelling content here, well, as much as I can while waiting on deliveries. I got up early this morning and having cut out the reduced copy of the Fallen Madonna, I constructed a picture frame for it. The picture is just a push fit in the frame at the moment but here is a picture of it. I decided that, given the size of the port holes, there would probably have been some reinforcing structure in those areas. Accordingly some was added from 20 'thou plastic strip. I also added some steps below the entrance hatch. I noticed that the cabin roof had a few ejector pin marks around the periphery so it was out with the Perfect Putty to sort this out. Finally I thought I should post a picture of the figures that have been prepared for the model. Thanks for looking Martian5 points
-
The two seat hunter has really grown on me. I ended up buying both the T.7 and T.8 conversions because I couldn't decide which one to get. Fortunately the base kit is currently as cheap as chips. at the moment and it occurred to me you may be able to get the 1:32 for less than the 1:72 one at the moment and a quick check on eBay confirms this. Thanks for the confirmation guys I'm pleased to hear it's not just me. Steve what's the T.7 Conversion like to work with? Any problems? I've decided to a clean build. I've made a little progress on this one and the Hunter has received a second session of filling as I missed a few bits the first time round. I've also been gathering up some references for the main landing gear wells. However I have been doing some work on Diorama accessories for this model. Last year I asked about how Hunters were connected to Ground Power Units here expecting a response like oh it's just a little panel you need to open. The answer was a bit more complicated and would take a lot of scratch building so I think this Houchin when I finish it will just be parked along side the Hunter. These Flightpath ground accessories are really impressive kits and benefit from soldering for strength. As you can see my soldering skills weren't brilliant when I made this. I got a Flightpath Oxygen/Nitrogen Trolley for Christmas and have decided to build this as well to go with it. My soldering skills have improved in the time between making both models as you can see. The lid even opens and closes I have two pilot figures to choose from. One from Reheat on the left and a Master Casters Pilot on the left. I'm going to use the Master Casters one but may well paint both. For a training squadron should I go with a white helmet or a green helmet with the reflective strip? A quick shot of all the components on the base I have in mind for the model. Thanks for looking, Mark5 points
-
Hi Folks This has to be one of the easiest kits I have ever built,the engineering of this is brilliant. i had laid a few of these in for the wings to use on the Academy F86 kits but thought it was time I built one just for a change. The decals are from Eagle Strike,painted with a mix of silvers,most of the pictures of F86D's show a very bright finish but the photo's I have of this aircraft show it to be somewhat more subdued. Ian5 points
-
Hello, This was one of my entries to the 75th Anniversary of the Battle of Britain GB (yes, back in 2015...), which I didn't manage to finish at the time. Hopefully, I'll be luckier this time ------------------------------------------------------------------------------------------------------------------------------------------------------------------------------------------ Dear All, this is my second entry to the BoB GB: the Dornier Do 17z from their 1/72 Dogfight Doubles boxing, which also includes the Defiant Mk I, which I'll be also building (WIP here). These two aircraft met over Britain in August 1940. The Defiant managed to shot down the Dornier but was, in turn, itself shot down next by an escorting German fighter. The Dornier crash landed on a muddy shore, two of their crew dying and two surviving the crash. The survivors were taken POW. The aircraft was covered in mud and water by the rising tide and got lost. It was found in 2013, recovered, restored and is now (or will be? I'm citing out of memory, because I don't have the instructions with me now) on display in a RAF Museum. Here is the box, sprues (still in the bag), PE frets and canopy masks I'll be using in the build: IMAG2301 This is a really ambitious build for me because it's my first two-engined aircraft, first bomber and I've never used PE before. So, with three ambitious builds running simultaneously for this GB (this one, the Defiant and a Bf 109 E4 - WIP here), limited time and a lot of PE and no experience with it, what can go wrong? I won't be starting this any time soon because I still have three British Phantoms to finish for the Phantom GB. Thanks for looking. Cheers Jaime4 points
-
EDIT: this thread started as an entry to the BoB GB. Since I didn't manage to finish in time, it was moved to the KUTA GB. ----------------------------------------------- Dear All, this is my third and last entry in the BoB GB: Helmut Wick's Messerschmitt Bf 109 E4, as flown on October 1940. Wick was the most successful German fighter pilot at the time, as he reached 56 confirmed victories in 168 combat missions, before being himself shot down over the sea, near Britain, on 28 November 1940, at the age of 25. During his career he was awarded several important military awards, including the Ritterkreuz des Eisernen Kreuzes mit Eichenlaub. The aircraft I'm building was the following one: As can be seen, painting this camouflage will be quite a challenge... The kit itself is the one from Tamiya and comes with the correct markings for the above profile. The picture shows the box, sprues, decals and the PE fret from Eduard I'll be using for better detailing the cockpit (mainly). The kit itself has a good amount of detail but I want to take it to the next level. IMAG2298 I've already planned the build in some detail and hope to be able to finish it relatively quickly. This is important because I'm also building Airfix's Defiant (WIP here) and Do 17z (WIP here) for this GB. It's quite ambitious for me, especially because I'll be using a lot of PE, which will be a first... Anyway, as said in my other posts, I'm still finishing three British Phantoms for the Phantom GB, which ends on the 26th, so I don't think I'll be able to start the BoB builds before that. Thanks for looking. Cheers Jaime4 points
-
Hi again Folks, Here's my latest effort, this has taken me nearly six weeks on and off and to be frank it was a bit of a dog(but it's an old kit I suppose) Poor fit in places Awful, awful decals raised panel lines It started life as a Belgian air force example, but because the crappy, brown paper backed decals disntegrated I shifted to the qinetic version. I have tried to capture the shabby, patchy finish on these jets when they first 'came over' from Luftwaffe service. Excuse the awful wing joints....I'm rubbish at filling. PS: I know that qinetic AJ's have not been seen with aux tanks(I think) but I could not resist hanging something there Comments welcome4 points
-
Hi, The inspiration for this version of the Seahawk was taken from the book, 'Collision Course' by Admiral Sir Raymond Lygo K.C.B. where, on page 219 there is a photograph of Seahawk XE372, 800 Squadron mid 1955. Lygo at the time commanded 800 Squadron. The model is based on the Hobby Boss 1/72 Seahawk with decals from wherever I could find them. The eagle eyed will notice I didn't put enough weight in the nose and had to put a little bit of blue tac on the base to hold the nose down...DOH!!! Thanks for looking Cheers, Russ4 points
-
Just finished this simple build - HMS Meteorite was a captured Type XVIIB U-boat (U-1407) - used by the Royal Navy to test the Walter High Test Peroxide closed-cycle engine that required no external air.... This is the Mikro-Mir box art.... The kit is the same as the existing MM Type XVIIB - with the addition of a new sprue for the revised conning tower and a set of RN decals...... The build is very simple....... here's the finished model ...... all of 12 cm long! I put a crew member on deck for size comparison.... It isn't the best 1/350 scale sub I have ever made - but it fills a gap in the collection. Ken4 points
-
An update, an update, my kindom for an update! Oh very well, here we go, after a week of soccer, chores and other menial stuff I managed to actually get some work done. I looked at the locking mechanism on the aircraft side of things and set about replicating that. My problem is to get the recessed effect in the locking lever as you can see below from the BM walkaround: ***Mods am I OK to copy and paste straight from BM walkarounds?** I first sta5rted off with a piece of square section plastic and engraved out a slot using files and a 'P cutter'. I did this whilst it was still straight and then bent it to shape and fixed it in I left the underside slightly proud so I could smooth it to the correct contour rather than trying to mould it exactly to the wing underside as below:\ Everything was over thickness and slightly oversize at this stage so that I could reduce it when dry. Once dry it was out with the wet n dry and was given a good rub down. It was at this stage I realised I had almost obliterated the recessed detail so then tried to re-do it but as it was on a curve I screwed it up totally. I also didnt like th look of it so whipped it off and tried a different approach. This time I fitted in the solid pieces at either end. I then joined it at the bottom with a strip of plastic, then applied a suitably shaped plastic rod and topped it with another strip of plastic (hope that makes sense!) and this was the end piece: I still have to whittle it down a touch and then we shall see where that leaves us. I also started work on the flap section to wing area. There is quite a bit to cut out so using the Prime Portal as a reference I started chopping it all away. I did look at using the Airwaves 1:72 fold etch as a template but it is not as accurate. They have the triangular cut outs going all the way accross whereas the example in FAA museum is only part of the way, anyway this is what I ended up with: Needs a little tarting up but not looking too bad........untill I noticed that you can see right inside the wing which is devoid of detail and is now sealed up!!!! I trialed it together to see what will be seen and frankly it isn't too much: I may put in a little detail on the lower wing that can be visible but that will probably be all. I drilled out a load of lightening holes on the flap assy and will put in some framing on the forward edge. I think I will use aluminium shim for this area as it does need to look very thin. Finally I did a bit of work to the wing side locking mechanism. I thinned down some of the casting and fitted some rod to represent the rollers, not much can be seen but a bit of paint in the right areas should sort it out. All in all it is going well, just trying not to make everything look too overscale! Next up more whittling but I just recieved notice that I have a Canadian Citizenship test next week so need to study to pass that, then I can become a proper Canadian eh? At least they did give me 6 days notice Cheers now Bob4 points
-
I couldn't resist a quick test of the new Friul tracks, so I wrapped them round the sprockets last night. Turns out that the Dragon tracks are either larger than the Friuls, or they under-estimated the number needed, so I added an extra three links from the spares, and loosely hooked them together with an over-long piece of wire (you can see it in the middle of the bottom run). I've also left the track tensioning axle glued to the idler wheel, but loose in its socket, which makes it easier to put the tracks on & off. It also gives me some leeway to adjust the tension, as the Panzer III/IV tracks had a fair degree of sag in the return run, causing a series of undulations over the return rollers. I think I've got it fairly well in the pic below, but there's not much I can do to reduce it anyhow, as there's not enough play when you remove a link, and the tensioner is touching its bump-stop. I can live with that though... a set of Schurzen will be covering up a good proportion of the top track run, so somewhere near will do4 points
-
To inject some reality into this build, where's the Elsan? I don't see doors marked "Herr" und "Frau"? After all flying one of those things is surely a brown trouser job? Trevor the Environmental Health Inspector4 points
-
Hamp old fruit - to be honest, I am learning more about the Wessex on this build than I ever did working on them. I have come to realize the importance of reference photo's and the study thereof. While I worked on them for two years I hardly paid them any attention - you were always concentrating on the job at hand rather than looking at the whole picture as it were. Being an A Mech A in those days, (only slightly higher in the food chain than a terrestrial pulmonate gastropod mollusc) the only jobs we were allowed to do were either mind numbingly boring (AF's/BF's/TR's, refuelling) - incredibly dirty, oily and/or sticky (head lubes, sacrificial tape), or likely to kill you (blade tracking). The JT's got all the exciting and technical work. Only now, thirty plus years later, do I wish I had paid slightly more attention back then! Nostalgia huh ?4 points
-
LOTS!!!!!,..........I don`t keep count but there are hundreds! Here are the main ones; But there are others in the loft and cellar,......plus the cabinet is a lot more crowded now than when I took these photos! I wish that I had a bigger house, but my missus says that I`d only fill that up too if we could afford one, Cheers Tony4 points
-
7/7 update: Cobbled up a raft with lanyard and compressed air bottle. Once painted it will look better. Starboard panel fitted, Now working on the aft cockpit bulkhead adding PE: All for now Whoot ! A memorable day: 30 years at VTS IJmuiden today and also my 1000th post here at BM, (I'll have to stop all my blathering )4 points
-
3 points
-
Last night progress report: more work on the exhausts, here's a little sequence (the colors used for weathering are all Lifecolor Matt) Black drybrush (selective, not overall) Another drybrush (even more selective) with a mix of Red, Brown and Sand Yellow Yet another drybrush, with Light Gull Grey, to pick out the overheated and dull metal Overall dark wash (Black + Grey) The discolored areas have been highlighted with some White Another (selective) dark wash and the exhausts are done Last for the night, I glued the wheel struts to their covers Ciao3 points
-
Result!! Phew!!!3 points
-
**Update** Primary Painting Part Three. The top side has now had panels bleached and weathered with Mr Hobby aqueous H333 and H1. Just enough to give that tonal effect and weathered look.3 points
-
So I have managed to get 2 coats of thinned humbrol 30 which was ok.... not overly happy with how this has come out, the paints look a bit too thick. But maybe that will change after a matt coat? What are your thoughts chaps? Another touch up coat need true but I don't want it coming out to thick.... maybe it's the glossy grey that's putting me out Cheers Rob3 points
-
Cheers GS mate, well that's the spirit. Having a go at the chains that support the DEs, these are taking longer than I expected, but getting there. In the last three day's at maybe four hour sessions I have only managed the main and four mast sections. Some pictures, with a little painting ness after I have completed. Had to also remove some gun hatch's. Foreward chains with three still to do. Main chains only on one side. foxy3 points

.thumb.jpg.158e2e086d45b8f96b7d93b8bee8dc21.jpg)


This leaderboard is set to London/GMT+01:00