
Leaderboard


Popular Content
Showing content with the highest reputation on 28/03/15 in all areas
-
Second model I would like to show you is Airfix Buccaneer 1/72. This model was build in 2011 for a Group Build of British Jets at Modelclub.gr forum I added a little detail, rescribed the whole kit and tried to do my best to this awful kit. Comments are welcomed15 points
-
Two models that i made in 2012. The kits are Italeri's Kfir C2/C7 and were both converted to F-21A Lion (Kfir C1). I added the smaller canards, changed the shape of the wings, added some detail in the cockpits and to the exhausts, scratchbuilt the entrance ladders and other minor things. The decals are from IsraDecals and depict a US Navy F-21A of VF-43 and a US Marines F-21A of VMFT-401 in the middle 80s.13 points
-
Hello guys! As promised in my topic of the Pakistani Thunder I have finally finished the Hokum! There were some 100 stencils to put on so this took some time. But it's done! For this one I used the Italeri kit with Eduard PE set and a Neomega resin seat (which is fantastic btw) and an Armycast resin set which provides pylons and exhausts. I think this is a must have if you are going to build this kit. Also I used the Begemot decalsheet which gives you the choice of 17(!) versions. The kit itself is not a real quickie to build. A lot of putty and sanding went in and quite some fitting issues. But all the more rewarding in the end. Enough said, here come the pictures. I hope you like my alligator A big thank you goes out to my good friend René (HartDeco) for making the pictures! Thanks for looking and have a nice weekend lads!! Regards, Jeroen12 points
-
Hello to all!! I am Nontas from Greece. I'm a new member to Britmodeller and I would like to show to you a few models that i have made over the previous years. I model airplanes in 1/72 only. This model is Revell's F-4F Phantom 1/72 and was converted to a Hellenic Air Force F-4E in the late 70s (just changed the stabilators and some other minor things). The build is from 2012. I only added a little detail in the very good for the scale cockpit and in the exhausts. The decals are from Icarus Decals. Comments are welcomed12 points
-
Hello all My latest offering - this is Revell's 1/48 Flying Fortress in 1/48. This is its Memphis Belle boxing of a kit dating back to the 70s, there were some fit issues and filling required. It might be stating the obvious but this kit is BIG - way too big for my display shelf, so it has had to find refuge in the garage. She was built straight from the box with no aftermarket additions, airbrushed with Revell Aqua Acrylics, then weathered with a Flory dark dirt panel line wash, some oils and pastels and a heavily diluted Tamiya acrylic mix for some exhaust stains. As well as the kit's own issues, my own shortcomings meant that I used superglue to attach the nose, forgetting that I hadn't dipped it in Klear first, hence some fogging :banghead:although I don't think that's noticeable in these pics. All in all an enjoyable build. Thanks for looking, any comments welcome Cheers Adam12 points
-
Hello, this is the new Airfix kit built for upcoming Valint Wing new Aiframe Extra no.1 "D-Day to VE Day" (more details ,http://www.valiant-wings.co.uk/pre-order-airframe-extra-no1-546-p.asp ), hence limited number of pictures. Cheers, Libor11 points
-
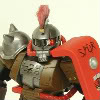
After 3 days hardworking its finished The Uh1 painted by brush using acrylics. The mud is 100 coat, a kind of varnisch11 points
-
Tamiya 1/48th scale Messerschmitt Bf109E-4. Painted with Aeromaster acrylics. Weathered with artist gouache. Knitting elastane used for aerial. Thank you for looking.11 points
-
Well, I finished the Gladiator a few weeks back, so here's some pics. I scratched the pilot's access door and used elastic thread to rig - easy enough to do but a bit over-scale i think... oh well... Looks like the starbd RF aerial could do with tightening - managed to melt through (the aerials are in sprue) twice when taughtening the first 2 sets so a bit reluctant to try a third time! My idea behind the build(s) and the In Progress work is here: http://www.britmodeller.com/forums/index.php?/topic/234971883-scale-models-battle-of-britain-special-gladiator-ii-172/ Not sure what's next - maybe the DO-17! Cheers for now, Ian10 points
-
Finished today for the 'Actung Panzer GB', the Bronco Humber Armoured Car Mk II OOB. This is a lovely kit but not for the faint hearted. It doesn't have a full interior, it's a complete armoured car - chassis, control linkages, engine, gear change and lots of gear inside. Painted with AK Interactive Light Stone ( From their Caunter Set ), Tamiya paints for the rest of the cammo, and Vallejo for the details. Weathered with a full range of AK Interactive / Ammo / Mig potions and pigments. Build thread is available here Peter9 points
-
Something else that has passed through my 'factory in between other builds. Hasegawa Beaufighter form the RAAF box issue. John Aero provided the 'stickle back exhausts, and all the decals are Aviaeology except upper wing roundels which were from 1998 issue of the T.F.X version of the kit. I used them because they looked Dodgy but worked very well when soaked in hottish water! Meanwhile lets take a stroll around a 404( Buffalo) Squadron Beau, NE355 as at RAF Strubby July August 1944. And before anyone says that it would have had some of the stripes removed by then, it was one of those anomalies where they remained for much longer. On this one,at least to March 1945. Terry of Aviaeology will confirm or amend my comments I'm sure . Note the bare metal cowl gills on the starboard engine and the red dope strips around the wing roots and port wing dinghy stowage. You may notice the 'tube' on the nose. It was a camera gun. And note the patchy weathering! I followed as closely as I could the info on the decal info sheet. Also note patches of freshly applied EDSg to certain areas that contrasts with the faded gry. I also added the whisker aerials either side of the nose. Just able to be made out here and in later photos further down. The tube on the nose was from a length of tubing from a packet of extruded tubes and strut sections. But I don't recall who produced these. Someone like Sutcliffe I think. Not sure. The D-Day stripes are white paint and the black stripe decals as supplied in the TF.X kit I mentioned earlier from the 1998 issue of that kit. The exhaust collector rings were black painted but from heat became tarnished and flaky. Pictures of his subject show this and the blackness. I have some other options from the same decal set and will save these for the new tool Airfix one when it comes in July!!! Hope you enjoyed browsing. Cheers.9 points
-
Hi Guys, Just completed the Hasegawa 1/48 F/A 18-F Super Hornet in the Diamond Backs 50th Anniversary scheme using "Two Bobs" decals. I found the decals to be fairly brittle and they cracked on me in a lot of places requiring paint touch-ups in many places. I have also used an Aires cockpit set and Two Mikes seamless resin intakes which were easy to fit and fitted perfectly, saving hours of filling and sanding. They are also mould in white so easing the masking/painting problem. Well worth the expenditure IMHO. Also thanks to Alan Sannazzaro for the photography. The Hasegawa kit goes together well with the only area requiring lots of filler, sanding etc is under LEX at the join.8 points
-
Well, I dropped the family off down in Baltimore this morning and got home around lunchtime - straight down to the basement as I wanted to storm all the little hangy off things that I keep noticing on the HC2. It seems that the more I look, the more I find. It also seems like every HC2 is slightly different and there are very few decent photo's of the particular helo I am building, so I have spent literally hours upon hours pouring over photo's trying to identify all the little bumps and knobbly bits on the 28 Sqn bird and seeing if I can find out what they actually are on other Wessex' And just the other day I spotted a rather unusual bump hanging off the bottom end. Out came some scrap runners and I made use of the number tags Some filing, shaping and trimming of the number tabs started to produce the missing part... can you tell what it is yet ? It's another hangy off bit of course! I'm assuming an aerial mount or summat similar. In my reference photo's, the bottom of the box thingy is at the same level as the underside of the Wessex. It seems the itlaeri profile is slightly out as I couldn't get the box to sit as I saw it in the photo's, so it hangs slightly lower than the underside... I think I can get away with it. The last thing to do on the tail (for the moment anyway) was to add this upper flange around the stabilizer - made from thin lead foil. Then to keep everyone happy, the last pair of curtains were added to the inside of the windscreen. Would you believe it ? I spotted another pair of hendie's protuberances just at the back end of the beetleback. These were a bit harder to fit as they sit on a curved surface but I got there in the end. I have a slight concern here... there's not much room between the upper door rail and the Vee thingy I fitted coming down from the beetleback. The "ROYAL AIR FORCE" decal is supposed to fit into that space. I must remember to check the height of the decal and make sure I can still fit it in there, otherwise there shall be a little bit of trimming to do later. The soldering iron was brought out again, this time to make the emergency release handles for the port side windows now fitted.... You probably spotted it in the shot above but I also added these strengthening plates and covers. Originally I thought they were a left over from the undercarriage on the UH-34 and they were just blanked off for the Wessex - Does anyone know ? On other Wessex I have seen tubular thingies protruding from these points - it took me ages to find a 28 Sqn shot where I could confirm what was actually fitted on those. The problem I am finding with this build is that there are so many features missing, it's becoming very difficult to know where to stop. I could almost go on forever adding a bit here, a bit there etc. However, there are some bits that I just couldn't resist adding.... the soldering iron was brought into play again, and this time it was to make the lanyard hook just below the cabin door. Followed by the mounting point for the SACRU release handle. I say "followed" but that particular item took me about 20 attempts to get anywhere near looking right. (the little extra bit will be trimmed back when the glue has set) Now, this part has really rubbed me up the wrong way today. This is the tie down hook for the blade fold support. Once again, it took about 20 attempts, trying different methods, different materials, and this was the best looking part I could get. Despite trying to make it smaller and smaller with each attempt, it's still way too large. I thought I was almost there with this one but it was not to be, alas. I have now given up for the day - that was really getting to me and I needed a break before I did something I would regret. So here's where we stand this evening. Port side mostly done. I still have the blade fold tie downs to add, and one sensor - a small tube thingy, again, I don't know what it's for. Then on the starboard side, lots of white bits added, but I am almost there, and happy with the way it is looking. I don't know why all those parts were not molded in to the kit. Most of them are line of draw of the mold so it really would not have been a difficult job to add them and make it look a lot more like a Wessex. Feel free to let me know if I have missed anything! .... and now I am going to take a break... I might even break out the Jack Daniels7 points
-
we're off! the litho plate arrived and I have the next day and a half off so on with it... ..the sheet is 6 thou and from a printer (£14 GBP for 10 x A4 sheets) so one face has stuff on it... ..the other side is nice... ..I tried a test piece, annealing it, embossing it on different surfaces etc... learning about the material - I also tried to discolour it by boiling with an egg but that didn't work... ..got some impact adhesive & cleaner - I thought I would try spray as well as painting it on... (£18 GBP all in...) ..I made the template from tape and cut out the first panel... ..masked up for the first adhesive spray - it goes on both surfaces - good job I did the panel first as it goes everywhere and I added to this masking to prevent a gloopy aeroplane... ...VERY carefully applied the panel - it doesn't move about like a decal and I suspect peeling it off would kink the material... ...when annealed it is quite maleable (I will use pewter for proper compound curves), I also decided to detail after applying as there will be no way to emboss the rivets from the other side and have them all line up accross multiple panels - an ugly concession to accuracy as I really wanted raised rivets at the rear, but hey, I am hoping the overall effect will be worth the loss... ..I have been using tamiya tape as templates and marking out the panel with a pencil - the scribed line is a good guide, and the last panel laid is used almost like a brass rubbing to get the correct shape to match up to... ..I soon got into a routine and have one side done (well half of one side - the easier half..).. each panel is anything from 15 - 30 minutes to make & fix. I have stopped using the spray adhesive as there just isn't enough control so use a soft flat brush. Mind you the solvent to clean the glue seems to destroy brushes and just about everything else pretty quickly so care is needed.. ..I am ending up scribing the airframe anyway so haven't saved any time as I need the scribed lines to determine the panel shape - I finished up the rear end and started on the fin... ..I needed the two big panels on the fin to run all the lower panels up to - it would be much harder to make all the lower panels end in a straight line separately.. ..I burnished the shapes where the panel has to curve at the leading edge with a cocktail stick and cut out the part for the rear of the fin.. ..after quite a few hours work most were done - the photography is rubbish as is the lighting sorry... so much to learn... I have also laid some test panels on an old kit to experiment with finishes as the test parts I did came out a bit weird - they seemed to have colours in them - greens & reds faintly visible and different layers of grain when finished with micromesh - i have some different grades of wire wool on order as thats what I have heard is supposed to be used... ..only trouble is I may have doubled the time to finish it by doing this! TTFN Peter7 points
-
This is the first "serious" model my 7 year old son and I built together over the last few weeks. Kit was picked up at Huddersfield show for £3. Build thread here: http://www.britmodeller.com/forums/index.php?/topic/234976911-dornier-skyservant-matchbox-172/ The idea was that I'd show him some simple, fun techniques like paint masking and rattle can spraying, that I thought he could do himself. Some of it was "watch and learn", mostly it was "do it like this...now do the rest on your own". Biggest issue was me not allowing him to use a scalpel - even under supervision. Excluding the small bits where I was physically showing him how to do stuff by example, the model is entirely his work. We had a blast! That's it folks - Thanks for watching! Final word should go to the man himself: I put loads of effort in the Skyservant. Finally I completed the Skyservant. It looks really good it looks super. The last thing I did were the very, very small windows- I also did the doors which were a bit bigger.6 points
-
What do you guys think? l like it6 points
-
Fresh off the bench last night and done as part of the Lesser Built Air Forces GB. Kit: AFV Club 1/48 F-5F Tiger II Decals: VFA from Malaysia, terrible in many areas Aftermarket: Quickboost seats, pitot tubes and gun barrel Paint: Decanted Tamiya AS-12 and Gunze acrylics Difficult kit in some areas, most notably with the surface detail, great overall but really hard to keep looking so good. Also tricky in the exhaust area with poor alignment points.6 points
-
Bronco 1/35th Humber Armoured Car Mk II, 11th Hussars, 7th Armoured Division 'Desert Rats'6 points
-
I have now given the Alclad nearly a week to harden up so I did some more tape tests. It was still coming off the test piece but did not seem to be too bad on the model. The tape at the 3cm mark on the ruler was well burnished onto the wing where the knife blade is pointing: Here you can just see the mark the tape has left: Given these results I decided to give the whole thing a coat of Alclad Aqua Gloss. That done and dried here is how I masked it for the white bands: The last job before spraying was to dab on some Maskol: and quickly whip off the tape before it dried: I used Alclad white primer for the bands. When unmasking there were some fairly alarming flakes of Aluminium coming away with the tape: Fortunately there still seemed to be Alclad under the flakes and the actual finish was not too bad: I have no idea why the Alclad is behaving like this but I think I've got away with it. I did a bit more chipping with the tip of a scalpel blade. Now I think I can get on with the masking for the green upper surfaces. Bye for now, Nigel6 points
-
Managed to get this to the finish line as all my chores are done and its raining! After giving the Martians a micromesh, I started on the base. The rocks were painted light grey, then given a wash and some high/low lights painted on and a Flory dark wash into the crevices. Poster paints on the greenery - bright green to start Quick dry fit to see all is OK with the splat! Darker green, light brown and fuscia then dabbed on to the foliage areas Tanks placed Yellow addeed to the foliage and then the remainder brushed with watered-down PVA and then green and red rock flock scattered and bedded. The incinerated guys were rubbed with white chalk I bought some 3mm clear rod and cut it to length ready for the Martian supports Finally the clear green pieces and all remaining clear bits were glued in place as were the Martians. Final shot as she is finished. Pics in the Gallery to follow once I have set up my booth... Thanks for the encouragement and for looking. Great little GB!6 points
-
afternoon. So here's where Im at. Oil wash on, and off! then flat coat on. I wasn't happy with the bright yellowness of the gas detection patch decal - so I masked it off and repainted a duller hue. The UC legs need the prominent locking latches adding - so some thin plastic card was drilled and cut and then CA'ed onto the legs Exhausts are nearly done, as are wheels and other bits. So with a bit of gentle dirtying up I'm nearly there! Cheers Jonners6 points
-
Finally done. Kit: AFV Club 1/48 F-5F Tiger II Decals: VFA from Malaysia, terrible in many areas Aftermarket: Quickboost seats, pitot tubes and gun barrel Paint: Decanted Tamiya AS-12 and Gunze acrylics Difficult kit in some areas, most notably with the surface detail, great overall but really hard to keep looking so good. Also tricky in the exhaust area with poor alignment points.6 points
-
RAAF CAC CA-13 Boomerang 4 SQN QE+K “The Grim Reaper” Kit and scale: 1/48 Special Hobby CAC CA-13 Boomerang Paint: White Ensign (main scheme), Model Master Clear Acrylics, Model Master Enamels & Metalizer Lacquers, Gunze & Tamiya Acrylics Extra stuff: Eduard/MPM PE Set Montex Masks Aries Resin R-1830 Engine Tasman CAC CA-13/19 Engine Accessory set Richard A. Franks book – The CAC Boomerang build link6 points
-
Bronco 1/48th scale SU 1526 points
-
Here is my another ESCI 1/72 F-100D kit, with minor changes, When they entered service with the Turkish Air Force, they started their career with the original users scheme which is highly weathered dark green overall. The most visible difference to other D models is their wing tip RWR equipment. Danish Huns also use different ejection seats, shorter fuel tanks and different engines. Also note the absence of fences on the wing. Other minor changes and additions are; Correction on brake chute flaps, they should be on left side only RWR UHF and Bullpup Aerials at bottom of the nose Doppler aerial TACAN aerial I also used Aires's excellent Cockpit and Wheel Bay sets for extra detailing. My next project of Danish aircraft will be an F-104G with the same overall green schema. Best Omer ERKMEN5 points
-
Bit of a challenge for me but thanks for looking. Mark5 points
-
I hope you don’t mind yet another blast from the past, this model being from circa 1985. Currently I have a big project going that is taking up most of my modeling time. Built basically OOB from the Williams Bothers kit in 1/72. I wanted a different aircraft than offered by the kit supplied decals so registration markings were pieced together by cutting up the kit decals. The early United Air Lines logo was made by hand painting the outline of the United States in the center of the later company emblem from the kit decal sheet. The finish was the challenge on this model. The 247s were built from anodized panels, each having a very slightly different silvery grey appearance. A base coat of silver gray was sprayed, then selected panels were masked and over sprayed with a drop of grey or sliver added to the paint cup. A very subtle effect was achieved. A homemade base with a snazzy (well...at least it was 28 years ago! ) Dymo label completed the display!5 points
-
Hmm, we have been given yet another severe weather warning up here, not sure what it is this time, unicorns, I think? I googled it. Looks like someone forgot to take the canopy masks off Indeed. I've heard they have palm trees Today I sprayed the undersides Sky as previously advised: Yes I know. It looks fine in real life though. Then I started on the undercarriage units: Not only is the undercarriage rather nicely detailed but you can add it after painting the undersides which is nice. Airfix depict the aircraft in question as having a wavy demarcation line between the upper and lower camouflage colours, I attempted to replicate this with Blu-tack: Pretty ugly, huh? Then I sprayed the Dark Earth: ... which was touch-dry by the time I had walked the dog and fed him, so I removed the masking to see how I did... ...hmm, well partially but adequately successful - it's not a very good view of it, but you'll get a better look soon enough I think I will brush-paint the Dark Green disruptive pattern as I have had enough complex masking for one weekend and it worked quite well with the Defiant, so that will be my next job. Cheers, Stew5 points
-
As well a continuing with the vacuum form approach to canopy modification I'm trying a new idea, Resin First of all a practice of casting a canopy so have cloned the kit one by making a 2 part mould and filling with the epoxy resin I bought for making the vacuum moulds. Female half was filled part way with resin then the male lowered into place allowing any excess to leak out. The plan now is to take one of the clones and modify the windows to T7 standard then make a mould of that for the final T7 cast. This should be a better way to maintain the detail in the upper straps as I showed in the pic in post #84 that wouldn't be possible with vacforming. Also still going to experiment with getting a vacform canopy too as I'm not going to let that beat me just yet. The resin was only degassed on this test but I intend to pressure cast the final canopy but cant do pressure casting at the moment as I needed to change a leaky seal on the pressure chamber and ended up rounding the head on an allan bolt in the process, new bolts in the post. Can you tell which is the original? its the one without the casing flash in the bottom left pic. Ive also cast one in the white polyurethane casing resin should make in easier to see what you doing in a solid colour while making the modifications. Just need the edges cleaning up a bit. CT5 points
-
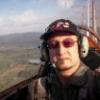
They are only asking this person to be there not to get in the pilots seat and start flying. Some airlines do this already and I cant see an issue with it.5 points
-
Cheers Kev, the running gear will go last matey Had an hour tonight at the bench, decals are finished and a few more bits painted up, here is the work so far. Cheers Dan5 points
-
4 points
-
There seems to have been a few Cromwells appearing on BM recently so I thought I'd show you mine too. This is my first 1/35 armour model and it's been a very enjoyable change from aircraft. So much so that I've got 3 more Tamiya armour kits in the stash now. I would have built it for the Achtung Panzer Group Build but I had already started it. The Tamiya Cromwell is a fantastic kit. Perfect fit, superb detail, can't fault it. I built it OOB other than the additional of some stowage - some helmets made from cut down spare 30-year old Airfix Multipose US Marine helmets, a pack from the same kit, a rolled groundsheet from tissue paper, camo net from dyed medical gauze and Italeri Jerry Cans in a scratched holder. The only other thing I added was the tow cable stowage hooks made from brass strip, the cable to the floodlight on the turret side and aerials from stretched sprue. I still have the wires from the commander's headset/mic to add. These photos are not the best but better than nothing. Maybe I'll update them when I've made the scenic base. Mark4 points
-
I have to give praise to Riich models for the excellent moulding quality, fine detail and scale accuracy only marred by a rather flimsy chassis which in my kit was twisted. There was also some warping to the cab and combined with the twisted chassis made for a tricky build and making the best of a bad job. Thanks for looking.4 points
-
AEG G.IV Late 1:32 Wingnut Wings [Edit] January 2017 - kit now being built over in 'Work in Progress' [/Edit] Introduction. The AEG G.IV late first started to appear with front line units in early 1917 although it wasn’t until the summer that were available in useful numbers. Developed from an early concept of the heavily armed ‘battleplane’ which was designed to fight it’s way through enemy formations, it was the first of the line to be intended solely as a bomber. The battleplane concept was proven to be flawed after heavy losses were suffered, although it partly resurfaced in later years with the Me.110 ‘Zerstorer’. The G.IV is less well known than the Gotha series of bombers, but in fact was able to carry a heavier bomb load. It was also the most popular amongst aircrews as it was considered to be the easiest of the twin engine bombers to fly. At first it was used as day time bomber, but heavy losses soon saw it switched to night bombing raids. Another lesson that was re-learned in second world war. The aircraft commander was not the pilot, rather he occupied the nose gun position and presumably issued any instructions from there. Due to the high likelihood of the aircraft nosing over during the take off run or on landing, he had a temporary seat beside the pilot, which he used at the these times. Wingnut Wings have now released a model of this aircraft in 2 versions covering its early and late incarnations, of which we have received the ‘late’ boxing for review. Of all Wingnuts promised releases, this is the one I have been most eagerly awaiting since their series of Fokker D.VII’s came out. Packed in large (deeper and wider) box than most, the lid has a striking painting of a shark mouthed G.IV lifting off against an orange sunset. Compared to an Albatros box; Anticipation was high as the lid was lifted for the first time, to reveal a box absolutely filled to capacity with individually shrink wrapped sprues. First glances show that the wonderful level of intricate and detailed mouldings that are the hallmark of Wingnuts engineering are all there across 17 sprue trees. There are also 3 A4 sized decal sheets of night lozenge fabric, another of Balkenkreutz & individual markings, and a smaller one with interior lozenge and more exterior for the nose area, including the shark mouth. Also included is a small etched brass fret with 3 sets of seatbelts and some internal pulleys and chains. Finally we have the Instruction book/reference manual, in the full and complete Wingnuts style. Sprue A. This covers many if the detailed cockpit interior components, all very finely moulded. Internal bomb racks are provided along with seats and various ancilliary fittings. The construction sequences are accompanied by detailed photographs of both original machines and the one preserved at the Canadian Aviation and Space Museum in Ottawa. There are some fabulous pictures of the whole of the interior, showing a goldmine of information. close ups of the sharp and neatly defined mouldings; Beautiful finesse on the these parts; Sprue B. Here we have the upper wing outboard sections, and the fin & rudder. Sprue C. The small windscreens and glass door for the lower gun. Sprue D1. Here we have the engine mounts and associated strutting, along with a choice of 3 different propellers. The intricate frameworks are only needed if you choose to build fully or partly exposed engines. Otherwise there are all the panels that go to create anything from a partly to full cowled engine nacelle. Finely moulded radiators, pipes, and mounts are provided, and there are even small deals to fit to the tops of them. A pair of the larger 100 Kg PuW bombs are also supplied for mounting on the external bomb rack under the fuselage center. Sprue D2. The tailplanes, various bombs, the wing struts and wheels are the main components here. Again two sets are provided. A nice touch is the choice of weighted or unweighted tyres with separate outer hubs to ease painting. If you are going to build your G.IV bombed up ready for a mission, the weighted tyres are an obvious choice. Sprue E. Again there are 2 of these, for the Daimler-Mercedes D.Iva engines. Beautifully moulded detail with every nut and bolt, and easy assembly are standard on every Wingnuts engine I have built. I usually start all my builds with these as they are model in their own right and give you an early sense of satisfaction. They are little gems, with even the dataplates as decals to attach, the only thing you might want to add is some spark plug leads from fine thread or fuse wire. On the G.IV the engines can be left exposed, and will form a centrepiece of the model. I expect most will go for one or both engines exposed, perhaps just setting one fully or partly cowled. Sprue F. The fuselage halves, cockpit floor, and interior side panels with very delicate moulding are here. The instructions point out where various holes will need drilling to cater for the differences between the ‘early’ and ‘late’ boxings of the kit, and the different fittings that go in them. The rear cockpit has internal bomb racks on both sides, wheras the early version only has a rack on the starboard side, so this needs to be opened up as well. All is very clear shown in the instructions. Sprue G. There are 3 of these, with various machine guns on them. Only 1 type, the LMG 14/17 Parabellum is required. As usual these are crisply moulded with excellent detail. Sprue H. Here we have the upper and lower wing centre sections, and cockpit coaming. Beautiful detailing on the walkways between the fuselage and engines; Sprue I. The lower outer wing panels, engine ‘bath tubs’ and side panels. Lovely rib tape details are moulded on, with a gentle amount of fabric sag between them. They are quite large mouldings but there is not a trace of any sink marks anywhere on them. Large tabs are provided at the root end to locate them in to corresponding slots in the centre section, making it a doddle to line everything up. Sprue J. More strutting and the other halves of the tubular frameworks for the engine cowlings. These frameworks will not be required if you decide to fully cowl your engines. There is some complicated looking struttery to go between the fuselage sides and the engine cowlings, but these are moulded in pre-set units of 3 struts each, a forward and aft set, that again will make child’s play of setting and aligning everything up. Engine mounting struts and cowling framework for the uncowled engine option; Sprue L. A small sprue holding the gunners coamings and gun mounting rings that fit in them. Photo Etch. Lap type seat belts for each of the 3 crew positions, and some nice pulley & chains to affix to the control column/steering wheel assembly. The other items are not required, so those unneeded LMG.14’s from sprue G can all go into the spares box with etched jackets. Very useful! Decals. An impressive set of decal sheets are provided to cover virtually all of the exterior with night type lozenge fabric. All are in pre-shaped ‘cookie cutter’ format, and there are even lighter sections provided for the fuselage interior. Data plates, instrument faces, propeller logos and a mass of other tiny items are the sheet holding the individual aircraft markings. All are printed by Cartograf, so quality is assured. 5 Options are provided, all for night bombers. Option A. G.IV 848/17 ‘White 1’, Bogohl 8b, May 1918. Option B. G.IV 850/17, ‘White 2’ Bogohl 8b, June 1918. Option C. G.IV ‘White VII’, mid to late 1918. Option D. G.IV 567/18, ‘White 7’ Bogohl 8b, mid to late 1918. Option D. G.IV 574/18, ‘White IV’ Bogohl 8b, November 1918. Conclusion. Well what can I say? Every new Wingnut Wings release is eagerly awaited and nudges the bar higher each time. Who would have ever thought a few years ago that a 1:32nd AEG G.IV would ever be produced as a mainstream injection moulded kit. What we have here is just extraordinary in its depth of detail and completeness. The quality of moulding is faultless, and previous experience says that it will fit together with precision. These kits require careful building as the fit tolerances are so tight that you can’t have primer or paint on mating surfaces, particularly those in recesses or sockets. But that’s what we want isn’t it? Accurate models engineered so you don’t have to use filler and brute force to get them together. This one isn’t for beginners, but if you’ve got a couple of Wingnut Wings single seaters under your belt, it should be well within your capabilities. By every measure this is an outstanding kit. Simply fabulous. Very highly recommended Review sample courtesy of4 points
-
Hi... finished the impressive Zoukei-Mura Horten Ho9 recently... some pics below (quite a few!) Hope you enjoy them. First, engines... Then internal fuselage supports, finished in wood effect with metallic framework, clips/bolts and fairings picked out. Lower frame to be completed, upper frame finished. Right side of central fuselage section with wood-effect frame in position. Test run of fitting engines into framework. Test fit of transparent skinning. In my kit, this will be overpainted but shows how good it might look if you choose to leave the skin transparent. Good snug fit all round. One of my favourites... a profile view of the central fuselage showing the sleek lines of the design. This is the inside of the upper central section, again finished in wood effect. Much of the interal area will be seen on completion so even if camouflaging the external surfaces, the internal areas will benefit from a good bit of effort as well. Another test fit of the forward nose section. The metalic and white paint you see are again internal, the white being the undercoat for the subsequent wood effect. Testing the rear upper central section cover, minus the nose. Wing details with fuel tanks and control surface actuators attached. Wings and central section complete, awaiting test fitting. Four small transparent pegs, two upper and two lower on both wing roots hold each wing in place... surprisingly sturdy given the weight of the wing relative to the the pegs. I permanently fitted the wings so had to fair over the wing root with some filler to blend it properly. Underside of central section, clearly showing the 'see through' quality of the model and confirming why the insides really need painting as well. The start of the colour scheme - late war greens x 2, plus brown. All this as well as wave pattern on control surfaces and the 'spine' of the centre section behind the canopy applied using a spraygun. Close up shots of the forward central section and cockpit area. Two seats are provided, one with no detail and the other with the integrally moulded seat belts... beautifully reporduced and look great when finished. And finally, the completed kit in the markings of JG7 and a comparison with a same-scale Trumpeter Me262B-1a/U1 nightfighter. ZM have produced a beautiful masterpiece with this kit that will suprise many. Few tricky bits but the main one was getting the nosewheel support strut to locate deep within the central section framework. Camouflage and markings, of course, are a figment of the builder's imagination as the aircraft never reached operational status. I opened a couple of small fuel hatches on the upper port wing and a hatch in the underside of the nose section, as well as turning the nosewheel, just to give the model a bit of life This is my first ZM kit but hoepfully will not be the last. All nine instalments of the build are over on Hyperscale in the 'Plastic Pics' forum, under the heading: 'Zoukei-Mura Horten Ho229 - Part 1' (2, 3 etc). Hope you like the pics and thanks for looking in. Regards, Paul4 points
-
I tend to have quite a few builds on the go at any one time, so suddenly, I find I have a number all being completed on the same day. Below are three of the seven rolling off the lines this week. All 1/144 Carvair - ( Roden kit and Classic-Airlines decals ). I believe this puppy could transport up to five cars plus a complement of passengers at a time - difficult to picture a souped up DC-4 being capable, but apparently so. With something else - Faster and quieter, but leave your cars at home. The Guyana Airways Tu-154. I know, the nerve, not operating British aircraft. Zvezda kit and classic-Airlines decals. With something else. Does Linhas Aereas de Mocambique not somehow sound English? The old Portuguese East Africa province of Mozambique is the only country to be a member of the Commonwealth that had never been in the Empire The Air Rhodesia DC-3 ( Minicraft kit and Classic-Airlines decals ) The "with something else" Her big sister, the Boeing 720 And as a forthcoming attraction - coming soon to a RFI near you. Hope you enjoyed the nostalgia tour ( and Mitchem, if it seems I am copying your idea of the Air Rhodesia fleet, it is because I am ) Cheers, Mike4 points
-
**Update** - Base Colours Part Two, After weathering the first base colour, it was masked off with tamiya tape. Then the second base colour of XF-59 was applied and weathered. Then masking tape removed. Then the last round of masking and the third base colour of XF-52 was applied and weathered. All masing then removed. I have a few areas of overspray, so i'm just going to weather those on with some very thin lighter base colours.4 points
-
You'll be delighted to know, Stew, that it had no side bulges on the windows.4 points
-
Some recently built birds from my kitchen table, built as a part of IPMS Ireland group build commemorating 90th anniversary of Irish Air Corps. Appologies for the quality of the photos and those watermarks, it's saved that way Bristol F2B, Roden, straight from te box, only one photograph exists and it was taken on Fermoy airfield around 1921: Another Roden Bristol has some Part photoetched parts thrown in. This is my interpretation of aircraft operating from Limerick 90 years ago: And 2 Hasegawa Hurricanes, box builds with Quickboost exhausts, gun barrels on MkIIc and seatbelts from spare box:4 points
-
Dont see why not, the resin takes a good 12 hours to cure so cant make all that many in a short period, Still not made a T7 master yet though. Not sure what the resin in Hobbycraft is but I would suspect its a polyester resin, but will be quicker curing. maybe not as tough as epoxy resin though. I just cleaned off the flash from the cast and have a bit of problem, I cant tell which is which without very careful inspection, although they do have a different sound when lightly dropped on a hard surface. CT4 points
-
Bah! What's all this "I'm going to take a few weeks off" stuff, Stew? I missed this one! Your interiors are just getting better and better. I love the homage to Navy Bird's Beaufort map. It's great to see another of your masterpieces coming together. Also, I may have just seen a Blenheim sitting under the Arizona sun with our mutual pal Procopius.4 points
-
Evening all Well she is nothing if not well used! I say sack the ground crew Iain4 points
-
Airfix Vickers MkVIb, built largely OOB, depicting a UK-based vehicle undertaking training duties in 1938.4 points
-
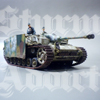
Zvezda SU-100 1/353 points
-
Hi folks yes, it will be a natural metal scheme - a Firebomber (without the tank) so quite colourful too so, all the time I am getting somewhere I thought I would drop in another update - I am sure once the novelty wears off I will slow down a bit... ..I have a small problem as I have been learning more as I move forward from the tail - each panel seems to teach me a new trick and I wish I had been doing what I do now from the first panel... ..I should have added the rivets as they are much easier while the panel is flat.. ..I should have scribed access panels etc for the same reason.. ..I should have varied the grain of the metal to contrast panels.. ..I should have riveted onto a cutting pad as the perspex sheet I used for the first two spine panels is too hard & the depressions are too small.. ..I should have used a wide, flat, soft brush to apply the impact adhesive.. ..I should have deeply scribed the whole fuselage to give guides for the tape templates.. oh well, we are where we are and lets look at it this way, it can only get better... anyways.. I needed to do the top of the spine as I want to try to do the lower fuselage panels in one strip curving right under the bottom and up the other side to reduce the number I need to make.. ..I started with a tape template / rubbing which is transferred from the scribed lines (or fitted panels) and this time added the rivets/access panels,panel lines by scribing, scoring or using a rivet wheel.. I had scribed the access panels on the airframe so they can be positioned correctly and these too were transferred to the template.. ..this is a different panel, but once detailed I roll it on the back of a stiff cutting mat to impart curvature - the mat must be flawless as any lumps or bumps will transfer to the part.. ..and this is just about good to go... ..THE most critical stage is applying the glue - I mask where I am putting it on the fuselage, but the masking must be removed immediately or when you pull it off you pull off the glue with it (it's like elastic..).. I also hold the panel on a rolled bit of tape so as not to get glue everywhere... ..and the panel fitted - carefully lining up and then squeezing it down with thumbs & fingers is key to getting a solid & neat fit.. ...a few more of the airframe as it stands... thats all for now.. TTFN Peter3 points
-
......and there is more to come, to be precise, more dirt and dust. Applied with a veteran hairy stick. Went good but i feel, i can improve this with a thin layer of sprayed dust3 points
-
I did say that it might take a little while to get the patterns and moulds made up for the update. This will continue. John3 points


.thumb.JPG.3498f40362ff13ebfc4b2e45abbd545e.JPG)


This leaderboard is set to London/GMT+01:00