
Leaderboard


Popular Content
Showing content with the highest reputation on 05/03/15 in all areas
-
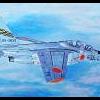
Hello chaps, Been ages since i've been on here, new job means i work away from home alot, a sad consequence is i get very little time to model : ( So this one was started way last year, its a Hobbyboss 1/48 A-10a, while looking for pics, stumbled on the story of Kim Campbels A-10 which was suffered battle damage on a mission over baghdad on the 7th April 2003, once hit the aircraft lost hydraulics and had to be reverted to fly back manually. Lucky escape indeed! So decided to try modeling this aircraft post damage, problem is the decals were not avialable, so alot of fidley hand painting with squinted eyes and tongue poking out was required! Not my best, and happy to see the back of it! Kit not great either, especially the engines which were poorly modelled. Anyway here it is along with the aircraft itself.23 points
-
Haven't posted anything here in RFI for a couple of years but have been building away army usual snails pace, although 2015 might see me hit double figures! This is the new tool Airfix A-4 out the box with the exception of some Hasegawa Mk.82's and an MER. All comments good or bad most welcome. I do need to have a play about to try and improve the pics a bit. Rgds, Eng22 points
-
Hi Everyone, Thought I`d show some photo`s of my latest completion, My attempt at making a SEAC Hurricane IIc out of the old Hobbycraft 1/48 kit Finished to represent an aircraft of 34 Sqn,RAF, Patel, India, around late 1943 Built pretty much OOB, but added a few embellishments; such as retraction jacks for the main gear, some pipes in the wheel bay, stiffener for the radiator intake, fixed gunsight.... the bombs, bomb pylons and decals all came from the stash Hope you enjoy, thanks for looking Cheers Russ19 points
-
Hello Fellow Modelers, I leave you some photos of one of my latest Work, the 1/48 Kfir C-2 from kinetic I hope you like it Best Regards, Pedro Matos18 points
-
Hi everyone. It is my first posting. I thinks, airfix new 1/72 scale airplane series are fantastic kits It work in 2013 summer. I hope you like this16 points
-
I have recently completed a little project that I started at the beginning of the year. I wanted to build the RAF's main players during Op Granby. All in 1/72, a Panavia Tornado GR1, a SEPECAT Jaguar GR1 and a Hawker Siddeley Buccaneer S2b. Thanks for looking. Any questions or comments are very welcome. Links to the individual RFI's can be found at the bottom. http://www.britmodeller.com/forums/index.php?/topic/234975186-revell-172-tornado-gr1-op-granby-debbie/ http://www.britmodeller.com/forums/index.php?/topic/234976630-sepecat-jaguar-gr1-op-granby-italeri-172/ http://www.britmodeller.com/forums/index.php?/topic/234977790-raf-buccaneer-s2b-op-granby-airfix-172/14 points
-
Another of Airfix new releases straight from the box, these nice red boxes are costing me a fortune!! Please excuse the pics if they are of poor quality, I'm playing around with iPad and iPhone and Photobucket trying to get the best possible quality. The kit itself, like the other new Harriers is a delight to put together, I've lost track of how many GR.3 and GR.7/9's I have still to go! Eng13 points
-
This is the Tamiya 1/48th scale Douglas A-1J Skyraider. I added a etched seat harness and a QuickBoost resin Canopy Actuator Cover. The model was painted with Hannants Xtracrylix colours and weathered with artist gouache. The decals are Iliad Design Sheet 48019. Special Ops Skyraiders. The bomb fuse wires are knitting elastane. Thanks for looking.10 points
-
A quick little job tonight with the instrument panel. This is one of those photoetch and film sandwich jobs. I painted the photoetch panel flat black, and the back of the film flat white. Then it's a simple job of squinting my centuries' old eyeballs to try and focus on the task of aligning the two so that the instrument faces are centered in the apertures of the panel, and then gluing to the coaming. For once, I think I got it pretty close! More detail painting to do on the panel, of course. You may also notice that I've traded in my trademark baby blue photo background for dull, boring neutral grey. I think the camera may make a better job of the colours without so much blue in each photo. That's my theory anyway. And to give you an idea of the size of the instrument panel, here it is with my zwei euro thingy... I also got the ECM fairing ready for the tail and then realized that in my haste I drilled out ALL of the holes on the tail. Of course, I only need half of them for this fairing, the other half are for the other style fairing. What a klutz! Now I get to fill half of them back in! It's OK, I need some more practice with putty. Cheers, Bill8 points
-
Hi All- The AZ Model version of the well known mount of Ludwig Franzisket, CO of JG 27. This was bought for me as a present (thanks Chris! ). Having already built AZ's G14 (link in my signature below), I decided to try Barry Numerick's fix for the under nourished nose profile- with mixed results. There's a lot still needs doing to my build, but tbh I got a bit fed up with it. Now looking forward to starting something more simple and straightforward! C & c very welcome, thanks for looking. Cheers, Dave. Here's Franzisket's G-6 : AZ Model G-14 shows the problem with their Gustavs- a seriously skinny nose profile: The fix...... A spacer 1.5 - 2mm placed between upper and lower engine cowlings. I assembled the wing as normal, sanding the fuselage-wing fairing to lose the extra depth. Barry does it differently by placing a shim between upper and lower wing halves as well as the cowling. the result........7 points
-
A few shots of my last two models from 2014. The new Airfix Spitfire Vb by two. Build OOB with exception of Eduard seat belts. A nice kit but who ever designed the undercarriage needs to be given a "stern" talking too!! Regards Greg7 points
-
Here is my first completion of 2015, the 1/72 Revell Me 262 B-1a/U1 made OOB. I used the kit decals but deviated from the kit colour instructions and chose to go with the profile in the Classic Colours book, Nachtjager vol 2. This profile shows the wings and tailplane painted overall RLM 83. The kit had lots of sink marks on the engine nacelles and intakes and the canopy has some molding flaws. I had a vac form replacement but managed to ruin that so had to go with the kit part. I did cut the main undercarriage down by 2mm to try to get the characteristic tail sit of the real thing but it is still sitting too high for my liking Painted with a mix of acrylics from Polyscale (RLM22), Vajello (RLM76) and Mr Color for the RLM 75 and 83. The mottling was sprayed with with my Iwata CM-C+ at 2bar and went on first time without any need to respray. The rest of the colours were sprayed at 1bar. I had terrible trouble trying to get decent photos of this model, hopefully these are ok. Duncan B6 points
-
ok,so this has been my first serious attempt at model building.its been a build of many firsts for me.first time using fillers,first time airbrushing,first time attempting panel washes etc etc etc it has many errors,but,i have a mental note off all the errors i can see,and know of.i wont make the same ones again.this build has been a huge learning curve for me. please be honest with your comments,i will take any critisism on the chin and learn from it. hope you like ps,sorry for the poor images,was taken on my phone daz5 points
-
Hello everyone- This is my buildup of the recently issued Kovozávody Prostejov (KP) Avia S-199 'Messer' in 1/72 scale. The only extras that was added to the kit was an AML resin ordnance rack. The finish is Revell 362 enamel (RAL 6013), and the markings are from Sky's Decals and depict D.117, which feature the name 'Nahama' in the port fuselage Star of David roundel.5 points
-
Hi guy's, Just completed this awesome kit today, although I might improve the rockets a bit. Thanks to Alan Sannazzaro for the photography.5 points
-
Built this when the new Airfix Zero was released with a view to trying some new weathering techniques around paint chipping. Had never built any Japanese aircraft up until this point Turned out not too bad although I did lose the aerial mast to the carpet monster! Eng5 points
-
If you take a photo of real subject and adjust white balance, contrast etc. until it's as close as possible to what you see with your eyes and then sample the colour on that image, I can pretty much guarantee that no single part of that image would correspond to whatever FS/BS code the subject is actually painted in. On a model, that is much smaller and therefore reflects much less light, that effect will be much less pronounced and as a result the model can look too flat and too dark when using the 'correct' colour. If I adjust the tone or hue of the colour I'm using, it's to replicate the way I'd see that subject in reality. I realise there are many modellers who don't like this approach which is fine. Surely everyone should find the method that works for them and gives the results they like. If I see five builds of the same model, I would much rather see five different approaches to that build and see how those five modellers have interpreted the subject than see five identical builds that have been done to a prescribed and approved style. This is a creative hobby and if the creativity is sucked out of it an important aspect will have been lost. Andy5 points
-
That's unfortunate Cookie, obviously it was International Protruding Perspex day... I think sanding and polishing those clear parts without damaging the varnish, paint and tiny stencil decals there is a non-starter, however I have prised out those windows on Dornier 2 - scratching up the varnish a bit in the process but that can be re-done - and will see if I can add windows from Micro Kristal Klear which is supposed to be useful for that sort of thing. If the deed is crowned with success I may attempt it on Dornier 1, otherwise I will leave it as for some reason the windows don't protrude so much on that one. Thanks for the compliment - it doesn't sit very easily with me when I can see, in places at least, shoddy workmanship, sloppy paintwork, misaligned decals and so on, I think most of the BM habitués are instinctively too polite to notice Thank you Jon, and in that case I retrospectively apologise if I trod on anything sensitive Thanks Duncan - the clear parts were a bit thick I thought, so I was surprised how clear they were when I took the masking off. It looks very busy in there and I think the efforts I made painting it before closing it up were worth it (almost) Thanks Rob, the Peewit masks were pretty good, I had a bit of undercreep with some of the panels - particularly the round ventral and dorsal gunner's windows - but that scratched off okay with a toothpick; the kits clear parts were very shiny and I was lucky enough to get away without much in the way of frame-paint-splintering-off when I removed the masks (further cementing in my mind the idea that removing the masks as soon as the varnish has dried enough to be handleable is beneficial; though I also think Duncan's advice not to use too much paint and varnish in those areas is probably better). So today I have to re-varnish a section of the back of Dornier 2 and try this Kristal Klear for the windows, and if I can motivate myself to multi-task, spray the Dark Earth uppersurface for the Defiant, which has been masked thusly: Cheers, Stew5 points
-
Evening all,just got a half hour in tonight so fearing the worst I thought I would see how the decals would behave,you can get mixed reactions on the subject Academy,s decals, the FW190,s were crap! luckily I only just managed to save the unit markings and serials from the sheet and used spares for the crosses.The Storch decals were flawless so tomorrow with the light I need I can get the camo on the wings and start laying paint on the glazing.Thanks for your interest.5 points
-
I've been watching your Yamato (davetwin and Jockster) and Akagi (ComfortablyNumb and Warren) masterclass builds in awe, and thought, "I've got something like that in the loft...!" This was 2011's birthday present and while the sea is drying on the USS Decatur I couldn't watch it sitting there any longer and decided to start! This kit needs no intro as it's venerable and well-known (plus I reckon at least 75% of the people who frequent the board already have one!) but I'll be building it in an unusual guise and using the Flyhawk Super Deluxe Ultimate Uber-Mega Ultra Detail Set on it! You can probably make out from the picture how much ground this set covers. Also adding the Scaledecks High-Detail wood deck, for reasons that shall become clear.... The Flyhawk set is probably the most intimidating aftermarket accessory I've ever bought. 25(!) sheets of PE, resin replacements for just about every piece of equipment, brass barrels and other accessories - it's a monster which will keep me well occupied for a while! Resin and brass parts - I couldn't physically take a picture of all the brass frets, I don't have enough floor space. Nice to see the resin 5" twin turrets, these are notoriously poor fitting in the kit. There are also resin replacements for all the vents, AA directors and even individual oxy-acetylene gas bottles So.... on with the build! Al4 points
-
Hi all, So I have been busy on and off over the last year or so and finally managed to complete this fabulous kit. Before I get to the pics, a few quick hat tips to important folk. Hat tips to: Madmonk for his fabulous lighting kit Michael Fitchenmayer for his amazing weathering tutorials Foxx from Modelmaking.guru for his dry-brushing with oils tutorials Paul over at International Scale Modeller for his panel scribing video and his generally very useful channel over on YouTube. And now to the pictures! Feedback and thoughts very welcome. This is only my 4th ever build and so there is plenty of room for improvement, but I am quite proud of how she has turned out.4 points
-
Recently finished, Revell's lovely 1/32 Arado Ar-196A-3. Thoroughly enjoyed this kit. OOB, hand brushed with Revell Aquacolours, and finished with a spray of Humbrol Mattcote (y)4 points
-
Done! I need to get some proper White Tak rather than the cheap stuff I've been using but most of it came off with a bit of effort. (The prop's just, er, propped there obviously). Of course the photos show up the bits of tak and those Vallejo colours change so much under different lighting. I put the model against the photo I have on my desktop and the green look brown! Scary. Anyway, job 60% complete and just the other 50% to do (old software development joke). The masking came off the bottom fine except ONE of the wheels: I have no idea why it's just that stripe. And of course the mandatory pitot tube snapping. You've also been very kind not mentioning the huge gap in the ailerons / flaps which I have addressed but need to paint. So, jobs to do (not tonight, I have some wine ready to celebrate the unmasking): - general touch up (especially the canopy which doesn't look too bad now) - paint the Sky tail band and black and white stripes (no decals - what!) - fit prop - make a rear view mirror - Klear coat - Decals - Weathering - Matt coat I intend to do the cannons and sticky out bits next to them (what are they?) AK true Metal gunmetal (or Aluminium?) and the exhausts Mr Metal Color Iron, variable polishing just to try it out. Unless anything exciting happens, or there's anything interesting for other newbies, or you ask me otherwise, my next post will be post decals. Thanks guys.4 points
-
Thank you very much Stix Haha thanks Adrian, the target-tug scheme maybe, that would put the cat amongst the on-site pigeons As for the Dornier cockpit, there is a lot there if you look for it, depending on how keen you are on interiors you can put a lot of work in there, or just do the basics and I think it will work either way Thanks very much Simon, the skylights thing was a bit rough but I must accept responsibility for it, I can't believe that all four little windows shifted under the masks before the glue set, so I clearly did not give it adequate attention, but you know, stuff like this always happens and we usually find a way around it Thank you very much Martin Yes, Procopius originally described this to me along with mentioning his befuddlement that apparently no-one else can see these gross flaws and I think it was only at that point that I realised that was pretty much how I had felt about it too and that it was probably widespread amongst modellers, if not universal. Still, since it appears to work in my favour I won't mention it to anyone... d'oh! As discussed I prised out the skylights on Dornier 2 and applied the Micro Kristal Klear, like this: Once the retouched paintwork around the other windows dried I did the same to them. After that, as restless as a man waiting for glue to dry, I sprayed the uppersurfaces of the Defiant with Phoenix Precision Paints Dark Earth: Phoenix Precision Paints I love you ... and this is the current state of the skylight windows on Dornier 2: ... still faintly milky but better than they were I think, certainly less visually obtrusive. Once they are dry I will compare them to the windows on Dornier 1 and decide whether to give them the same procedure (my current thinking is still 'not' as they were nowhere near as protuberant as the windows on Dornier 2 but you know, never say never ) Anyway as a result of all that faffing around I didn't get round to painting the gun barrels, pitot tubes etc., so that will either be done before bedtime this evening, or tomorrow. I also need to decide whether to mask the Defiant disruptive camo pattern with Blu-tack or brush-paint it directly... Cheers, Stew4 points
-
Tomahawk IIA Bomber Defence Training Flight AH899 PB-F This was fun, with some new methods trialled and plenty learned from the good and bad outcomes. Hope you enjoy ( phone pics, must work on better options).4 points
-
Thanks to Philip's help I should have a new decal sheet in four to eight weeks time. Hopefully that will be in time for me to complete this model for the Scottish Nationals at the end of April. I am slightly running out of jobs to do without the tail decals so will probably have to start on another build. Here is what I managed to do tonight. The Eduard stays for the steps were very difficult to get into anything like a straight condition so I hatched a plan to replace most of the PE with 0.3mm brass rod: Here is the soldering set up, I used aluminium foil to stop the solder from wicking up the joint: The other ends were given similar treatment: The intermediate PE was then cut away: After a bit of cleaning up these were mounted up ready for painting: Well that's it from me tonight so it's bye until tomorrow. Nigel4 points
-
U]4 points
-
Jon, if that was 1989 I may have been (red-eyed but still, remarkably, upright) in the same field A couple of teasers anyway - I thought prior to painting the guns and stuff it might be a wise move to remove the masking... I was not entirely pleased with what I found... the 'skylights' for the bomb-bay roof had, I am sure, fitted perfectly when installed, yet stood out like applique armour when I removed the masks: Sorry about the poor quality picture - for the record next time I shall fit these windows before attaching the top wing to the fuselage so that I can sand and polish them until I am happy with them. I was however much happier with the cockpit itself: So tomorrow I will be mostly painting guns. Cheers, Stew4 points
-
It was great fun and quite rewarding to get the box of broken bits back to a reasonable state once again. The poor old girl deserved better than being stuffed in a box in a loft for the past 30 years. There are a few bits that I would do better if I were to start over, and maybe a more few upgrades too, but the point of this project was to use as much as possible of the original bits and only replace or re-make where really necessary. If anyone hasn't seen the build, it's here: http://www.britmodeller.com/forums/index.php?/topic/234975263-pocher-fiat-130-hp-back-from-the-dead/ I haven't yet decided where the old girl is going to go as display space is now at a real premium with these biggies. It might go in the entrance hall on a book case - being a real old-timer, it's a bit more 'decorative' than a Jaguar, or Lambo... Roy. FROM HERE: TO HERE:3 points
-
Box and sprue shots from my first project in the GB. Brain pattern of skilled model maker loaded into 'BIG RAT' (hopefully, no data corruption) Cheers, Steve.3 points
-
Here is my final addition to a trio of RAF Op Granby jets. A link for the trio can be found here http://www.britmodeller.com/forums/index.php?/topic/234977789-op-granby-trio-tonka-jag-and-a-buc/ The kit is the Airfix 1/72 Hawker Siddeley Buccaneer S2B. As many will know the kit itself is aged and could well do with an update. I sanded off the majority of the old-school raised detail. It also required lashings of filler and sanding to get a neat fit. The decals have be modernized and were of good quality. The kit was painted in Xtracrylix "Gulf War Pink". Thanks for looking, any comments or questions are very welcome.3 points
-
Dark Eldar Talos Pain Engine Hi guys, I thought I'd upload some of my older GW builds. I haven't done any for a while now as the price for the newer kits is getting pretty steep and the designs aren't what they once were but as stand alone models they make great builds and are useful for trying new techniques that can then be applied to regular models. So to start with this is the Talos Pain Engine given a corroded finish with Model Mates rust effects and some hairspray chipping. Enjoy the shots Thanks for looking Andy3 points
-
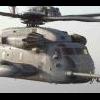
hi all, here are some Japanese helicopters to get your modelling creative juices flowing. Didn't dare put the blue ones on otherwise you might get too excited! Andy3 points
-
This is the Spin Models 1/48 Caproni Ca.20. The build thread may be found here A couple of Airscale WW I instruments make the office much more liveable3 points
-
3 points
-
Ced - no worries, I am, most of the time, a horse's hinder in any case Casey, I recommend the first two Bunnymen albums - 'Crocodiles' and 'Heaven Up Here' - to you, if you like them you may like the later stuff but after the break-up of their first line-up I never really followed them after that so can't vouch for anything after the 'Ocean Rain' album; I still have the first two albums in my now vastly-reduced cd collection and am content to leave it at that. The jury is still out on the Micro Kristal Klear but from the results so far I would say it would be viable to build the kit without adding those bomb-bay skylights, paint and varnish it and fabricate the skylights with Kristal Klear afterwards - in fact in some ways it would be advantageous. However were I to do it again, I would probably fit the windows before attaching the wing to the fuselage so I could fettle and sand and polish to my heart's content - it contents fairly easily with that sort of thing but I think I would make a better job of it that way Cheers, Stew3 points
-
It's been a while since I built anything so to try get something done I thought I'd a try a pair of simple kits. Firstly the new Airfix Gnat T.1 in 1/48. Nice kit but a little over-engineered for me. The intake/engine arrangement need very careful fitting or the fuselage halves won't go together. I tried spraying it with a Humbrol can but it might have been too cold as it was a terrible finish. I sanded it down and brush painted it in Xtracrylix. Next the older Airfix Hawk T.1, also in 1/48. Nice kit with decent fit. Decals are bit fragile and too thin. Some choice language used when applying these. Again finished in Xtracrylix. Not my best but I think I've got the modelling bug again.Thanks for looking.3 points
-
I took these photos of RF342 when they were being 'cared for' by Aces High at North Weald in the 80's. At least most of it is now well cared for even if it's on the other side of the planet. As an aside I was told that Doug Arnold was looking at these bits to make a Lancaster/Lincoln frankenplane. At the same time he had his eye on the Dan Air York for the same reason which now lives in Duxford Trevor3 points
-
"Of course, you know it's thanks to me that they got where they are today, but I never saw a penny of it myself..." Haha, do you know, that made me think of Cillit Bang again Noah Cheers, Stew3 points
-
3 points
-
thanks guys. Minor update: Cabin area glued on one side. Cockpit not yet glued. I'm going to need quite a few clamps to hold this together when the two halves are joined I think. cheers Aaron3 points
-
Soon this bird (or dragon...) will be finished. I discovered that the white animal on the fin was not a (rather strange-shaped) bear, as I first thought. It was a wild boar - which it did NOT look like: Luckily I found out that I had the right decal, on a sheet from Euro Decals that I bought a few years ago, but had completely forgotten: (The bubbles on the numbers are caused by Micro Sol). Next step was to finish the landing gears: Mounting the angle indicator from Master was easier than I thought thanks to a tip from a fellow modeller: Some other details; like a pitot tube from Master and a ladder from Eduard: Ejection seat from Aires, now with belts, and canopy with some extra details: Next step was weathering, using dry pastels. As I pointed out before, these Drakens were extremely dirty. This is actually not over-weathering... The upper surfaces was weathered mostly with some (extremely dry) dry-brushing with black and a little aluminium.3 points
-
On the contrary, I spend lots of time around my chosen subjects and always have done. I've seen and travelled on aircraft that are only a few months old and already there are signs of usage, stains from exhaust and lubricant for instance, small and subtle but still there. I think most people know what a newly built aircraft looks like, they just choose not to model them in that condition. Just because you don't agree with something doesn't make it rubbish. There are many very talented modellers who use colour fading and weathering and many who don't. Nick Millman has given a technical reason for the effect - I'm not that clever, I just do what looks right to me. Neither approach is wrong. It just boils down to tolerance of other folks viewpoint. I've seen many thousands of models, real cars, boats and aircraft over the years and I know which approach I prefer. Takes all sorts don't it! Dave PS. I agree 100% with Will's post above. I once saw a line-up of Ferrari race cars from the '50s onwards. Not one of them was the same colour. Of course, we all know that's wrong, don't we. It's also often stated that the Campbells' Bluebird cars and boats were all painted the same colour. They weren't. Reading the blog of the rebuild of the Coniston wreck proves that there were colour variations on the same boat. Being pedantic over colour in many cases just ignores real life.3 points
-
Thanks chaps Just tried masking up the flaps to make them stand out a bit. I think the couple of hours spent cutting thin strips of tape, masking and spraying looks ok but I may have not thinned the paint enough and it looks to dark hmmm. Oh well onto masking the insignia now. Just noticed that taking the pics in a different room really changes how the green looks Thanks Simon3 points
-
At last I went back to my bench last night. Still no sign of the second etch set which I want to use on the cockpit. I almost finished the side door with the steps which is much more work than I thought. I either did something wrong or the steps are too wide. My reference pics were of no good quality and the instructions are a bit vague as stated above. Painting this will be tricky: Then I added some details as below: Finally I was not happy with the floor and tried to add some more detail. First I just scribed some panel lines but it was not very convincing, so I approached a new method (well for me at least), which turned out rather good IMHO, though the details are obviously not correct (I referred to an Eduard set for the Cyber Hobby Sea King but the pic of the real Sea King interior below shows a different layout): Maybe I will add some riveting too. Another plate for above the sonar bay will be added from thin plastic sheet next. Rene3 points
-
How's about an update?! Here is the progress after a few uninterrupted days in the shop. Several more foam parts have been cut and have done a few more in acrylic. Also the 3d printer has pumped out few parts while I was at it. Here are the representative parts hastily placed together to give the idea of the construction. The acrylic bulkhead that incorporates some detail for the nose gear well. The acrylic is hard and stable but quite brittle. Sometimes a miss calculation of the feed of the bit and I get a little bit of chipping of the detail. Although I will be able to repair this without too much effort. Here's the rear cockpit bulkhead set into milled recesses of the foam fuselage side. Again the fuselage side with a 3d printed gun shroud. The gun shroud in place..nice fit better than expected and this is before any post mill/print finishing whatsoever. Last one these are two of the three vacuum form molds that will shape the nose section of the Jag; that house the LRMTS. The process is light coat of primer is applied followed by careful file and sandpaper work to remove the primer. As the low spots mark the true shape of the part once the paint is gone the part should be closer to it's nominal size. That's it for now more later. Timmy!3 points
-
Worry more about your display lighting than arcane colour adjustments based on size. Display lighting has a lot more to do with whether you will like your finished piece. (Incidentally, about red, Mr. Stanton is right only as to fairly large scales. Red does not travel over long distances very well. Blue travels very well.)3 points
-
Progress has been made... fuselage is nearly ready to close up but I'm now calling it a night! Photos soon.... Also, this is now a Madagascan Air Force Mil-8 as I handed over Thailand.3 points
-
I got the RCAF P-40K unmasked and decals on: Unmasking the main canopy went better than I could have hoped, but unmasking the side-view windows revealed that they are too thick, or the bay is too shallow. I hadn't noticed this, as I installed them already masked, and just thought it was the masking protruding from the bay. But, if you look at previous pics above, it is pretty clear that the windows are sticking out. I was afraid that removing them and trying to enlarge the bay at this point would only lead to worse results, so I used paint to try and hide the defects as best as possible. On the bright side, this is the first time I've tried doing subtle color variations in the scheme with an airbrush - following some advice from Mish in her wonderful Flying Tiger thread - and it turned out pretty successful. The roundels are from an Xtradecal roundels pack, and the serials are from a Kits-World P-51 serials and lettering pack. The yellow serials are individual numbers that had to be applied separately, so don't look too close!3 points
-
That's great Paul....I think !! If the consensus is to have a bash, looks like I should! I'll follow up with Mike....he says with trembling hands! Back to the topic anyway, got the weathering done and masks off tonight, on to the sticky out bits next...3 points
.thumb.jpg.d17ff607fc7e89ed057e63fcb6f2a888.jpg)


This leaderboard is set to London/GMT+01:00