
Leaderboard


Popular Content
Showing content with the highest reputation on 10/01/15 in all areas
-
When Revell released their Halifax a few years ago, I knew immediately that I would build it as L9163, the aircraft which dropped Jozef Gabčík and Jan Kubi into Czechoslovakia to assassinate Reinhard Heydrich. I cannot do justice to their story of incredible heroism and sacrifice, but if you wish to, you can read more here. The kit is not without its problems, but I was fortunate enough to receive a review sample of the excellent Freightdog improvement set, which includes replacement radiators, propellers and wheels. I think it really improves the look of the kit and is well worth investing in. Paints were a mixture of Tamiya and Mr Color, while decals were sourced from the Kits-World serial and code letters sheets and those supplied with the kit. I must say that while it is a bit of a clunker in terms of accuracy, the Revell kit is a joy to build. My only frustration was caused by my breaking a number of small parts during and after construction, but that is down to my own clumsiness.31 points
-
Here is my RFI of the much built and much discussed Airfix 1/24 Typhoon Mk. 1b. Airfix's Typhoon was one of the "must have" items of 2014 for me and the previews provided by Airfix fueled the anticipation even more. I received the model from Axel's Modelbau shop in Germany on July 27th and the build took until October 16th. Overall fit was good with some minor problems fitting the chin radiator plating. Keeping an eye on alignment and fit of the different build modules will help you keep clear of any problems. The moulds did show some flash and the placing of the ejector pin marks could have been better thought out. It was a very enjoyable build and I am quite happy with the final result. Airscale provided me with a set of instrument panel decals specially for this build and they also provided their set of placards. EagleCals sent a set of their decals which included the markings of Emannuel "Manu" Geerts, (Belgian Airforce), which is the aircraft I chose to model. I bought Master Model brass Hispano barrels and Radu's PE Typhoon radiator set and Sutton seat harness to provide some better detailing on these parts of the aircraft. For anyone with masochistic tendancies here is the link to the entire build log: http://aeroscale.kitmaker.net/modules.php?op=modload&name=SquawkBox&file=index&req=viewtopic&topic_id=223177&ord=&page=1 Here is a selection of photos taken during the build: And here the final "Beauty shots":18 points
-
They were the times of the Swinging London... the Fab Four played all around, George Best ran and dribbled, miniskirts everywhere... and on the HMS Victorious deck the Sea Vixen stood proudly. Excuse my horrible "verses".... Sea Vixen 1/48 from Airfix, A kit that all of you, British friends, know very well. I found it a real pleasure to built. Even the decals (and those red lines on the fuselage worried me a lot because of potential silvering) were perfect. I love this beast.. so asymmetrical, so odd looking yet powerful... So British! With the engines intakes embedded into the wings leading edges... The "coal hole" where that poor navigator had to dwell....15 points
-
Hi People Here my first plane in this new year 2015 A MiG-15 Bis n.2915316, pilot Maj.S.A. Fedorets, 913th IAP, Antung North Korea July 1953 Kit is an Eduard 1/72 Profipack And now I start a B-25J based in Solenzara-Corsica 1944 Will be an Hasegawa kit 1/72 with MMR sexy Pin Up Take a nice week Ettore12 points
-
Hi I post already three photos of this model but not in RFI but in Aircraf Modelling, WWII forum in last August. http://www.britmodeller.com/forums/index.php?/topic/234953845-raaf-ford-trimotor-colours/page-3 There was a discussion on colours and camo pattern of this particular machine - Ford Trimotor AT-5, of 33 Squadron RAAF, New Guinea 1942, A45-1. Since it was my first ever post on BM I've chosen a small photo of this Trimotor as my avatar. I apologize for posting it again, but one collegue asked me to give more photos... I hope you do not mind. I do hope that not everyone traced this topic im AM WWII... Best regards and comments welcome Jerzy-Wojtek Edit '2017: two photos from inside:11 points
-
My family is 50% Russian.. so it is time to post someting from the Great Mother... This tiny one was one of the most manouvrable planes ever built. Able to turn in a dime. So if flown by good hands it was not so easy to shoot down by BF-109s. The kit, extremely hard to find now (not to be confused with the I-152) was from Classic Airframes.11 points
-
hello guys My last one finish One build for a friend Difficult build ... because hold model badly stored in its attic, a few years especially with the heat ! ..result drilled wings, deformed fuselage ! and decals fallen powder!!!! in the watter ...And I cross details besides of the assembly ... After some shout........... and white hair.. . here is the result before delivery Just two three things has to rectify And on Tuesday takes off (sorry for my Anglish ) Pascal10 points
-
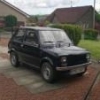
Hi all, I have just added the build pictures of my Fiat. http://users.skynet.be/fb990055/Fiat_G91R3.htm Cheers, Pierre.10 points
-
Yes but when they do occasionally pop out they are true works of art. I went to see Billy Connolly live in Nottingham at about that time. One of the funniest shows I have ever seen, he was on stage for about three hours and they practically had to drag him off. Awesome comedy. Anyroad, I have not done a great deal tonight but I did complete masking the canopy, finishing off with Eduards instruction to complete the masking with a liquid medium: I was very impressed with this masking set, it all fitted very well and only needed the tiniest of trimming here and there: I had another look at the blackened PE, and yes it is a massive fail but I bent up the mirrors and may still be able to use them as they are: Next I installed the overhead console using Gator glue: Using some 1.25mm black rod I then fitted some map lights: This is the look I was trying to achieve I then tried to make some curly wires a la Milktrip style but it did not go well: I will have another bash at those in the morning so its bye for now from me, Nigel8 points
-
Hi all; first of all I wish you and to your families a Happy new year. My latest model, the only one completed in 2014, I wanted something different from my usual WWII topics. The kit is very peasant to built, the only issue being the sightly to dark grey marking decals dealt with spraying light coat of very ligth grey. I hope Freedom will release other as intersting subjects. Hope you enjoy. Alain7 points
-
P-47D-3 Thunderbolt 42-22637/38 "Daring Dottie III", 348 Fighter Group, 341 Fighter Squadron USAAF, Finschhafen, New Guinea, march 1944. Pilot: Capt. John T. Moore (7 victories). Kit: Tamiya (1/72). Decals: AviPrint.6 points
-
One week in and nobody's finished yet? Oh well, leave it up to the Poles to get the job done... Polish Air Force MiG-21MF, Academy 1/48 built OOB apart from a resin seat: Build thread here: http://www.britmodeller.com/forums/index.php?/topic/234973802-poland-mig-21-finished/ Cheers, Dean6 points
-
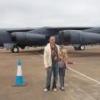
Hi all, New to this site, I thought I'd post some pics from a recent build. As you can see, taking pics is not one of my better skills, but here you go.6 points
-
Spent the last day or so pretending to be Dr Frankenstein as I put together the rescue crewman from spare figure bits, (The arms, legs, torso and head are all from different figures), and eventually came up with this..... The hose is a bit of old wire. When put together with the cockpit and base and then added the odd Photobucket effect...., you end up with a little game of `spot the difference`...... ok....., perhaps it`s not quite that much of a game...??6 points
-
So does mine, something's wrong with the seat adjuster. I believe a chair is not fixed in place, a seat is. But it can't be German, it has only one syllable and doesn't sound like rottweilers fighting.6 points
-
This is the Tamiya World War One Male tank. Motorised 1/35th scale. Thanks for looking.5 points
-
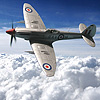
Yet another one of the bench (3 so far this year !..... must be something in the water). Airfix's Spitfire 19 in 1/48. The markings are for Flt. Lt. E.C. 'Ted' Powles of 81 Squadron RAF, based at Kai Tak, Hong Kong 1951. A year later, on a routine meterological sortie he took PS852 up to a true height of 51,550 ft. but encountered problems with cabin preasure. He nosed her over to reduce height. His speed increased; at some point in his dive he reached 690 mph. the fastest speed recorded in a Spitfire. Anyway here are the pic's. Thanks for looking and please feel free to comment.5 points
-
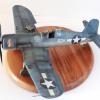
Accurate Miniatures 1:48 TBM-3 Avenger. Long time stash resident. (The Avenger was nicknamed "Turkey" and I got this for Christmas nearly 20 years ago!) I got this for Christmas way back when it first came out in 1996, and it has been sitting in my stash ever since. I have always been keen to build it, but never quite got around to it. As Christmas just past was approaching (eh?) I thought it was high time I got started on it, as I had about 10 days off work over the Christmas period. I'll finish it in box art scheme of overall sea blue, which I quite like. Looking at it, there were 2 things that I thought needed improvement. The instrument panel is a clear plastic moulding, but no decals are supplied for it. Very odd. And the seatbelts are supplied as decals, which I didn't think would work. I found that Eduard do a zoom set for less than a fiver that addresses both these areas, plus some more, I've been slowly painting and building up the interior, there are some really tinly and fiddly bits of PE to fit, some of which is now residing in the stomach of the carpet monster! But mostly I am really pleased how the instrument panel and consoles look. Having read much of the discussion on this site about Avenger interior colours, I went with the late production overall interior green. I'm wondering whether to use a KMC wingfold set on it. This was given to me by a good mate, Brian, who sadly died in 2001, and I have always thought that I should incorporate it into this build. I'm just a bit put off by the complexity and potential fragility of the finished article. We'll see. I keep changing my mind. The fuselage halves are about ready to be joined, so on with that task now. Thanks for looking John5 points
-
I'm hoping that one day you will give in to the pressure and finish all these Avro kits off he he!!!!! I remember Don (can't remember his username) did something similar with a Lancaster diorama a few years back, it was excellent. Got the nose on last night and just taken some pictures with most of the big bits dry fitted in place. A bit more tidying up to do, but the wings will be going on permanently today I suspect Not far off the painting stage now5 points
-
Debs has kindly emailed me a diagram showing the position of the various aerials on the outside of the JP5A. I was bl**dy happy to see that I hadn't put anything in the wrong place - and a little less happy to see that there was a couple more of the darned things than I bargained for. I hated/feared navigating with the VOR/DME as a stude on the JP and now it has come back, in the form of more aerials to reproduce, to haunt me again in my dotage by frustrating my modelling efforts........ Not perhaps as much as the good old British weather tho' A sniff of strong winds and we lost electricity to the village at about 6.30 last night - just as I wos thinking of a nice bit of stress relieving modelling after a long week at work. Electricity still off when we gave up and went to be to watch DVDs on the MacAir, eat chocolate and drink surplus prosecco left over from christmas (comfort food?). And it's gorn off again this morning.......... Why did I hate VOR/DME as a stude you (didn't) ask? Well - for the those that haven't aviated or used a flight sim - you get a range and bearing from a ground based beacon on a compass card type display in the aircraft. It's easy enough to navigate straight to and from the beacon cos the needle is pointing straight at the beacon. But being a civilian nav aid - there wasn't very often a beacon directly where we wanted to go (and there wasn't one at Church Fenton) - so we were always flying from one position that was an offset (i.e. a range and bearing from the beacon) to another position that was an offset. No such thing in the JP as a computer to calculate the track and distance to fly for you - so it all had to be done mentally. We were taught how to visualise relative positions on the compass display and so estimate the track and distance - but it was brain numbingly hard to do in the air as a student (at least this student) Oh yes and in case you're wondering - taking a peek over the side as a check of position (1) wasn't possible above cloud (of course) and (2) was discouraged on clear days by vigilant instructors ready to verbally or physical chastise poor stude..... Anyways. I'm only posting this drivel of a thread drift cos I haven't got a proper update to post........Sorry......5 points
-
I had a very immature snigger at that too, but in fairness I insist that no sentence (let alone a word) should contain the words "kissen" and "fahrt" in any kind of proximity... Cheers, Stew5 points
-
Hello everyone! I am presenting you the model of Colonel Thomas Christian's aircraft, named LOU IV, wich was finished 3 years ago. The model was made out of the box with some sratchbuilt. I removed dorsal fin fillet and add a few details in the cockpit. The back mirror, machine guns in the wings, details on the additional fuel tanks, antennas and position lights were scratchbuilt aswell. I painted the model according to the references I found on the internet: - Aircrew Remembrance Society - Tom Cleaver P-51 D (LOU IV) Used colors: -Humbrol HB1 Dark Green - Model Master Aluminum metalizer - Model Master Olive Drab FS34087 Decals are Aero Master, wich are a bit incorrect, the writing E2-C is 1,5mm too short according to the height. The writing with names of mechanics on the left side of the windshield are also missing. Photos of the finished model: Comparison of the model and the reference photos of the real aircraft: More photos and the WIP can be found here: http://eberlemodel.blogspot.com/search/label/Mustang Regards, Aleš.4 points
-
Final build of 2014. Finished it up New Year's Eve day. All except the exhaust.4 points
-
The special scheme "Bavarian Tiger" of Luftwaffe Eurofighter EF-2000 Typhoon S 3009 (cn GS004/048) during NATO Tiger Meet 2014. Kit:F-Toys Euro Jet 1/144 EF-2000 Decal:Fully hand-painted with DIY decal4 points
-
I think it's more the fact that it's nine months and not nine years that's impressing the rest of us!4 points
-
This is the quarterdeck; Lusty in this case, taken from a MoD Navy site feature on her being at sea over Christmas 2013 (helping after the tsunami).4 points
-
Thank you giemme. Unusually for a Saturday I managed to find a bit of time to work on these so I started work on the first coats of Humbrol's 116 US Dark Green for the camo. Airfix on the left: Hopefully I'll get the camo finished tomorrow and then it will be time for some coats of Pledge in preparation for the decals. Comments and suggestions welcome. Kind regards, Stix4 points
-
Or this one, both aircraft from my boyhood 'Spotting days' and cycling up to the hangars with no security and guys saying "we've got the new Delta bomber ( the Vulcan VX770)) in there, do you want a look.. (Langar c1950's) Tollerton c1956.4 points
-
I bought the Aifix 1/48 mosquito pr xvi kit and I was very surprised to see nearly two full kits inside so I had a look at all the parts and decided to have a bit of fun with it instead of sticking to the instruction I decided on one of the mossies from 633 squadron not a great film but it has real mossies in it so that makes it awsome 😃4 points
-
Another step - the decals. Hasegawa's decals are just fine, a little to thick and fragile, but finally I put them without any serious problems.4 points
-
Out of curiosity, was Afrikaans the dominant language in South Africa, or was English? I've read -- very cursorily -- that the Afrikaners feared cultural dilution, not only from the usual suspects, but also from Anglophones.It was a strange relationship. The majority of the whites were Afrikaners, something like 60%, and then the Cape Coloureds also had Afrikaans as a home language, so it was spoken as a first language by significantly more people than English was. The Afrikaners tended to dominate the farming areas, small towns and civil service, whereas the English were in the cities and the formal economy. It was only in the 70s that the hatchet of the Boer War was buried, so there used to be very little social interaction. However, unlike Canada, Belgium or Switzerland where the different language groups, more or less, lived in different areas of the country, we is SA were much more 'jumbled up', and it was said we were the most bilingual country in the world. One really just had to speak both. Culturally yes, they were on watch. English being so internationally dominant there was a constant eroding. Eg the world for TV is 'Beeldradio' ( picture radio literally ), but it was only ever called 'televisie'. There was quite a good, long running, satirical show in Joburg, where a South African immigration official is interviewing a new arrival. "What languages do you speak?" "English, German, French, Spanish, and Japanese" "No Afrikaans?" "No" "Okay, not bilingual" All this under a banner advertising the newly introduced television service, which was to be for educational, not entertainment purposes - "Southern Hemisphere Instructional Television" Having said all that, Afrikaners still tended to feel more at home when visiting London compared to Amsterdam though, South Africa having a big "Made in England" stamp all over it. It was an interesting 300 years. Mike4 points
-
And another...! Italeri kit with Airfix decals which I got off ebay years ago. Built as a tribute to my grandad (no longer with us) who jumped out of them at Arnhem and many other places. Hope you like.4 points
-
Believe or not but it`s limited...Anyway recently i`ve been working on "Mitsubishi A6M Zero aircraft fighters"(These are intended to be placed inside a hangar deck) i got most of the parts cut out so hopefully i will get these assembled at the end of this week...All my aircrafts will have a transparent windshields and maybe cockpits;))4 points
-
Superb model, my favourite RN aircraft.4 points
-
There was a period when I could say the Monty Python "My hovercraft is full of eels" phrase in seven languages, but most of them have gone now. However, this is why I can tell you that the Germans call a hovercraft a "luftkissenfahrtzeug"; literally an air cushion going-along machine.4 points
-
Well thanks to theplasticsurgeon's suggestion, I went out to Hobbycraft today and bought a few coloured A1 mounting boards and did some more photos with a black background this time and wow, what a difference! Cheers mate!!4 points
-
Messerschmitt Bf 109 E-4 W.Nr. 1480, Stab II/JG3, pilot: Oblt. Franz von Werra (21 victories). On September 5, 1940 the plane was shot down over Kent and has landed in a field near Marden. The pilot bacame POW - the only one who managed to escape from Canada to Germany to keep fighting. Kit: Airfix (1/72). I have built this model together with my 7 years old son, Gustaw.3 points
-
Hello everyone. It has been a while since I have been here, lack of time I'm affraid . Here is my Mini, which I have finished few months ago. I've entered it to the competition in Telford, hopefully any of you who have been there seen it. Different approach this time, rusty, tired of it's life and it's owner Mini. Scratch built items inside, few details in the engine bay. Pictures will (I hope) show the rest. Sorry for random order of pictures but my pc is playing up.3 points
-
Just for info I think you'll find that "the sticky-out bit (which is something to do with replenishment at sea) is actually a Marine Evacuation System (MES). To quote http://www.survitecgroup.com/news/survitec-awarded-queen-s-award-for-enterprise "RFD MarinArk Mk II, which has been continuously developed, employing twin vertical chutes at muster stations to transfer passengers into square, inflatable and reversible, life-rafts. The chutes and rafts are fully enclosed, sheltering passengers from the elements. The chutes, which, for increased safety, permit passengers to pass others, incorporate shock cords for controlling descents. The rafts incorporate unique features concerned with buoyancy and storage. The equipment, capable of safely evacuating over 800 people in less than 30 minutes, is installed on cruise ships, passenger and commercial vessels worldwide and has had global commercial success." Hope this helps.3 points
-
you get the idea I've gone for LifeColour paints which I'd not used before. Very nice I must say3 points
-
Hello All, I might as well call this post "Why it's a good idea to buy kits"... So I carved myself a new fuselage and kept a closer eye on cross sections: Meanwhile I tried out some epoxy green stuff (comes as a strip of putty half yellow putty and half blue hardener) to beef up the first one. It says it dries "flexibly". So I slather it on the old fuselage and get sanding... Flexible it is! I had left it a day to harden but it stays flexible. When I started sanding I noticed it was starting to peel off! It's nice to work with but I think it's more suited to figures than this mullarkey. Good news is that it peels off cleanly so I can do it all over again: Meanwhile, back on the new one, a touch of green putty (the good ole' Squadron one this time!) and some hollowing out of the cockpit You can see the cockpit walls are getting pretty thin - a wipe of superglue makes the outside layer almost like plastic, so it's a question of hacking out all the soft wood: Next step is to prime the new halves so I can see what I've got, and we will go from there! Thanks for looking, Adrian3 points
-
Rich, The "giveaway" is the position of the gangway against the bulkhead and the bollards. If you look at the picture at anchor the gangway is on the RH side of the opening. If it was port side to then it would be the other way round. Other clues are layout of comms panels and physical size of the area. Port side is a bit of a squeeze in comparison.3 points
-
Here's my rendition of the old Airfix SB2C-4 in the markings of Air Group 87, VB-8 that flew from the aircraft carrier U.S.S. Ticonderoga in 1945.3 points
-
That's the aft (Officers') brow, or "gangway", as most people call it, though the Navy almost never does! (Don't even go there with "gangplank"; that's pirate ship stuff!) Some admiral or other coming on board. That is the next opening forward of the quarterdeck, in this case on the starboard side; on the model it is the one with the stowed accommodation ladder (the staircase wot would hang down the side of the ship if she were at anchor, for people to get on and off boats). Seems my memory was wrong; this bit does at least have a wooden deck, but I guess that makes sense in view of its purpose. That thing on the right is one of the wooden covers I was talking about above, which go over the oily bollards in harbour. There is a second brow / gangway, further forward, (visible upon the model as the other opening with a stowed accommodation ladder in it) - this is where non-officers generally come on board. [This segregation malarkey all sounds terribly Victorian and class-ridden, but it is largely because of the size of the ship; no other ships have two brows. Officer-land is aft, and the boys (and girls nowadays) generally live further forward. The last thing the ship's company need when they're trying to get ashore for a few beers, or bring on board loads of stores, or whatever, is a bunch of Pigs getting in the way cos they're having some poncy cocktail party... ] Though officers have (a lot) more space than the ratings, position in the ship certainly doesn't guarantee comfort. In my first two embarkations I had a bunk on 2 deck (the level below the flight deck), directly under the SHAR ground running spot; I'd generally be woken up at around 5 in the morning by the "Chain Gang" - 801's boys adding chain lashings to some jet or other in preparation for an engine test... and then they'd flash up the Pegasus, and you'd have a thin steel plate between your head and a howling jet engine. In my second year on the squadron I got a cabin lower in the ship, down on 5 deck (around the waterline). Much nearer the wardroom (and the bar!), which is also on 5 deck... but also directly on top of the port screw, so when the ship was going anything over about 12 knots, constant vibration. Mind you, I understand the mess deck actually inside the ramp was unbelievably noisy!3 points
-
Thanks Matthew for pointing that out, now amended, trying to get this one as accurate as possible This is why I like BM, the knowledge of others is a real help. Cheers Dan3 points
-
This is my set up for making the curly wires: Here they are installed with PE heater vents and rear view mirrors: I daubed some Alclad chrome on the mirrors. I did a bit of retouching, checked for dust and then manned up and glued on the canopy with five minute epoxy: The clamp was needed to spring in the sides of the canopy otherwise there would have been some bad steps. I went off and had a bacon sandwich and by then it was set and ready to unclamp: There are few gaps which I will sort out with black Milliput but overall I am quite pleased with that.3 points
-
Just to prove that I am still occasionally modelling: It's a lovely kit, and I used the Aires cockpit and wheel wells which are stunningly detailed. The Promodller 'how to' DVD for this kit was also most useful. Hope you like it.3 points
-
Hi tmaci6. I will check that out. Thank you. This morning I got another coat of paint on both kits and I think they now look about right: Then I painted the frames of the canopy parts with Humbrol 116, US Dark Green. I've done this at this stage to try and make sure it blends in better when I paint the camouflage on the rest of the aircraft. Airfix: Tamiya: I decided to let all this dry well before starting the camouflage painting so I got the base coats on the props. I used Revell's Anthracite. Airfix prop on the left: Next up will be painting the camo. Comments and suggestions welcome. Kind regards, Stix3 points
-
Eye watering for any big cat I`d imagine........3 points
-
I'm still a too busy to chop plastic up at the moment, but I thought I'd find time to raise a few of the errors which appear on this kit. I think that the most useful word in this project will be compromise because this kit contains so many errors and it would take a whole Boots Cosmetic counter to supply the Lipstick for this Pig. There will be those among us, and I totally appreciate their views, who will want a halfway decent model of a Hornet, (the kit as it stands goes together quite well) without spending a year building it or binning it because of the work needed. Visually the most jarring area IMO is the nose and canopy which we have already gone some way to addressing and as soon as a new canopy is available this will be not too onerous a task to do. It is the modeller's prerogative to ignore or carry out much of what follows. The rear fuselage needs to be extended by cutting off the tail at the black line and a piece of plastic 3 mm thick inserting and shaping to section. This is required for any of the Hornet Mk.s (if you choose to carry out this mod). For all Mk.s other than a Mk.1 the tail cone it's self will require lengthening by further 3 mm with Milliput, The tail cone extension was as a result of the empenage anti flutter mods that also led to the larger tail planes. Another concern that I have is that when Trumpeter bring out the Mk.3, is, will they use the same tailplane as in this kit (we have the fin) because if so this will be too short. The Mk.3 introduced the 18' 1.4" span tail (over the elevators). I note from the pictures of the NF.21 kit that it does have a larger tailplane, However the span over the elevators of the NF.21 was increased to 18' 9.7". so unless they're cut back they're too long for the Mk.3. It can easily be trimmed. In the above photo you might note that there are several other black lines. The ailerons are too short and too wide. All moving surfaces require the 'fabric effect' removing by filling and filing. The tail surfaces all require minor profile alterations and the rudder hinge line will need rescribing. The wing tips have over emphasized fuel dump nozzles which give an odd profile. These are only really noticeable if the ailerons are deflected. The major areas of work on the wings will be as follows. For some of which I haven't worked out a complete solution yet. The engine nacelles are too far apart by 3 mm. The radiator intakes are not angled in front view and the large raised area inboard of the nacelle and fuselage over the radiators will need to be added. On the underside the carburetor filter box will need scribing on. The most difficult area will be the nacelles. These are too short by 2 mm but they are misshapen fore and aft and the wheel bays are too shallow The main under-carriage is very over simplified and the tail wheel unit is fictitious. All will be dealt with in detail. There are also a number of other little irritants and the overall sections aren't very good. I'm sure if I've got anything wrong David will comment further. John3 points


This leaderboard is set to London/GMT+01:00