
Leaderboard


Popular Content
Showing content with the highest reputation on 02/01/15 in all areas
-
Italeri's 72nd scale AC-47 Gunship is quite an impressive kit for its age. Fine engraved panel lines and a good fit requiring no filling. All I replaced were the gun barrels with better scaled resin ones from Quickboost. Painted with Humbrol enamels and decals from the box. free image host host image screen capture img host how to do a screen shot upload image online Alongside her stable mate the AC-119: post a picture picture uploader Thanks for looking25 points
-
Hi all, here i want to show my Dornier Do 215 B-5 Nachtjäger: Kit + Construction: The ICM model is very well detailed, but has substantial fitting problems due to a complex part division and some "manufacturing inaccuracies". Nevertheless, a beautiful model can be built. The only in my opinion necessary modification of the model is to increase the cooling air intakes. The FuG 202 antennae were srcatch bulit. Original aircarft: With the introduction of the DB 601 series engines, the Do 17 received the new RLM number 215. The B-5 was the last model of this aircraft series from the early 30s. Originally planned as a fast passenger aircraft, the latest variant of the series had a maximum speed of 480 km / h. Only 17 (20 in an other source) of this night fighter variant were built. First, the Do 215 B-5 were equipped only with an infrared viewer Spanner (red headlight in the front). In late 1941 the first FuG 202 were installed in the machine. Whether the infrared viewer was still used at this time, is unknown to me so my model shows both. My machine is a plane of Nachtjagdgeschwader 2 (night fighter squadron), in the spring of 1942 long distance night fighter raids were carried out form Leeuwarden (Netherlands) up to the whole UK. There bombers were hunted, who were returning from their operations over the Reich. Some Do 215 B-5 should have been in service until May 1944. Walkaround: Bottom: Some Details: Hope you like this model. Criticism, notes, and comments are gladly welcome. Greetings from Germany. Kai18 points
-
Hi all, and happy New Year! A sneaky late completion for 2014 here-this is a little Airfix Bulldog which I picked up looking very sorry for itself in the "give an old model a new home" stall at Telford this year. Those of you whom I met at Telford might have seen how sad this little fellow looked, with a bizarre desert scheme and gold spinner, all apparently applied with a yard broom... Anyway, much to my surprise all that gunk lifted off sweet as a dream with Tescos 26p cleaning fluid, and to boot the canopies, which has been attached with some non-poly cement glue, simply lifted off as the magic liquid softened their attachments. There was quite a lot of seam cleaning, sanding back of glue runs and general tidying to do, and the model got a full rescribe and new interior paint. I also widened the tiny kit seats, added some belts and one or two pipes, exhausts, brake lines etc. An intake or two got drilled out, and I had to splice the undercarriage back together and fabricate some new prop blades. However, on the whole this is a nice little kit which captures the subject well, and has stood the test of time. Not my neatest ever paint job, but the model is tiny and I was rushing a bit to get it done in 2014! Paints are all Humbrol- White from the spray can, and Light Aircraft Grey and Signal Red hand brushed. Decals for the original kit were kindly provided my Britmodeller Jason from Swansea. Although they were 30 or 40 years old, and the roundels and flashes were pretty dull and out of register, I was well impressed with how they'd survived-no yellowing or glue deterioration, and they played ball very well with a bit of Microset. I made full use of the maintenance markings, serials, and Central Flying School badge. I'm missing the glazed landing light cover for the starboard wing-has anybody got one hiding somewhere?13 points
-
Here are the photos of my completed Buccaneer build. WIP http://www.britmodeller.com/forums/index.php?/topic/234961480-hs-buccaneer-s2b-148-airfix-finished/ Thanks for looking....13 points
-
Hi guys its been a while since i posted any builds, so i thought ide share my tamiya lancaster that i had for christmas last year from my girlfriend... This build had a few extras added which are as follows Eduard colour interior etch Brass replacement cannons Eduard etch seatbelts Montex spray on roundal stencil and mask set Tamiya tilly truck Revell WW2 Ground set This build was weathered with airbrush in the way of pre shade and post shade and exhaust stains where also sprayed on with Tamiya X19 smoke. This has probably been one of the most enjoyable of 2014 and i hope you like the finished item. All comments are welcome thank you for looking Enjoy... HAPPY NEW YEAR11 points
-
Hi Guys, This one is a couple of years old but I thought I would share it with you if you don't mind. The model is a Hasegawa Mk.I with a CMK cockpit, a Squadron vaccuformed sliding canopy (Kept the Hasegawa Windshield) and an Airfix Mk.I proppeler and spinner. The decals came from Aeromaster and the paint came from Gunze and Tamiya. Weathering was done with a colour dilution and pastel chalk.11 points
-
Hi Folks and a Happy New Year. Here is my last completed model of 2014, finished off on Hogmanay. This is the Airfix 1/72 EE Lightning F6 kit built for the Lightning Group Build here on BM. Built OOB but using Model Alliance decals to portray XS931 of 11 Sqn in 1968 while resident at RAF Leuchars. Photos show this aircraft to have been very highly polished as it appeared to have been the aircraft sent around the Airshow circuit at one point so that is how I tried to depict it. Unfortunately the kit didn't come supplied with the clear sprue so I had to use a flawed canopy discarded from one of my F2A kits (I'll get round to getting a replacement sometime) but I was able to find a photo of this exact aircraft wearing a full set of covers so made a cover to match. The Armourers haven't arrived yet (last on the Line as usual) so no missiles fitted, I couldn't make my mind up if the Airfix supplied Redtops were accurate or not (they look too skinny to me). And here is one with it's cousin from 74 Sqn There are some more photos in the GB Gallery along with the WIP in the GB, I hope you like her. Duncan B11 points
-
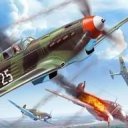
These are two out-of-the-box builds of the Fine Molds Bf 109 G-6, the best 109 model in any scale IMHO. The full build article can be found here: http://www.britmodeller.com/forums/index.php?/topic/234969303-romanian-twins/ Thanks for looking and Happy New Year to all!9 points
-
Hello, This is my Tamiya Spitfire MkIXc in the markings of SAAF Lt Eric Robinson. Aftermarket parts include Barracuda wheels and some of their cockpit items. Montex masks and HGW wet transfers were also used. Overall an exceptionnal kit that you must build, if not already done! Happy new year and all the best! Tristan Estoppey Late addition... And a few build pics9 points
-
Here comes the Blue Nemesis. I've fell in love with this bat from hell and I'm pretty sure this isn't my last Ford. The kit is real LEGO and it's coming along nicely. The downside are provided decals which are *VERY* stubborn and I opted for custom die-cut masks in the end. Eduard's PE parts for this kit are rare these days (so are masks for canopy) and apart of instrument panel and landing gear doors there's not much to enjoy. The other story are Eduard's Brassin AIM-9 Sidewinders which I would recommend along with Remove Before Flight superfabric tags. I really enjoyed this build and it's my second build since my comeback after 15 years long break8 points
-
Allow me to introduce my latest model of 2014, collected during Bomber Command GB: If you're interested, WIP you can see here: http://www.britmodeller.com/forums/index.php?/topic/234968940-avro-lancaster-biii-phantom-of-the-ruhr-airfix-172-finished/. All comments and criticisms welcome. Sergiy.7 points
-
6 points
-
807 Sqn HMS HUNTER, British East Indies Fleet, 1945. Over the Christmas period, in between Turkey, Puddings, Chocolate, Wine, Port and Beer, I have actually managed a little modelling. so here then is my first completion of 2015! This is a project I envisaged a few years back when I came into possession of a cheap 1/72 Italeri Spitfire IX and an Aeroclub white metal Merlin engine of roughly the right type. Its not particularly accurate, but was intended purely as a bit of fun that has kept me happily occupied in between family duties for a couple of weeks: FredT6 points
-
Okay Henrik and Cliff, Here are a couple of group photos of my Latin American collection, so far! I hope that you like them. Craig.6 points
-
Thanks Colin. I've been checking all the variables this morning and found the following: The fuselage plug is parallel and a triple check of the cuts indicate errors less than 1mm The Airfix fuselage against the war paint 1/72 profile is out by a few mm but even worse at the front end. I've taken some pictures but the pc has died this morning so going to be stuck until sorted. As the error at the rear is in the region of 2mm, I suspect the total error is a cumulative effect of cut tolerance being amplified across the length and the air fix errors. Something for people to think about when doing this buil is to do the rear fuselage cut for the resin plug at a slight angle to compensate. I reckon about 1.5mm or perhaps add some long spars as a guide inside. Not the end of the world, the razor saw and car filler will come to the rescue. Thanks for your observations John Aero Guys, there's somewhat of an unhealthy thread drift developing so please take the discussion not related to the build in to another thread to avoid this one going sour, cheers6 points
-
On to the first build then. This will be a Dominie representing a pre-DAU aircraft (Dominie Avionics Upgrade) of 6FTS RAF Finningley. The aircraft modeled will be XS726 'T' which I did my First Solo on New Type on. My intention was to model the aircraft with the flaps down. For those interested in the HS125 series of aircraft, all of what follows is applicable to Series 3A and 3B aircraft and earlier (but not to Series 3A/RA or Series 3B/RA or later), ie to all aircraft lacking the aft ventral fuel tank. Some of what follows will be applicable to later aircraft aside from the flap servodyne mechanism (since later aircraft did away with the servodyne and replaced it with a rotary flap motor). Before going further, it is probably worth discussing the HS125 services and how they are used, since this may be of benefit to those wishing to model the 125 in a static ground-borne pose. Firstly, you will never see deflection of the 125 control surfaces on the ground unless it is 'crewed in' or is being serviced in the hangar. This is because it is SOP to fit the control locks on the ground. These consist of a 'claw' that rotates out from the port (1st Pilot's) coaming and engages with the left hand half of the control column 'bicycle handlebar', thus locking both the ailerons and the elevators. Additionally a rudder gust-lock is provided that fits through a flap in the floor of the First Pilot's station and engages in the rudder mechanism (essentially it is a tubular rod that also doubles up as the manual hydraulic pump lever for use in dropping the gear and flaps in cases of hydraulic failure - it was also pretty good for twatting recalcitrant students around the head [i jest]). Turning to the flaps and airbrakes, you are unlikely to see these deployed on the ground (apart from the pre-Taxy checks, or upon the landing roll-out) except in a very specific situation (qv later). Flaps and airbrakes would not be deployed together in the air owing to the fact that the resultant buffet would lead to accelerated flap fatigue with a resultant increased possibility of failure. The flaps on the 125 are 'gated', that is to say there are notches in the flap lever gate at 15 (Take Off flap), 25 (Approach flap) and 50 (Land flap) degrees (from HS125 Series 600 onwards the Land flap gate is at 45 degrees). While it is possible to select proportional intermittent flap settings (based upon the position of the flap lever between the 'gates'), it is not usual to do so. Having said that, on the ground, it is possible for the flaps to droop as hydraulic system pressure decays through the Thermal Relief Valve. Some aircraft were notoriously worse than others for this. Flap droop was a major bugbear when doing the pre-flight walkround checks since it would make it difficult to get beneath the trailing edge of the wing to remove the main undercarriage ground-lock pins and would necessitate opening up the rear equipment bay door (part number 19 in the Airfix kit) to use the Ground Servicing Hand Pump so as to pump the flaps back up to their in-flight position. The one occasion where you would see an aircraft on the ground with both flaps and airbrakes deployed would be when it was parked outside in strong, or gusting, winds (40kts +). A peculiarity of the 125 was that, after Land flap was selected and after airbrake was selected (usually on the landing roll-out), lifting the airbrake lever through a gate and pulling it further aft would cause the flaps to rotate further to the LIFT DUMP configuration of 73 degrees, which significantly shortened the landing roll. This is the configuration that would be used on an aircraft parked in high winds. So, onto the build. Initially the lower wing surfaces were cut from the lower (fuselage) centre section, and the centre section retained, thus. Additionally, the pitot head on the port wing needs to be removed since no production 125 ever had this. I'm not sure what Airfix were thinking of here save that they might have been confused because the 2nd prototype (G-AYRB) did have this during early flight trials. As noted earlier, Airfix got the main oleo locations far too far aft, so the undercarriage oleo bays have to be remade. Also as noted before, the lower wing flap hinge line is wrong and should be filled, before the flap is removed at the correct hinge line: The black arrowsabove denote the kit hinge line, the red line denotes the actual hinge line where the cut should be made. Looking at the upper wing: Areas A and A1 are the flap hinge line shrouds, B is the upper airbrake. The green line denotes where the upper surface trailing edge of the wing is when the flap is lowered. For depicting a model with the flaps lowered, this is where the cut should be made. Cutting the upper wing gives this: You can see that the airbrake has also been cut out. Cutting the lower wing gives this: A comparison: The lower airbrake was then cut out and the airbrake area boxed in and squared off: The flap sections that had been removed were then cemented together and the missing area made good with an insert of 30thou Plastikard sanded to an aerofoil shape: The HS125 had double-slotted flaps and these would need to be replicated for an aircraft in the flaps down configuration. Initially I made up a 'ladder' from Microstrip. The main member was 20thou x 40thou, with the 'rungs' being 10thou x 20thou. After they had set the 'rungs' were shortened, and the 'ladder' cemented to the flap. This secondary flap slot should lie just forward of where the 30thou Plastikard filler was let into the kit flap (the grey part being the after end of the upper flap surface):6 points
-
The year started with completion of a kit bash in 1/12 scale to create the barbarian queen, Red Sonja: ------------------------------------------------------------------------ Next followed a couple simpler builds in 72nd scale, Fujimi's A5M4 Claude: ... and Choroszy's resin Ki-9 biplane trainer: -------------------------------------------------------------- Final two would be light tanks in 1/35 scale, Italeri's L6/40: ... and AFV Club's M3A3 (Stuart V): -------------------------------------------------- The one that didn't make it, but hope to finish soon is a captured British Light Tank VI: regards, Jack5 points
-
My comeback to the scale modeling after 15 years long break. I got this kit from my friend and I had to promise it will be OOB build. I had great mentors while building and enough of courage to bring it to the model show competition, even if it has many flaws. I hope you like it5 points
-
Some other "easy kit" from HB in "what if" conventions of Polish Air Force 1952. Just finished last night. Pilot some Ace from WWII with 5 German kills and Korean Ace with 5 Red kills 8) - 142th Fighter Squadron. LiM-2 because it is a built under license F-86F - by Państwowe Zakłady Lotnicze in Mielec. Li for Licencyjny - License M Myśliwiec - Fighter. In fact the LiM-2 or Lim-2 was a license built MiG-15bis5 points
-
This is conversion of A320 from Zvezda kit. The fuselage is cut to short. Made all the antennas, lights, and other small items. Colored paint for cars. Decal from BOA and Ascensio. Happy New Year!5 points
-
Hello All, Here's my nine ten, all 1/72: Airfix Chipmunk Airfix Tiger Moth gift set Old Revell Corsair (causing Revell to issue new release...) Airfix Albatros DVa Old Airfix He111 (causing Airfix to announce new release...) Airfix early Hurricane Airfix Tiger Moth civil boxing Airfix Roland CII Hobbyboss Yak-3 MPM Wellington 1C Thanks for looking and happy new year! Adrian5 points
-
Eduard provide these rectangular pieces (86) to block off the exhausts but I decided to replace them with some plasticard positioned further down the ducting: I don't think the exhausts should be blocked like this but the card pieces should prevent a see-through effect. Here is a good reference picture of this area: Here they are installed along with some PE parts: Temporarily jigged together this is what the exhausts look like: When finished with a suitable dark paint I think the blanking off will disappear. These PE parts certainly give a nice, authentic appearance to the exhausts: I repositioned my clamps to the underside (the gap did not close up much) and troweled in some Gorilla superglue. I also fitted the ramp: One of the critical stages now is to get the canopy fitted. There were three ejector marks inside the canopy, the one in the centre will be covered by the overhead console but the other two would be visible. I probably could have left them but such things bug me so I sanded them off with a skinny sanding stick: I then masked it up for the smoke grey to go on the inside: I then fancied doing a spot of resin casting to reproduce some engine fronts (these are leftover from my Flying Stiletto build). I could have just used these parts of course but I was looking for an excuse to have a play with the Sylmasta casting kit that I acquired at Telford. First I Blu Tacked the resin masters inside a milk bottle top: On opening the kit I was a little T'd off to find that silicone moulding rubber was on its side and had leaked: After a clean up I established that 10ml of rubber would be sufficient to fill the container, that meant that 0.6ml of catalyst was required, measured out using a disposable syringe: By letting the rubber flow from one side hopefully I can avoid any air bubbles: This can now harden up overnight: Then we'll see what we have in the morning. Bye for now, Nigel5 points
-
The kit is very easy and fast to build. I had craving to do something quickly, and for fun. Unfortunately, the Allies have left the Poles in Russian zone, so we have only Russian aircrafts in our Air Force after the WWII. So is this F-84G only one What if build Polish 22th attack squadron in Korea 1952 with 2 Soviet kills Next will be a F-86F Sabre also in painting from Korea, it's waiting for decals5 points
-
finito... the next 4 engines 60cm5 points
-
Thanks for the encouragement guys. I haven't given the blue paint any special thoughts yet, but I have several blue lacquer paints so I expect to pick something I think looks close enough, or do some mixing. We'll see as we get closer. I decided to start at the rear end, trying to get the bottom section and the four exhausts to fit. After a good deal of cleaning the edges, including opening up a lot of air bubbles, the bottom piece dropped in place. I cut the back ends, which are casting blocks, of the exhaust parts for a start. Then I had to remove a lot of material from the bottom part to allow the exhausts to fit correctly. I'm marking them all up for their respective positions to prevent unnecessary surprises later. There are no instruction in the kit so I'm not sure if the exhausts are meant to be cut shorter, but I'm trying to keep their full length with the cast end plug for the best possible effect. Here is the outside of the bottom piece and exhausts, a rough dry fit to see that it will work. I have to cut off a lot of material from the back ends of the exhaust parts to allow them to sit on top of each other. There is an air bubble at the bottom of each casting that opens up because of that which I will have to fill later. Next the Dremel with a larger sanding drum comes out to remove a lot of material from inside the main body part to allow the top exhausts to fit at the correct angle. The body is now very thin here... Here we go, a very rough dry fit of all parts confirms that there will be enough clearance to fit the four exhaust parts once the bottom piece is firmly joined to the body. A look at the mighty exhausts from behind, upside down.5 points
-
Them little gadgets are the small stands from the Tamiya painting stands. Here's a linkie to evil bay - dunno if this is the best seller/price - but it did have a photo http://www.ebay.co.uk/itm/Tamiya-Spray-Work-Painting-Turn-Table-Stands-X-2-in-a-Box-New-Hand-Tool-Tools/171611486717?_trksid=p2141725.c100204.m3164&_trkparms=aid%3D222007%26algo%3DSIC.MBE%26ao%3D1%26asc%3D20140407115239%26meid%3De7a024d2bf164a2d8bff4fa40c1ef401%26pid%3D100204%26prg%3D20140407115239%26rk%3D3%26rkt%3D30%26sd%3D351018823443 MDC - Oh yes - still gonna do it - but I'n leaving that to be the very last task....... Like most of us Gary - did a bunch of model making as a kid. Then had empty ump years away; during which time I probably did a couple of builds. And I've been back at it a couple of years now. Get them Dominies onto a WIP Debs - it's amazing what motivation that gives you..... First solo on a 5A? That means BFTS at Cranwell? We'll need a Herc build as well of course....... Ok. So. The thing about being self employed is that no-one pays you when you're ill.....so funny old thing you only ever get ill when you're on holiday. Anyways I've just had my traditional Xmas man-flu - which required lots of laying about on the sofa being pathetic and being brought food and drink. It magically and briefly got better to go for a curry on Monday but I couldn't swing doing modelling and begin pathetic/getting brought food and drink. So had to ditch the modelling and so ain't gonna finish the JP's in 2014........ Did get some done today tho Nose aerial and (tiny) light on the JP5: Nose aerial and light on the JP3. The anti-coll lights I 'punch' moulded earlier from sprue. Cut to size: Gently sanded flat on the back: One used clear on the bottom of the JP 3. Here it is alongside the white painted light (ident light?): And here it is glued in place with Krystal Klear: The others were airbrushed with tamiya clear red and attached top and bottom to both JPs (You can see the bottom one on the JP3 in the photo above): And then the rain clearing vents on the nose of the JP5. Cut strips of black plastic card for the black bits and white for the white.....Logical huh Bit fiddly really.... I also masked and painted the JP3 tip tank lights using tamiya clear green and red: But I don't think the red/green came out dark enough and I'll have to attend to that in some way. Tamiya smoke? Well that's it for 2014. Off out for the evening. happy new year all. Hope to get these suckers finished in only another session or two ....5 points
-
Hi Folks I built this for a mate who was asking me to help build a diorama for him. It's finally done after a good amount of work and supplies.....sorry for the crappy pictures....as I just snapped a few whiles waiting for him to collect it. OOB with custom Malaysian decals...aircraft belongs to 14 Sqn - The Peacemakers based out of RMAF Subang in crica late eightees.....many fond memories.....of seeing these flying in and out..... The last one is just for fun as I put in a F-5 to busy it up a bit If anyone is interested, the build log is in the WIP section This is the last for 2014 and Happy New Year to one and all rgds and happy modeling mr b4 points
-
First of all a Happy New Year! Here my latest build in 2014: Me 262 A-1a by HobbyBoss in 1:48. Add some Eduard eatched parts and used decals from a Kagero book showing off one of 7./ KG(J) 54 based at Neuburg/Donau in late 1944. Hope you like it!4 points
-
Just finished today the lovely litttle Tamiya GAZ Truck with some extra clutter. The camera flash is a bit harsh and makes some of the paintwork a bit glossy. Comments, as always, welcome4 points
-
Just finished over the Christmas hols....... The excellent Micro-Mir kit of the first US Navy Fleet Ballistic Missile boat - the USS George Washington.... Ken4 points
-
Here's a radical idea, let's just wait till the Shack is released before slamming it. We haven't even seen any CAD drawings yet.4 points
-
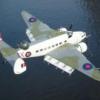
Apologies in advance if these should be their own individual categories and will adapt if so. Here are a selection of my builds involving Flying Boats and Float Planes since restarting model-making a few years back after a break of around 35 years. 1/72 Airfix Junkers Ju52/3m finished as a WHIF, used by the Regia Aeronautica on Rhodes in late 1940 OOB Build. (I had posted this previously in a Junkers thread but seemed appropriate to include it here as well as it has floats! ) 1/72 Airfix Short Sunderland III with Wrapround Camouflage. OOB Build with slight scratch cockpit. Roundels from Original Kit, Lettering from Revell Heyford 1/72 Airfix Supermarine Walrus in USN Colours. OOB Build, but missing canopy glass. WHIF scheme. 1/144 Airfix Boeing B314 'Clipper' in wartime BOAC Markings. OOB Build. 1/72 Matchbox Heinkel He-115 FloatPlane as a Swedish TB-2. OOB Build. Roundels & Lettering from Airfix Mosquito J30 kit This is my first Airbrushed model and really like the finish that can be achieved over (my) brush 1/72 Airfix Auster AOP (kit #01023), represented in a fictional Swiss Flying Doctor scheme. OOB Build with slight cockpit "clutter" added. Decals raided from spares box Lovely little kit to build 1/72 Matchbox Dornier Do G/Do-18 Flying Boat (Kit #PK-409), finished as a Deutsche Lufthansa South Atlantic Mailplane. OOB with slight mods to convert kit to more accurately represent civilian service.4 points
-
I don't think we will have any excuse for not having some fresh stuff on the table this year Andy, the pressure is on us lol!!!! Up and running again (ish) on the man cave PC - forgot I had one in there even though I only put it in a few weeks ago, the mince pies have damaged the brain! Not got Photoshop on it yet though and need it to lighten and sharpen up the photographs, so I'll hang fire to see if I can get this sorted. The fuselage corrections are done now, so we're back on track. Apart from the nose, all the heavy engineering work is done, so normal model building will commence soon. Here's an unedited shot of the fuselage after faffing about with the rear end!4 points
-
It remains to be seen what changes/additions they will make to the plastic, but I'll probably be getting one. Most of what you need is in the German boxing though, no? (the Scots are British, by the way... ..... ) Andrew4 points
-
Hiya Folks, I promise that this is my last one for 2014,.....I`ve been finishing off a few from the shelf of doom, hence the rapidity of their completion lately. This one represents Curtiss Tomahawk Mk.IIb, AK457 GA-D (US designation P-40C) from 112 Squadron RAF based at Sidi Heneish, Egypt during September 1941, before they had desert camouflage applied. The sharkmouth has been recently applied but no eyes and the famous `GA' codes have also been recently applied. This is the 2nd Airfix Hawk/Tomahawk kit that I`ve built and it goes together well wih no problems, it was brush painted using Polly Scale Dark Earth and Aeromaster Dark Green and Gull Grey while the excellent decals came from Barracuda Decals; Happy New Year and all the best wishes, Tony4 points
-
Great looking model, I love hearing about other people's Mini experiences. Can I ask what Tamiya kit it is and what you reshelled it with? Apart from the wheels (mine had 12" and they look like 13") it's a good lookalike of my Mini which I eventually want to recreate in miniature. Most of the kits available seem to be Mk1 Coopers and mine was an 80's Mini that I, ahem, modified slightly. Here she is, lovingly known as Red5: 1275 with Metro box, stage 1 kit, rollcage, SS centre exit, 12" minilites, adjustable cones, mahogany dashboard that I hated (it was a gift), seats from a Cavalier SRi that had extended brackets (I'm 6'5") and numerous other mods that I've forgotten. Oh, and that bootlid is paint, not a sticker, took me ages masking it. That pic is taken just after a day on a rallycross course so excuse the dirt. I'd love to make it in small form and your model has really inspired me, thank you Finnthedude.4 points
-
**Update** Got the satin varnish coat done to seal in the wash etc.4 points
-
Today is a significant milestone as I'm going to close up the fuselage. This gap at the side of the cockpit will need some serious clamping and more epoxy adhesive I think: This was my general clamping arrangement: The assembly went OK, probably the worst area was this misalignment on the top which I could not correct: I think I will be better sanding that feature off and reinstating with discs of plasticard. There is also a minor gap on the underside which I can probably improve with more clamping but I have to let the various adhesives on the upperside set first to free up my clamps: While that was happening I had another play with the engines. Eduard provide this part to go in this side intake but it seems to block it off completely if you follow their instructions: This is the best picture I can find of it (from the Britmodeller Walkaround) where there seems to be little evidence of it: I think I might position it like this instead: The Eduard also provide this lovely set of etched parts to replace this kit part here: Unfortunately they also expect the poor modeller to attach the back part along its two long edges with no support of any sort. My solution was to solder it together, using a foil wrapped Blu Tack sausage (mmm, tasty ) as the support: Here is the soldered item - not the neatest of jobs but it is at the back and I have managed not to fill any of the perforations: I also decided to attach the base plate with solder at the back: I then finished it off at the front with some thin superglue and this ideal clamping system: Again I was trying hard not to fill the perforations with glue.4 points
-
even worse - it was Mull of Kintyre all day - and I have always hated that song so much!4 points
-
Eduard kit + Brassin (cockpit, engine, gun bay and wheels). Regards from Russia.3 points
-
finally finished, revel tornado gr1, need tofigure out how to take some better pics,3 points
-
Hi guys, Here's my Tamiya 48th Corsair. The only addition that was made was the Aries cockpit. Weathering was done mainly with a fine airbrush, thin washes and pastel chalk.3 points
-
2014 has been a reasonably productive year for me, despite the upheaval of moving house (again!) and starting a PhD. I’ve managed to finish 7 1:72nd models this year, including two rebuilds and one which was 95% done at the beginning of the year. Hope you enjoy them as much as I did building them, and happy 2015! January (actually mostly Dec 2013): Airfix Vampire T.11 February-April: Airfix Lightning F.2A: April-July: Airfix Gladiator (conversion to Malta Sea Gladiator) and Swordfish: August: Revell Hurricane IIb: June-July: Rebuild of MPM Blenheim I: August-October: Airfix C-47 (Conversion to civil DC-3), commission for my Mum's 60th birthday. November-December: Rebuild of Airfix S.A. Bulldog from charity stall at Telford:3 points
-
Another small update - can you tell I'm off work this week? Carrying on with my bubble exploitations, I decided it was time to try and fix it in place. After some trial fits with the tight fit and the loose fit versions and much contemplation, I opted to go with a tight fit. I trimmed the bubble down as much as I dared, then used blu-tac to hold the bubble in place. Once I was happy with the position from all sides, I ran some PVA glue around the seam (with a pin) between the resin part and my new bubble. I find it easier to add a small drop of water to the PVA glue to thin it down for the first application as it allows it to wick down into those small gaps - of course it's a pain to load the pin head with diluted PVA. The PVA was left overnight to harden up. This morning I very gently, eased the blu-tac off and success - the PVA had worked and held the window in position. So far so good! Next I wanted to make sure that it is going to stay in position throughout all the (lots of) handling to come - I had to use super glue for that. I masked the outside and the inside as best I could with tape, then used a dollop of blu-tak to fill the corners so that hopefully, there's no part of the bubble exposed to the ca fumes. Again, using a pin, a bead of super glue was applied all around the outside of the bubble in the seam between it and the resin. I have now set that aside to fully cure. Once that is done, I'll trim off any excess bubble on the inside and all things going well, the window will stay in position! Next in line for my attention were the trans deck platform/doors. My bottomless pit of styrene scraps (I haven't bought any since Periwinkle!) came into play again and I fashioned a couple of ribby panel parts. These were attached to the platforms, then I added some support ribs. I have spent literally hours scanning the interweb for decent pictures of the inside of these doors and found two grainy photo's. Of course, as soon as I had made them, I found a great picture in the 4+ book! I must have been through that book dozens of times and never noticed that particular picture before. Aaarghhhhhhhh!!!!!! Anyway - the ribs were added along with another platformy bit. - those ribs are about 0.5mm wide! Here are my two partially finished doors in situ..... I'm not sure where to go from here - Originally I had planned to use the vacu-formed door panels I made the other day. My plan was to cut through the kit door between the ribs I have added, and then attach the vacu-formed part on the outside once finished. I thought that would really give the ribs some depth. However, after realizing just how thin those ribs are - at 0.5mm wide, I think there's too much chance I will damage the doors while trying to cut out those recesses. I know the ribs above aren't particularly deep, but once they're painted and a dirt wash put over them, I think they'll look okay..... thoughts ??? Suggestions??? Back to the nose door again - I added the two apertures leading to the scoop underneath the door The visible edges of the scoop were thinned down as much as I could manage, then added the separator plate in the center. - I think the two boxes I added to the underside are a bit long - I'll need to scour some more photo's and determine if I need to cut them shorter or not. My mind is starting to turn towards the rotor head assembly and all the mods I'll need to make. During my Dauphin build, I ended up using some brass tube inside the gearbox structure which turned out to be a good decision, so I opted to go the same route this time around. The kit shaft is around 2mm in diameter, so I ordered some Ø2mm and Ø3mm brass tube for the job. Here I have opened the kit gearbox out to Ø3mm and fitted the larger diameter brass tubing in place. The reason I like this method is twofold: 1) it (the Ø3mm tube) provides a nice sturdy connection, and 2) the Ø2mm tube fits nicely inside, allowing the rotor to rotate, and it can be removed easily if I ever want to transport the kit anywhere.... and I don't have to worry about the plastic shaft ever breaking! The brass tube was then cut down and filed flush with the top of the gearbox. Then a piece of Ø2mm tube was cut and slotted inside the larger tube - now I can start building up the rotor head. It's very difficult to see in the photo's above and below, but I have applied a weathering wash - very thinned down dark grey - over the gearbox area. My new cutting mat forces my camera to use flash so the colors are slightly washed out. However, the effect is quite subtle and has toned the entire area down nicely. I'll take another look at it tomorrow and decide if I want to add another wash or not.3 points
-
A small update, the wings and fuselage almost fully covered in metal. Now i just need to add some pannel lines and rivets.3 points
-
Hi Georgeusa, thank you very, thats very kind of you. The mottling is my first attempt and I am quite happy with the way it turned out. Flory wash is great for the panel lines, I have more or less settled on the dirt/grime colour as the black is a bit stark. The Typhoon: The entire build can be found here, picture heavy and very long: http://aeroscale.kitmaker.net/modules.php?op=modload&name=SquawkBox&file=index&req=viewtopic&topic_id=223177&page=13 points
-
Hi, all. This is my first ready for inspection. My father gave me this old kit of his to build, the Revell Ju 87 D-5/G-2. https://www.scalemates.com/products/product.php?id=144321 I built the kit for a friend and finished it just in time to visit them for new years. It was a fairly straight forward build. I removed the ubiquitous flash and all the raised detailing and filled in the large gaps around the connections of the wings to the fuselage. Despite the age of the kit I'm very happy with how it came out, so I think I'll tackle some of the other fairly ancient kits I've got in my collection (some more from dad). Happy new year.3 points
-
UPDATE .... The painting is nearly done..... Lot of tape, lot of painting.... RLM81 over RLM82. Next steps... painting of the details, Decals, Weathering. Cheers Micha3 points
-
Not had chance to do anything on the Blenheim today, but here are some pics of the work done yesterday.3 points
-
So here are a couple of photos taken with my big camera today as a 'taster' for the photos I'll put in the Gallery. Yippee, I finally managed to complete a model for a Group Build within the allotted timescale, it'll be a while before I take part in another though** as it is quite stressful trying to beat the clock. Thanks to everybody who looked in and made comments and suggestions along the way. Duncan B ** or so I thought but I've remembered that I put my name down for the Phantom GB later in the year!!3 points


.thumb.jpg.1bfd8b8f095b8a4ccfc9ffc0cbecf59c.jpg)


This leaderboard is set to London/GMT+01:00