
Leaderboard


Popular Content
Showing content with the highest reputation on 22/12/14 in Posts
-
Something British at last! Not-so-famous-but-very-interesting-anyway long-range FAA fighter Fairey Fulmar. Fought epic battles with Regia Aeronautica S-79s in the Mediterranean skies. 1/48 Special Hobby if I am not mistaken. Always loved FAA liveries.17 points
-
2014 started well, but then I messed up my modelling time by going back to work.12 points
-
Now you know why I wouldn't re-issue my Skackleton conversion. John11 points
-
Retrokit Judge Banana! Completed the master for this earlier in the year, combining two of my favourites....Despicable Me and Judge Dredd! Will be working on a few more yellow helpers next year10 points
-
Hi chaps, well I decided my new bedroom needed models - so the acrylic display stand was dusted, and the Tornadoes had new nose probes built ( originals had broken off, and was never happy with the GR4 one anyway!) and the GR4 canopy was re-stuck. So these 2 plus the Phantom now sit on my bedroom chest of drawers- so i can appreciate some "all jet action" each morning as I scramble for my socks & bocks!! LOL Sometimes a break from what you are building to do some simple repairs is a great thing - freshens up an old model, and gives you some time off from a project. Cheers Jonners10 points
-
Hi all, Here's my latest creation to roll off the workbench: Revell's 1/48 Rafale M. This is the original issue, so I've used Wolfpack's M Production resin update set and a host of minor scratch building to get it to represent an M from 2007. The decals are Model Alliance and poorly researched. A full build article, including all the updates I made (and those I didn't!) is at jonbryon.com/RafaleM.html. Comments welcome; thanks for looking. Jon10 points
-
Why, twice as many props, old boy!10 points
-
Lovely little kit this Eduard Weekend edition of the Albatross D.111 in 1:48 scale. Normally this kit includes some photo etched parts but my kit was given to me years ago and the etched parts are missing!....which doesn't bother me in the slightest as I am not a big fan of all this after market stuff!! The only problem I found with this kit was the decals....they just wouldn't sit down when they were told to!! ...even with gallons of Micro Set and Sol!!....but a very enjoyable kit to build. So this offering was built OOB and painted with a hairy brush (old school)!!...the rigging was done with fine grade fishing line...and it depicts Fritz Jacobsen aircraft ..Jasta 31 May 1917 Hope you like the photos............................... Thanks for taking a look Fozzy9 points
-
Hi chaps, Airfix have done a cracking job on this. As holders of the design rights we at the Shackleton Preservation Trust supplied the original manufacturers drawings for the project. Its the first time ANYONE has had full access to the data since the 1970's. Regards, Rich W8 points
-
Thanks, mates! I appreciate your nice comments. So, you remember these guys I presume, all these crazy little ASV aerials on the fuselage sides: Well, I have to face this sooner or later, so it might as well be now. Let's put 'em on! First, though, I have a choice of photoetch - the fret that came with the Special Hobby kit, or the fret that came with an aftermarket set from HPM (which I bought primarily to get the underwing YAGI aerials which did not come with the S-H kit). Here is a comparison: The S-H version, on the bottom, are a much better rendition of the actual antenna (clear distinction between the standoff and the dipoles) but as you can see they are much more fiddly. They have an advantage over the HPM parts, as when removed from the fret one can leave on a little extra "nub" that might find its way into a hole that one might drill in the fuselage, should one be so looney as to attempt that. Did someone say looney? Here I is! Here we have the antennae, a 0.015" wood drill in a pin vise, and a Euro buck. The drill bit is somewhat oversize (the nub is only about 0.008"), but that will give me an area where the superglue can pool, hopefully making a stronger bond. I started by making some rough measurements in order to figure out where I should be drilling the holes, then I made a template from card stock. I should have done this before the fuselage was painted and all that, but that would have required planning. Oops. After drilling the holes, all I could do was cringe when I saw these insanely magnified photos! Well, what's done is done. If this doesn't work out, memsahib emptied the trash bin in my studio yesterday so there is plenty of room for a new arrival! But let's hope it doesn't come to that. I used a 20/0 brush to paint the standoffs with Gunze H302. Once that was dry, I removed all the antennae from the fret, hoping that Special Hobby might have provided an extra one or two. No such luck, there is just the exact number required (16) so methinks I better be on my best behaviour. One thing I noticed from studying photos of these crazy things is that the standoff is always perpendicular to the surface where it attaches. This is true of most things like this that stick out of airplane fuselages, and it's what I meant by my earlier comment that some of them (the rear row on the top) look to have "dihedral" to them. I have to be careful when gluing these on to make sure that this kind of alignment is preserved. Attaching the antennae was quite a bit simpler than I thought it would be. I held them by the standoff with some sharp, pointy tweezers, dabbed a bit of superglue on the nub, and placed the nub in the corresponding hole. Each antenna is so light that I had no problems having to hold it while it set, and it naturally seemed to assume the perpendicular alignment without any help from me. It took about half an hour to put them all on. Once the superglue had set, I sprayed some Alcald Clear Flat over the dipole jungle to tone down any reflections from the superglue. And here they are! Needless to say, I can never, repeat never, pick this model up by the rear fuselage again. In fact, once the model is completely finished I'm not so sure I can pick it up at all! Maybe by the wingtips... OK, now I'm going to do the bomb racks. Cheers, Bill PS. Ah, I almost forgot. I also attached the remaining two portholes into the sides of the cabin. They were a pretty snug fit, so I did not have the opportunity to test my porthole retention device. You buy an insurance policy, and ye never needs it...8 points
-
Airfix is to release in 2015 a new tool 1/72nd Armstrong Whitworth & Whitley - ref. A08016 Expected August 2015. Source: http://www.airfix.com/catalog/product/view/id/8408/ V.P.7 points
-
Deciding to put Tamiya's Corsair on the bench was a no-brainer. Having built the Mustang and Spitfire, I expected top notch engineering etc, but this one somehow...unexplainably...was even better than expected. I'll say it every time I talk about one of Tamiya's super kits, but every modeler deserves to treat themselves to one of these kits at least once. Kit: Tamiya 1/32 Birdcage Corsair AM: Barracuda cockpit stencils and decals, Barracuda resin tires (If Barracuda makes items for a kit I'm building I buy it...stuff is that good. Paint: Tamiya custom mixes, airbrush and oil weathering7 points
-
Greek Air Force PZL-24. 1/48 kit by Mirage. The roundels' blue should have been darker. These ones look like more Argentine than Greek. I always have found the PZL really ugly. But, you know, I have a maternal instinct...7 points
-
I know I've used this already but..... Mike.7 points
-
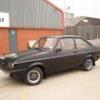
Latest finish for me and probably my last for 2014, Tamiya 1/24 Mini Cooper S converted to MkII spec (apart from larger rear window) Britax campaigned 2 (Class cars driven by Gordon Spice and Steve Neal and finished 5th overall in the championship. This has long been one of my favourite racing Mini's and, thanks to Rich Middleton who made the decals for me, I've finally been able to add it to my collection. To convert the car to MkII spec I used the rear lights from a diecast model, front grille from the Fujimi kit, the badges were scratch made from plasticard and wire. Paint is Halfords Fiat Broom Yellow and general gloss Black. Side windows were replaced with clear sheet as the kit parts are very thick and my kit had mould marks in one side. The model is not highly detailed as I decided to glue the bonnet shut, this made it easier to use the Fujimi grille. Anyway, my goal has been achieved and I am more than happy to have this little racer in my display cabinet. Thanks for looking. Steve.6 points
-
Hi all, After a little gentle persuasion from Claudius here is one of my earlier builds which has not been shown on here before. It seems Claudius and I (and I am sure a few more of you) share an interest in the war surrounding the Mediterranean during WWII. Claudius has asked me to inflict some of my builds on the theme on you, so here we go with the first one... This is Revell's boxing of Hasegawa's excellent Henschel Hs-129 finished in the markings of the aircraft flown by Staffelkapitan Oblt. Bruno Meyer of 4.(Pz)/Sch.G2. This aircraft was later captured at Castel Benito. I hope that you all like it, all criticisms and points of view are welcome.6 points
-
For a member who claims to prefer ships, you sure do pull a lot of G's.6 points
-
Hi, A short break with my secodliners - a model of a fighter... Italian Macchi MC 202 Folgore. Kit from Hasegawa, 1/72. I made just some minor modification (like drilling inlets etc.). Decals basicly from drawer, except the emblems of squadron (a centaur) on tail, which were handpainted on decal. Markings presents machine from 386 Squadron, 21 Gruppo Ant. CT CSRI, Reggia Aeronautica, Voloshylograd (occupied part of Soviet Union), 1942. Regrads and comments welcome Jerzy -Wojtek6 points
-
Hi again Folks Here's my latest offering, this is, without doubt, a unique model. Story is I bought an Academy 109G on ebay. when I opened the box I found: 1) A Hasegawa 109F with instructions and some critical wing parts missing and no decals 2)A partially made Fujimi 109 fuselage with cockpit detailing and decals but no instructions 3)An Academy 109 minus the fuslage no decals So, I used the hasegawa fuselage(with the details from the Fujimi cockpit) and fitted the academy wings. Still with me !!! I have a Revell 109F in the stash with two sets of decals, so robbed one of those with the stencils from the Fujimi sheet was able to produce Hans 'Assi' Hahn's machine from JG2. Hope you like it....I'm quite pleased with the result....but feel free....6 points
-
Represent a Heller 1/72 Gloster Gladiator Mk.II convert it to Finland Verzion. I choose a decal AML option of GL-273 and 6 colour camouflage. im used Aeroclub engine and prop.. GLOSTER GLADIATOR II GL-273 of Lentolaivue 14 ,Avgust 1941 Uti,Finland/ Even a few years ago built kid NEED HIS OWN SHOW!! P.k6 points
-
Airfix is to release in 2015 a new tool 1/72nd Bristol Beaufighter Mk.X kit - ref.A04019 Expected July 2015. Source: http://www.airfix.com/catalog/product/view/id/8398/category/15/ V.P.5 points
-
This is the Airfix Gladiator, finished in Land Tropical (LT) 3 colours (dark sand/red sand on the lower wings and fuselage, dark earth/dark red sand on the upper parts) with markings from the Xtradecal set 72182. This aircraft was flown by P/O Percy Oliver Valentine Green, and the whole of 112 Squadron was involved in fairly intense flying and fighting against Italian aicraft during the East African campaign. P/O Green claimed a Caproni Ca.133 shot down on 1st August 1940 whilst flying this aircraft. She was finally written off on 22nd December 1940 in a take-off accident (pilot at the time not known). Green later flew Hurricanes, was shot down and captured in North Africa and survived the war. She's built pretty out of the box except for added details in the cockpit and the rigging, which is 1.1lb BS fishing line. The base is my standard scrap of airfield, with a bit of soft sand scrubbed into the grass. I have no idea what the exact conditions at Summit in the Sudan were, but I would imagine they were arid at best. Here's a view of the underside. I can't think of a good way of doing this. It shows the tyre grot and gunsmoke though. Other side, with gunsmoke again, and a view of the upper wing colours. All the paints were mixed using Tamiya acrylics. Atmospheric shot of the plane ready to go after Italian intruders.5 points
-
My entry into the Lesser Built Air Forces Group Build is the 1/32 T-6 Texan by Kittyhawk. When this kit came out Zotz decals did “North American T-6 ‘Texan in the African Wars’”. I zapped that puppy up as soon as it was available. After looking at the choices on the sheet (there are 12!) I was drawn to the aircraft serving in Biafra due to its very different camo scheme. Of course astute observers will notice, nice camo scheme, but where are the national markings? It seems I am using a very fancy decal sheet that has many and various colorful options solely as a painting guide! It does not appear to have any markings on the craft and all of the stencils were painted over when the camo scheme was applied. Looks like I will have to be forced to buy a few more of these kits to justify the purchase of the decal sheet. (Hey any reason, no matter how small or illogical, will work when it comes to feeding the stash monster.) My next task is to do a bit more research to see how these were used, the weapons load and if there were any markings on them. I am looking forward to this build as this will be my first Kittyhawk kit.5 points
-
Hi all Another little bargain picked up at SMW and what a little beauty it is too. Not much to it in terms of numbers of parts and a quirky little subject, she is finished as a Polish Army machine No. 5332 "Mucha". Painted with Humbrol and Tamiya acrylics and finished with Matt Kote. The last picture is her with her bigger (and later sister). All comments welcomed and thanks for looking5 points
-
An average - 5 builds for me in 2014. But with all these new kits coming out I really need to up the build rate to eat into the stash. First off - Steggy - A Tamiya Stegosaurus, which my first go at vegetation. Next was the 1/48 Airfix Lightning F1A Then, after a 6 month odyssey - A 1/48 Hasegawa F/A-18A Hornet. A couple of quick builds followed to make up the numbers - First was 1/48 Eduard/Airfix Spitfire Mk 22 And to close out the year a 1/48 Tamiya 190A8, built in 2 weeks.5 points
-
Oh-ho! I can already see some problems: 1) The cowlings have a much greater diameter than the FROG's, 2) The tailplanes are much longer than the Matchbox's, 3) There appears to be interior detail, unlike Airfix's earlier version, 4) It retails for much less than Hasegawa's. Unbuildable rubbish, I say . . . regards, Martin5 points
-
Now I've got my Beaufighter, I need to find something else to obsess over...5 points
-
Okay, after some discussion, here's the list of allowable subjects for this GB: UK/Empire/Commonwealth/Free European forces Any aircraft from a Battle of Britain squadron during the Battle; eligible squadrons are so named in AMO N850, and can be found here or here. Figure or vehicle kits modelling a vehicle or person that can be proven to have been at a Royal Air Force Battle of Britain airfield during the battle; the burden of proof to rest upon the builder. RAF air-sea rescue launches that can be proven to have been in service during the battle; the burden of proof to rest upon the builder. Axis Powers Any Luftwaffe aircraft from a unit participating in the Battle of Britain, within the timeframe of the Battle as accepted by the RAF. As the Germans lost the war (spoiler alert, sorry), they did not provide a convenient battle honor list of squadrons or whatever heathen unit organization they used for our delectation; this Order of Battle from August should serve as a useful starting point, and in general, it should be fairly obvious. As always, when in doubt, the burden of proof rests upon the builder. Any aircraft from the dread Corpo Aero Italiano during the timeframe of the Battle as accepted by the RAF, an order of battle for which may be found here. Obviously there are a lot of potential subjects that had to be left out, because for a time, the entirety of the war was the Battle of Britain, in one form or another. The omission or exclusion of anyone or thing from the build is in no way intended as a slight against their contribution to the final victory, and, if I may be so bold, to the preservation of a world worth living in. All played their part; but to keep the build manageable and thematically unified, we were forced to make some difficult choices.5 points
-
Hi guys If I might throw our hat into things? We are not "Save our Shackleton" or affiliated with them. They are a group headed by a local enthusiast who intend to put the aircraft on a pole outside the Aerohub. We are the Shackleton Preservation Trust (registered charity 1020951). We're an organisation dedicated to supporting the preservation of all surviving Shackleton aircraft. Formed in 1993, the SPT own Avro Shackleton WR963 based at Coventry Airport which is hoped will fly in the near future. Over the years we have been fortunate to acquire a sizeable amount of spares for the aircraft, tooling, equipment, the original manufacturers drawing archive, and the design rights. The SPT have had a long standing association with the Cornish Aviation Society and through them WL795, organising loans of parts and vital spares to replace damaged or corroded items. Parts were offered to the RAF as late as 2012 to prevent WL795's demise. As such we have put in a tender for WL795, with no other motive other than to preserve her intact and with the intention that she stay in Cornwall. We don't require donations to take things forward, or to crowdfund, nor will we ask. Bidding is already over. They had to be in to the MOD in hard copy, with a firm price offer by no later than Wed 17th December. We expect to hear back in about a month's time if we are successful or not. We won't strip WL795 for parts. We have enough spares to keep WR963 going, and have sent new parts down to Rosalie. We have more waiting to go on to make her safe should we be the winning bidder. A local home is already secured. She won't leave the area. we're committed to keeping her on duty in Cornwall - an important task she's done patiently for 25 years. The local link to the spiritual home of Coastal Command at St Eval is one we are proud of. If we are successful WL795 will not die at the hands of the scrappers. Kind regards, Rich Woods Shackleton Preservation Trust5 points
-
Just looked at the Airfix 2015 programme & was utterly delighted to see that they will be re-issuing the 1/32 Maserati Indy . One of my favourites from their range , so I'll DEFINITELY be buying one when it comes out .4 points
-
The Mr Color "Grayish Blue" on the seats had dried to a nice glossy finish. With luck this will provide a good base for the liquid masking I applied to the seat padding: Liquid masking can be a bit hit or miss in my experience, hopefully it will come off OK here. I also added some 1 and 2mm wide pieces of Micro Masking tape to aid in removal. Now they were painted I was even more pleased with my seat cushions. I now wanted to add some yellow stripes to the side door floor. I could have cut up some decals from the spares box but I liked the colour of this Microscale decal film: This has been sitting in my Modelling Materials Storage Facility since the mid 1980's, still sealed. This is its day in the Sun. Stripes this narrow have a habit of breaking so I effectively doubled their widths by including some carrier film: Here they are installed: I then wanted to add some white and yellow stenciling, I found these white ones on a sheet left over from you know what: Here they are installed: In full scale reality they are illegible but hopefully convey the right impression. While I was in decalling mode a popped a label on the fire extinguisher: I need to do a bit of detail painting on that but first dinner. Bye for now, Nigel4 points
-
Cos the Shackleton used up all the rivets Shackletons on the Christmas 2015 wish list for me4 points
-
4 points
-
And so ends one of the most emotive eras in 1:72 scale !…….I am old enough to remember the fights that (literally) broke out at the IPMS Kit Swap in the early 1980s between those trying to get their hands on one of the Frog kits that had been unearthed in some old shop stock……they could have given lessons to recent 'participants' in Tesco's Black Friday battles….and then the plethora of Russian/East European re-boxings throughout the 80/90s before Revell bit the bullet and did their own re-issue. Now, all being well, we will have a kit that WILL be worth all of the waiting without any of the fighting !. WELL DONE Airfix !…..Another inspiring choice that just demonstrates how narrow minded other manufacturers have become with their so-called 'new' subject matter…….AND a Whitley too !.4 points
-
After a few nights off for pre-christmas socialising (hic) I managed to get some time in today and pretty much finish off the last major sub assembly - the JP5 canopy. Masked: Airbrushed: Unmasked + rivet decals to simulate the prominant screws + handles. You can't see it very well in this photo but the front hoop is cream coloured as is a thin strip next to the clear sections: And test fitted. Needs a little light weathering to match the rest of the airframe: I'm pretty pleased with the slightly 'flared' effect that sticking streched sprue around the bottom of the canopy has given it. Only thing left to do is stick on various PE and plastic aerials and lamps - oh and the bang seat top handles: Nearly there...4 points
-
3 points
-
Hi all. My entry in the GB will be a Bolivian Breguet XIX A2, a Chaco War participant from the late 1920s. I shall be using this Omega Models resin kit as the basis. As a Chaco war collector, I've discovered that Omega Models is one of my best friends, as they are the only providers of many of the more obscure aircraft types that I need. It's a bit of a love/hate relationship though, as the quality of Omega's moulding is irritatingly variable. For example, this Breguet has lovely 1/72 spoked resin wheels, but Omega's interpretation of ribbed structures is about as bad as it gets (not obvious from below, but you will see what I mean later!) I will be using Blue Rider decals, their Bolivian Chaco war sheet providing for two Breguet XIXs. In time, I hope to add both to my collection, but for this GB I will be doing the green one, 'Potosi'. There are two reasons for my choice: 1) 'Potosi' is an historically significant aircraft because it carried out the first aerial action of the Chaco War; namely the bombing of Paraguayan positions at Puerto Suarez on 18th January 1929. As an aside, 'Potosi' was accompanied on its mission by a sole Junkers F.13 (for me, the thought of these two together is !). 2) I'm hoping that dark green paint (probably darker than Blue Rider suggests), will be much better than shiny aluminium at disguising Omega's 'ribbing'! Cheers Cliff3 points
-
Well done Airfix, lots of brave choices for new kits and I expect there are lots of happy people on here tonight. I still want to see 1/72 Sea Vixen and Javelin though. Duncan B3 points
-
It is. Looking at the website now, they've corrected it to 01/03/2015. Cheers, Dean3 points
-
They've surpassed my expectations for next year. These are the golden years3 points
-
I like big bristols3 points
-
The Hurricane looks good in CAD shots, note the option of an open gun bay, never done in 1/48th even as aftermarket. The Spitfire is a part new tool, as the sprue breakdown of the new VB allowed for a new wing to be added to do a Mk I, the fact 3 types of canopy are supplied was a bit of a giveaway. EDIT - Edgar has just posted, the Spitfire I assume will use the new VB fuselage etc with a new wing sprue for the 8 gun wing, and appropriate props.just to be clear. The 1/48th airfield vehicles are a really good idea, http://www.airfix.com/catalog/product/view/id/8396/category/1221/ http://www.airfix.com/catalog/product/view/id/8397/category/1221/ Edit ... WWII RAF Ground Crew 1:48 - A04702 http://www.airfix.com/catalog/product/view/id/8403/category/54/ Though I hope this is an artwork rough,as it's a Battle of Britain Hurricane of what looks to be 32 Squadron with the later style Rotol prop and what looks like belts of 20 mm cannon shells being fed into a machine gun wing Still, having some ground equipment is an excellent idea. Airfix, If you are reading and looking at more 1/48 vehicles - Churchill tank please, but a Centurion and M4A4 Sherman would be good too3 points
-
Beaufighter X. Maybe we will have some peace here now3 points
-
Deleted - multiple reposted photos without bothering to edit.3 points
-
Fritag's next trick will be to try and do the MDC. It remains to be seen which of Kipling's two impostors will be applicable at the end of that effort..... Oh yeah and I need to try and follow Bill's (Navy Bird) example and stick some PE on the things. Awfully glad the JP didn't have anything like those Beaufort aerials......3 points
-
My grandfather served with 602 Sqn. as a mechanic during the BoB and was badly injured during a Luftwaffe raid so hopefully I can take part with something suitable as tribute.3 points
-
Blimey some people get aggravated at producers ! like wow ! we all know they are just model kits correct? I find these mini rants and ( i dont know quite what to call them ?) hate threads ( probably a little harsh maybe accuracy threads?) that turn into endless pages totally amusing and a wonderful indication of what gets peoples back up ! over plastic Hate them all you like but as Recce points out they will continue to flood the market and couldn't care less what most of us think ! And i bet they will be scarce in the shops and online like the Vampire and whirlwind were , which by the way still sell quickly in our model shops here, a great percentage of modellers out there don't seem to care that much for accuracy so as far as giving the manufacturer the 'message' it aint working I was going to comment on attitudes and opinions of others but have no desire to be booted 'off planet' without a rocket just yet Lets just Chill enjoy the Hobby and have a great Xmas Cheers guys n gals3 points
-
So did Sunday dinner at the Old Toad today! Cheers, Bill PS. My kids tell me that I'm supposed to take pictures of my food with my phone. I don't know why, but they all do it!3 points
-
In the nicest possible way you are completely mad. But once I see an error like that I have to fix it as well. A very good job Sir! I think the base looked good myself. The model is very wacky so why not a different approach? One day I may be 5% as good as you at this model making lark!3 points
-
Before I assembled anything I mixed up a dark grey wash for the wheel wells: I applied it with a brush and then swabbed it off with a damp cotton bud. This is the front well but gives an idea of the effect I was trying to create: Here is how it looks after assembly: I then started to assemble this using some of the pre-coloured PE belts: I thought the control panel here would be forever invisible but you can just see the edge. I cut off the fire extinguisher bracket and retouched the cut as well as painting the red detail: I decided to use black decal film for the painted area on the floor: Next the instruments, the centre section has three bends in it so I cut it out with the backing paper: Here it is fitted: I was surprised to find this top piece did not have any adhesive on it so I had to glue it on with Gorilla glue: I have since come to realise the glue Eduard use is not that effective on tiny parts so they were quite right in leaving it off this piece. Eduard then recommend attaching these parts on some 0.8mm diameter rod: That seems like too much of an unnecessary balancing act to me so I used some black 1.3mm rod instead. Here they are fitted: I also painted the control columns with tyre black (all my other dark greys have spoil) and added some grey dots to the buttons. I have also painted the park brake handle (for that is what it is). In went the padded panels in the corridor and I distressed the floor decal with a coarse skinny sanding stick: That was a lot of fun. Bye for now, Nigel3 points


This leaderboard is set to London/GMT+01:00