
Leaderboard


Popular Content
Showing content with the highest reputation on 12/12/14 in all areas
-
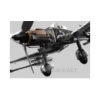
Hi guy's, Just completed this awesome kit today, although I might improve the rockets a bit. Thanks to Alan Sannazzaro for the photography.29 points
-
Hi fellows. Follow pictures of my Hawker Hunter in Tiger Meet colors...the painting job was done with air brush and free hand...hope you like it! In time it´s from Revell in the 1/72 scale... Best regards for all!18 points
-
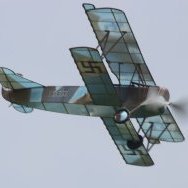
Hello everyone, here are the photos of my latest WW1 aircraft diorama '' Sleeping Fokker''. I build this for a group build''old kits'' on our National forum www.makete.si . This is the Revell Fokker DV.II in 1:72 scale from the 80s, everything was build from scratch except the figures, I Used mainly the MIG AMMO products to get the desired finish. I hope you guys will like it. Cheers from Slovenia!12 points
-
GRUMMAN S2A TRACKER IN SERVICE BY THE NETHERLANDS NAVAL AIR ARM In the year 1960, under the Mutual Defense Aid program (MDAP). The Netherlands received the first batch of 28 S2A Grumman Trackers. The Trackers were to be stationed on the carrier Hr.Ms. Karel Doorman and the Naval Air Base “Valkenburg”. Major maintenance was carried out on the Naval Airbase “De Kooy” The 28 Trackers were registered 146/173. Powered by two Curtiss Wright R1820-82 radial engines, generating 1575 HP each. The plane was certainly NOT under powered. Armament consisted mainly out of torpedoes, rockets and depth charges. To search the patrol area, the operator could use a very powerful search radar. This radar was located in a dome in the belly of the aircraft. This dome could be lowered to make full use of this device. To detect minute variations in the earth’s magnetic field, the Magnetic Anomaly Detector (MAD), was housed on the extreme back of the plane. This boom could be extended. The S2A and the SH-34J Sikorsky helicopter were the onboard equipment for the Dutch carrier to hunt submarines. Normally, six to eight trackers and four to six helicopters were carried during operational trips. These former British Fleet carriers were rather small for the big sized Tracker. To my knowledge, none crashed during start or approach. The plane could be catapulted into the air, or make a free start from the back of the flight deck. THE SCALE MODEL 1/72 SCALE HASEGAWA/REVELL To my knowledge, this model was first presented in the seventies, so it was manufactured the old way. The Tracker was a rather large airplane in wing sizes. To reduce this, I disconnected the outer wing halves, so that the original wing fold was established. To enhance the model, I purchased the following Eduard sets: Bomb Bay/Exterior and Cockpit set. To place the metal Bomb Bay in the model, all plastic coverings in this area were removed. The metal bomb bay is rather flimsy, so a very careful approach had to be taken. Once in place, the corners were extra supported by Evergreen beams. The cockpit escape hatches were removed. On the deck, during the start and approach, these were always open, to ensure a quick escape for the pilots with ditching. The operators had their own escape hatches above their heads. These were closed. Opening was possible from the in and outside. On the back of the aircraft, I made one more hatch, this contained the dinghy. I improved the landing gear bays and the front landing gear. From metal tubing, I made the MAD boom on the backside. This can be extended or retracted. The S2 was painted with XTRA Colors and the airbrush used was the Revell Master Class. Decals were from the Revell box and Dutch Decal. The model was sealed with Humbrol Medium Gloss Cote. SERIAL 160 In the Revell box, it contains the decals for serial 160. This particular aircraft has the following history: Bureau Number 148282. From 1960 until 1968, carrier based on board Hr.Ms. Karel Doorman (R81) From 1968 until 1976, land based (Mostly Naval Air Station Valkenburg) 1976 until present, stationed at the Military Aviation Museum, located at the village of Soesterberg in the Netherlands. Model Photos made by Joris de Neve, webmaster modeling club Eeklo (Belgium) Real pictures from the website www.vlaggeschipsmaldeel5.nl . This site is regularly updated by Webmaster Steven Visser, a former Naval NCO technician, who served on the carrier in the sixties. The carrier is also available in the scale 1/400. This set contains the plastic model, resin update for the angled deck configuration and numerous etch sets, including the (Large) Holland Signal Radars. Questions about all of this, just ask me. Regards, Derek The Netherlands. Next time on ready for inspection: "Hr.Ms. Karel Doorman" in 1/400 scale, including many Trackers on deck.9 points
-
Folland Gnat T.1 Central Flying School, RAF Little Rissington, 1964 1/48 Airfix kit no. A05123. Painted with Tamiya TS-17 Gloss Aluminium and Zero Paints McLaren Marlboro Red. WIP thread here.9 points
-
Evening all, Back along, I chose the Airfix Typhoon with the intention of building something nice and easy quickly. Two months later, it's finally done, and to be honest I'm happy to have it off the bench; not the greatest model I'll ever build. Nothing wrong with the kit at all, I just made a bit of a hash of things during construction and lost a bit of interest. Anyway, here she is... Thanks for looking, please excuse the dust and crud on the model, it's something I seem to be having an increasing problem with, no doubt due to the length of time it seems to take me to finish a kit these days.... Cheers, Shaun9 points
-
So calling this done and the final build from me of the year. F8F-2 Bearcat V01 flown by Cdr D R Flynn VF-111 `Sundowners` USS Valley Forge (CVN-45) September 1949 ..... and a final picture of the Grumman aircraft flown by the Sundowners from the 40`s into the 50`s.9 points
-
So this was my first year back with the models (well, actualy i came back like around november 2013) and i m quite happy with my progress (during last 16 years a lot of things has changed) and also i m happy for finding new "home" here on BM I was trying new and new techniques for me, learning and taking inspiration from people here on BM (and some more personal modelling blogs). I cant say the finished kits were better and better, as i m still doing mistakes and errors, but i think i did learn at least something new so far Now need to master it.. The goals for the next year should be to try to do cleaner work and get some stuff for making better photos So my year 2014, trying to go in order (the links are to RFI, WIP is usualy posted in RFI as well) Hurricane Mk.I (fiber wing), Airfix, 1/72 (started this 31.12.2013 so obviously it was finished in 2014, hope it does count ) http://www.britmodeller.com/forums/index.php?/topic/234954075-hawker-hurricane-mki-fabric-wing-172-airfix/ La-7, Eduard, 1/72 http://www.britmodeller.com/forums/index.php?/topic/234954233-red-lavochkin-la-7-172-eduard/ A6M2b, Airfix, 1/72 http://www.britmodeller.com/forums/index.php?/topic/234955620-172-airfix-a6m2b-zero-balikpapan-defense/ Bf 109G-6, AZ Model, 1/72 http://www.britmodeller.com/forums/index.php?/topic/234957397-bf-109g-6-az-model-172/ Spitfire IX, AZ Model, 1/72 http://www.britmodeller.com/forums/index.php?/topic/234958186-spitfire-mkixc-idf-172-az-model/ Mustang Mk.IV, Airfix, 1/72 (one of many, lovely kit) http://www.britmodeller.com/forums/index.php?/topic/234959359-mustang-mkiv-jaws-or-raf-shark/ Mosquito FB Mk.VI, Tamiya, 1/72, built for LTAT GB http://www.britmodeller.com/forums/index.php?/topic/234962046-mosquito-fb-mkvi-banff-strike-wing-for-ltat/ P-51B, Hasegawa, 1/72, built for D-Day GB http://www.britmodeller.com/forums/index.php?/topic/234965003-p-51b-the-iowa-beaut-hasegawa-scratchbuild/ P-51B, Revell, 1/72, built for Mustang GB http://www.britmodeller.com/forums/index.php?/topic/234965689-p-51b-shangri-la-revell-172/ P-51D, Airfix, 1/72, built for Mustang GB http://www.britmodeller.com/forums/index.php?/topic/234966031-airfix-p-51d-sweet-arlene/ F-51D, Airfix, 1/72, built for Mustang GB http://www.britmodeller.com/forums/index.php?/topic/234966232-f-51d-was-that-too-fast-for-me-it-was/ Bf 109G-6, AZ Model, 1/72, built for D-Day GB http://www.britmodeller.com/forums/index.php?/topic/234967239-bf-109g-6-172-az-model/ P-51D, Airfix, 1/72, built for Mustang GB http://www.britmodeller.com/forums/index.php?/topic/234968271-gunfighter-21st-century-p-51d-mustang/ P-40C, Airfix, 1/72 http://www.britmodeller.com/forums/index.php?/topic/234969574-the-flying-tiger-p-40c/ There are many and many unfinished kits as i did not have much time during the last months, so i hope i ll be able to finish at least few of them over the incomming christmass holidays8 points
-
8 points
-
the last few days modelling time (that sounds good but it adds up to about an hour and a half ) have been spent trying trying to marry up the undercarriages and the airframes. It's been a blast....... I scratched the undercarriage legs using the CMR parts as dimensional guides (cos the CMR kit is great quality) - but they seem to be a bit long.... The JP has a characteristic 'squat' look on its undercarriage - and it definitely don't have its ar*e in the air like this (main legs blue tacked in place): Out with the razor saw and an bit of judicious shortening of the main legs gives this for the JP5 - which is rather more like the real thing: And a piccie of the legs in place with the bracing shackle in situ. The JP was steered on the ground using differential braking and the nose wheel castored rather than being steered. It made for entertainment for all apart from the poor stude - until said stude had learned the knack. Anyways I've offset the nose leg slightly - which is a tad of artistic licence as mostly (but not invariably) the nose wheel is seen straight for and aft on a JP that's parked. Mine will be parked with the nose wheels slightly angled - on the basis that the last stude that flew em wobbled his way towards the parking slot and didn't quite get em straightened up in time Not me governor...... JP3 main legs have bene trimmed and the next job is to stick them on.... Steve7 points
-
Hi mates! The model is a SdKfz 263 from AFV CLUB that fought in the Poland 1939...follow the pictures...comments are more than welcome... Best regards! Luiz.6 points
-
Gentlemen, Having a really soft spot for the naval aviaition of the 1950s and 60s, adding a "Ford" to my collection was a mere formality. Since I was a kid, recularly spending some of my pocket money for Buck Danny comics, the shape of the F4D has been quite familiar to me - back then the delta-winged F4D looked so cool. TAMIYA's quarterscale F4D had been around for some years, when I eventually had the opportunity to tackle one of these kits. Douglas F4D-1, VF-213 "Blacklions", USS Lexington 1957 In order to further improve an already great kit, I added a CMK cockpit set and Eduard PEs. The kit's decals were replaced by an AeroMaster sheet - AeroMaster #48-542, "F4D-1 Skyrays Part 2" The paintjob was accomplished using Gunze Mr.HOBBY colour acrylics, applying only restrained post-shadings and subtle weathering effects. The AIM-9B Sidewinders were taken from a Hasegawa weapons set. Cheers, Erik6 points
-
Well Steve, All I can say is: Nice one, Dean6 points
-
Forty years ago on 12th December 1968 a Pan American Boeing 707 took off from New York bound for Maiquetia airport just outside Caracas, Venezuela. It never got there. The aircraft was a nine month old Boeing 707-300, the tail number was N494PA and the aircraft was named ‘Jet Clipper Malay’. To my knowledge a transcript of the final moments either doesn’t exist or has never been published. This is fictional but I believe it might have gone something like this; (All times are local) 21.56 PA217: ‘Maiquetia Tower good evening this is Clipper two-one-seven becoming established at fifteen miles for runway two-seven’. 21.56 Maiquetia Tower: ‘Good evening Clipper two-one-seven, continue approach, one to depart ahead of you’. 21.56 PA217: ‘Continue approach, Clipper two-one-seven’. 21.59 Maiquetia Tower: ‘Clipper two-one-seven cleared to land runway two-seven. Wind is two-eight-two at nine knots’. 21.59 PA217: ‘Cleared to land Clipper two-one-seven’. 22.02 Maiquetia Tower: ‘Clipper two-one-seven I can’t see you on the radar, confirm you are at eleven miles?’ 22.02 Maiquetia Tower: ‘Clipper two-one-seven did you hear my last transmission?’ 22.03 Maiquetia Tower: ‘Clipper two-one-seven can you hear me? Come in Clipper two-one seven.’ Clipper 217 did not respond. To this day no-one really knows what happened to Pan Am Flight 217 but all 42 passengers and the crew of 9 perished. Some reports say that the aircraft undershot into the sea because of an illusion caused by the town lights on the upslope behind the airport –this has never been proved. The flight deck crew were all very experienced with many flying hours so it’s hard to believe it was ‘pilot error’. Recently I found out that rumours at the time said there was an altercation or argument in the cockpit just before the accident. Apparently the Cuban Purser on board had a few issues and could be a bit ‘moody’ from time to time, but again there is no proof of this. So no-one really knows. Another consideration is we’re talking of 1968 here, the US was heavily involved in an unpopular foreign war and there was a lot of ill feeling towards the Americans (some things don’t change!) so sabotage/terrorism also hasn’t been ruled out. What is known is the aircraft suddenly disappeared off of the radar. I don’t know if aircraft blew up before impact with the sea or if the aircraft broke up when it hit the sea. The front section of ‘Clipper Malay’ broke away from the rest of the fuselage and fell into a ravine under the ocean. The bodies it contained were never recovered. I believe 34 bodies were recovered from the crash scene and it is thought some might have survived the initial impact only to drown shortly after. So why am I telling you this little story? My father was the First Officer on that ill fated flight. He had a lot of flying experience. He learnt to fly at the beginning of the war because he knew sooner or later he would be called up and he’d rather have a choice if he volunteered. He chose flying as it fascinated him and coming from a poor background he would never be able to afford it. In 1943 he was posted to England and was a part of the 368th BS, 306th BG operating out of Thurleigh as a captain on B17’s. Just after the war while still in the Air Force he was involved with ‘Project Casey Jones’. This was really one of the first acts of what was to become the ‘Cold War’. The operation was to have the first accurate photo map of the whole of Western Europe. The flying would have been boring, up and down, up and down and if the pictures didn’t turn out right you’d have to do it all over again. He did a lot of flying around Gibralter and Southern Spain. After leaving the Air Force he got flying with Pan Am. Although he was a B17 Captain he did have to go ‘backwards’ and fly as a Flight Engineer for a while and I do know he flew on Boeing Stratocruisers. In the 1960’s he got rated on the 707 and a little while later became First Officer. Then shortly before the accident he was about to be promoted to Captain. He’d done all the hours and taken the tests. His new uniform with the four stripes was in the wardrobe and all he was waiting for was a letter telling him to sit in the left seat next time he came to work. But of course it wasn’t to be. I remember some years ago my mum telling me that shortly after the crash the FBI coming round asking questions like ‘What make of watch did he have?’ and ‘What brand was his shirts? Describe his shoes’. All sorts of questions to make identification easier if any more bodies were recovered. There wasn’t. I don’t remember him as I was just 8 months old at the time. So a couple of years later mum sold the house and moved back to England with me and my brother, back ‘home’ where her parents lived. So, Forty years later I have finally built the model I always wanted to, ‘Clipper Malay’. I saw the1.72 scale Heller 707-300 kit in a model shop in Bedford about 8 years ago it was only about £12.99. Not knowing then about forums and people making decals I just stored it in the loft until I fathomed out how I would turn it into ‘Clipper Malay’. Around three years ago I was browsing Ray Charles’ ‘Two-Six’ decals website when I spotted a sheet of 1.72 Pan Am 707 decals. I emailed Ray to confirm they were designed for the Heller kit. I then asked him if it was possible to change the decal sheet’s tail number to N494PA and include ‘Jet Clipper Malay’ and briefly told him why. Ray said it was no problem and the decals arrived a few days later. That was three years ago. Since then I kept meaning to get this kit built but never got around to it until recently. Being the 40th anniversary now seemed a good time to get it done. Here's to the memory of 'Clipper Malay'. Keep smiling! Cheers for looking.5 points
-
Hi, here fresh from my desk the new Airfix Gnat T.1 in 1:48. Build was OOB apart from some spare parts I used for the Cockpit details. Build was very easy, need about 3 weeks for it. Hope you like it5 points
-
I built this in the summer but have only just gotten a decent photo setup to be able to take pictures. This was built straight from the box and I used it as an experiment to try out a couple of techninques. The first was 'pre-shading' panels in different shades of grey before overspraying in Alcad pollished aluminium. This gives the effect of sublte differences in the panels without having the stress of masking metallic paint (it tends to peel off when I try!) The second technique I tried was the use of small dots of oil paint on the large areas of red to create a suble wethered look. A mix of yellow, red orage and brown was used and i'm prety happy with the result, though I will need a lot more practice. I've also made a short video (best watched in HD) Any comments or suggestions welcome John5 points
-
All in 1/48 scale, so lets kick off with the `Tiger` builds first....., Gloster Meteor F.4 `First and Last` Tigers (SE5.a/Hawk T Mk.1a) Phantom FGR.2 Spitfire Mk1.a Gloster Meteor F.8 EE Lightning F.1 Gloster Meteor T.7 EE Lightning F.3 Gloster Gauntlet Hawker Demon Hawker Hunter T.7 Hawk T.1a EE Lightning F.6 ..... and not forgetting those `could of been` 74 Sqn aircraft....., G/D TF-111A SEPECAT Jaguar Moving onto my other side project, that of the VF-111 `Sundowners`...., `Sundowners` Hellcat `Sundowners` F-8C Crusader `Sundowners` F-4B Phantom `Sundowners` F-14A Tomcat F8F-2 Bearcat .... and finally finishing with a `what if` Intruder....., Grumman A-6K Intruder ..... and a build from the spares box. F-4J Phantom II (AMARG) Thanks for looking.5 points
-
Hi All, A post to show my latest build! It's been a shelf of shame rescue as i must have started this kit almost two years ago Finally dug it out and finished it over the last couple of weeks. It's Eduard's Bf-108B kit finished as D-IDBT, an aircraft operated by the German Embassy in London in 1939. One of the biggest battles with this kit was ascertaining what RLM-05 (lazure yellow) actually looks like. In the end i had to mix it by eye using humbrol paints and other people's interpretations of the colour. I'm happy with the result though and trust far more the judgment of my fellow modellers than a sketchy paint chart. Anyhoo... The pictures: Arf! I hope you guys like it. It was, as always, a pleasure and a delicious escape to the modelling desk. And an ever increasing drop into the oceanic learning curve. Je suis le muppet. ~M~5 points
-
Hi guys, here is one of my latest build, the famous yellow 10 Fw 190 D 13 from Hobbyboss. This kit is sold as a D 11 but the underside wing is not accurate for that version (but correct for a D 13). It is a nice kit, easy to build, and not expensive, but that suffers from a lack of details and with some inacurate parts in the wheel wells. Thanks for watching, Comments are welcome. Cheers, Manu.5 points
-
Hello Friends The last one from the bench, the old Tamiya kit, still a good one to work with... i think! I hope you like it. Best regards from Portugal Vitor Costa4 points
-
Hi everyone ! Finally finished ! Hope you like it4 points
-
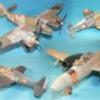
Even though I have confirmed, just wanted to add these two. I think I will do the IL-28 (North Korean) first, then the Mil-24 (Ivory Coast) half way through and see where I get. Trumpeter 1/72nd IL-28 by Totallyrad.co.uk, on Flickr MiniHobbyModels 1/48th Mil-24 (ex-Monogram/Revell) by Totallyrad.co.uk, on Flickr4 points
-
Plumbing for pitots my A*!*, its perfectly obvious what these pipes are: No sober pilot would voluntarily attempt to fly this aeronautical abomination. A4 points
-
After battling the tracks numerous times I decided to base the beast Thanks3 points
-
Hi. Built these two in between other ongoing WIPs'. First up, Revell Spitfire Mk.V. Depicting W3902 WX-T of 302 squadron (Polish).Out the box with Techmod decals, Xtracrylics, artists matt varnish with a drop of white to give the lightened faded look. I know the kit suffers from a lack of gull wing to the underside but , not bothered as No one looks underneath much. Note unusual position of the Polish 'Chessboard appplied to the Mk Vs of this unit. Next up, the Mk.XVIE. This one is TB634, AU-S of 421 Squadron RCAF early 1945.AZ Models kit(from the Joy pack set), all decals from my stock of generic roundels, letters and numerals by Modeldecal. Good fun lining up the serial numbers and then overlaying with code letters to partially hide them! Oh I found a pair of 421 Red Indian badges from the Civvy Spit I forgotten I had. But would still like anyones who doesn't want thiers please! Typically, while scouring hannants site, I see the Sword kit has these exact markings!! And after I done mine. On to the pics: Quite pleased in how the serial turned out without the overlapping clear film, from indvidually cut items, showing up. And note the 'fresh paint where the sky band was overpainted Note the assymetric roundel to the wing tops! Photo exists of this! In Volume 3 of those lovely 2nd TAF books by Chris Thomas and Chris Shores. And now the pair together: Be seeing you!3 points
-
She is finished finally! tried to be ready before the new highly awaited Kinetic wonder! I especially like the AML exhaust! Iwill buy more from them in the future! (they released a pair for the Heller Mirage IV as well recently!!! ) it is looking cool, no? sunset was already some years ago for Brazilian Mirages! first the IIIs and later the stopgap 2000B/C (till what exactly? Gripen E in some years time!!) the in progress can be found here: http://www.britmodeller.com/forums/index.php?/topic/234966501-mirage-iiiebr-148-aztec-decals-on/?hl=mirage thanks for comments!3 points
-
It's been a funny year, but I have managed to get through a number of builds. Looking at them now, though, I feel that very few of them are actually "finished." Most of them have been put on the shelf after I got fed up with them, and could use some more time to finish some small details properly. i've come to realise that I have far too many over-ambitious ideas that can never work properly, due to lack of time, the financial resources to throw large amounts of resin, PE and other aftermarket bits and bobs at them to make them work or, let's admit it, knack. The pieces I'm happiest with tend to be the simplest; (there's a lesson for me for next year.) I think this first one qualifies as a 2014 build, but I cannot remember actually when I beat this one into submission. Actually, let's call it a draw for accuracy. This chap followed fairly swiftly. Some Eduard PE can be seen on this, lots more PE pinged off into the distance and will never be seen again. Not officially a new build, more of an enhancement here, I replaced the scratched kit windscreen with some acetate and built a drystone wall from Das, in time for Automodelismo. It's one the kids love to see. Kids up to the age of about 55 that is. Then I had fun with this lovely little kit from Comet Miniatures. This appeals to a lot of people of a certain age at shows. There's nothing better than sitting at a Britmodeller table at a show, with good company, watching people smile as they stop to look and relive some childhood memories. Then I discovered a product called Precision Ice and Snow and experimented with it. This was just recreating tracks in snowfall. While this played with various stages of snow and ice-melt. And this combined snow, broken ice and slushy stuff. Now, at this time of year, I need some company to come up with a product called Sunshine and Blue Skies. It must have been my white period, because I then came out with this. It's the reissued AMT kit with some busying-up around the engines but otherwise OOB. I know it has issues but it looks OK from a distance on the shelf, and I can't be bothered to spend the rest of my life filing the white metal flash from the Warp one, even if I could be persuaded that it's worth the money. For some light relief I followed up with this delightful chap from Retrokit. There's something very Wile E Coyote about Scrat, which is probably why I have a soft spot for him. And then I was trying to finish this scene for November. Some time was wasted on a couple of disasters that I won't elaborate on here, and that was 2014. There's a couple of projects underway that I hope will be finished in 2015, but I seem to be getting obsessed with cramming LEDs and fibre optics everywhere at the moment, (refit Enterprise), and going overboard with PE and rigging, (HMS Dreadnought). There might be a dogfight double between a P45 Thunderbox and a Lockheed Shirtlifter, but then again, probably not. I hope everyone on BM has a good New Year, and I hope to meet up with some of you at a show somewhere. All the best, Paul3 points
-
I had this languishing, partly built for ages. So I decided it needed finishing. Its a lovely kit, loads of fine details, but I added some extras, mainly in the cockpit with an Eduard etched set. The rest was from the box. I painted the model with Xtra Color enamels and used the kit's decals. image ru image hosting gif adult image image posting photo hosting sites free picture upload image hosting site over 5mb image hosting over 10mb free adult image hosting posted image imageupload Thanks for looking3 points
-
First off, to prove I am a man of my word, my earned curry from last night. You can trust a man who's honest about what he eats (and drinks). Back to the model, everything zipped up with a dab of perfect putty wiped away with IPA to lessen the seam: Panel with decal and Tam 109 sight: Seat and belts: Yes I know it had an ejector seat thingy and these would be the end of Hptm. Heimlich should he have to leave this brute but they'll do to add a bit of interest to the pit I make these using prepainted tape that's has Radu Brinzan's rivetter tool run over them and these cute little airmodel buckles, cheap and good enough thru a closed canopy: Shaped and polished the tip lights: I painted the wing recess black to suggest an empty space like this T11 in our museum: That's all the modelling done for this week as the canopy future has to dry along with the gator glue dabs in the pit, Now its time to caramelise some shallots and flambé them in brandy for the peppercorn sauce, for tonite is steak night at Kumar Towers and if this lapsed Hindu don't get his sacred cow, he ain't no happy pappy. Peace be upon your nuptials and naiads and thank you for tuning into Channel Kumar. Anil3 points
-
I keep forgetting that there is also this thread... I got a few nice deliveries yesterday. Ebbro 1/24 scale decals for the 1980 Paris Dakar Renault R4 Sinpar. A few 1/24 scale decal sheets from DMC for some Tour de Corse Audi Quattro's that I have half built. And then a few 1/24 scale resin kits from FPP; Auto Union type C Mercedes T80 speed record car 1939 And not least the Bluebird CN7. There is a definite risk that this one might have to be pushed in between ongoing projects.3 points
-
Off my build thread but wanted to post this. Joint having a toy sale (kids stuff) with 50% off marked prices today. Went in found this (only plastic kit aircraft in the whole place sitting there by itself).....Originally marked at $99.99 reduced to $50 and then the big winner take a further 50% off again and you have yourself a 1 48 EE Canberra for $25 Aussie dollars! Just couldn't resist even though it's not my normal scale or topic! And it's all there.. Better get that Stuka finished now!3 points
-
Photo time! Got an overdue update installed and suddenly everything works again. flipping computers. Anyway, on with the show for what it is;3 points
-
Hi, everyone! Let me present you my next model. This is almost "just from box" assembling.3 points
-
2 points
-
Hi All, Here you are my last built the SEM in AFGHANISTAN version based from Heller kit with some modification....you can see more détails on My Webpage I hope you will like it Thierry2 points
-
Evening all, As well as modelling, I have a keen interest in photography, particularly aviation, and as such I spend much of my spare time through the summer attending airshows and visiting airbases, and thought I'd share a handful of shots of my highlights from what has been a pretty productive year. The rest can be found in my various albums on my Flickr page in the link below for those interested. >>> https://www.flickr.com/photos/shaun_schofield/sets/ <<< DX_D-Day70_086 by Shaun Schofield, on Flickr Cotswolds_050614_01 by Shaun Schofield, on Flickr FFD_130614_100 by Shaun Schofield, on Flickr Merryfield_2014_100 by Shaun Schofield, on Flickr Waddo2014_Fri_070 by Shaun Schofield, on Flickr Waddo2014_Fri_049 by Shaun Schofield, on Flickr RIAT2014_WED_001 by Shaun Schofield, on Flickr RIAT2014_SAT_031 by Shaun Schofield, on Flickr RIAT2014_SAT_045 by Shaun Schofield, on Flickr RIAT2014_SUN_001 by Shaun Schofield, on Flickr RIAT2014_SUN_002 by Shaun Schofield, on Flickr RIAT2014_SUN_022 by Shaun Schofield, on Flickr RIAT2014_SUN_019 by Shaun Schofield, on Flickr VL2014_Arrivals_038 by Shaun Schofield, on Flickr VL2014_Departures_001 by Shaun Schofield, on Flickr Culdrose_2014_024 by Shaun Schofield, on Flickr Dawlish_2014_059 by Shaun Schofield, on Flickr Dawlish_2014_101 by Shaun Schofield, on Flickr CWJOD_AUG14_047 by Shaun Schofield, on Flickr OW-Race-Day_2014_100 by Shaun Schofield, on Flickr Thanks for looking, hope you enjoyed them. Once again, feel free to browse through them all. Regards, Shaun2 points
-
- This is at last the long awaited SAAB 37 VIGGEN in 48 from TARANGUS - - Well, I know it is a grey Viggen, I promise that the next one will be splintered, but the weathering is a challenge in itself. - On the kit itself, It is not a bad kit at all, there is no more or less bugs in what we meet on the so called state of art from the Asian countries, Hadn't it be its price, it would have been a good kit worth to be acquired...... - In this country we have a sentence which says ; Quand on aime on ne compte pas.. ( When ones likes ones does not count ) approx translating..... So....with Xmas approaching.....2 points
-
Both schemes are based on those featured in Steve Zaloga's book Modelling the US Army First up is an M4 that belonged to the 8th Tank Battalion, 4th Armoured Division during the advance on Paris in 1944. Second up is an M4A3 of the 2nd Armoured Division during Operation Grenade, Germany 1945 Honestly I do build kits made by different manufacturers but these are a quick build to help practice some techniques. Thanks for looking2 points
-
Thanks to all for your comments chaps I am thinking of vac forming another turret! .....I have decided that this one is not strong enough for all the detail that I have to try and pack into ...so its time to fire up the oven and get the hoover out again!!2 points
-
Final decision: 1/48 Airfix Spitfire Mk.I, as R6893, KL@T of 54 Sq, Colin F. Gray2 points
-
A quick build, of a great, well fitting model, finished in a nice bright scheme. Not one of my finest builds, but just a nice break in between big projects. NB wing tank stencils added before I found out these aircraft were pretty much un-stencilled ( but I like the extra bit of "colour"' it adds) Hope you like her. Cheers Jonners2 points
-
Thanks Tom and everyone else. I was also umming and ahhhing about it, not sure where I'd end up, but now I've got going... Bit more done adding the magnetos, pump, compressor, starter motor and various little bits. I also added a piece around the supercharger's outlet to thicken it up a bit and then backfilled with the liquid filler to blend with the supercharger casing. Looks much better now, or it will once painted! This is now just about ready for a first coat of aluminium base colour.2 points
-
Hello, After just over a week of spending 15-20 minutes a night on this, I can finally call this complete! Here's a couple of shot's for the time being as I'm waiting till the morning to go outside with the kit and take some photo's in the Sun (if it ever stops hailing/raining)! Thanks for Looking John2 points
-
Once heard a story that in the ops room for visiting squadrons at an RAF Phantom base, there was a sign posted that read: NOTE Jaguar pilots may NOT use afterburners when taxing.2 points
-
Like my Swedish 262 for example? .....or a plane of an actual operator, but not in colours it ever flew in with them? These are my efforts from previous WHIF group builds. It also helps to create a back story too. It all adds to the fun! Trevor2 points
-
In what way is that a waste? That is a sad shame Milktrip, our meetings will be sadly diminished without your input. Tonight I removed the PE parts for the seat armrests / side trays: I am not really sure what they are for, possibly map trays (they fit on the side of the seats, I do know that). Cleaned up and folded, I got them ready for some paint: I then extracted this interesting looking piece of PE to add some detail to the side door opening: Keen followers may notice that it is a leftover from the Flying Stiletto jet exhausts, as I keep telling hendie, you never know when these things will come in useful. Here it is installed: Next I drilled out six holes on each side of the cockpit ready to receive some plumbing: This is what it should look like: Well that's me about done for tonight. Bye for now, Nigel2 points
-
So at last I've got the upper wing on. This was a bit of a fight, what with having to replace the two cabane struts, but it's OK, I think. I pulled the wires last night, which was a long job, as there are plenty on a Gladiator! The spraying process left the wires an assortment of different shades, which I'm pretty sure isn't authentic! I found wiping a Faber Pitt pen along them soon sorted this out. Here's the upper wing: the rigging holes are filled with white acrylic gesso. This is easy to sand, sticks well and shrinks as it dries, so hopefully I can get this sorted fairly soon!2 points
-
Shucks ! Wasn't expecting to have to start so soon but I'm still in with South Africa (Cheetah D) and Indonesia (Mig-21) please2 points
-
Is it because the pilot inadvertently jettisoned the drop tanks instead of the 1000 pounders and has slammed on the air brakes whilst contemplating returning for them? Alas they appear to have just landed right on the bonfire... There'll be hell to pay in the debrief.2 points
-
Well chaps, work continues but at snails pace... 2 steps forward 1 step back, prime, fill, sand, over and over again taking out all the blemishes, getting the tailplane fairing looking right. A final wet sand and a final complete spray of white primer done today. A couple of large screws are drilled into the nacelle through the undercarriage well, these allowed me to clamp the model with pliers and allow me to spray all over. (Earlier on in the build I held the wing leading edge down and poured resin into the nacelle, this made the nacelle rigid and allowed me to sand and blend the plastic of the wing / nacelles to the engines within a mill of it's life. Here she is pretty as a picture, oh I do like this aeroplane Also on the bench:2 points


.thumb.JPG.3498f40362ff13ebfc4b2e45abbd545e.JPG)


This leaderboard is set to London/GMT+01:00