
Leaderboard


Popular Content
Showing content with the highest reputation on 02/12/14 in all areas
-
A quick build, of a great, well fitting model, finished in a nice bright scheme. Not one of my finest builds, but just a nice break in between big projects. NB wing tank stencils added before I found out these aircraft were pretty much un-stencilled ( but I like the extra bit of "colour"' it adds) Hope you like her. Cheers Jonners26 points
-
This is it! Build twelve since I restarted this modelling gig. I . Can. Stop. Counting! And it only took me 22 months to do 12. But what a choice. You SNEAKY Sword... Lulling me into a false sense of security with your nice little Spitfire kits that went together with little problem. Making me think all your kits are like that. SILLY me. This one was definitely in the check fit, file, check fit, rinse repeat category. I'm sure more experienced modellers would have no problem, but I'm glad I did the shake and bake Airfix Vampire before this. I don't think I'd survive doing two like this in a row. That on top of the suddenly very busy photoshoot schedule I have and it was touch and go whether it would get done! Here it is though. The Sword Photo Banshee. I chose it for build 12 because I don't think I'd seen one of these versions by Sword on here yet and I also fancied practising messing up the glossy sea blue finish a bit. I noticed the Marine aircraft based in Korea did get a bit mucky. In the end I don't think I messed it up enough, but it is what it is. A few build points. I used Lifecolor glossy sea blue for the main colour. The aluminium was Aclad 2. The camera nose is a separate section in the kit and all transparent. So that was masked off before construction. My fitting wasn't quite perfect though and it's a degree or two off clockwise. The decals are nice and thin and settled down very well. I washed the panel lines with a mix of humbrol dark earth and sand weathering powders in a mild mix of water and decal fix. The kit is missing a few details I think. For instance it doesn't have what I think are the tear drop lights on the front of the tip tanks that I've seen on photos of the real thing. Of course a REAL modeller would have fixed that. I also think the front undercarriage sits a bit low in comparison to the main gear, and I should have applied a bit of surgery to balance that out, but Real Life called and I needed it finished. In the end I quite like it. Not sure what 2015 will bring. More aircraft in 1/72 for sure, but I'm tempted to go Sci-fi for my first 2015 build. PhotoBanshee_021214_01 by IrritableRabbit, on Flickr PhotoBanshee_021214_02 by IrritableRabbit, on Flickr PhotoBanshee_021214_04 by IrritableRabbit, on Flickr PhotoBanshee_021214_05 by IrritableRabbit, on Flickr PhotoBanshee_021214_06 by IrritableRabbit, on Flickr PhotoBanshee_021214_07 by IrritableRabbit, on Flickr PhotoBanshee_021214_08 by IrritableRabbit, on Flickr PhotoBanshee_021214_11 by IrritableRabbit, on Flickr PhotoBanshee_021214_12 by IrritableRabbit, on Flickr13 points
-
Hi, all Here is a model that I've finished a year ago. It's MPM's Meteor assembled as FR.9 Major modifications to the original kit included - addition of resin cockpit, wheel bays and wheels - extension of nose part. MPM provides transparent parts to replace original F.8 nose. However these transparencies have the same length as F.8 nose while in reality FR.9 nose was longer. This also confirmed by comparison to photos. FR.9 nose is visibly longer and pointier - so I decided for some surgery. I cut transparencies between camera windows and front edge and inserted ~1.5mm of plastic. Another 1mm was added where transparencies join fuselage. - resin cockpit supplied by CMK has solid nose which is fine for F.8 but in FR.9 there should be a camera! Solid nose was removed and some bits of wire and resin F.24 camera (from a set for Spit PR.19) were put in place Meteor bears marking of 8 Squadron during service in Oman in late 50s. And together with its Swedish contemporary Kind regards, Dennis11 points
-
FineMolds' Ki-10 1/48, built for Model Airplane Int'l mag.9 points
-
I had this in my stash for over 10 years before I decided to build it. I have read many negative reviews about this kit regarding its poor fit and also discrepances in accuracy. Well,I decided to have a go anyway and tried to make the best out of it. The engines I found the worst part of this model kit.Wrong shape and wrong angle if attached to the wings without alteration and no fit of the parts. I sanded away the holds for the engine cowlings to get them as straight as possible.The wings were another problem to fit and align them properly to the fuselage. I also realize that the nose section is wrong in shape and that there was once a resin replacement part available.But it seemed sold out at the time I was working on this kit,so I had to go on with whats provided in the box. As a matter of fact the replacements are not completly correct.It seems pretty difficult to get the 757s characteristic look right. For the decals I opted for the colourful Air Europe decals from TwoSix and a detail set. Despite the inaccuracies it looks fine and maybe I will build another 757 some day as this is the only one in my collection but then buy some replacement engines that I hope will look more realistic than the kits. Enjoy9 points
-
Good afternoon After the 51 FIW Sabre I built for the Gb earlier I decided to build another Sabre and this time flown by the 4FIW , this one was flown by captain Clifford Jolley an ace with 7victoires serving with 335Fis .. I used a Pavla seat ,decals come from the "Wings over Korea" Eaglestrike decals sheet and I brushpainted with Humbrol Metalcote paints .. Patrice9 points
-
Just finished this in the bomber Command GB after what seems like an eternity! L7463 started out with 97 Sqn based at Coningsby on 26th September 1941 in the markings of OF-P. It moved to 106 Sqn on 20th January '42 and changed its markings to ZN-S where it operated until it's fateful end on the morning of 24th April of that year. Taking off from Coningsby at 22.00 on the 23rd, it attacked the Heinkel works in Rostock. On the return, the port engine caught fire which was not uncommon for the Vulture, the Achilles heel of the Manchester. Losing altitude on one engine and slowly turning due to the asymmetrical power of a starboard engine trying to compensate, the pilot Harry Murdoch Stoffer ordered the crew to bail out to which all successfully did. Stoffer stayed with the aircraft, but unfortunately the fire burned through the port wing causing it to break away. Sadly he died in the subsequent crash in Visgaarde near Tinglev in Denmark: The build represents the aircraft as it was with 97Sqn when it started it's short career: The build uses the Revell fuselage mated to the Planet wings. The mid upper was from the Planet kit, the front from the Falcon set and the rear scratch built using the Falcon Sunderland rear turret part. All in all a fun build. Just hope we can get a 1/48 conversion set in the future with out re-mortgaging the house for a Paragon set! Hope you like it The build is here Thanks for looking Neil8 points
-
The only IL-96 kit around,Eastern Express' kit is a very tough one to build. Seldom I had a kit that had such a poor fit to the parts.Every single piece needed dry-fitting and corrections,filling and sanding to no end and some parts couldn't be used at all and needed to be replaced. Such part is the complete landing gear which I took from a Revell Boeing 747-200. In order to fit the gear to the Il-96 i had to highten the main gear bays and also trim parts of the front gear. But...after all the trouble it turned into a nice replica of this "Russian Lady" and its a welcome addition to my collection. Decals are from F-Decal I still have the Eastern Express IL-96M in the stash and this seems to be in the same "Quality" as this one,so I was not yet in the mood to get started with it. Enjoy8 points
-
Couldn't wait any longer. Down to the garage and on with the Polish Aluminium Alclad. A nervous couple of hours and then unmasked: Relief. JP5: JP3: That'll do Righto. I reckon I can stick the undercarriages on now. Out for a curry tonight so nothing more today. Steve8 points
-
Hi all, I wanted to share pictures of my latest build - a Pakistan Air Force F-86 built using the old Fujimi F-86F-40 in the colors of the famous 'Black Spiders' squadron at the beginning of the 1971 war with India. The colors are Alclad 'Chrome' and decals are from the DP Casper's big sheet on that war. The only change I made to an otherwise oob build was to delete an extra scoop near the starboard air brake that is unique to JASDF F-86Fs. Hope you like it and let me know what you think -8 points
-
Hello everyone! My name is Ollie and while I wait for my own Britmodeller account to be opened and the chief people allow me to post there, I have hijacked my Daddy's account and he's showing me not just how to be a modeller, but how to be a Britmodeller! I went downstairs the other evening to say goodnight to my Daddy and he was painting the seats on a really nice looking aeroplane. He said it was called a Gnat and I went to bed dreaming of when I could make models too. I did not have to wait long because the next day my Daddy took me somewhere that he calls his 'cave' and showed me his stash! When I went to school the next day I told my teacher that my Daddy has a huge stash and when I got home Mummy said that Daddy had gone away for a little bit as some people from the Drugs Squad had arrested him! He came home later that evening though and said that maybe he should change the name of his model collection? He did say that after school the next day I could choose any model from his collection and make it myself!!! So long as it was cheap, 1/72nd scale (whatever that means!!) and that he was hardly likely to make it himself!! I was left with the choice between a really cool looking aeroplane called a Skyraider which had loads of bombs and rockets!!! A funny looking one called a Walrus. My Daddy said that one could land on water! But the one that I chose was a really, really cool one with a jet engine that could take off straight up!! Well, that's what my Daddy said, personally I think he's joking. He does that sometimes! My Daddy said that I could paint it whatever colours I liked, so long as it was dark green and dark sea grey with something about colour matched paints? I have no idea what he was talking about so chose a really pretty red! We spent a while putting it together and my Daddy let me cut all the parts off with some really sharp cutters!! I tried to cut his arm as well, but he got a bit cross... But after a while we got the parts together and it was really great to see all those little bits that I cut off become a real aeroplane!! My Daddy took a few photos so I will show you them I checked to make sure that all the pieces were in line and where they should be. I didn't care too much about the raised panel lines though. My Daddy's planes have recessed ones. My next model will have recessed panel lines. After all the pieces were put together my Daddy got the green and grey paints that he said I had to use. But I wanted a RED one!!! And I said that we had gone to see the red planes (there were lots of them and they all flew really close together with smoke!!) so I knew that there were red planes. After I got my way (I usually do!!) my Daddy gave me one of his best paintbrushes (well, he said it was his best, but I saw others that were in nice plastic tubes that he said I couldn't touch. I think they were his best ones!) and I started painting the aeroplane all over. My Daddy said I was naturally gifted and had great paint brushing skills! I think what he meant was that I did not get any paint on my jumper. Mummy would have been a bit pis annoyed with me. I really loved painting it though! After quite a long time and lots and lots of paint, it was finished!! I wanted to go and play with it straight away but my Daddy said we had to put decals on it and then varnish it. He also was said something about paint chipping and weathering??? It was quite cold today if that's what he meant? It seemed ages before he let me touch it again as he said the paint was still wet. I didn't believe him and so I touched it and got red paint on my fingers. I guess he was right. So we left it a bit longer and borrowed Mummy's hair dryer so that we could dry it faster. My Daddy sprayed some stuff called 'varnish' on, he said it would make the decals stick better? I still don't know whether he's joking, I have lots of stickers and put them everywhere and I never used 'varnish' before. But after he put the varnish stuff on he said I had to go to bed and that we'll do the stickers... oops, decals, tomorrow. When I got back from school (I didn't say anything about my Daddy's stash this time) my Daddy and me went to his 'cave' and he asked me to choose some stickers decals. I really liked the red, white and blue ones and saw pictures of other planes, even some other red ones, with them on and so I chose those ones. It was hard work putting them on and if I'm honest I got a bit bored. Daddy was concentrating so much that he stuck his tongue out a little bit on the corner of his mouth, he does that when he's concentrating hard!! But after what seemed ages we finished it!! My first model aeroplane!! My Daddy says it's called a Harrier!! I looked them up on the Internet, but it says they don't exist anymore? That must have been sad for the people who flew them because it looks like a really cool aeroplane. It is supposed to have some windows but we looked everywhere for them, I think we dropped them somewhere. My Daddy said that the carpet monster must have got them!!!!!!!! I'm too scared to go down to the 'cave' now in case it gets me too!!!!!!! But I hope you like my Harrier, it's sitting in my bookcase now between Dusty Crophopper and Skipper from the movie 'Planes.' I like that movie a lot and have just got Planes 2!! I want to build lots of planes now and my Dad says that maybe one day I can have a stash too!! Mummy gave us a funny look then when he said that, I think she thinks he has enough models and that we don't need anymore, but my Daddy said he would show me somewhere to hide them so Mummy won't find them!!! Thank you for looking at my first model!! I'm only 3 and have to go to bed now, but I will be dreaming about my next model!!! I've seen a really cool MPM 1/48 He-177 with all the after market stuff in his cupboard!!! I want to do that one next!!!!! Ollie7 points
-
Hello all, Here is my recently finished 1/48 Hasegawa A-4N Skyhawk (or Ahit in IDF service) in the markings of 102 'Flying Tiger' Squadron. Kit is mainly OOB (all the resin parts needed for the IDF version were included in the box along with the 30mm Cannons) with the exception of a Pavla resin seat, Steel Beach FOD covers and MK82's and AGM-45s from various Hasegawa weapons sets. For those interested, my Israeli Air Force project/build thread is here And alongside the mighty F-4: Comments welcome, thanks for looking. Dave7 points
-
Well folks I started this on the 7th October and today was happy to finish it off. Built for the Lightning STGB, you can see the build thread over there if anyone is interested. However, for a quicker précis ... Airfix F6 with Xtradecal markings used with the kit stencils, Aires cockpit, jet pipes and wheel wells, CMK control surfaces, Quickboost seat, Master pitot and Alclad finish. Please forgive the artistic license in having the flaps dropped a tad and the airbrakes out I put some gubbins on the canopy insides...mirror, locks, silica containers, pipe work etc, as posing it open would have left their absence a bit more obvious. The Aires sets called for a lot of plastic thinning to fit in (heard that before?!) and the nose cone isn't actually centralised. This isn't my fault as such, I just put it in as it was moulded, so beware if you use the undercarriage sets! I think I used all the Alclad aluminium shades at some point, and whilst it does look darker than normal that's down to me liking a dirtier bird !5 points
-
Hi, Hasegawa Starfighter, Platz and kit decals, Daco details, Aires pit,wheel well,engine nozzle and CMK engine compartment, Master pitot. Aires as usual hard work but partially worth it, Daco parts are simply perfect, even the Helmet has a transparent visor. I will take better pictures in daylight later. Alclad and Tamiya colours used. MIG light wash. No it's not aluminium lacquer, this is a very early one with natural metal but very worn. Thanks for looking Thomas5 points
-
Hello! Here's my 1/72 Airfix Lancaster BII, which I started working on in April 2014. It was already finished at the end of October and went on display at the Wiener Modellbaumesse (Vienna Model & Toy Fair), where IMPS Austria were attending. Now I finally managed to get pictures taken, thanks to Mr. Wolfgang Rabel of IGM Cars & Bikes. This is the 1/72 Airfix kit with some Eduard photo etch added, representing a machine of 408 (Goose) Squadron, 6 Group RCAF, RAF Linton-on-Ouse, Yorkshire, July 1944. The model was airbrushed using Gunze/Mr Hobby acrylics. TT Thanks for looking! Cheers from Vienna, Austria Roman5 points
-
Something that I'd built not long ago and waited fro someone to do WW2 RCAF decals for it. Caracal came along and answered my wishes. So a quick decal order to Hannants last Monday and a few days later, they are on my model. The kit is the 'Revell-o-gram' new tool(2014) 1/48th Stearman. And a lovely kit it is too!! The Caracal decal option depicts FJ848 in RCAF service somewhere in Canada. I added all the rigging from stretchy stuff and invisible mending thread. Enjoy: The wood grain effect on the prop is actually a decal supplied on the kit decal sheet! Any questions, I'll gladly answer. Thanks for looking.5 points
-
Was it through military action?5 points
-
Bill, Steve, Roger and Tomoshenko, thanks so much. Your kind words and encouragement mean a great deal and keep the motivation bubbling along merrily, cheers. I'm thrilled that you are all enjoying the progress so far. Talking of progress, today it is time to turn our attention to the undercarriage {~gulp~} Let's have a look at the starting point. Flash aplenty plus alot of material along the mold seams. Any surface detail has been softened over time so the gear legs are little more than amorphous sticks. Rather bizarrely, the wheel has different hub diameters from one side to the other. Also, the wheels appear to be quite large when compared to reference photos. Have a look at this side shot on the BM walkaround and you'll see what I mean. http://www.britmodeller.com/walkarounds/aircraft/dh88/88%2005.jpg (Does anyone ever open these links I wonder?) Looking at the way the kit sits I think there is a little room for improvement. As can be seen from the above image, the kit tyre/wheel combo is rather large in diameter plus the sit quite close to the nacelle. I think we need more air between the tyre and metalwork. I began by rummaging through my spares box. It took a while but I came across a couple of candidates to replace the kit wheels. The smaller pale coloured wheels are actually the nose wheels from a 1/72nd scale Airfix Tomcat. Although smaller in diameter they are still quite thin. The red wheels are probably from a Hawk of some description (I can't remember ever building a 1/72nd scale Hawk ) and whilst they are smaller in diameter they are also a bit thicker. If we cover the hubs with discs of plasticard I think we'll be able to get away with it. Additionally, I think we'll need to lengthen the main gear legs a smidge to get the aeroplane to sit right. Finally, the bracing strut will need to be moved. The actual drag braces attach lower down on the gear leg meaning more can be seen below the nacelle. This is today's task. More when I can. Cheers.5 points
-
An oldie really. I was working on this kit at the time of the F-104 STGB. It wasn't entered as it was more than half way through the build. But while working on the GB models, I worked on this at the same time. But never got much further than plain decalling and not fitting the tanks and canopy. So recently I dusted it down from the proverbial 'Shelf of Doom' and finished off what was needed to complete it. Basically its the ESCI 1/72nd kit and leftover decals from a Hasegawa kit.5 points
-
November's project: ICM TU-2 1/72 A bit of an odd one this - At first glance it looks like a typical older Eastern European kit, a bit rough round the edges with tons of flash and the decals from hell... BUT with an amazing level of very fine surface detail, almost all of it far too fine to make out after painting. So I've scribed all panel lines to make them visible and given her a good rivetting, most of which was still a bit too light to be seen! Scratch the built bomb bay, added the bomb racks, gun barrels, wheel wells and cockpit details also. Anyways, may I present Theresa the Tupolev for your delectation...4 points
-
Okay, so this'll be my first plastic model in over twenty years! I've been building other scale models for a while, so this will also be a departure from my normal building methods and materials - no weight to worry about! This'll mainly be a study build for a future quarter scale Spitfire, so I'm going to attempt to scratch build and weather as much as I can to make it look realistic. But, this'll also be me coming back to my roots in scale modelling having acquired the tools, techniques and experience to, hopefully, achieve the static models I've had in my head since a young kid. I'm a big fan of using everyday household things/leftovers for fabricating bits for a model, so I keep all sorts of bits and pieces (as I'm sure we all do, to the chagrin of others!) with the intent of using them here and there for future projects. I'm going to convert this Vb to an early Va. I've not decided yet on a specific airframe, but it will be the early 'brown and green' of the late Battle of Britain era before they switched to the 'green and grey' schemes. I want this to be a really weathered, beaten and bleached, hard worked airframe. So far, I have collected the two Datafiles, the two Aero Details and also the Monforton book and CAD drawings, as well as loads of reference photos and three views as references. This is going to be a good few months worth of build, with the odd other kit thrown in to spice things up (and prevent me getting bogged down), so please bare with me as I explore and rediscover this side of scale modelling I've got it all spread out ready to separate from the sprue. I must thank Airfix for all the extra plastic! Just need to find somewhere to store all the flash now The kit does include the lower cowling for the MkVb Trop, as well as a choice between the Rotol and DeHavilland props with the correct spinners for each one. There are also different sized wing bulges for the different armaments. Pretty cool I'm going to sit now and cut out the various stages and file/sand the flash off.4 points
-
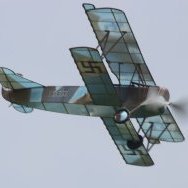
Bf110C-6 2N+RH of 1./EprGr.210, St.Omer, July 1940 This is the Eduard 1/72 Bf110C-6 Limited Edition built for the Bf110 STGB build thread here This model represents the aircraft flown by Leutnant Erich Beudel and his gunner Obergefreiter Heinrich Diemer, which took off at 16.35 on 29 July 1940 to take part in the gruppe's attack on the convoy codenamed 'CAT'. As the attack developed the 110's were intercepted by Hurricanes of 151 Squadron and this aircraft was one of those damaged in the attack and later crash-landed back at St.Omer. Ltn. Beudel was unhurt but Heinrich Diemer was hospitalised with bullet wounds. Erich Beudel would be killed flying another 110C-6 (the S9+TH) later in the Battle of Britain and Heinrich Diemer would return to duty but was later posted as missing on the Russian Front in September 1942. This aircraft was one of six 110C-6's originally issued to 1./ZG1 and taken with them when they were detached to form the 1st Staffel of ErprGr.210 in July 1940. Although they had their new unit badge painted on, they retained their old '2N' codes from ZG1 until new aircraft were taken on charge at the start of August 1940 when all had the 'S9' gruppe codes applied - this did not apply to the subject aircraft as it appears to have been written off in the crash landing. Info from John Vasco's very interesting and informative book on ErprGr.210 'Messerschmitt Bf110: Bombsights over England'. I enjoyed building this kit, though I found it a bit challenging in places compared to the other two I built in that some of the kit parts needed modification to fit the resin parts and I had some difficulty with the assembly - whether as a result of the surgery to the kit parts, bad luck or ham-fistedness I cannot say for sure - overall though it was easier than I had expected and I am pleased with the end result. Cheers, Stew4 points
-
Hello and thanks for your interest. This is another AZ Model Bf-109 from my workbench, The markings represent the mount of Gefr. Alfred Michels of 16/JG53, who crash-landed this plane behind American lines on January 1, 1945. A number of pictures of this machine exist on the internet - an interesting feature is the placement of 'Blue 2' which sits upon a patch of colour where a previous number had been overpainted. The "Blue 2" is on the second fuselage segment behind the cockpit, on the left; It's on the first fuselage segment behind the cockpit, to the right. The number itself seems very pale or weathered. Therefore, I misted the "2" and the Gruppen-Balken with grey paint while still on the decal sheet - not my best idea. While it worked well on the number itself, it left traces around the Gruppen-Balken where I failed to eliminate the carrier film. It seems as if a squadron badge had been overpainted on the cowling. The model was painted with Gunze/Mr.Hobby acrylics in RLM 74/75/76. Weathering was done with artist's oils. I added Brengun photo-etch to enhance some details like cockpit, flaps, antennas. The canopy is a vacu item from Rob Taurus. Thanks for your interest! Cheers from Vienna, in the pouring rain.4 points
-
Hi, This is my Kawasaki T-4 special boxing from Japan years ago (thanks Andy). The details are scratch build, the colours were self mixed and altered with filters to get that glow. Thanks for looking. Thomas4 points
-
So after all the sanding and other sanding, this is what im left with. wing root fit is ok, just a little filling required That wing position is a lot better! I know its a lot of work but the improvement in the flesh and the overall geometry of the aircraft is worth it. The canopy is, however. wrong with the cockpit sills being too low. here are the partially finished wheel wells Tail is on, and now an overall mock up to try for size. Thats a 1/32 MGB which will make an appearance if I get time. Now on to the heavy duty construction.4 points
-
Airfix 1/48 Lightning F6 XR753 23 Sqn RAF Leuchars 1975 Xtradecal decals used with kit stencilling Aires cockpit, wheel wells and exhausts Quickboost seat CMK control surfaces Master metal pitot Alclad finish Build thread here http://www.britmodeller.com/forums/index.php?/topic/234968601-frightening-in-48/ Please forgive the artistic license shown with the slightly dropped flaps and open airbrakes! Also the not so great phone photos. Thankyou for looking!4 points
-
after filter and wash4 points
-
An update: I glued the engines in, some savage surgery was required at the bottom of the nacelle to reduce its diameter and make it a closer fit to the diameter of the cowls.. look away if squeamish, it is not pretty but nothing a heap of filler wont hide. The major bits were then all loosely laid out together in one piece. The wing mounts are fixed in the fuselage but deliberately "wobbly" at the wing roots so when I jig it up for assembly I can get the right dihedral and incidence and get both wings on the same "plane". So far my plans are to finish her as an Australian registered example of Butler Air Transport who flew three of them for a short time late 50s early 60s. Some problems though are that the decals are going to be difficutlt to design and print / make. The Butler Air Transport titles look like no "font" known to man and are smallish and the lettering is white "shadowed". Because the colour scheme is so "bland" : white top, silver bottom, silver wings, blue cheat-line, the finish would have to be something special and I am not good with that. A Danair example is a possibility, I do like Autair but the fuselage titles are difficult to design and they are white on a blue background. So my plans are not firm on this as you cansee.. I'll worry about it when she is closer to completion.4 points
-
Ho Ho JP5 canopy is a nicer fit now. 'scuse the photo - done with my IPad. You can see what remains of the white strip at the bottom of the canopy following sanding and polishing. Just raises the front of the canopy and adjusts the angle. Canopies been micromeshed - but needs a tad more and a bath in Klear: Canopy'll be posed open when it's done. The front of it will be about level with the bang seats. So it's important that the slope of the front is parallel with the slope of the windscreen. Steve4 points
-
Hi all here,s todays progress.Three coats of thinned Tamiya paint and I am happy with the covering achieved. I really think that the Humbrol flat brushes lend themselves to hand painting especially in the larger scale.so next time I can get the table out it,s time for the gloss varnish and get a wash into all the lovely detail Revell have given us.Thanks for now.4 points
-
Officially my last two builds of the year, both reflecting my 70th anniversaries build theme: First up, the Revell(ex-Matchbox) Supermarine Walrus from HMS VICTORIOUS, bearing the markings of the newly formed British Pacific Fleet. This is a most enjoyable little kit, confirming the excellent quality of Matchbox's biplanes. I added some basic interior detail, plus the radio masts to this one, but otherwise it is built as supplied. Areas to watch: aligning the wing and motor pod struts: Second, another build of my ancient FROG Stash, a Grumman Hellcat in British Eastern Fleet markings from 1839 Sqn in HMS INDOMITABLE. After my experience earlier in the year with the same kit, I have extended the undercarriage oleos on this one to a more realistic length: And finally the two together: FredT4 points
-
Here is the final one for the year (no. 10 would you believe!?). The research material for this kit was supplied by Fred Ballam, a long time Westland employee, and when he sadly passed away I acquired this kit from his stash – so the pressure is on to do a bang up job. First impressions are – this is a bit more than the normal kit. I seem to have two lots of resin u/c parts, plus some white metal u/c and props. The resin looks nicely molded, just a few pin pricks to fill, and the panels lines are recessed and refined. Lots of detail in the cockpit, but following a recommendation from a previous build I found online of the Welkin MkII kit I will start with the vac formed canopy and check it and the fuselage are the same width. More soon...3 points
-
This was something I'd wanted to do for a while and at first it was going to be a knocked out KT but that changed once I started painting and had gone a bit over the top with the rust so decided to do what I wanted to do and made it a complete wreck that's been sitting in a forest for 70 years Oh and yeah I realise I've left the front MG on3 points
-
Hi guys, Can't believe it's that time again... another year past and lots of photos taken. Here are some favourites taken during the year, I've had a fairly good year too, I went to Holland for a surprise birthday, RIAT, Cosford, CWJ @ Brunters, Nightshoots at Northolt, Woburn + what ever trips to airports etc! First off... SC-ACR on one of her final flights. S2-ACR Take off! by Totallyrad.co.uk, on Flickr Another last chance was the Monarch A300... my brother was on this flight. G-OJMR by Totallyrad.co.uk, on Flickr Irish Casa seen at the start of the year nightshoot 252 - Irish Air Force Casa 235M by Totallyrad.co.uk, on Flickr Along with a RAF King Air Untitled by Totallyrad.co.uk, on Flickr Cold War Jets saw new paint on Colins lovely Bucc! IMG_913 by Totallyrad.co.uk, on Flickr Lightning past me so fast I missed a bit.. Lightning at 1/30th by Totallyrad.co.uk, on Flickr Cosford saw a nice, never to be repeated line up of Harriers. Kestrel 'Harrier' on display at Cosford Air Show 2014. by Totallyrad.co.uk, on Flickr ZD465 - It's great to see this aircraft outside. I painted this airframe during my time at RAF Cottesmore. by Totallyrad.co.uk, on Flickr XZ991 Gr.3 on the Harrier display, RAF Cosford 2014. by Totallyrad.co.uk, on Flickr Canberra was star of the show too! Canberra-pass by Totallyrad.co.uk, on Flickr When I caught wind of the '225 coming to the UK, I was on it in an instant. An-225 on approach... by Totallyrad.co.uk, on Flickr An-225 Landing at East Midlands Airport by Totallyrad.co.uk, on Flickr Luchtmachtdagen @ Gilze Rijen was next on the list, flying out on my birthday the 20th June for my 30th.. Far to many to post so just a small selection. Untitled by Totallyrad.co.uk, on Flickr Untitled by Totallyrad.co.uk, on Flickr Another last chance.. PH-KCE doing a flypast at Gilze Rijen - Luchtmachtdagen. by Totallyrad.co.uk, on Flickr Untitled by Totallyrad.co.uk, on Flickr Cosford gain another exhibit, the stunning EAP. Untitled by Totallyrad.co.uk, on Flickr Onto RIAT.. C-160 Transall departing Fairford by Totallyrad.co.uk, on Flickr German Navy P-3 by Totallyrad.co.uk, on Flickr Another last chance... Greek Air Force A-7 Corsair by Totallyrad.co.uk, on Flickr Greek Air Force A-7 Corsair by Totallyrad.co.uk, on Flickr Untitled by Totallyrad.co.uk, on Flickr Red Bull air races saw some nice visitors.. OK-OFB L-200 at Blackbushe by Totallyrad.co.uk, on Flickr OO-TTD by Totallyrad.co.uk, on Flickr UR-DWF seen doing a classic Antonov dive into BHX, sadly this aircraft crashed 13 days after my photos An-12 nose dive.. UR-DWF by Totallyrad.co.uk, on Flickr An-12 nose on.. UR-DWF by Totallyrad.co.uk, on Flickr Woburn saw two lovely Fw-44J's D-EXWO by Totallyrad.co.uk, on Flickr D-ENAY by Totallyrad.co.uk, on Flickr 'easy does it' G-SVIV by Totallyrad.co.uk, on Flickr Onto Duxford, two, well three reasons to visit. Two Lancasters and the B727 flying. Shame about the weather.. C-GVRA + PA474 Duxford 14th Sept. by Totallyrad.co.uk, on Flickr Untitled by Totallyrad.co.uk, on Flickr C-GVRA Duxford 14th Sept. by Totallyrad.co.uk, on Flickr B727 display was wicked to hear and see! G-OSRA B727 doing a display at Duxford by Totallyrad.co.uk, on Flickr G-OSRA Boeing B727 doing a display at Duxford by Totallyrad.co.uk, on Flickr Also been out practising my nightshooting handheld, both at really high ISO (12,800) Turkish Airlines A321 by Totallyrad.co.uk, on Flickr Malaysia Airlines A380 by Totallyrad.co.uk, on Flickr Onto the second nightshoot at Northolt.. Apache by Totallyrad.co.uk, on Flickr Tucano seen at the Northolt Nightshoot. by Totallyrad.co.uk, on Flickr OV-10 Bronco seen at the Northolt Nightshoot. by Totallyrad.co.uk, on Flickr Continental B757 landing at BHX while I was passing very early one morning.. Continental B757 on aproach to BHX by Totallyrad.co.uk, on Flickr If you've got this far, thanks... I hope you enjoyed them. Roll on 2015, what ever that may bring! Radleigh.3 points
-
Here's my finished RAF Sabre. Built from the Academy kit, I used a replacement seat from Quickboost and Eagle Strike decals. The camo has been sprayed freehand using Tamiya acrylics. WIP topic here. Thanks for looking, comments welcome! Matt3 points
-
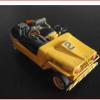
Here's another in my CHP build collection. The Lindbergh Dodge Charger done period correct. I'm looking for additional photos to down load. G3 points
-
Picked up a couple of Italieri Spitfire IX dirt cheep and part built them over a year ago, I found them in the loft and decided to finish them off to get me back into the hobby. Any tips or creative criticism welcome.3 points
-
After some gentle persuasion form Jorgen I've rummaged through the stash and got this Garage Kit out. She's from the Lineage II series and is known as the Dark Elf. Will probably start her alter in the week, but here is a photo of the parts. Oh, and I'll need to find a stand for her too.3 points
-
Here we have ICM's Ki27b, possibly one of the worst kits I've ever had the pleasure to make. Other than the canopy, nothing else fitted without scraping, filling and filing, and some downright butchery, and it's still not right. The main issue is the fit of the engine, there's too much to go in a small space without splitting the whole cowling open, and leaving a ridiculous gap. The cylinders need masses of sanding just to get the fuselage closed. Plus the fit of the cockpit interior is woeful, which leads to problems with the fit of wings and fuselage. However... it cost me the pricely sum of 1 pound, and got me through a bit of mojolossitis, for that, it's alright. I also have had a set of Blue Rider decals sitting in the stash this past few years, Manchuria/Manchukuo Part2, sheet no. BR-257. The markings are for a Ki-27b of the Manchukuo National Military Force Air Corps, circa 1943. The black script on the side of the fuselage indicates the sponsor of the aircraft. The decals behaved brilliantly, and were applied with Klear The figures are from the Hasegawa Isuzu TX-40 refueller set, (which is close to finish itself). I'm not sure about the colours for their uniforms, but these were the closest match I could achieve using Humbrol paints. The pilot is from the Hasegawa pilot set Painted using Humbrol Enamels through out, with Daler Rowney brushes, and built straight from the box. Over all I'm fairly pleased with how it came out, it's by no means perfect, but it's something different on the display shelf, and is a very pretty looking aeroplane. A couple more pics: Thanks for your interest, Regards, Sean3 points
-
Hawk T.1a XX226 74 Sqn RAF Valley .... and finally with it`s `grey` stablemate.3 points
-
More progress on the F-106 although more and more time is on fettling, sanding, filling, scribing... Once I had glued the nose it was clear that this was not a great fit. Time for superglue and then a re-scribe. I used a new scriber I found in Tokyo which has different width scribers to fit. Here is the nose showing the lines re-scribed Another area of the model is the fin - I cut of the front slot to help get a better fit.3 points
-
Hi all, thought it time to re-visit this build,so I have been painting the moulded on details on her deck in the gray finish of the upper superstructure and applying a wash to the already painted and glossed parts already built so here,s a photo of one of her main guns after a bit of weathering. I have applied the same to the rest and hope to post more tomorrow(the camera needs charging!).3 points
-
Thank you gentlemen. I have recently migrated from photoyucket to Fotki and am still figuring it out. Let me try G3 points
-
The results: Mostly Aviation Battle of Britain 105 votes Lesser build AF 84 votes Vietnam 80 Votes WhatIf 71 Votes Non Injected 69 Votes French Fancy 68 Votes Non Aviation =1. SciFi 68 Votes =1. Achtung Panzer In the interest of giving the most choice and fairness I have confired with the above subject hosts and all will have a place in the calender for next year. It seems silly to drop on GB because it is one vote behind and to have vote off's for a tie especially given that the voting has been neck and and neck all the way along. This will mean that the calender will be very busy next year and where possible I will try to minimise overlaps and keep similar subjects separate. The next job is for me to work with the hosts and soft out some dates. We'll will have something sorted out soon. I realise that their are those of you that will be upset that your chosen subject didn't get through, but I hope that you will both continue to campaign for next years vote and agree that the above solution is the fairest. The thread is now unlocked and is open for comment but please don't vote as it will not now count. Thanks you for you interest,3 points
-
Somewhere in the South Atlantic May 1982... This is my 1/350 build of three of the ships in the RNs Falklands task force, there are two scratch builds, and one minor conversion, plus huge amounts of detail on all three. I don't want to think about the amount of time I've spent over the past 5 1/2 years... Starting with the complete scene: From left to right: HMS Broadsword, HMS Hermes and HMS Yarmouth HMS Hermes and Yarmouth are both scratch built from plans Weathering on both was closely based on photos from the time to get the weather worn look of two of the oldest ships in the fleet. Many of the details are from WEM and Atlantic Models etched brass sets, but I also learnt to etch at home for unique pieces including H's mast, crane, davits and some antenna. Around 230 figures are spread across the 3 ships, mostly on the flight deck HMS Broadsword was a conversion of the OOP WEM HMS Brilliant kit, the main change being the funnel, plus a wealth of detailing. the seascape is modelling clay plus acrylic medium and teased out cotton wool for the foam and spray. The base was lined with plasticard to get a mid-ocean swell adding a bit more interest and action Finally for this post a couple of overhead shots, Broadsword is approaching to start taking on fuel from Hermes' starboard quarter, Yarmouth steaming past on the port-side. Both escorts are really a bit close, but the base is the largest I could fit in my cabinets (to the millimetre) and the navy have been known to bend ships every so often so it's not impossible. Next up some detail shots. If anyone has missed the WiP and would like to see the history on this one, here's the thread: http://www.britmodeller.com/forums/index.php?/topic/234927178-operation-corporate-carrier-battlegroup-1350 Andrew2 points
-
Been thinking about how I can pull this off the last week or so. I`m going to do it in 1/48 and so far a Lightning and Phantom kit have been acquired. One thing I have decided on will be that my creation, (it lives..., it lives...!), will be an `upgraded` version of the one seen in the picture to give it a bit more of a modern look.2 points
-
And just so you are up to speed Here's the most important bit of the FAA -5N. Eduard's "closed" hood converted into the blown version using plastic card flanges to form the side of the bulges, then infilled with CA & talc filler, sanded, polished and given a first prime. More work has been done on this since. The finished item will be used as a master to vacuform new hoods. Jonners, who had forgotten how much he liked, not only the kit but also, Hellcats!2 points
-
Nice CFs dude no seriously, I mean to say no but yes but Actually Steve it is so good that my wife just popped her head into t'office and said "Nice plane...oh...it's a model isn't it? Is it?" Then "Why don't you make them like that?" I hope she means red, white and grey. Not holding my breath... I liked the dHG Meteochip too2 points
-
After seein that I've got only one thing to say: "For sale a huge collection of kits (both unstarted and WIPS),detailing sets,decals,AIRSCALE PLACARDS AND INSTRUMENT OF ALL SORTS,tools,resins, silicones,glues,paints,books,technical manuals,CDs and I'll throw in my man cave for good measure and take on knitting! Cheers Manu2 points
-
I wanted to see if I could do a model in a weekend. (I cheated as it was the Thanksgiving Holiday and a little longer weekend. I thought about using one of the Eduard Weekend kits, but oddly enough, even though I have too many Eduard kits in the stash, I have no weekend edition. So, perusing for what looks like a simple kit to build, I ran across this kit. It is the RS Models version of a Me-109 X “Experimental Fighter”. Basically, take a Me-109 F airframe and mate the engine from a FW 190 and you get this kit. Seems a bit redundant, and given the performance of the FW 190, there was only one airframe made as the FW 190 performed so well. The kit is a short run injection molded kit with a resin engine. There are not many parts to this kit. There are two alternative schemes to the kit, one a fictitious Russian front plane and the other a British captured airframe. I went with the Russian front scheme for 2 reasons: (1) I wanted to see if I could do mottle with the airbrush (demon thing that it is; evil black art) and (2) I hate to paint yellow and to get it right would take longer than the weekend with coats and drying times. Being short run, there are no locating pins and the sprue attachments are quite large in relation to the parts. I am apologizing for this thread as it will be a shortened WIP with the RFI attached. If I put this in the wrong place, please Mr. Mod, don’t be angry. You can switch it to wherever it needs to go. The interior is very basic. The seat belt detail on the seat, however seems to be really good given the rest of the interior. And after a quick paint job as I doubt much will be seen through the canopy I have this poor picture. The fuselage is then buttoned up. And what is this, an instrument panel? Shouldn’t that be inside of the fuselage? Yeah, it should, but I forgot to attach it prior to joining the fuselage halves and inserting the cockpit flooring. Muttering under my breath and doing a few interesting ministrations with my tweezers, the IP panel was inserted. As an aside (my ADD is kicking in again!) I have a wonderful collection of tweezers. Why then, do I only use one about 99.99% of the time? And why do I buy so many and never use them? Does anyone else do this or am I the only strange bird? Back to the build. I get out the parts for the propeller and engine assembly. I didn’t really spend much time on the engine as I don’t think it will be seen with the fan blades in front of it. It begs the question, why did RS go to the effort of producing a resin engine for this that will not be seen? Also, the short run nature of this kit reared its ugly little head in regards to the propeller spinner. Seems what should be a hollow spinner is full of plastic and will not fit. Out come the filing tools to hollow out the spinner. The canopy is the next step and I don’t give it much hope looking at the airframe and the canopy. Filler will be necessary. The wings are then joined together. They fit remarkably well with each other. A little sanding is necessary. Then the wings are mated to the fuselage with not so good a fit. More filler is the call of the day. There are some rather large steps along the wing root and the top and bottom seams need work. After some wonderful filling, sanding, etc. the airframe is complete and ready for painting. The painting process begins with the bottom being sprayed in RLM 76 and the top in RLM 74 and 75. The kit gets the bottom painted first and then masked. The top gets a coat of RLM 75 and then masked off for the splinter/mottle pattern with RLM 76. The tape is then removed and the decals put on. I did no weathering at all as this was a prototype and thought I would show it as it came from the factory, i. e. lazy me! Then all the necessary little doo dads, thingamabobbies and hangy down items were put on the airframe. The only modification I did to this little kit was make some wing cannon out of metal tubing. The guns are very prominent in the box art but no provisions are made for them with the kit. I was attracted to this kit because I have a weakness for shark mouths. A word about the decals; you drop them in the water and they are almost immediately ready to be put on. If left in the water for more than 30 seconds, they will come off the backing sheet and have to be fished out of the water container. Also, you would think the shark mouth would be a nice little decal all its own. Nay, nay; you get two strips of teeth and you have to make your own mouth and paint the red portion. After much fun I got the shark mouth down and thought it looked really good. Then somehow, I dropped the cowl assembly into the water container and watched about 30 minutes of work come completely off of the cowling and I had to start all over again. I love being a clumsy oaf. So now this little kit is in its new home With is shelf mate Overall, this is not a bad little kit. The fit, except for the canopy was fairly decent for a short run kit. The interior detail is almost non-existent, but hardly anything shows once the rather thick canopy is on. I would recommend this kit to anybody wanting something a bit different in the 109 family tree. And, what did I learn from this kit? I learned I need lots more work on getting mottling down (there are only so many times you can respray and do over!) and not to place finished decaled items next to the water container! As always, all comments are welcome.2 points


.thumb.JPG.3498f40362ff13ebfc4b2e45abbd545e.JPG)


This leaderboard is set to London/GMT+01:00