
Leaderboard


Popular Content
Showing content with the highest reputation on 24/10/14 in all areas
-
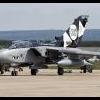
Have an ongoing project to build 5 of these beasts. Build was straight forward enough although slightly awkward due to size on bench. Painted using Xtracrylix Dark Camo Grey and finished with Flory Models dark dirt and an Alclad Klear Kote Flat varnish. Case was from Just Bases although it comes with no markings so i sprayed on some taxyway lines. Only 4 to go. Thanks for looking.20 points
-
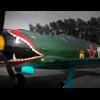
Ok more Phantom obsession - this time the Revell 1:48 version! I decided to do this as FGR2 XV474 from RAF Wattisham in 1992. I used Xtradecals for this and they went on a treat. Otherwise it is OOB and it was quite an easy build. I used Gunze Mr Color for the greys, Alclad for the exhausts etc and Alcad Light Sheen varnish which I think works really well. I started this in the summer and realised recently that I had 5 kits at various stages so needed to get them finished off. I have also just finished a 1:72 Fujimi Phantom and hopefully this weekend I shall have finished off my Hasegawa 1:48 FAA Phantom which I will post up when done. Any comments welcome Chris15 points
-
Ok well my obsession with Phantoms continues and in particular I love building the Fujimi kits as they are superb. Indeed this is my fourth Fujimi Phantom this year and I only have one left in my stash! Its a shame we haven't seen more of them since Amerang became the main importers of Fujimi kits - in fact if anything there seems less of them about now than earlier this year! So this kit is out of the box with the exception of the decals which are the excellent Model Alliance RAF Germany part 1. I used Gunze Mr Color for the paints and various Alclads for the engines and pods and of course Matte varnish to finish it off. I think it is one of my favourite builds of the year. So now I need to finish of my Hasegawa 1:48 Phantom - Fleet Air Arm! Any comments welcome Chris13 points
-
Here is one of two of my latest builds. It is the Airfix Marauder built to represent a MkII of the SAAF stationed in Italy in 1944. The only difference was the addition of an observers dome. The paints used were Tamiya acrylics, the olive drab being a mixture of several colours, and the grey being their own neutral grey. Once completed, I airbrushed it with Vallejo matt varnish with a little white mixed in to give it a faded look. The decals are from xtradecal. Any comments welcomed.13 points
-
Just finished - (it still needs a bit of weathering/dirtying up)...... Next to the revamped ekranoplan version - 1/144 scale 14M1p from Anigrand..... It's a big beast - same wingspan as a Lancaster........ I'm having problems getting it to sit on all 10 wheels - and it a tailsitter! Next to a Su-30MKM for size comparison..... Ken10 points
-
Isn't this an amazing colour scheme for a cargo jet? Cathay Pacific painted one of its 747-8 Freighters in this special "Hong Kong Trader" livery which highlights Hong Kong's skyline. B-LJA entered service in late 2011 and has been seen at Manchester occasionally. This build isn't Revell's 747-8F kit but a conversion of Zvezda's 747-8i passenger version. The extended passenger top deck has been chopped out and replaced with a resin top deck section from Authentic Airliners. Passenger windows and doors have been filled. Fuselage colours are custom paints made by mixing white, light grey, blue and green to match pictures on airliners.net. Masking the diamond shapes was a bit challenging. Decals are from Nazca who have many special airliner liveries in their catalogue. Thanks for looking Tim10 points
-
Hi everyone, Just thought I`d put some pic`s on of Otaki 1/48 scale Ki-44, allied code name `Tojo` that I`ve just completed building for my Brother in Law Built almost completely OOB, the only additions being.... seat belts, ignition harness for the engine,aerial wire from stretched sprue and..... home made landing light even managed to use the kit decals Can`t tell you anymore about it as the instructions were in Japanese. Hope you enjoy, thanks for looking Cheers Russ8 points
-
Hi folks,here,s Airfix,s Hurricane in 1/48 built to represent a MKII in Russian service,thanks to info supplied by Troy I have altered the kit,s spinner by simply using putty and sanding to a shape more representative of this mark,also scribed new panel lines to cover the extra four guns carried and added their detail on the wing leading edge.The model is 2mm to short has a different tail wheel( which I have had a go at) and there are other details not correct but for a £6:99 kit I,ve enjoyed building three of them with only the Rumanian version left to finish which I hope to post tomorrow.thanks for looking build info below,thanks for looking! http://www.britmodeller.com/forums/index.php?/topic/234967231-airfix-148-hurricane-raf-rumanian-russian/8 points
-
8 points
-
Here is my Fairchild AC-119K s/n 52*9982 of 18th Special Operation Squadron stationed at Nha Trang in 1968/69. This Italeri kit is quite easy to build even if I scribed the panel lines and added the missing part of the lower tail. This kit is published in Wingmasters Vietnam Special Volume 2. Patrick7 points
-
Hello once again from Greece! This time I built a Typhoon Mk.Ib Late from Italeri's kit, which is a rebox of Hasegawa's one. Painted with Tamiya acrylics and weathered with artists' oils and airbrush, hope you like it! More info and photos here: http://www.modellingnews.gr/el/%CE%BC%CE%BF%CE%BD%CF%84%CE%B5%CE%BB%CE%B9%CF%83%CE%BC%CF%8C%CF%82-%CE%BA%CE%B1%CF%84%CE%B1%CF%83%CE%BA%CE%B5%CF%85%CE%AD%CF%82/hawker-typhoon-mkib-late-italeri-1487 points
-
Afternoon folks - I am have a busy week finishing off kits and this one I finished this morning. Its the first Cyber Hobby I've done and I think its great. The only slight issue is that I did't put enough weight up front so its a tail sitter which is damn frustrating! You will see at the back I have put some sprue under the tail to keep the nose on the ground! So I really enjoyed this kit although I found it bizarre that the instructions just seem to leave out certain stages - whats all that about!? I used Xtracolor Xtra Dark Sea Grey for the upper sides and Tamiya Sky for the undersides and the kit decals which were fine. I am surprised how much I like it in 1:72 - I once did the Revell 1:32 version which was an aweful build! Think I will be doing some more of these and I have the Cyber Hobby Sea Vixen in my stash which I might do next. So any comments welcome Chris6 points
-
Recently finished, Airfix 1/72 Lancaster Mk.I (F.E). 2nd of the new tool Lancs I've built, and have to neither had the 'fun' factor. Topside is Halfords rattle can, the rest Revell Aquacolor (y)5 points
-
Here is the other of my two latest builds, the Ventura II by Minicraft. The top camouflage paints were xtracrylix and the sky undersides were Tamiya acrylics. The scheme is the one that comes with the kit, although some of the decals were replaced with spares as they were of questionable quality. Any comments welcome.5 points
-
I've just finished this; the Zvezda Ju88A, modified to a late A-1 with the shorter-span wing: I've been waiting for a very long time for one of the kit manufacturers to produce the Battle of Britain A-1 version of the Ju88 with no joy so far, so I made an attempt at converting an existing kit. I've had the Zvezda Ju88A-5 kit in my stash for some time (two of them if I am to be absolutely honest about it) and decided to use this as the basis for an A-1 as it already includes much of what is required; the non-offset hinged rudder, the engine undersides without the intercooler bulges, narrow-blade propellers and the two-gun non-bulged rear canopy which was introduced with the A-5 although at least some A-1s were modified with it. I cut the wings down using the plans supplied with the Kagero Topdrawings No.16 Ju88 Bomber Variant book, this was actually quite - surprisingly - easy to do. I used the Eduard mask set designed for the Zvezda Ju88A-4 which meant I still had to do the rear canopy masking but was worth every penny just to get me out of having to do the nose glazing. The decals were from the Techmod Ju88A-1 set 72142 which provides what appears to be a complete set of stencilling too, needless to say I only used a part of that. The aerial wire was made from EZ Line fine black. I used the Precision Paints Luftwaffe colours 70/71 Black Green over Dark Green over 65 Light Blue and they applied very nicely as always. I finished off with Xtracolor Satin Varnish and did some exhaust staining with Xtracolor Matt Varnish stained with some dark grey and brown. The aircraft represented is from the Stab/II KG.30 based in the Netherlands during the Battle of Britain; I was under the impression that this A-1 was retro-fitted with the A-5-style rear canopy but I cannot find what reference led me to this idea and all the evidence indicates the early one-gun unbulged rear canopy so I am probably mistaken... however since it is impossible to prove a negative I think no-one will be able to prove that this aircraft did not have the modified canopy Incidentally, apart from having most of the features necessary to convert the kit to an A-1, the Zvezda kit also includes the finest crew figures I have ever seen: They were so nice I had to use them with the exception of the ventral gunner who somehow prevented the gondola from fitting properly so was discharged to the spares box. Thanks for your attention, Cheers, Stew5 points
-
https://www.flickr.com/photos/sdasmarchives/8663871088/in/set-72157633279699475 Thanks to Bob on HS http://www.network54.com/Forum/149674/message/1414036024/Great+photos+%28link+inside%295 points
-
Here's one I've made a while ago. Great Tamiya kit with full Aires detail set and Aeromaster decals.4 points
-
Hey, I never said it was the Big Fellah! This is the 1:72 offering, which I decided to build as a sort of taster. When I eventually get round to building my 1:24 kit (don't hold your breath) I'll be doing it with all the cowlings off to expose the innards, so I wanted a version that was almost buttoned up for flight to show off the chunky nature of the front end. I really enjoyed building this - it's the first new Airfix kit I've made (by which I mean one tooled and released in the last couple of years) and I was very impressed by the ease with which the parts went together and the level of detail in such a small kit. I remember when Airfix pilots had to sit on a peg protruding from the cockpit wall - this beauty has a lovely little seat with moulded leather padding! Also the interior of the cannon bays, though unlike the 1:24 beast the closed access covers aren't supplied as separate parts; you have to cut them out to expose the workings. I decided to have just the one open, as seen above. A confession about that last photo though - although it looked all right on the model itself, when I saw the extreme close-up on screen I was horrified at how ragged the edge of the decal was (you have to apply it so it hangs over the cannon bay opening, then trim it once it's dry). So I've photoshopped it... I also had a wee bit of trouble attaching the canopy - I've never really got to grips with Clearfix as I don't find it attaches the parts securely, so I used normal poly cement (in the yellow Humbrol bottle with needle applicator). Despite my attempt to just put on a thin smear, it ran up the inside of the canopy and made a smudge. Also the yellow markings on the leading edge wouldn't sit flat. I would have sealed them down with matt varnish, but though I do have a bottle I, er, can't get the lid off because of the childproof cap. So now that I've seen the quality of Airfix's recent output, my next project is likely to be the C-47.4 points
-
Hello My latest work. Thank you for watching.4 points
-
Airfix Fairey Swordfish Mk.I. (02071) P4154 L4M 815 NAS, HMS Illustrious 11/12 November 1940 Flown by Lt. Swayne and Sub. Lt. Buxall 2014#22 Completed using some of the decals from Xtradecal sheet X72144 to make a plane flown at the Taranto Raid in 1940. Brush painted with Humbrol enamels and rigged using EZline.4 points
-
Hello, here are my newest "lunch time" project. Its is a Ferrari 512M from 1970 & 71. At this time the Ferrari was the biggest challenger of the Porsche 917's . Unfortunately Ferrari was not able to get to the same level as Porsche did.The whole car was to heavy compared to the same power from Porsche.The Ferrari got about 100kg more than the 917! This story tells the same difference from the MFH Porsche 917 to this Resin. The whole MFH Porsche,with all those perfect metal parts,got less weight than the resin body & chassis from the Ferrari! I bought this body 6 chassis from a ebay seller.He only offers these two parts.After the body arrives i know where he get it from. The heavy and hard as iron resin comes from Mexico.Its the body and chassis from CMM. Here are the first pics. Only two parts are bought. The panels lines are made from hand.A very old man seams to do that.With a very restless hand. In the mean time i mailed a friend who is addicted to Ferrari in 1/12 scale. He got an MG Models Italy kit of the Ferrari 512 S. I ask him if i can copy his wheels and the seats from his kit.....No problem! So i made a copy from his parts.The Italian parts are not perfect,but much better than the Mexican ones for sure! So here are the last pics. At the end i hope i get a nice curbside model in my cabinet.But its a long way to this goal. Here you can see my next step. I need to reshape the chassis to the body. Thats all for now.Thanks for watching! regards Christian3 points
-
This monogram kit's detail is awesome. Since I am slowly getting into 1/48 scale from 1/72 I am enjoying the level of details you can actually do with out losing your mind. I found this kit to be an excellent kit with very nice panel line details. Built OOB.Took me couple of weeks to build. The wing is hugeeee. Almost 25 inches in length. Be warned that it is gonna need SOME space. Also the decals were a nightmare, maybe because this was a very old kit and it must have been sitting in somebdy's shelf for many many years. Picked it up at a swap meet. You can tell by the stale cardboard smell of the box. Used Modelmaster, Green zinc chromate primer, US Navy blue grey, falt white.The figures were painted with cheap acrylic paints from Walmart. Used several coats of future and a final flat coat. Very happy with the end result. But have to handle the aircraft with care as there are several antennas sticking out. I originally wanted to display it water , but realized how big the kit was and abandoned that idea. Hope you all like it Thanks Vivek more3 points
-
My first Armor model Any comments on what could have been done better welcomed so that I can better my next one3 points
-
It´s another Airfix Hawker Typhoon Ib...i know a lot of people have done this subject, probably because its such a good model ! A great work from airfix on this one... I ´ve build this in a GB comemorating the 70 years of DDay, and i finish it last week...i just wanted to put the photos here also ! It was my first model using the airbrush...and what a diference...so much more you can do... First the small base: Used a cheap picture frame and used some powders and acessories...then i "invented" a fire extiguisher Here is the Typhoon alone: Final : I painted the DDay stips on the pic frame for "dramatic" effect... I loved doing this comemorative model, a very small tribute, for such an important day...3 points
-
hello all. So i have finally finished this.Airfix did great job with this one This model representing Belgian Hurricane from 1940. On this one i doesen't want to do to much weathering.Just normal wear and tear marks. I had some problems with making photos so i hope you like it. As always all comments are welcome Ps This one was fun to build now i have to start next one. Cheers3 points
-
Hello all. As regards that exhaust thingy (very technical I know) at the back on the port side, here is a comparison between the Trumpy and Airfix versions: Airfix is still attached to the sprues. The Trumpeter one is much larger, but they both look to have been done the same way. I was not going to do anything about this, but you know what we as meddlers modellers are like, so: Out came the drill, knife and file, along with some Contrail tube cut at an angle which looks like it will fit the resulting hole. I have also been fiddling with the bang seat, and this is what has happened to it: I had a little accident with the ejection ring pulls, chopping one in half when removing it from the sprue, so I have replaced both with some speaker core wire which I twisted round my trusty probe and CA'd them into a pair of 0.4mm holes, and added a bar of the same material to join them together, roughly following images on the walkround section. Not perfect by any means, but as close as I can get. I think it would have been easier if I had some very fine tubing for that straight red bit, as it would allow me to form the relatively complex shape easier. I still need to paint the black spirals on the pulls. The main pit is also close to being finished, but I can only get a poor photos with my lighting: It was painted matt black, but then I drybrushed some grey on, then drybrushed white over various lumps and bumps which corresponded to switches etc. I re-blacked the instrument dials, then gloss varnished them, and it is safe to say no-one will probably ever know! I have a feeling I will be doing more than building this out of the box with no mods (as per my original plan) but I still don't know how far down the modification line I am going to go... Thanks for looking and all the encouragement, all the best, Ray3 points
-
Revell 1:32 BAe Hawk T.Mk.1. (04284) RAF Benevolent Fund Display Hawk, XX307 No 208 ® Squadron RAF Valley 2009. 2014#23 The Revell Red Arrows machine made as the RAF Benevolent Fund Display Hawk XX307 using the Xtradecal set X32-034. Brush painted with Humbrol enamels. Really impressed with the way the kit goes together, only encountered a couple of small issues with the undercarriage, firstly the U/C retractor was slightly too long. Secondly, there are door actuators which attach the doors to the main oleos, if making a wheels down version the longer of the two actuators should go on the front of the oleo wit the shorter one on the rear, Im sure I followed the instructions but managed to put them on wrong.3 points
-
As promised, and without any further ado I give to you....3 points
-
This is a twofer - a double helping of the Academy 1/32 Sufa converted to a UAE Desert Falcon with the IsraCast conversion and judicious scratch building. The second includes the Aires cockpit and wheel bay sets as well. These were built about three years apart - I made the intake corrections from scratch and used the Aires GE jet pipe/nozzle. Wheels corrected from the Wheelliant set for the Sufa. Scratch built Northrop-Grumman AN/AAQ-32 targeting pod and mid-part of the spine. Otherwise it's a pretty easy conversion using the Sufa kit, as a lot of the Block 50/60 parts are included. The Academy Sufa is like hen's teeth these days, and unless IsraCast re-release the conversion set, these will be rare birds indeed! Paints were Xtracrylix, Vallejo and Tamiya. Decals were included with the IsraCast set. Ladies and gents, I give you , the world's most advanced F-16 in man scale! First aircraft - pictures by Chris Bradley. The second example as photographed by me in my back garden! The pylons contain magnets to enable swapping out of various bits of ordnance. This was a commission build for a fan of the first one! The canopy is propped open to show off the cockpit for photography, it usually sits at a better angle for display. Thanks for looking, Alan2 points
-
Hello friends. I show the latest work I've done. This is the Trumpeter Wellington Mk.III 1/72. It is a very detailed model but showing a geodesic structure too steep and you have to soften when painting. I have tried to represent an aircraft with many hours of service ... and I think I've got a proper wear. Hope you like it. greetings Fernando2 points
-
This is my interpretation of the Hobby Boss FM-1 Wildcat it's finished as an FAA 882 Squadron machine operating off HMS Searcher in the Mediterranean, summer 1944. Apart from difficulties with the undercarriage it's been a very enjoyable build. The issue with the kit is the somewhat vague drawings in the instructions which gave me problems with the undercarriage as some parts wouldn't fit. I then had to resort to dismantling and trimming in places that wouldn't show. Never the less all in all I think it looks the part and I've tried to replicate the freehand demarcation between lower surface and upper surface colours that seem to be so typical of the FAA. Hope you like it. Mike2 points
-
So this is my first model aircraft since I was 8 and gluing airfix kits onto vaguely plane shaped objects (Most of them had two wings by the end, even the bi planes). Ive been modelling and painting for years but in the wargaming, figure painting and dollhouse furniture making worlds so this is all a bit of a change. I thought I would do a build thread so you can all see what a mess I make of it! This is going to be a long build as I cant do much each day and I tend to go a bit overboard on details. I bought a Revell F-22 kit in 1:72 and immediately found the fine detail was missing in some areas so I went off and purchased the three eduard photo etch kits for this model. That company does some amazing stuff but I'm not quite sure how much of the exterior detail kit I will use as they seem a bit on the thick side for the scale. First mistake was thinking Revell plastic would behave like GW plastic and not need priming for small interior parts. So the remnants of black on the seat and cockpit are just bits that stuck and wouldn't be stripped easily. Lesson 1 learnt, prime everything! Wasnt a big problem in this case as I had decided to get the detailing kits after the intial painting so I would have had to have stripped parts anyway. At the moment I'm detailing the wheels by drilling out sections and rebuilding the rear in between adding photoetch parts to the seat and cockpit. A word of warning before you look down any further. If you have problems with messy desks then close this thread immediately as it seems I'm incapable of working in a tidy and ordered fashion. It seems a full frontal box shot is required in these things (this one is spread out on a bed no less!). Yes I've had that cutting mat for years, yes I do need a new one and no I probably wont get round to buying one in the next few years. The seat belts do come painted but I figured I would repaint them with the seat so they blend in better. I would have to deal with those shiny buckles anyway. One side drilled out and the other side completely drilled out with a new centre. I need to add the brake system details next and it will also give me something to attach the brake cables to as there was basically nothing before. If you see anything and think "for gods sake man don't do that!" then please do say as I'm always happy to learn.2 points
-
Hi folks Here is my second model and it was a quicker job than my first. I went for a 'out of the box' build only adding brakelines to the undercarriage, I wanted to finish this before Christmas(which one though ?) and gain further experience of general modelling skills. The model is a Airfix 1982 era F5E and was an enjoyable build, I did not do a great deal of research but I do believe the weapon loadout may be a bit fanciful for that particular plane and the colours are as good as I can get with my terrible judgement of shades and hues. The decals have a heavy carrier film and setting solution helped a little but it is still noticable. Hope you enjoy the pics. Gary.2 points
-
Evening All, After 5 hours of driving i managed to catch Virgin Atlantic's newest arrival! Birthday Girl! A brand new Boeing 787-9 Dreamliner, the first of its kind registered in Europe. It was pure luck that i photographed it! I was heading to Blackpool and Liverpool Airports for the day, when i got a heads up of this! So these are my photos of G-VNEW Landing and Taking Off from Liverpool John Lennon Airport! Virgin Atlantic Airways Boeing 787-9 Dreamliner G-VNEW by Bradley at EGSH, on Flickr Virgin Atlantic Airways Boeing 787-9 Dreamliner G-VNEW by Bradley at EGSH, on Flickr Virgin Atlantic Airways Boeing 787-9 Dreamliner G-VNEW by Bradley at EGSH, on Flickr Virgin Atlantic Airways Boeing 787-9 Dreamliner G-VNEW by Bradley at EGSH, on Flickr Virgin Atlantic Airways Boeing 787-9 Dreamliner G-VNEW by Bradley at EGSH, on Flickr Virgin Atlantic Airways Boeing 787-9 Dreamliner G-VNEW by Bradley at EGSH, on Flickr Virgin Atlantic Airways Boeing 787-9 Dreamliner G-VNEW by Bradley at EGSH, on Flickr Virgin Atlantic Airways Boeing 787-9 Dreamliner G-VNEW by Bradley at EGSH, on Flickr Thanks for Looking Bradley2 points
-
...and now the chassis is coming together... ...with a bit of luck, the lid will be on this weekend. I've found a solution for the sun-roof, I think... bestest, M.2 points
-
TwoMikes were somehow related to TwoBobs IIRC. But they are located in Arizona while TwoBobs is in Texas. TwoMikes webpage (http://www.twomikesresin.com/) is down but they have a Facebook page which still seems active. But their stuff was always quite hard to get. Scalemates give a good overview on aftermarket items with some more decal options: http://www.scalemates.com/products/product.php?id=136735 Rene PS My Vulcan arrived today. A classic box (initial release) which is a bit worn but Parts seem to be in very good shape - decals look way better than expected too (XL321 will be my choice).2 points
-
Right! following a long session on Photocrap that made having the thought of having every one of my teeth extracted without anaesthetic seem extremely attractive by comparison, I can now update you on this weeks progress. I began by adding structure to the firewall bulkhead and fitting it out ready for all the plumbing and associated wiring and prior to receipt of further supplies of Albion Alloys tubing for the construction of the engine bearer. The sonar buoy units at the rear of the nacelles had their tubes fitted from Albion Alloys brass tube. I will have some of these empty and some loaded on the finished model. Next up will be to add the structure on the inside of the rear nacelles, prior to buttoning them up. I will then be in a position to start detailing the main wheel wells. Thanks for looking Martin2 points
-
The freight dog 202 exhausts are the best ones out there, They are also very accurate and have the down and out kick out of the outer exhausts, Most Vulcan B2s had 202s, Few were converted to 301s, and many more B2s had the 301s, The airfix kit exhausts are not accurate for 301s but not too bad. if you squint. The B1s had even smaller Exhausts and the Flight path ones are ok but not accurate for any vulcan really. With the decals watch out for the smaller nose roundels, They should be 54" but some offer them as 48" which are a little too small and make your Vulcan look a bit fat, If you want D type decals The fantasy Print shop ones are worth using in conjunction with the other decals you might use. The wolfpack intakes are great but on mine I needed to place them forward of the location pins to fit as if they were sat on the pins of the kit they were back to far by 1 mm, However my last kit was unbelievably badly molded compared to my others. The best thing is they come with 202 engine faces rather than the kits 301s which are quite accurate too. You need to move the port hole windows 4mm to the right and up, After that it depends what airframe and era your modelling, There were many many little variations between vulcans, None were exactly the same. Photos are your friend here. Which one do you want to model and when. Good look with it, Look forward to seeing it cheers Rob2 points
-
Dimmer control for the mood lighting?2 points
-
My latest build, OOB for a summer break, I focused more on the painting as the build was nice and easy! Hope you like it, more photos here: http://www.modellingnews.gr/el/%CE%BC%CE%BF%CE%BD%CF%84%CE%B5%CE%BB%CE%B9%CF%83%CE%BC%CF%8C%CF%82-%CE%BA%CE%B1%CF%84%CE%B1%CF%83%CE%BA%CE%B5%CF%85%CE%AD%CF%82/vought-f4u-5n-corsair-hasegawa-1482 points
-
Hi guys! Let me present you my latest work. Set of the Academy is pretty good - much better than the usual their products. Except "oak" decals as always. Consuming almost all detailsa from set of photo-etched "Eduard."2 points
-
Thanks a lot guys much appreciated for the nice words....yes I plan to load it up in the cargo bay..... Got some progress.......been sometime..... bits and bobs to put in before I close it up most of the cabin is in...not a snug fit ....maybe it's me or what ....but needs some fine tuning got this landy to put in....but it's a wrong type it was never used by the Malaysian Armed Forces...but it will have to do..... Rear area might do some minor enhancements ....but not too sure Got the wings and engines done up too....just blending it in ....then clean up and ready to mount......I was thinking of getting the wings on before mating the sides.....it's massive and I am not used to the size.... started on the cargo bits...just to get a feel.....still loads to go and to finalize Hope to get it to the paint shop soon........ Happy modeling rgds mr b2 points
-
Thanks, build took about 45 hours all in. 6.5 of these mucking about with walkway lines/stencils! Believe it or not it took about half a bottle of Xtracrylix Dark camo grey. Decals were a mixture of the kit, Xtradecal RAF Letters and home made. Thanks, It's a job for Airbus Military and 5 was the requested number....2 points
-
A pity you haven't got two, I could have then said nice pair of jugs. As it is very nice Jug2 points
-
A little update on this build - I've finished the weathering using a mixture of oils & coloured pencils (a bit of an experiment!) After that I added the smaller parts ; tow cables, tools (apart from the spade which broke!) I also patched the gap in the tracks with some Revell links. It's not ideal, but mud should conceal the joins! Some ' foliage ' was also added, which is actually a plant I found in the garden. Thanks for looking, all C & C are greatly appreciated. Patrick2 points
-
Finally, after a lot of work, Wessex is looking, well, like a body of a helicopter. I had major fit issues, especially around nose and windscreen, as it is obvious by a huge amounts of putty. So that took a lot of work. To get some peace, I've started with adding tons of photo etched parts, tail section is almost done, I hope to start working on some exterior piping, and missing bits. Oh, and I've rescribed and deepened the rivets on entire body. Hope you like it.2 points
-
HEY AGAIN, The "Porch Light" section of the lighting chapter is now finished. The porches are the small entryways that lead from the outside space to the interior. In this photo you can see the lights from the cab and the entryways. This is with the room light off. Now, I want to take a little time, a day or so, and do all the little cleanning and straightening of the wires and make sure that the top of the beams are level with each other. Then I will close up the top side for the last time. I have a single piece that is the cover plate for the top. The largest piece of the model. Cutting this plate will take a day or two and also painting. I'll have new photos of the top deck install in a while. Thanks all for liking and checking in, RichO.2 points
-
Thanks guys @Stix: I haven't actually totally rescribed the rivets, they were already there but kind of too shallow, so I just made them deeper using a pointy brass stick. I have never tried adding a brand new line of rivets myself (except for very short spans), nor I have the tools for that. The panel lines close to the round access doors, on the other way, were completely lost while sanding and tidying up, so there I used labeling tape as a guide and a "hook-shaped" blade to scribe them Ciao2 points
-
If you haven't already sprayed the old decals with clear then get yourself a bottle of Microscale Liquid Decal Film. You can apply it by brush, a large flat sable hair one works the best. Allow it to dry and the decals will not break up when they hit the water. Don't worry about any brush marks, you won't see any. It's the best way of saving old decals, however if they are really past it, a new sheet from one of the after market decal makers will be your best, and easiest option..2 points
.thumb.jpg.d17ff607fc7e89ed057e63fcb6f2a888.jpg)


.thumb.jpg.ba34a9f6ddce411193946dbdcc7b5fe8.jpg)


This leaderboard is set to London/GMT+01:00