
Leaderboard


Popular Content
Showing content with the highest reputation on 29/09/14 in all areas
-
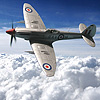
Three Spitfires LF.IX from AZmodel JoyPack, made together. I decided to have them all from Polish Air Force and with Invasion Stripes for the 70th Anniversary. Besides of that I tried to make them as different as possible - different squadrons, different shapes and condition of the stripes, one Spitfire has pointy rudder and other has no wheel disk covers. Things under wings are also different and include beer kegs of 'streamline' type used by 308 Sqn. I have used 3 sets of Master cannon barrels and QuickBoost exhausts, 2 sets of QuickBoost masts (3 masts in a set, but one mast was broken as I have dropped a model upside down), 2 sets of Kora flat-disk wheels (not very good quality) and some details from CMR resin Spitfire - bombs with racks for WX-D and kegs for ZF-P. Racks for kegs were scratchbuilt with CMR ones as a template. The propellers have axes from brass tubes to let them turn easily for in-flight photos. Decals from various sets of Techmod (including the ones in Sword kits). Feel free to click the photos to see more of them on my website. 1. ZF-P NH186, 308 Squadron PAF, Chailey, England, June 24, 1944. The kegs were used to bring beer to brothers in arms in Normandy. The plane was hit y flak and lost on September 11, 1944 near Nieuwdorp. F/O Jerzy Mazurkiewicz evaded capture and returned 6 weeks later assisted by Dutch Resistance. 2. WX-D MH712 "Pat", 302 Squadron PAF, autumn 1944. Pilot: W/O Henryk Dygała. 3. SZ-G NH342, Chailey, England, autumn 1944. Personal mount of G/Cpt Aleksander Gabszewicz (9,5 confirmed kills, 1,33 probables, 3 damages) from June to October 1944 has markings of 316 Sqn PAF, although she was not part of it. Gabszewicz was pilot (and commander) of 316 Sqn till June 1942, then Wing Commander/Flying of 2nd Polish Wing and finally the 1st Polish Wing. He was also attached to the Command of 131 Wing RAF in February 1944, leading the wing during the invasion of Normandy.18 points
-
Finished today, this is the Tamiya 1/32nd Spitfire VIII kit with extras from Barracuda, Eduard, Master, Quickboost and Radub. Constructed as one of 152 Sqdn's mounts from Burma in late 1944. Painted mainly with Gunze Aqueous paints, and weathered with pastels and oils. Mostly loved this kit, but the Engine cowlings are a pain ( might be due to the AM rocker covers), and some of the swappable parts are basically pointless. Also you are left with holes to fit the slipper tank. I am happy how it's turned out though. Build Thread is available here Peter12 points
-
Hello all, This is my rendition of WNW's superb FE.2b. I built this as my first completed biplane model. An amazing kit, to which I added very little.The little I did add where: a motor to the propeller, I modified the undercarriage to show an unloaded in flight condition, and two crew members from the Wings Cockpit range. Bobs Buckles helped with the rigging. Thank You. Adrian11 points
-
Hi again. I've just finished putting the final touches to this 2 year tweenie. This has been my first resin kit and it's been a bit of an experience, not all bad.....I mean, it's finished isn't it ! It's a three-footer, I had to do a bit of scratchbuilding and also raid the spares box for a couple of the decals. So, here's my interpretation of XR810 as it might have looked sometime in in the mid 90s. 810 was the first VC10 Major Servicing I worked on in '97. I hope you like it......I do. Cheers Gaz P.S. Come on Airfix, I've done my bit, it's your turn now. I'd still like to build ZA142 and ZA147. And finally....... can spot the VC10 ? If it quacks like a duck........9 points
-
Hi Everyone, Just completed my Fine Molds 1/48 D4Y2 Suisei (Comet) or Judy Finished in the markings of 523rd kokutai, based at Tinian Island, Northern Marianas, 1944 Built OOB with just aerial wire added Been after one of these at a reasonable price for years and managed finally at the Hinckley Show in March this year Was a bit surprised to find lots of cast metal parts in the box but they hardly needed any clean up and fitted perfectly. Here`s two shots of it with my previous Judy build from the same manufacturer Which was the D4Y4 Radial engined version. Hope you enjoy, thanks for looking Cheers Russ9 points
-
hello, I'd like to present my model-made for the D-Day Group build project. Spitfire Mk,IXc, MH 712 flown by W/O Henryk Dygala, No 302 Squadron Model- Eduard ProfiPack 1/48 Montex mask 48378 Painting = Humbrol & Model Master The WIP: http://www.britmodeller.com/forums/index.php?/topic/234962615-spitfire-mk-ixc-late-eduard-148/ Kind regards,9 points
-
Hello All, This was a bit of an experiment and I usually do the occasional 72 scale armour kit. This is the third attempt at a larger scale. I would describe the build pretty good but the paint and weathering was a lot of blundering around in the dark. The scheme is from the Kagero mini top colours volume on the 'Panther in attack and defence'. Happy Modelling all Ian8 points
-
8 points
-
Many that I have not seen before Hope it is of some interest http://fjexpeditions.com/frameset/GJMostert.htm6 points
-
Hi everyone, here is my latest adition to my shelf, Tamiya 1/48 in the colors of the alaska agressors, hope you like i My family of agressor is growing, 2 out 4 done so far5 points
-
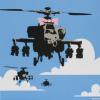
Hi Folks, Its been a while since I last posted a finished model, but here is another one, & a helicopter too! Its the fab 1/48 scale Skunkworks HH-60J, which is a superb kit. Great detail & a colour photo etched parts, plus a basket. Nice base, too. The only thing you need to do is add some interior in the back, as its fairly wrong, but with some plasticard, stretched sprue, & tomato puree packet (for the belts) you can make it into a good kit. HH-60J 6 by tonyrichard24759, on Flickr HH-60J 4 by tonyrichard24759, on Flickr The tail wire aerial is spring loaded, so I made one by wrapping some fuse wire around some stretched sprue, it doesn't look too bad. HH-60J 3 by tonyrichard24759, on Flickr HH-60J 5 by tonyrichard24759, on Flickr HH-60J1 by tonyrichard24759, on Flickr5 points
-
Not that much progress over weekend, i did have time only today afternoon after all.. Anyway, i made new seats for both pilot and passenger, equipped seat belts to both. For the pilots seatbelts i made some "holder" behind the pilots seat, hwere the seatbelts are usualy locked to the construction . Next i completed the u/c, painted all lights. Tomorrow i ll add tail wheel wells doors, the antenas under wing, pitot tube, landing light and the canopy. The exhausts are painted already, but i ll want to do some touch to these yet5 points
-
Hi All, Looks like I've got about a month off work and doctor's orders to take it easy, so it's time I started this behemoth of a kit! It seems like a good subject for a WIP thread as I'll be doing a bit each day for the next month or so - this is a BIG kit and I'll be throwing the kitchen sink at it. I've got a proper digital camera instead of my phone for pictures, so hopefully I will be able to keep a record that is visually explanatory as well as detailed in words. Trumpeter's by now familiar 1/32 Su-27 Flanker-B kit. I bought it seven years ago on my first visit to China - it cost me about £40 at the time when it was double that in the shops at home. Since then I've gradually accumulated practically every aftermarket item worth having, with still some more on the way! The main purpose of the aftermarket stuff is to deal with some of the well-documented shortcomings of this kit. I'll outline those in this post and tackle them as I go. As far as the kit goes, it was among Trumpeter's first forays into the 1/32 jet world in the early 2000s, which brought us several very popular subjects that had never been released in this scale before. No-one really expected to see large aircraft like the F-105, A-10 and Su-27 in 1/32, but Trumpeter surprised us all with their efforts. Unfortunately for all these early kits, though very nicely produced, they were blighted with some fundamental shape problems, and the Flanker was arguably the worst offender. From studying drawings, I think the shape of the Trumpeter kit is based on drawings of the earlier development airframes (T-10-10/11), rather than the production model T-10-S. That said, there isn't a kit in any scale out there that captures the correct shape of the Flanker's fore section (except, I'm told, the new Zvezda 1/72 version), and this kit is very finely detailed in good quality plastic, nicely produced with minimal flash, and fits together well. And it is seriously HUGE! The three Aires sets for the kit - cockpit, wheelwells and exhaust/nozzles: Superb quality - I haven't used many of these Aires add-ons, but they are amazingly detailed: These items are luxuries to upgrade the kit detail - out of the box the kit versions are very much acceptable! Now for the corrective items - all from Zactomodels. These are the intakes and new nose. The kit intakes are too narrow and curved along the bottom profile. The kit nose is much too short and conical and these replacements are spot on. The other problem shape is the canopy - the kit windshield is too sloped and the overall shape is too short and bulbous looking. I did get Zactomodels' canopy set as part of the combo, but since I'll be posing the canopy open, it's less apparent that the shape of the canopy is wrong. I've test fitted the canopy and Aires instrument panel coaming and there is likely to be an interference fit with the HUD as well, so I've decided only to use the canopy accessories from the Zacto set and keep the vac canopy for another day. I can't overstate how very, very good these items are. The quality is the best I've ever seen in resin. The surface is almost creamy, perfect fidelity and very finely detailed. They also fit the kit exactly. This stuff is by no means cheap, but it is good value for what you get. It's also sufficiently accurate to throw suspicion on later releases of the Trumpeter kit which mysteriously "fixed" the intake and nose problems within a year or so of Chris' (Zactomodels) release. Make of that what you will! I also have the obligatory Eduard etch sets for the ejector seat and airframe exterior - some of the exterior is for the FOD guards, but as they are based on the kit intakes, which are quite dimensionally different to the Zacto ones, I won't be using them :'( Decals - I have Linden Hill's stencil set and Guardians of the North decal sets - I've also got some leftover Begemot MiG-29 decals, so who knows what I will end up with?? I'm leaning towards one of these two at the moment - 03 Red or 41 Blue. On the other hand, it would be nice to do a bang-up-to-date 2014 version seeing as these may be becoming very relevant in the coming months! If that were not enough, I also have MasterCasters' replacement wheel set, and the seated pilot figure. The wheels are pretty much exact copies of the kit wheels but without the need to use the rubber. Personally, I have no problems with rubber wheels, and have several completed kits going back eight years with rubber wheels that have suffered no ill-effects. So I may not use the MasterCasters wheels unless I have trouble reshaping the rubber ones. The last aftermarket items (still on their way) are some wingtip Sorbitsya ECM pods courtesy of Wolfpack Designs. I could have also got these from Zactomodels, but I could buy the Wolfpack ones here in the UK. This solves the problem of the kit's mis-shapen wingtip missile rails which are conspicuously wrong and very visible. I intend to build this as a modern-day Su-27 interceptor with R-73, R-77AE and R-27(E)T missiles, so two less R-73s won't make a huge difference. The missiles will come from the Trumpeter 1/32 Russian Weapons Set which I bought years ago and luckily have all the required missiles included. They are not spot on but perfectly acceptable, as I used several for my MiG-29UB built two years ago: Well, that's that little introductory thesis over - the casting blocks are cut off, the resin is drying off after a marathon washing and scrubbing session, the parts are cut to shape - we begin at dawn tomorrow, Comrades! 8) Hope you enjoy following the build, I'll try to be as detailed and explanatory as I can, tell me if it gets too boring or tedious with minutiae!4 points
-
I built this not to long ago , I do have a bit of silvering on the decals and I always do with Italieri kits no mater how much micro sol I apply I hope you like it4 points
-
This is my first post, just finished a Tiger Moth build and would appreciate any feedback. The model is the Revell 1:32 TIger Moth, colour scheme is based on a Tiger Moth at the Shuttlewort Collection. Sly4 points
-
This is my first 'Kiwi' project since moving down here to NZ two-and-a-half years ago, so it's about time I got around to building something 'local'. Two months solid work has gone into this one, really pushed-up against my 'skills envelope' with the weathering effects, but I'm extremely happy with the outcome. Have to say this was one of the most, enjoyable and satisfying builds I have ever done. Loved every minute of it. Kit - Tamiya 1:48 Paint - Camouflage - Enamels mixed 'by eye'. Interior, tyres, prop blades - Tamiya acrylics. Landing gear, prop boss, cylinders - Alclad lacquers. Decals - Ventura (various sheets) Extras - Eduard Zoom set & Ultracast resin wheels. Vought F4U-1A Corsair 18 Squadron, RNZAF Green Island December 1944 [url=http://smg.photobucket.com/user/280163/media/Corsairs/64e98436-d501-45eb-a338-0b6ebf546491_zpsa6281341.jpg.html] Thanks for taking the time to look, if you're interested in the 'build thread', you can see it here at Kiwi Modeller http://www.kiwimodeller.com/index.php/forum/38-follow-as-i-build/29411-f4u-1a-f-i-n-i-s-h-e-d . In the meantime all comments, questions and criticisms are welcomed. AFN Ian4 points
-
Hi guys ! Worst kit I ever made ! Old Mastercraft mold based on KP with rescribed panel lines. Well, that's double trouble ! Need to rescribe everything again, joints are horrible... this kit took 3 years from me, lack of motivation was the main problem. I manage to finish it because I wanted this MiG sooo hard in my collection and... I finally did it ! Decals are from KP, I add only resin cockpit with some PE parts from Extratech, colours are Revell 90 and Humbrol 56. Hope you like it ! Cheers, Nenad4 points
-
Also waiting four the pics :-)4 points
-
Righto guys this is finally it. She's not great but she's okay and interesting and I learnt heaps. I'm just going to post here.....not doing an RFI...must be build fatigue! Anyway thanks to absolutely everyone....heaps of fun along the build , lots of great advice and plenty of humour.....goodness knows I need that! So here we go ..... Sorry for the crappy photos and I'll add comments as required. Chocks away! First complete photo.... Another angle Here's the other side....nice ladder Gondola's a bit rough....oh well... There's a pilot in there somewhere Another long shot......looks better that way! Seems a lot of effort for a grey plane that never saw active service... One a little further away Bit blurry sorry.... A few of the fix on the underside decals... Other side Both together LOL Not too bad just a bit of a brewer's droop on the pitot tube there! Thanks heaps to all... Finally onto the next project!4 points
-
Thanks Crisp, yes I think it was worth the faff. I've now got it too the point that I'm happy with it. This is how most of them look in profile (this captures it pretty well) - a definite down turn in the red in last panel at the nose - but that is also the area in which the black and red are largely parallel to each other: Now here's how I got it when I reprofiled the red and did the black anti-dazzle - much happier with the red, but the black in the last panel was too obviously not parallel to the red. So I have now very subtly straightened the black at that point - quite an easy job - I'm not claiming perfection but it is pretty bloomin close (remember this is an unflattering close up ) and I think it's probably as close as I can get The alternative would have been to adjust the curve of the red at that point - but that would have had the knock on effect of straightening out - and probably losing entirely - the curve back to the windscreen; and that would have been a glaring error. Actually I think accuracy from every angle is probably unachievable - because I suspect that the 3 dimensional profile of the nose on the kit will be very slightly different from the real thing - either due to the limits of the kit or subtle alterations due to sanding the fuselage hoping flat and/or rubbing down the seams. There same was true on the JP 5 and I ended up masking lines that looked the best from most angles but might look slightly out from (say) vertically down or exactly head on etc. Anyway, I believe that is adequate anality for one day..........4 points
-
Did that. Worked a treat - perfect result. Invaluable tip ta Bill. Ta hendie. Always on the look out for different masking solutions. I'll try some of that. As to the red. I used Revell Fiery Red 330 Matt - thinned with Tamiya X20A and a drop or two of flow enhancer - and it sprays really nicely - which helps a great deal! It's rather disconcertingly thick in the pot - so much so that I couldn't accurately decant it to thin it - more a case of a few lumps of paint in a mixing jar and then eyeball the thinner until it looked suitably thin. I can't say precisely how many coats - cos I'm a bit haphazard in my methodology (notwithstanding that this is the third model on the trot I've painted in this red ) What I can say is that I give each area a light mist coat to begin with - and I've learned not to get immediately disheartened at the fact that it looks like it will never adequately or evenly cover the white primer - and then I just continue working over the model with lightish coats - probably at least 3 or 4 passes over any given section - until it's done. I do it all in one go and let each section just go matt before going over it again - so only a few minutes between coats. I did say it was a bit haphazard.... Note to self - get more methodical..... Ah - it does look like that don't it. In fact the fuselage line was marked in only 3 lengths of strip. Each side had 1 long thin strip from tail to near the nose - and then a separate strip for the nose itself. I get a bit paranoid that thin strips of tape won't stay stuck where I put em - so I reinforce the strip with a larger square of tape at each point there is a bend or change in direction - and at regular intervals over longer straight runs. It makes it look like the whole fuselage was done in 2cm lengths! Didn't do much modelling this weekend. Had a busy time of it with other stuff. One of which was a 1 hour trial lesson in a flex wing microlight (that's me in the blue in the front): Tootled for a look see over Church Fenton and then over Elvington and generally around the vale of York. Really enjoyed it and may well do more. It was simple to fly but it would take a while to became intuitive. Everything works opposite to fixed wing controls; i.e. push the bar forward to climb, pull backwards to descend, push it to the left to bank right and so on. Even taxying is opposite. the steerable nose wheel is directly connected to the foot bars - so push the left foot forward to steer to the right (like bicycle handlebars). Anyways - when i did get a bit of time to work on the JPs - the Mark 3 began its fight back....... I'm really pleased with how the red went on and how clean the masked lines came out - but as soon as I took the masking off I was a bit troubled by the profile around the nose. On the full size version there is a distinct dip towards the nose lights: Which my effort failed to capture: I'd hoped I'd got it - but was sort of afraid I hadn't. There is quite a small radius curve around the nose and I sort of knew that I'd let the masking tape dictate to me how small a radius I managed - rather than the other way around. Know what I mean? I wasn't relishing the prospect of correcting it - but hey ho. Applying the collective wisdom of BM it wasn't too bad. I gently scraped off the red on the nose over the area that now needed to be white (thanks again Bill) - to minimise the amount of white respraying needed - and I sacrificed another mini test tube (thanks Mark) for a quick mix of white. Mark is soooo right that it's having this easy means of mixing and keeping (if need be) small quantities of paint that makes these annoying little jobs less unpalatable: New Profile: Compared with the old - subtle but noticeable difference - and even more noticeable from head on or the front quarter: And after re-sprayign red: happier with that...... And anti-dazzle black panel done too: Very hard to get these subtle curves right. Not sure I've got it 100% even now - the cures of the black and the red should actually match each other for a little bit more of their length - I may or may not bother adjusting that as it's very subtle - but better..... Oh - I said that the JP 3 was fighting back - well the windscreen came off as I unmasked the black...... And I'd used cyano to try and avoid such an eventuality too. Oh well. Shouldn't be a big fix.....4 points
-
Nigel, if all else fails, you can cut the wings off and use it as a loofah4 points
-
Some nasty injector marks to deal with - manufacturers do seem to put them in the most inconvenient of places. For that joint under the tail can I suggest you put some masking tape over the rivet detail and then fill with Vallejo putty? That should save a difficult clean up job. Hendie, you literally don't know the half of it. That photo only shows a small fraction of "the office" stash. In addition g-usa also has a semi-secret stash that I was given rare and privileged access: It has its own dedicated, air conditioned storage unit.4 points
-
Glad to have finally finished this lady. She has sat patiently on the shelf of doom for about three years or so, brought our every now and then for some work and then put away again as the finishing line seemed to recede rather than draw nearer. mer8 If you are making one of these, remember two crucial tips. First, attach the tail section to each fuselage half separately rather than gluing the fuselage together and then the tail and joining the two as the instructions suggest. The fit is poor and at least if you join the two parts on each side you can get them to line up, and then you get the easier job of filling the gap top and bottom when you bring the whole lot together. mer5 Second, the side sections of the fuselage need to be packed out with plastic strip otherwise they will sit too deep and leave a nasty step. There are a host of other small issues with this kit that if you were so inclined you might try to correct. Everytime I compared the kit with pics of the real thing I could see subtle differences in the shapes and positions of various protrusions and intakes - I added two blisters above the sponsons (originally clear parts from a Matchbox Mosquito!) which seemed quite prominent on the real thing. I sanded down the raised areas around the steps near the cockpit, but lost the heart to do the same to the steps at the rear. The mirrors also seemed to stick out too far so I trimmed down the attachments. mer4 The sleeves that the rotors fit into also seemed quite unlike the real thing - I understand this has been corrected on later boxings of the kit like the Revell HC2 and the "Skyfall" one [EDIT as has been pointed out below not all Merlins have folding rotors which would account for the later change in shape of these parts] . The Italeri decals were really a very poor effort - pretty much all of them were the wrong size, colour, or font - all sometimes all three. The White Ensigns and "Guinevere" markings came from a Modelart sheet, although I thought that some of these decals were also the wrong size and replaced the serial myself. mer7 Paint was all over Xtracrylix Medium Sea Grey with Dark Green main rotors. mer3 Hope you like!! mer2 mer10 Pat3 points
-
This is my first WIP so be gentle I'm average enough Background growing up as a kid lucky enough to have a dad who worked in the hangars in Dublin and spent a lot of time mooching about Collinstown I developed a real love for the Viscounts Aer Lingus operated and always wanted to build one, Missus and myself went to Telford last year and spoke to a number of decal makers about getting sheet for a Viscount 808 to go with a Frog kit (long family story about this kit I won't bore you here involving a git in Beatties in Birmingham lol ) that she picked up for a song on a certain website. We approached a number of decal makers who all said they could help and to contact them directly in the end the only one who replied was the wonderful Nick Webb from Classic-Airliner.com who made me a sheet. I already had S&M beautiful sheet for the earlier Viscount 707 to go with the Glencoe kit so I thought a double build might be in order As always any advice or help will be appreciated3 points
-
Let me present “Wars End” Berlin 1945 No cohesive, over-all plan for the defense of Berlin was ever actually prepared. All that existed was the stubborn determination of Hitler to defend the capital of the Reich. Circumstances were such that he gave no thought to defending the city until it was much too late for any kind of advance planning. Thus the city's defense was characterized only by a mass of improvisations. These reveal a state of total confusion in which the pressure of the enemy, the organizational chaos on the German side, and the catastrophic shortage of human and material resources for the defense combined with disastrous effect. These are 2 x legend 1/35 figures , the base is scratch built3 points
-
Cheers Wolwe, Stix., Mustang Mania has come to an end, and here are the final pics: The first,(and quite possibly the last) time I've tried some weathering, apart from the odd exhaust stain. It's something I find very hard to do to a nice shiny paint job, although certain aspects of this were quite pleasing, mainly the chipping on the blades and cowling. I also found that Klear is great for sticking the canopy together and will go back to the other Airfix Mustang and change the clear piece. Overall, I've enjoyed taking part in the GB, as I had done this last year with the Spitfires last year, and found it a great way to get some kits built,(although, I had 3 Spits to start, actually built 5, and still have 4 in the stash, wt... ). There are no more Mustangs in the stash,(so far) So here we are, all the Mustangs together: Thanks to all who followed this wip, brave souls that you are, Regards Sean3 points
-
Met a nice chap at EDay over the weekend who thrust a 1:350 model of the submarines M1, M2 and M3 into my hands. They are beautiful produced kits and they are very enthusiastic about doing other British subs, so, if you have any plans for K, S and T classes or the X1 then drop me a line. Keep an eye out for the first review of the M2, coing to your favourite forum soon. http://www.roposmodels.cz/lode/lode-1350/3 points
-
I've been trepidatory for a few days about the roof Lesson learnt AGAIN!!! if you dont think it's right do summat about it The rear right corner has been a worry, as have the front screen tops. Remember I did some alterations before? Obviously there was some more distance to go worm thanks for more nice pictures, is that one personal I wonder? I intend making a slimmer sight, it has been on my niggle list I reckon part of the roof panel trouble is down to using PETg which I am just not used to, enough Acetate thins out a little when you mould from it PETg seems to say, "sod you matey I'm, staying thick and hard" so I am going to mould from acetate sheet next time, I got six A4 sheets for £6 at the local Artists suppliers The curves around the upper screen and the roof panels along the door tops needs to be more subtle as does that back window join too Having said that I have to say I AM pleased with the rest of it, it has been a fantastic learning curve with the printing, I'm even quite happy with the door badges ISH! I am making a decent job with the wheels I think, show you in a day or so, unless I can get the wife to come away for a few days She needs a break soon Anyway thanks for your kind comments, this pressurised build makes for constant improvement and that can only happen if you help out with your own impressions I dont take helpful comment personally laters guys3 points
-
Yesterday being a Sunday I naturally thought - let us spray - XF65, XF59 and XF64. A few over sprays to be 'brushed out' but no great disasters. Here are the results plus a first base coat of XF84 on the exhaust and gunmetal on the mgs Chris3 points
-
Love that Squadron Print, with the Beefer looking sideways at the Stude. Surely he should be smacking him round the head?3 points
-
Next update One bearer installed, and the other ready to go. I've also just noticed Verlinden made an error here, as the bearer should run behind the cowling frame rather than in front of it. Too late and too much effort to try and change it now. There is also a cowling frame that runs from behind the exhaust stack to the firewall that Verlinden didn't include, but this is often seen removed on the real thing I have found. An airframe is no good without accessories: And on it's feet looking a bit like a warbird restoration: The undercarriage legs are even straight-ish. The bendy one is the one on the right. They look straighter in real life and the model sits perfectly level in any case: Decalling underway and briefly evoking a Royal Navy Mustang: Decalling done: I've also fabricated a new aerial mast. Do I need to explain why?3 points
-
I seem to have spent the entire day working on aerials and pointy sticky-outy thingies. On checking my reference photo's I noticed a bunch of greeblies adorning the airframe of the Islander so thought I may as well try and replicate some of them. I had a problem though - it seemed that every photo I had showed a different aerial configuration and most of the photo's were only from one angle, so I had to try my best guess at the actual location of some of them. First up was a backwards facing pointy thingy. I began by rough shaping a piece of styrene, then drilled it to accept a small diameter rod. as you can see here, it wasn't the easiest thing for my humongous digits to work with. Once the glue had dried, I filed the top end of the widget and did a little bit more shaping. I drilled it form the bottom which allowed me to insert a piece of wire to help with location. Here it is in place. Looks terrible here but it isn't too bad when seen with the naked eye. Then I noticed a couple of prominent marker lights, one up top , and one down below. Again I drilled some small diameter rod to accept some wire. This will be the base of the lights - I still need to stretch some clear styrene to make the actual lamp which will sit on top of this part. I won't tell you how long it took me to get this little blighter in place. It was a left over from the Trumpeter etch set. The blade aerial was supposed to sit in another piece of etch, but I had about 6 attempts at putting it together before I gave up! In the end, I cut a small slit in a piece of styrene, pushed the etch aerial though, then ca'd it from behind. Once the ca had dried, I filed that flat, trimmed the styrene, then glued it on the underside. Another aerial went up front. This was a left over form the Trumpeter kit and worked out quite nicely. I did actually have two of them ready to go, but one pinged out from the tweezers and although I don't have a carpet monster, I do have a concrete monster, and trying to find one of these little bits of grey plastic on a grey concrete floor covered in dust (the floor and me!) was not a good way to spend quarter of an hour! In the end I opted to roll my own from - yes - some more scrap styrene. Drilled and pinned ready to go after a little bit of shaping the base plate. I cut some scraps to sort of look like actuators under the wing - nothing fancy as they will probably never be seen. And lastly, a shot of the back end with some greeblies attached. I have a few more small bits to attach, another quick spray with primer and then this one will be ready for paint. There is one small probe which protrudes from the front windscreen - I think I am going to attempt to model it, although if I screw that up, it's going to be a mess! I also discovered today that the Islander is a tail sitter. I was aware of that from other posts and had added some weight to the front though obviously, not enough. I did try dripping some resin inside the engine cowlings but that didn't work out too well. It's not the end of the world and I am sure I will think of something to help it sit as it should.3 points
-
Nice of you John but... This has been uncrafty as heck lately When I came to put my home brewed decals on the tail they were awfully disappointing What was black on the decal sheet left the backing paper grey, not the impression I was after Awful photo, but you can just make out the greyness, poor print property selection so I had another go before giving up and accepting the old Almarks sheet sizes as gospel. Their 6" serials don't fit the ribs on the tail, which it seems they should on the real thing Now for the later offering I turned the contrast to maximum, full on darkness and slid the colour sliders about until the visual indicator window went almost black Now the lettering has printed full-on black, phew The actual fit between the ribs is better even though it isn't quite the fit on the helicopter for real There's an access panel on the tail spine which looks as if it provides service access for the tail shaft bearing a couple of layers of Tamiya tape for that, if anyone thinks it's too visible I can whip one layer off (Steve?) I redid the tail rotor warning decal in Photoshop and printed it on white decal sheet Trim to suit and white outline as required I think I can move on now, overall coat of matt varnish and see what the windows look like Then on with the engine and let the detailing begin, I've alread started by removing the traces of visible red from the earlier tail rotor DANGER signs in case you wondered . .3 points
-
Hi, a couple of good folks jolted me up into updating my WIP. The Zero has moved at snail's pace as I foolishly started to build 4 other models... A momentary lapse of reason I guess. I shall try and post the others this evening as well. I have painted the underside of the Zero orange-yellow and I am happy with the colour I ended up with. This photo was taken under the bright, lunchtime, African sunshine, the worst possible time for pix. So the colour is actually a bit darker than on the model. Anyway, that gives an idea of what I am trying to achieve. The top remains to be painted green and then the paint will be chipped, hoping I do not stuff that up. But the aluminium under coat lets the top coat be pulled and scratched quite nicely. I will have to finish making the canopy as well... when time permits! The paint smudges look a bit messy on the upper surfaces (brush painting is the guilty party), but it won't show once finished.... I hope. Any comment welcome. JR3 points
-
Sure I'm glad you like it3 points
-
Miss Ashley II, Unlimited class racer, 1999 Modified P51-H fuselage mated to Lear Jet wings and tail planes and a Griffon engine. Kit: High Planes 72005, 1/72 scale. Quickboost resin exhausts, PropBlurs, Airfix radiator outlet. Build thread here3 points
-
Welcome to my latest posting- I'm going to win no prizes for speed modelling but I'm having fun so who cares! I'm working on a big long term airfield diorama project but it'll take me months/years to get all the components done so I'll post 'em as I do 'em. Here's the finished article (read down for WIP & more finished pics). I was inspired by an article by Richard Langford in Airfix Model World magazine, Jan 14 issue. The moulding is pretty ancient (I built one as a kid, it hasn't changed and I'm pretty ancient as well!) so I thought I'd have some fun super detailing it. As you can see, I got a bit carried away (considering most of it was inside and won't be seen when assembled) but it was a learning piece as much as anything, more scratch building experience and my first use of PE, which went pretty well in the end. I make no claims to historical accuracy with this model and some elements were made up as I went along, but I've enjoyed myself. DJ Parkins (www.djparkins.co.uk) supplied the PE set for the windows, doors, hand rails and watch hut and the maps/posters/blackboards etc were a custom set from Sankey Scenics. I found him on-line & asked if he had anything suitable. He does mostly model railway stuff (as well as being a professional model maker) but researched it for me and came up with a great little sheet of scale images that I've used all over the model. Check him out at www.sankeyscenics.co.uk. The sheet costs £5.00, which seemed pretty reasonable to me as he put it together from scratch. You can order by accessing the bespoke page of his website and by clicking the £5.00 button (towards the bottom). This will take you through the steps for the order. You can quickly access this by clicking the link below: http://www.sankeyscenics.co.uk/#/bespoke-items/4551163731. Based on Richard Langford's article, I fabricated a first floor out of styrene sheet, supported by styrene corner pieces. I then decided to put a dividing wall in made from more styrene and utilising a door & window from the Airfix set (redundant because of the PE set). I glazed it with clear acetate and used thin slices of Tamiya tape to represent diagonal blast taping. An assortment of notice boards, maps, pictures, chalk boards, clocks & signs were carefully scalpeled out of the Sankey Scenics sheet & glued in place. Very late in the day I decided to also build a desk/counter upstairs and some of Sankey's maps and documents decorated the surface. I decided to call it a day, furniture wise, as I had a life I had to get on with! Incredible detail on the maps & chalk boards! Having enjoyed that, I decided to build a room for the ground floor so built a floor and walls from styrene sheet and used the Airfix windows again. More posters/signs added a bit of interest downstairs. Those observant amongst you may have noticed that my super detailing may possibly have forgotten to build a staircase to get from the ground floor to the first, and then to the terrace and roof. Oops! I decided to let this one slip! I also decided to have fun with the watch tower on top. The phone was made from a bit of styrene sheet, the radio from a piece of sprue. The phone cord is a piece of thin fuse wire and the microphone boom from a slightly thicker piece of wire. More Sankey docs spread around the desks. I got a Master Tools PE bender thingy for Christmas and really couldn't figure out how it was meant to work, but a few goes with the thingy & a pair of flat jaw pliers & I sussed it! The watch tower was a bit fiddly with folds going in different directions but got there in the end with a bit of squeezing and swearing. I had to fabricate a pillar to join the edges and locate the walls as the Airfix location points were in the wrong place. The acetate proved tricky - it was hard to keep it free from scratches and glue. The handrails were an absolute bugger - microscopic folding, aligning, gluing, drilling and feeding through 0.31mm brass wire. Lots of patience required. They're not perfect but for a first go, I'm quite pleased. The stairs were also tricky, being made from folded side pieces and individual folded treads. Richard Langford suggested building a little jig, which I did and it worked well. The last thing was to slosh a load of Flory Models 'Grime' wash around the model in places where the day to day muck from a busy airfield would accumulate; on the flat surfaces, window sills, stair treads etc. Flat roofs are notorious for puddling so the Flory grime is spot on for this, although I kept it light on the higher traffic areas. The RAF figures came from a 1970s vintage Airfix set I had as a kid. They'd been painted in gloss enamels (I was young!) so I had lots of fun soaking them in white spirit and picking off the paint! Only later did I discover that Airfix still sell that set so I could have saved a lot of bother, but there's something nice about recycling a 40 year old toy! I think some of them might have come from a Bloodhound missile set - wrong decade but I think I got away with it! I chopped the bases off so they're secured with Deluxe Materials Tacky Wax - it's good stuff. Here are some other shots of the finished building: I broke the aerial thingy in the corner so had to botch up a new one from the spares box. I had to fabricate a new door for the emergency exit as the PE set didn't include one and I'd mistakenly used the Airfix door for my Amera Nissan hut! Always read the instructions! The bionic dog! One of his legs got broken off somewhere between the 1970s and today so I had to make a new one out of a piece of fuse wire! Thanks for looking and any feedback/tips would of course be appreciated. Andrew2 points
-
Bought this recently direct from China and went pretty much straight onto the modelling table. The kit just fell together with the majority of it done one Sunday afternoon. A couple of hours on a weekday evening saw most of the etch fitted. SO this is how she stands with only a few items such as the pioneer tools and several handles to be attached. All the turrets and wheel assemblies aren't glued into place yet to allow for an easier paint job. I will be setting the tank into a diorama which is still in the planning stage so don't expect lots of quick updates.2 points
-
Thanks chaps. Having temporarily excised the anality from the system it was time to fix the windscreen back on..... It cyano'd nicely back into place but as I feared the join still needed a fair bit of cleaning up: I seem to be spending the back end of these builds having to clean up joins without mucking up the surrounding paint work.... Have to say that having a better airbrush is making these little tasks much easier. It also helped me quickly tidy up all the little overspray jobs like this: And now the 3 has just about caught up with the 5 - only needs a coat of gloss or klear and both of em'll be ready for the windscreen frames to be painted, U/C bays painted and then a bit of light weathering. Steve2 points
-
I think you need to judge distance better! ;-)2 points
-
Thanks for all the kind words guys couple more pics showing the differences in kits not sure when the moulds were first produced but they both holding up well Frog at the top Glencoe at the bottom will start build later this week and see how I get on Eamonn2 points
-
Here's WE update. few pics, but the work behind them was quite long. Nozzles received a gloss coat on the sky blue, and then were painted with Model Master Gun Metal Metalizer - and buffed after a couple of hours curing Then it was time for masking the transparents and adding the flimsy little PE parts Once dry, I sealed them with some future and let cure overnight. Ready for some paint now. Ciao2 points
-
I built the hase t2 about 15 years ago and the shield was red. I also have a pic found on pprune of a car used by the squadron which was hit by the belly tank of a low flying jag.2 points
-
Rick, you know it's just jealousy!2 points
-
M2 points
-
Evening everyone Well whats a day its been! My wife sprung a little surprise on me this morning and took me to the Classic Air Force at Newquay airport where waiting for me was this... Chipmunk G-APLO in which I had the most excellent 30 minutes of aerobatics at the hands of Ollie my pilot... That,s me in the back grinning like a Cheshire cat! Thanks Leanne!! What a great day! I have managed to do a little modelling over the past week once I'd gotten over the shock of how much its going to cost me to replace the sprues needed to rebuild my Merlin (about 40 quid for those of you who are interested) and I tried the hair spray technique for the first time on the seat and I'm very happy with how its turned out.. The instrument panel (98% completed).. and the oil tank.. Well ladies and gents, thats that. Yours aye Iain2 points
-
I see the problem immediately; you used Army paint on an Air Force aircraft!2 points
-
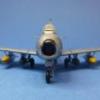
Good day, guys. Following the legendary British "Mossy" I found logical to make the German "attempt" to repeat the success of English. The set from Hasegawa is gorgeous, but some details from QB and the cab from CMK is also quite relevant. I did not do anything more, except some navigation lights from Elf and guns and pitot tube from tubules.2 points
-
The cockpit coaming is now pretty well done, just need a bit more detail on the HUD mounts and then it can be sprayed and weathered. Finding good photos of the forward end of the coaming was difficult but after a lot of searching I managed to find a few. I've seen a lot of conflicting info about the inspection holes for the foot brake accumulators and demist pipes, some say there weren't any, some say one hole, others two, no demister pipes (though how the system was fed is a mystery), no plates, etc...but the photos I found seem to indicate that these were all present, at least on the IDS, ECR, GR4 and F3 so I can't believe it wasn't the same for the GR1A. Hard to make out but you can see the pipe appear to disappear into the framing on this GR4, http://en.wikipedia.org/wiki/Aerial_refueling#mediaviewer/File:GR4_VC10.jpg GR4 from our walkaround section, you have to strain your eyes but it is visible on both sides... Same here on a German IDS, F3 bottom right photo...... you can see the pipes angling out to the screen frames. http://www.tornadosig.com/f3t-walkaround-ze256.html And finally the best close up shots of an Italian ECR, this page seems to take an age to load, (well for me anyway), but worth it as it shows everything clearly...... http://www.modellismopiu.it/modules/newbb_plus/viewtopic.php?mode=viewtopic&topic_id=22966&forum=49&start=170&viewmode=flat&order=0 So I went with the detail as it adds a lot more interest to the otherwise bland coaming area...Revell included nothing at all ! The holes and plate seem far up the coaming. This is due to Revell cleverly making the screen longer so that the forward end forms part of the fuselage making blending a lot easier ! The HUD glass, g-meter and AOA indicator will be added after painting.... Checking that nothing fowls the wind shield... Cheers all, Melchie...2 points


.thumb.jpg.87669a5ffb8b13672a3d675087a46d42.jpg)
.thumb.jpg.d17ff607fc7e89ed057e63fcb6f2a888.jpg)


This leaderboard is set to London/GMT+01:00