
Leaderboard


Popular Content
Showing content with the highest reputation on 01/08/14 in all areas
-
Just a few from a hot & sunny RNAS Culdrose, cheers12 points
-
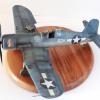
All done! I really enjoyed building this one despite what people have said about it. It builds into a very nice replica of the 109. Thanks to Anders Hjortsberg for the inspiring profile. Thank you Jason Brewer of Brewer Models for the awesome pics. The kit was built out of box (including all decals except for the EZ line. It was painted with Model Master enamels for the RLM 74/75/76. Vallejo was used for the RLM 04, 70, and Tamiya for RLM 66. The RLM 24 was a Tamiya mix (see build). Thanks, Thanks, Aaron11 points
-
Hi all, after more than 2 years without editing .... (twins at home), I deliver to tinker ... simple assembly, cockpit Aires I test new approaches: -Surface treatment: simulation constraint plate (here takes a monster time!!) -painting "Spanish School" deeper than usual these are the first photos ... your keyboards! necessary equipment so we can do here almost anywhere ... attention to chips the surface is scraped gently with the blade perpendicular to the surface, stress at the root of the movement of personnel wingtip constraint riveting at sanding with water to 600 uniform surfaces, then after passage of a motor the cockpit is painted ... 8 hours work, there is still a bit of pigment to ... Finish!9 points
-
Hey guys, this baby way made as part of D-Day GB here on BM. The kit is Hasegawa 1/72 and i used some parts from few PE sheets i had left over here + scratchbuilt rest. Used this way to add some details to cockpit and to make all new wheel wells. Also i used quickboost exhausts and CMK wheels, well, just because they were pretty Aaaand i took the flaps from Airfix P-51D mustang it did fit like it was born for it! If anyone is interested, the WIP thread is here http://www.britmodeller.com/forums/index.php?/topic/234962289-p-51b-d-day-marking-combo-172/. The cockpit was made quite quickly, i did not want to spend too much time on it. Next i did some work ont he wheel wells, which were originaly too shallow and (like by most of mustang kits) the back side wall was not correct. So i did a bit to correct it. Decided to fully detail just one side, other one i planned to build with the doors closed. As last i did some work on the drop tanks and fuel pipes. And after some time, using various methods for painting and weathering,here is the result. I m sorry for the photos, took one serie outside and second serie inside, no idea which is better (proly neither of them.. ). Also sorry for so many images, i simply cannt decide which image should i use and which i should not fuel tank detail It is probably my best weathering so far, though there are plenty of messed areas from building and masking :/ Anyway i hope you like it, any comments or tips are welcomed THanks for looking guys8 points
-
Hi, Here is my last plastic model built. . Just a mounting for the sake of sticking plastic and have a airbrush stroke. I just replaced the cockpit italeri very ugly by falling photoetched parts and a resin seat. See you for the next one.8 points
-
Hi, Here is my interpretation of Wellington Mk.III HF670 'U' from 142 Squadron flying from Blida airfield during early 1943. The Trumpeter kit is an absolute joy to work with and the only criticism I can think of is that the wheels look too skinny. The decals are from the generic Xtradecal dull red however I found that these were too wide but carefully cutting a bit from the middle seemed to have done the trick. My reference was 'Wellington Squadrons in Focus' by Freer and Parry. I do need help however, as you can see I am rubbish at dioramas! Can anyone point me to any good websites that cover bases/dioramas for aircraft. All comments and criticisms welcome. Russ8 points
-
few more: -Aaron8 points
-
Here's my take on the very nice Eduard kit of the Bf109-G6. This will appear as a full build review in the next issue of AMW, out next week. This was built straight from the box, with corrections as described in the article, wing tip reduction etc. and presented as the aircraft flown by Flown by Oblt. Alfred Grislawski, Commanding Officer of 1./JGr.50, Wiesbaden – Erbenheim Air Base, September, 1943 Despite the naysayers, this really is a lovely kit!7 points
-
I’m calling this one finished.. Built as part of the Harrier Single Type Group Build II, this is a BAe Sea Harrier FRS.1 XZ453 of 899 NAS. This aircraft was transferred to 801 NAS for the Falklands conflict and ultimately crashed into the sea following a collision with another Harrier, sadly, both pilots lost their lives The kit is the old Airfix kit, lots of help from aftermarket "stuff" Build thread is here:7 points
-
This is the Revell 1/144th scale kit, with the CF6 engine option (Lufthansa boxing.) It's starting to show its age a bit now, and this moulding had lots of flash and misaligned parts - the landing gear in particular was a complete nightmare to clean up and get to an acceptable standard. The Revell 747-400 also has a slight shape issue with the nose and flight deck area, so I attempted to remedy this a little with some Milliput and sanding - I think I have improved on the look of the original. All obliterated panel lines which were destroyed in the filling and sanding process (of which there was plenty!) were rescribed back on to the model. I used TwoSix decals which were absolutely outstanding, over Halfords' automotive paints, finished off with a little light weathering with Humbrol enamels and pastels. Build time - from opening the box to completing the model: 5 days. Boeing 747-443, Virgin Atlantic Airways, G-VROY 'Pretty Woman' Virgin's 'four-holers' - alongside an A340-600 using the Braz conversion: Happy modelling folks! Tom6 points
-
So here she is Wednesday July 30 being prepared for her flight to the UK. She leaves Hamilton on Monday and, according to a volunteer I spoke to, her route is now via Newfoundland and then straight to Iceland. In Iceland there is some sort of ceremony as this will be the first Lancaster to land there for over 60 years. There she picks up an RAF navigator and flies on to UK. She will apparently be escorted by a BBMF Spitfire and Hurricane for the last part of the journey to Coninsgby. Today they ran up all four engines for a test and when I left the Canadian Warplane Heritage Museum they had wheeled he back into the hanger and were re-installing the cowlings. Enjoy her, UK. David6 points
-
A few Hornets I decided needed finishing off because the started but unfinished pile is just getting bigger, like a lot of members I suspect. Anyway, starting the process of finishing, easier said than done btw, but that is the plan...4 points
-
ello Other one of my corsair's F4U-5N hasegawa , To change the color blue........... black is black a great moment of painting and weahtering ,The seat and the collimator in resin, the yellow reservoir for the napalm taken in a box of mustang VMF 513 Capt.Eugene Derrickson Korea 1951 Well I hope that pleases you bye Pascal4 points
-
Strictly OOB4 points
-
Why can't I just leave things alone? Here we are with three days left to the deadline and after having completed decalling I find that I want to add something else. It was whilst I was adding the said decals that I noticed the two small intakes behind the canopy were missing from this model, I thought OK I should have seen that but I can live with it at this stage. Then this morning I decided if I was going to the trouble to make two aerials and add discs at the GPS positions then I could not leave these off and so I set about adding them along with another smaller duct missing from the nose. So the hunt was on for something of a suitable size that could be quickly modified and which would be an adeqate representation of the missing bits. After looking through the parts not used for this build I hit upon the idea of using the ends from a couple of missile launch rails, not 100% accurate I know but hey I think I can live with it at this late stage. Which is where we came in , so now it's out with the old hairy stick and a tin of Humbrol 165 again. Anyway here are the offending bits added4 points
-
There are certain rules that I follow: - I always prime for acrylics - I always prime if putty is used - that makes it possible to see possible putty shrinkage - I always prime when I sand - it reveals (and sometime heals) minor scratches - I may not prime if I use enamels - I never prime transparent parts4 points
-
Gone cross eyed now with still a bit more to go, applied the thinnest slice I could do of the dashed line decal to the rear frame of the canopy, bit crooked but was the best I could do Then thought I'd best do the white seal on the top of the canopy before doing the rest of the dashed lines. Tried to do this with 1 piece of 0.25mm line decal from fantasy print shop but couldn't get it to conform to the bend at the rear of the centre frame so ended up putting it on in 3 pieces instead. I'll just progress on this a little bit at a time.as I dont think I can hold concentration long enough (or breath) to do them in one session. need to put that other mirror back on when I'm done too. Over on Fritag's JP build Kev67 has suggested using dry micromesh on the primer, so this I have done, Then Miggers has suggested wiping the resulting dust off prior to painting with a Tak rag from Halfords, going to try to get one today. Could hopefully get some grey on this weekend, but first I need to mask the booms then re-attach all those bits that fell off Mark4 points
-
Recently finished this old girl. Revell 1/72 Halifax B.Mk.II. I know those engine nacelles are wrong, but money is tight, so resin replacements were not an option. On the plus side, it was a thoroughly enjoyable build, OOB and hand brushed with Revell Aquacolor (y)4 points
-
I’m calling this one finished.. BAe Sea Harrier FRS.1 XZ453 of 899 NAS. This aircraft was transferred to 801 NAS for the Falklands conflict and ultimately crashed into the sea following a collision with another Harrier, sadly, both pilots lost their lives4 points
-
EDIT JUNE 2018 - To see pictures please google sternail. Any pictures of the ship in a garden are of this build. There is also a photoshopped image of the ship with clouds in the background. Yeah, thanks Photobrokit. Pete And there's more! This one I built about a year ago, I think. There are, In the Ma.k universe, Two types of Sternail. Both Space going and operated by the opposing sides. One is large & grey, The other smaller & white (usually) So far as I know, there are only a few of these around. The small white one can be had as a garage kit (I think) But this one has to be scratchbuilt, using the few bits of information on the net. It ended up at 65cm long. So, This is a 1/35th scale, Single seat spaceship (The door is on the left side. Yes, those are Russian tank turrets at the back. This is as close as I could get to the original by Kow Yokoyama. The other models aren't armed, But I built this for my mate John and he wanted missiles. Now, Ma.k is part styled on WW2 Germany. (Markings, some shapes etc) So, Based on the Rucksetz? used by the Luftwaffe to add weapons to say, Fw190's, I 'bolted on' a couple of homemade ones. Actually a modded blue steel & a TSR2 missile! Pictures are by Johns wife, Maria. Many thanks. (Photobucket wouldn't do all of them to 640x480 for some reason?) The basic frame is model boat type wooden strips. Add a 1/48th F15, The Turrets, Drop tank halves for the hump, Various other bits, LOTS of filler & plasticard and hours of rubbing down & painting. Markings are a deaths head near the bow, Then a German Tornado sqn badge. the blue & white stripes are because John is a Scot. As always, Comments are welcome. Pete3 points
-
Finished at last!!..... this is my take on Tamiya's 1/32 Spitfire Mk IX. It is modelled on one of the aircraft from 313 sqn based in Ibsley, 1944. Here is the WIP thread.. http://www.britmodeller.com/forums/index.php?/topic/234945298-tamiya-132-spitfire/ I've tried loads of new techniques and it's been great fun to build. I made many mistakes also (mostly in the building stage) but have covered them up the best I can! As usual I have had loads of help from the BM forum and would like to thank the following people. Starting with my good mate LT Motta, who recently made a fantastic EE Lighting. I would also like to thank for their encouragement and help...Somnas, Kallisti, Robvulcan, Geedubelyer, Crossy, JasonC, Houston and last but not least Ralph Riese for his inspirational Spifire builds which I had hoped to emulate. I also want to thank everyone who took the time to post a message on the WIP forum. I am not keeping this model, I'm going to give it to my Dad who has been through a particularly difficult time in the last few months. I hope he likes it! My next build is going to be a 1/48 MIG 17 with A Bare metal finish I think I will do a WIP thread................ because of all the help you get Anyway... Here she is. I hope you like my efforts.... You can see the aircraft modelled in the center above. This is the only picture I ciould find!3 points
-
Just getting my older photos onto Photobucket... here's my 1/72 Hawk of course. Like most people I also found the bulkhead behind the back seat was 1mm or so too tall, the decal for the blue area on the fin is too small, and the underwing flashes are very hard to get on if, like me, you stuck the strakes on before painting everything. Ahem. White trim round the canopy was prepainted strips of decal, I later found this was a bit overscale but I wasn't going to change it. Stand was made of perspex rod and sheet. I went for a very clean finish with this one.3 points
-
Grumman F4F-4 Wildcat BuNo 5093, Lt. Cdr. John S. Thatch, Officer Commanding VF-3, USS Yorktown, Midway, 1942-06-04 Kit: 1/72 Hasegawa F4F-4 Wildcat Afermarket parts: True Details #72455 resin cockpit and wheel well detail set Squadron #9105 vacu canopy Decals: Aeromaster #72-093C F4F-4 Wildcat Aces Pt.1 The following improvements made to this kit were: Inner surfaces of wing halves and rear fuselage halves (rudder) were thinned down to obtain sharp trailing edges. Some panel lines were filled and some added according to reference photos. In addition, the overlapping panels (for example, on the rudder) were represented using thin metal foil. The cockpit was replaced by the True Details resin parts. The canopy was replaced by the Squadron vacu formed item. Since the Squadron canopy is designed to fit the Academy kit, some adjustment work was required for mounting it on the model. The canopy replacement forced widening the fairing above the control panel in the cockpit, which have originally had rather wide margins for placing the thicker kit canopy. This fairing was also thinned down for correct scale representation. The most serious flaw with this kit is just an empty space where the landing gear bay should be. This problem is partially solved by inserting the True Details tub, however some extra work was still required. For instance, the recesses to accommodate the main wheel are just repeated in full size on the resin tub and, since it is designed to fit the kit fuselage having rather thick plastic, these recesses turned out to be much deeper than they should be. Some filling and re-scribing was required to fix this problem. Some additional detail was also added to the rear bulkhead and to the engine compartment interior partially visible in front of the wheel bay. In addition, the fuselage walls around the front of the wheel bay were partially thinned down for the correct skin representation. The air intakes in the forward engine cowling ring were deepened and thinned down to scale. Some detail was added to the rather basic kit parts for the reasonable representation of the Wildcat’s complicated landing gear. The aileron, elevator and rudder hinges molded as solid pieces were improved by cutting out their inner areas. The missing central elements were also added to the fairings covering the hinges of the landing flaps. Too shallow kit exhaust stacks were replaced by scratch built parts and the fuselage panel around them was also somewhat refined by making extra steps, holes etc. A new rounded propeller hub and the visible part of the arrester hook were made from scratch. A larger pneumatic tail wheel provided with the kit was replaced by the solid smaller one which is correct for this particular a/c. The replacement wheel was the part left unused after building the F2A-2 kit as a Dutch Brewster Model 339C. Some further minor improvements made on the model can clearly be seen on the photos.3 points
-
Hi everybody, Here is my first model that I show you. I finished him a couple days ago. He is a Revell MiG-25, in 1/48 scale. I scribed all line panels and used a resin cockpit and Eduard photo-etcheds for exhaust and external details. Well, can weave your comments. Soon I will post more finished models and start a build to share with you. Thanks, and sorry for my mistake English3 points
-
This kept me busy for a while. its the Airfix 1/48 Hawk T1A. it has CMK pit, which fitted really easy, and wheel wells which didnt , the front well was unusable. Xtradecal decals were a pleasure to use, and a Tirydium models lighting kit. For those not aware Tirydium models is run by a member called Warren (Madmonk). the LED light kit is reasonably easy to fit too. the red top and bottom lights flash as they should, the others are constant on.3 points
-
Thanks again Jabba. Just wondering would any weathered or chipped areas on the airframe reveal bare metal or primer? Last night's work....decals on which were a mix of Italeri and Airfix (thanks Murfv) Then a liberal wash.... And then a clean up followed by my favourite part of any Harrier build, getting her to sit on all four points! The weathered drop tanks was something I've seen on some Falklands-era pics though it might be a little overdone. The Sidewinder pylons were a bear to fit with really poor attachment points between the pylon and the rail. I'm only adding one Aim-9, leaving the other rail empty as if she's just returned from a patrol. The kit has had 3 coats of Future which means she's quite glossy (and the wash didn't really want to settle down) but by all accounts was the finish. She's a bit grubby in places which I think is ok though?? I'm also going to try and tone down the markings as they're very bright. Will add the last bits and pieces tonight hopefully. Thanks for looking and any comments or suggestions welcomed! Dermot3 points
-
Thanks Arniec Incremental progress today Yes I know its cheating, but masking those canopies without the aid of masks would have taken me a month of Sundays And I think I may have added enough weight now to make her sit on her 3 wheels3 points
-
P-51B Mustang, 1/72, Hasegawa + scratchbuild WIP thread here http://www.britmodeller.com/forums/index.php?/topic/234962289-p-51b-d-day-marking-combo-172/ RFI thread with more images here http://www.britmodeller.com/forums/index.php?/topic/234965003-p-51b-the-iowa-beaut-hasegawa-scratchbuild/3 points
-
Please, you will have to excuse the following meandering posts they are here for a reason, perhaps not for best of reasons either. I apologise in advance as I am posting basically to get my post count up ! I recently tried to purchase a kit from the Sales thread but not having very many posts I found the thread locked out to me. The seller, obviously suspicious of a lurker, wanted re-assurances but it seems that the best re-assurance is for me to come out of the shadows and post some of my work. I am a lurker, in the true sense of the word. I spend a lot of time looking at the exceptional quality of the work done by members on the forum. It is art, it is craft and it is fantastic and that is also the reason why I never submitted anything in the past - my stuff could never be that good, shameful in fact. I do modelling for my own relaxation devoting a minimum of an hour a day to de-stress myself. Not quite 60 I have made the move from an active sports life to painful arthritis from playing injuries and two major operations. Sitting in front of the TV may not drive me mad but my wife, well that's a different, she'd rather I was active in someway. I am a member of a well known What-if forum so some of these are already 'out-there'. I will keep using BM as my inspiration and hope the following what-ifs are acceptable. What-if #1 Westland / Grumman F7F-5P Bosscat PR.4 Westland had over estimated the Navy's desire for the Wyvern and had a stockpile of Armstrong Siddeley Python engines and initial considered re-launching the cancelled TF.2 converting it to a photo reconnaissance version. But in a bizarre link up with Grumman, Westland were given several airframes from the Tigercat (F7F-3) project that was scaling down. Unfortunately the F7F-3 was a single seater and the RN's specification required a twin seater. Westland got around this by extending the nose and lengthening the wingspan Kit is 1/72 scale (as are all my kits bar a very few) Monogram Tigercat, the extended front fuselage is a balsa wood plug as are the engine cowling extensions. Props are from two old Novo Wyverns. Very rarely do I get the photography right - I wish I could remember how I did this ! Andy (aka Bungle)2 points
-
Issued to the 305th Bombardment Group, 8th U.S. Army Air Force, Chelveston, Northamptonshire, on 17 May 1944. ‘Flak Eater’ of the 364th Bombardment Squadron, saw much action as WF-J but sustained battle damage on 12 September 1944 and following repair was recoded WF-U. On 4 December 44-6009 failed to return to Chelveston following another raid on Germany, she made an emergency landing on a newly created continental airstrip. Repaired once again, the aircraft survived the war, carrying out in excess of 28 missions. It was transferred to the 351st BG on 23 May 1945, before returning to the USA in June. She was scrapped at Kingman the following December.2 points
-
Hi all, Got a number of RAF WW11 bombers to complete so decided to use the Airfix supply kit for a base that will most likely do for all.2 points
-
Playmate was painted gloss black, with nose, waist guns and ball turret removed. A ‘Joe Hole’ replaced the ball turret. Waist windows were blacked out and teardrop blisters added to both cockpit windows. The Group ceased Carpetbagger missions on 16 September 1944. This is the Minicraft 1/72 kit.2 points
-
Hi to all! I want to show you my Buffalo, this model is the result of recast old famous kit of Hasegawa. One day I found an interesting photo: On the photo was F2A-3, so I decided on a small remaking: And result: All comments and criticisms welcome. Sergiy.2 points
-
A characteristic shared by all the British built CVE's was the substantial supports and plating used as the basis of the flight deck-in comparison,those on American built CVE's were much lighter in appearance,using cross brace supports under the flight deck,particularly at the bow.In addition, US boats were welded,something that the British yards were lagging behind in.It has been stated that the Britsih ones were preferred for the Arctic convoys as their riveted hulls were less likely to suffer cracking in the extreme conditions,though their generally heavier hulls and pre war construction may have played an equal part. M_V_Pretoria_Castle_1943 by plastichacker, on Flickr I had intended from the start to make this as a master for casting,pretty much in one piece,so a great deal of time was spent working out the arrangement of the bow supports and how they could be made to allow for this. As much time was spent just trying to interpret the limited number of photos I had to try and not miss anything. Pretoria Castle bow by plastichacker, on Flickr The hull has now been plated up to the flight deck level,and the bow supports added.It is,finally,starting to look a bit like an aircraft carrier. Unfortunately the lighting washes out white plastic card and the filler shows up far better than the actual model....it isn't as scruffy as it looks. 4 by plastichacker, on Flickr Here,the large sponson for the aircraft loading crane has been roughed in-there are still a lot of these sponsons to add to the hull,which will give it the typical CVE shape. 6 by plastichacker, on Flickr Up to this point the model was fairly zipping along,now the fun starts,spending about 1 minute building time for every half hour spent studying photos....onwards and upwards. mtd2 points
-
and another one, quite pleased with this one: Boeing 787-8 Demonstrator by Caution Wake Turbulence, on Flickr That's it now . I'll get round to doing an RFI soon, hopefully! Thanks, Andrew2 points
-
Its been far too long since I updated this ac. She has had little bits done here and there so here is a little update. Her glossy blue coat airbrushed on. Hu15 was used here. Then onto the masking of the nose which has a two tone white black variation. Then the alu/steel areas painted along with the finished nose. Final straight now ready for decals.2 points
-
Finally (after a bit of a slog) finished my Fw190. Weekend Edition? There's no way I'd be able to buildthis kit in a weekend! There are some work-in-progress shots here Built OOB except for the Lion Roar PE belts. Construction was a challenge at times, the tolerances are very fine especially when putting together things like the engine area. It looks lovely built up though, and I wouldn't mind building another one as I've learned a lot building this one. I didn't do anything in the way of detailing, as the kit detail is nice enough. I did add a couple of tubes to the drop tank, as it looked a bit 'detached' otherwise. Painted with Tamiya acrylics, the colours are various mixtures made up using guidelines found online, until they looked about right. Oils & pastels for weathering, sating coat from flattened Klear. Oleo strut done with self adhesive aluminium tape, much easier than the foil & PVA I have used before. Antenna wire courtesy of SWMBO's head Looking at these photo's I've realised I'm missing a pitot tube. Half a job Heeley strikes again! Thanks for looking! Chris2 points
-
Thanks! I'm spellbound by these P-51 based speed birds... I applied 2-part filler to the top surface wing roots. While the filler cured I begun drilling out the tail planes to fit some dowels for added strength. The filler was then sanded smooth with less trouble than expected. Then I drilled each fuselage half to accept the tail planes according to their recesses. The first dry fit looked horrible. I don't think I was surprised though. The left side was almost OK, but the right side was way off. I had never seen it, but the two fuselage halves didn't match very well around the tail plane joint. I first corrected the left side which only needed to be lowered very slightly at the trailing edge. Then I rectified the right side fuselage to match the left side, and adjusted the tail plane mounting holes to match the left side. That took some work and measuring, but in the end I got this. This makes me much more satisfied. There is indeed some filling work needed around both tail planes. More 2-part filler. I just had to tack on the spinner for a look in the mean time.2 points
-
(this in response to Max's comment) Quite apart from the pleasure of conducting research "in the field", a TARDIS would neatly solve the problem of where to store the stash (or for those few of you, the ever growing number of finished models to display)! bob2 points
-
On request some F-86 banners to choose from: And for those who build a naval FJ in this GB: Rene2 points
-
Cheers everyone Some of the glazing has been fitted along with the undercarriage doors. I should get some primer on it in a few days time.2 points
-
Right chaps, a wee bit more progress, this build is very much like a vac-form but with all the bits pre cut. I’ve been working on cleaning up the wings, they are now at a stage where I’m happy to consider them ready for re-scribing to replace the detail lost in the process. I have also rubbed the fuselage sides down so they are now flatter along the contact surface. I test fitted the wings to the recess in the fuselage side to see how the fit was; as you will see it’s not too good! One side is better than the other, but both will need work. This is exactly the same problem I had with my HP RB.57D build (http://ipmscanberrasig.webs.com/apps/forums/topics/show/8436639-operation-pigs-ear-or-how-to-build-the-high-planes-rb-57d). You will also see in the photo the two B8 details outlined in pencil that need filling. I’ll work on getting the wings to fit before I move on to fitting out the cockpit. John2 points
-
I agree with Arnold and Brews - the chain will be okay - especially if you get some darker weathering on it.2 points
-
1.48 Airfix Sea Harrier FRS.1 XZ453 of 899 NAS, Build thread here2 points
-
They need to hire whoever did the Atlantic and Transall to do it though, not the mad riveter/shape challenged guy who did the 1/32 Spitfire.2 points
-
Hi again Been working at making transparencies that fit the fuselage flushly, Humbrol Clear drying before I can cyano them into their holes safely ish In the meantime working inside the cabin gets us a collective fitted alongside the centre console and seat cushions being made for the driver chappie. We want him comfy after all It's been a mostly non modelling week so far but as the grandkids have gone back to their suffrage at home I can have a go again Here are the seat cushions being crafted from a Helix India Rubber, I did say I want my pilot and his obbo to be comfy and scribed shaped and painted black and popped up on a blob of modelling clay near its final home Making the other cushions now2 points
-
Cut thin test slice this afternoon and applied it to a scrap piece, think I have it cracked.2 points
-
Nice job Bri. I'd love to see 'em try and stuff that cookie into that Blenheim though2 points
-
Again some pictures. The decals are on, panellines done and a dull coat. Here are three pictures after the decals. And here some after the panellines and the dull coat. Now I just need to finish it. Cheers,2 points
-
NOBODY Expects the F-35 Inquisition, Amongst our weapons are Fear, Surprise, A ruthlessly over inflated budget and and almost fanatical devotion to the concept of First look first kill and a nice red hat...2 points


.thumb.jpg.158e2e086d45b8f96b7d93b8bee8dc21.jpg)


This leaderboard is set to London/GMT+01:00