
Leaderboard


Popular Content
Showing content with the highest reputation on 17/07/14 in all areas
-
So, like busses, 6 months passes by without a finished model post from me, then rather anticlimactically, two turn up at once! Manufacturer: Airfix Scale: 1/72 Type: Skyhawk A-4B Extras used: Resin seat (I think Pavla? Doesn't fit!!), Photoetched instrument panels which can barely be seen.... OOB next time me thinks... Paints: Tamiya underside, Xtracrylix top colour, and for the weathering, Tamiya smoke, Flory Models Grime wash for panel lines, oil paint, Flory's Black and Dark Dirt wash for streaks. Alclad Aqua gloss and Matt Kote also used. Build link is here, although it's not great!! Good little kit this one, fit is excellent throughout. Panel lines look ok to me, the decals are magical, only problem is all the little bits that keep snapping off (slat activators, aerials etc). That, to be fair, is more my fault than the kits, but explains where there's quite a few bits missing! Weather is possibly over the top, but I had fun! The cockpit is open to show off the resin seat, and mainly because the seat is too big for the cockpit to close, even with loads hacked off the bottom!! As usual, I haven't killed myself for accuracy, but would be very interested to learn about the mistakes I've made for future reference. Any tips and constructive criticism is welcome. It's a great fun kit, just don't bother with the after market stuff (imo). Oh, and the refuelling probe is scratch built out of a plastic tube, and using the Airfix end bit thingy, as the original snapped... Thanks for looking Val11 points
-
Well, after many moons of plastic bashing, I've finally produced a model!! It's Tamiya's excellent Mustang III, and is finished in FB353 No.316 squadron (although I'm lead to believe this might not be totally accurate?). Details: Manufacturer: Tamiya Scale: 1/48 Type: RAF Mustang III Extras used: Resin wheels and prop (True Detail I think, could be wrong) Paints: Tamiya's RAF colours on the whole, Vallejo interior green for wells and cockpit, and Model Master metalizers for the exhaust. Tamiya smoke for weather/post shading (hint), Tamiya's weather pigments for oil stains, plus oil paints for wells and oil streaks. Flory Models Dark Dirt Wash, of course, Aqua gloss and finished with Alclad Matt varnish. Build thread is here: http://www.britmodeller.com/forums/index.php?/topic/234933452-148-tamiya-mustang-iii-build-first-wip/ The kit is brilliant! Just drop some extra thin in the box, shake it, and the plane falls out. The decals were poor though, and I lost a roundel due to disintegration. The replacement roundel is unfortunately quite a bit brighter... Only other problem I really had was a bit of the canopy went cloudy near the frame, something obviously got under the masking tape. Not the end of the world though, I'm still learning! Paint chipping was done with a tiny brush and thinned Tamiya acrylics, I just tried to be sparing with it. So, that's about it. I've not strived for total accuracy, but at the same time I am very interested in what would make it more accurate (I won't change this model but would like to learn). I tried to keep the exhaust staining to a minimum as I couldn't where these get loads. Constructive criticism is welcome also Thanks for looking, Val10 points
-
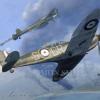
Well here it is, My 1/72 Airfix Spitfire XIX that was used by 541 PRU Sqn RAF late 1944. I got a few upgrades for the kit; being the Quickboost fishtail exhaust (for Fujimi), the Quickboost prop and spinner (for Academy) and the Pavla vacform early canopy (for Airfix). The kit exhaust and prop are dreadful, but the rest of the kit is quite nice. Here's the meal I made of it. IMG_8512_zps7ebfd09d by Ben Standen, on Flickr IMG_8513_zpse11642be by Ben Standen, on Flickr IMG_8514_zpsd5a904e3 by Ben Standen, on Flickr IMG_8515_zps210c7b41 by Ben Standen, on Flickr IMG_8516_zps491f2a93 by Ben Standen, on Flickr IMG_8522_zpsf2f243df by Ben Standen, on Flickr IMG_8524_zpsb34d55d9 by Ben Standen, on Flickr Ben.9 points
-
Calling this one finished, done some little touch ups since the WIP. Kit is the Hasewaga boxing with kit decals, Eduard wheels and painted using Alclads for the metallics and Mr. Hobby/Tamiya for the main scheme with ProModeller wash. I decided not to weather this bird any further, I like the finish I've got just by fading the panels a bit. My first attempt at seatbelts, really glad I tried a bit of detailing, it makes a big difference compared to my RAF Phantom! And parked on the flightline! Thanks to the guys who helped me out on the various threads I put up8 points
-
Greetings from Ukraine! That's my first post on this forum, and I want to introduce one little kit: F4U-1. As copy of Corsair in 72, this kit is very good (maybe even the best of current).7 points
-
This is my first Tomahawk and also my first desert scheme, OOB painted with Vallejo paints.7 points
-
Hello everyone! That's my first post on this forum. I'm Mike, i live in Poland. Painting is from Eduard instruction - Sardinia, late 1943 pilot Charles W. Hoover. Eduard's kit is good but canopy doors are a big problem, so i decided to open them.6 points
-
Hi everyone! This is my next model from my "corrugate serie"))).6 points
-
Well, I've finally managed to finish one! This is the excellent new-tool P-51D mustang from Airfix. I built the kit with a few scratchbuilt parts such as harnesses, wiring and gun barrels. The decals are by Kits-world with Stencil markings and insignias from the kit sheet. For less than the price of two pints this kit has provided me with hours of entertainment, and with so many decal options available I can't wait to build more! I hope you like it. Sean6 points
-
Brassin engine added.5 points
-
I'm new here! Finished this yesterday, a Firefly 5 from an old Palitoy-era Airfix kit - basically accurate but a bit rough, decals going a nice shade of brown. It was moulded in nice navy blue plastic, which wasn't very easy on the eyes. After building a decent interior, where I cheated by copying the parts off an Airwaves etch set instructions, building seats and instrument panel etc. from sheet, there was a lot of filling and sanding involved (first off were the boiler rivets...) - I used Deluxe Materials "Perfect Plastic Putty" - talk about boast. This stuff is water soluble so you can wipe it with a wet cloth rather than sand, but it is porous as chalk so needs priming with enamel - I sprayed the whole plane with Humbrol Aircraft Grey before attempting to paint it. Then sanded it some more. A lot of work. Underside colour was Humbrol Beige Green - my tin had nearly gone off and I had to strain the paint before spraying it. Nice coverage though! Top colour was Humbrol grey 32, probably a bit dark but it looks ok. Korean War Invasion stripes were masked and sprayed - should have done the white before doing anything else, masked them and sprayed the main colours, I know, but I forgot. It all looks good now though. Decals are off the Print Scale sheet (Hannants) - very good decals but a bit thin - I destroyed the squadron code on one side so it only has one! These went on over a brush coat of Klear. A further Klear coat sealed it all in. Handsome plane! PL5 points
-
This is my first chipped airplane. Its not "what if", that was realy: For box content were added photoetched for cockpit and flaps.4 points
-
Hi Folks! Finally I've finished something. The kit is superb Tamiya's Zeke 32. Building was pure pleasure. The only problem was narrow gap between fuselage and lower wing. But with a llitle help from Evergreen I fixed it. I painted her with Gunze C, Gunze H, Tamiya and Vallejo paints. Hope you like it. Cheers!4 points
-
Hello All I have finished recently this build. May I present ypo RAF Red Arrow Hawk T.Mk.1 1/48 from Airfix. This kit is very good.It comes together like a lego blocks.Just a small amouts of filler was required.I have finnish it using humbroll products nad i am very happy how it turns out.This is my first modern aircraft that i made. If you are interested this is the wip thread http://www.britmodeller.com/forums/index.php?/topic/234962656-raf-red-arrow-hawk/ Ok pictures time.Sorry fore picture quality.I have to buy a soft box and lamps but i will do that after holiday Ok have a nice day.All comets are welcome bad and good4 points
-
After having been away from aircraft for many years, the opportunity arose of doing some for developing projects; resulting in these two: The old Airfix RE-8. Rigged with fishing line. It doesn't bear close scrutiny as a decent model of the aircraft but it is only a wargame piece. Revell Fokker E-III, in Turkish service in Mesopotamia. All as before.4 points
-
Agree with Rob. Let's just wait for some facts. Speculation does no-one any good.4 points
-
Pinched another Cheshiretaurus idea this afternoon. Used the vac machine to mould some painting masks from the resin canopy moulds. Vac machine excels at stuff like this.: JP5's had a warm water washing/up liquid bath and is in prep for priming - here with canopy masks test fitted (great idea Mark). Unfortunately were out tonight - so it may not be until the weekend until I get to see how all the surface detailing looks under paint...........But hey it'll be painted before the snow!!4 points
-
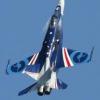
Hi, Here is my Hasegawa J35F converted into a J35B from F18 Wing that was located just south of the capital Stockholm. The plane represents R57 from the Swedish Air Force Acrobatic Team 'Acro Deltas' back in 1964-65. The early J35Bs were then finished in a bare metal finish. Some after market from Aires, Eduard and Mestro Models was used togheter with a scratch built bang-seat, as the early J35 had no parashute built into the seat. The metal finish is made with different shades of Aclad II and the rest is painted with Gunze and Valejjo and weathered. The superb decals are from Twobobs. Thanks for looking Cheers! /Fred3 points
-
Finished! Blenheim Mk.1 L1388,AV-W, 113 Squadron, Greece 1940-41. This I managed to complete in a week! Lovely kit to build with a a couple dodgy area that now I know about will tackle differently next time. In particular the nose. Maybe the nose halves would be better fixed in place to the main fuselage half before joining said fuselage halves? I'll try that next time. But in the meantime, I enjoyed this build and opted to use the new DK Decals I bought from Hannants on Sunday at Duxford( the website shows this set as sold out!!!). All main colours are Xtracrylics and a top coat of artists acrylic matt varnish thinned with flow improver and a drop of matt white paint added to get a faded appearance. A touch of nose art. Bombed up! Not sure if the small bombs would have been fitted on these at the frontline but I used them regardless to avoid filling my spares/leftover parts box! .....Slight paint chipping done here and there... The only kit decal I used was the walkway that fitted the model perfectly! Also I only added some seat belts. Pics of part of the WIP can be seen here: http://www.britmodeller.com/forums/index.php?/topic/234964274-blenheim-in-progress/ PS: I lost one of the open bomb door parts.(C29). But not a big problem as when I get the next kit, be it another Mk.1 or the Mk.IV, I can replace it, as my next one will be closed up.3 points
-
Hi all, Got a number of RAF WW11 bombers to complete so decided to use the Airfix supply kit for a base that will most likely do for all.3 points
-
Good day to you people. Hope you readers having a good day and all are good. As you all aware, I'm building a fleet of SPG and this is my sixth on the line after the Dana, Type 99, Pzh2000, AuF1 and the K9. The seventh and last will be the AS-90. This beautiful baby is actually a gift from a friend. My most heart felt gratitude to my friend Paul Bicar who spent alot of money for this kit (£59.99 is not cheap ). The kit was painted with 2 colours from Vallejo Model Air and 2 Tamiya colours. I used Light Brown and Sand (Ivory) from Vallejo Model Air and Hull Red and Nato Green from Tamiya. The colour scheme is from the RAE 2013. For weathering, I did it completely new and fresh without even a drop of pin wash but I had to dirty up the running gears a bit as these vehicles were shown going around the demonstration field during the RAE 2013. I also dirtied up the gun as the references photos show them as dirty with smoke stains. The same went for the exhaust. Well, that's about as much I can sum up about the build. More informations and more photos and bigger ones (4000X3000) can be found on my blog - There is also links to the 4 parts Work in Progress that you can look at for an detailed inbox build - http://modeller-innovation.blogspot.co.uk/2014/07/2s19-msta-s-during-rae-2013.html Please do have a look and thank you so much in advance for any feedback you guys may have. C&C are welcomed. Just be gentle... LOL. Thank you for always supporting and for the kind words and various encouragements. Until the next launch.3 points
-
Another build that's been languishing in the started pile for a while now, So seeing as the blackjack build is still awaiting white rattle-can procurement, I got on and finished this one. The kit built beautifully, only slight meddling was needed on the top nacelle to wing fairings really. Primed with rattle-can grey, then pre shaded with semi gloss black. Then the camo was sprayed free hand, Tamiya flat earth, and Vallejo bronze green were used, after masking the black was sprayed I used Tamiya NATO black. Then a gloss coat of Tamiya clear cut with Mr levelling thinner was sprayed all over. I had a bottle of Humbrol Decalfix on the shelf and thought id use this on the airfix decals rather than my usual Daco product, And this is where things started to fall apart...... The decalfix seemed to dissolve the paint where it touched right down to the grey primer(Never had that happen before with Daco or Microsol) , so this had to be touched in with the airbrush again. The decals settled nicely though, and a quick MIG wash was run into the panel lines. Some zorst stains were added using rubber black and deck tan, and a mist off deck tan was sprayed all over to tone it down a bit. Finally a coat off Tamiya flat clear was sprayed all over which oddly dried with odd white powdery patches, luckily some neat klear applied with a brush sorted those out. So all in Im happy with the outcome, Its no prize winner But It's taught me some more lessons from the trial and error book of modelling. Enough waffle so now here are some photos. Thanks for looking3 points
-
Hi I started this project before the very nice Airfix PR Mk.XIX had been announced (had I known I would have waited for that one instead ) The basis for this is the Academy Mk.XIVc kit with the Daco correction nose / spinner with radiators and gear legs The bowser wing with lower camera ports comes from the Heritage Aviation Resin PR.XIX kit. (Didn't have the airwaves conversion set). I used the Aires cockpit set for the Mk.XIVc with some major alterations to get in the PR.XIX specific stuff. Seatbelts comes from the HGW line of fabric seatbelts (this sure beats pe seatbelts by miles) 4-spoked wheels with block tread comes from Ultracast and the canopy comes from falcon. Swedish decals are from RBD Decals Painted with Xtracolor PRU Blue A WIP can be found here: http://www.britmodeller.com/forums/index.php?/topic/234918899-148-spitfire-prxix-swaf-s-31/ Well that's it, on to the pictures. And there's quite a few so bear with me. best regards Johan3 points
-
Well, it's finally fully completed and on its base. The build thread is here http://www.britmodeller.com/forums/index.php?/topic/234934724-pacific-coast-models-132-spitfire-ixc/ Other pictures of the Spit, the figure and the work tables on their own are here http://www.britmodeller.com/forums/index.php?/topic/234952426-132-pacific-coast-models-spitfire-ixc/ But here are the pics of the final model as handed to the client. Happy days3 points
-
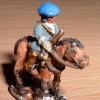
After a re-base. They belong to a DBA Achaemenid Persian army completed some time ago. Figures are plastic by Zvezda.3 points
-
Evening chaps, More work done on the base today. The grass areas were misted with a thin wash of Tamiya Yellow Green. Once this had dried the area was then sprayed again with a thin mix of Vallejo Russian Green, This helped to lift it up a bit. The same was also done to the bush with the Yellow Green misted on the top and edges and the Russian Green to the lower areas and shadows, More washes and dry brushing was done to the earth and stony parts of the base. The tape was then removed from the frame edges. Some areas needed to be touched in where the white of the plaster still showed. Vallejo Dark Earth and Russian Green was used for this. The model was attached to the base with dabs of Super Glue Gel. The tracks were then given a dusting of earthy coloured pastels to blend it all together. The label was stuck down and........... IT'S DONE!!! I have to say that this is possibly the best model that I've done so far. I really enjoyed the challenges that it threw at me, despite the fact that I nearly put ot on the shelf of doom on a couple of occasions The finished article will be posted up in the gallery section asap Thanks for the encouragement along the way & now to decide what o do next! Regards, Steve3 points
-
OK Vanja, here are all the parts in the chrome finish: I clicked in one of the engines and it is quite remarkable how a little bit of paint has tightened things up. I also tested the lights and there is not a trace of light escaping from where it should not be so that is quite pleasing as well. Nigel3 points
-
Part Two - landing lights and wing bomb-cells As well as the rear turret I've also been working on other detailing. The wing bomb-cells are now complete. The first task was to scratch-build the 24 doors and their hinges. The doors are split into two sections lengthwise - the front sections had to be made slightly curved as they follow the aerofoil shape of the wing. Here are the completed doors about to go into the paint shop: Once done, they were then added individually to the wing - a tedious task in getting them all aligned correctly but definitely worth it: As you can see from this shot, I've added my previously built racks to the starboard wing, but left the bays on the port side empty, although the mounting structure has all been added: The landing light has also been scratch-built. This was retractable on the Series IA, but I thought I'd have it in the down position for a little more interest - it wasn't uncommon to see them this way on the ground: Again this was made from plastic card and some Evergreen, with the lenses made using self-adhesive foil - simple but effective. The next task is the nose - I need to make the bracing for the .50 carried in the nose, as well as a bomb-sight and ammo-boxes, before I can attach the nose glazing. Should be fun! Until next time, Tom3 points
-
Pat, I use Evergreen strip and just plain old plastic card - all can be sourced reasonably easily on the 'net. I usually buy in bulk at model shows though - it often costs me more than the original model by the time I've finished! No... but moving them around the bench can cause all kinds of contortions... oooh errr! I'm afraid it's a good old fashioned footballing injury - a high speed collision with a goalpost Thankfully, despite the cast I've still been able to get plenty done... in fact it's quite an advantage as the wife has been unable to leave me her usual list of chores... little does she know I've got the rear turret finished off now - there were plenty of piccies available on the web on the Canadian Halifax so I've been able to make a reasonable representation of the real thing. It was another case of plasticard, Evergreen and a bit of anything else I could lay my hands on to construct the interior: And painted up and weathered lightly: And finally installed in the tail: I'm pleased with it considering I had nothing whatsoever to start with! Part two to follow shortly...3 points
-
Superb Phantom in THE best scheme they ever wore.Very nice indeed.3 points
-
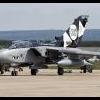
Hello, New member here. I like how so many people show pics of their builds here. So here's my contribution. Here's my latest build, wasn't a fan of the Eurofighter, but decided to give it a go. When I opened the kit, I noticed the decals were not like the box photo. infact, I found the colour of blue used on the tail was too 'purple' compared to photos of the real bird. Decals : Note the purplish colour of the tail The real bird So I decided to try painting the background colour myself and cut out the bits and pieces of the Tail art. Here is the tail with the cut out decals applied and here's the final product This kit was a pretty nice kit. It comes with a lot of weapons including AIM-120, Meteor, IRIS-T, ASRAAM, Brimstone missiles, ALARM missiles and a few cruise missiles. Though as this is a show birds, I'm just going to put 2 IRIS-T missiles. I like the luftwaffe colours for the Eurofighter, so I'll probably do a normal Luftwaffe bird as well.3 points
-
I finished this last night, the new Airfix Bristol Blenheim Mk.1: It was built OOB except for the aerial wire which was made from lycra thread, I used Precision Paints Dark Green and Dark Earth for the upper surface camouflage, the undersides were a mixture of Citadel Black and Vallejo German Grey, mixed on the hoof so I didn't note what the proportions were. The final coat was Xtracolor matt varnish. I used the kit decals for Squadron Leader Arthur Scarf VC's aircraft and they went on perfectly with no silvering at all, even the little stencil decals on the underside. This took me about two weeks of intermittent work and I had no real issues with it but I found a couple of parts seemed to have an awkward fit, however with further test fitting/wiggling on each occasion a good fit was achieved. The only criticisms I have are that the wingtip navigation lights are moulded onto the wings - it would have been nice if they had been moulded in clear plastic as separate parts; also I was disappointed to see the Mk.1f gun-pack was not included in this issue of the kit. I'm definitely in for at least one Mk.1f and a couple of the Mk.IV when that comes out Cheers, Stew3 points
-
I'm waiting for Airfix. I still say Airfix would have sold 1/48 Vulcans 20:1 over 1/48 Javelins. Nobody (except me and Roy Sutherland) on this side of the ditch has ever heard of a Javelin, but almost everybody has heard of the Vulcan.3 points
-
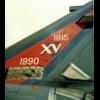
For those people interested in my pictures of Muharraq based Tonka's taken during 'Op Granby/Desert Storm' here is a link to the Aeroflight website where they are displayed. http://www.aeroflight.co.uk/pics/gulfwar/gwtornados2.htm I've noticed that a number of decal sheets show wording on the Snoopy 1000lb bomb noseart for ZD790 'Debbie' As far as I can remember this wording was never carried during the whole of operations, and appears to have been after cessation of hostilities, and after our detachment returned to RAG Brüggen and RAF Laarbruch. So. if you want to have an accurate Op Granby aircraft you will have to paint out the wording on the 1000lb bomb. Cheers XVTonker3 points
-
Now, then, then now, now, then...now, then !...I'm away for five minutes and look what happens in my trench !, Jason, welcome to the latrines, I totally agree old fella why stick to the mundanity of modelling when such companiable fun can be had !......as for the Bison, 'fraid not, it's the monstrous Myasischev 3M variety rather than Avro's monstrosity.............a Blackburn Blackburn...now there's a thing !!....so good they named it twice ! Sorry to hear that you'd passed away....life eh ! Crusty Bob, you've been rumbled ......Darling will take some shifting.......are you able to take a hot crumpet from behind without blubbing, order up to 3 lorry loads of paper clips or arrange chairs to the required military standard, eh ?...hmmm...thought not ! Rob, Baldricks weapon would be his cooking....I don't think there's any known records of anyone surviving one of his fricasseed plum duffs or sauteed Rat-Au-Vans.....messy business war ! Cheers Radders, you really should get her on the table again and start licking her into shape........Woof, Woof........never mind this working for a living lark !...we need more big Buccs...(mind you I guess that the whole point !!)....what happened to the 'einkel ?? Anyhow, I've been rather busy with social studies recently, (involving a lot of food, drinking and mindless conversation), so I haven't been at the bench much but I have managedto crack on with some more detailing of this beastie, (much to skypirates relief I'm sure) and to complete an area of the cockpit that until now was a tad difficult to work out. Luckily Colin, (crobinsonh) came to the rescue as ever, even though he's in LA at the mo he rang his PC and ordered it to send me a huge pile of photos of the pit of his Bucc XX894 at Brunty, so that I could crack on with the final piece of the jigsaw. The area in question are the two mechanisms either side and just in front of the navs anti blast screen and right behind the pilots seat, (it's a tight fit !!). Anyhoo with the seats removed it was a lot easier to see what actually lay there, These are the two halves so far... Starboard side, And port.... The two halves together will be joined by a bridge structure in the middle prior to painting and fitting, The other piece now I've completed is the navs anti blast shield and the twin air con pipes, (these will be connected to the appropriate boxes in the pilots office once the screen is in place...the pipe work around them both looks a bit of a nightmare but as the seats will obscure most of this it shouldn't be too bad. Looks more like something Captain Nemo might have found useful for the crew of the Nautilus to be honest....! The pipes will be washed with oils and white spirit later.. The test will come when trying to put it all together...hopefully Baldricks done the maths correctly and it'll all fit, if not.....!! Cheers all, Melchie...3 points
-
Hi here is my take on the 6 sqn Typhoon beside a hurricane mkIID. The Hurricane MKIID is the revell 1/72 hurricane mk11c converted using 3d-kits conversion which includes the 2 cannons and decals for 3 aircraft serials and codes. stencils were from the kit. Hurricane and Typhoon by gmsphoto1, on Flickr Hurricane and Typhoon by gmsphoto1, on Flickr Hurricane and Typhoon by gmsphoto1, on Flickr The Typhoon is the revell kit. Decals are homemade with kits stencil data, scratchbuilt another 2 asraams and pylons to make it a Q-bird. Hurricane and Typhoon by gmsphoto1, on Flickr Hurricane and Typhoon by gmsphoto1, on Flickr Hurricane and Typhoon by gmsphoto1, on Flickr Hurricane and Typhoon by gmsphoto1, on Flickr Hurricane and Typhoon by gmsphoto1, on Flickr Hurricane and Typhoon by gmsphoto1, on Flickr The aircraft on a base together Hurricane and Typhoon by gmsphoto1, on Flickr Hurricane and Typhoon by gmsphoto1, on Flickr Hurricane and Typhoon by gmsphoto1, on Flickr Hurricane and Typhoon by gmsphoto1, on Flickr Cheers Graeme2 points
-
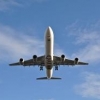
Had a great few days down at RIAT despite the appearance of an F35. I didn't get the best of locations unfortunately so i was a fair distance from the crowd line but still super enjoyable! I'd pay £40 to see a pair of Su22's taking to the skies anyway of the week! As usual, Monday proved to be the most fruitful . Bigger lens and better spot for next year me thinks!2 points
-
...... but is now finished. These couple of pics were done when I was thinking of doing a WIP for this column butI got carried away and finished it. BUt as a teaser here are those few pics: This last pic is at the late stages with just a couple things to be added before signing off. For those interested, I added a drop of matt white acrylic to some Rowneys or W&N matt varnish, flow improver all weel mixed in my airbrush and lightly sprayed over the model roughly depicting a faded paint work. The glazing is masked, by the way, with liquid mask also from W&N or someone and not matt varnished over!!. The dark window on the nose is where I peeled off the masking. Pics of the completed job tonight hopefully in RFI!! See you later!2 points
-
M5A1 Stuart VI 2nd Fife & Forfar Yeomanry 11th Armoured Division Decals are a mix of those supplied with the kit and Archer. Painted with Tamiya and Vallejo paints. Build thread http://www.britmodeller.com/forums/index.php?/topic/234962233-7th-armoured-stuart-vi/ Please excuse the fact that the build thread is marked up a 7th Armoured! Regards, Steve2 points
-
Here are some pictures after the decals went on. The red two's were painted on. Cheers,2 points
-
Well what can i say? Friday night 11:00 and the wife says why don't you go to RIAT?? Where would i stay? I have no tickets? It starts tomorrow!!!! Quick phone call or two and come Saturday afternoon i'm in the car like a bat out of hell...... Got there at 12:15am Sunday head down in the car till 6am and Gill picked me up. The rest is history. I'm in debted!!! C-27J-Spartan-roll by tom.sunley, on Flickr IMG_0122 by tom.sunley, on Flickr IMG_0173 by tom.sunley, on Flickr IMG_0200 by tom.sunley, on Flickr IMG_0242 by tom.sunley, on Flickr IMG_0247 by tom.sunley, on Flickr IMG_0290 by tom.sunley, on Flickr IMG_0301 by tom.sunley, on Flickr IMG_0477 by tom.sunley, on Flickr IMG_0501 by tom.sunley, on Flickr IMG_0520 by tom.sunley, on Flickr IMG_0525 by tom.sunley, on Flickr IMG_9344 by tom.sunley, on Flickr IMG_9347 by tom.sunley, on Flickr IMG_9350 by tom.sunley, on Flickr IMG_9357 by tom.sunley, on Flickr IMG_9374 by tom.sunley, on Flickr IMG_9497 by tom.sunley, on Flickr IMG_9548 by tom.sunley, on Flickr IMG_9583 by tom.sunley, on Flickr IMG_9622 by tom.sunley, on Flickr IMG_9645 by tom.sunley, on Flickr IMG_9659 by tom.sunley, on Flickr IMG_9743 by tom.sunley, on Flickr IMG_9747 by tom.sunley, on Flickr IMG_9761 by tom.sunley, on Flickr IMG_9814 by tom.sunley, on Flickr IMG_9816 by tom.sunley, on Flickr IMG_9856 by tom.sunley, on Flickr Polish-SU-22-Fitter by tom.sunley, on Flickr reds2 by tom.sunley, on Flickr sluff1 by tom.sunley, on Flickr sluff2 by tom.sunley, on Flickr Solo-Turk1 by tom.sunley, on Flickr Solo-Turk2 by tom.sunley, on Flickr Solo-Turk3 by tom.sunley, on Flickr What an awesome day out!! Thanks to the missus for suggesting it and big thanks to Gill for making it happen!2 points
-
What the deuce has been going on in my latrines !!! takes me back to my old Harrovian matron Brunhilda von Klaggheffer, a loofa, some barbed wire and a cake of bicarb !! I'll send young Baldrick down to mop it up...he's pretty handy with a hamster on a stick. Rob, true, it isn't the easiest thing to heft about. It really either has to be on its belly or over on its back well supported by polystyrene blocks !....I'm not looking forward to drilling out the metal wing spars for the main gear pins !! Former AVM, being diseased offers few advantages, can't think of any off hand ! The gaff regarding the Bison is of course inexcusable and will be thoroughly investigated by military tribunal, and no doubt you'll be arrested, your chocolate ration severely reduced, court martialled then tidied up with death by firing squad..... As for ordering me around well I answer to no one.............isn't that right Darling ! I've been working on the main gear doors too, carving and dremelling away on the inner surfaces to work in the concave areas that allow the doors to close fully....hopefully you can just make them out in the photo...2 points
-
I think you guys are over-emphasising the aspect of "what manufacturers think we want" and so on... in most cases there's nothing of that kind but more of a "what's the best panel lines quality that can be achieved by the tool-maker I can afford to pay with the money I want to invest in this project" or something like that. It's a matter of technology and money, not really of fashion or market research2 points
-
Is some reference to the F35's engine? Rick.2 points
-
I just received my Lightning kit (for which I sent in flying hour tokens before the kit was even released!) and the windscreen and canopy are fine. Using my magnifying glass, I couldn't find any flaws. Probably some of the nicest clear parts I've seen - the clarity looking through them is pristine. I also picked up a Lightning kit from a dealer, and the windscreen has a VERY faint line on it, but it's only visible under magnification and back light. With the naked eye you really can't see it at all. I'm happy with it. Maybe they've turned the corner on this problem? Cheers, Bill PS. Yes, Duncan, I've also acquired an early conversion set from Ali. And Hannants were kind enough to sell me some decal sheets - methinks an F.3 from 56 Squadron is on the horizon. If I pick up another conversion set, an F.1 from 111 Squadron would be rather nice, too, eh?2 points
-
One here for you to comment on. 1/72 Academy PBY Catalina with PCM aftermarket decals. Any comments welcome. Thank's for looking.2 points
-
Another quick update for today (cor blimey guv'nor, you wait ages for one, and then two come along together...) The Hasegawa Emerson nose turret is complete, with a couple of extra bits added that Hasegawa missed off: So, will it fit in the Minicraft fuselage? Will it 'eckers like - it's a combination of the base being a bit too wide and the aperture in the fuselage being a lot too narrow. The solution (or my solution, anyway), was to firstly shave the sides off the turret base, which sits inside the fuselage aperture: Fortunately I hadn't glued it together! and secondly enlarge the turret aperture in the fuselage: There's quite a lot to take off - the fuselage walls were about 1mm thick, and the sides are now wafer-thin in parts, but at least it now fits. Phew! More soon Simon2 points
-
A recent finish using the very nicely done High Planes two seater. Model finished in Gunze with decals from the kit and old Roodecal sheet. Goes together as well or better than the single seater and High Planes nailed the nose profile on this one. An absolute delight to build and add to the growing list of completed ones. Cheers, AGW..2 points
-
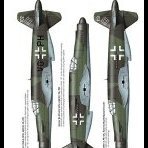
Unfortunately I never took any WIP pictures of this build. But what I did was simply to scratch build a new seat using plastic card using the original seat as model. I cut out and re-used parts as for example the head rest. I also did some extra detailing to the rear of the cockpit as it is quite simple in the kit. I actually used the surface from the (cut out and replaced) wheel bay as back part to simulate the riveting. The Tail was painted with a mix of Gunze H35 trying to match the color of the National Insignias by mixing in H15. Have no idea of any percentage.2 points
-
It looks nothing like a Whirlwind, Trumpeter really ball'sd this one up. Nicely done btw2 points


.thumb.JPG.3498f40362ff13ebfc4b2e45abbd545e.JPG)


This leaderboard is set to London/GMT+01:00